Simplest Arduino Game with Display 1602 - Part # 2
PART # 2 from start to finish
We continue to make the game on arduino and in the future we stick this game into the program, which I do for the machine and with our acquired knowledge we will create the second game, for fun and we will make the right music for it.
To understand what we need to write now, we must make a plan, what we will have and in what form. We have the main character, he has two frames of animation, and we already sorted it out in the last lesson. I didn’t make him change the sprite of the jump, not because I’m too lazy, I just don’t see the point. Next, we should have a life symbol, just making hearts in a row is not interesting, and the numbers are also trivial, let's make three life points and label them, for example, the battery charge level. And for the joy of the eye, a heart that will beat near this battery. The number of points per round, set on the left of the screen, purely in digital form and the enemy we will have an evil cactus, for starters, go.
We have defined the objects and let's draw them, immediately all the sprites and write them down.
')


We have working sprites and we can already imagine how it will look on the screen, following the first lesson we will write them out in the binary system, we remember where the zero is empty and where the unit is, our pixel is on. Let's start:
"--------------------------------------------------------------------------" // : byte Player_1[SYMBOL_HEIGHT] = {B01110,B01110,B00100,B01110,B10101,B00100,B01110,B01010,}; // : byte Player_2[SYMBOL_HEIGHT] = {B00000,B01110,B01110,B00100,B11111,B00100,B01110,B01010,}; // : byte Enemy_1[SYMBOL_HEIGHT] = {B00010,B00110,B10111,B10110,B11111,B00110,B00110,B11111,}; // : byte Heart_L[SYMBOL_HEIGHT] = {B00000,B01010,B11111,B11111,B11111,B01110,B00100,B00000,}; // : byte Heart_R[SYMBOL_HEIGHT] = {B00000,B00000,B01010,B11111,B01110,B00100,B00000,B00000,}; // : byte Battery1[SYMBOL_HEIGHT] = {B01110,B11111,B11111,B11111,B11111,B11111,B11111,B11111,}; // : byte Battery2[SYMBOL_HEIGHT] = {B01110,B10001,B10011,B10111,B11111,B11111,B11111,B11111,}; // : byte Battery3[SYMBOL_HEIGHT] = {B01110,B10001,B10001,B10001,B10011,B10111,B11111,B11111,}; // : byte Battery4[SYMBOL_HEIGHT] = {B01110,B10001,B10001,B10001,B10001,B10001,B10001,B11111,}; "--------------------------------------------------------------------------" Now we have sprites, and it's time to revive it all. First, let's think about what additional features we need. Knowing that the arduino does not work perfectly and in some places is even very capricious, we begin to try to simplify the life of this microcontroller as much as possible. Do not overload and at the same time demand complete returns. So we will derive such additional functions that will live their lives and do everything we need:
- heart animation
- animation of the hero
- hero damage check
- the movement of the evil cactus
- scoring (so far every second +1, then we change)
- screen update (but this is not accurate, most likely, we will remove this function and add another, I did not like that the screen blinks, I want stability). Subsequently, we will replace this function by deleting the hero's past location, this will remove the screen flickering, and zeroing the villain will be inside the evil script, I think there will be one or two lines maximum.
- remote control
- loop and setup settings
We want to have an animation of the heartbeat. Putting it into a separate function and forcing it to live its own separate life, it will be easier for us to track the work and in the future it will be easier to edit, since we have everything, or almost everything is in one place. This code could be looped () and commented out, but I, personally, used to break into separate functions, you are not looking for code in the whole list and you know that a separate function controls certain elements of our game.
Now, I will write the code segments, we will connect them at the end and get a full-fledged script, I will now explain the essence and idea to you, and then we will assemble the puzzle and enjoy the result.
Before the beginning of the code itself, I will explain a couple of moments.
lcd.createChar // is a command to access the screen and use one of the memory cells to write new characters. The number of the cell is written in parentheses and separated by a comma, the name of the variable with information.
Control over the drawing will be carried out through a digital variable, using four digits, for correct animation, if we wanted to make the heart just beat back and forth, then the usual variable bool would fit. But my thought is different, one big blow and two short ones, it will look more interesting.
"--------------------------------------------------------------------------" void HeartHit () // { if (HeartControl == 0 || HeartControl == 2){lcd.createChar(1, Heart_L);} // , if (HeartControl == 1 || HeartControl == 3){lcd.createChar(1, Heart_R);} // , if (currentMillis - HeartHitBigCheck >= HeartHitBig) { // if (currentMillis - HeartHitLightCheck >= HeartHitLight) { // HeartHitLightCheck = currentMillis; // if (HeartControl<3){HeartControl++;} // , else {HeartControl = 0; HeartHitBigCheck = currentMillis;} // , } } } "--------------------------------------------------------------------------" Once again, I want to focus your attention on this code:
lcd.createChar (x, y); assignment to the cell of the memory “x” from (0 ... 7) data for display on the screen “y”
Go ahead =)
Now, we have a code that creates the effect of an interesting heartbeat, it doesn’t do anything useful, just show off =)
Further, based on this, we will create the animation of our hero, there are huge advantages, the further we dive into this article, the more you will learn my thinking style, and I, less you need to explain and focus more on the code and the construction of the idea. I will try to explain more in the comments of the script, that would be less to write outside the script.
So let's get down to the main character and create another function for this:
"--------------------------------------------------------------------------" // (). =) , . void PlAn () // { If (JumpB == true && GGpozY == 0){ // ( ) = . if (currentMillis - JumpUPCheck >= JumpUP) { // 0.8f JumpB = false; GGclear (); GGpozY = 1; // , . = ; (); = ; } } if (AnimPlayer == 1){lcd.createChar(0, Player_1);} // , if (AnimPlayer == 2){lcd.createChar(0, Player_2);} // , if (AnimPlayer < 2) // , , { lcd.setCursor(GGpozX, GGpozY); // lcd.write(0); // } if (currentMillis - AnimatedTimeCheck >= AnimatedTime) { // AnimatedTimeCheck = currentMillis; // if (AnimPlayer == 2){AnimPlayer = 1;} // else{AnimPlayer = 2;} // , . } } void GGclear () // { lcd.setCursor(GGpozX, GGpozY); // lcd.print(" "); // } "--------------------------------------------------------------------------" Now the timer, uh, or rather our glasses, which will be awarded, let's just write a timer and we will assume that these are glasses.
"--------------------------------------------------------------------------" void timer () // { if (currentMillis - DHTTimeRCheck >= DHTTimeR) // { DHTTimeRCheck = currentMillis; // Timer_z ++; // lcd.setCursor(0, 0); // lcd.print(Timer_z); // } } --------------------------------------------------------------------------" That's all. The farther the easier.
Now, it remains to work out our cactus.
His task is simple, to appear, walk all the way from the right to the left and try to touch the hero to cause damage. With damage everything is easier, one touch - one hit. So far, the increase in complexity, we will not do. Let the cactus move at a speed of 0.5f (complexity will already be your homework =)) or Russian half a second - one step.
Let's look at how this piece of code will look:
"--------------------------------------------------------------------------" void enemy_go () // { if (Emeny_check_1 == 0) // , , , { Emeny_control = random (100); // , , , , , . if (Emeny_control == 1) { // = 1 100 . Emeny_check_1 = 1; // , , bool , , hitON = false; // } } if (Emeny_check_1 == 1) // , { if (currentMillis - TimeBlinkCheck >= TimeBlink) // 0.5f { TimeBlinkCheck = currentMillis; // lcd.createChar(2, Enemy_1); // 2 lcd.setCursor(E1pozX, E1pozY); // 1 lcd.print(" "); // E1pozX--; // lcd.setCursor(E1pozX, E1pozY); // 2 lcd.write(2); // if (E1pozX <= 0) // { lcd.setCursor(0,1); // lcd.print(" "); // Emeny_control = 0; // Emeny_check_1 = 0; // E1pozX = 16; // - \/ \/ \/ E1pozY = 1; // - } } } } "--------------------------------------------------------------------------" It remains quite a bit and after the examination of each piece, I can already lay out the full script assembled, configured and ready for the test on your devices.
So now we have one of the most important scripts in the queue, this is a script for checking the damage and turning on the game tree in the absence of life. There is nothing supernatural in the script. Therefore, we can begin to disassemble it (by the way, if you were attentive, you would notice that when we created a heart, we didn’t display it on the screen, so you’ll see where I put this piece of code):
"--------------------------------------------------------------------------" void check_hit_gg_1 () // { if (E1pozX == GGpozX && E1pozY == GGpozY && hitON == false){ // Y , , LifeCheck -= 1; // hitON = true; // if (LifeCheck <= 0){ // AnimPlayer = 50; // loop () Emeny_check_1 = 50; // lcd.clear(); // lcd.setCursor(3, 0); // lcd.print("GAME OVER"); // } } else { // ! … lcd.setCursor(13, 0); // … lcd.write(1); // lcd.setCursor(14, 0); lcd.print("="); // lcd.setCursor(15, 0); lcd.write(3); // } } "--------------------------------------------------------------------------" This code is very simple, its main function is to check it, and wait until the conditions are all met to stop the game and let us know that we lost.
Now the last function is control. In fact, if we have disassembled the code above, then it will seem easier for us to be simple. From the first lesson, we pulled out the remote control codes, I wrote them all out, they look like this:
* CH- 0xFFA25D
* CH 0xFF629D
* CH+ 0xFFE21D
* << 0xFF22DD
* >> 0xFF02FD
* >|| 0xFFC23D
* - 0xFFE01F
* + 0xFFA857
* EQ 0xFF906F
* 0 0xFF6897
* 100+ 0xFF9867
* 200+ 0xFFB04F
* 1 0xFF30CF
* 2 0xFF18E7
* 3 0xFF7A85
* 4 0xFF10EF
* 5 0xFF38C7
* 6 0xFF5AA5
* 7 0xFF42BD
* 8 0xFF4AB5
* 9 0xFF52AD
Button _ code (attention!) (Codes on the consoles may differ)
Who has not read, I advise you to read the 1st part.
Something like that, then you will have it too, and you can customize everything you need without any problems.
Now we will create the simplest algorithm based on what our game already knows and will come to life.
"--------------------------------------------------------------------------" void IRCheck () // { if ( irrecv.decode( &results )) // , { if (results.value == 0xFF18E7 && GGpozY == 1){ // « 2 » «» GGclear (); // GGpozY = 0; // 2 ( ) JumpB = true; // JumpUPCheck = currentMillis; // } // 2 if (results.value == 0xFF10EF && GGpozX >= 0){ // GGclear (); // GGpozX -= 1; // } // 4 if (results.value == 0xFF5AA5 && GGpozX <= 15){ // GGclear (); // GGpozX += 1; // } // 6 if (results.value == 0xFF6897){ // 0 // , … lcd.clear(); // AnimPlayer = 1; // LifeCheck = 3; // Timer_z = 0; // GGpozX = 8; // \/ \/ \/ GGpozY = 1; // Emeny_check_1 = 0; // E1pozX = 16; // \/ \/ \/ E1pozY = 1; // . } irrecv.resume(); // } "--------------------------------------------------------------------------" The output from the above written code:
button 2 is jump
button 4 is a step to the left
button 6 is a step to the right
button 0 clears the game and restarts it
Here, now it remains for us to set up setup & loop, everything is already coming to an end. We have created all the additional functions and all we have to do is stick together all the libraries and add them. I think we will consider the variables and main settings of setup \ loop already in the common code, so let's get started, and then ctrl + c & ctrl + v is required of you and that's it =) and further independent development in this direction, if of course this is all liked.
"--------------------------------------------------------------------------" #include <IRremote.h> // #include <Wire.h> // i2P #include <LiquidCrystal_I2C.h> // 1602 LiquidCrystal_I2C lcd(0x3F,16,2); // int AnimPlayer = 1; // int GGpozX = 8; // int GGpozY = 1; // int Emeny_check_1 = 0; // int Emeny_control = 0; // int E1pozX = 16; // int E1pozY = 1; // int HeartControl = 0; // int LifeCheck = 3; // long Timer_z = 0; // long AnimatedTime = 300; // long AnimatedTimeCheck = 0; // long HeartHitBig = 800; // long HeartHitLight = 250; // long HeartHitBigCheck = 0; // long HeartHitLightCheck = 0; // long BatteyBlink = 200; // 1 long BatteyBlinkCheck = 0; // long JumpUP = 800; // long JumpUPCheck = 0; // long DHTTimeR = 1000; // long DHTTimeRCheck = 0; // long TimeBlink = 500; // long TimeBlinkCheck = 0; // long currentMillis = 0; // bool JumpB = false; // bool BatteryB = false; // bool hitON = false; // decode_results results; // IRrecv irrecv(A0); // enum { SYMBOL_HEIGHT = 8 }; byte Player_1[SYMBOL_HEIGHT] = {B01110,B01110,B00100,B01110,B10101,B00100,B01110,B01010,}; byte Player_2[SYMBOL_HEIGHT] = {B00000,B01110,B01110,B00100,B11111,B00100,B01110,B01010,}; byte Enemy_1[SYMBOL_HEIGHT] = {B00010,B00110,B10111,B10110,B11111,B00110,B00110,B11111,}; byte Heart_L[SYMBOL_HEIGHT] = {B00000,B01010,B11111,B11111,B11111,B01110,B00100,B00000,}; byte Heart_R[SYMBOL_HEIGHT] = {B00000,B00000,B01010,B11111,B01110,B00100,B00000,B00000,}; byte Battery1[SYMBOL_HEIGHT] = {B01110,B11111,B11111,B11111,B11111,B11111,B11111,B11111,}; byte Battery2[SYMBOL_HEIGHT] = {B01110,B10001,B10011,B10111,B11111,B11111,B11111,B11111,}; byte Battery3[SYMBOL_HEIGHT] = {B01110,B10001,B10001,B10001,B10011,B10111,B11111,B11111,}; byte Battery4[SYMBOL_HEIGHT] = {B01110,B10001,B10001,B10001,B10001,B10001,B10001,B11111,}; void setup() { Serial.begin(9600); // irrecv.enableIRIn(); // lcd.init(); // Wire.begin(); // lcd.backlight();// } void loop() { currentMillis = millis(); // IRCheck (); // if (AnimPlayer < 3){ // , , if (LifeCheck == 3) {lcd.createChar(3, Battery1);} // if (LifeCheck == 2) {lcd.createChar(3, Battery2);} // if (LifeCheck == 1) {// , 1 if (BatteryB == false){lcd.createChar(3, Battery3);} // if (BatteryB == true){lcd.createChar(3, Battery4);} // if (currentMillis - BatteyBlinkCheck >= BatteyBlink) {BatteyBlinkCheck = currentMillis; // if (BatteryB == false) {BatteryB = true;} else {BatteryB = false;}} // } timer(); // check_hit_gg_1 (); // PlAn(); // HeartHit (); // enemy_go(); // } } void IRCheck () // { if ( irrecv.decode( &results )) // , { if (results.value == 0xFF18E7 && GGpozY == 1){ // « 2 » «» GGclear (); // GGpozY = 0; // 2 ( ) JumpB = true; // JumpUPCheck = currentMillis; // } // 2 if (results.value == 0xFF10EF && GGpozX >= 0){ // GGclear (); // GGpozX -= 1; // } // 4 if (results.value == 0xFF5AA5 && GGpozX <= 15){ // GGclear (); // GGpozX += 1; // } // 6 if (results.value == 0xFF6897){ // 0 // , … lcd.clear(); // AnimPlayer = 1; // LifeCheck = 3; // Timer_z = 0; // GGpozX = 8; // \/ \/ \/ GGpozY = 1; // Emeny_check_1 = 0; // E1pozX = 16; // \/ \/ \/ E1pozY = 1; // . } irrecv.resume(); // } } void timer () // { if (currentMillis - DHTTimeRCheck >= DHTTimeR) // { DHTTimeRCheck = currentMillis; // Timer_z ++; // lcd.setCursor(0, 0); // lcd.print(Timer_z); // } } // (). =) , . void PlAn () // { if (JumpB == true && GGpozY == 0){ // ( ) = . if (currentMillis - JumpUPCheck >= JumpUP) { // 0.8f JumpB = false; GGclear (); GGpozY = 1; // , . = ; (); = ; } } if (AnimPlayer == 1){lcd.createChar(0, Player_1);} // , if (AnimPlayer == 2){lcd.createChar(0, Player_2);} // , if (AnimPlayer < 2) // , , { lcd.setCursor(GGpozX, GGpozY); // lcd.write(0); // } if (currentMillis - AnimatedTimeCheck >= AnimatedTime) { // AnimatedTimeCheck = currentMillis; // if (AnimPlayer == 2){AnimPlayer = 1;} // else{AnimPlayer = 2;} // , . } } void GGclear () // { lcd.setCursor(GGpozX, GGpozY); // lcd.print(" "); // } void enemy_go () // { if (Emeny_check_1 == 0) // , , , { Emeny_control = random (100); // , , , , , . if (Emeny_control == 1) { // = 1 100 . Emeny_check_1 = 1; // , , bool , , hitON = false; // } } if (Emeny_check_1 == 1) // , { if (currentMillis - TimeBlinkCheck >= TimeBlink) // 0.5f { TimeBlinkCheck = currentMillis; // lcd.createChar(2, Enemy_1); // 2 lcd.setCursor(E1pozX, E1pozY); // 1 lcd.print(" "); // E1pozX--; // lcd.setCursor(E1pozX, E1pozY); // 2 lcd.write(2); // if (E1pozX <= 0) // { lcd.setCursor(0,1); // lcd.print(" "); // Emeny_control = 0; // Emeny_check_1 = 0; // E1pozX = 16; // - \/ \/ \/ E1pozY = 1; // - } } } } void check_hit_gg_1 () // { if (E1pozX == GGpozX && E1pozY == GGpozY && hitON == false){ // Y , , LifeCheck -= 1; // hitON = true; // if (LifeCheck <= 0){ // AnimPlayer = 50; // loop () Emeny_check_1 = 50; // lcd.clear(); // lcd.setCursor(3, 0); // lcd.print("GAME OVER"); // } } else { // ! … lcd.setCursor(13, 0); // … lcd.write(1); // lcd.setCursor(14, 0); lcd.print("="); // lcd.setCursor(15, 0); lcd.write(3); // } } void HeartHit () // { if (HeartControl == 0 || HeartControl == 2){lcd.createChar(1, Heart_L);} // , if (HeartControl == 1 || HeartControl == 3){lcd.createChar(1, Heart_R);} // , if (currentMillis - HeartHitBigCheck >= HeartHitBig) { // if (currentMillis - HeartHitLightCheck >= HeartHitLight) { // HeartHitLightCheck = currentMillis; // if (HeartControl<3){HeartControl++;} // , else {HeartControl = 0; HeartHitBigCheck = currentMillis;} // , } } } "--------------------------------------------------------------------------" By connecting. We did that code, but how to assemble the wires and what to stick with, I did not explain this to you. Although I am sure that more than 80% of those who decide to read this little article already know this, but as for me, the article will not be complete if I do not provide maximum information.
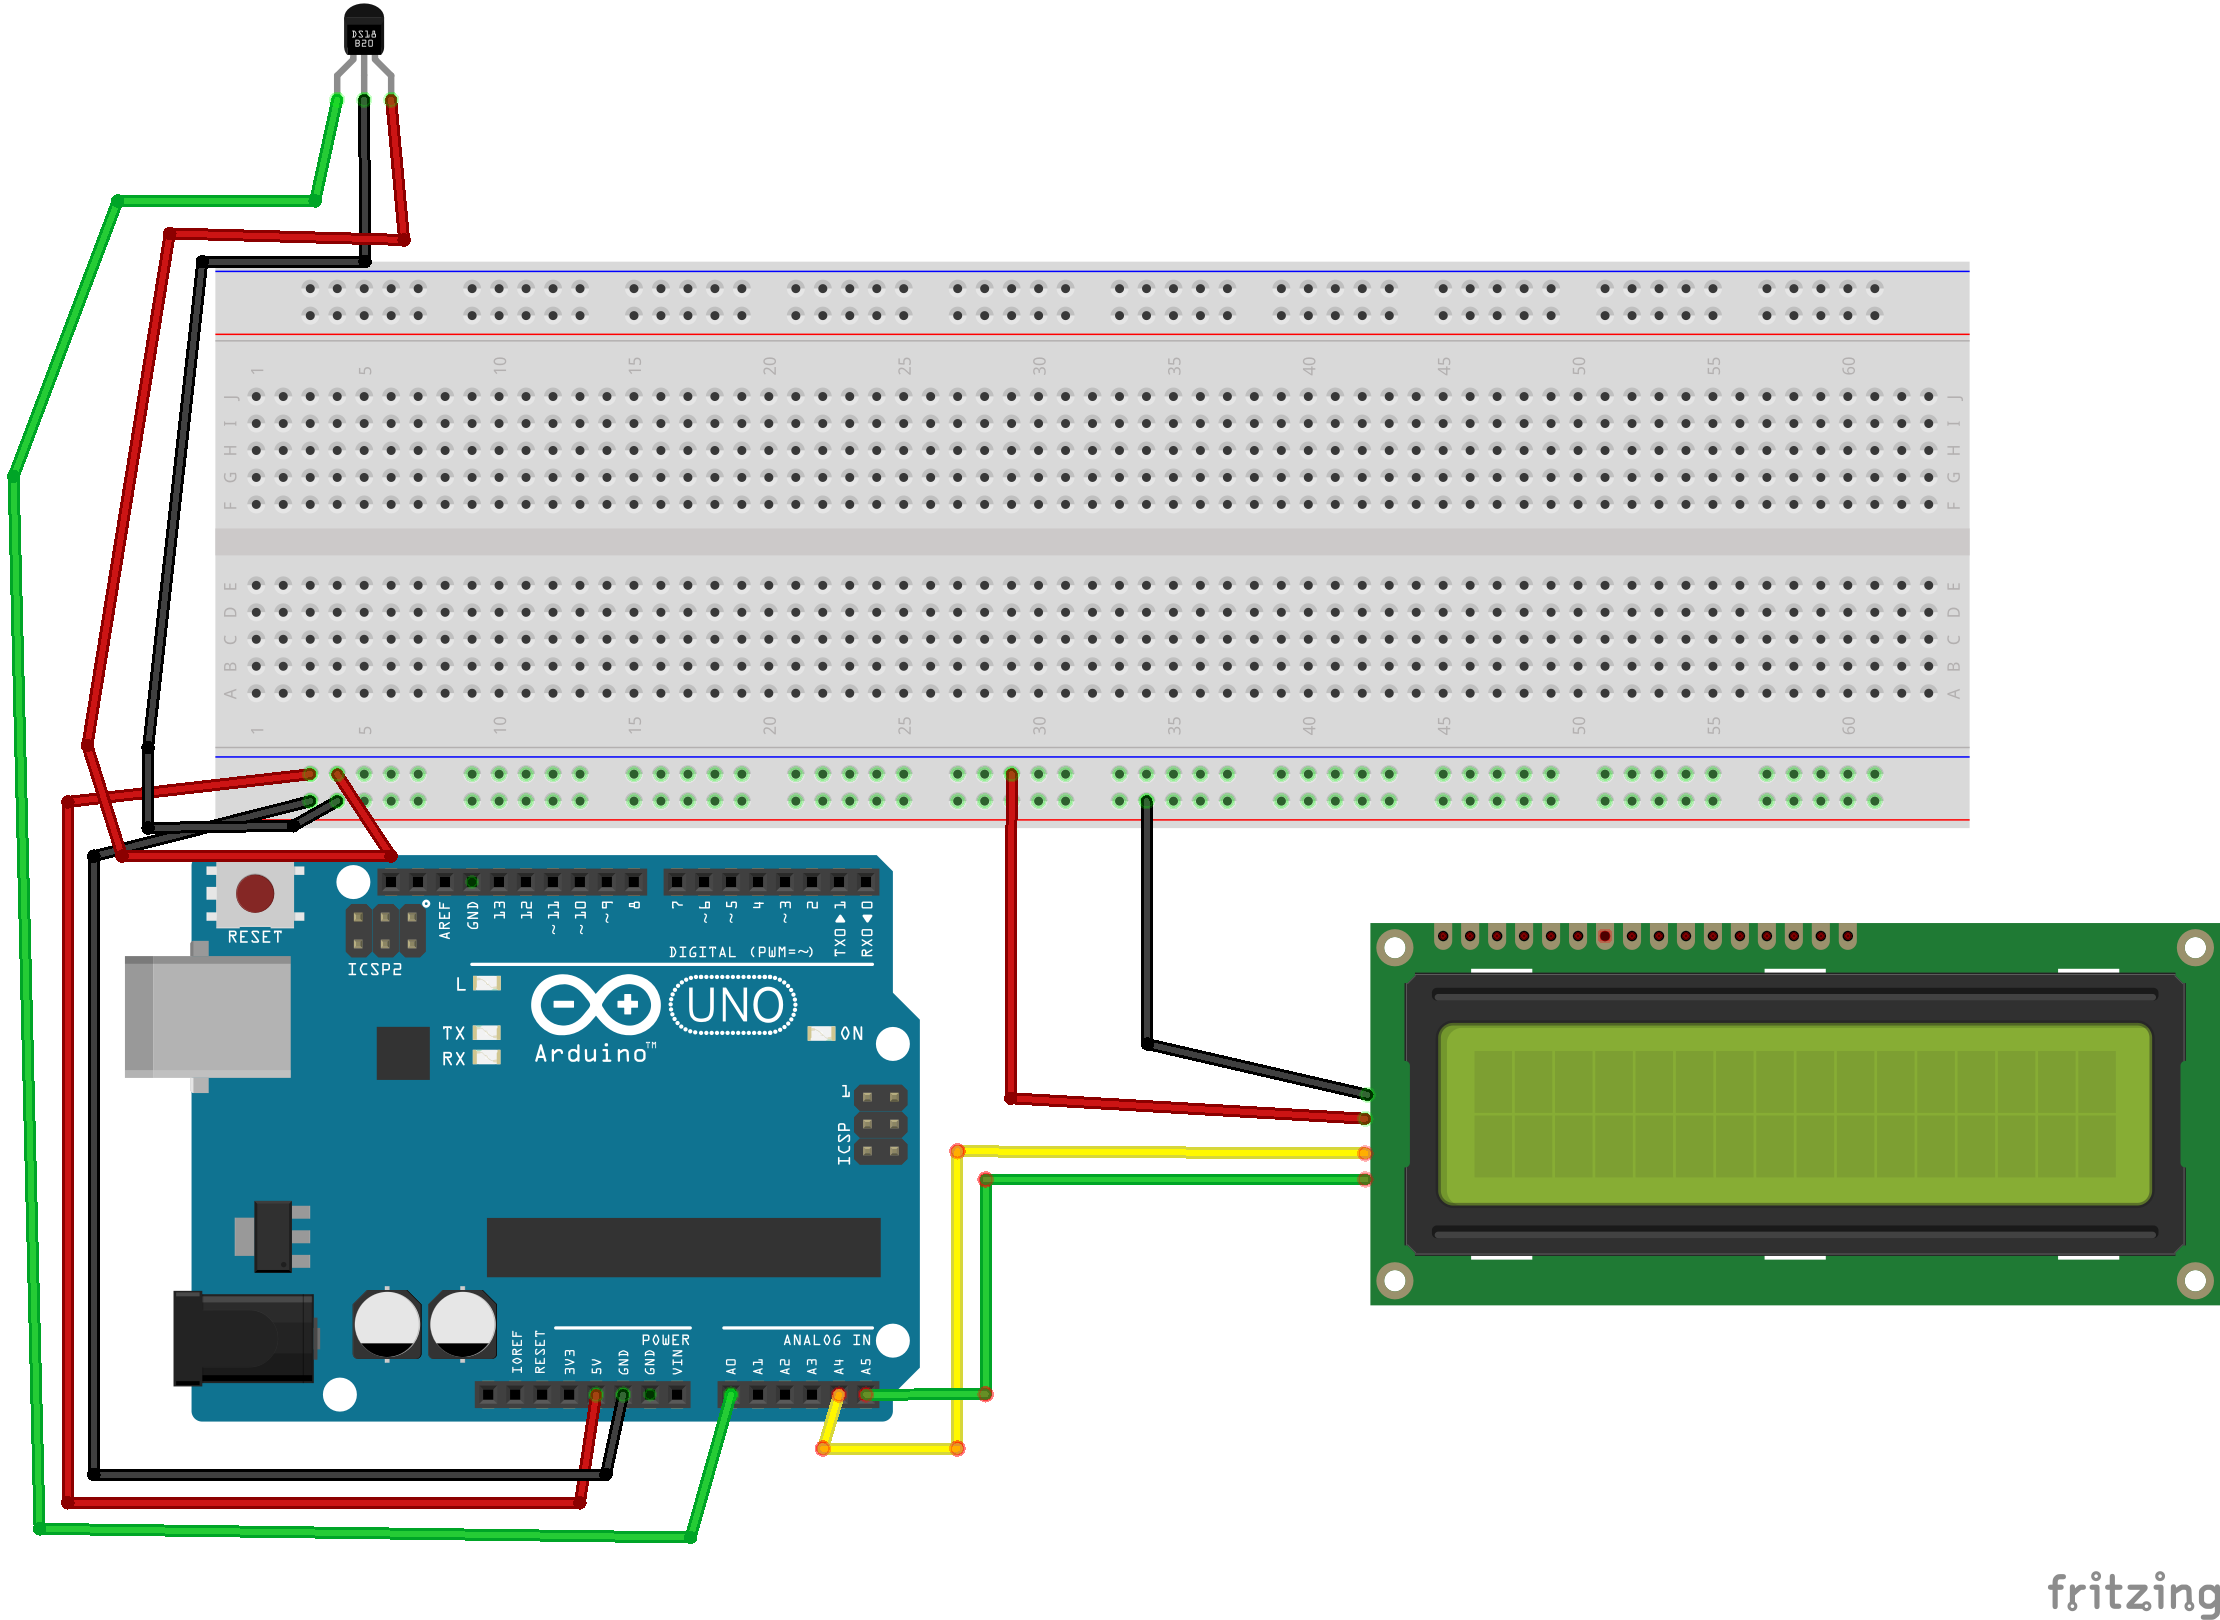
A5 Display 1602 - SCL
A4 Display 1602 - SDA
A0 IR Sensor
Now I am working on creating a radio key for a car based on an arduino, and on the 1602 screen I want to display the moisture and temperature sensor data outside the car (since I will soon be in Moscow, look for a new job, I will need to know what is happening behind the car so as it is very cold there), the clock, the battery voltmeter and the games to be put there (I have 4 pins left free, and I still have to shove there), so that I could poke this game or the second one I plan do as the good old pockets race ca 2000s from where the point was just to go around the obstacle and music to put on a background of the Rock n Roll Racing. Uhh classic =) and stick it all optimally into one arduino without using external data storages (pure chelendzh), but I have already used ~ 60% and if the game code takes a maximum of 15% - 20%,that music ... oh ... there will be problems with it, it weighs a lot, it is necessary to optimize, I have already started collecting the track and managed to reduce the weight almost 10 times, but I made mistakes in the construction of notes and tones and now I have to do it all over again. I will most likely later write here a full version with a description of the project I'm currently working on. I hope someone has something new to think about, I have provided, if everything is good and time, I will continue to write articles. Any questions? Write in the comments.I hope someone has something new to think about, I have provided, if everything is good and time, I will continue to write articles. Any questions? Write in the comments.I hope someone has something new to think about, I have provided, if everything is good and time, I will continue to write articles. Any questions? Write in the comments.
All subscribe, put likes, stay tuned for new articles.
Thank you all for your attention, Chao-Cocoa!
PS: I still can’t take a video out of the game’s performance, the camera on the phone has died and it’s very sad. But I will think of something and add a vidos to the article a little later.
The first part of the article ->
Source: https://habr.com/ru/post/425367/
All Articles