The Ultimate DJI GO 4 Tutorial: Main Screen and Camera Settings

What is a DJI GO 4 knows every owner of a quadrocopter DJI. With this program, you can not only manage your drone, but also change the settings of the camera, sensors, track the status of all systems of the device and much more. But, unfortunately, the application has not yet received the official Russification. In this regard, many users still do not know what the various menu items are responsible for.
Waiting for the Russian-language version of the program, as well as with the aim of helping to understand the variety of settings, we decided to tell in detail about the possibilities of DJI GO 4. As a result, we got detailed material, which we broke into several series. Today we will tell about the main screen of the application, as well as the most interesting section: "Camera Settings". If you already know everything about the DJI GO 4 start menu, after reading about the location of the key settings in the User Guide, then we advise you to go straight to the second part.
Disclaimer
A series of reviews "The Ultimate Guide to DJI GO 4" is primarily intended for beginners who have just recently bought a quadrocopter and do not know what the various settings for the application are responsible for. But many experienced pilots will be able to find something new for themselves, as the application is constantly updated, and new items appear in the menu from time to time. Our guide is suitable for most DJI devices, but due to the different functions of drones, some settings are only available on certain models.
')
Main screen

Most of the time you work with the drone, you will have the main DJI GO 4 screen or virtual viewfinder, with which you will see the same thing as the copter camera. By clicking on the icons located along the edges of the screen, you can go to the settings listed below.
- System status: this icon displays flight status, as well as various warnings.
- Obstacle detection: a red signal indicates that there is an obstacle near the drone. An orange beep indicates obstacle detection.
- Battery level indicator: This indicator shows the change in battery level of the copter. The color of the indicator changes depending on the ability of the battery to perform a specific function.
- Flight Mode: This icon displays the selected flight mode. Click to go to general management settings. Here you can change the flight characteristics.
- GPS Signal Level: displays the number of connected GPS satellites. The white color of the indicator indicates a stable signal level.
- Status of the 3D sensor system: click on this icon to enable or disable the functions of the review systems.
- Wi-Fi settings: tap to go to Wi-Fi settings.
- Battery charge level: displays the battery charge level. Click to see detailed information about the battery level, change the low battery warning threshold, view the warning history.
- Basic settings: click on the icon to go to the basic settings, system data, to display flight routes, etc.
- Camera tilt: displays the angle of the stabilizer.
- Photo / video switch: Click to switch between photo or video mode.
- Start button to take a photo / video: click to start taking a photo or video.
- Camera settings: opens the camera settings menu.
- Playback: View captured photos and video.
- Telemetric flight data: this area of the screen displays information about the flight, the distance between the drone and the home point, the speed of horizontal and vertical movement, and so on.
- Virtual joystick: display of the joystick on the smartphone screen and control of the drone with its help.
- Intelligent flight modes: tap to select intelligent flight modes.
- Smart Home Return: Launch the self-return function to the starting point. Press to bring the drone back to the last recorded point.
- Automatic takeoff / landing: click to start an automatic takeoff or landing.
- Return to the main menu: click on this icon to return to the main menu.
System status
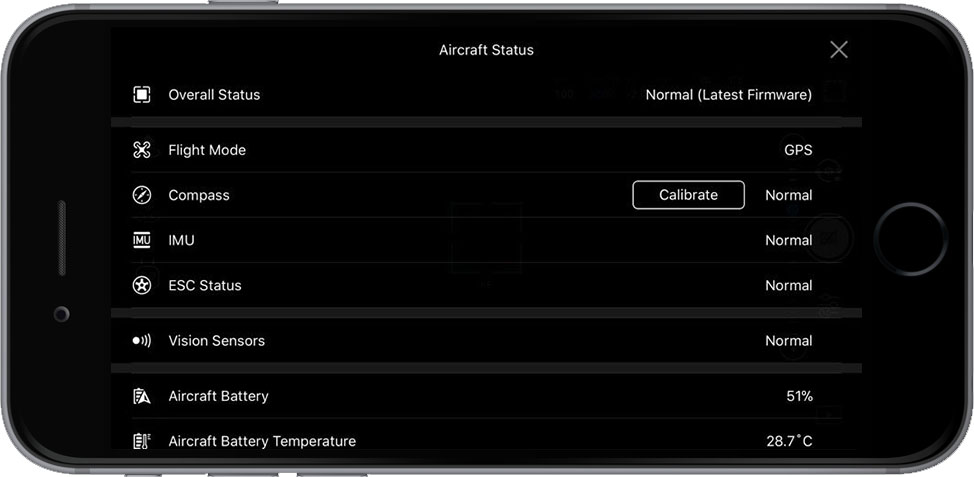
During shooting, this icon is located at the top of the screen. It can be red, yellow or green. Green indicates a good GPS level. Yellow warns of a weak GPS signal - the drone can switch to ATTI's intelligent mode to preserve flight safety. If the icon is red, it means that the quadcopter cannot fly. There may be several reasons: to find out the source of the problem, you must click on the system status icon and go to the Aircraft Status menu
Compass: helps the drone determine its location. When changing the place of flight due to interference from electromagnetic waves, it is sometimes necessary to do a calibration.
IMU (Inertial Gauge Block): This is a barometer and gyroscope for measuring the spatial position and angle of flight. If DJI GO 4 advises to calibrate the unit, follow the instructions on the screen.
ESC Status (Electronic Stroke Control): This indicator displays the motor's performance. If a warning appears, try restarting the device. If the warning is left, you need to send a drone for repair.
Vision Sensors: These sensors detect obstacles during flight. It is highly recommended to always keep the sensors on.
Obstacle Detection Status: A visual alert that appears on the screen when the drone is close to an obstacle.
Aircraft Battery: Displays the device's battery temperature. If it rises above 65 ° C, then you need to put the copter and allow the batteries to cool. If DJI GO reports that the battery is damaged - immediately turn off the battery.
Charge level indicator

This indicator shows the current battery level. The shorter the strip becomes, the less charge is left. The first dot on the left shows the moment when the drone automatically lands due to a lack of charge level. The second point displays - when the application prompts you to activate the function "Return to the starting point." The yellow letter H represents the starting point and how much charge is needed to return the drone. The value at the right end of the scale displays the estimated remaining flight time based on the current battery charge level.
Flight modes
In the application DJI GO 4 there are three flight modes:
Positioning mode (P-mode): a mode in which all sensors are enabled for stable operation of the device. This mode is the safest to fly. If the sticks on the control panel stop moving, the drone will automatically stop moving and freeze in the air.
Attitude or ATTI mode (A-mode): the driver will automatically switch to ATTI mode with a weak GPS signal or its absence, as well as in low light to operate the sensor system. In this case, the drone will drift at a given height.
Sport mode (S-mode): in this mode, the drone can fly at maximum speed using GPS data. However, the front and bottom sensors are disabled, so the drone will not be able to recognize and avoid obstacles. In addition, the search for landing sites and other intelligent modes are disabled.
Camera Settings

In this section, you can configure the following camera functions:
Auto: the camera itself selects the appropriate settings for a photo or video.
A (aperture): aperture priority. In this section, you can change the lens aperture value, and the rest of the settings will be set automatically according to the exposure.
S (Shutter): shutter priority. In this mode, you adjust the shutter speed, but the other parameters will be set automatically according to the exposure. Low shutter speed allows more light to penetrate the matrix, which is convenient in low light. High shutter speed suitable for taking clear pictures of moving objects and people.
M (Manual mode): here you can set both the shutter speed and the aperture value manually for maximum control of shooting.
EV (Exposure Compensation): this section shows how much your settings differ from the recommended ones. With a +2 indicator, the shades of white in your image will be too bright, with a -2 indicator - too dark. In some situations, you really need a high or low exposure rate, for example, when shooting in low light you need to set a slower shutter speed and a higher exposure rate.
Photo Settings
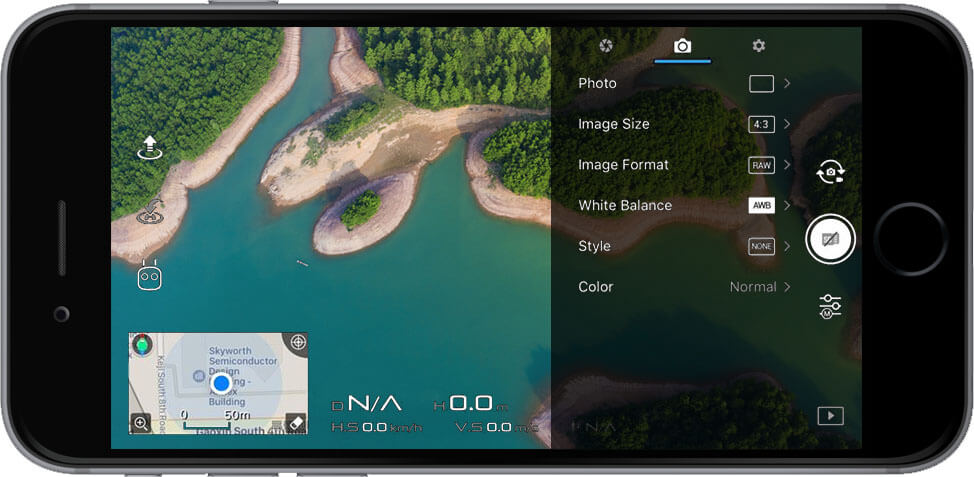
This tab hides the camera settings for taking photos.
Photo: here you can select a photo mode. Single Shot - standard mode. One click on the shutter button produces one photo. HDR Shot - when this option is selected, the camera takes three images at the same time. One of them has a light exposure, the other with a dark one, and the third combines the previous two to get the most dynamic image. Multiple - in this mode, the camera takes a series of photos when you press the shutter button. This mode is suitable for shooting moving subjects. AEB - allows you to shoot from 3 to 5 photos at a time. This function is similar to HDR, since the camera takes pictures with different exposure levels, but in this case the pictures are not combined as with HDR (except for Spark). Timed Shot - timer shooting, convenient for selfies. Pano - allows you to make a panorama in a short time. It is also possible to make a spherical panorama (Sphere mode). ShallowFocus: in this mode, you can change the depth of field of the image.
Image Size: here you can select the aspect ratio of the image (4: 3 (35mm), 16: 9 (HD), 3: 2).
Image Format: in this menu, select the photo format: RAW, JPEG or RAW + JPEG (Spark model supports only JPEG format).
White Balance: This feature helps to remove unrealistic color shades so that the white colors remain white in the photo. This characteristic is measured in kelvins. When Auto mode is selected, the camera automatically selects the appropriate parameters. But you can choose one of the suggested modes or adjust the white balance yourself.
Style: this window contains settings for sharpness, contrast and saturation of the image or video. The triangle is sharpness, the circle indicates the contrast, the rectangle - the saturation of color. You can select a level from -3 to +3.
Color: Camera color settings that will be reflected in the photo. Modes D-Cinelike and D-Log are designed for post-processing frames. The remaining modes can be used without post-processing.
Other Camera Options

In this tab there are a large number of different options. Settings may vary depending on the model of the copter.
Histogram: activation of a window with a histogram. Thanks to this feature, you can track the exposure of the image you are going to take.
Front LEDs Auto Turn Off: Automatically deactivate the front position lights during shooting.
Lock Gimbal When Capture: After activating this feature, the camera will be pointed in one direction during shooting, even if the position of the drone changes. If disabled, the camera will follow the movement of the drone.
Enabled AFC Mode: AFC - constant autofocus, when it is on, the camera automatically focuses during shooting.
MF Focus Assistant (for Phantom 4 Pro): helps to set the focus when working in manual mode.
Mechanical Shutter (for Phantom 4 Pro and Inspire 2): This feature prevents the appearance of photos with the effect of "jelly" during the shooting of fast moving objects.
Portrait Capture (for Mavic): When you turn on this feature, the camera switches to portrait mode.
Over Exposure Warning (for Mavic, Phantom 4, Inspire 2): the function will tell you when the exposure in the photo is exceeded.
Auto Sync HD Photos: automatically send uncompressed images to your mobile device while shooting.

Long Exposure Preview: A preview will appear on the screen before you take a picture.
Video Caption: automatically create a file with subtitles (.srt), which contains information about altitude, GPS, ISO, shutter speed, barometer data, GPS coordinates of the Home point, etc.
Grid: turns on the grid on the screen, which will help align the photos and follow the rule of thirds. You can also include diagonal lines to define leading lines.
Center Points: here you can select the visual style of the center point in real time.
Anti-Flicker: This function prevents glare during shooting. Two options are available: 50 Hz - for European standards and 60 Hz - for American.
File Index Mode: controls the file numbers from a video or photo. If you do not interrupt the account, it will continue with each new photo or video. When the counter is reset, the file numbering starts from 001.
Peak Focus Threshold: This feature adds red lines in the focus area to highlight its main elements. Here you can choose one of the options: off / weak / medium / strong focus.
Format SD Card: With this option you can completely clear your SD card.
Reset Camera Settings: this function will change all camera settings to default settings.
Video Settings

This section contains the camera settings for shooting video.
Video Size: set the video resolution and frame rate. The options in this section may vary depending on the model of the drone or Inspire 2 camera.
Video Format: select the type of format for the video. Note again that the options will depend on your copter or the camera you are using on Inspire 2.
NTSC / PAL: these are the standards for color television systems. In simple words, if you are in America, choose the NTSC standard, in the rest of the world - PAL.
Source: https://habr.com/ru/post/424385/
All Articles