How to bypass SMS-identification when connecting to public Wi-Fi networks?
In 2014, the RF Government Decree No. 758 No. 801 began to take effect, obliging the owners of public WiFi networks to set up on their routers the identification of users through passport data, sms or the state portal. services. The reluctance of the cafe owners to spend money on the Captive portal has contributed to some providers in distributing their access points with paid sms authorization. I had a desire to check whether it is possible to bypass such sms-authorization.
This article is written for informational purposes only. In no case does the author urge readers to violate the laws of the Russian Federation. Please do not repeat the actions described in this article without first reading Chapter 28 of the Criminal Code of the Russian Federation. All trademarks and names of Wi-Fi networks in this article are fictional, and all matches are random.
')
To find the right victim, I took a laptop with Debian on board and headed to the nearest pizzeria. Nearby were a couple of shopping centers, and a few eateries, which guaranteed me to find a suitable "victim". I connected to one of the networks available to me, then opened the browser to go to the cherishedpornhab habr.com and this is what I saw:

This access point was controlled by one of the Russian providers. I was offered to use this network as a guest at minimum speed, get a premium for 99 rubles or (if I am a client of this provider) enter through my personal account. And, of course, I went the way not included in this list (otherwise why would I start writing this article).
In my experience, I knew that if I passed identification on one access point of this provider, then when connecting the same device to another point, identification was not required (then it turned out that this was the case with all providers providing sms authorization). Identification was not required even when a different browser was used. So, the provider somehow remembers our "hardware". The very first thing that occurred to me was that the provider remembers the mac-address of our device. This means that if you set yourself the mac-address of the one who has already passed the identification, then we will be able to safely use the network. And, as we shall see, intuition did not let me down.
To attack, I decided to use the utilities from the aircrack-ng package and the TL-WN722N WiFi adapter with an external antenna for more coverage. First, I connected the adapter and using airodump-ng I switched it to monitor mode. I described this process briefly, in more detail you can read here .
We get the output:
wlx60e32719503f is our adapter
We kill the processes that use the adapter, and translate it into monitor mode.

We see that a new network interface has appeared - wlan0mon. Run it
We are waiting for a couple of minutes, and we get this sign
We are interested in the BSSID (mac-address of the access point), CH (channel) and ESSID (network name) fields. Through the ESSID field I found the network of interest (it is the sixth in a row). We take from the table the mac-address of the access point (CC: B2: **: **: **: FC), the channel (channel 4) on which it works and transfer them to airodump-ng:
We are waiting for some time, and now we get the following conclusion:
The first table has only one row. This is our attacked network. In the second table we see the list of clients of this network. We are interested in the STATION field. These are mac-addresses of clients, we save them in a text file. We need to replace our mac-address with one of them. I chose the mac of the penultimate client (1C: CD: **: **: **: 43), because this client is the most active on the network, and therefore, it must have been identified.
As everyone knows (and I hope you know), it will be difficult for two devices with the same mac-addresses to get along on the same network. And now we have 2 options.
You can use the aireplay-ng utility to deauthenticate our client from the network.
But I decided not to harm the person, but to go in a more humane way - to wait until the client leaves (just have time to eat pizza).
Fortunately, this client quickly left. Now we have to put his mac-address himself. There are many ways to change the mac address to linux. The easiest is to specify the desired mac-address directly in the network settings.
Mac address is specified, now we can connect to the point, and check access to the Internet with the ping command.

I tried to go to Google, and several other sites - successfully.
Thus, we managed to find out that SMS authorization is easy to get around by replacing your mac-address with the mac-address of a client who has already been authenticated. In conclusion, I would like to say once again: “This article is written for informational purposes, the author in no way encourages readers to violate the laws of the Russian Federation.”
Disclaimer
This article is written for informational purposes only. In no case does the author urge readers to violate the laws of the Russian Federation. Please do not repeat the actions described in this article without first reading Chapter 28 of the Criminal Code of the Russian Federation. All trademarks and names of Wi-Fi networks in this article are fictional, and all matches are random.
')
To the point ...
To find the right victim, I took a laptop with Debian on board and headed to the nearest pizzeria. Nearby were a couple of shopping centers, and a few eateries, which guaranteed me to find a suitable "victim". I connected to one of the networks available to me, then opened the browser to go to the cherished
This access point was controlled by one of the Russian providers. I was offered to use this network as a guest at minimum speed, get a premium for 99 rubles or (if I am a client of this provider) enter through my personal account. And, of course, I went the way not included in this list (otherwise why would I start writing this article).
In my experience, I knew that if I passed identification on one access point of this provider, then when connecting the same device to another point, identification was not required (then it turned out that this was the case with all providers providing sms authorization). Identification was not required even when a different browser was used. So, the provider somehow remembers our "hardware". The very first thing that occurred to me was that the provider remembers the mac-address of our device. This means that if you set yourself the mac-address of the one who has already passed the identification, then we will be able to safely use the network. And, as we shall see, intuition did not let me down.
To attack, I decided to use the utilities from the aircrack-ng package and the TL-WN722N WiFi adapter with an external antenna for more coverage. First, I connected the adapter and using airodump-ng I switched it to monitor mode. I described this process briefly, in more detail you can read here .
sudo -s # ifconfig # , We get the output:
... wlx60e32719503f: flags=4099<UP,BROADCAST,MULTICAST> mtu 1500 ether 2a:36:62:d5:ec:63 txqueuelen 1000 (Ethernet) RX packets 0 bytes 0 (0.0 B) RX errors 0 dropped 0 overruns 0 frame 0 TX packets 0 bytes 0 (0.0 B) TX errors 0 dropped 0 overruns 0 carrier 0 collisions 0 ... wlx60e32719503f is our adapter
We kill the processes that use the adapter, and translate it into monitor mode.
airmon-ng check kill airmon-ng start wlx60e32719503f We see that a new network interface has appeared - wlan0mon. Run it
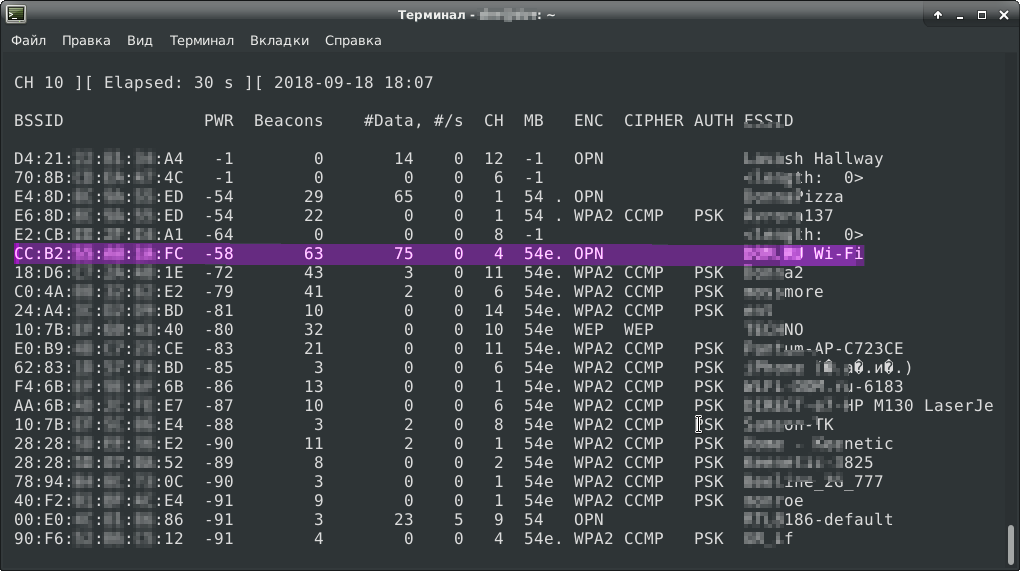
airodump-ng wlan0mon We are waiting for a couple of minutes, and we get this sign
We are interested in the BSSID (mac-address of the access point), CH (channel) and ESSID (network name) fields. Through the ESSID field I found the network of interest (it is the sixth in a row). We take from the table the mac-address of the access point (CC: B2: **: **: **: FC), the channel (channel 4) on which it works and transfer them to airodump-ng:
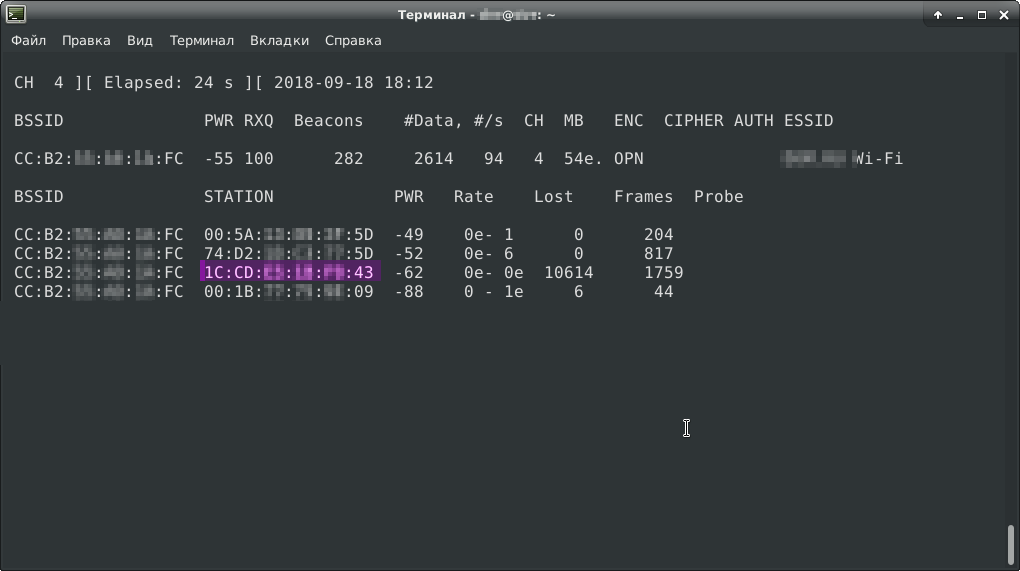
airodump-ng wlan0mon -c 4 --bssid CC:B2:**:**:**:FC We are waiting for some time, and now we get the following conclusion:
The first table has only one row. This is our attacked network. In the second table we see the list of clients of this network. We are interested in the STATION field. These are mac-addresses of clients, we save them in a text file. We need to replace our mac-address with one of them. I chose the mac of the penultimate client (1C: CD: **: **: **: 43), because this client is the most active on the network, and therefore, it must have been identified.
As everyone knows (and I hope you know), it will be difficult for two devices with the same mac-addresses to get along on the same network. And now we have 2 options.
You can use the aireplay-ng utility to deauthenticate our client from the network.
aireplay-ng -0 1000 -a CC:B2:**:**:**:FC -c 1C:CD:**:**:**:43 wlan0mon - "-a CC: B2: **: **: **: FC" is the attacked access point
- "-c 1C: CD: **: **: **: 43" is the client that we will disconnect
- "-0 1000" - here we indicate the type of attack (zero is deauthentication) and the number of deauthentication packets to disable the client if it connects again.
But I decided not to harm the person, but to go in a more humane way - to wait until the client leaves (just have time to eat pizza).
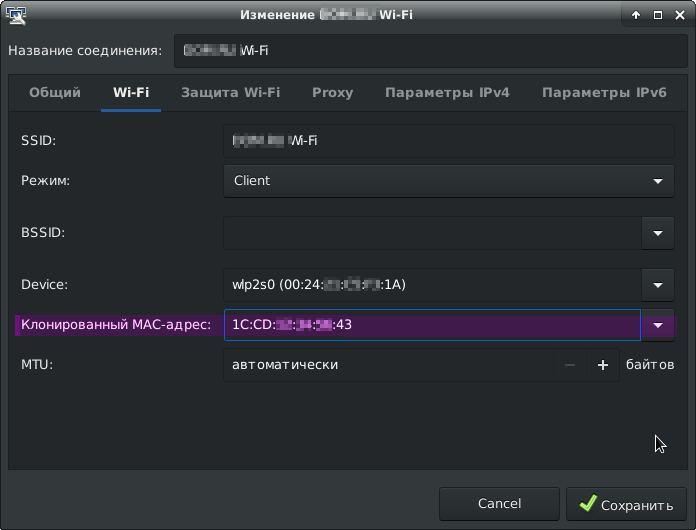
Fortunately, this client quickly left. Now we have to put his mac-address himself. There are many ways to change the mac address to linux. The easiest is to specify the desired mac-address directly in the network settings.
Mac address is specified, now we can connect to the point, and check access to the Internet with the ping command.
I tried to go to Google, and several other sites - successfully.
Conclusion
Thus, we managed to find out that SMS authorization is easy to get around by replacing your mac-address with the mac-address of a client who has already been authenticated. In conclusion, I would like to say once again: “This article is written for informational purposes, the author in no way encourages readers to violate the laws of the Russian Federation.”
Source: https://habr.com/ru/post/423931/
All Articles