How to use “Tobii Eye Tracker 4C” to communicate with a child who cannot speak and move (SMA, Cerebral Palsy, ALS)
The methodology is based on tracking the direction of gaze that the “Tobii Eye Tracker 4C” device performs. A table with several pictures is displayed on the computer screen. If you hold your eyes on a separate picture, the corresponding phrase will be announced, for example, “drink”, “turn on its side”, “watch cartoons”.
When the child learns the letters, you can use more complex methods, like typing with your eyes .
')
What is required (in a nutshell)?
- computer
- Aytreker - device for tracking the direction of sight
- free software (from the author of the article)
Content
How it works?
detailed instructions
1. Choosing a computer
2. Tobii Eye Tracker 4C device
2.1 Fastening the eytreker to the monitor
3. Software installation
3.1. Get the file TobiiGazeCore32.dll version 4.1.3.938 or newer
3.2. Driver installation and calibration
3.3. Installing “Microsoft Visual C ++ Redistributable for Visual Studio 2012 Update 4”
3.4. Installing and configuring free software (from the author of the article)
3.4.1. Setup of the program for work in the table mode
4. Using the program
5. How to change table contents
6. Calling external programs (update November 2018)
7. Controlling external devices: electrical appliances, a motorized sidecar, a model on a radio control (updated in November 2018)
Can one buy a ready-made system from a reputable manufacturer instead?
Greetings and thanks
How it works?
Video illustrating the program:
Violetta learns to work with the program:
Violetta is capricious and says “No!” With the help of the program:
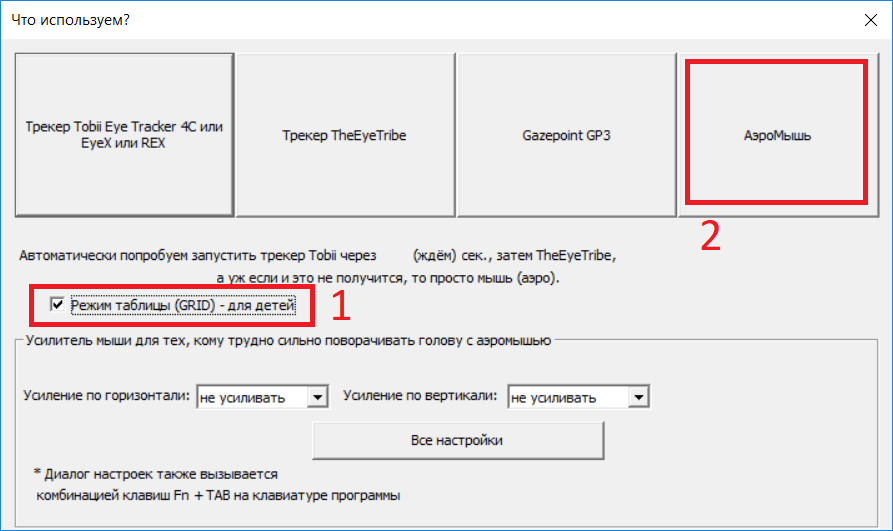
If you do not have an Aytreker, you can still evaluate the performance of the program, since it can also work with any device that moves the mouse cursor around the screen. Drag the mouse on the screen as you would move your eyes. Stop the cursor on the pictures (no need to click), this will correspond to the fixation of the look on the picture when using the eytreker.
In order for the program to work in this mode, you need to select Aeromouse as the device used (2 in the figure below), but first do not forget to tick the box “Table mode (GRID) for children” (1).
detailed instructions
1. Choosing a computer
Which computer is suitable for this? I would say this: modern with average features and operating system Windows versions 7, 8.1, 10 (Windows 10 - only 64 bits). Despite the fact that the recommendations on the use of the Aytreker Tobii 4c (https://help.tobii.com/hc/en-us/articles/213414285-Specifications-for-the-Tobii-Eye-Tracker-4C) advise using a computer with an Intel i5 or i7 processor, I was able to work on modern processors cheaper: i3, Pentium, Celeron, and even on Atom x5, although the work on the last two may seem slow.
In other words, if you already have a computer and it is not archaic, then you should try to work on it. If you are thinking of buying a computer, the main thing is not to take the old one, and do not take it with the Atom processor. Although, if there is no money at all, you can try this, but it is better to discuss the possibility of a return.
A computer must have at least one USB port of version 2 or 3. It is better that there are at least two ports so that you can plug the mouse apart from the Aytrecker. (Tablets, by the way, often sin because they have only one USB port).
2. Tobii Eye Tracker 4C device
This device is manufactured by Tobii for gamers and is sold at a reasonable price. In order not to create competition for its much more expensive devices, the “Tobii Eye Tracker 4C” is made incompatible with programs for people with disabilities, produced by it.
However, the development tools released by Tobii left a loophole for me to write such programs myself. Perhaps not so perfect, but free.
Today (autumn 2018) this device can be easily purchased in several stores. You can easily find the most convenient option. I took in the spring of 2018 for 11,500 Russian rubles.
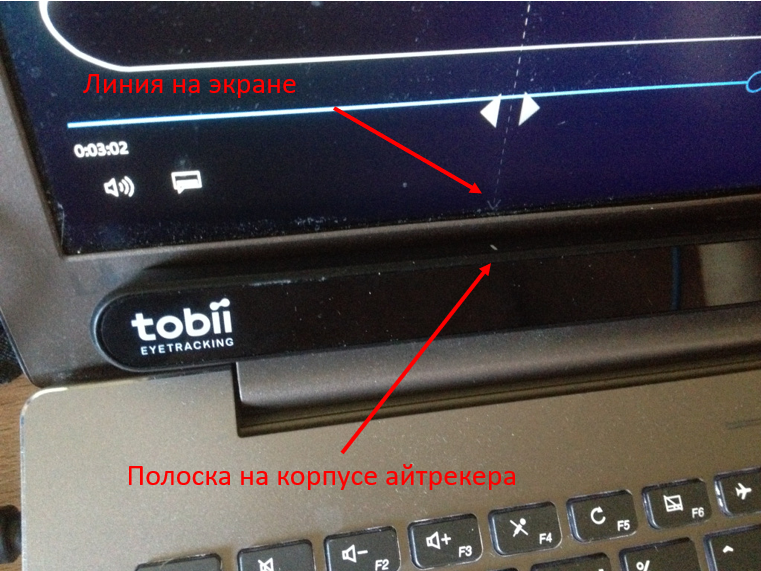
2.1 Fastening the eytreker to the monitor.
Video illustrating installation on a laptop:
A computer can be large with a stand-alone monitor or mobile (laptop). Maybe even a Windows tablet. But you need to remember that the eytreker needs to be positioned exactly under the monitor so that the mount is rigid. And if to an ordinary monitor, the eytreker is attached with a self-adhesive magnet that comes with it, then you have to fasten it to the tablet somehow masterly. In the photo below, the tablet and the eytreker are fixed on a piece of board, which, in turn, is connected to a bracket that rotates at the corner of the table.
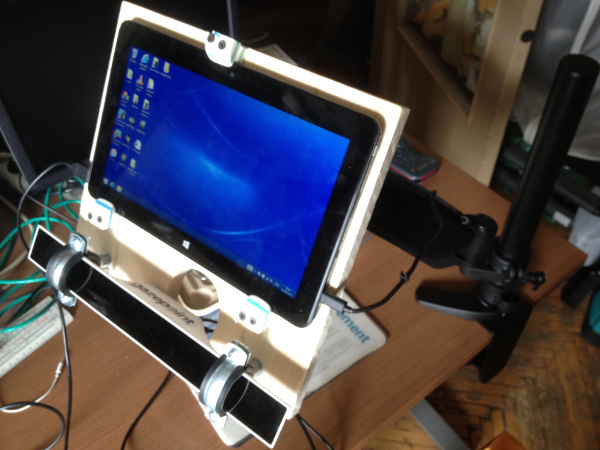
You also need to remember that behind the dark glass (transparent only in the IR range) in the center of the eytreker there is a camera, and at the edges there are infrared LEDs. When fastening with clamps, it is important not to block one or the other.
The eye line should coincide with the line of the location of the eytreker. If a person is lying on his side, then the monitor should be tilted to the side.
The distance from the eyes to the monitor with an eytreker should be about 50 cm (arm's length) or a little further. Therefore, fixing the eytreker to the TV on the wall will not work - too far.
As already mentioned, there is a camera in the eytreker, and it should be aimed at the eyes. The front surface of the ytreker slightly reflects light. Try to see your eyes in it, as in a mirror, this will mean that the camera is looking at them. Tilt the monitor if necessary.
3. Software installation
Do everything exactly in this sequence!
3.1. Get the file TobiiGazeCore32.dll version 4.1.3.938 or newer
Previously, this file could be downloaded as part of the Tobii Gaze SDK. Now Tobii has stopped providing it, and we have to use the trick described below.
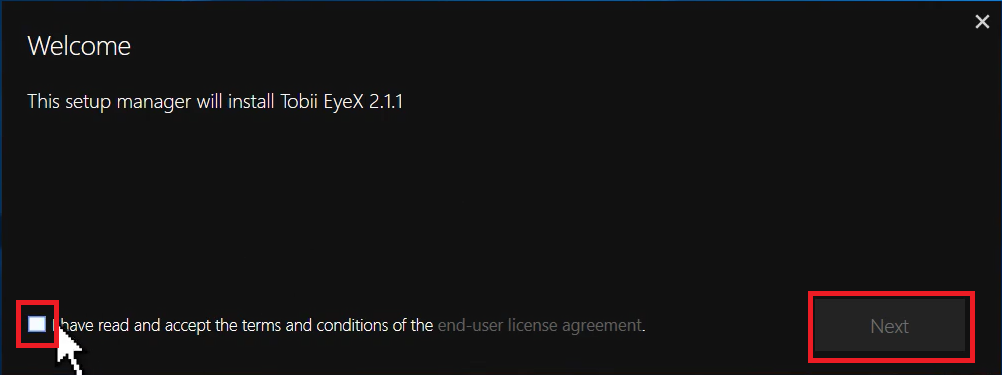
You need to download and install Tobii EyeX 2.1.1 software. After that, this file will appear in one of the directories. You need to copy it to a safe place, after which the installed software can be removed.
You need to install this software BEFORE installing the drivers from Tobii, otherwise the TobiiGazeCore32.dll file we need may not appear (if you are interested, we solved this problem here: github.com/MastaLomaster/bkb/issues/6 )
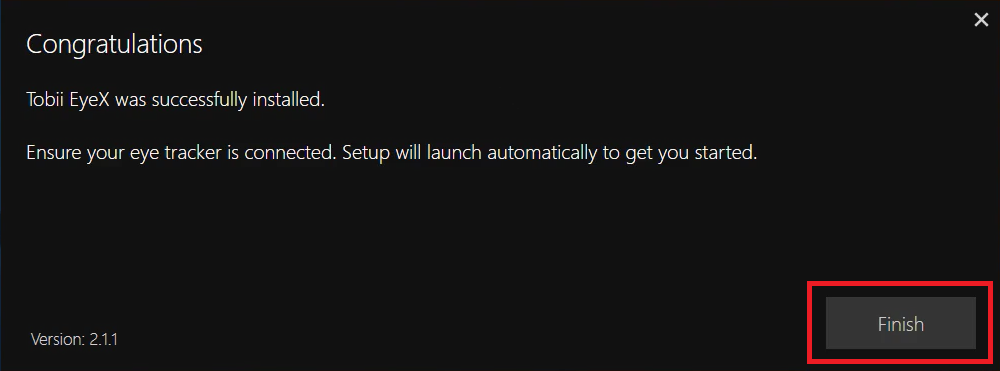
So, download Tobii EyeX 2.1.1 ( files.update.tech.tobii.com/engine/Tobii.EyeX_2.1.1.293.exe ) and run. We agree with the conditions: put a tick and press the 'Next ”button.
We wait…
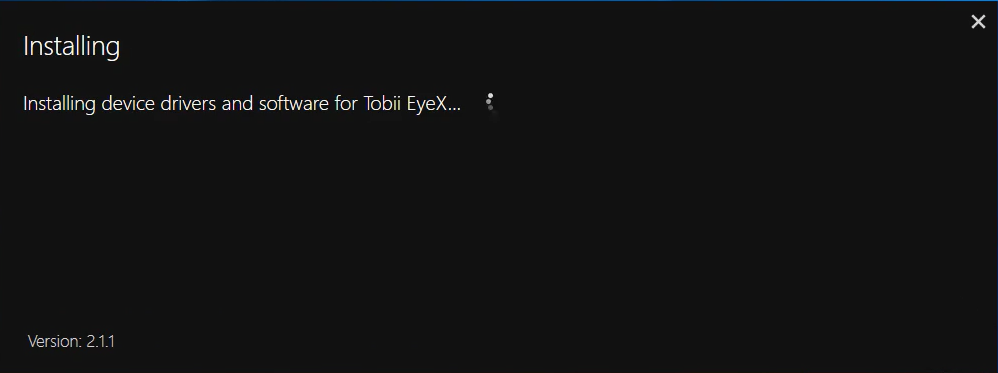
Done, click “Finish”.
After installation, two TobiiGazeCore32.DLL files appeared. The newer one is in the “C: \ Program Files (x86) \ Tobii \ Tobii EyeX” directory. This can be checked by clicking on the file name with the right mouse button and selecting “Properties” in the context menu.

And then, on the “Details” tab, look at the version number:
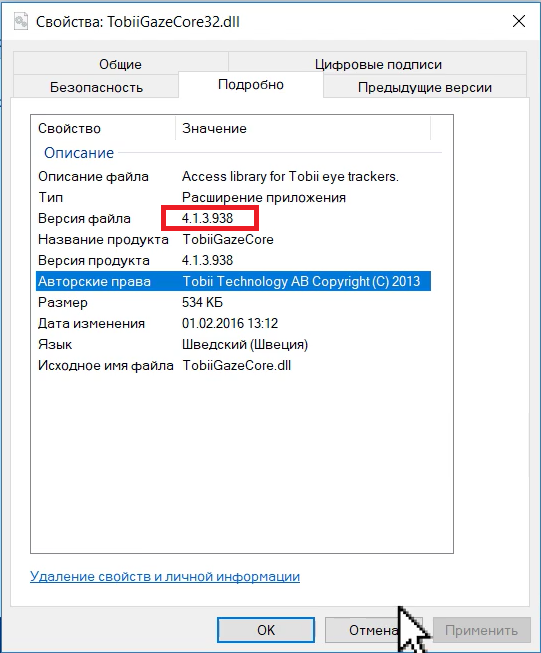
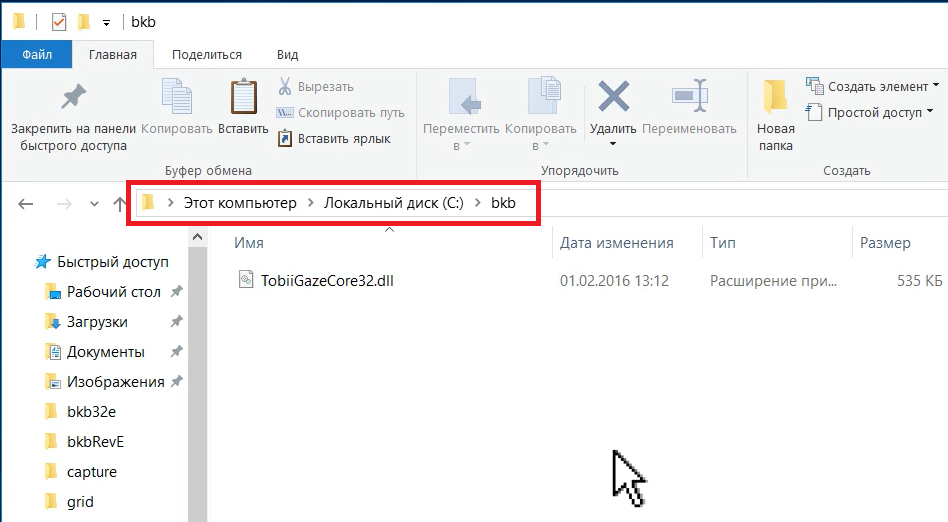
Copy this file to a safe place, for example, create a BKB directory on drive C and put the file there:
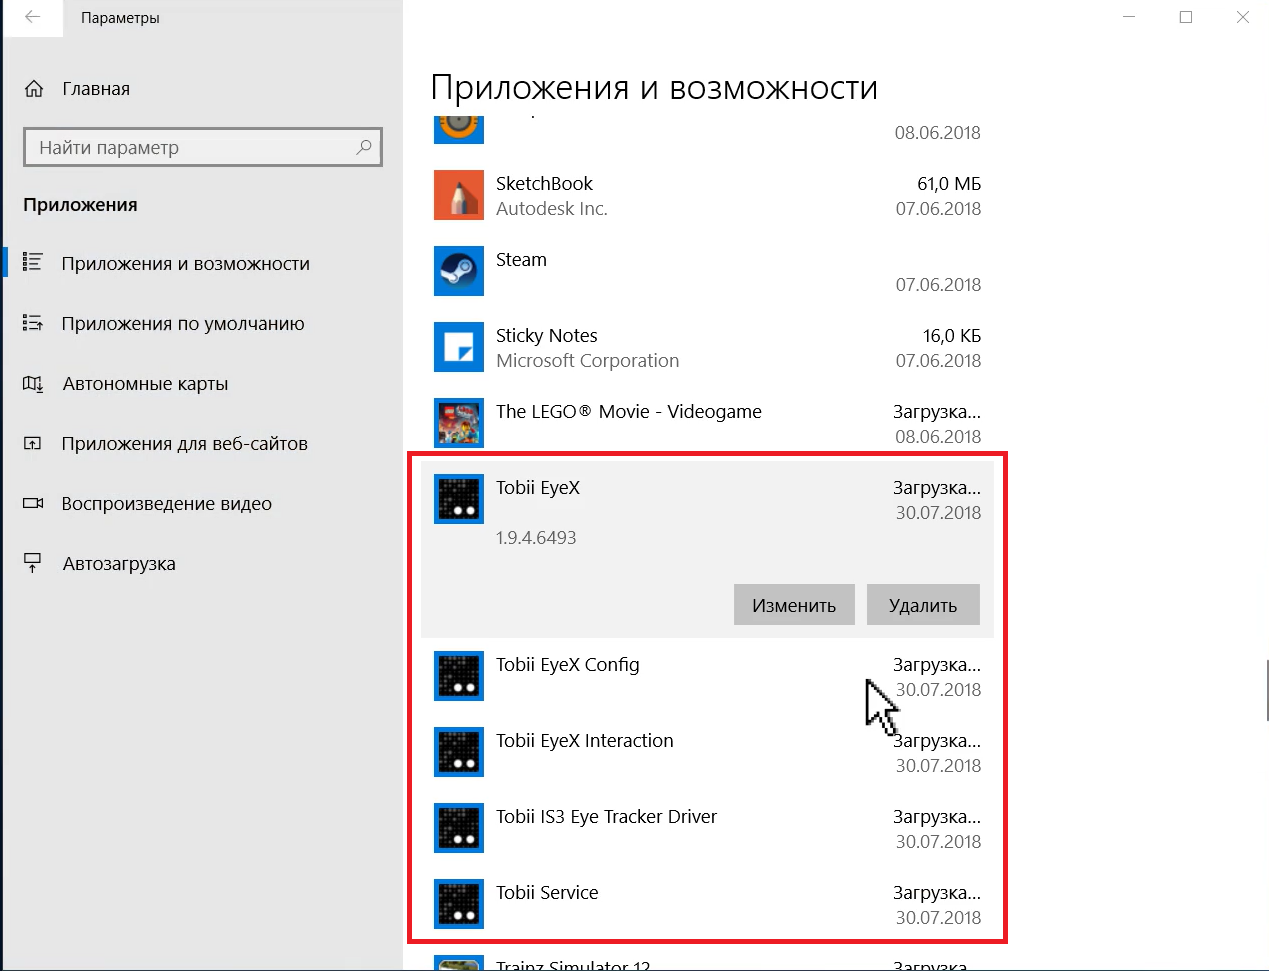
Now you can remove the Tobii EyeX program - we took everything we needed from it.
In Windows 10, for this, click the "Start" button, then the appeared button with a gear.
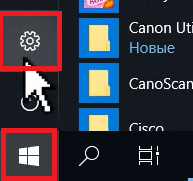
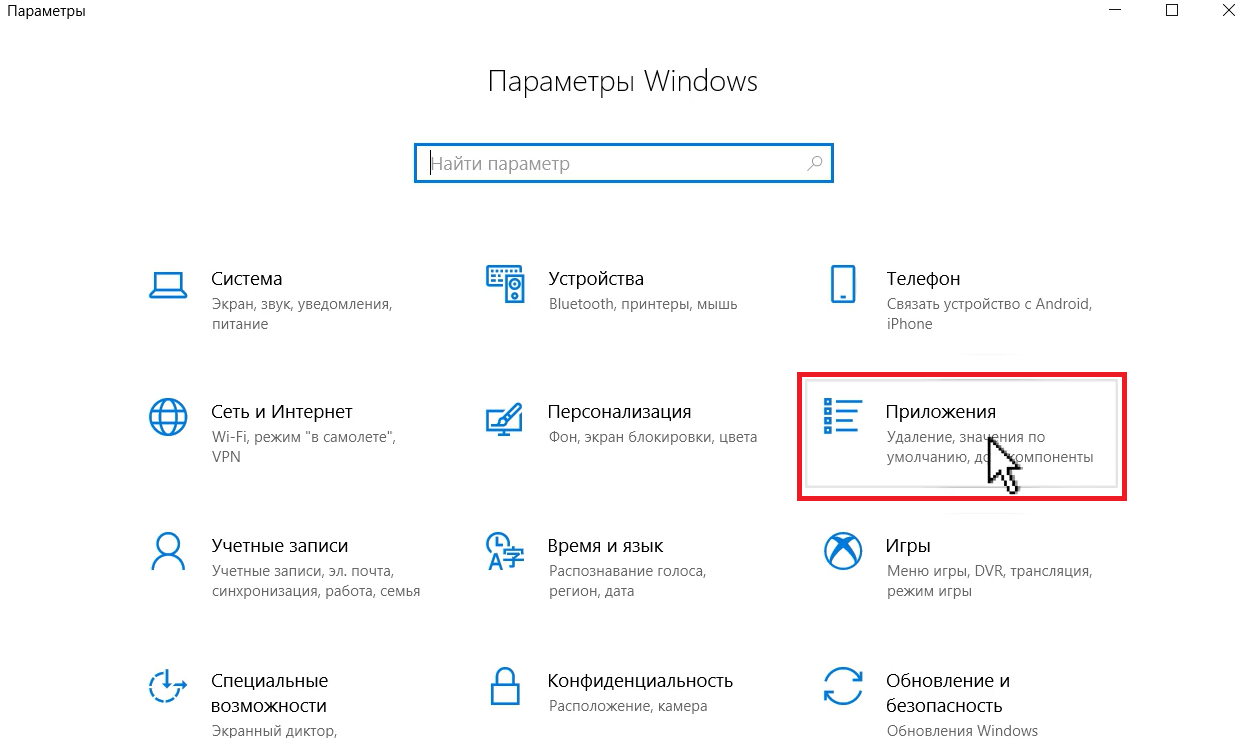
Then select the section "Applications"
Find and delete everything that starts on “Tobii” by clicking on the “Delete” button:
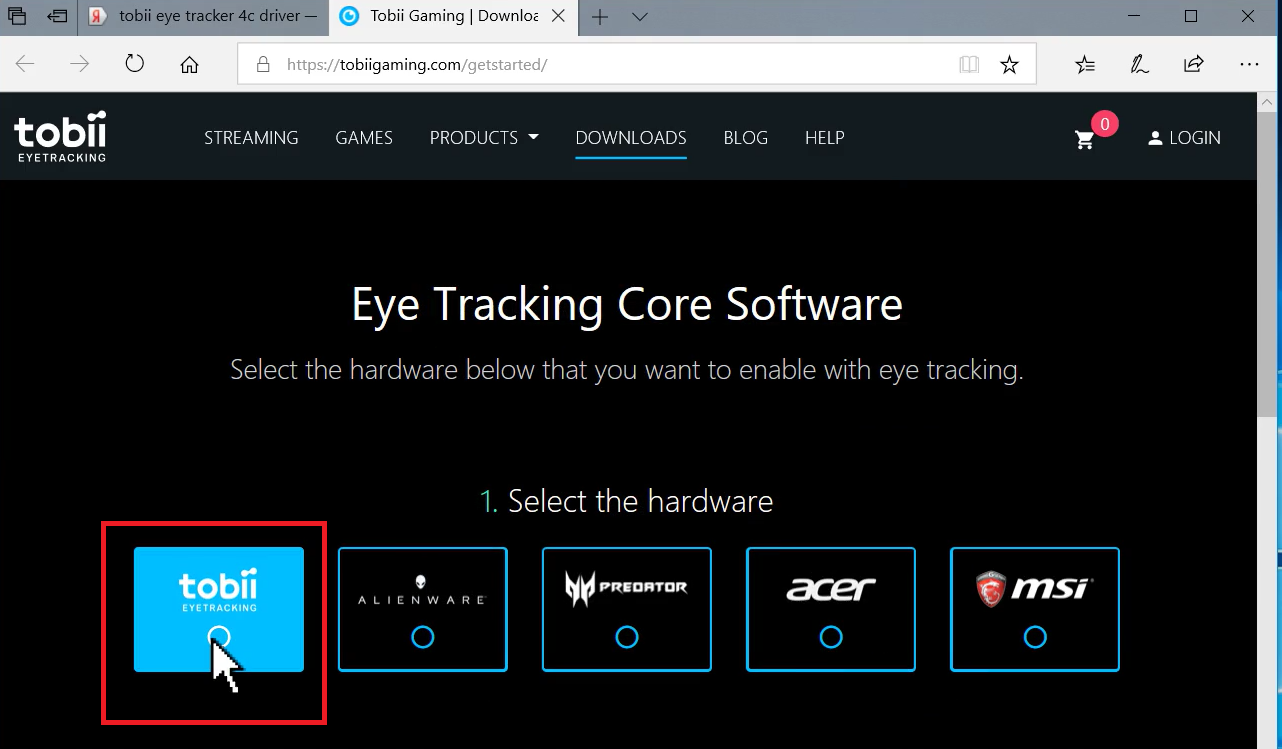
3.2. Driver installation and calibration
Go to the tobiigaming.com/getstarted page and click on the “Tobii Eyetracking” button:
Then on the “Download” button that appears:
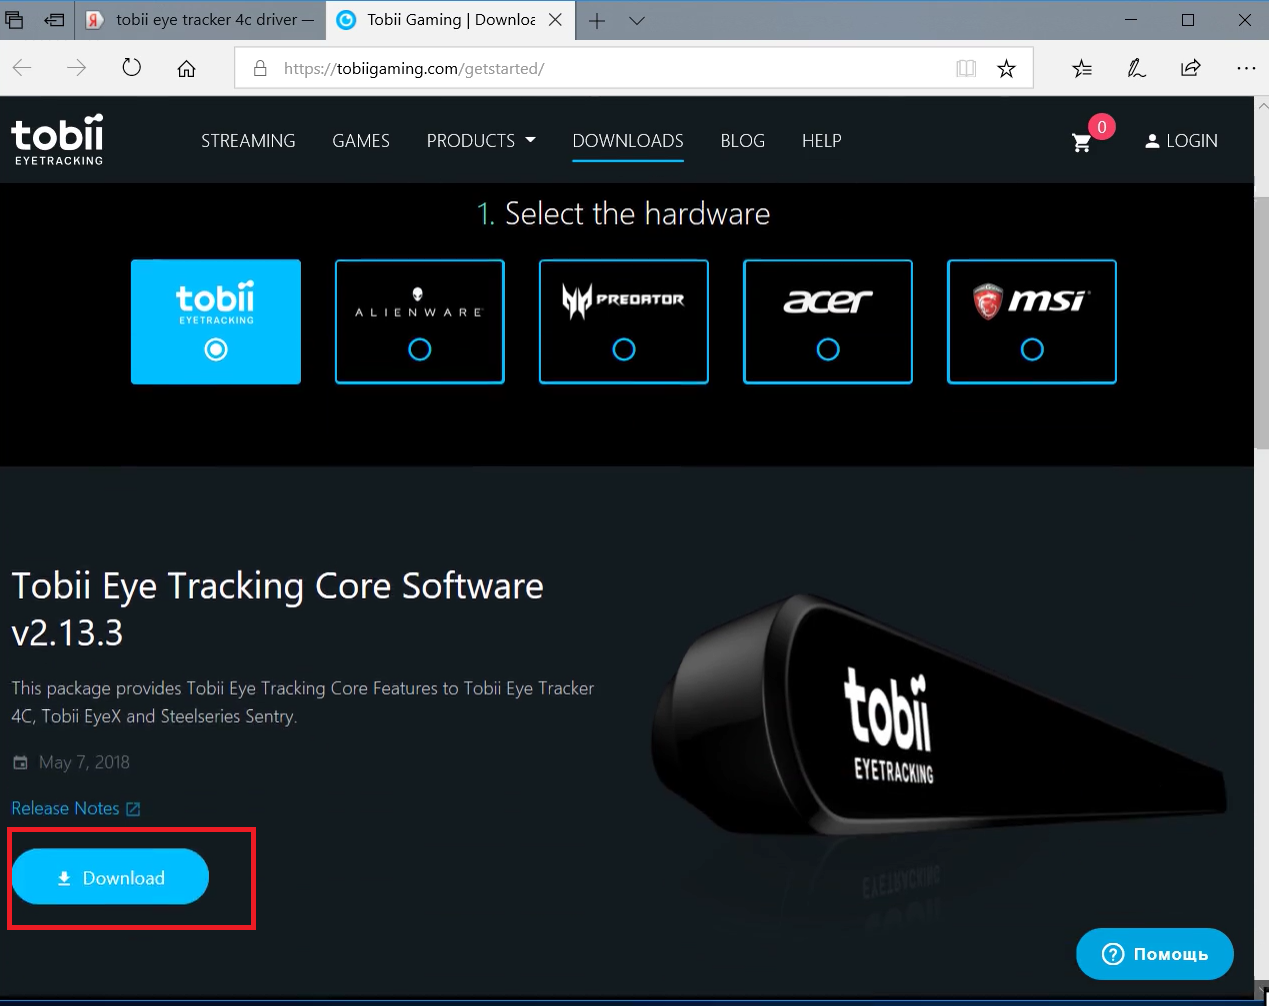
Save the file (for the future), and then run it:

Put a tick, click the button «Next»:

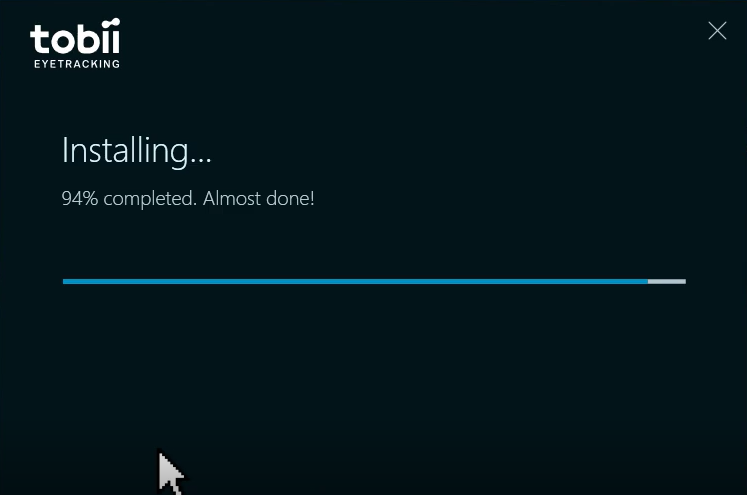
We wait…

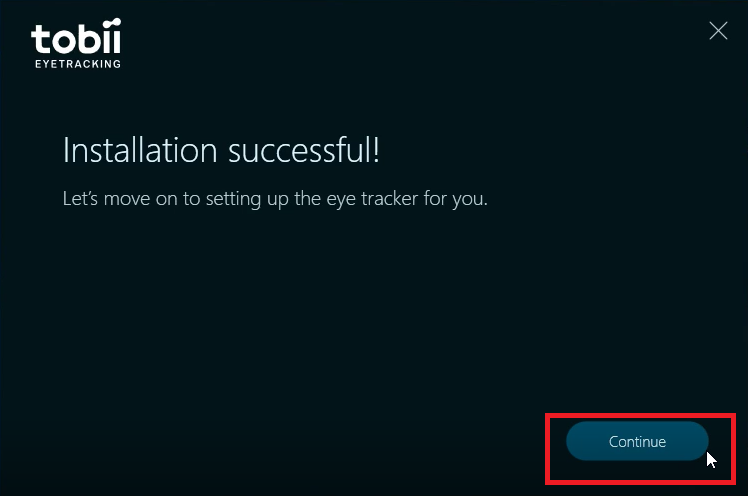
Click the “Continue” button:
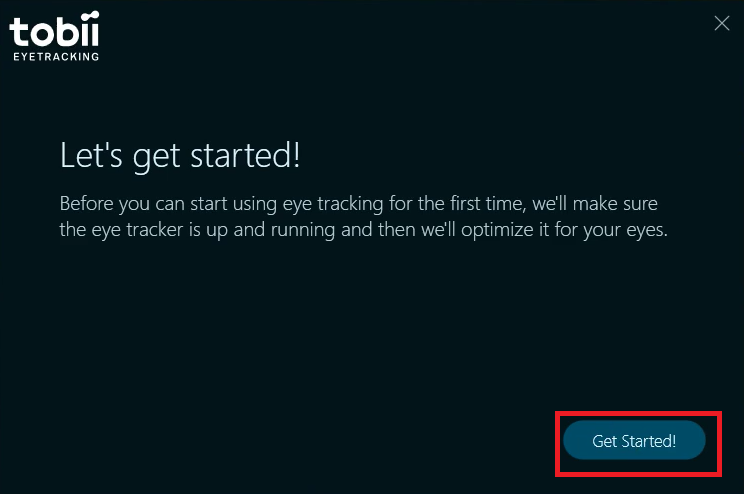
Then click the “Get Started” button:
Next you need to drag the lines on the screen with the mouse so that they coincide with the stripes on the eytreker case:

When finished, click the “Done” button.
Then two mugs will appear on the screen that illustrate if the Aytreker sees your eyes well.
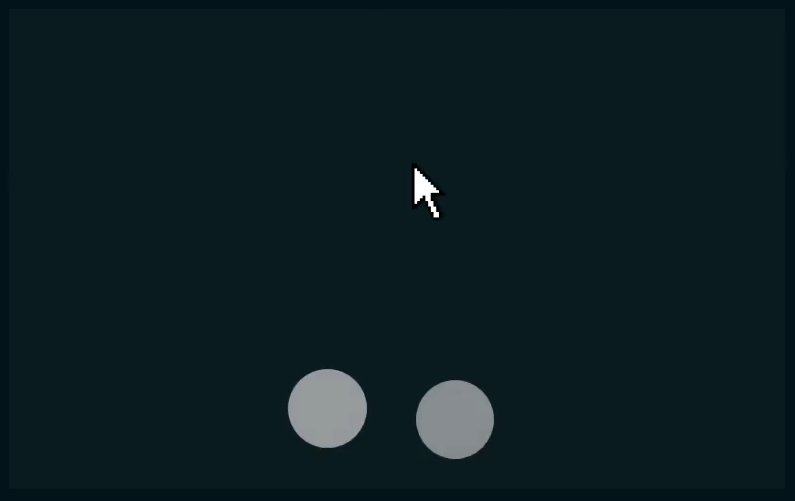
If the circles are not located in the center of the screen (as in the picture above), tilt the monitor to move them.
If the circles are large and dull - you are too close moved to the monitor.
If the circles are small and dull - you are too far from the monitor.
As I wrote above, the optimal distance from the monitor to the eyes is about 50 cm.
Next, the calibration of the ytreker begins.
IMPORTANT!!!
If the child uses the eytreker, then the calibration will need to be performed through the eyes of the child !!
To begin with, you can calibrate the device under your eyes, and then under the child's eyes.
Blue dots will appear on the screen, you will need to look at each of them in turn.
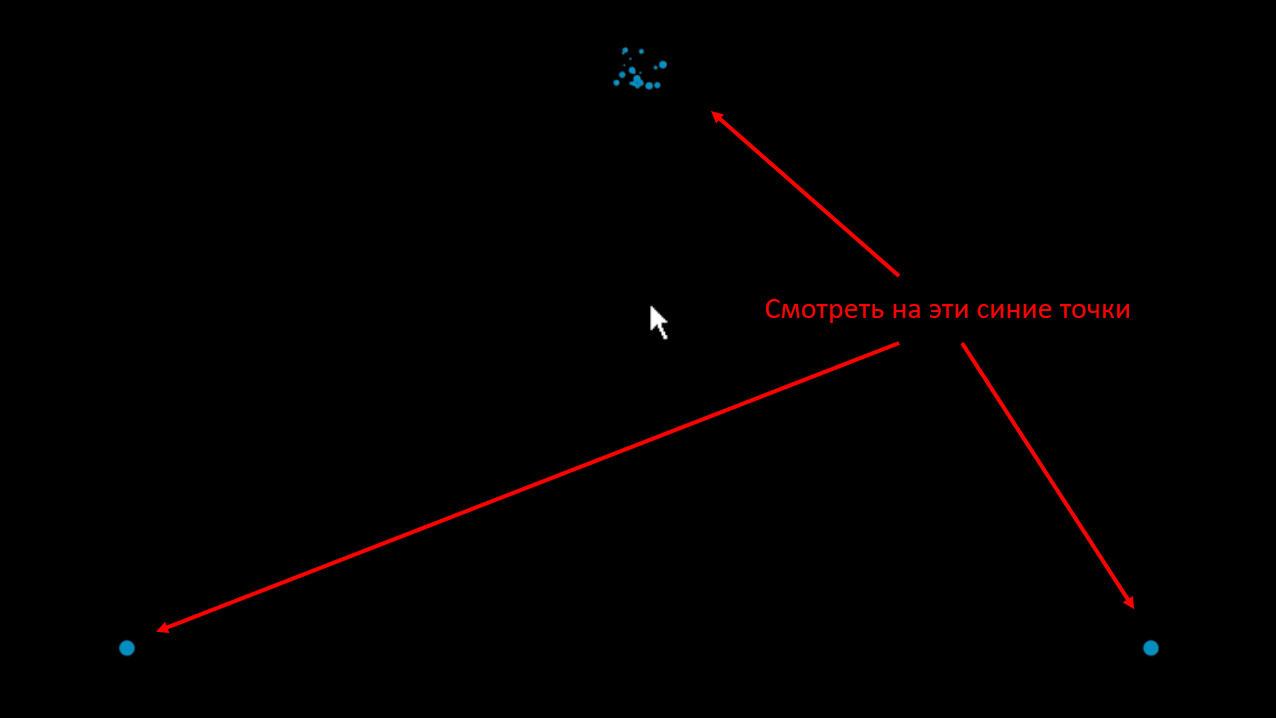
After you fix your eyes on one of the points, it will shatter into pieces, like the top point in the picture above.
After the calibration is complete, enter the name of the person for whom the calibration was carried out and click the “Save” button

Then the game will start, in which you move the sight of the spacecraft with your eyes, and then shoot at the asteroids with the space bar:
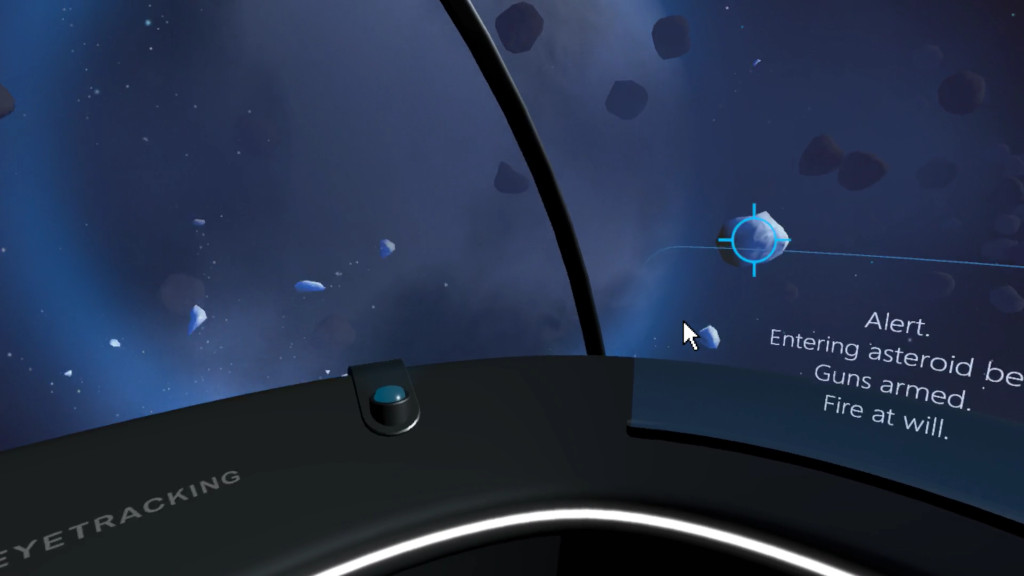
Exit the game by pressing the “Escape” key.
An icon with two circles depicting the eyes will appear on the taskbar:

If the device sees only one eye, then only one circle will be shown:

If the device does not find the eye at all, then two crosses will be drawn:

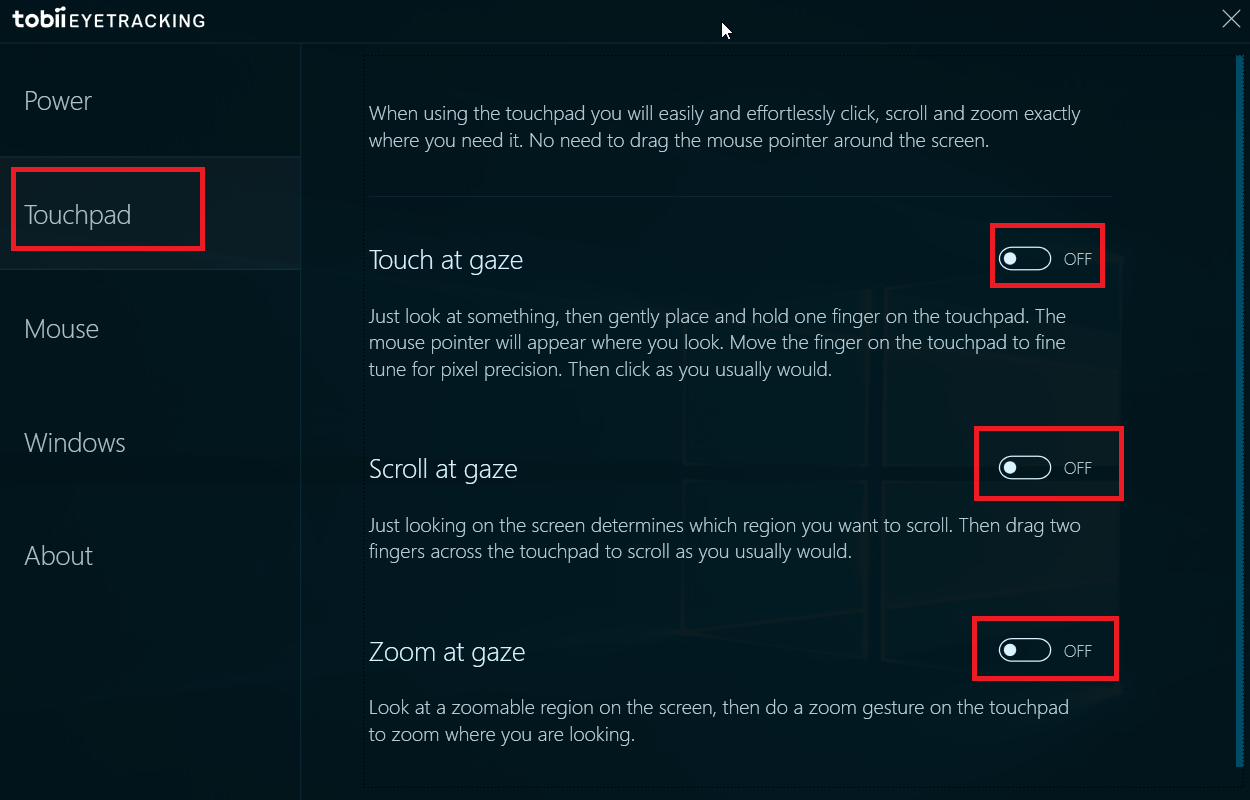
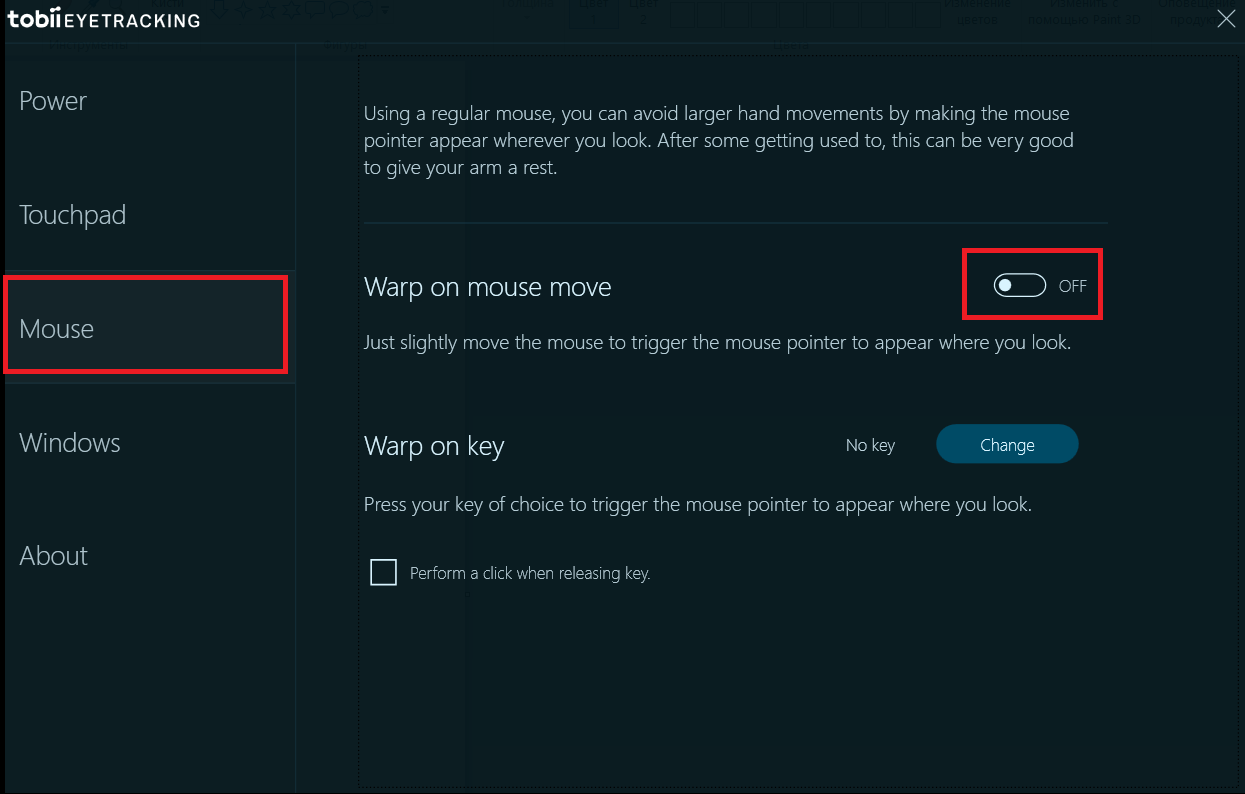
IMPORTANT! In order for the programs not to interfere with each other, you need to disable the standard actions that the Tobii driver produces.
To do this, click on the icon with circles (1) and in the menu that opens, go to the section Interactions (2):
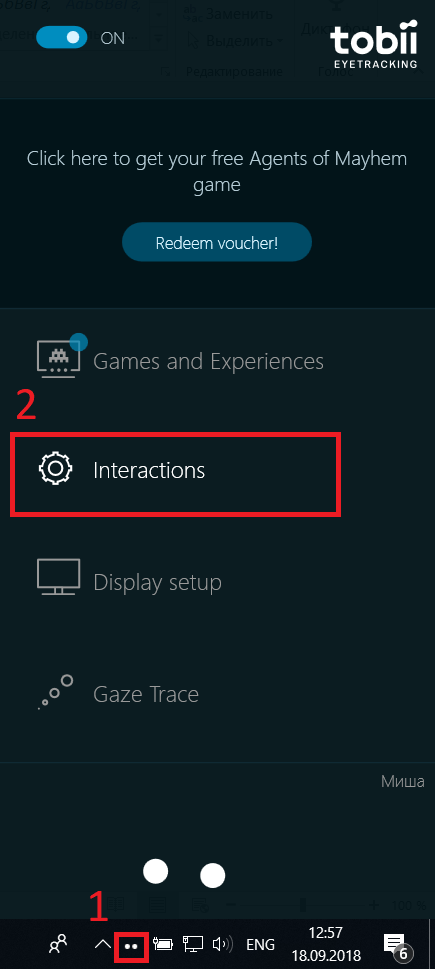
In each of the sections (Touchpad, Mouse, Windows), turn all switches to the “OFF” position:

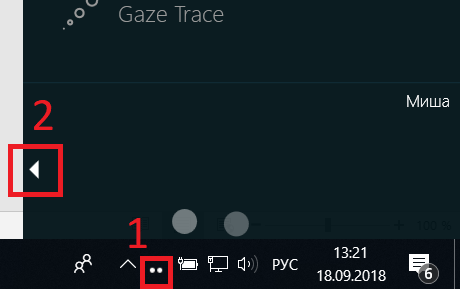
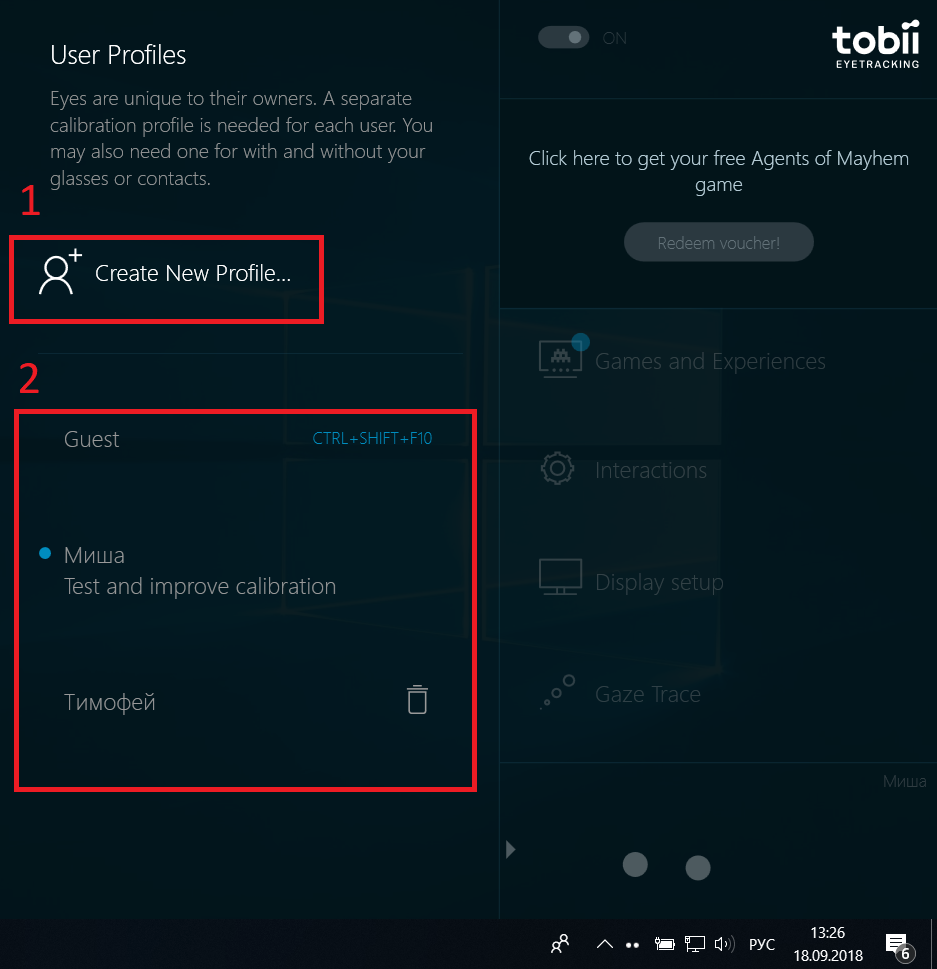
If you need another person to work with the device, you need to perform a calibration for his eyes too. To do this, click again on the icon with two circles, and then on the left arrow:
Then select “Create New Profile ...” (1) and repeat the calibration for the new person.
Switching between profiles of different people is done in the area below (2). The current profile is marked with a blue circle:
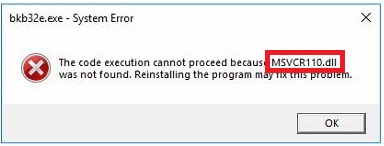
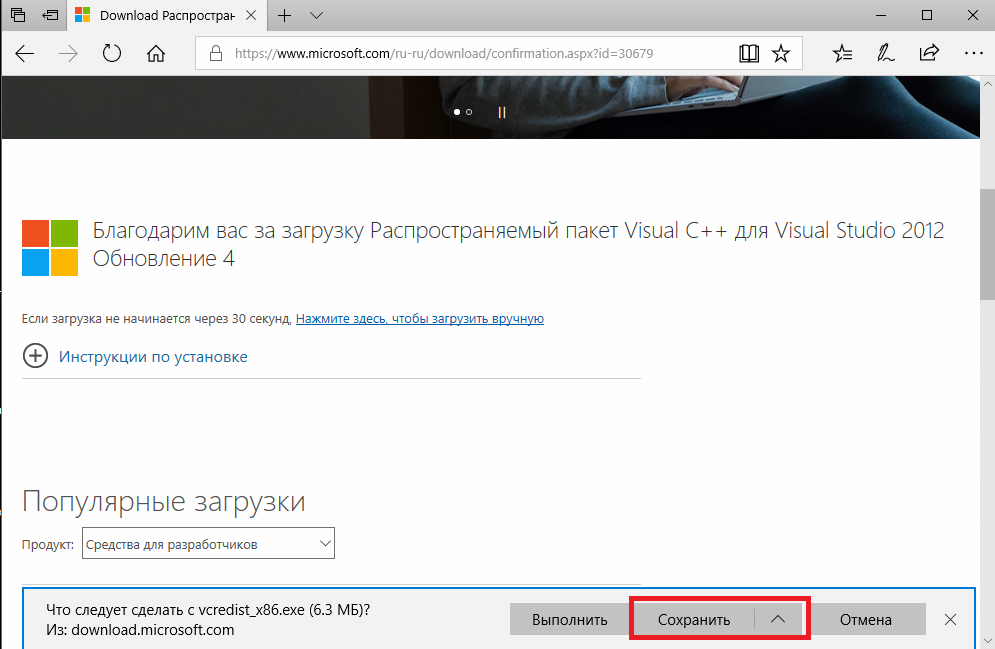
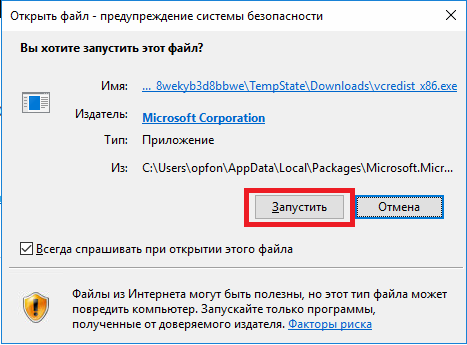
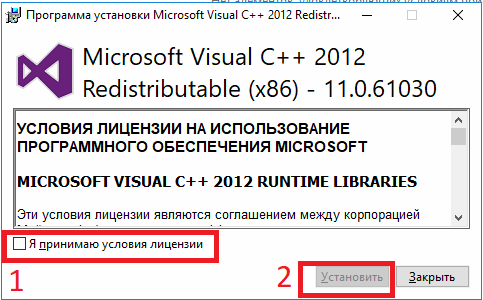
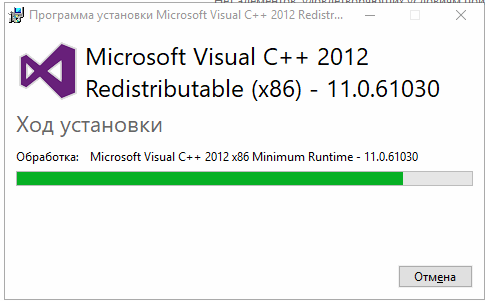
3.3. Installing “Microsoft Visual C ++ Redistributable for Visual Studio 2012 Update 4”
If you skip this step, then when you start the program, you will see a message stating that the msvcrt110.dll file was not found:
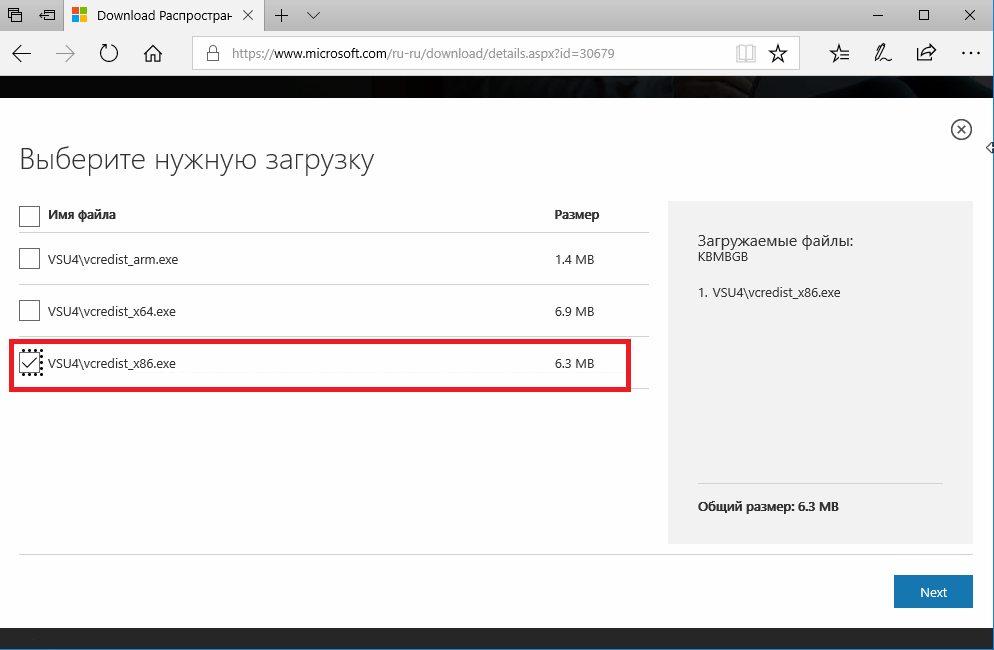
Go to the link: www.microsoft.com/ru-ru/download/details.aspx?id=30679
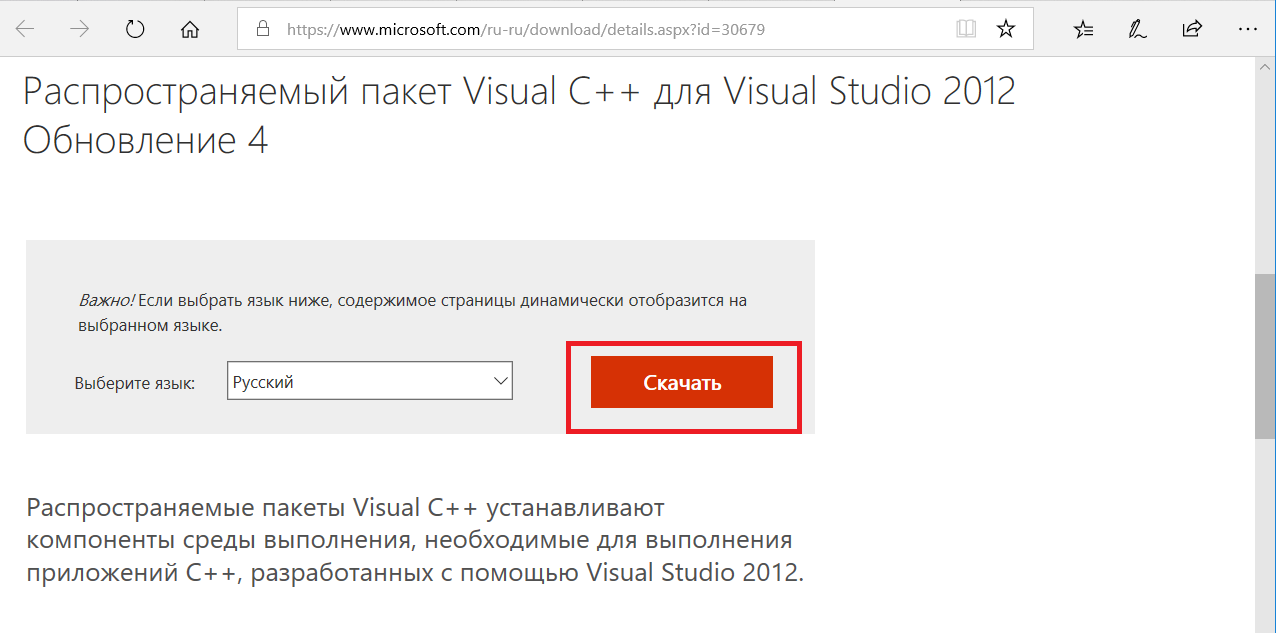
Download and install the version for x86 processors :
3.4. Installing and configuring free software (from the author of the article)
Go to the link.
After that click the button “Download” or “View Raw”
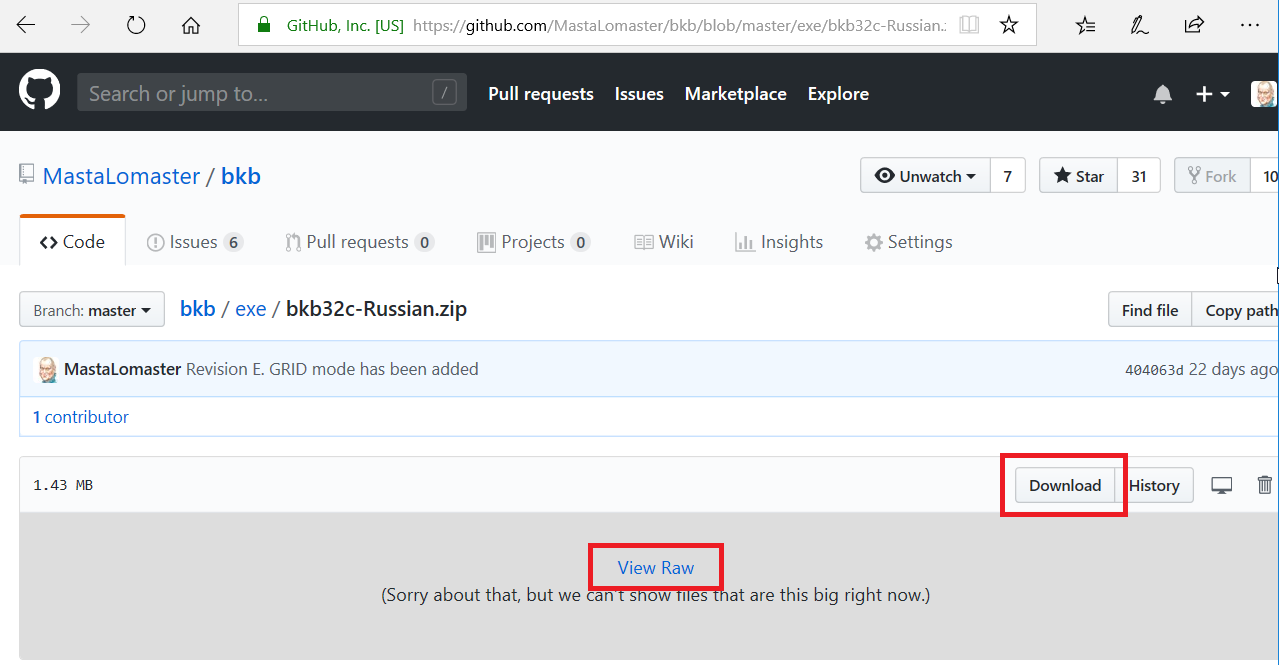
Save the file.

(if anyone is interested, the source codes in C ++ are also nearby)
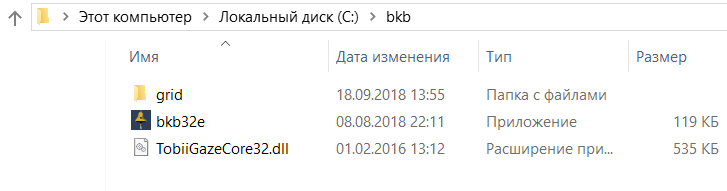
Create a directory “C: \ bkb” and copy the contents of the downloaded archive “bkb32c-Russian.zip” there.
We also copy the “TobiiGazeCore32.dll” file there (see p. 3.1. Of the instructions).
You should have a directory with such files and the “grid” subdirectory:
In general, you can choose another directory for the program, but this should not be the “Program Files ...” subdirectory. The point is that the program saves the configuration file “config.bkb” in this directory, and the subdirectories of “Program Files ...” are closed for writing. (Yes, I know that it was necessary to write in% AppData%, but historically so).
3.4.1. Setup of the program for work in the table mode
The program is written in such a way that if you do not click on its first window, it starts to determine for itself which device it should work with. This is done in order to be able to put it into autoload on the computer of a person who himself cannot press anything.
Therefore, when starting the program, we do not catch the crows, but quickly tick the “Table mode (GRID) for children” field (1).
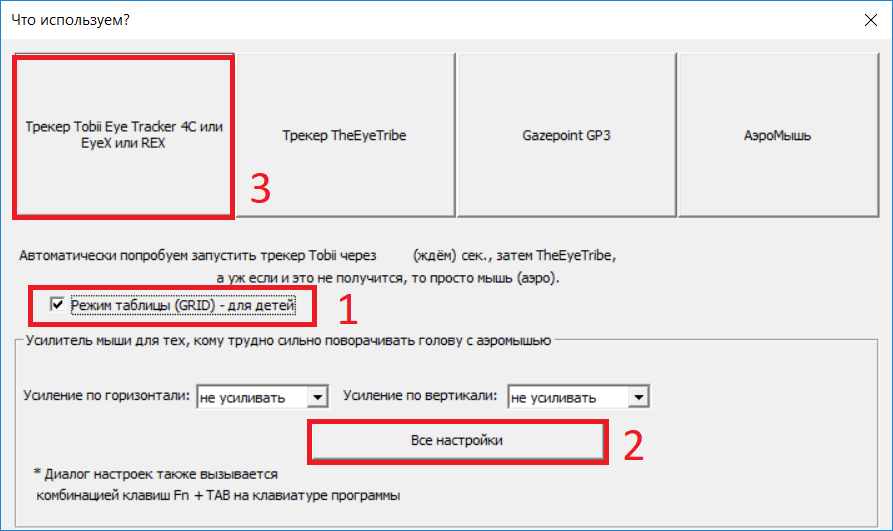
I also recommend that you click the “All Settings” button (2) and set a longer look-out time on the pictures, as well as a wait time for the next look-up:
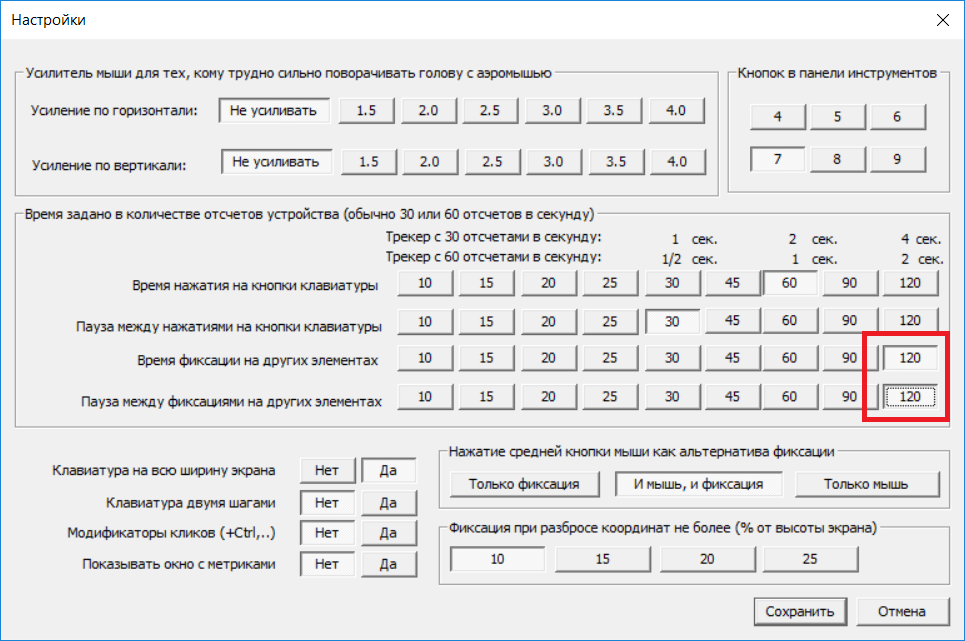
Specification 03.10.2018: In the latest version of the program, the fixation time for the table is taken from the settings and multiplied by 3, so you may not need to increase it.
We press the “Save” button and select our Aytreker, for example, Tobii (3).
If you do not have time to tick or enter the settings, and the program has started, close it and try again.
You can exit the program only by closing its window in the taskbar:
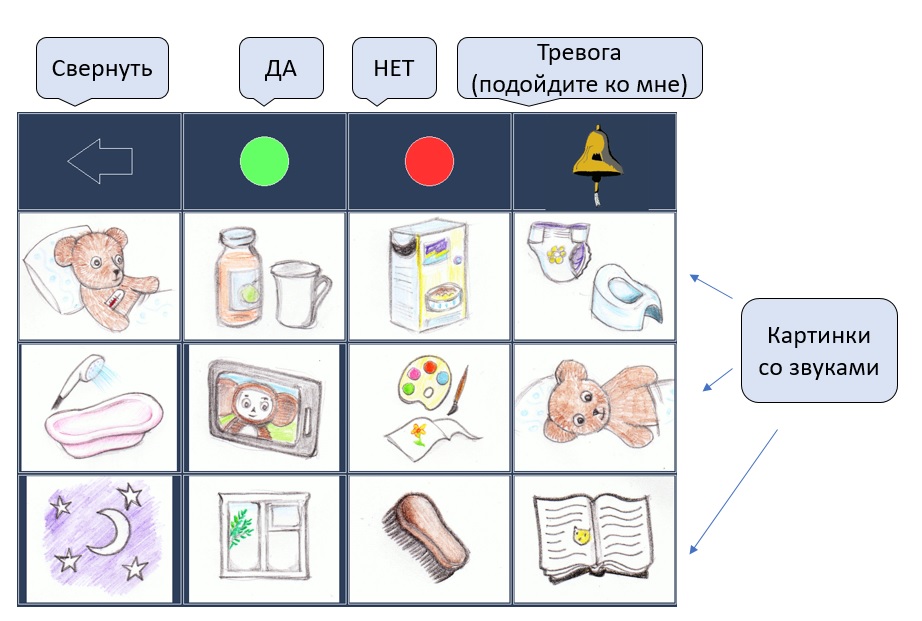
4.Use of the program
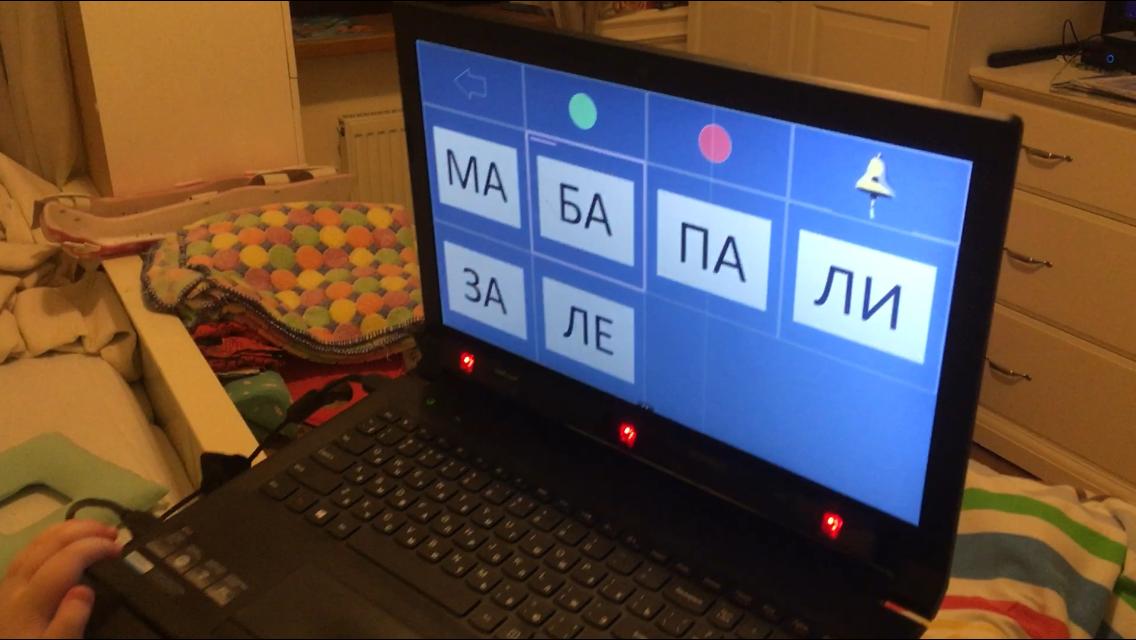
After launching it in the table mode, the program will expand the whole image like this:
Collapse this table to a single cell by looking at the left arrow (collapse). For example, to watch cartoons.
If you look at the folded table, it will again unfold on the whole screen.
If you look at the green circle, the word "Yes" will be pronounced.
Red - the word "No"
The bell is the sound of a bell.
On one of the pictures - the corresponding phrase:
| Table cell |
|---|
| 0. Stomach ache. |
| 1. To drink. |
| 2. To eat. |
| 3. How to. |
| 4. Swim. |
| 5. Watch cartoons. |
| 6. Draw. |
| 7. Turn on its side. |
| 8. Sleep |
| 9. Watch the window. |
| a.Cool forehead. |
| b.Read a fairy tale. |
As already mentioned, you can exit the program only by closing its window in the taskbar.
5. How to change table contents
You can change the contents of the table by putting your own files in the grid directory.
For pictures, these are files in BMP format. (It is advisable to save them in Microsoft Paint, otherwise the program may not read them).
For sounds, these are files in WAV format.
The first cell of the table displays the 0.BMP file and the 0.WAV sound is played.
In the second cell - 1.BMP and 1.WAV
In total at one level there can be up to 16 cells, they are numbered as follows:
0,1,2,3,4,5,6,7,8,9, A, B, D, E, F
That is, the F.BMP and F.WAV files will be attached to the 16th cell.
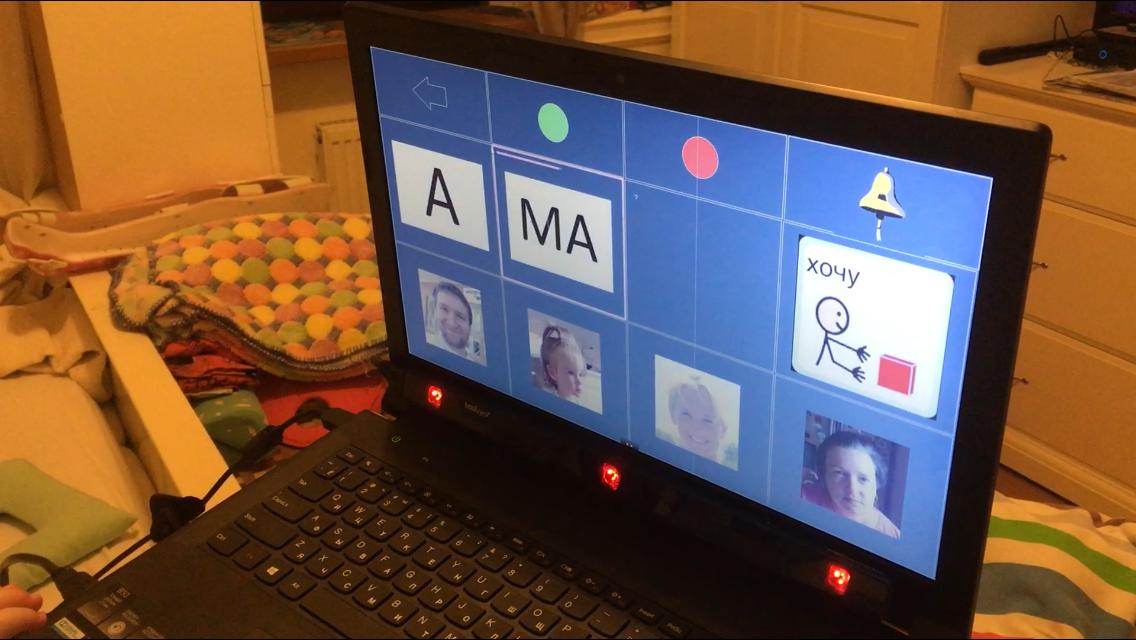
You can make additional levels of the table.
For example, when selecting the “Eat” cell, you can open a table with a choice of food.
In the second-level table, files are referred to as two-digit values.
For example, “Eating” on the first level has the number 2, and from it we get to the table with cells starting at 2: 20, 21, 22 .......
Try this:
Take the file 2.BMP and copy it to the file 20.bmp, and another file 21.bmp. Then in the graphical editor, edit the file 20.bmp so that a plate of porridge appears there. And edit the file 21.bmp so that there is an image of mashed potatoes.
Now record two sound files: 20.wav and 21.wav. In the first, write down how you pronounce the word “porridge”, and in the second, the word “mashed potatoes”.
Now restart the program, and when the child looks at the picture with the word “eat,” after pronouncing this word a new table will open with your pictures 20.bmp, and 21.bmp. And when you stop looking at these pictures - will be pronounced the words recorded in the files 20.wav and 21.wav, respectively.
There can be three levels in total, as shown below:

The next level cells add another digit to the name of the top level file:
2-to-eat, 20-porridge, 200-semolina porridge.
After adding new files to the grid directory, the program must be restarted for it to see them.
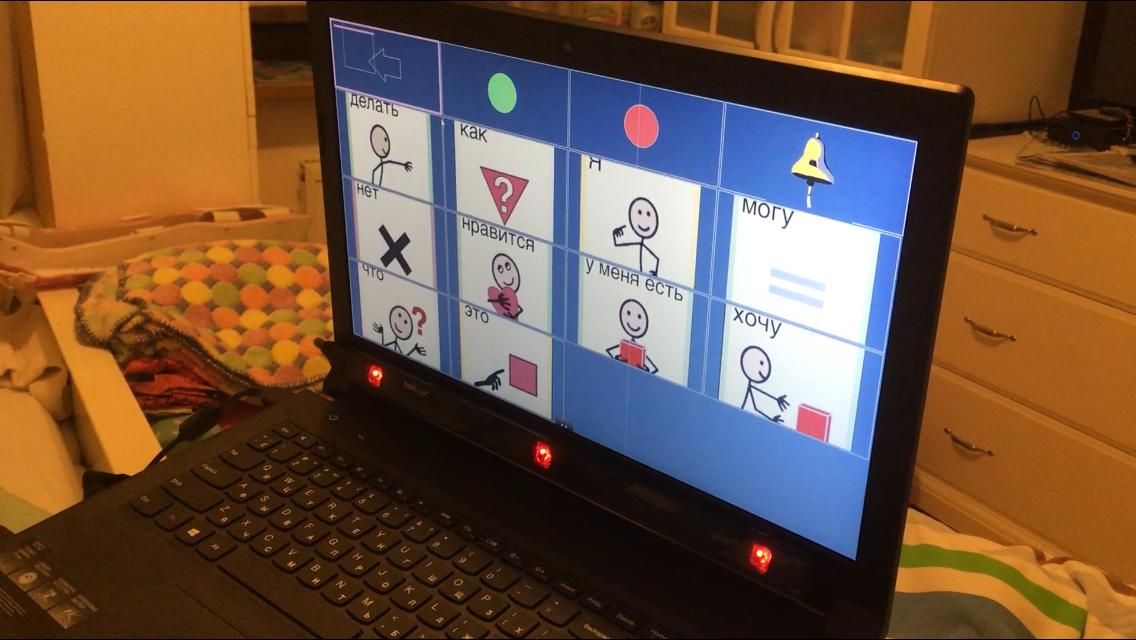
Record your sounds, create your own pictures, merge them into your own tables.
Examples of screens created by other people:
6. Calling external programs (update November 2018)
Now you can call external programs by simply adding a file with the .cmd extension and the same name as the file with the .bmp extension
For example, for the 5.bmp picture you can create the 5.cmd file, and if you look at this picture in the table, not only 5.wav sound will be played, but the 5.cmd file will also be launched .
When you call an external program, the window with the table is minimized, turning into a small box with an arrow, so that you can see the window of the running program.
7. Controlling external devices: electrical appliances, a motorized sidecar, a model on a radio control (updated in November 2018)
A separate article is devoted to this: habr.com/post/430078
Here I will just provide video clips showing how this can work:
Can one buy a ready-made system from a reputable manufacturer instead?
Sure you may. But they ask for money for software, and these programs do not work with cheap gamer aytrekery.
For example, a tracker with a basic program for $ 1,700 .
Communication Tables - Grid 3 for £ 480
Easier Tables - Snap + Core First for $ 180
Whether they work with the Russian language and keyboard - I do not know.
Greetings and thanks
I made the table mode for children to communicate with the suggestion of Alexander Makarchuk, the head of the charity fund “At the Owl” ( sova.by ) from Belarus. Alexander also helped me with requirements collection and testing. The Foundation, among other things, organizes distance education for people with disabilities with subsequent employment. Sasha, hello and success to you!
Source: https://habr.com/ru/post/423807/
All Articles