Node.js tutorial, part 3: hosting, REPL, work with console, modules
This is the third part of the translation of the Node.js guide. Today we will talk about choosing hosting for Node.js projects, how to work with Node.js in the REPL mode and how to run scripts with arguments, about interaction with the console and about modules.

The choice of hosting for Node.js applications depends on your needs. Here is a small list of hosting options that you can explore by deciding to deploy your application and make it publicly available. First, consider the simple options, the possibilities of which are limited, and then - more complex, but also have more serious features.
')
Even if your computer is assigned a dynamic IP address or you are behind NAT, you can deploy your application on it and serve user requests to it using a local tunnel.
This option is suitable for quickly organizing testing, to arrange a product demonstration, or to give an application to a very small group of people.
For the organization of local tunnels there is a very good service, ngrok , available for many platforms.
Using ngrok, just run a command like
Another tool that can be used to organize local tunnels is called localtunnel .
Glitch is an interactive environment and platform for rapid application development, which allows you to deploy them in glitch.com subdomains. This platform does not support its own user domains yet; there are some limitations when working with it, but it is great for working on application prototypes. The design of the Glitch looks pretty funny (perhaps it can be written into the advantages of this platform), but this is not some kind of “toy”, a very limited environment. Here you have the opportunity to work with Node.js, CDN, secure storage for confidential information, the ability to exchange data with GitHub and much more.
The Glitch project is run by the same company behind FogBugz and Trello (which is also one of the creators of StackOverflow). I often use this platform to demonstrate applications.
Codepen is a great platform around which an interesting community has been formed. Here you can create projects that include many files, and deploy them using your own domain.
Serverless platforms allow you to publish applications without worrying about servers at all, about setting them up or managing them. The paradigm for serverless computing is that applications are published as functions that respond to calls to the network endpoint. Such an approach to the deployment of applications is also called FAAS (Functions As A Service, function as a service).
Here are a couple of popular solutions in this area:
Both of these projects provide the developer with a certain level of abstraction that allows publishing applications on various FAAS platforms, for example, on Amazon AWS Lambda, on Microsoft Azure and on Google Cloud.
PAAS (Platform As A Service, platform as a service) are platforms that take care of many things that, under normal conditions, the developer should take care of when deploying the application.
Zeit is an interesting option for deploying applications. Deployment, when using this platform, comes down to typing the
The creators of the Nanobox platform, which includes the deployment of Node.js applications, call it PAAS V2.
Heroku is another great platform for hosting Node.js applications. Here is a good article on how to work with it.
Azure is a cloud platform from Microsoft. In its documentation there is a section dedicated to Node.js applications.
Google Cloud is a great environment for deploying Node.js applications. Here is the relevant section of its documentation.
There are many platforms that provide VPS hosting services . A common feature of such platforms is the fact that a developer gets a virtual server at his disposal, independently installs an operating system (Linux or Windows) on it, and independently develops applications.
Among the platforms that provide VPS services, of which there are a great many, we can note the following, which I used and which I could recommend to others:
From our side , we add that RUVDS also provides VPS hosting services. We are licensed by FSTEC, our clients are insured by AIG, we have four data centers in different countries. We have our own RUCLOUD data center of TIER 3 level in Korolev, Moscow region, as well as tight areas in the data centers Deltalis (Switzerland) , London Equinix LD8 (United Kingdom) , and MMTS-9 (Moscow, Russia). All germozones meet the level of reliability not lower than TIER 3.
Partners of the company are Finam JSC, BCS Financial Group, the National Settlement Depository (Moscow Exchange), VTsIOM JSC, Gars-Telecom, the Gett taxi operator, the Delivery Club delivery operator and many others.
Another hosting solution is to purchase (or rent, for example, using the Vultr Bare Metal service ) a regular server, install Linux and other software on it, connect it to the Internet and host Node.js applications on it.
Hosting is a huge topic, but we hope the materials in this section will allow you to choose exactly what you need. Now let's move on to the story about working with Node.js in the REPL mode.
The REPL abbreviation stands for Read-Evaluate-Print-Loop (the cycle “read-calculate-output”). Using REPL is a great way to quickly explore the possibilities of Node.js.
As you already know, the
If you enter the same command, but do not specify the file name, Node.js will be launched in the REPL mode:
If you try now to enter such a command in your terminal, you will see something like the result:
Node.js is now in standby mode. The system is waiting for us to enter some JavaScript code on the command line that it will execute.
First, let's try something very simple:
Here we suggested Node.js to execute the command used to output data to the console. The first value,
After the command is completed, the REPL prompt appears, which means that we can enter a new command here.
REPL is an interactive environment. If in the process of writing the code, press the
Enter in the command line the name of some standard JavaScript object, for example,
The REPL will list the properties and methods of the object with which the developer can interact:
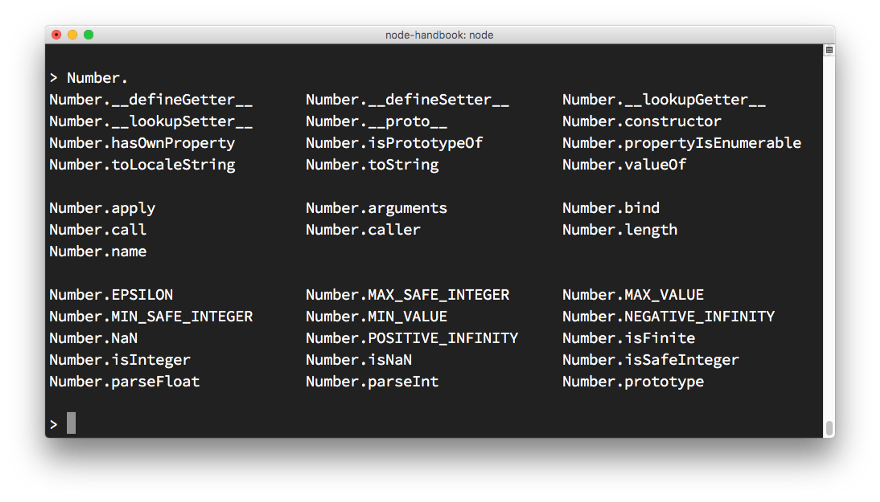
Number Object Study
To find out which Node.js global objects you can work with, enter the

Study of global objects
The variable
In REPL mode, you can use some special commands that start with a dot. Here they are:
It should be noted that the REPL recognizes the input of multi-line expressions and without using the
For example, we began to enter an iterator code:
If, after entering the curly bracket, press the
Pressing
The REPL mode is a useful Node.js feature, but its scope is limited to small experiments. We are also interested in something more than the ability to perform a couple of commands. Therefore, we proceed to working with Node.js as usual. Namely, let's talk about how Node.js scripts can take command line arguments.
When you run Node.js scripts, you can pass arguments to them. Here is the usual script call:
The arguments passed to the script can be either independent values or constructions of the key-value type. In the first case, the launch of the script looks like this:
In the second - so:
What method of passing arguments is used depends on how you can work with them in the script code.
So, in order to get access to the command-line arguments, the standard Node.js
The first element of the
The second element is the path to the script file to be executed.
All other elements of the array, starting with the third, contain what was passed to the script when it was launched.
Brute-force arguments in
If the first two arguments do not interest you, on the basis of
Suppose, when running a script, only one argument was passed to it, in the form of an independent value:
Refer to this argument as follows:
Now we will try to use the key-value type construction:
With this approach, after forming the
Now consider the output to the console.
The standard module Node.js console gives the developer a lot of opportunities to interact with the command line during program execution. In general, this is the same as the
The
After executing this sequence of instructions, both the
To form complex strings, the
For example, here is a command that displays the text
Consider the features of wildcard characters:
Here is another example of using wildcard characters:
To clear the console, use the
We will now look at a useful
The
Using this method, you can, in the following example, count apples and oranges:
Sometimes it is useful to display the function’s stack trace in the console. For example, in order to answer the question of how we got in a certain place of the program. You can do this with the following command:
Here is an example of its use:
This is what happened when I ran this code in REPL mode:
You can measure the time it takes, for example, to perform a certain function, using the methods
As we have seen, the
The
In order to color the texts output to the console, you can use escape sequences that identify colors:
If you execute this command, for example, in REPL mode, the text
This approach, however, is not particularly convenient. To display color labels in the console, it will be convenient to use a specialized library, for example - chalk . In addition to the color formatting of texts, this library also supports other ways of styling them. For example, with its help you can make the text in bold, italic or underlined font.
To install it from npm, use the following command:
You can use it like this:
Using the
To learn more about chalk, check out this library ’s page on GitHub.
The progress bar can be useful in different situations. To create progress indicators running in the console, you can use the progress package. You can install it like this:
Below is a sample code in which an indicator is created that can be used to display information about a certain task consisting of 10 steps. In our case, the execution of each step takes 100 ms. After the indicator is full, the
How to make command line applications written for the Node.js platform interactive? Starting with version 7, Node.js contains a readline module that allows you to receive data from streams that can be read, for example, from
Consider the following code snippet:
Here we ask the user for his name, and after entering the text and pressing the
The
, , , , , , —
, readline-sync , ,
, . inquirer . :
:
inquirer . , .
Node.js.
, API
, , - , . , , . , API
.
,
:
, , :
Or so:
,
Node.js-, REPL, , Node.js. npm, , ,
Dear readers! Node.js-?

[We advise to read] Other parts of the cycle
Part 1: General Information and Getting Started
Part 2: JavaScript, V8, some design tricks
Part 3: Hosting, REPL, work with the console, modules
Part 4: npm, package.json and package-lock.json files
Part 5: npm and npx
Part 6: event loop, call stack, timers
Part 7: Asynchronous Programming
Part 8: Node.js Guide, Part 8: HTTP and WebSocket Protocols
Part 9: Node.js Tutorial, Part 9: Working with the File System
Part 10: Node.js Guide, part 10: standard modules, streams, databases, NODE_ENV
Full PDF Node.js Manual
Hosting for Node.js applications
The choice of hosting for Node.js applications depends on your needs. Here is a small list of hosting options that you can explore by deciding to deploy your application and make it publicly available. First, consider the simple options, the possibilities of which are limited, and then - more complex, but also have more serious features.
')
▍The simplest hosting option: local tunnel
Even if your computer is assigned a dynamic IP address or you are behind NAT, you can deploy your application on it and serve user requests to it using a local tunnel.
This option is suitable for quickly organizing testing, to arrange a product demonstration, or to give an application to a very small group of people.
For the organization of local tunnels there is a very good service, ngrok , available for many platforms.
Using ngrok, just run a command like
ngrok PORT and the port you specified will be available from the Internet. You have at the same time, if you use the free version of the service, there will be an address in the ngrok.io domain. If you decide to make a paid subscription, you can use your own domain names, and, in addition, you can increase the security of the solution (using ngrok, you open access to your computer all over the Internet).Another tool that can be used to organize local tunnels is called localtunnel .
▍Meduals for deploying Node.js projects that do not require configuration
Glitch
Glitch is an interactive environment and platform for rapid application development, which allows you to deploy them in glitch.com subdomains. This platform does not support its own user domains yet; there are some limitations when working with it, but it is great for working on application prototypes. The design of the Glitch looks pretty funny (perhaps it can be written into the advantages of this platform), but this is not some kind of “toy”, a very limited environment. Here you have the opportunity to work with Node.js, CDN, secure storage for confidential information, the ability to exchange data with GitHub and much more.
The Glitch project is run by the same company behind FogBugz and Trello (which is also one of the creators of StackOverflow). I often use this platform to demonstrate applications.
Codepen
Codepen is a great platform around which an interesting community has been formed. Here you can create projects that include many files, and deploy them using your own domain.
▍Server environments
Serverless platforms allow you to publish applications without worrying about servers at all, about setting them up or managing them. The paradigm for serverless computing is that applications are published as functions that respond to calls to the network endpoint. Such an approach to the deployment of applications is also called FAAS (Functions As A Service, function as a service).
Here are a couple of popular solutions in this area:
- Serverless framework.
- Standard Library.
Both of these projects provide the developer with a certain level of abstraction that allows publishing applications on various FAAS platforms, for example, on Amazon AWS Lambda, on Microsoft Azure and on Google Cloud.
▍PAAS solutions
PAAS (Platform As A Service, platform as a service) are platforms that take care of many things that, under normal conditions, the developer should take care of when deploying the application.
Zeit Now
Zeit is an interesting option for deploying applications. Deployment, when using this platform, comes down to typing the
now command in the terminal. There is a free version of Zeit, there are some limitations when working with it. There is also a paid, more powerful version of this platform. Using Zeit, you can simply not think that you need a server to run your application. You simply deploy the application, and everything else is managed by this platform.Nanobox
The creators of the Nanobox platform, which includes the deployment of Node.js applications, call it PAAS V2.
Heroku
Heroku is another great platform for hosting Node.js applications. Here is a good article on how to work with it.
Microsoft Azure
Azure is a cloud platform from Microsoft. In its documentation there is a section dedicated to Node.js applications.
Google Cloud Platform
Google Cloud is a great environment for deploying Node.js applications. Here is the relevant section of its documentation.
▍VPS hosting
There are many platforms that provide VPS hosting services . A common feature of such platforms is the fact that a developer gets a virtual server at his disposal, independently installs an operating system (Linux or Windows) on it, and independently develops applications.
Among the platforms that provide VPS services, of which there are a great many, we can note the following, which I used and which I could recommend to others:
- Digital ocean
- Linode
- Amazon Web Services (in particular, I would like to mention AWS Elastic Beanstalk , which facilitates application deployment and AWS resource management).
From our side , we add that RUVDS also provides VPS hosting services. We are licensed by FSTEC, our clients are insured by AIG, we have four data centers in different countries. We have our own RUCLOUD data center of TIER 3 level in Korolev, Moscow region, as well as tight areas in the data centers Deltalis (Switzerland) , London Equinix LD8 (United Kingdom) , and MMTS-9 (Moscow, Russia). All germozones meet the level of reliability not lower than TIER 3.
Partners of the company are Finam JSC, BCS Financial Group, the National Settlement Depository (Moscow Exchange), VTsIOM JSC, Gars-Telecom, the Gett taxi operator, the Delivery Club delivery operator and many others.
▍ Normal server
Another hosting solution is to purchase (or rent, for example, using the Vultr Bare Metal service ) a regular server, install Linux and other software on it, connect it to the Internet and host Node.js applications on it.
Hosting is a huge topic, but we hope the materials in this section will allow you to choose exactly what you need. Now let's move on to the story about working with Node.js in the REPL mode.
Using Node.js in REPL Mode
The REPL abbreviation stands for Read-Evaluate-Print-Loop (the cycle “read-calculate-output”). Using REPL is a great way to quickly explore the possibilities of Node.js.
As you already know, the
node command is used to run scripts in Node.js, it looks like this: node script.js If you enter the same command, but do not specify the file name, Node.js will be launched in the REPL mode:
node If you try now to enter such a command in your terminal, you will see something like the result:
> node > Node.js is now in standby mode. The system is waiting for us to enter some JavaScript code on the command line that it will execute.
First, let's try something very simple:
> console.log('test') test undefined > Here we suggested Node.js to execute the command used to output data to the console. The first value,
test , is what the console.log('test') command console.log('test') . The second value, undefined , is what console.log() returns.After the command is completed, the REPL prompt appears, which means that we can enter a new command here.
▍Completion of commands with the Tab key
REPL is an interactive environment. If in the process of writing the code, press the
Tab key on the keyboard, the REPL will try to automatically complete the input by selecting, for example, the appropriate name of a variable already declared by you or the name of a standard object.▍ JavaScript Object Exploration
Enter in the command line the name of some standard JavaScript object, for example,
Number , add a period after it and press the Tab key.The REPL will list the properties and methods of the object with which the developer can interact:
Number Object Study
▍ Global Object Investigation
To find out which Node.js global objects you can work with, enter the
global. command in the terminal global. and press Tab .Study of global objects
▍Special variable _
The variable
_ (underscore) stores the result of the last operation performed. This variable can be used as part of commands entered into the console.▍ Commands beginning with a point
In REPL mode, you can use some special commands that start with a dot. Here they are:
- The
.helpcommand displays reference information for commands beginning with a dot. - The
.editorcommand.editorsystem into editor mode, which makes it easy to enter multi-line JavaScript code. After being in this mode, you will enter everything you want, use the commandCtrl+Dto launch the code. - The
.breakcommand allows.breakto interrupt the input of a multi-line expression. Its use is similar to the use of the keyboard shortcutCtrl+C - The
.clearcommand clears the REPL context, and also interrupts the input of a multi-line expression. - The
.loadcommand loads the code from a JavaScript file into the current session. - The
.savecommand saves to the file everything that was entered during the REPL session. - The
.exitcommand allows.exitto exit a REPL session, it acts like two successiveCtrl+Ckeystrokes.
It should be noted that the REPL recognizes the input of multi-line expressions and without using the
.editor .For example, we began to enter an iterator code:
[1, 2, 3].forEach(num => { If, after entering the curly bracket, press the
Enter key, the REPL will move to a new line, the invitation in which will look like three dots. This indicates that we can enter the code of the corresponding block. It looks like this: ... console.log(num) ... }) Pressing
Enter after entering the last bracket will execute the expression. If you enter .break in this mode, input will be aborted and the expression will not be executed.The REPL mode is a useful Node.js feature, but its scope is limited to small experiments. We are also interested in something more than the ability to perform a couple of commands. Therefore, we proceed to working with Node.js as usual. Namely, let's talk about how Node.js scripts can take command line arguments.
Working with command line arguments in Node.js scripts
When you run Node.js scripts, you can pass arguments to them. Here is the usual script call:
node app.js The arguments passed to the script can be either independent values or constructions of the key-value type. In the first case, the launch of the script looks like this:
node app.js flavio In the second - so:
node app.js name=flavio What method of passing arguments is used depends on how you can work with them in the script code.
So, in order to get access to the command-line arguments, the standard Node.js
process object is used. It has a property argv , which is an array containing, among other things, the arguments passed to the script at startup.The first element of the
argv array contains the full path to the file that is executed when the node command is entered on the command line.The second element is the path to the script file to be executed.
All other elements of the array, starting with the third, contain what was passed to the script when it was launched.
Brute-force arguments in
argv (this includes both the path to the node and the path to the executable script file) can be organized using the forEach loop: process.argv.forEach((val, index) => { console.log(`${index}: ${val}`) }) If the first two arguments do not interest you, on the basis of
argv you can form a new array, which will include everything from argv except the first two elements: const args = process.argv.slice(2) Suppose, when running a script, only one argument was passed to it, in the form of an independent value:
node app.js flavio Refer to this argument as follows:
const args = process.argv.slice(2) args[0] Now we will try to use the key-value type construction:
node app.js name=flavio With this approach, after forming the
args array, the name=flavio in args[0] will name=flavio . Before using the argument, this line must be parsed. The most convenient way to do this is to use the minimist library, which is designed to make it easier to work with command line arguments: const args = require('minimist')(process.argv.slice(2)) args['name'] //flavio Now consider the output to the console.
Outputting data to the console using the console module
The standard module Node.js console gives the developer a lot of opportunities to interact with the command line during program execution. In general, this is the same as the
console object used in browser-based JavaScript. Perhaps the simplest and most widely used method of the console module is console.log() , which is used to output the string data transmitted to it to the console. At the same time, if you pass an object to it, then it will be converted to its string representation before output.The
console.log() method can pass multiple values: const x = 'x' const y = 'y' console.log(x, y) After executing this sequence of instructions, both the
x value and the y value will be included in the console.To form complex strings, the
console.log() command supports the use of wildcard characters, which, when outputting data, are replaced with their corresponding values in the order of precedence.For example, here is a command that displays the text
My cat has 2 years : console.log('My %s has %d years', 'cat', 2) Consider the features of wildcard characters:
%sformats the value as a string.%dor%iformat the value as an integer.%fformats the value as a floating point number.%Oused to display string representations of objects.
Here is another example of using wildcard characters:
console.log('%O', Number) Cleaning console
To clear the console, use the
console.clear() command (its behavior in different terminals may vary).▍Counting of elements
We will now look at a useful
console.count() method. Take a look at this code: const x = 1 const y = 2 const z = 3 console.count( 'The value of x is ' + x + ' and has been checked .. how many times?' ) console.count( 'The value of x is ' + x + ' and has been checked .. how many times?' ) console.count( 'The value of y is ' + y + ' and has been checked .. how many times?' ) The
count() method counts the number of line breaks and displays the result next to them.Using this method, you can, in the following example, count apples and oranges:
const oranges = ['orange', 'orange'] const apples = ['just one apple'] oranges.forEach(fruit => { console.count(fruit) }) apples.forEach(fruit => { console.count(fruit) }) ▍Delete to the stack trace results console
Sometimes it is useful to display the function’s stack trace in the console. For example, in order to answer the question of how we got in a certain place of the program. You can do this with the following command:
console.trace() Here is an example of its use:
const function2 = () => console.trace() const function1 = () => function2() function1() This is what happened when I ran this code in REPL mode:
Trace at function2 (repl:1:33) at function1 (repl:1:25) at repl:1:1 at ContextifyScript.Script.runInThisContext (vm.js:44:33) at REPLServer.defaultEval (repl.js:239:29) at bound (domain.js:301:14) at REPLServer.runBound [as eval] (domain.js:314:12) at REPLServer.onLine (repl.js:440:10) at emitOne (events.js:120:20) at REPLServer.emit (events.js:210:7) ▍ Measuring the time spent on performing some action
You can measure the time it takes, for example, to perform a certain function, using the methods
console.time() and console.timeEnd() . It looks like this: const doSomething = () => console.log('test') const measureDoingSomething = () => { console.time('doSomething()') // , doSomething() console.timeEnd('doSomething()') } measureDoingSomething() ▍Work with stdout and stderr
As we have seen, the
console.log() command is great for displaying messages to the console. It uses the so-called standard output stream, or stdout .The
console.error() command outputs data to the standard error stream, stderr . Data sent to stderr , get into the console, although what is displayed in this stream, you can, for example, redirect to the error log file.▍ Using color when outputting data to the console
In order to color the texts output to the console, you can use escape sequences that identify colors:
console.log('\x1b[33m%s\x1b[0m', 'hi!') If you execute this command, for example, in REPL mode, the text
hi will be displayed in yellow.This approach, however, is not particularly convenient. To display color labels in the console, it will be convenient to use a specialized library, for example - chalk . In addition to the color formatting of texts, this library also supports other ways of styling them. For example, with its help you can make the text in bold, italic or underlined font.
To install it from npm, use the following command:
npm install chalk You can use it like this:
const chalk = require('chalk') console.log(chalk.yellow('hi!')) Using the
chalk.yellow() command is much more convenient than escape sequences, and the program text is much easier to read with this approach.To learn more about chalk, check out this library ’s page on GitHub.
▍Create an operation progress indicator
The progress bar can be useful in different situations. To create progress indicators running in the console, you can use the progress package. You can install it like this:
npm install progress Below is a sample code in which an indicator is created that can be used to display information about a certain task consisting of 10 steps. In our case, the execution of each step takes 100 ms. After the indicator is full, the
clearItnerval() command is clearItnerval() and the program ends. const ProgressBar = require('progress') const bar = new ProgressBar(':bar', { total: 10 }) const timer = setInterval(() => { bar.tick() if (bar.complete) { clearInterval(timer) } }, 100) ▍ Receive user input from the command line
How to make command line applications written for the Node.js platform interactive? Starting with version 7, Node.js contains a readline module that allows you to receive data from streams that can be read, for example, from
process.stdin . This thread, during the execution of the Node.js program, is what is entered into the terminal. Data is entered one line at a time.Consider the following code snippet:
const readline = require('readline').createInterface({ input: process.stdin, output: process.stdout }) readline.question(`What's your name?`, (name) => { console.log(`Hi ${name}!`) readline.close() }) Here we ask the user for his name, and after entering the text and pressing the
Enter key on the keyboard, we display a greeting.The
question() method displays what is passed to it as the first parameter (that is, the question asked to the user) and waits for input to complete. After clicking on Enter it calls the callback passed to it in the second parameter and processes what was entered. In the same callback, we close the readline interface.readline , , ., , , , , , —
* ., readline-sync , ,
readline , ., . inquirer . :
npm install inquirer :
const inquirer = require('inquirer') var questions = [{ type: 'input', name: 'name', message: "What's your name?", }] inquirer.prompt(questions).then(answers => { console.log(`Hi ${answers['name']}!`) }) inquirer . , .
Node.js.
readline , readline-sync inquirer. , , .Node.js, exports
, API
module.exports , . Node.js , . , require , : const library = require('./library') library.js , , , ., , - , . , , . , API
module.exports , ..
module.exports , , . : const car = { brand: 'Ford', model: 'Fiesta' } module.exports = car //.. const car = require('./car') ,
exports . , , — : const car = { brand: 'Ford', model: 'Fiesta' } exports.car = car :
exports.car = { brand: 'Ford', model: 'Fiesta' } , , :
const items = require('./items') items.car Or so:
const car = require('./items').car module.exports exports ?,
module.exports . .Node.js-, REPL, , Node.js. npm, , ,
package.json package-lock.json .Dear readers! Node.js-?
Source: https://habr.com/ru/post/423701/
All Articles