We save on RAID-controller, or how to feed
 In our century of cloud services, AWS Lambda and other
 TL; DR> combining, balancing, rr limit, that's it.
Actually, the text further is not about the fact that it is generally possible or some kind of know-how. The Internet is full of articles for dummies (here we tick, then Next, Next, Done) on how to submit iSCSI disk capacity. I am writing just to eliminate the “mistakes of the survivors” and share moments when “everything goes wrong” (and it goes, Murphy was right), and when you try to load the solution, it just falls.
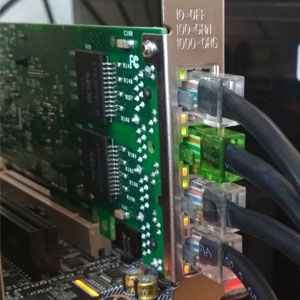
So, we will try to extinguish our “home hypervisor” with an external disk array connected via the network. Since everything revolves around us “cheaply”, let it be FreeNAS and 4 SATA-disks, which are serviced by the average 3 GHz 45-nm percent. We look at Ebay, and for money comparable to a used RAID controller, we are dragging a pair of i350-T4 network cards from there. These are Intel's four-port gigabit adapters. According to them, we will associate the storage with the hypervisor.
')
Count a little bit. The average data transfer rate of an average SATA disk is 160-180 MB / s with an interface width of 6 Gbit / s. In fact, the actual data transfer rate from the HDD does not exceed 2 Gb / s. This is not such a big number, considering that we are planning to use 4 gigabit ports on the connection (how exactly to turn 4x1 Gbit into 4 Gbit - we will discuss further). Everything is much worse with random access speeds - here everything falls almost to the level of diskettes.
Considering that the disk load profile of many guest OSes is far from linear, I would like to see more cheerful figures. To correct the situation in the hypervisor file system (VMFS v6), the block size is 1 MB, which contributes to the consolidation of many random operations and speeds up access to data on virtual disks. But even with this, a single physical disk will not be enough to handle I / O operations from all the "guests".
Immediately make a reservation - everything further makes sense if you have more than two adapters for a “network of storage”. ESXi with a free single-processor license can connect, in addition to local drives, to two types of storages - NFS and iSCSI. NFS assumes file-level access and is also good in its own way. On it, you can deploy guests, undemanding to disk performance. Backing them up is a pleasure, because You can open the same NFS ball somewhere else and copy snapshots vm. In general, with one network interface (if it’s not 10GE, of course) - NFS is your choice.
ISCSI has several advantages over NFS. In order to realize them fully, we have already prepared ourselves - laying 4 gigabit ports for the storage network. How does network bandwidth typically expand at a known interface speed? That's right, aggregation. But for the complete utilization of the aggregated channel, a number of conditions are needed, and this is more suitable for the communication of switches between themselves or for the network hyperlink of the hypervisor. The implementation of the iSCSI protocol provides for such a function as multipathing (literally, many ways) - the ability to connect the same volume through different network interfaces. Of course, there is some load balancing, although the main purpose is the fault tolerance of the storage network. (To be fair, NFSv4.1 supports session trunking based on the ultimate magic like RDMA and MPTCP, but this is an attempt to shift the problems of file access
So, for the beginning we will publish our target. We believe that FreeNAS is installed, the IP-address of the management regularly ships us the web-interface, we cut the array and zvol on it in full accordance with our inner convictions. In our case, these are 4 x 500GB disks, combined in raidz1 (which gives only 1.3 TiB of effective capacity), and zvol is 1 TB in size exactly. Let's configure the i350 network interfaces, for simplicity we assume that everyone will belong to different subnets.

Then we configure the iSCSI-ball using the “Next, Next, Done” method. When setting up the portal, do not forget to add there all the network interfaces allocated for iSCSI. It should look something like the pictures.


A little more attention will need to be paid to setting the extent — when presenting a volume, it is necessary to force the block size to 512 bytes. Without this, the ESXi initiator refused to recognize the presented volumes at all. For fidelity, it is better to disable the forwarding of the sizes of the nat block (which is not on the zvol and can not be) and enable Xen support mode.
With FreeNAS, for now.
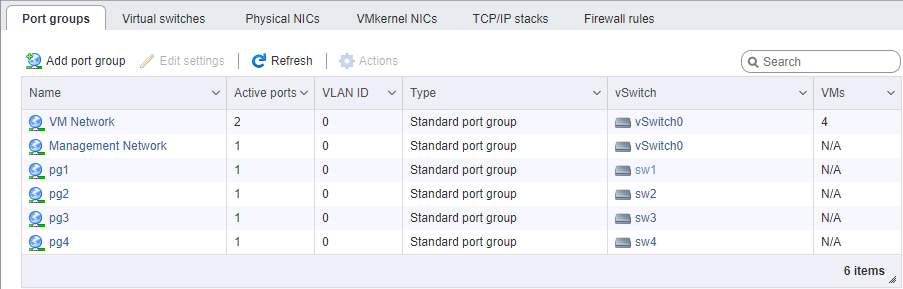
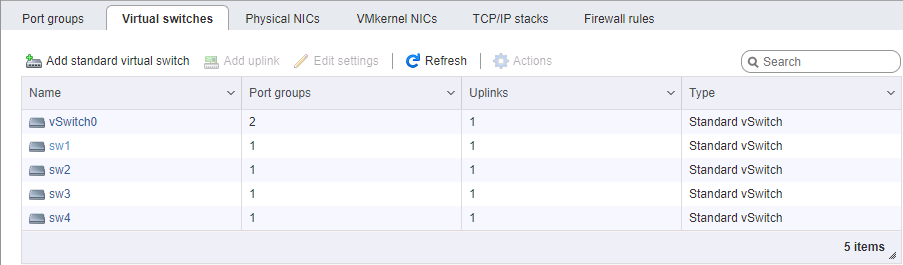
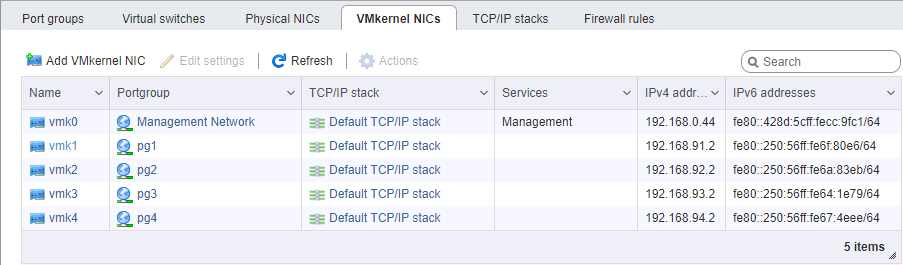
On the ESXi side, it's a bit more complicated with network configuration. Again, we assume that the hypervisor itself is installed and is also controlled by a separate port. You will need to allocate 4 VM Kernel interfaces belonging to 4m different port-groups in 4 different virtual switches. Each of these switches is allocated its own physical port of uplink. We take vmk addresses, of course, in the corresponding subnets, in the same way as configuring the storage ports. The procedure for setting addresses is generally important - either we connect port-to-port cards without a switch, or we give different links to different networks (well, this is an adult), therefore the physical correspondence of the ports matters.
When setting up a network for iSCSI, we pay special attention to the MTU parameter. This is exactly the case when “size matters” - we take the maximum that allows all components of the network to be installed. If the cards are directly connected, you can specify mtu 9000 on both sides, on ESXi and FreeNAS. However, normal switches will support this value. We ping, we see that our network is normal, and the packets of the required size pass. Fine. We set fire to the initiator.
Turn on iSCSI, add IP addresses to the dynamic configuration section (Storage -> Adapters -> Configure iSCSI -> Dynamic targets). After saving, the iSCSI portals will be polled at these addresses, the initiator will determine that the same volume is behind each of them, and connect to it at all available addresses (that same multipath). Next we need to create a datastore on the device that appears.
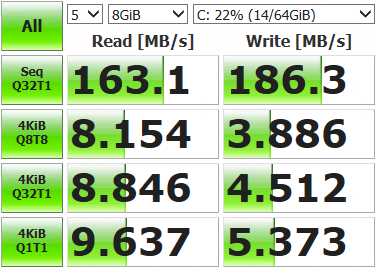
After that, you can roll out a virtual machine and measure what we did.

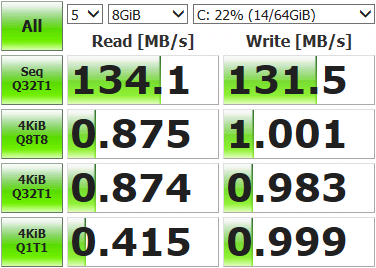
Not so impressive results. Open the storage console, display the current network status and run tests.
root@freenas:~ # systat -ifstatWhat we see?
/0 /1 /2 /3 /4 /5 /6 /7 /8 /9 /10 Load Average Interface Traffic Peak Total lo0 in 0.319 KB/s 0.893 KB/s 3.041 MB out 0.319 KB/s 0.893 KB/s 3.041 MB alc0 in 0.478 KB/s 1.233 KB/s 3.934 MB out 0.412 KB/s 1.083 KB/s 2.207 MB igb3 in 0.046 KB/s 0.105 KB/s 181.434 KB out 0.073 KB/s 0.196 KB/s 578.396 KB igb2 in 0.046 KB/s 0.105 KB/s 120.963 KB out 0.096 KB/s 0.174 KB/s 517.221 KB igb1 in 4.964 MB/s 121.255 MB/s 10.837 GB out 6.426 MB/s 120.881 MB/s 3.003 GB igb0 in 0.046 KB/s 0.105 KB/s 139.123 KB out 0.073 KB/s 0.210 KB/s 869.938 KB Only one of the four network ports (igb1) was utilized. This happens because the balancing mechanism provided by default for multipath selects the same adapter with each data packet. We need to use everything.
Connect to the hypervisor via SSH and command.
First, let's look at the id of the moon with multipath, and how it works:
[root@localhost:~] esxcfg-mpath -b
naa.6589cfc000000b478db42ca922bb9308 : FreeNAS iSCSI Disk (naa.6589cfc000000b478db42ca922bb9308)

[root@localhost:~] esxcli storage nmp device list -d naa.6589cfc000000b478db42ca922bb9308 | grep PSP
Path Selection Policy: VMW_PSP_MRU
The path selection policy is MRU, I mean most recently used. All data goes to the same port, re-selecting the path occurs only when the network connection is unavailable. Change to round-robin, in which all interfaces change in turn after some number of operations:
[root@localhost:~] esxcli storage nmp device set -d naa.6589cfc000000b478db42ca922bb9308 -P VMW_PSP_RRReboot ESXi, open monitoring, run tests. We see that the load is distributed evenly across the network adapters (at a minimum, peak values, too much), the test results are also more fun.
Interface Peak igb3 in 43.233 MB/s out 46.170 MB/s igb2 in 42.806 MB/s out 45.773 MB/s igb1 in 43.495 MB/s out 45.489 MB/s igb0 in 43.208 MB/s out 46.079 MB/s There are some deviations in the ports, this is due to the limits of the Path Selection Policy - the number of operations or bytes, after which the switch to another port occurs. The default is 1000 IOPS, that is, if the data exchange went within 999 operations, it will go through one network port. You can change, compare and select the appropriate value. You can not change, the default is enough for most tasks.
We make measurements, we test, we work. The results obtained significantly exceed the capabilities of a single disk, so now our virtual machines can not be pushed by elbows on I / O operations. The resulting speeds and the fault tolerance of the array will depend on the hardware and how the volume is configured.
Source: https://habr.com/ru/post/423513/
All Articles