How to make the moon rover
If you didn't have a bike as a child, and now you have a Bentley,
you still didn't have a bicycle as a child.
It so happened that in my childhood there was no moonwalker . And then there was a child born. In general, I thought, and decided to make a toy for both of us.
I didn’t want to create an exact copy, and I don’t know how to print cases at home, so I decided to limit myself to recreating similar functionality. In addition, it seemed to me inhumane to introduce a “program” of movement from memory and did not understand what exactly I managed to enter, so I added a display.
')
At hand was an inexpensive chassis with Ebay and Arduino Uno.
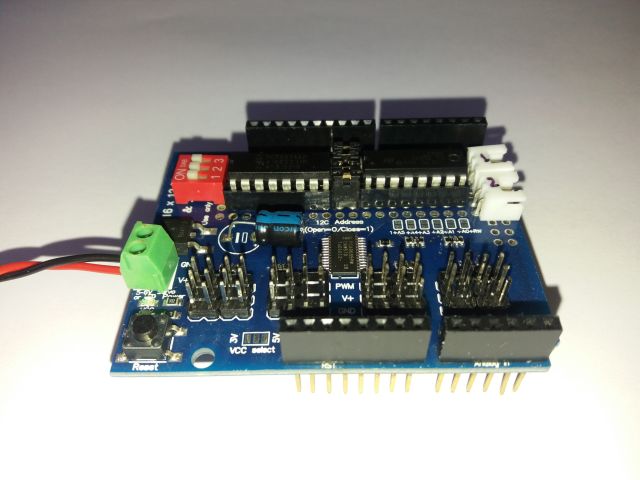
To control the motors, I took the PWM Servo Shield and soldered the L293D + PCF8574 on the breadboard:
For reading from the keyboard, took PCF8574 and a handful of diodes:
The keyboard itself is made of a printed circuit board:
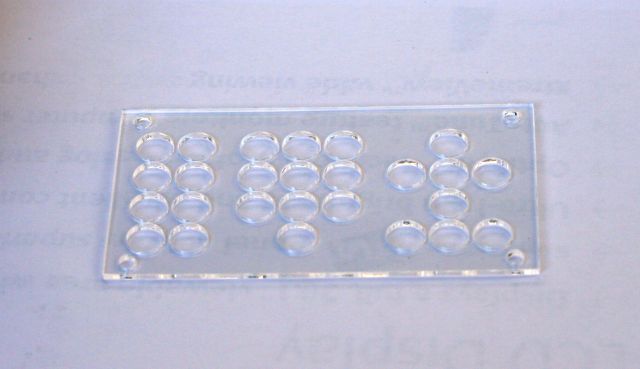
So that the keyboard does not fall apart in the hands, secured the pad on top. It had to be ordered from the “millers” :)
To display the program using a conventional display of 20 to 4 characters. Yes, also through PCF8574;)
At first, I used 4 batteries for power, but they sat down too quickly, and I replaced them with a pair of 18650 batteries:
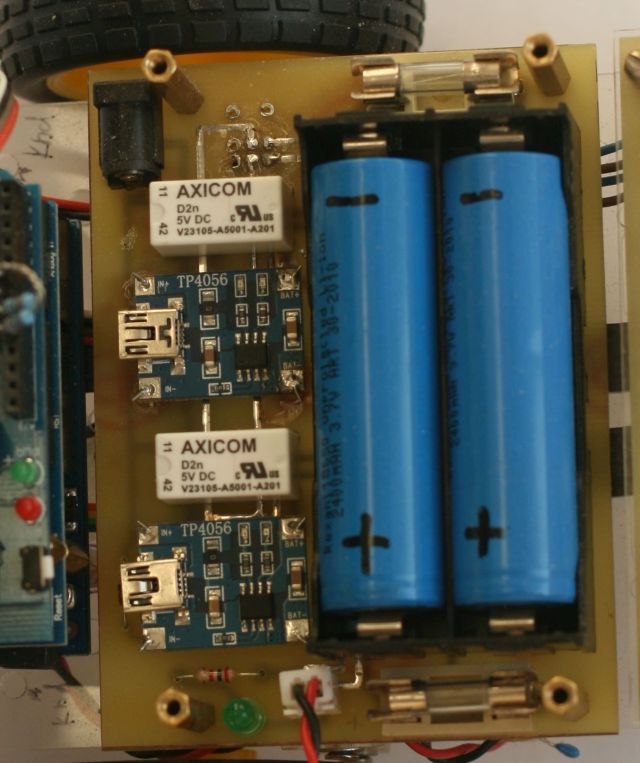
For charging, I used TP4056 modules, which I connected via relays to batteries, although not very successfully.
The fastest way was to write the firmware. Unfortunately, it turned out that the I2C LCD library has a GPL license, and the code went to the trash. It was around this time that I realized that the Arduino Uno is not the best option, and that the handful of PCF8574 is very inconvenient to solder.
And I decided to start over.
I took into account previous experience, which suggested that there are several problems:
As a result, bought:
Besides:
Achtung! Warning! Attention! These links are provided solely for the purpose of illustrating and simplifying further search for parts. I can not guarantee that the seller will not suddenly change the lot for some other one, will not change the price, quantity, etc.
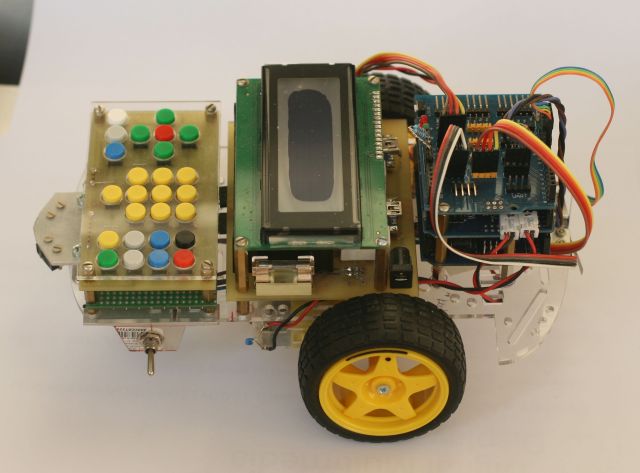
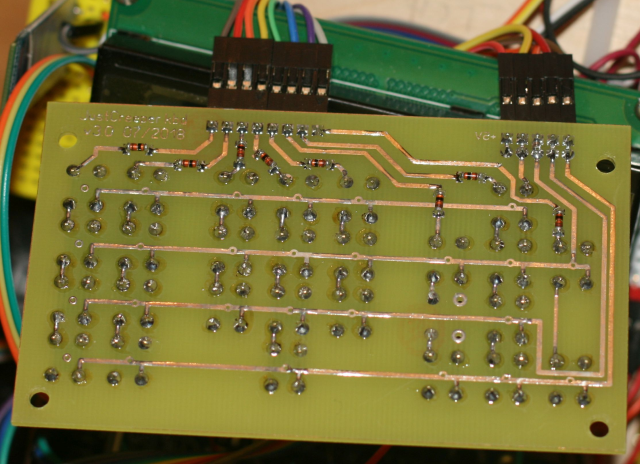
I transferred the keyboard to the printed circuit board (perhaps this is the only element difficult to repeat). Overlay on the keyboard I milled to order.
There was a question: from what to make the chassis? Plastic was not suitable, the metal is difficult to handle ... And if you take plywood? “But this is not aesthetic!”, I thought. But when after half an hour I got a normal chassis, I changed my mind. The chassis was not very presentable and went to the basket, but I liked the processing speed so much that I decided to continue using plywood.
True, I began to cut the second sheet only after I drew a rough plan:
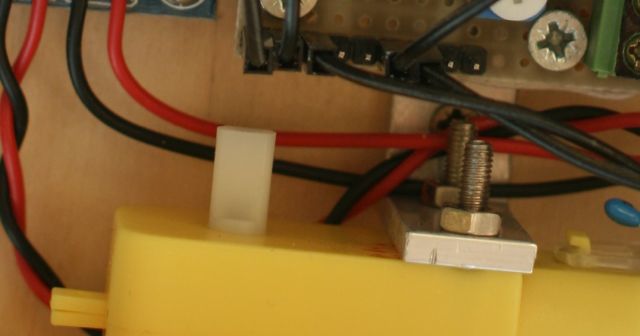
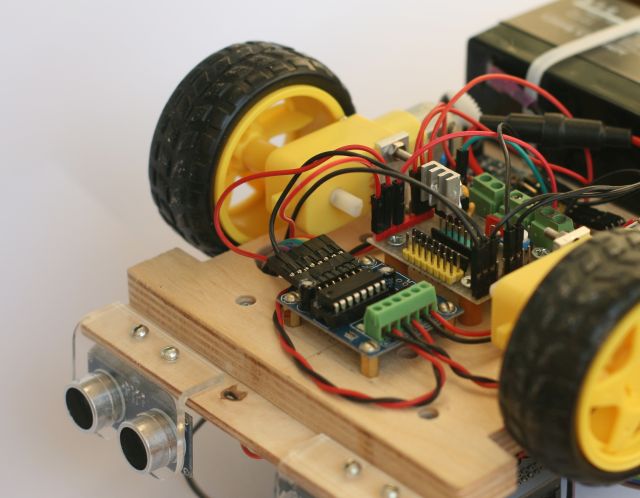
To mount the motors cut off a piece of aluminum corner and drilled:
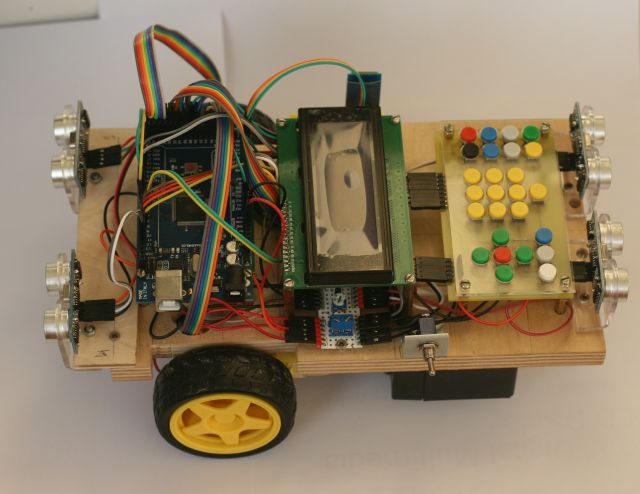
I fixed the boards on the hex posts and connected them with each other by loops.
(here you can see a stabilizer on 5V and some power contacts).
The power wires turned out to be a bit much, so I made a power board from the stripboard (see details here ). I suspect that you can take an ordinary sensor shield, which has excess power outlets.

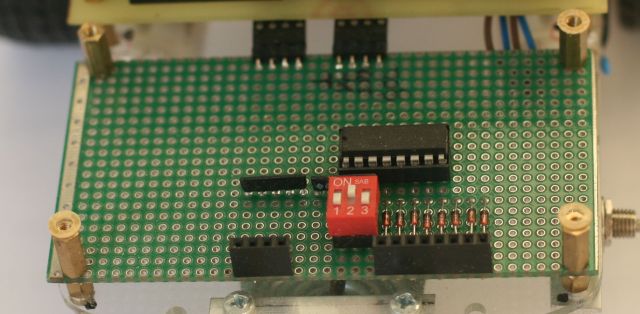
Since there were no more I / O extenders, the keyboard had to be redone ( source ). I transferred to it diodes and pull-up resistors:

As a speed sensor, I used a slit optocoupler and gear (I painted it with a permanent marker):
The ball was used as the third wheel:
Initially, there was a support in the form of a wheel on the yoke, which came along with the chassis. However, when the direction of movement changed, the wheel began to turn at the most unexpected moment and the cart was thrown to the side.
It is best to see the files consts.h and lcd.ino, they contain the most relevant information. Connections, as they are now, look like this:
The picture is clickable.
The firmware , in essence, is an ordinary program written in the Arduino IDE. There are two modes of operation: editing and execution. In the editing process from the keyboard, the command + number of repetitions is accepted. All this is packaged in a 16-bit value and added to an array in RAM. When executing a program from an array, values are retrieved and executed. Performing one step (in a very simplified form) looks like this:
The path traveled is determined by the number of pulses from the optocoupler, which is checked in the timer interrupt.
The only exception is sound playback. If the “shot” command is encountered, the simplest
Unfortunately, the real world is somewhat different from the software model for which the firmware is designed, so I added a number of delays that allow us to take into account the chassis inertia.
I deliberately put the MIT license. In my understanding, the firmware with such a license can be freely used as you like, without the need to publish further changes (I don’t want to force anyone).
The keyboard is slightly different from the "classic" Lunokhod:
Once again with a sign:
The program is entered by pressing the "Command" and "Digit". Then click the green "Run" and look at the result. Deletion occurs by pressing the red button, but not immediately: you must confirm your decision by pressing the green “Start” button. When you turn off the power, the program is deleted.
The “Repeat” command contains one parameter: how many steps need to be repeated [once]. Example: Fwd1, Pause1, Bwd1, Loop3; as a result, the commands Fwd1, Pause1, Bwd1 will be executed twice. The first time is because they are in the program, the second time is because it is indicated in the “Cycle” command.
In any case, battery charge is controlled. If it is too small, a warning is displayed and the toy does not travel.
It’s hard to keep the whole program in my head, so I screwed up the simplest indicator, on which the information entered is duplicated.
After launch, the prompt is displayed:
When you enter a command in the upper left corner, the command icon and the number of repetitions are displayed:
If more than one command is entered, there will be a list below (in fact, a program), and the input command will still be displayed above:
The toy was created from what was on hand or easy to get. Separately, I want to say about Arduino. It is selected for several reasons:
Chassis With a sharp start, the wheels “grind” and the toy loses its course. You can try to make a six-wheeled chassis, or even tracked (on Aliexpress is, but I have not tried it yet).
GUI . Now the indicator displays only the minimum amount of information, and this is done in the simplest way.
Code Pulitzer I definitely will not get.
Sound There are cheap and very small mp3 players. You can safely throw out the R-2R DAC and replace it with a ready-made player.
Backup buttons . You can record the finished program in the EEPROM, so that it does not get lost when you turn off the power. The implementation can be like in the radio: with a long press the program is saved, with a short - run.
Button out . Currently not implemented. You can screw something like relay / servy to one of the Arduino pins.
I like movies with Jackie Chan, because in the end there is a cut of unsuccessful doubles. I have not done without them either. What surprised me the most was the fact that a round drill with two grooves gives a triangular hole;)
you still didn't have a bicycle as a child.
It so happened that in my childhood there was no moonwalker . And then there was a child born. In general, I thought, and decided to make a toy for both of us.
I didn’t want to create an exact copy, and I don’t know how to print cases at home, so I decided to limit myself to recreating similar functionality. In addition, it seemed to me inhumane to introduce a “program” of movement from memory and did not understand what exactly I managed to enter, so I added a display.
')
Version 1
At hand was an inexpensive chassis with Ebay and Arduino Uno.
To control the motors, I took the PWM Servo Shield and soldered the L293D + PCF8574 on the breadboard:
For reading from the keyboard, took PCF8574 and a handful of diodes:
The keyboard itself is made of a printed circuit board:
So that the keyboard does not fall apart in the hands, secured the pad on top. It had to be ordered from the “millers” :)
To display the program using a conventional display of 20 to 4 characters. Yes, also through PCF8574;)
At first, I used 4 batteries for power, but they sat down too quickly, and I replaced them with a pair of 18650 batteries:
For charging, I used TP4056 modules, which I connected via relays to batteries, although not very successfully.
The fastest way was to write the firmware. Unfortunately, it turned out that the I2C LCD library has a GPL license, and the code went to the trash. It was around this time that I realized that the Arduino Uno is not the best option, and that the handful of PCF8574 is very inconvenient to solder.
And I decided to start over.
Version 2
I took into account previous experience, which suggested that there are several problems:
- The chassis with Ebay is made of plexiglass and very (!) Fragile (I pulled the gearbox mounting screw and the mount just broke).
- On the chassis a lot of mounting holes, but not one suitable.
- Gearboxes 1:48 come with the chassis, but they are too nimble.
- In general, the chassis is not enough.
- The Arduino Uno has few legs.
- There is no sound module (and it is needed for the “fire” command).
- They write horror stories about Li-ion on the Internet, I don’t want to give a child a potentially dangerous device.
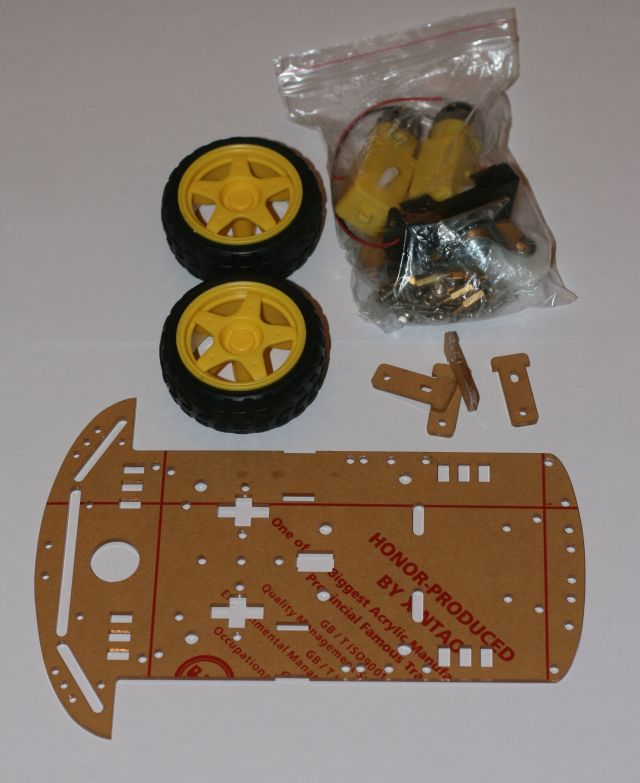
As a result, bought:
- Gearboxes 1: 120.
- Motors with two shafts (in the hope of installing a PID controller later).
- Module L293.
- Arduino Mega.
- Lots of color plumes!
- Lead-acid battery on 6V (it does not sit down so quickly, gives more current, and it is heavy - the wheels are less “polished”).
- Ultrasonic sensors as obstacle sensors.
- The third wheel in the form of a ball.
- Clock buttons.
- Button pusher.
- Slot sensor
Besides:
- The LCD 2004 (5V) display remained on version 1.
- Soldered the R-2R DAC on the circuit board ( here is a circuit in KiCAD and a 3D model).
Achtung! Warning! Attention! These links are provided solely for the purpose of illustrating and simplifying further search for parts. I can not guarantee that the seller will not suddenly change the lot for some other one, will not change the price, quantity, etc.
Iron
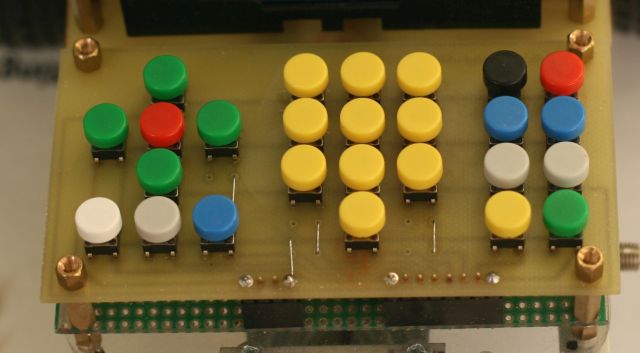
I transferred the keyboard to the printed circuit board (perhaps this is the only element difficult to repeat). Overlay on the keyboard I milled to order.
There was a question: from what to make the chassis? Plastic was not suitable, the metal is difficult to handle ... And if you take plywood? “But this is not aesthetic!”, I thought. But when after half an hour I got a normal chassis, I changed my mind. The chassis was not very presentable and went to the basket, but I liked the processing speed so much that I decided to continue using plywood.
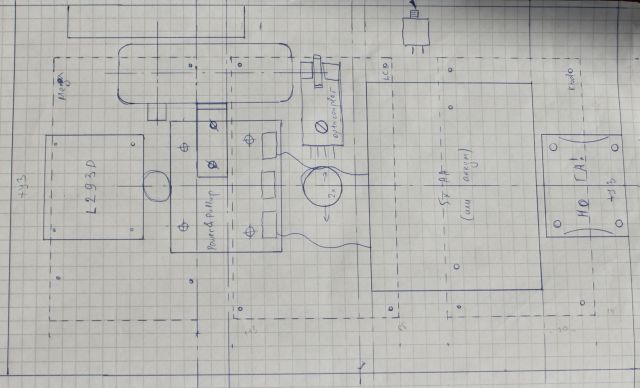
True, I began to cut the second sheet only after I drew a rough plan:
To mount the motors cut off a piece of aluminum corner and drilled:
I fixed the boards on the hex posts and connected them with each other by loops.
(here you can see a stabilizer on 5V and some power contacts).
The power wires turned out to be a bit much, so I made a power board from the stripboard (see details here ). I suspect that you can take an ordinary sensor shield, which has excess power outlets.
Since there were no more I / O extenders, the keyboard had to be redone ( source ). I transferred to it diodes and pull-up resistors:
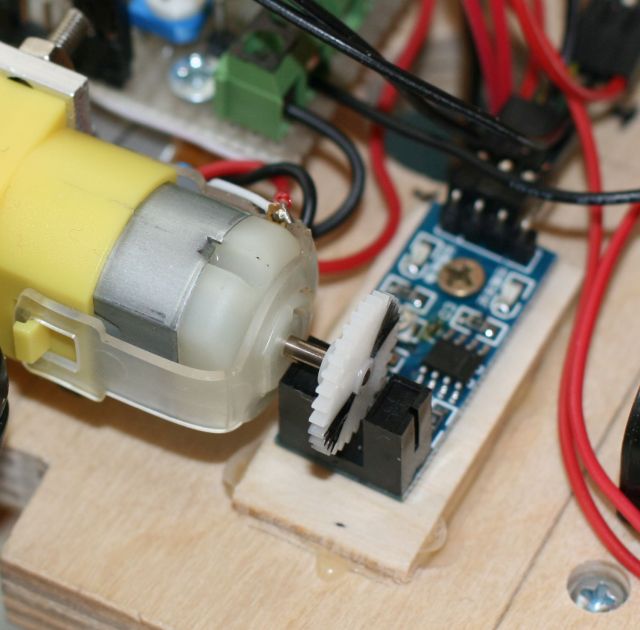
As a speed sensor, I used a slit optocoupler and gear (I painted it with a permanent marker):
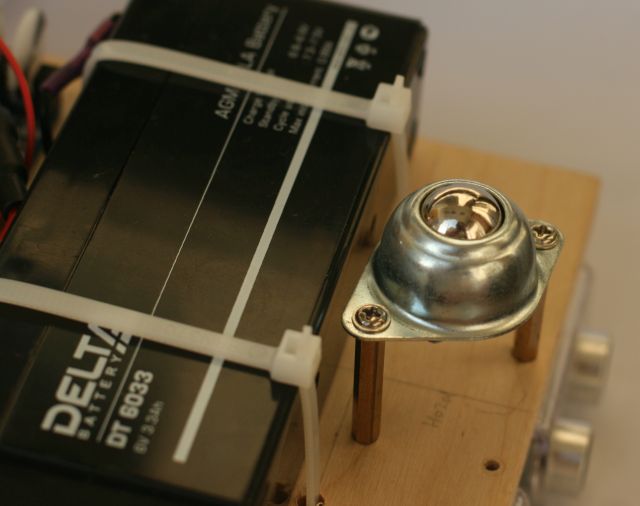
The ball was used as the third wheel:
Initially, there was a support in the form of a wheel on the yoke, which came along with the chassis. However, when the direction of movement changed, the wheel began to turn at the most unexpected moment and the cart was thrown to the side.
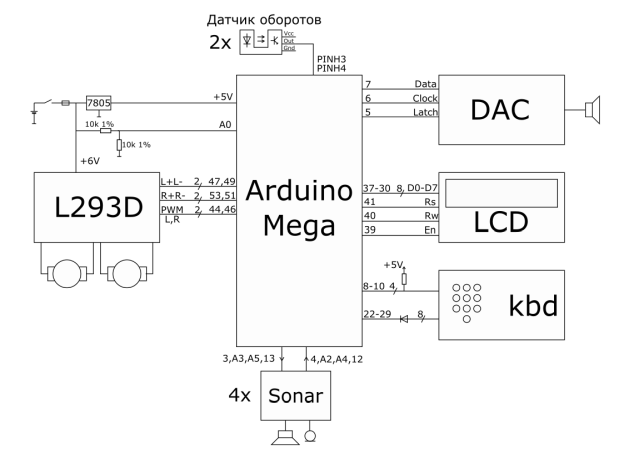
Connection diagram
It is best to see the files consts.h and lcd.ino, they contain the most relevant information. Connections, as they are now, look like this:
The picture is clickable.
Firmware
The firmware , in essence, is an ordinary program written in the Arduino IDE. There are two modes of operation: editing and execution. In the editing process from the keyboard, the command + number of repetitions is accepted. All this is packaged in a 16-bit value and added to an array in RAM. When executing a program from an array, values are retrieved and executed. Performing one step (in a very simplified form) looks like this:
( ) ( >= ), = *
( ) ( >= ), = *
The path traveled is determined by the number of pulses from the optocoupler, which is checked in the timer interrupt.
The only exception is sound playback. If the “shot” command is encountered, the simplest
for loop is started, which extracts values from the wav file (it is flashed in the same flash memory as the program) and outputs them to the R-2R DAC. When the values end, it returns to the normal program execution process.Unfortunately, the real world is somewhat different from the software model for which the firmware is designed, so I added a number of delays that allow us to take into account the chassis inertia.
I deliberately put the MIT license. In my understanding, the firmware with such a license can be freely used as you like, without the need to publish further changes (I don’t want to force anyone).
Manual ;)
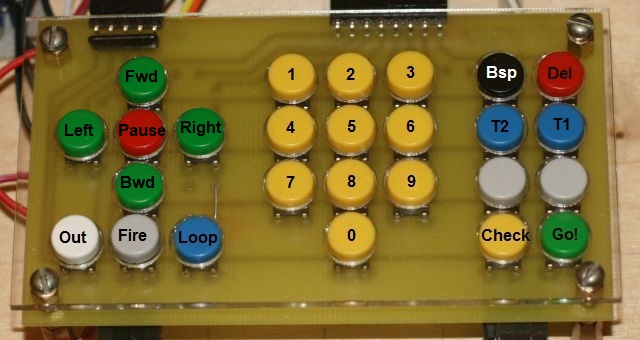
The keyboard is slightly different from the "classic" Lunokhod:
- On the left is a block of commands (green - where to go, red - pause, below - Out, fire, repeat).
- In the middle - the numbers with the number of repetitions.
- On the right there are 8 control keys (black - remove the last command, red - remove everything, green - start, yellow - start the last command, blue - test, gray - spare).
Once again with a sign:
| On the picture | Transfer | Meaning |
| Fwd | Go forward | |
| Bwd | Go back | |
| Left | Turn left | |
| Right | Turn right | |
| Pause | To freeze | |
| Out | Not implemented, left for future | Did as in Lunokhod |
| Fire | the fire | Makes a sound "pi!" |
| Loop | Cycle | Repeat several previous commands once |
| 0-9 | Number of steps | Maximum 20 |
| Bsp | Delete the last command | |
| Del | Delete the whole program | Confirmation with the Go! Button is required. |
| T1, T2 | Test | Run the test program |
| Check | Perform the last step | |
| Go! | Perform all steps |
The program is entered by pressing the "Command" and "Digit". Then click the green "Run" and look at the result. Deletion occurs by pressing the red button, but not immediately: you must confirm your decision by pressing the green “Start” button. When you turn off the power, the program is deleted.
The “Repeat” command contains one parameter: how many steps need to be repeated [once]. Example: Fwd1, Pause1, Bwd1, Loop3; as a result, the commands Fwd1, Pause1, Bwd1 will be executed twice. The first time is because they are in the program, the second time is because it is indicated in the “Cycle” command.
In any case, battery charge is controlled. If it is too small, a warning is displayed and the toy does not travel.
GUI
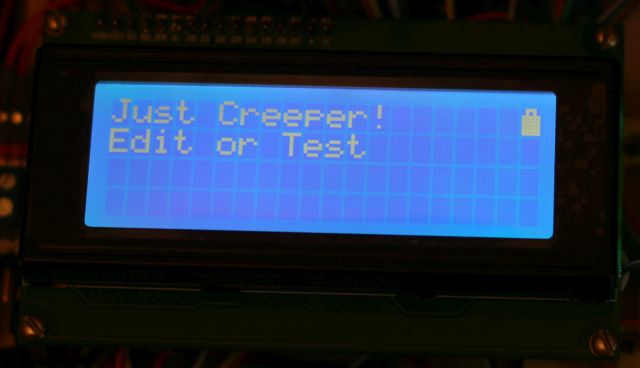
It’s hard to keep the whole program in my head, so I screwed up the simplest indicator, on which the information entered is duplicated.
After launch, the prompt is displayed:
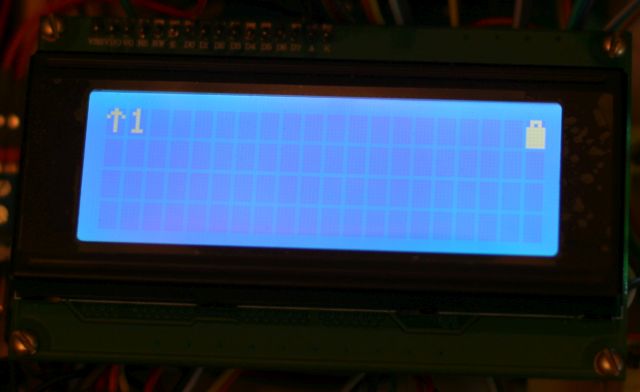
When you enter a command in the upper left corner, the command icon and the number of repetitions are displayed:
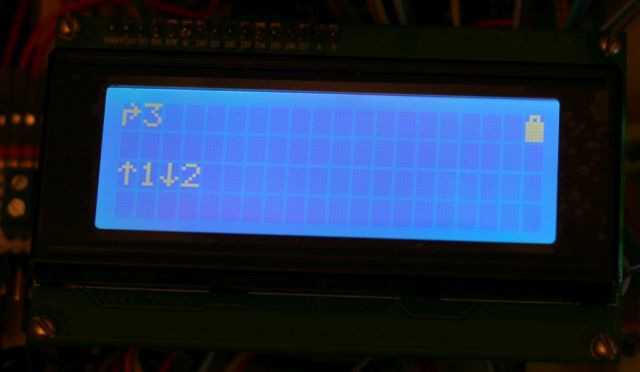
If more than one command is entered, there will be a list below (in fact, a program), and the input command will still be displayed above:
Why did it happen that way
The toy was created from what was on hand or easy to get. Separately, I want to say about Arduino. It is selected for several reasons:
- She has a suitable number of conclusions, and there are a lot of them (43):
- 6 for motor control;
- 8 + 4 for the keyboard;
- 11 for LCD;
- 3 for DAC;
- 8 for ultrasonic sensors;
- 2 for speed sensors;
- 1 for measuring the voltage on the battery.
- I am familiar with this platform.
- It is stitched in one click.
- From the microcontroller does not require any huge speeds or memory volumes.
- And special efficiency is also not required, because 90% of current consumed by motors.
What can be improved
Chassis With a sharp start, the wheels “grind” and the toy loses its course. You can try to make a six-wheeled chassis, or even tracked (on Aliexpress is, but I have not tried it yet).
GUI . Now the indicator displays only the minimum amount of information, and this is done in the simplest way.
Code Pulitzer I definitely will not get.
Sound There are cheap and very small mp3 players. You can safely throw out the R-2R DAC and replace it with a ready-made player.
Backup buttons . You can record the finished program in the EEPROM, so that it does not get lost when you turn off the power. The implementation can be like in the radio: with a long press the program is saved, with a short - run.
Button out . Currently not implemented. You can screw something like relay / servy to one of the Arduino pins.
Thanks
- The child who motivated me all this time.
- Wife, who patiently waited while I play enough, and helped with Corel Draw!
- Sergei Dudnikov, who drew the pad on the keyboard.
- Andrei Shishkov, who milled this pad.
- Anton, who made me a great mp3 with the sound of "pi!".
- hudbrog , for the idea to implement the PID controller!
- Chatter of homemade artists who morally supported me and were forced to look at the intermediate results of the work;)
Bad doubles
I like movies with Jackie Chan, because in the end there is a cut of unsuccessful doubles. I have not done without them either. What surprised me the most was the fact that a round drill with two grooves gives a triangular hole;)
 |  |
 |  |
 |  |
 |
Source: https://habr.com/ru/post/423409/
All Articles