Application Coordinator in iOS applications
Every year, many changes occur in the iOS platform, and third-party libraries regularly work on networking, data caching, UI rendering via JavaScript, and more. In contrast to all these trends, Pavel Gurov spoke about the architectural solution, which will be relevant regardless of what technology you use now or will use in a couple of years.
ApplicationCoordinator can be used to build navigation between screens, and at the same time solve a number of problems. Under the cut demo and instructions for the fastest possible implementation of this approach.

')
About the speaker: Pavel Gurov is developing iOS applications in Avito.
Navigation

Navigating between screens is a task that 100% of you face, no matter what you do - social network, taxi call or online bank. This is what the application starts from when it comes to creating a prototype, when you don’t even know to the end what the screens will look like, what will be the animations, and whether there will be data caching. Screens can be empty or static pictures, but the task of navigation appears in the application as soon as there are more than one of these screens . That is almost immediately.
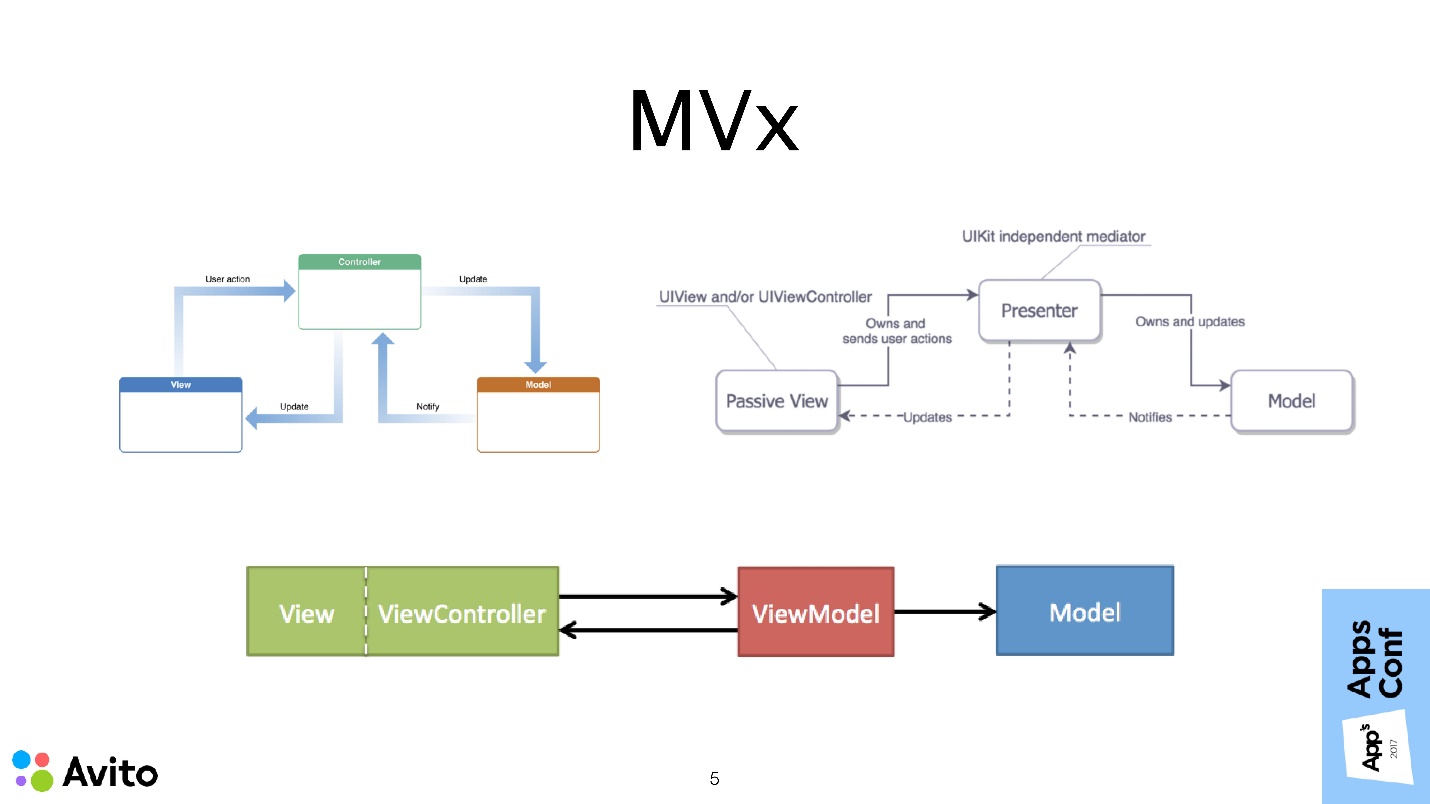
The most common methods for building the architecture of iOS applications: MVc, MVVm, and MVp, describe how to build a single screen module. It also says that modules can know about each other, communicate with each other, etc. But very little attention is paid to questions, how transitions between these modules are made, who decides on these transitions, and how data is transmitted.
UlStoryboard + segues
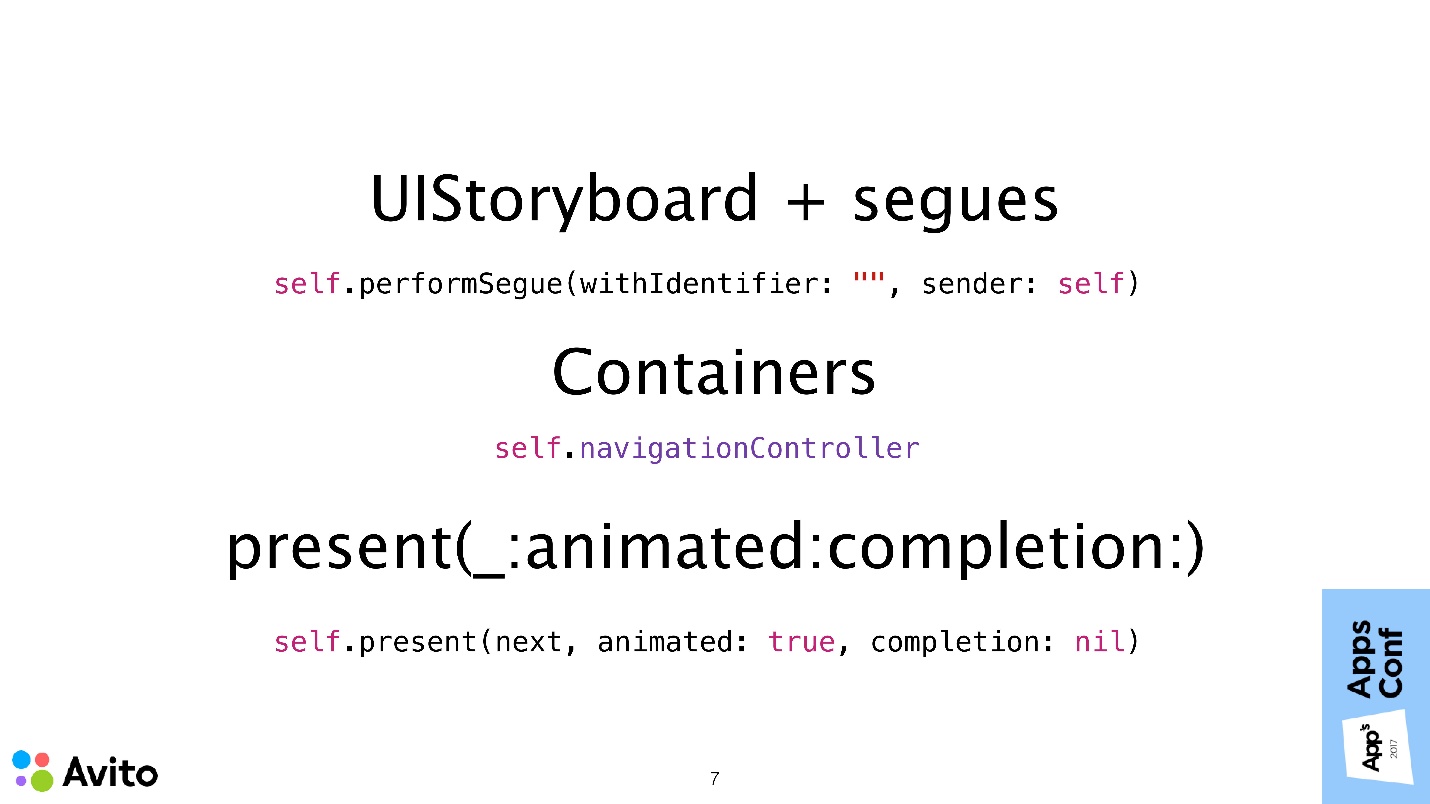
iOS out of the box provides several ways to show the following script screen:
There are no problems in these tools themselves. The problem is exactly how they are commonly used. UINavigationController, performSegue, prepareForSegue, the presentViewController method is all property methods of the UIViewController class. Apple suggests using these tools within UIViewController itself.
Proof of this is the following.
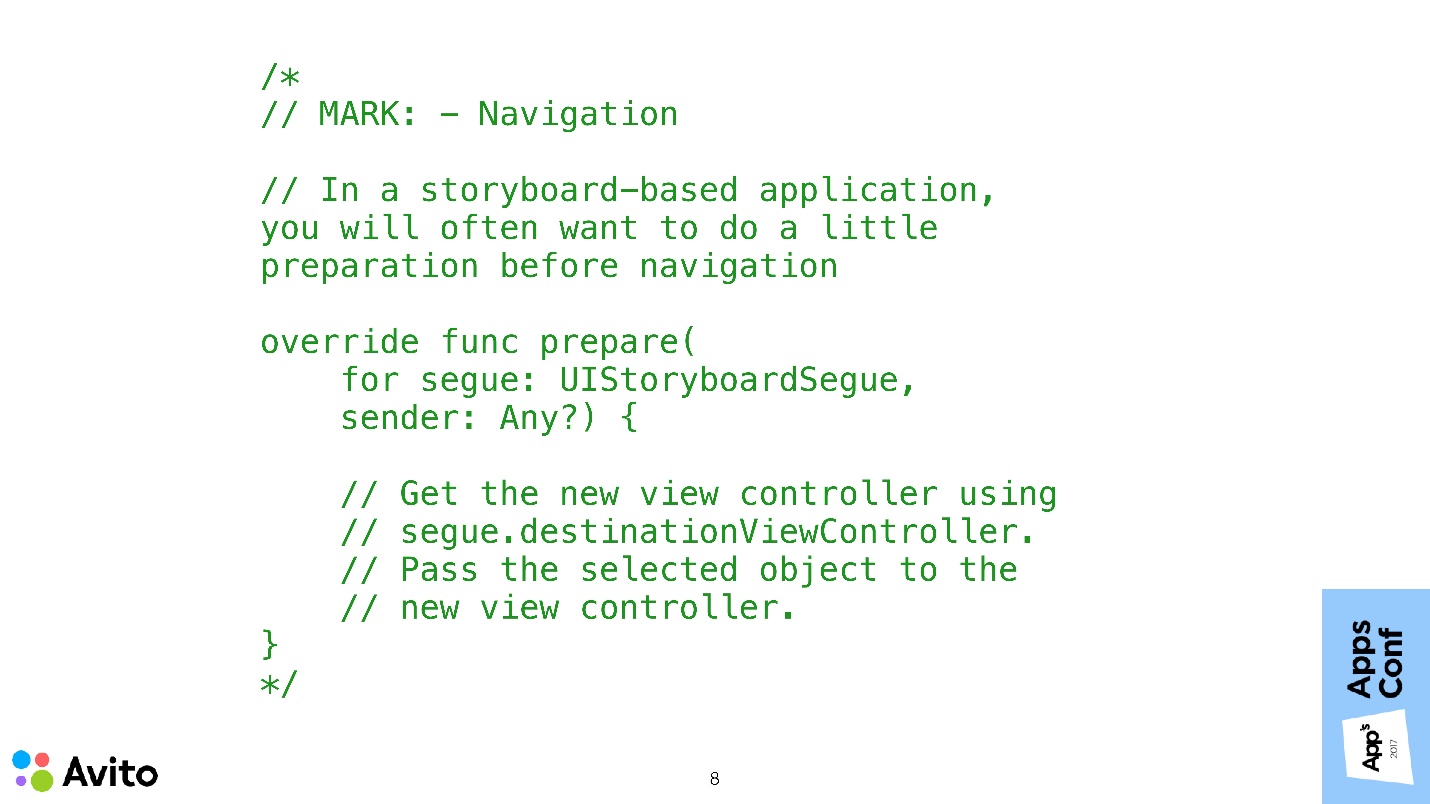
These are comments that appear in your project if you create a new subclass of UIViewController using a standard template. Written directly - if you use segues and you need to transfer data to the next screen, you must: get this ViewController from segue; know what type it will be; bring it to this type and transfer your data there.
Such an approach to problems in building navigation.
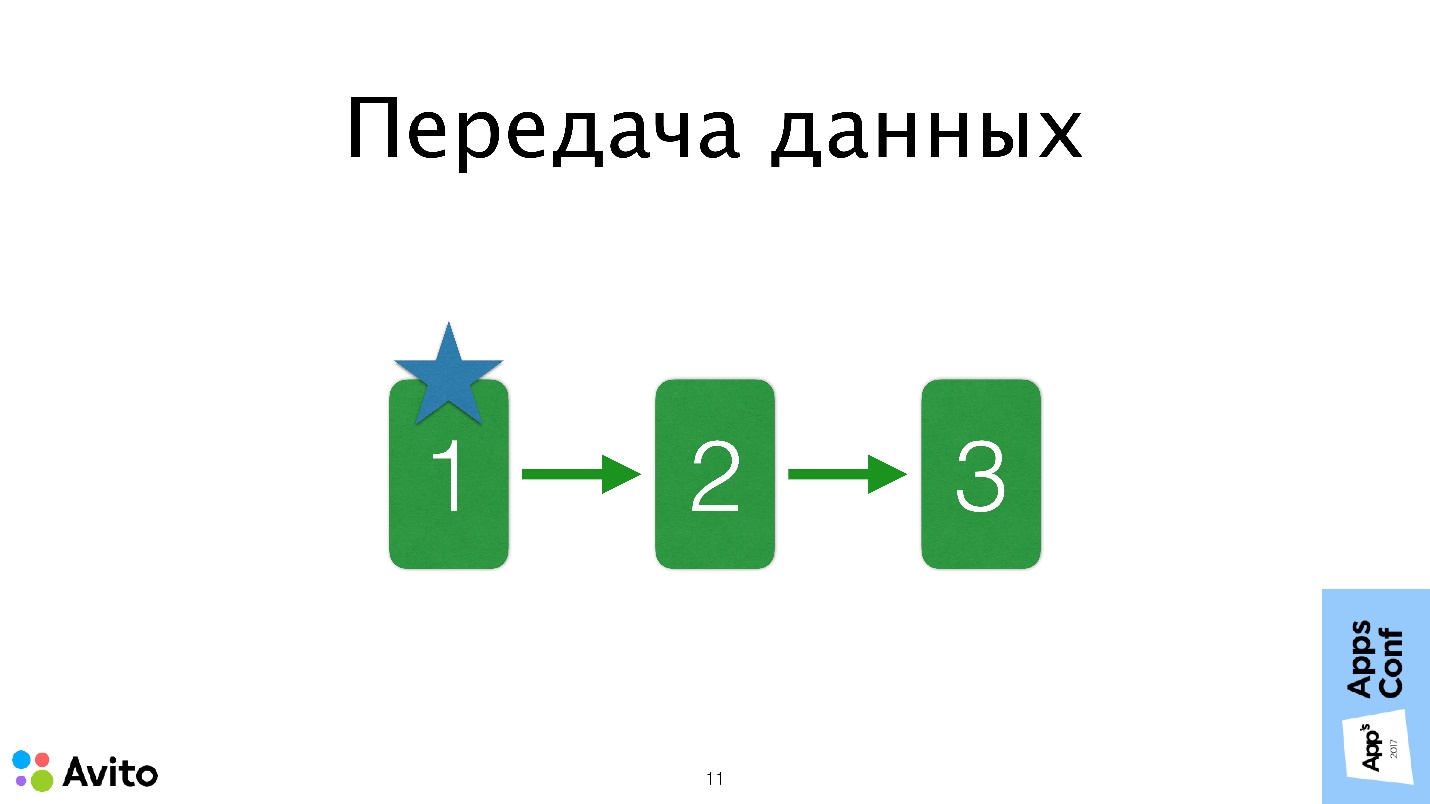
1. Hard connectedness of screens
This means that screen 1 is aware of the existence of screen 2. Not only is it aware of its existence, it also potentially creates it, or takes it from the segue, knowing what type it is, and transmits some data to it.
If we need, under some circumstances, to show instead of screen 2 screen 3, then we have to know about the new screen 3 in the same way to stitch it to screen controller 1. Everything becomes even more difficult if controllers 2 and 3 can be called from a few more places, from screen 1. It turns out that knowledge about screen 2 and 3 will have to be stitched in each of these places.
To do this is another half of the trouble, the main problems will begin when changes to these transitions are required, or to support all of this.

2. Reorder Script Controllers
This is also not so easy because of connectedness. To swap two ViewControllers, it is not enough to go to the UlStoryboard and swap 2 pictures. You will have to open the code of each of these screens, transfer it to the settings of the next one, change its places, which is not very convenient.

3. Script data transfer
For example, when choosing something on screen 3, we need to update View on screen 1. Since we initially have nothing but ViewController, we’ll have to somehow link these two ViewControllers - no matter how - through delegation or somehow still. It will be even more difficult if, by the action on screen 3, it will be necessary to update not one screen, but several at once, for example, both the first and the second.
In this case, delegation will not manage, because delegation is a one-to-one relationship. Someone will say, let's use the notification, someone - through a shared state. All this makes it difficult to debug and track data flows in our application.
As they say, it's better to see 1 time than to hear 100 times. Let's look at a specific example from this Avito Services Pro application. This application is for professionals in the service sector, in which it is convenient to track your orders, communicate with customers, look for new orders.
Scenario - the choice of the city in editing the user profile.
Here is a profile editing screen, such is in many applications. We are interested in the choice of the city.
What's going on here?
In this diagram, the problems of connectedness, which I mentioned earlier, are depicted as arrows between the ViewController. We will get rid of these problems now.
How do we do it?
Coordinator
Since we are removing all these responsibilities from the UIViewController, we need a new entity that will fulfill them. Create a new class of objects, and call it the coordinator.
The coordinator is just an ordinary object, to which we pass the NavigationController at the start and call the Start method. Now do not think about how it is implemented, just see how in this case the scenario of choosing a city will change.
Now it does not begin with the fact that we are preparing a transition to a specific NavigationController screen, but we call the Start method at the coordinator, passing it to it in the NavigationController initializer. The coordinator understands that it’s time to launch the first screen in NavigationController, which he does.
Further, when the user selects a cell with a city, this event is sent to the top of the coordinator. That is, the screen itself does not know anything - after it, as they say, even the flood. He sends this message to the coordinator, and then the coordinator responds to this with those (since he has a NavigationController), which sends him the next step - this is the choice of regions.
Then the user clicks "Region" - the same picture - the screen itself does not solve anything, only informs the coordinator, which opens the next screen.
When the user selects a specific city on the third screen, that city is also transmitted to the first screen through the coordinator. That is, a message is sent to the coordinator that a city has been selected. The coordinator sends this message to the first screen and rolls the Navigation stack to the first screen.
Note that the controllers now do not communicate with each other , deciding who will be next, and not transmit any data to each other. Moreover, they do not know anything about their surroundings.
If you consider the application within the framework of a three-layer architecture, then the ViewController should ideally fit completely into the Presentation layer and carry as little of the application logic as possible.
In this case, we use the coordinator to pull the transition logic to the layer above and remove this knowledge from the ViewController.
Demo
The presentation and demo project is available on Github, below is a demonstration during the report.
This is the same scenario: profile editing and city selection.
The first screen is the user edit screen. It shows information about the current user: name and selected city. There is a button "Select city". When we click on it, we get to the screen with a list of cities. If we choose a city there, then the first screen gets this city.
Let's see now how it works in the code. Let's start with the model.
Models are simple:
Next - StoryBoard . It starts with NavigationController. In principle, here are the same screens that were in the simulator: a user editing screen with a label and a button and a screen with a list of cities, which shows a sign with cities.
User edit screen
Here there is a property User - this is the user that is transmitted outside - the user we will edit. Set user here causes the didSet block to be called, which causes the local updateView () method to be called. All that this method does is simply place the user information into the label, that is, it shows its name and the name of the city in which this user lives.
The same thing happens in the viewWillAppear () method.
The most interesting place is the handler of clicking on the select button of the city selectCityTap (). Here the controller itself does not solve anything : it does not create any controllers, it does not cause any segue. All he does is callback calls — this is the second property of our ViewController. The onSelectCity callback has no parameters. When the user presses a button, this causes the callback to be called.
City Selection Screen
This screen is a UITableViewController. The list of cities here is fixed, but it can come from somewhere else. Further (// MARK: - Table -) a rather trivial table code that shows a list of cities in cells.
The most interesting place here is the didSelectRowAt IndexPath handler, a well-known method. Here again the screen itself does not solve anything. What happens next after a city is selected? It simply calls a callback with the only parameter "city".
This is where the code for the screens themselves ends. As we see, they know nothing about their surroundings.
Coordinator
We turn to the link between these screens.
The coordinator has two properties:
There is a simple init () that fills these properties.
Next is the start () method, which causes the ShowUserEditScreen () method to be called . Let us dwell on it in more detail. This method gets the controller from the UIStoryboard, transfers it to our local user. Then it puts down the onSelectCity callback and pushes this controller to the Navigation stack.
After the user presses the button, the onSelectCity callback is triggered, and this causes the following private method ShowCitiesScreen () to be called.
In fact, he does almost the same thing - picks up a slightly different controller from the UIStoryboard, puts on it onCitySelected a callback and pushes it into the Navigation stack - that's all that happens. When the user selects a specific city, this callback is triggered, the coordinator updates the field “city” of our local user and rolls the Navigation stack to the first screen.
Since User is a structure, updating the "city" field causes the didSet block to be called, and the private method updateInterfaces () is called accordingly. This method traverses the entire Navigation stack and tries to deploy each ViewController as the UpdateableWithUser protocol. This is the simplest protocol that has only one property - user. If it succeeds, then he passes it to the updated user. Thus it turns out that our selected user on the second screen automatically prokakyvaetsya on the first screen.
Everything is clear with the coordinator, and the only thing left to show here is the entry point to our application. This is where it all starts. In this case, this is the didFinishLaunchingWithOptions method of our AppDelegate.
Here, navigationController comes from the UIStoryboard, a User is created, which we will edit, with a name and a specific city. Then our coordinator is created with User and navigationController. It calls the start () method. The coordinator is transferred to the local property - that’s basically all. The scheme is quite simple.
Inputs and outputs
There are several points that I would like to dwell upon. You probably noticed that the property in userEditViewController is marked with a comment as Input, and the callbacks of these controllers are marked as Output.

An input is any data that may change over time, as well as some ViewController methods that can be called outside. For example, in UserEditViewController this property User - the User itself or its City parameter can change.
An exit is any event that the controller wants to communicate to the outside world. In UserEditViewController, this is a click on the onSelectCity button, and on the city selection screen, this is a click on a cell with a specific city. The main idea here is, I repeat, that the controller knows nothing and does nothing about these events. He delegates to decide what to do, to someone else.
In Objective-C, I didn’t like to write saving callbacks because of their terrible syntax. But with Swift, this is much easier. Using callbacks in this case is an alternative to the well-known delegation pattern in iOS. Only here, instead of designating methods in the protocol and saying that the coordinator conforms to this protocol, and then somewhere to write these methods separately, we can immediately very conveniently create an entity in one place, put a callback on it and do it all.
True, with this approach, unlike delegation, there is a hard connection between the coordinator's essence and the screen, because the coordinator knows that there is a specific essence of the screen.
You can get rid of this in the same way as in delegation using protocols.
To avoid connectedness, we can close the controller's Input and Output protocol .
Above is the CitiesOutput protocol, which has exactly one requirement - the presence of an onCitySelected callback. On the left - an analogue of this scheme on Swift. Our controller conforms to this protocol, defining the necessary callback. We do this so that the coordinator does not know about the existence of the class CitiesViewController. But at some point he will need to configure the output of this controller. In order to turn all this, we add a factory to the coordinator.
The factory has a cityOutput () method. It turns out that our coordinator does not create a controller and does not receive it from somewhere. A factory is thrown to it, which returns an object closed by a protocol in the method, and he does not know what class this object is.
Now the most important thing - why bother to do it all? Why do we need to build another additional level, when there were no problems anyway?
One can imagine such a situation: the manager will come to us and ask to do A / B testing of the fact that instead of the list of cities we would have a choice of a city on the map. If in our application the choice of a city was not in one place, but in different coordinators, in different scenarios, we would have to sew up a flag in each place, throw it out, and raise either one or the other ViewController using this flag. This is not very convenient.
We want to remove this knowledge from the coordinator. Therefore, it could be done in one place. In the factory itself, we would make the parameter by which the factory returns a closed protocol, either one controller or another. Both of them would have a onCitySelected callback, and the coordinator would, in principle, not care which of these screens to work with — a map or a list.
Composition VS Inheritance
The next point that I wanted to dwell on is composition against inheritance.
Each option has its pros and cons, but personally it seems to me that the composition in this case is more suitable than inheritance. Inheritance in general, in principle, less flexible scheme. If we need, for example, to change Navigation to, say, a UIPageController, then in the first case we can simply close them with a general protocol, such as “Show the next screen” and conveniently substitute the container we need.
From my point of view, the most important argument is that you hide from the end user in the composition all the methods that he does not need. It turns out that he has less chance to stumble. You leave only the API that is needed , for example, the Start method - and that's it. It does not have the ability to call the PushViewController method, PopViewController, that is, to somehow interfere in the activities of the coordinator himself. All methods of the parent class are hidden.
Storyboards
I believe that they deserve special attention along with segues. Personally, I support segues , as they allow you to visually quickly familiarize yourself with the script. When a new developer comes, he does not need to climb the code, Storyboards help with this. Even if you make an interface with the code, you can leave blank the ViewController, and impose an interface with the code, but leave at least the transitions and the whole point. The whole essence of Storyboards is in the transitions themselves, and not in the UI layout.
Fortunately, the approach with the coordinators does not limit the choice of tools . We can safely use coordinators along with segues. But it must be remembered that now we cannot work with segues inside a UIViewController.
Therefore, we must in our class override the onPrepareForSegue method. Instead of doing something inside the controller, we will delegate these tasks to the coordinator again, through a callback. The onPrepareForSegue method is called, you do not do anything yourself - you do not know what the segue is, what the destination controller is, it doesn’t matter to you. You just throw it all into a callback, and the coordinator will figure it out. He has this knowledge, you do not need this knowledge.
In order to make everything easier, you can do it in a certain Base class, so as not to override it in each individual controller. In this case, the coordinator will be more convenient to work with your segues.
Another thing I find comfortable with a Storyboard is to stick to the rule that one Storyboard is equal to one coordinator . Then you can greatly simplify everything, make one class at all - the StoryboardCoordinator, and generate the RootType parameter in it, make the initial Navigation controller in the Storyboard and wrap the entire script in it.
As you can see, here the coordinator has 2 property: navigationController; rootViewController of our RootType generic type. During initialization, we give it not a specific navigationController, but a Storyboard, from which our root Navigation and its first controller fall. Thus, we will not even need to call any Start methods. That is, you created a coordinator, he immediately has Navigation, and immediately there is Root. You can either show the Navigation modally, or take the Root and launch into the existing navigation and continue working.
Our UserEditCoordinator in this case would simply be typealias, substituting the type of its RootViewController in a generic parameter.
Data transfer back to the script
Let's talk about solving the last problem, which I identified at the beginning. This is the transfer of data back to the script.
Consider the same scenario of choosing a city, but now it will be possible to choose not one city, but several. In order to show the user that he has selected several cities within one region, we will show a small number next to the region name on the screen with a list of regions, showing the number of cities selected in this region.
It turns out that the action on one controller (on the third) should lead to a change in the appearance of several others at once. That is, in the first one we have to show in the cell with the city, and in the second we must update all the figures from the selected regions.
The coordinator simplifies this task by transferring data back to the script — this is now as easy as transferring data forward to the script.
What's going on here? The user selects a city. This message is sent to the coordinator. The coordinator, as I showed in the demo, is passed through the entire navigation stack and sends updated data to all interested parties. Accordingly, the ViewController can update its View with this data.
Refactoring existing code
How to refactor existing code if you want to implement this approach in an existing application, where is MVc, MVVm or MVp?

You have a pack of ViewController. The first thing to do is to divide them into scenarios in which they participate. In our example there are 3 scenarios: authorization, profile editing, tape.
Every script we now wrap inside our coordinator. We should be able to, in fact, start these scenarios from anywhere in our application. There must be flexibility in this - the coordinator must be completely self-sufficient .
This approach in the development provides additional convenience. It lies in the fact that if you are currently working with a specific scenario, you do not need to repeat it every time you start it. You can quickly start it when you start it, edit something in it, and then remove this temporary start.
After we have decided on our coordinators, we need to determine which scenario could lead to the start of another, and from these scenarios make a tree.
In our case, the tree is simple: the LoginCoordinator can start the profile editing coordinator. Here, almost everything falls into place, but a very important detail remains - our scheme lacks an entry point.

This entry point will be a special coordinator - ApplicationCoordinator . It is created and started by AppDelegate , and then it already controls the logic at the application level, that is, by which coordinator starts right now.
We just looked at a very similar scheme, only ViewController instead of coordinators was on it, and we made sure that ViewController did not know anything about each other and did not pass data to each other. With the coordinators, in principle, you can do the same. We can mark at them a certain Input (Start method) and Output (onFinish callback). Focal points become independent, reusable, and easy to test . Coordinators no longer know about each other and communicate, for example, only with ApplicationCoordinator.
You need to be careful, because if your application has a lot of these scenarios, then ApplicationCoordinator can turn into a huge god object, it will know about all existing scenarios - this is also not very cool. Here one must already look — perhaps, to split the coordinators into sub-coordinators, that is, to think up such an architecture so that these objects do not grow to incredible sizes. Although size is not always a reason for refactoring .
Where to start
I advise starting from the bottom up - first implement the individual scenarios.
As a temporary solution, they can be started inside the UIViewController. That is, as long as you do not have Root or other coordinators, you can make one coordinator and, as a temporary solution, start it from UIViewController, saving it locally in property (as above is nextCoordinator). When an event occurs, you, as I showed in the demo, create a local property, put a coordinator there and call the Start method on it. Everything is very simple.
Then, when all these coordinators have already been done, the start of one inside the other looks exactly the same. You have a local property or an array of dependencies of the coordinator type, you put all this in there so that it does not run away, and call the Start method.
Total
ApplicationCoordinator can be used to build navigation between screens, and at the same time solve a number of problems. Under the cut demo and instructions for the fastest possible implementation of this approach.
')
About the speaker: Pavel Gurov is developing iOS applications in Avito.
Navigation
Navigating between screens is a task that 100% of you face, no matter what you do - social network, taxi call or online bank. This is what the application starts from when it comes to creating a prototype, when you don’t even know to the end what the screens will look like, what will be the animations, and whether there will be data caching. Screens can be empty or static pictures, but the task of navigation appears in the application as soon as there are more than one of these screens . That is almost immediately.
The most common methods for building the architecture of iOS applications: MVc, MVVm, and MVp, describe how to build a single screen module. It also says that modules can know about each other, communicate with each other, etc. But very little attention is paid to questions, how transitions between these modules are made, who decides on these transitions, and how data is transmitted.
UlStoryboard + segues
iOS out of the box provides several ways to show the following script screen:
- The well-known UlStoryboard + segues , when we designate all transitions between screens in one meta file, and then call them. Everything is very comfortable and great.
- Containers - such as UINavigationController. UITabBarController, UIPageController or possibly self-written containers that can be used both programmatically and with StoryBoards.
- The present method (_: animated: completion :). This is simply a method of the UIController class.
There are no problems in these tools themselves. The problem is exactly how they are commonly used. UINavigationController, performSegue, prepareForSegue, the presentViewController method is all property methods of the UIViewController class. Apple suggests using these tools within UIViewController itself.
Proof of this is the following.
These are comments that appear in your project if you create a new subclass of UIViewController using a standard template. Written directly - if you use segues and you need to transfer data to the next screen, you must: get this ViewController from segue; know what type it will be; bring it to this type and transfer your data there.
Such an approach to problems in building navigation.
1. Hard connectedness of screens
This means that screen 1 is aware of the existence of screen 2. Not only is it aware of its existence, it also potentially creates it, or takes it from the segue, knowing what type it is, and transmits some data to it.
If we need, under some circumstances, to show instead of screen 2 screen 3, then we have to know about the new screen 3 in the same way to stitch it to screen controller 1. Everything becomes even more difficult if controllers 2 and 3 can be called from a few more places, from screen 1. It turns out that knowledge about screen 2 and 3 will have to be stitched in each of these places.
To do this is another half of the trouble, the main problems will begin when changes to these transitions are required, or to support all of this.
2. Reorder Script Controllers
This is also not so easy because of connectedness. To swap two ViewControllers, it is not enough to go to the UlStoryboard and swap 2 pictures. You will have to open the code of each of these screens, transfer it to the settings of the next one, change its places, which is not very convenient.
3. Script data transfer
For example, when choosing something on screen 3, we need to update View on screen 1. Since we initially have nothing but ViewController, we’ll have to somehow link these two ViewControllers - no matter how - through delegation or somehow still. It will be even more difficult if, by the action on screen 3, it will be necessary to update not one screen, but several at once, for example, both the first and the second.
In this case, delegation will not manage, because delegation is a one-to-one relationship. Someone will say, let's use the notification, someone - through a shared state. All this makes it difficult to debug and track data flows in our application.
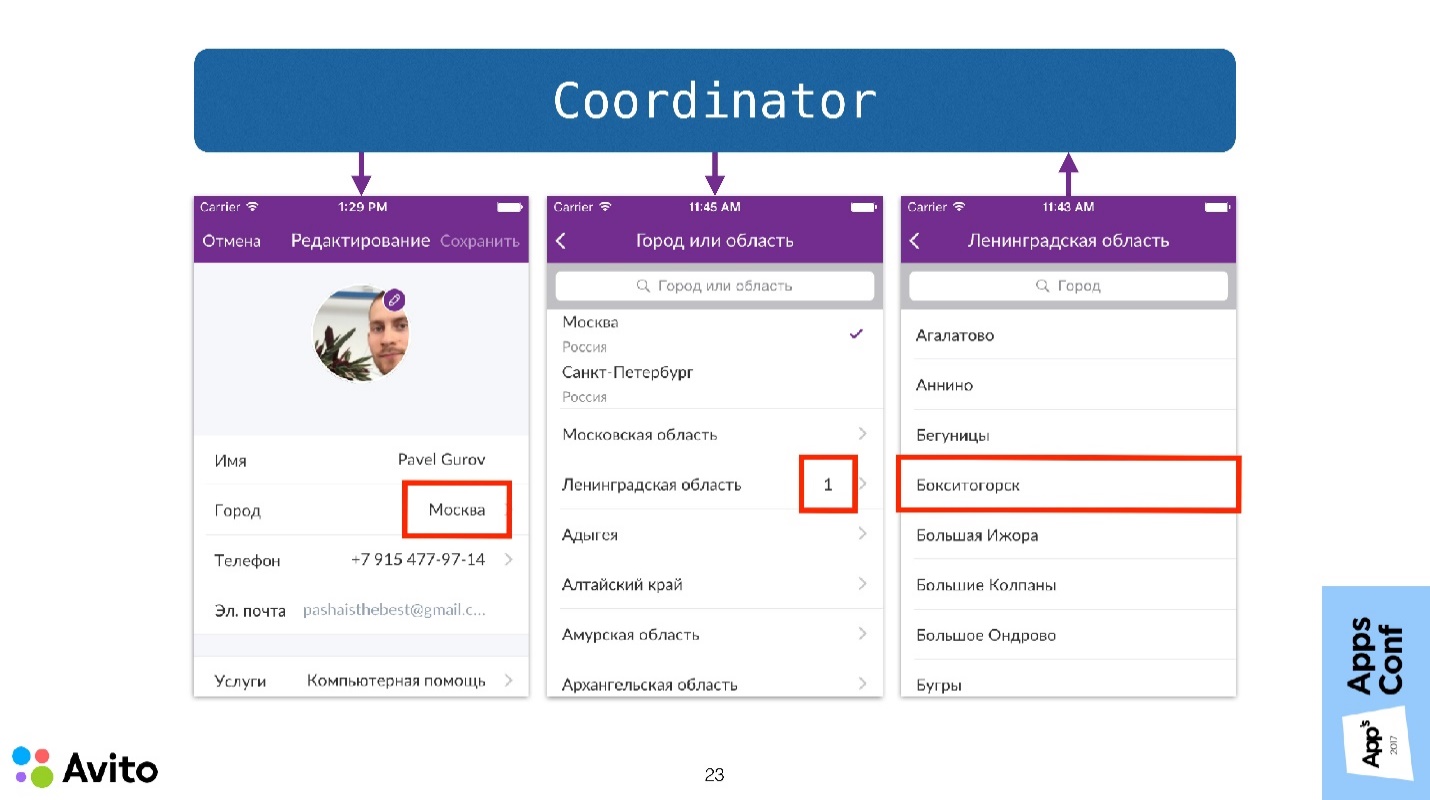
As they say, it's better to see 1 time than to hear 100 times. Let's look at a specific example from this Avito Services Pro application. This application is for professionals in the service sector, in which it is convenient to track your orders, communicate with customers, look for new orders.
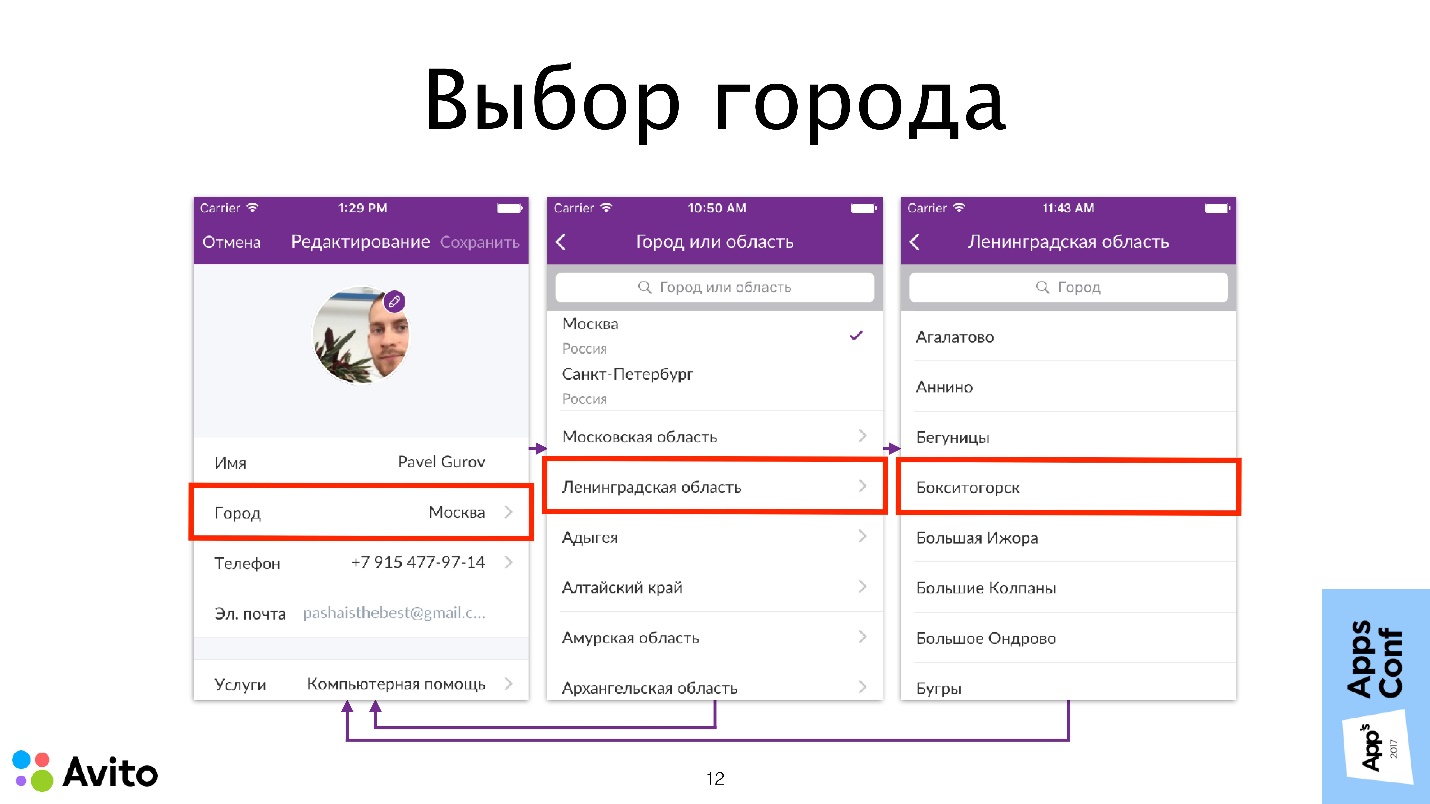
Scenario - the choice of the city in editing the user profile.
Here is a profile editing screen, such is in many applications. We are interested in the choice of the city.
What's going on here?
- The user clicks on the cell with the city, and the first screen decides that it’s time to add the following screen to the navigation stack. This is a screen with a list of federal cities (Moscow and St. Petersburg) and a list of regions.
- If the user selects a federal city on the second screen, the second screen realizes that the script is completed, forwards the selected city to the first one, and the Navigation stack rolls back to the first screen. The script is considered complete.
- If the user selects a region on the second screen, the second screen decides that a third screen should be prepared, in which we see a list of cities in this region. If the user selects a city, then the city is sent to the first screen, rolls back the Navigation stack and the script is considered complete.
In this diagram, the problems of connectedness, which I mentioned earlier, are depicted as arrows between the ViewController. We will get rid of these problems now.
How do we do it?
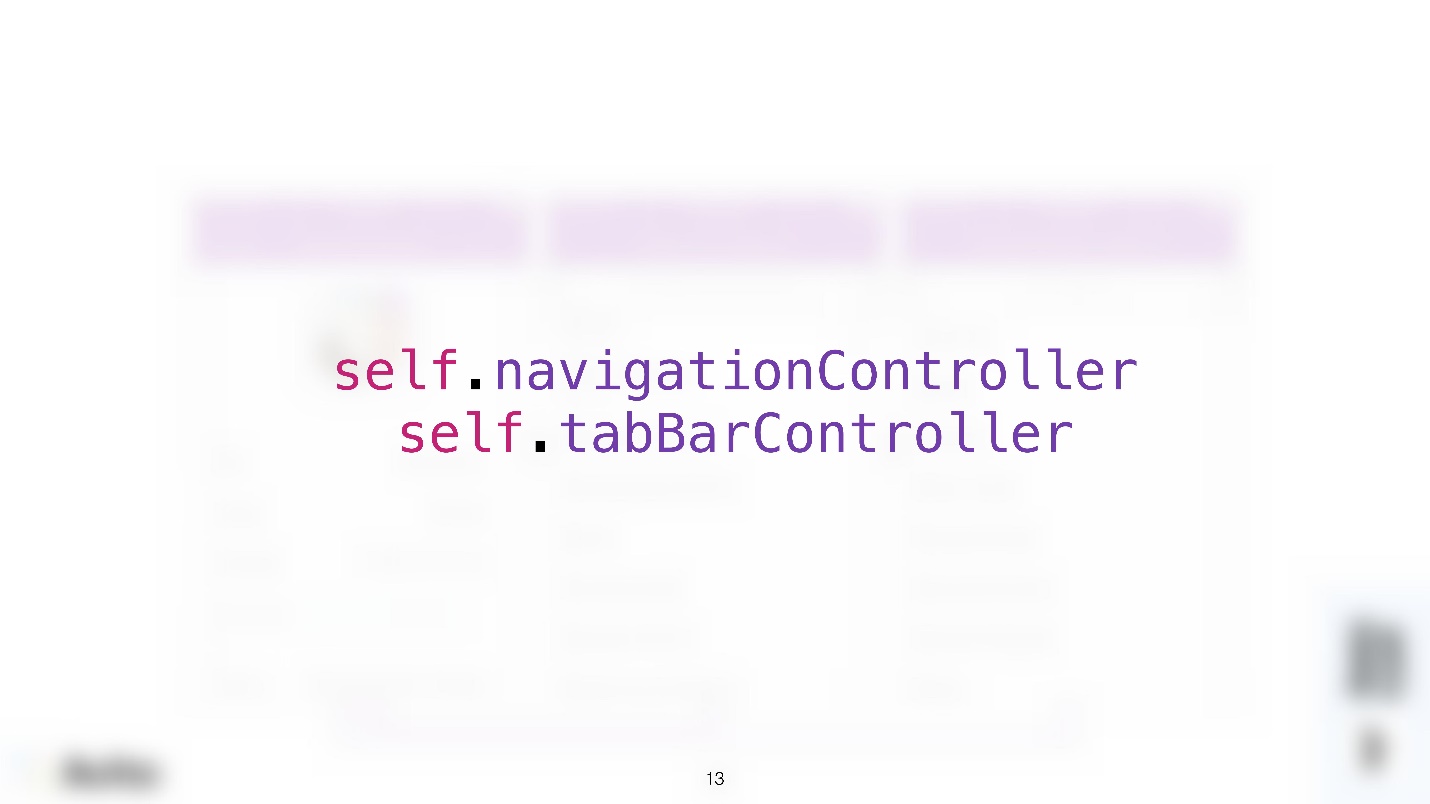
- We do not allow ourselves inside UIViewController to access containers , that is, self.navigationController, self.tabBarController, or any other custom containers that you made as a property extension. Now we cannot take our container from the screen code and ask it to do something.
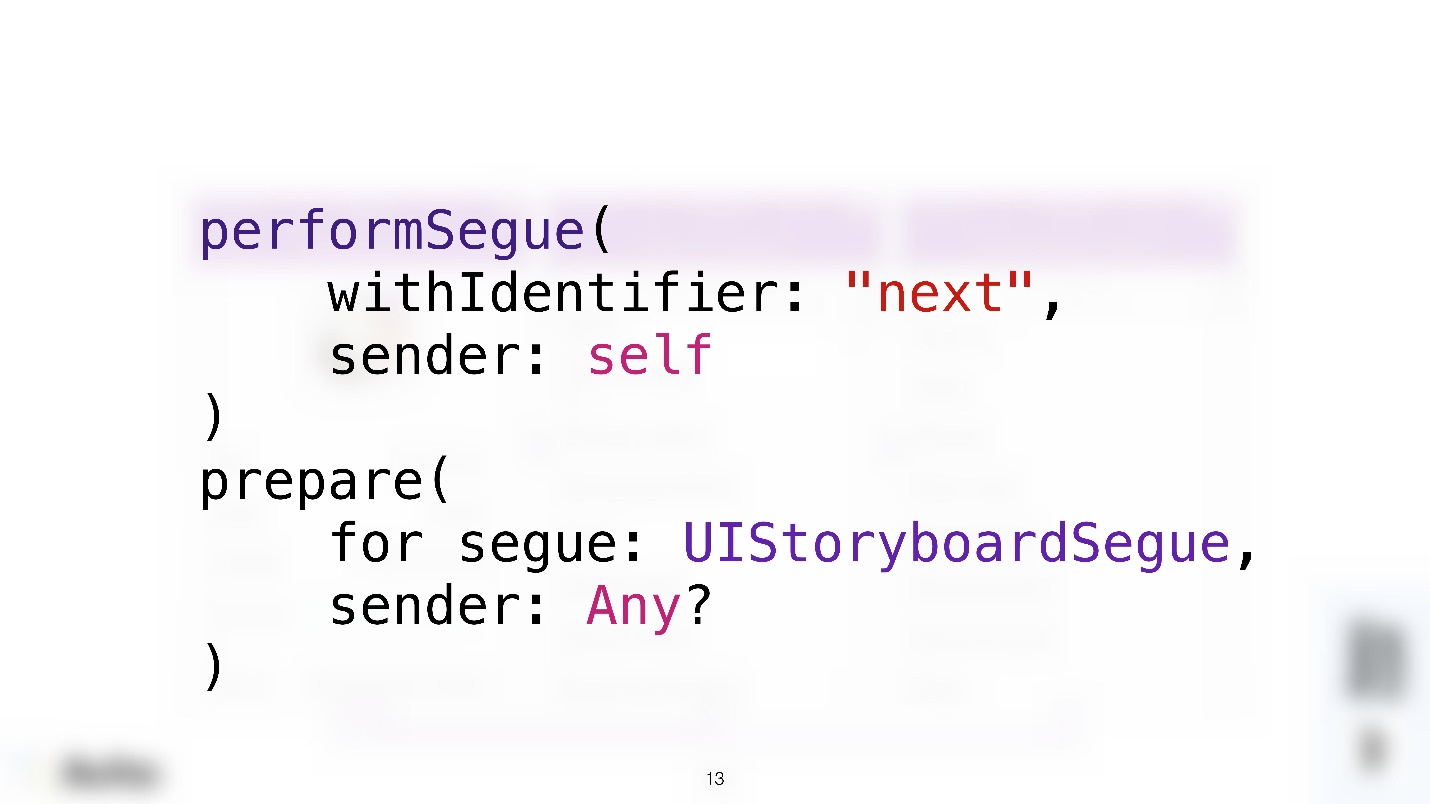
- We do not allow ourselves inside UIViewController to call the performSegue method and to write code in the prepareForSegue method that would take the next screen and configure it. That is, we no longer work with segue (with transitions between screens) inside the UIViewController.
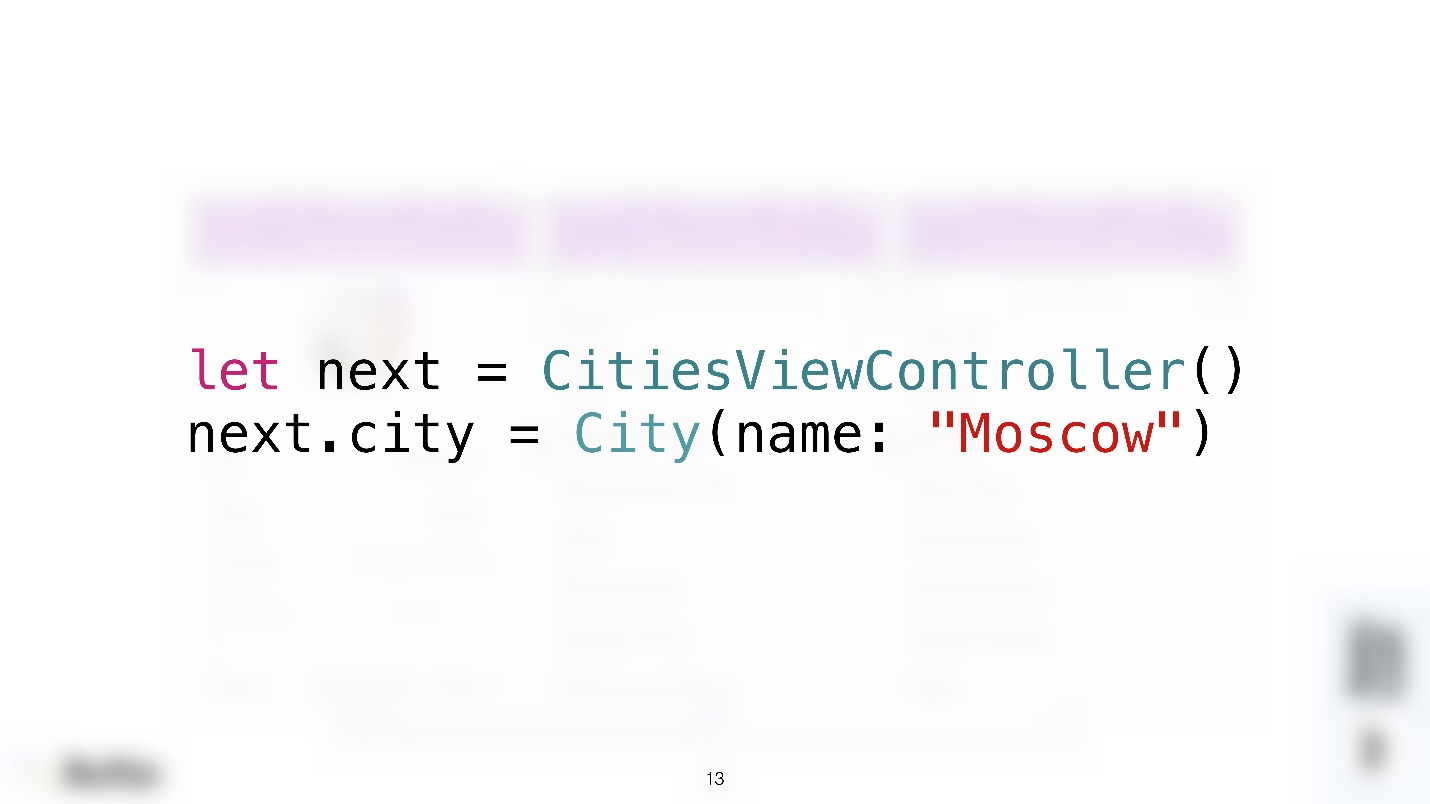
- We also forbid any mention of other controllers inside our particular controller : no initializations, data transfers and all that.
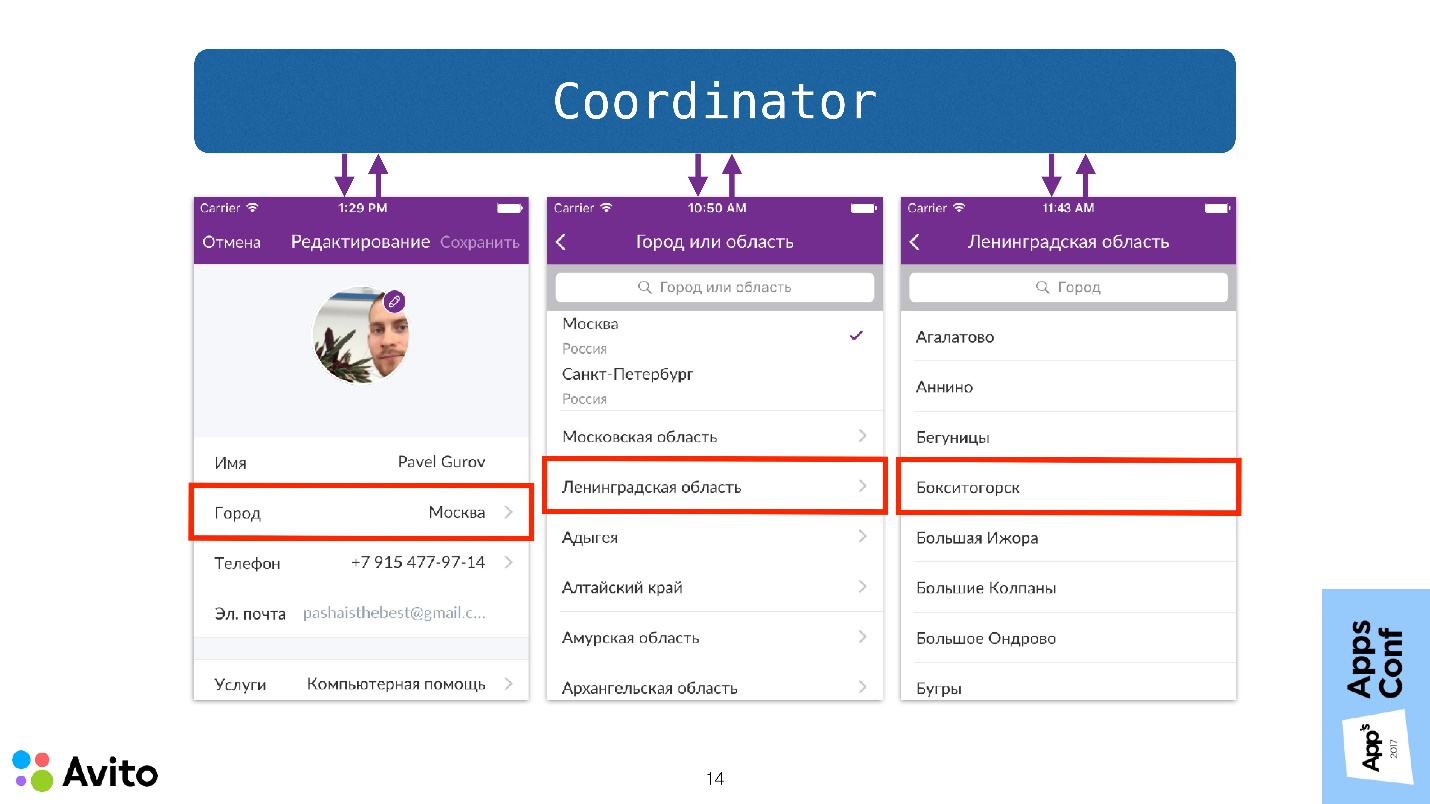
Coordinator
Since we are removing all these responsibilities from the UIViewController, we need a new entity that will fulfill them. Create a new class of objects, and call it the coordinator.
The coordinator is just an ordinary object, to which we pass the NavigationController at the start and call the Start method. Now do not think about how it is implemented, just see how in this case the scenario of choosing a city will change.
Now it does not begin with the fact that we are preparing a transition to a specific NavigationController screen, but we call the Start method at the coordinator, passing it to it in the NavigationController initializer. The coordinator understands that it’s time to launch the first screen in NavigationController, which he does.
Further, when the user selects a cell with a city, this event is sent to the top of the coordinator. That is, the screen itself does not know anything - after it, as they say, even the flood. He sends this message to the coordinator, and then the coordinator responds to this with those (since he has a NavigationController), which sends him the next step - this is the choice of regions.
Then the user clicks "Region" - the same picture - the screen itself does not solve anything, only informs the coordinator, which opens the next screen.
When the user selects a specific city on the third screen, that city is also transmitted to the first screen through the coordinator. That is, a message is sent to the coordinator that a city has been selected. The coordinator sends this message to the first screen and rolls the Navigation stack to the first screen.
Note that the controllers now do not communicate with each other , deciding who will be next, and not transmit any data to each other. Moreover, they do not know anything about their surroundings.
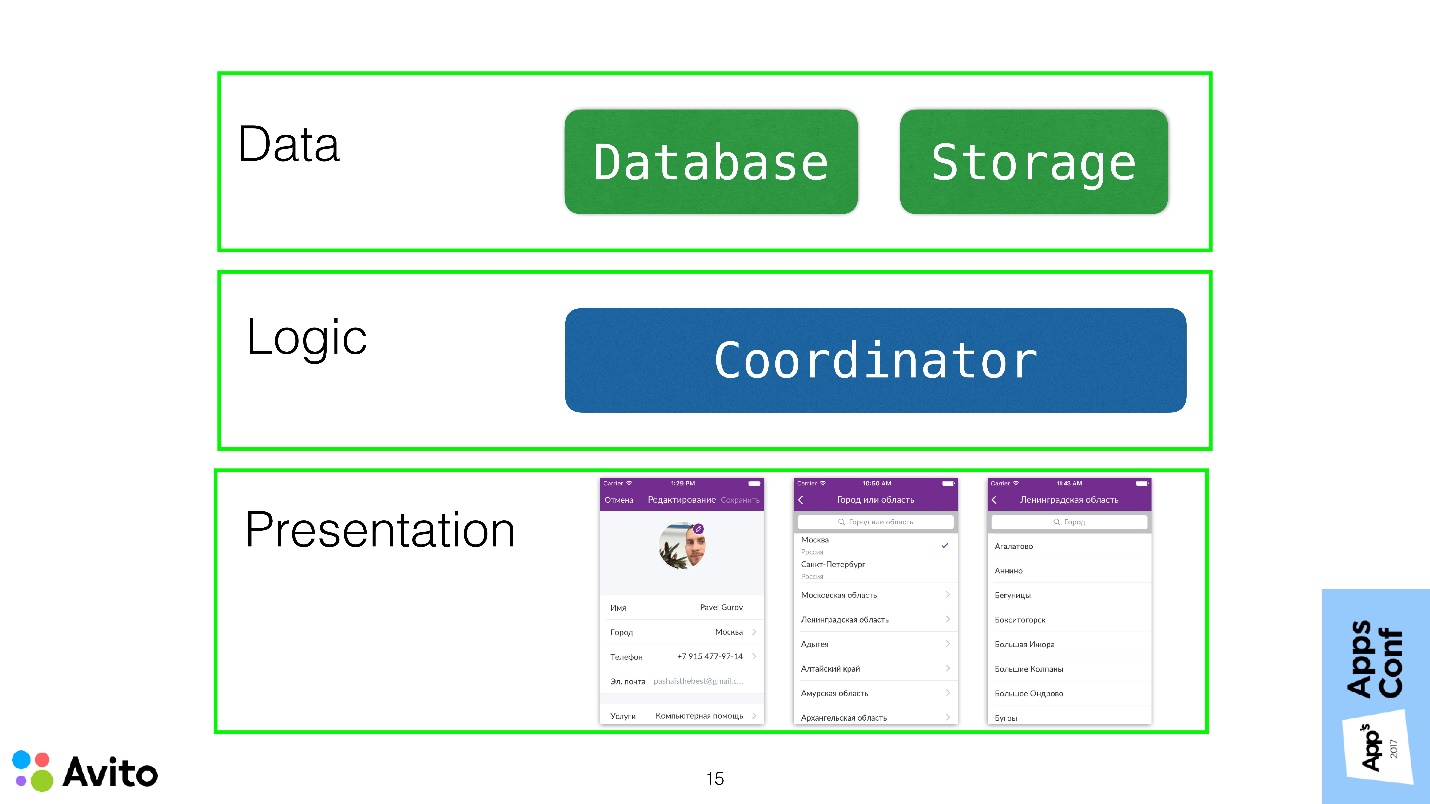
If you consider the application within the framework of a three-layer architecture, then the ViewController should ideally fit completely into the Presentation layer and carry as little of the application logic as possible.
In this case, we use the coordinator to pull the transition logic to the layer above and remove this knowledge from the ViewController.
Demo
The presentation and demo project is available on Github, below is a demonstration during the report.
This is the same scenario: profile editing and city selection.
The first screen is the user edit screen. It shows information about the current user: name and selected city. There is a button "Select city". When we click on it, we get to the screen with a list of cities. If we choose a city there, then the first screen gets this city.
Let's see now how it works in the code. Let's start with the model.
struct City { let name: String } struct User { let name: String var city: City? } Models are simple:
- Structure city, which has a field name, string;
- A user who also has a name and a city property.
Next - StoryBoard . It starts with NavigationController. In principle, here are the same screens that were in the simulator: a user editing screen with a label and a button and a screen with a list of cities, which shows a sign with cities.
User edit screen
import UIKit final class UserEditViewController: UIViewController, UpdateableWithUser { // MARK: - Input - var user: User? { didSet { updateView() } } // MARK: - Output - var onSelectCity: (() -> Void)? @IBOutlet private weak var userLabel: UILabel? @IBAction private func selectCityTap(_ sender: UIButton) { onSelectCity?() } override func viewWillAppear(_ animated: Bool) { super.viewWillAppear(animated) updateView() } private func updateView() { userLabel?.text = "User: \(user?.name ?? ""), \n" + "City: \(user?.city?.name ?? "")" } } Here there is a property User - this is the user that is transmitted outside - the user we will edit. Set user here causes the didSet block to be called, which causes the local updateView () method to be called. All that this method does is simply place the user information into the label, that is, it shows its name and the name of the city in which this user lives.
The same thing happens in the viewWillAppear () method.
The most interesting place is the handler of clicking on the select button of the city selectCityTap (). Here the controller itself does not solve anything : it does not create any controllers, it does not cause any segue. All he does is callback calls — this is the second property of our ViewController. The onSelectCity callback has no parameters. When the user presses a button, this causes the callback to be called.
City Selection Screen
import UIKit final class CitiesViewController: UITableViewController { // MARK: - Output - var onCitySelected: ((City) -> Void)? // MARK: - Private variables - private let cities: [City] = [City(name: "Moscow"), City(name: "Ulyanovsk"), City(name: "New York"), City(name: "Tokyo")] // MARK: - Table - override func tableView(_ tableView: UITableView, numberOfRowsInSection section: Int) -> Int { return cities.count } override func tableView(_ tableView: UITableView, cellForRowAt indexPath: IndexPath) -> UITableViewCell { let cell = tableView.dequeueReusableCell(withIdentifier: "cell", for: indexPath) cell.textLabel?.text = cities[indexPath.row].name return cell } override func tableView(_ tableView: UITableView, didSelectRowAt indexPath: IndexPath) { onCitySelected?(cities[indexPath.row]) } } This screen is a UITableViewController. The list of cities here is fixed, but it can come from somewhere else. Further (// MARK: - Table -) a rather trivial table code that shows a list of cities in cells.
The most interesting place here is the didSelectRowAt IndexPath handler, a well-known method. Here again the screen itself does not solve anything. What happens next after a city is selected? It simply calls a callback with the only parameter "city".
This is where the code for the screens themselves ends. As we see, they know nothing about their surroundings.
Coordinator
We turn to the link between these screens.
import UIKit protocol UpdateableWithUser: class { var user: User? { get set } } final class UserEditCoordinator { // MARK: - Properties private var user: User { didSet { updateInterfaces() } } private weak var navigationController: UINavigationController? // MARK: - Init init(user: User, navigationController: UINavigationController) { self.user = user self.navigationController = navigationController } func start() { showUserEditScreen() } // MARK: - Private implementation private func showUserEditScreen() { let controller = UIStoryboard.makeUserEditController() controller.user = user controller.onSelectCity = { [weak self] in self?.showCitiesScreen() } navigationController?.pushViewController(controller, animated: false) } private func showCitiesScreen() { let controller = UIStoryboard.makeCitiesController() controller.onCitySelected = { [weak self] city in self?.user.city = city _ = self?.navigationController?.popViewController(animated: true) } navigationController?.pushViewController(controller, animated: true) } private func updateInterfaces() { navigationController?.viewControllers.forEach { ($0 as? UpdateableWithUser)?.user = user } } } The coordinator has two properties:
- User - the user we will edit;
- NavigationController to which you want to transfer at start.
There is a simple init () that fills these properties.
Next is the start () method, which causes the ShowUserEditScreen () method to be called . Let us dwell on it in more detail. This method gets the controller from the UIStoryboard, transfers it to our local user. Then it puts down the onSelectCity callback and pushes this controller to the Navigation stack.
After the user presses the button, the onSelectCity callback is triggered, and this causes the following private method ShowCitiesScreen () to be called.
In fact, he does almost the same thing - picks up a slightly different controller from the UIStoryboard, puts on it onCitySelected a callback and pushes it into the Navigation stack - that's all that happens. When the user selects a specific city, this callback is triggered, the coordinator updates the field “city” of our local user and rolls the Navigation stack to the first screen.
Since User is a structure, updating the "city" field causes the didSet block to be called, and the private method updateInterfaces () is called accordingly. This method traverses the entire Navigation stack and tries to deploy each ViewController as the UpdateableWithUser protocol. This is the simplest protocol that has only one property - user. If it succeeds, then he passes it to the updated user. Thus it turns out that our selected user on the second screen automatically prokakyvaetsya on the first screen.
Everything is clear with the coordinator, and the only thing left to show here is the entry point to our application. This is where it all starts. In this case, this is the didFinishLaunchingWithOptions method of our AppDelegate.
import UIKit @UIApplicationMain class AppDelegate: UIResponder, UIApplicationDelegate { var window: UIWindow? var coordinator: UserEditCoordinator! func application(_ application: UIApplication, didFinishLaunchingWithOptions launchOptions: [UIApplicationLaunchOptionsKey: Any]?) -> Bool { guard let navigationController = window?.rootViewController as? UINavigationController else { return true } let user = User(name: "Pavel Gurov", city: City(name: "Moscow")) coordinator = UserEditCoordinator(user: user, navigationController: navigationController) coordinator.start() return true } } Here, navigationController comes from the UIStoryboard, a User is created, which we will edit, with a name and a specific city. Then our coordinator is created with User and navigationController. It calls the start () method. The coordinator is transferred to the local property - that’s basically all. The scheme is quite simple.
Inputs and outputs
There are several points that I would like to dwell upon. You probably noticed that the property in userEditViewController is marked with a comment as Input, and the callbacks of these controllers are marked as Output.
An input is any data that may change over time, as well as some ViewController methods that can be called outside. For example, in UserEditViewController this property User - the User itself or its City parameter can change.
An exit is any event that the controller wants to communicate to the outside world. In UserEditViewController, this is a click on the onSelectCity button, and on the city selection screen, this is a click on a cell with a specific city. The main idea here is, I repeat, that the controller knows nothing and does nothing about these events. He delegates to decide what to do, to someone else.
In Objective-C, I didn’t like to write saving callbacks because of their terrible syntax. But with Swift, this is much easier. Using callbacks in this case is an alternative to the well-known delegation pattern in iOS. Only here, instead of designating methods in the protocol and saying that the coordinator conforms to this protocol, and then somewhere to write these methods separately, we can immediately very conveniently create an entity in one place, put a callback on it and do it all.
True, with this approach, unlike delegation, there is a hard connection between the coordinator's essence and the screen, because the coordinator knows that there is a specific essence of the screen.
You can get rid of this in the same way as in delegation using protocols.
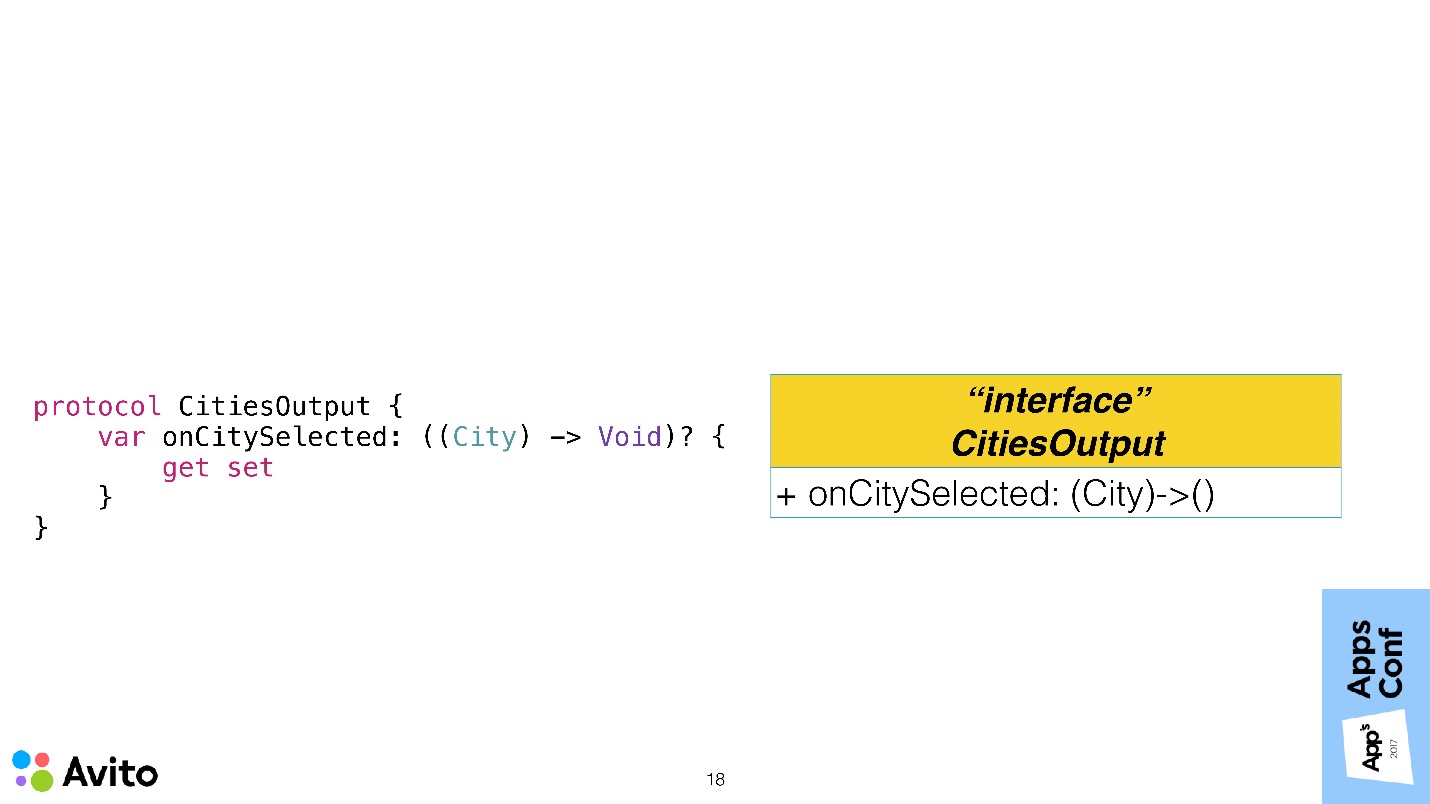
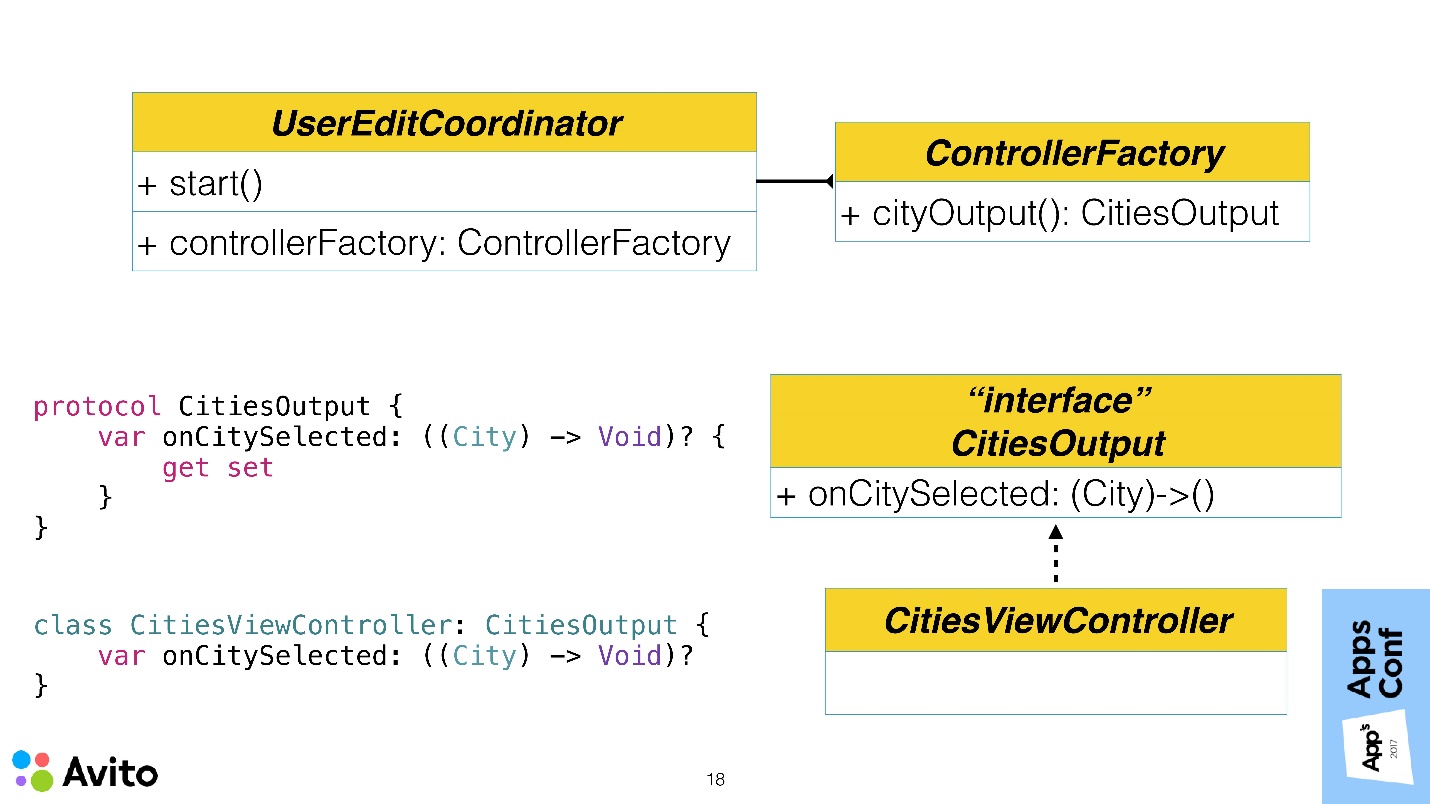
To avoid connectedness, we can close the controller's Input and Output protocol .
Above is the CitiesOutput protocol, which has exactly one requirement - the presence of an onCitySelected callback. On the left - an analogue of this scheme on Swift. Our controller conforms to this protocol, defining the necessary callback. We do this so that the coordinator does not know about the existence of the class CitiesViewController. But at some point he will need to configure the output of this controller. In order to turn all this, we add a factory to the coordinator.
The factory has a cityOutput () method. It turns out that our coordinator does not create a controller and does not receive it from somewhere. A factory is thrown to it, which returns an object closed by a protocol in the method, and he does not know what class this object is.
Now the most important thing - why bother to do it all? Why do we need to build another additional level, when there were no problems anyway?
One can imagine such a situation: the manager will come to us and ask to do A / B testing of the fact that instead of the list of cities we would have a choice of a city on the map. If in our application the choice of a city was not in one place, but in different coordinators, in different scenarios, we would have to sew up a flag in each place, throw it out, and raise either one or the other ViewController using this flag. This is not very convenient.
We want to remove this knowledge from the coordinator. Therefore, it could be done in one place. In the factory itself, we would make the parameter by which the factory returns a closed protocol, either one controller or another. Both of them would have a onCitySelected callback, and the coordinator would, in principle, not care which of these screens to work with — a map or a list.
Composition VS Inheritance
The next point that I wanted to dwell on is composition against inheritance.
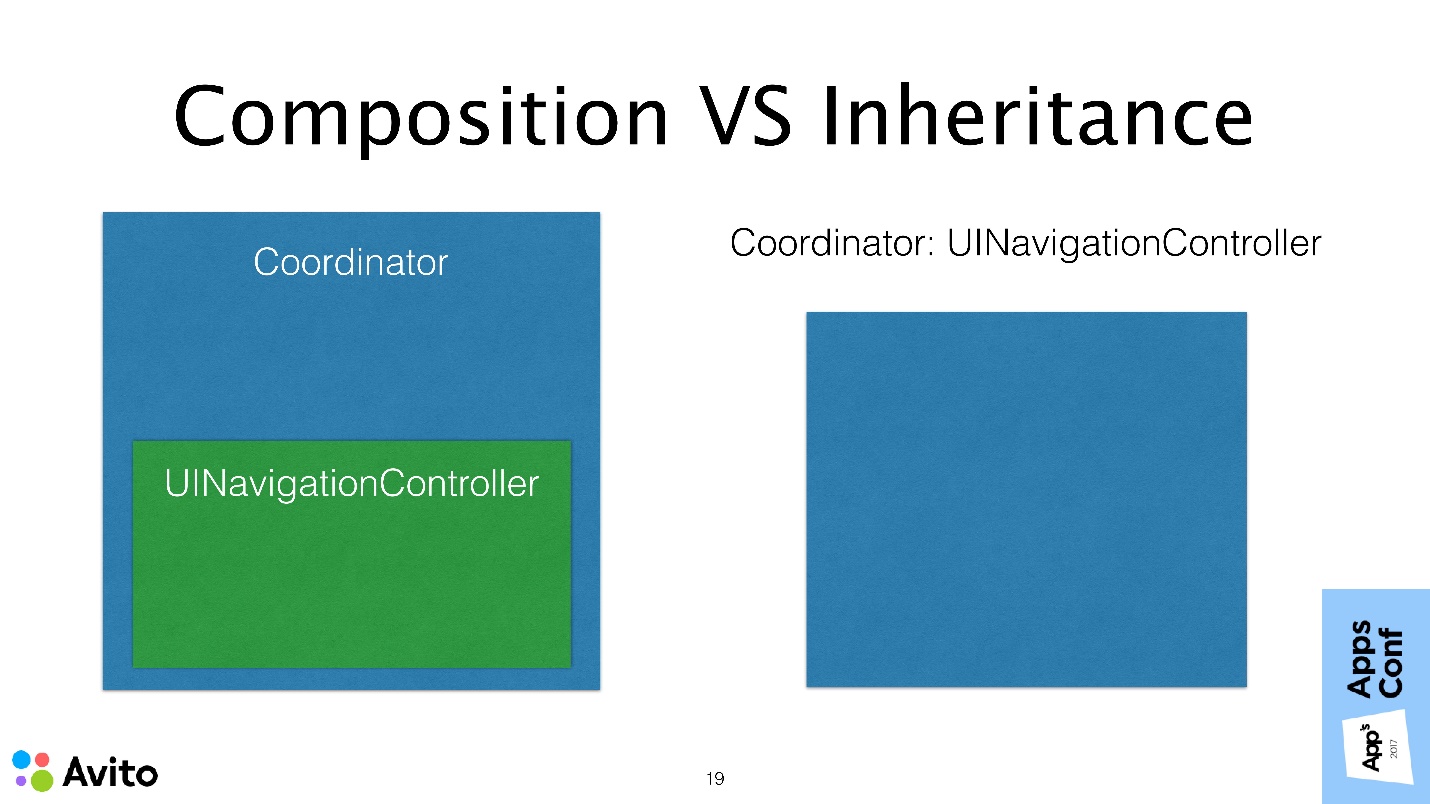
- The first method, as our coordinator can do, is to make a composition when the NavigationController is passed to it outside and stored locally as a property. It’s like a composition - we added NavigationController as a property to it.
- On the other hand, there is an opinion that everything is there in the UI Kit, and we don’t need to reinvent the wheel. You can simply take and inherit UI NavigationController .
Each option has its pros and cons, but personally it seems to me that the composition in this case is more suitable than inheritance. Inheritance in general, in principle, less flexible scheme. If we need, for example, to change Navigation to, say, a UIPageController, then in the first case we can simply close them with a general protocol, such as “Show the next screen” and conveniently substitute the container we need.
From my point of view, the most important argument is that you hide from the end user in the composition all the methods that he does not need. It turns out that he has less chance to stumble. You leave only the API that is needed , for example, the Start method - and that's it. It does not have the ability to call the PushViewController method, PopViewController, that is, to somehow interfere in the activities of the coordinator himself. All methods of the parent class are hidden.
Storyboards
I believe that they deserve special attention along with segues. Personally, I support segues , as they allow you to visually quickly familiarize yourself with the script. When a new developer comes, he does not need to climb the code, Storyboards help with this. Even if you make an interface with the code, you can leave blank the ViewController, and impose an interface with the code, but leave at least the transitions and the whole point. The whole essence of Storyboards is in the transitions themselves, and not in the UI layout.
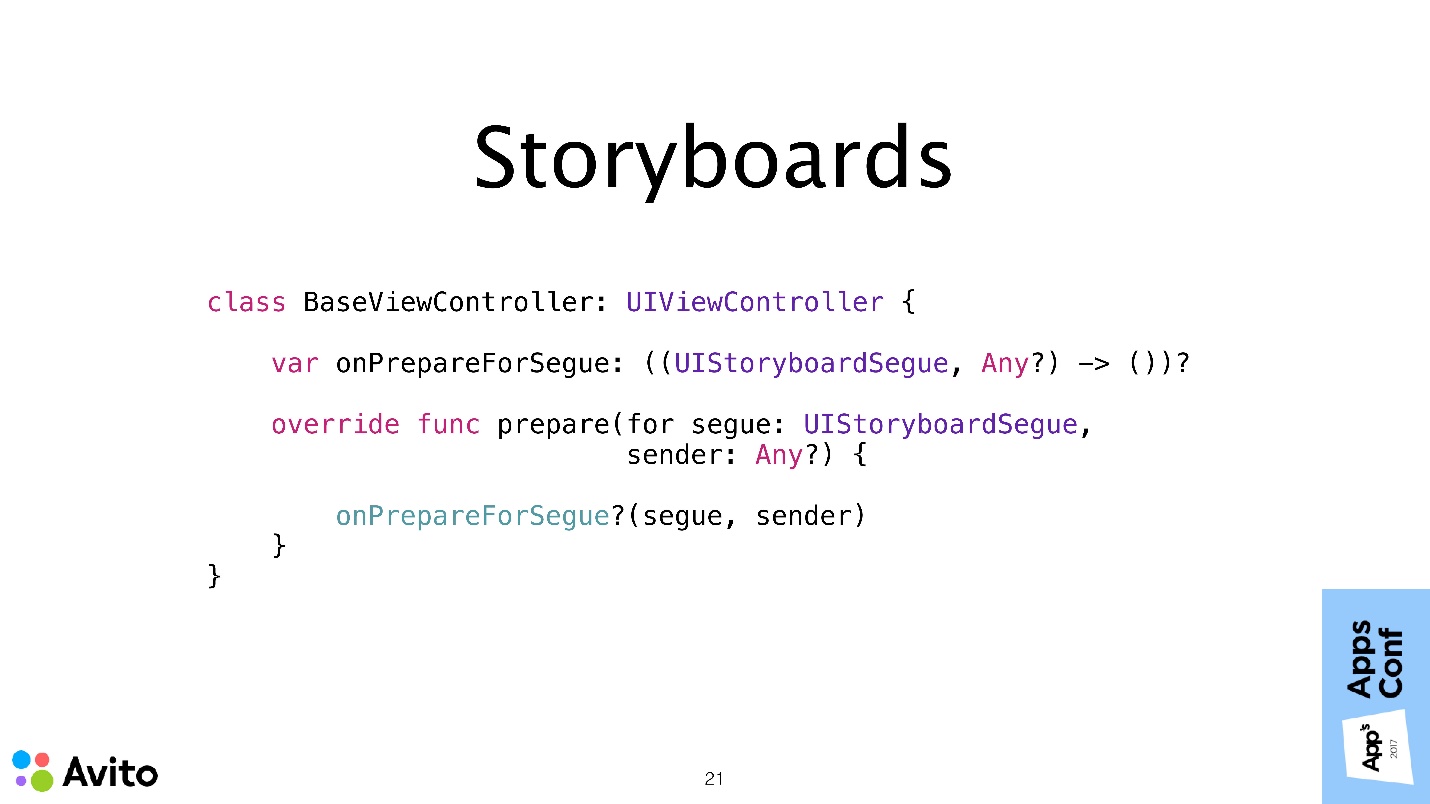
Fortunately, the approach with the coordinators does not limit the choice of tools . We can safely use coordinators along with segues. But it must be remembered that now we cannot work with segues inside a UIViewController.
Therefore, we must in our class override the onPrepareForSegue method. Instead of doing something inside the controller, we will delegate these tasks to the coordinator again, through a callback. The onPrepareForSegue method is called, you do not do anything yourself - you do not know what the segue is, what the destination controller is, it doesn’t matter to you. You just throw it all into a callback, and the coordinator will figure it out. He has this knowledge, you do not need this knowledge.
In order to make everything easier, you can do it in a certain Base class, so as not to override it in each individual controller. In this case, the coordinator will be more convenient to work with your segues.
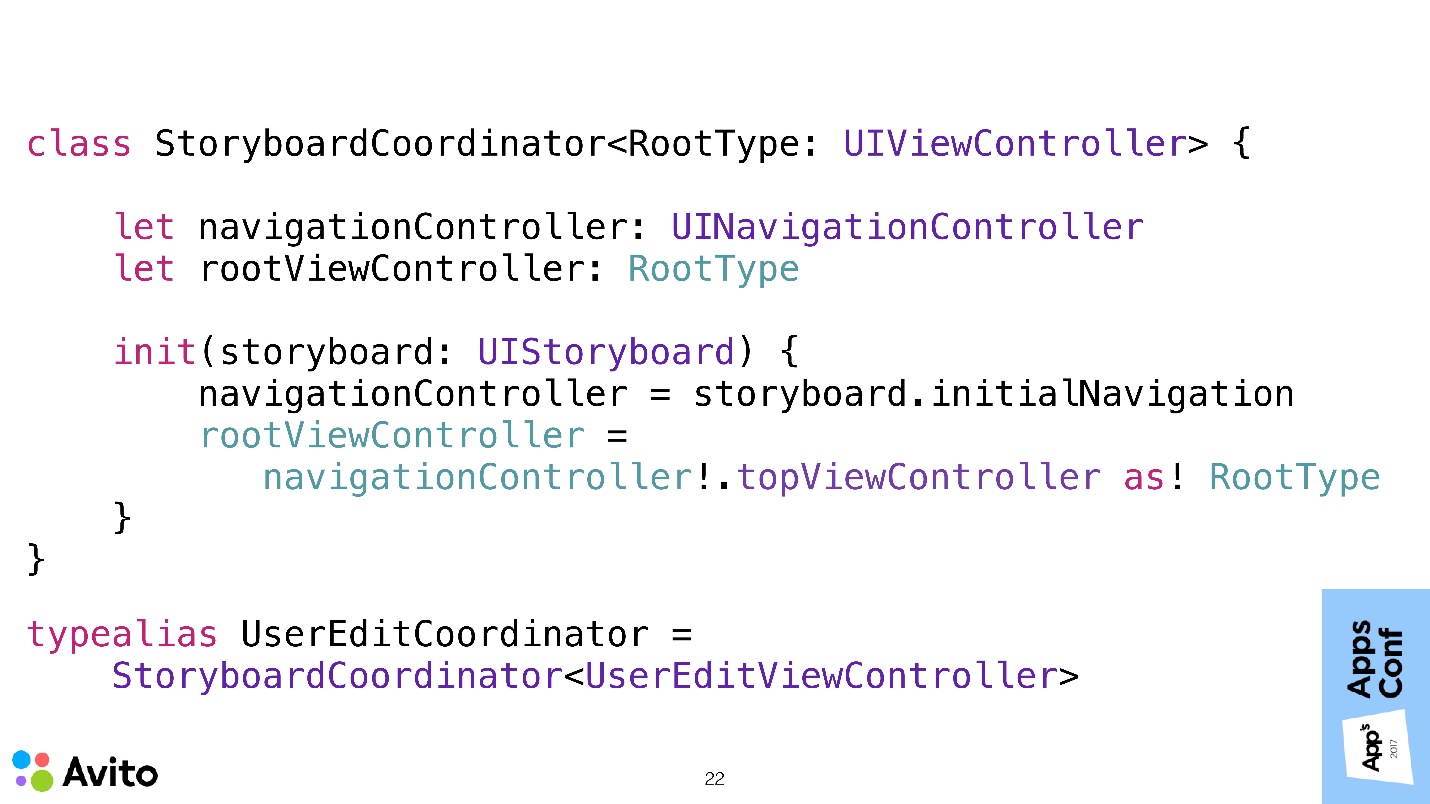
Another thing I find comfortable with a Storyboard is to stick to the rule that one Storyboard is equal to one coordinator . Then you can greatly simplify everything, make one class at all - the StoryboardCoordinator, and generate the RootType parameter in it, make the initial Navigation controller in the Storyboard and wrap the entire script in it.
As you can see, here the coordinator has 2 property: navigationController; rootViewController of our RootType generic type. During initialization, we give it not a specific navigationController, but a Storyboard, from which our root Navigation and its first controller fall. Thus, we will not even need to call any Start methods. That is, you created a coordinator, he immediately has Navigation, and immediately there is Root. You can either show the Navigation modally, or take the Root and launch into the existing navigation and continue working.
Our UserEditCoordinator in this case would simply be typealias, substituting the type of its RootViewController in a generic parameter.
Data transfer back to the script
Let's talk about solving the last problem, which I identified at the beginning. This is the transfer of data back to the script.
Consider the same scenario of choosing a city, but now it will be possible to choose not one city, but several. In order to show the user that he has selected several cities within one region, we will show a small number next to the region name on the screen with a list of regions, showing the number of cities selected in this region.
It turns out that the action on one controller (on the third) should lead to a change in the appearance of several others at once. That is, in the first one we have to show in the cell with the city, and in the second we must update all the figures from the selected regions.
The coordinator simplifies this task by transferring data back to the script — this is now as easy as transferring data forward to the script.
What's going on here? The user selects a city. This message is sent to the coordinator. The coordinator, as I showed in the demo, is passed through the entire navigation stack and sends updated data to all interested parties. Accordingly, the ViewController can update its View with this data.
Refactoring existing code
How to refactor existing code if you want to implement this approach in an existing application, where is MVc, MVVm or MVp?
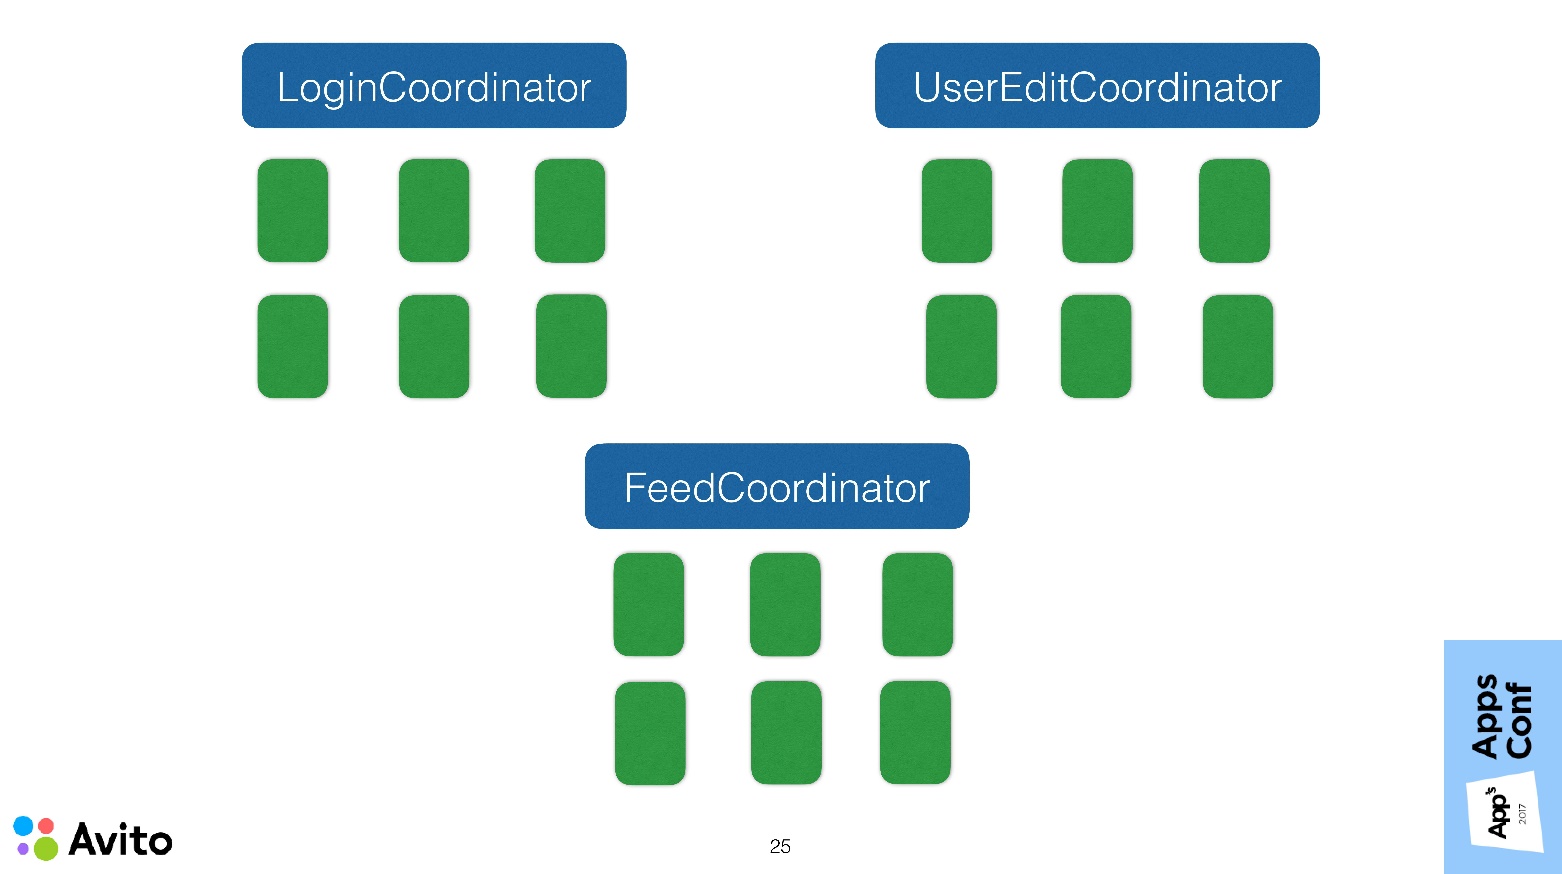
You have a pack of ViewController. The first thing to do is to divide them into scenarios in which they participate. In our example there are 3 scenarios: authorization, profile editing, tape.
Every script we now wrap inside our coordinator. We should be able to, in fact, start these scenarios from anywhere in our application. There must be flexibility in this - the coordinator must be completely self-sufficient .
This approach in the development provides additional convenience. It lies in the fact that if you are currently working with a specific scenario, you do not need to repeat it every time you start it. You can quickly start it when you start it, edit something in it, and then remove this temporary start.
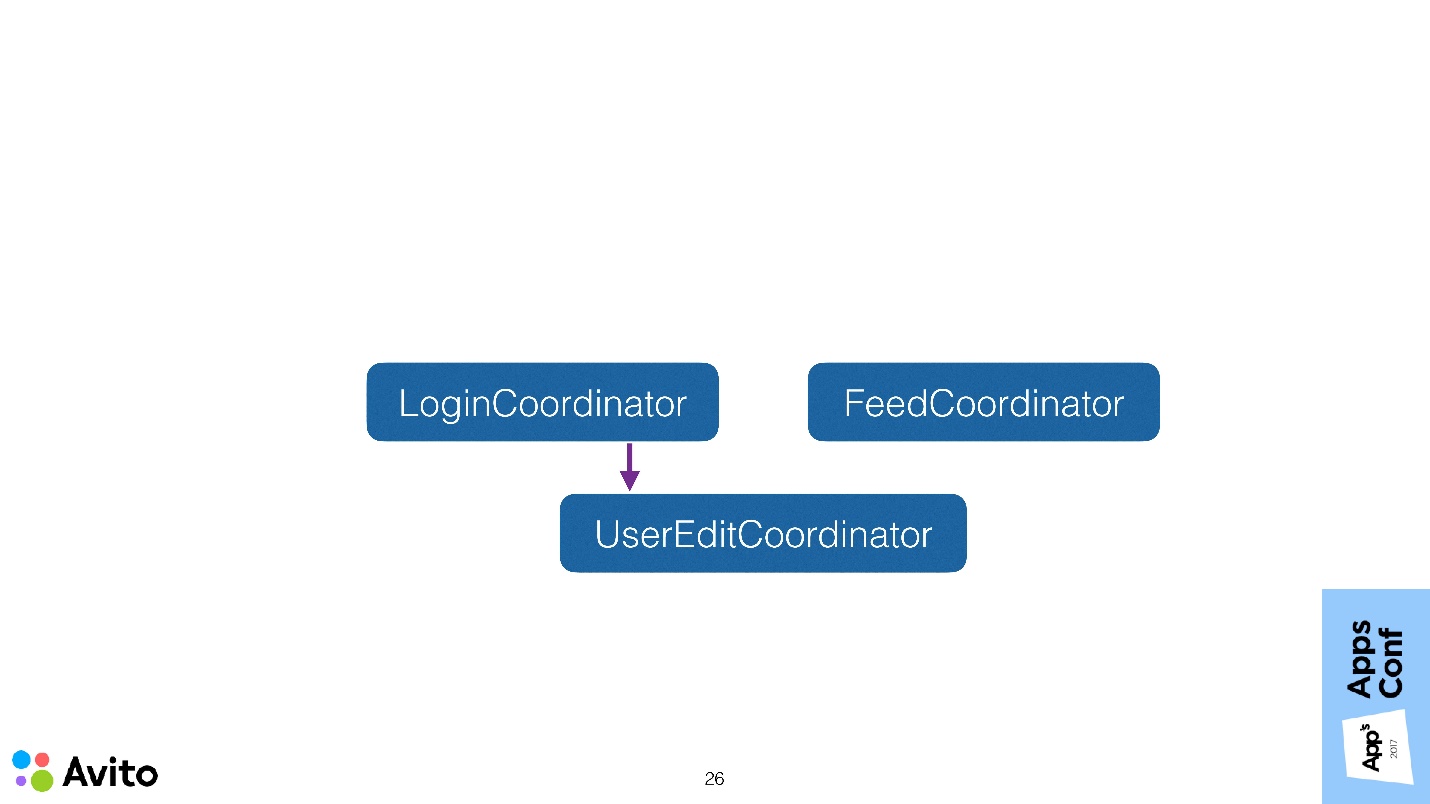
After we have decided on our coordinators, we need to determine which scenario could lead to the start of another, and from these scenarios make a tree.
In our case, the tree is simple: the LoginCoordinator can start the profile editing coordinator. Here, almost everything falls into place, but a very important detail remains - our scheme lacks an entry point.
This entry point will be a special coordinator - ApplicationCoordinator . It is created and started by AppDelegate , and then it already controls the logic at the application level, that is, by which coordinator starts right now.
We just looked at a very similar scheme, only ViewController instead of coordinators was on it, and we made sure that ViewController did not know anything about each other and did not pass data to each other. With the coordinators, in principle, you can do the same. We can mark at them a certain Input (Start method) and Output (onFinish callback). Focal points become independent, reusable, and easy to test . Coordinators no longer know about each other and communicate, for example, only with ApplicationCoordinator.
You need to be careful, because if your application has a lot of these scenarios, then ApplicationCoordinator can turn into a huge god object, it will know about all existing scenarios - this is also not very cool. Here one must already look — perhaps, to split the coordinators into sub-coordinators, that is, to think up such an architecture so that these objects do not grow to incredible sizes. Although size is not always a reason for refactoring .
Where to start
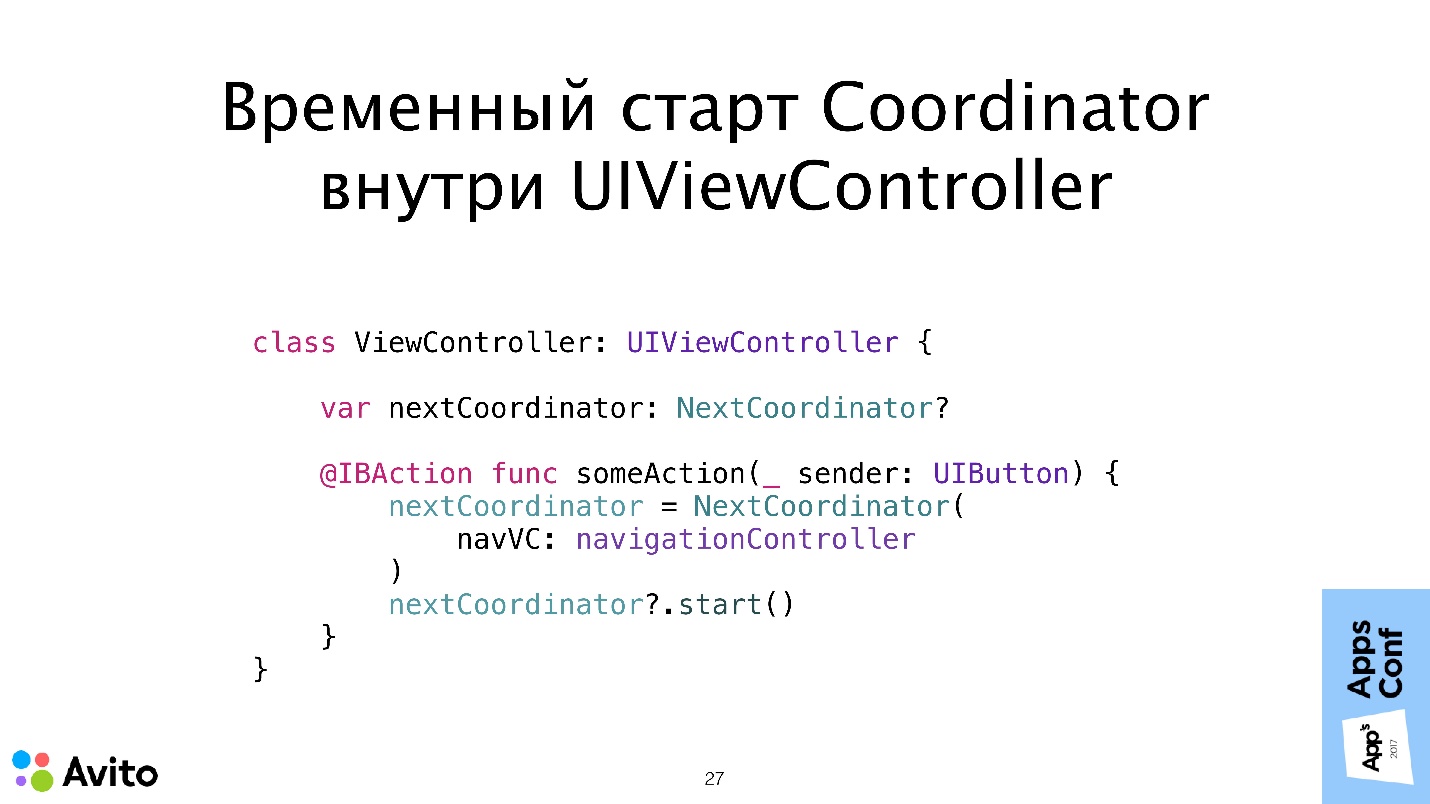
I advise starting from the bottom up - first implement the individual scenarios.
As a temporary solution, they can be started inside the UIViewController. That is, as long as you do not have Root or other coordinators, you can make one coordinator and, as a temporary solution, start it from UIViewController, saving it locally in property (as above is nextCoordinator). When an event occurs, you, as I showed in the demo, create a local property, put a coordinator there and call the Start method on it. Everything is very simple.
Then, when all these coordinators have already been done, the start of one inside the other looks exactly the same. You have a local property or an array of dependencies of the coordinator type, you put all this in there so that it does not run away, and call the Start method.
Total
- Independent screens and scripts that do not know anything about each other do not communicate with each other. We tried to achieve this.
- Easily change the order of screens in the application without changing the screen codes. If everything is done as needed, the only thing that should change in the application when the script changes is not the screen code, but the coordinator code.
- It simplifies the transfer of data between screens and other tasks that involve the connection between screens.
- — , .
AppsConf 2018 8 9 — ! ( ) . — iOS Android, , , , .
Source: https://habr.com/ru/post/423299/
All Articles