Download field we deserve
Everything flows, everything changes, but only
Using the example of creating a field for uploading files, I will show you how to hide
Let's start with the HTML markup:
Perhaps the main element that is worth paying attention to is
')
The HTML specification does not allow us to overlay visual properties directly on
A plan of action emerges: we stylize the label as we like, and we hide the
Now let's stylize our tag:
What we are striving for (

Of course, it was possible to center the label, add a background and border, having received a full button, but our priority is Drag-and-Drop.
Now we need to hide the
Let us position our
Congratulations, we achieved what we wanted: our field looks exactly like in the previous picture.
Since our
Our task is to select the label in a certain way at the moment when the focus is located on the file upload field. But how can we do this if the label cannot receive the focus? CSS3 connoisseurs will immediately think about the pseudo-class
But again, not so simple. First, let's discuss how we should highlight the label. As you know, all modern and not very browsers have unique default properties for elements in focus. Basically, this is the
In browsers based on the WebKet engine (Google Chrome, Opera, Safari), the default property for the elements in focus is:
Here,
We open Google Chrome or Opera, we look. Everything works as it should:

Let's see how things are with the focus in Mozilla Firefox and Microsoft Edge. For these browsers, the default property is:
and
respectively.
Unfortunately, the
Add a style from Mozilla Firefox before the style for WebKit: first, all browsers use the first property, and then those that can (Google Chrome, Opera, Safari, etc.), apply the second.
And here the strange begins: in Edge everything works fine, but Firefox, for some unknown reason, refuses to apply properties to the label while focusing on
Well, nothing, normal characters always go around. As I said earlier, the
We will describe the class
Now everything works as it should. Congratulations, with the focus, we figured out.
Work with Drag-and-Drop is carried out by tracking special browser events:
First, let's define the Drag-and-Drop-element:
Then we will describe in CSS a special class that we will assign to the
Now let's go to the js file. First, we need to undo all default actions on drag-and-drop events. For example, one of these events is the opening of a thrown file by the browser. We do not need this at all, so we will write the following lines:
In jQuery, calling the
Let's start describing our own event handler. Let's do the same thing as we did with the focus, but this time we’ll track the
And again an unpleasant surprise awaits us: when moving along the
And this flicker occurs due to the fact that when you hover over a
And again we have to somehow get out. If the browser itself does not understand that we are not leaving the field, we will have to help him. And we will do this through additional conditions: we will calculate the coordinates of the mouse relative to the
And everything, the problem is solved! This is how our field with the file inside looks like:
We proceed to the processing of the
First, remove the
Now let's work through the loading method via
We follow the
The last stage - the description of the file processing function - is unique for everyone. It will directly depend on the goal you are pursuing. For example, I'll show you how to send files to the server via AJAX.
Suppose we create a field for uploading photos. We don’t want something else to come to our server, so we’ll define the file types: let it be PNG and JPEG. It is also worth regulating the maximum size of a single photo that a user can send. We restrict ourselves to five megabytes. We begin to describe our function:
In the
Now everything is ready to send files via AJAX. Add the following lines to our function:
As the
Congratulations, now you can create your own file upload field! Of course, I do not position my method as the only correct and correct one. I set my task to show the general course of solving this problem, suitable primarily for beginners. If you think that somewhere something could have been done better - write in the comments, discuss!
That's all. Thanks for attention!
Download:
Feel for:
input[type=file] as it spoiled the nerves of all novice web developers, and continues to do so until now. Remember yourself N years ago, when you were just beginning to comprehend the basics of creating websites. Young and inexperienced, you were genuinely surprised when the file selection button completely refused to change the color of its background to your favorite peach. It was at that moment that you first encountered this invincible iceberg called “Uploading Files”, which to this day continues to “drown” novice web developers.Using the example of creating a field for uploading files, I will show you how to hide
input[type=file] correctly, adjust the focus on an object that cannot focus, process Drag-and-Drop events and send files via AJAX. And also I will introduce you to a couple of browser bugs and ways to work around them. The article is written for beginners, but in some moments it can be useful and entertaining even for experienced developers.Layout and Primary Styles
Let's start with the HTML markup:
<!DOCTYPE html> <html lang="en"> <head> <meta charset="UTF-8"> <title> , </title> <link rel="stylesheet" href="style.css"> <script type="text/javascript" src="jquery-3.3.1.min.js"></script> <script type="text/javascript" src="script.js"></script> </head> <body> <form id="upload-container" method="POST" action="send.php"> <img id="upload-image" src="upload.svg"> <div> <input id="file-input" type="file" name="file" multiple> <label for="file-input"> </label> <span> </span> </div> </form> </body> </html> Perhaps the main element that is worth paying attention to is
')
<label for="file-input"> </label> The HTML specification does not allow us to overlay visual properties directly on
input[type=file] , but we have a label tag, clicking on which causes a click on the form element to which it is attached. To our joy, this tag has no limitations in styling: we can do whatever we want with it.A plan of action emerges: we stylize the label as we like, and we hide the
input[type=file] out of sight. First, let's set up the general page styles: body { padding: 0; margin: 0; display: flex; justify-content: center; align-items: center; min-height: 100vh; } #upload-container { display: flex; justify-content: center; align-items: center; flex-direction: column; width: 400px; height: 400px; outline: 2px dashed #5d5d5d; outline-offset: -12px; background-color: #e0f2f7; font-family: 'Segoe UI'; color: #1f3c44; } #upload-container img { width: 40%; margin-bottom: 20px; user-select: none; } Now let's stylize our tag:
#upload-container label { font-weight: bold; } #upload-container label:hover { cursor: pointer; text-decoration: underline; } What we are striving for (
input[type=file] removed from markup):Of course, it was possible to center the label, add a background and border, having received a full button, but our priority is Drag-and-Drop.
Hide input
Now we need to hide the
input[type=file] . The first thing that catches your head is the display: none and visibility: hidden properties. But it is not so simple. On some older browsers, clicking on the tag will stop producing any effect. But that's not all. As you know, invisible elements can not get the focus, and no matter what they say, the focus is important, because for some people this is the only way to interact with the site. So this method does not suit us. Let's take a detour: #upload-container div { position: relative; z-index: 10; } #upload-container input[type=file] { width: 0.1px; height: 0.1px; opacity: 0; position: absolute; z-index: -10; } Let us position our
input[type=file] relative to its parent unit, reduce it to 0.1px , make it transparent and set its z-index less than that of the parent, so that, so to speak, for sure.Congratulations, we achieved what we wanted: our field looks exactly like in the previous picture.
Adjust the focus
Since our
input[type=file] physically present on the page, it has the ability to receive focus. That is, if we press the Tab key on the page, then at some point the focus will shift to input[type=file] . But the problem is that we will not see it: there will be a field that we have hidden. Yes, if at this moment we press Enter , then the dialog box will open and everything will work as it should, but how do we understand that it is time to press?Our task is to select the label in a certain way at the moment when the focus is located on the file upload field. But how can we do this if the label cannot receive the focus? CSS3 connoisseurs will immediately think about the pseudo-class
:focus , which defines styles for elements in focus, and selectors + or ~ , which choose right neighbors: elements located at the same level of nesting after the selected element. If we consider that in our markup, input[type=file] is located right in front of the label tag, the following entry takes place: #upload-container input[type=file]:focus + label { /* */ } But again, not so simple. First, let's discuss how we should highlight the label. As you know, all modern and not very browsers have unique default properties for elements in focus. Basically, this is the
outline property, which creates a stroke around the element that differs from the border in that it does not change the size of the element and can be moved away from it. As a rule, people use only one browser, so they get used to its standards. To make it easier for people to navigate on our site, we must try to adjust the focus so that it looks as natural as possible for most popular modern browsers. In theory, using JavaScript, you can get information about the browser through which the user opened the site, and adjust the styles accordingly, but this article is too complex and cumbersome as part of an article intended primarily for beginners. We will try to do a little blood.In browsers based on the WebKet engine (Google Chrome, Opera, Safari), the default property for the elements in focus is:
:focus { outline: -webkit-focus-ring-color auto 5px; } Here,
-webkit-focus-ring-color is a focal stroke -webkit-focus-ring-color specific only for this engine. That is, this line will work exclusively in WebKit-browsers, and this is exactly what we need. We indicate this property for our label: #upload-container input[type=file]:focus + label { outline: -webkit-focus-ring-color auto 5px; } We open Google Chrome or Opera, we look. Everything works as it should:
Let's see how things are with the focus in Mozilla Firefox and Microsoft Edge. For these browsers, the default property is:
:focus { outline: 1px solid #0078d7; } and
:focus { outline: 1px solid #212121; } respectively.
Unfortunately, the
-moz- prefix with the outline property will not work. Therefore, we have to choose which of these two properties we choose. Since the number of Firefox users is much higher, it is more rational to give preference to this particular browser. This does not mean that we are depriving Edge users and other browsers of the opportunity to see where the focus is now, it’s just that they will look like “non-native”. Well, you have to make sacrifices.Add a style from Mozilla Firefox before the style for WebKit: first, all browsers use the first property, and then those that can (Google Chrome, Opera, Safari, etc.), apply the second.
#upload-container input[type=file]:focus + label { outline: 1px solid #0078d7; outline: -webkit-focus-ring-color auto 5px; } And here the strange begins: in Edge everything works fine, but Firefox, for some unknown reason, refuses to apply properties to the label while focusing on
input[type=file] . And the focus event itself happens - checked through JavaScript. Moreover, if we forcefully set the focus on the file selection field through the developer tools, the property will be applied and our stroke will appear! Apparently, this is a bug of the browser itself, but if someone has an idea why this happens, write in the comments.Well, nothing, normal characters always go around. As I said earlier, the
focus event happens, which means we can adjust the properties directly from JavaScript. But for this we will have to change the logic of our selector: #upload-container label.focus { outline: 1px solid #0078d7; outline: -webkit-focus-ring-color auto 5px; } We will describe the class
.focus for our label and we will add it every time when input[type=file] gets the focus and remove when it loses. $('#file-input').focus(function() { $('label').addClass('focus'); }) .focusout(function() { $('label').removeClass('focus'); }); Now everything works as it should. Congratulations, with the focus, we figured out.
Drag-and-drop
Work with Drag-and-Drop is carried out by tracking special browser events:
drag, dragstart, dragend, dragover, dragenter, dragleave, drop . A detailed description of each of them you can easily find on the Internet. We will track only some of them.First, let's define the Drag-and-Drop-element:
var dropZone = $('#upload-container'); Then we will describe in CSS a special class that we will assign to the
dropZone when the cursor that pulls the file is directly above it. This is necessary to visually inform the user that the file can already be released. #upload-container.dragover { background-color: #fafafa; outline-offset: -17px; } Now let's go to the js file. First, we need to undo all default actions on drag-and-drop events. For example, one of these events is the opening of a thrown file by the browser. We do not need this at all, so we will write the following lines:
dropZone.on('drag dragstart dragend dragover dragenter dragleave drop', function(){ return false; }); In jQuery, calling the
return false equivalent to calling two functions at once: e.preventDefault() and e.stopPropagation() .Let's start describing our own event handler. Let's do the same thing as we did with the focus, but this time we’ll track the
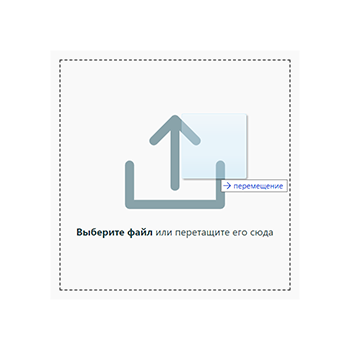
dragenter and dragover to add a class and the dragleave event to remove it: dropZone.on('dragover dragenter', function() { dropZone.addClass('dragover'); }); dropZone.on('dragleave', function(e) { dropZone.removeClass('dragover'); }); And again an unpleasant surprise awaits us: when moving along the
dropZone with the mouse with the file, the field starts to flicker. It happens in Microsoft Edge and WebKit-browsers. By the way, most of these WebKit browsers currently run on the Blink engine (appreciated the irony, huh?). But in Mozilla nothing flickers. Apparently, I decided to correct after the bugs with the focus.And this flicker occurs due to the fact that when you hover over a
dropZone child element, be it a picture or a div with a file selection field and a label, for some reason, the dragleave event is dragleave . It is obvious to us that we are not leaving the field, but for some reason, there is no browsers, and because of this, they .focus the dropZone class from dropZone .And again we have to somehow get out. If the browser itself does not understand that we are not leaving the field, we will have to help him. And we will do this through additional conditions: we will calculate the coordinates of the mouse relative to the
dropZone , and then we will check if the cursor is outside the block. If left, then remove the style: dropZone.on('dragleave', function(e) { let dx = e.pageX - dropZone.offset().left; let dy = e.pageY - dropZone.offset().top; if ((dx < 0) || (dx > dropZone.width()) || (dy < 0) || (dy > dropZone.height())) { dropZone.removeClass('dragover'); }; }); And everything, the problem is solved! This is how our field with the file inside looks like:
We proceed to the processing of the
drop event itself. But first, remember that, in addition to Drag-and-Drop, we have input[type=file] , and each of these methods is independent in its essence, but must perform the same actions: upload files. Therefore, I propose to create a separate function, universal for both methods, to which we will transfer files, and it will already decide what to do with them. Let's call it sendFiles() , but we sendFiles() describe it a bit later. First, let's handle the drop event: dropZone.on('drop', function(e) { dropZone.removeClass('dragover'); let files = e.originalEvent.dataTransfer.files; sendFiles(files); }); First, remove the
.dragover class from the dropZone . Then we get an array containing the files. If you use jQuery, then the path will be e.originalEvent.dataTransfer.files , if you write in pure JS, then e.dataTransfer.files . Well, then we pass the array to our as yet unimplemented function.Now let's work through the loading method via
input[type=file] : $('#file-input').change(function() { let files = this.files; sendFiles(files); }); We follow the
change event on the file selection button, get an array through this.files and send it to the function.Sending files via AJAX
The last stage - the description of the file processing function - is unique for everyone. It will directly depend on the goal you are pursuing. For example, I'll show you how to send files to the server via AJAX.
Suppose we create a field for uploading photos. We don’t want something else to come to our server, so we’ll define the file types: let it be PNG and JPEG. It is also worth regulating the maximum size of a single photo that a user can send. We restrict ourselves to five megabytes. We begin to describe our function:
function sendFiles(files) { let maxFileSize = 5242880; let Data = new FormData(); $(files).each(function(index, file) { if ((file.size <= maxFileSize) && ((file.type == 'image/png') || (file.type == 'image/jpeg'))) { Data.append('images[]', file); } }); }; In the
maxFileSize variable, we maxFileSize maximum file size that we will send to the server. FormData() function, we will create a new object of the FormData class, allowing us to form sets of key-value pairs. Such an object can be easily sent via AJAX. Next, we use the jQuery .each construction for the files array, which will apply the function we set for each of its elements. As arguments, the function will be the sequence number of the element and the element itself, which we will process as index and file respectively. In the function itself, we check the file for compliance with our criteria: the size is less than five megabytes, and the type is PNG or JPEG. If the file passes the check, then add it to our FormData object by calling the append() function. The key is the string 'photos[]' , the square brackets at the end of which denote that it is an array in which there can be several objects. The object itself will be file .Now everything is ready to send files via AJAX. Add the following lines to our function:
$.ajax({ url: dropZone.attr('action'), type: dropZone.attr('method'), data: Data, contentType: false, processData: false, success: function(data) { alert(' '); } }); As the
url and type parameters, we specify the values of the action and method attributes for input[type=file] respectively. We will transmit the Data object via AJAX. Parameters contentType: false and processData: false are needed so that the browser does not accidentally transfer our files to some other format. In the success parameter we indicate the function that will be executed if the files are successfully transferred to the server. Its content depends on your imagination, but I will confine myself to the modest output of a message about a successful download.Congratulations, now you can create your own file upload field! Of course, I do not position my method as the only correct and correct one. I set my task to show the general course of solving this problem, suitable primarily for beginners. If you think that somewhere something could have been done better - write in the comments, discuss!
That's all. Thanks for attention!
Download:
Feel for:
Source: https://habr.com/ru/post/423035/
All Articles