AliceVision: command line photogrammetry
Do you need to automate a huge number of photogrammetric scans? Then I have good news for you.
The video shows an open source Meshroom photogrammetry program. This project in various forms has been around for quite some time, but recently developers have released binaries, so you can just download and use them. The video demonstrates the use of GUI for loading images, processing them, changing parameters, etc. I recommend you to try this program in action.
But I am interested in full automation. If you have a scanner with 100 or more scans per day, then you need a fully automated solution for batch processing of these files. This post is a guide and / or tutorial for solving this task.
For a start, it is important to understand that Meshroom is not a giant, monolithic project. In fact, the processing itself is performed by separate C ++ programs running from the command line, and the Meshroom is a thin Python padding program that executes the corresponding calls. Therefore, instead of using Meshroom, we will apply these programs directly. Note that full sources are available, so you can link libraries directly.
')
Meshroom has one more convenient feature: when performing each operation, its command is displayed in the terminal. Therefore, in order to create the steps of this process, I simply worked with the Meshroom and looked at the teams. Then I looked into the code to change some parameters. In addition, it seems that when you launch Meshroom, you can order it to collect a set of images from the command line, but I prefer not to connect these steps.
0: Requirements
Meshroom / AliceVision will not run on every platform. Some steps require CUDA, so you need an NVIDIA GPU to build depth maps. Unfortunately, it is impossible to use CPU fallback (transferring GPU functions to the CPU), otherwise the program would work fine on Windows and Linux. The instructions in this article are for Windows, but with minimal changes you can tweak them under Linux.
1: Download the Meshroom release
Meshroom 2018.1.0
The first thing you need to do is install Meshroom . Select the folder from which you want to do the work, and then download the latest version. There are binary files of all dependencies in the zip file.
If you are drawn to adventure, you can try building a program yourself. The release dynamic-link libraries work fine (/ MD), but I had to hack cmake files to create debug builds and / or static-link builds. If you will build a program for Windows, then EXTREMELY recommend using VCPKG.
2: Download data
alicevision / dataset_monstree
Obviously, the whole point of photogrammetry software is to process your own images, but for a start, I suggest using images that are guaranteed to fit. They will allow you to find the sources of the problems if something goes wrong. Fortunately, the developers have released a set of images for their test tree.
3: Download the run_alicevision.py script
run_alicevision.zip
This is the script that we will use. Just download the zip file and unzip it into a working folder.
4: Install Python
https://www.python.org/download/releases/2.7/
Install Python if you have not done so already. Yes, I'm still writing code for Python 2.7.0. The easiest way to install Windows X86-64 MSI Installer from releases.
5: Install Meshlab (optional)
Meshlab
As an optional step, you must also install MeshLab . In fact, it will not be necessary for processing, but at several stages the data is output in the PLY point files. They cannot be loaded into Maya , so I use MeshLab to view them.
After unpacking all files, the folder should look like this (except for the build_files folder, which is generated by scripts):

Here is the following:
Now it's time to take a closer look at run_alicevision.py
The python file takes 5 arguments:
To summarize: we start with 6 images that look like this:

Using the python script run_alicevision.py, we are going to create the following folder structure:

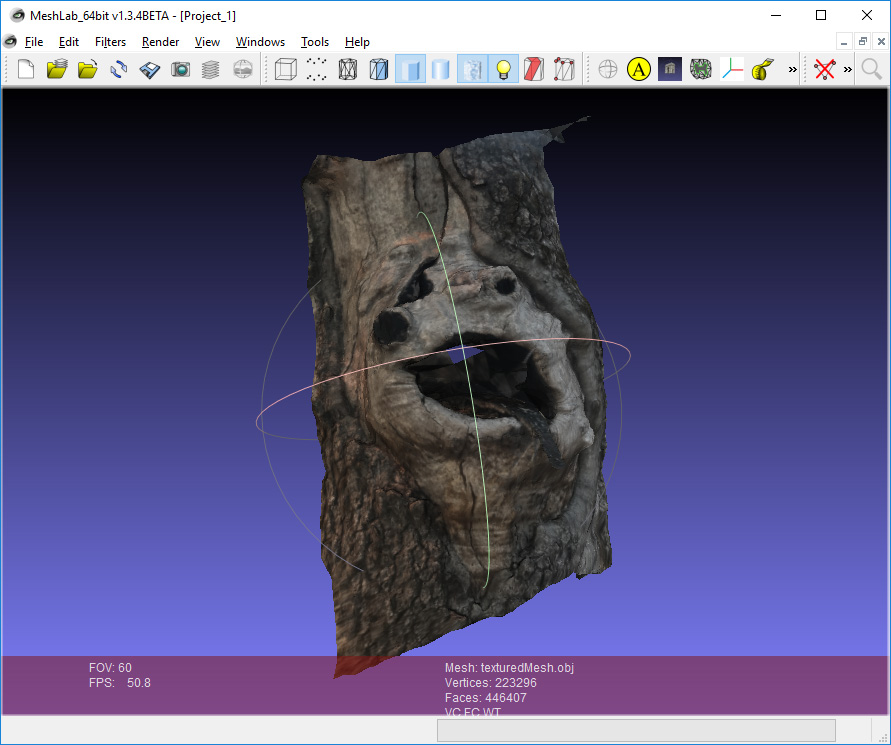
And in the 11_Texturing folder there will be a ready-made model opened in Meshlab :
Each of these folders is one of the stages. We can either run them in turn using the run_monstree_runXX.bat files, or use run_monstree_all.bat to collect them all at once.
That's all. Now you can run the file run_monstree_all.bat , or perform one step at a time. You can look at the script to understand its work. For those who want to be able to customize the processing pipeline, I have prepared an introduction to the individual steps.
00_CameraInit
The first step will generate an SFM file. SFM files are JSON files that store camera size, sensor information, found 3d points (observations), distortion factors, and other information. The original SFM file in this folder will contain only sensor information and select default values from the local sensor database. Subsequent steps will create SFM files containing full matrices of camera external parameters, points, etc.
You may need to customize this step. If you are using a 4-camera setup, but take 10 shots of an object rotating on a turntable, then an SFM file with 40 images, but with just 4 different sensor calibrations, comes in handy. This is the main reason why I like the structure of AliceVision . It is easy to customize batch operations (for example, generating your own SFM file) without suffering, with customizing other software elements that you shouldn’t touch.
01_FeatureExtraction
The next stage extracts the features from the images, as well as the descriptors of these features. It will change the file extension depending on the type of feature being extracted.
02_ImageMatching
02_ImageMatching is a post-processing step that determines which of the images is logical to compare with each other. If you have a set of 1000 images, then a rough search of all 1000 images to match all 1000 images will require 1 million pairs. This may take a long time (actually half the time, but you understand the principle). Stage 02_ImageMatching cuts these pairs.
03_FeatureMatching
03_FeatureMatching finds matches between images using feature descriptors. The txt files generated by it do not need an explanation.
04_StructureFromMotion
So, this is the first serious stage. Based on the 04_StructureFromMotion correspondences, it calculates camera positions as well as internal camera parameters. Note that the term “Structure From Motion” is used as a generic term for calculating camera positions. If you have a setup for photogrammetry of 10 synchronized cameras, then “Structure From Motion” is used to bind them, even if nothing really moves.
By default, Meshroom stores all calculated data as an Alembic file, but I prefer to store it in an SFM file. This stage creates intermediate data to ensure that cameras are properly linked. At the output, the script creates PLY files that can be viewed in Meshlab . The following files are important:
Here is the cloud_and_poses.ply file. Green dots are cameras. I believe that this format is best suited for checking the absence of gross errors in the binding of cameras. If an error occurs somewhere, you can go back and change the features, matches, or SFM parameters.

05_PrepareDenseScene
The main objective of 05_PrepareDenseScene is to eliminate image distortions. It generates EXR images without distortion, so that subsequent stages of calculating depths and projections do not need to perform back-to-back conversions from the distortion function. Images look like this:

It should be noted that you will see black areas. Subsequent stages of AliceVision do not use a real camera matrix. Instead, we pretend that the camera has a new matrix without distortion, and 05_PrepareDenseScene deforms the original image under this fictional matrix. Since this new virtual sensor is larger than the current sensor, some areas will be empty (black).
06_CameraConnection
Strictly speaking, this stage violates the principle of our work process. All stages were designed so that each folder becomes a completely unique separate stage. However, 06_CameraConnection creates the camsPairsMatrixFromSeeds.bin file in the 05_PrepareDenseScene folder, because this file must be in the same folder as the image without distortion.
07_DepthMap
This is the longest stage of AliceVision : generating depth maps. It creates a depth map for each image as an EXR file. I set it up to make it easier to see. You can see a small “tongue” protruding from the tree.

Since this stage takes a lot of time, there is a parameter that allows us to launch groups of different cameras as different separate commands. Therefore, if you have 1000 cameras, you can create depth maps for groups of cameras on different farm machines. Or you can break up the execution of work into small groups so that if one machine fails, you do not need to repeat the whole process again.
08_DepthMapFilter
Original depth maps will not be fully consistent. Some depth maps will need to see areas covered by other depth maps. Step 08_DepthMapFilter isolates such areas and enforces depth consistency.

09_Meshing
This is the first stage in which the mesh is directly generated. There may be some minor problems with the mesh that can be solved with ...

10_MeshFiltering
Stage 10_MeshFiltering receives the 09_Meshing mesh and improves it. It performs the following operations:

Some of these operations in certain cases are not always desirable, so if necessary, the parameters can be configured.
11_Texturing
Final stage. 11_Texturing creates UV and projects textures. And at this stage everything ends!
The last trick you can do with Meshlab : you can drag and drop different OBJ and PLY files as layers.

In my example, there is a layer for both the finished mesh and the points / chambers of the SFM. Sometimes the smoothing phase of the mesh can be slightly more aggressive than needed, so it’s helpful to compare the source and smooth meshes. If the mesh looks broken, it’s convenient to use sfm data from PLY and meshes from OBJ to track problems in the pipeline.
Thanks
This post would not be complete without a huge thanks to the AliceVision and OpenMVG development teams. The source of inspiration was the libmv project. This project was the predecessor of OpenMVG , which is a repository of engineers / researchers of computer vision for the development of new algorithms. AliceVision is a fork of OpenMVG , created specifically to turn these algorithms into a separate solution in the form of a finished product.
AliceVision / Meshroom is a large, ambitious open-source project. His main achievement is the achievement of the final line with such a serious project, and we owe him very much. We are also obliged to thank the OpenMVG (and libmv ) team, whose fundamental work allowed us to create AliceVision .
Finally, I want to say special thanks to Microsoft for VCPKG . VCPKG is a package manager that greatly simplifies the assembly of large open-source projects for Windows. A few years ago I tried to build under Windows OpenMVG . It did not end very well. So when I heard about AliceVision a few months ago, I tried to compile it, but I failed even with simpler things. Then I tried VCPKG , and it all worked right away. It is difficult to quantify the advantage of using a project such as VCPKG , but it really helped the open-source ecosystem under Windows.
github.com/alicevision
github.com/openMVG/openMVG
github.com/libmv/libmv
github.com/Microsoft/vcpkg
The video shows an open source Meshroom photogrammetry program. This project in various forms has been around for quite some time, but recently developers have released binaries, so you can just download and use them. The video demonstrates the use of GUI for loading images, processing them, changing parameters, etc. I recommend you to try this program in action.
But I am interested in full automation. If you have a scanner with 100 or more scans per day, then you need a fully automated solution for batch processing of these files. This post is a guide and / or tutorial for solving this task.
For a start, it is important to understand that Meshroom is not a giant, monolithic project. In fact, the processing itself is performed by separate C ++ programs running from the command line, and the Meshroom is a thin Python padding program that executes the corresponding calls. Therefore, instead of using Meshroom, we will apply these programs directly. Note that full sources are available, so you can link libraries directly.
')
Meshroom has one more convenient feature: when performing each operation, its command is displayed in the terminal. Therefore, in order to create the steps of this process, I simply worked with the Meshroom and looked at the teams. Then I looked into the code to change some parameters. In addition, it seems that when you launch Meshroom, you can order it to collect a set of images from the command line, but I prefer not to connect these steps.
Preparation and installation
0: Requirements
Meshroom / AliceVision will not run on every platform. Some steps require CUDA, so you need an NVIDIA GPU to build depth maps. Unfortunately, it is impossible to use CPU fallback (transferring GPU functions to the CPU), otherwise the program would work fine on Windows and Linux. The instructions in this article are for Windows, but with minimal changes you can tweak them under Linux.
1: Download the Meshroom release
Meshroom 2018.1.0
The first thing you need to do is install Meshroom . Select the folder from which you want to do the work, and then download the latest version. There are binary files of all dependencies in the zip file.
If you are drawn to adventure, you can try building a program yourself. The release dynamic-link libraries work fine (/ MD), but I had to hack cmake files to create debug builds and / or static-link builds. If you will build a program for Windows, then EXTREMELY recommend using VCPKG.
2: Download data
alicevision / dataset_monstree
Obviously, the whole point of photogrammetry software is to process your own images, but for a start, I suggest using images that are guaranteed to fit. They will allow you to find the sources of the problems if something goes wrong. Fortunately, the developers have released a set of images for their test tree.
3: Download the run_alicevision.py script
run_alicevision.zip
This is the script that we will use. Just download the zip file and unzip it into a working folder.
4: Install Python
https://www.python.org/download/releases/2.7/
Install Python if you have not done so already. Yes, I'm still writing code for Python 2.7.0. The easiest way to install Windows X86-64 MSI Installer from releases.
5: Install Meshlab (optional)
Meshlab
As an optional step, you must also install MeshLab . In fact, it will not be necessary for processing, but at several stages the data is output in the PLY point files. They cannot be loaded into Maya , so I use MeshLab to view them.
After unpacking all files, the folder should look like this (except for the build_files folder, which is generated by scripts):
Here is the following:
- build_files: the files we have compiled.
- dataset_monstree-master: source images
- Meshroom-2018.1.0: Meshroom / AliceVision binaries .
- Everything else: the scripts to run them, which are taken from run_alicevision.zip .
Launch AliceVision
Now it's time to take a closer look at run_alicevision.py
The python file takes 5 arguments:
python run_alicevision.py <baseDir> <imgDir> <binDir> <numImages> <runStep>- baseDir : the folder in which you want to place temporary files.
- imgDir : folder containing source images. In our case, IMG_1024.JPG (and others).
- binDir : a folder containing AliceVision executables , for example aliceVision_cameraInit.exe .
- numImages : the number of images in imgDir , in our case 6. Of course, you can recognize this number automatically, but the goal was to create as simple a python script as possible, so you need to specify this number yourself.
- runStep : the operation to be performed.
To summarize: we start with 6 images that look like this:
Using the python script run_alicevision.py, we are going to create the following folder structure:
And in the 11_Texturing folder there will be a ready-made model opened in Meshlab :
Each of these folders is one of the stages. We can either run them in turn using the run_monstree_runXX.bat files, or use run_monstree_all.bat to collect them all at once.
That's all. Now you can run the file run_monstree_all.bat , or perform one step at a time. You can look at the script to understand its work. For those who want to be able to customize the processing pipeline, I have prepared an introduction to the individual steps.
00_CameraInit
The first step will generate an SFM file. SFM files are JSON files that store camera size, sensor information, found 3d points (observations), distortion factors, and other information. The original SFM file in this folder will contain only sensor information and select default values from the local sensor database. Subsequent steps will create SFM files containing full matrices of camera external parameters, points, etc.
You may need to customize this step. If you are using a 4-camera setup, but take 10 shots of an object rotating on a turntable, then an SFM file with 40 images, but with just 4 different sensor calibrations, comes in handy. This is the main reason why I like the structure of AliceVision . It is easy to customize batch operations (for example, generating your own SFM file) without suffering, with customizing other software elements that you shouldn’t touch.
01_FeatureExtraction
The next stage extracts the features from the images, as well as the descriptors of these features. It will change the file extension depending on the type of feature being extracted.
02_ImageMatching
02_ImageMatching is a post-processing step that determines which of the images is logical to compare with each other. If you have a set of 1000 images, then a rough search of all 1000 images to match all 1000 images will require 1 million pairs. This may take a long time (actually half the time, but you understand the principle). Stage 02_ImageMatching cuts these pairs.
03_FeatureMatching
03_FeatureMatching finds matches between images using feature descriptors. The txt files generated by it do not need an explanation.
04_StructureFromMotion
So, this is the first serious stage. Based on the 04_StructureFromMotion correspondences, it calculates camera positions as well as internal camera parameters. Note that the term “Structure From Motion” is used as a generic term for calculating camera positions. If you have a setup for photogrammetry of 10 synchronized cameras, then “Structure From Motion” is used to bind them, even if nothing really moves.
By default, Meshroom stores all calculated data as an Alembic file, but I prefer to store it in an SFM file. This stage creates intermediate data to ensure that cameras are properly linked. At the output, the script creates PLY files that can be viewed in Meshlab . The following files are important:
- bundle.sfm: SFM file with all observations.
- cameras.fm: an SFM file with data of the associated cameras only.
- cloud_and_poses.ply: points found and cameras.
Here is the cloud_and_poses.ply file. Green dots are cameras. I believe that this format is best suited for checking the absence of gross errors in the binding of cameras. If an error occurs somewhere, you can go back and change the features, matches, or SFM parameters.
05_PrepareDenseScene
The main objective of 05_PrepareDenseScene is to eliminate image distortions. It generates EXR images without distortion, so that subsequent stages of calculating depths and projections do not need to perform back-to-back conversions from the distortion function. Images look like this:
It should be noted that you will see black areas. Subsequent stages of AliceVision do not use a real camera matrix. Instead, we pretend that the camera has a new matrix without distortion, and 05_PrepareDenseScene deforms the original image under this fictional matrix. Since this new virtual sensor is larger than the current sensor, some areas will be empty (black).
06_CameraConnection
Strictly speaking, this stage violates the principle of our work process. All stages were designed so that each folder becomes a completely unique separate stage. However, 06_CameraConnection creates the camsPairsMatrixFromSeeds.bin file in the 05_PrepareDenseScene folder, because this file must be in the same folder as the image without distortion.
07_DepthMap
This is the longest stage of AliceVision : generating depth maps. It creates a depth map for each image as an EXR file. I set it up to make it easier to see. You can see a small “tongue” protruding from the tree.
Since this stage takes a lot of time, there is a parameter that allows us to launch groups of different cameras as different separate commands. Therefore, if you have 1000 cameras, you can create depth maps for groups of cameras on different farm machines. Or you can break up the execution of work into small groups so that if one machine fails, you do not need to repeat the whole process again.
08_DepthMapFilter
Original depth maps will not be fully consistent. Some depth maps will need to see areas covered by other depth maps. Step 08_DepthMapFilter isolates such areas and enforces depth consistency.
09_Meshing
This is the first stage in which the mesh is directly generated. There may be some minor problems with the mesh that can be solved with ...
10_MeshFiltering
Stage 10_MeshFiltering receives the 09_Meshing mesh and improves it. It performs the following operations:
- Smooths the mesh.
- Eliminates large triangles.
- Keeps the largest mesh, but removes all the others.
Some of these operations in certain cases are not always desirable, so if necessary, the parameters can be configured.
11_Texturing
Final stage. 11_Texturing creates UV and projects textures. And at this stage everything ends!
The last trick you can do with Meshlab : you can drag and drop different OBJ and PLY files as layers.
In my example, there is a layer for both the finished mesh and the points / chambers of the SFM. Sometimes the smoothing phase of the mesh can be slightly more aggressive than needed, so it’s helpful to compare the source and smooth meshes. If the mesh looks broken, it’s convenient to use sfm data from PLY and meshes from OBJ to track problems in the pipeline.
Thanks
This post would not be complete without a huge thanks to the AliceVision and OpenMVG development teams. The source of inspiration was the libmv project. This project was the predecessor of OpenMVG , which is a repository of engineers / researchers of computer vision for the development of new algorithms. AliceVision is a fork of OpenMVG , created specifically to turn these algorithms into a separate solution in the form of a finished product.
AliceVision / Meshroom is a large, ambitious open-source project. His main achievement is the achievement of the final line with such a serious project, and we owe him very much. We are also obliged to thank the OpenMVG (and libmv ) team, whose fundamental work allowed us to create AliceVision .
Finally, I want to say special thanks to Microsoft for VCPKG . VCPKG is a package manager that greatly simplifies the assembly of large open-source projects for Windows. A few years ago I tried to build under Windows OpenMVG . It did not end very well. So when I heard about AliceVision a few months ago, I tried to compile it, but I failed even with simpler things. Then I tried VCPKG , and it all worked right away. It is difficult to quantify the advantage of using a project such as VCPKG , but it really helped the open-source ecosystem under Windows.
github.com/alicevision
github.com/openMVG/openMVG
github.com/libmv/libmv
github.com/Microsoft/vcpkg
Source: https://habr.com/ru/post/422807/
All Articles