Instructions for working with TensorFlow Object Detection API
Translation TensorFlow Object Detection API tutorial - Training and Evaluating Custom Object Detector .
We all know how to drive a car, because it's pretty easy, right? But what will you do if someone asks you to sit at the controls of an airplane? That's right - you read the instructions. Similarly, the guide you will find below will help you set up the API and enjoy a pleasant flight.
First of all, clone the repository by reference . I hope you already have TensorFlow installed.
git clone github.com/tensorflow/models.git
')
In machine learning, we usually train and test the model using a CSV file. But in this case, we act according to the scheme shown in the figure:

Before proceeding, we will focus on the directory structure that we will use.
- data / - This will contain entries and CSV files.
- images / - Here is a data set for teaching our model.
- training / - Here we will save the trained model.
- eval / - The results of the model performance evaluation will be stored here.
Step 1: Save Images to CSV
Everything is pretty simple here. We will not delve into this task, just give a few useful links.
Our task is to mark the image and create the train.CSV and test.CSV files.
- Use the labelImg tool to label the image. How to do this, see here .
- Convert XML to CSV, as shown here .
There are many ways to create CSV files that are more or less suitable for working with each specific data set.
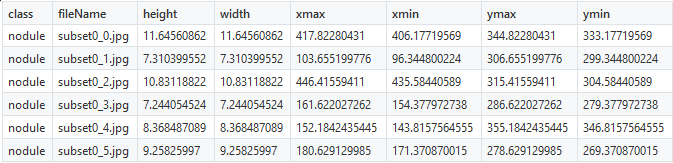
As part of our project, we will try to achieve the detection of pulmonary nodes using the LUNA dataset . The coordinates of the nodes were already known, and therefore the creation of CSV files was not difficult. To locate the nodes, we use the 6 coordinates shown below:
You should correct only the class name
nodules (nodes), everything else will remain unchanged. As soon as the marked objects are presented in the form of numbers, you can proceed to the creation of TFRecords.Step 2: Create TFRecords
TensorFlow Object Detection API does not accept input data for training the model in CSV format, so you need to create a TFRecords using this file.
""" Usage: # From tensorflow/models/ # Create train data: python generate_tfrecord.py --csv_input=data/train_labels.csv --output_path=train.record # Create test data: python generate_tfrecord.py --csv_input=data/test_labels.csv --output_path=test.record """ from __future__ import division from __future__ import print_function from __future__ import absolute_import import os import io import pandas as pd import tensorflow as tf from PIL import Image from object_detection.utils import dataset_util from collections import namedtuple, OrderedDict flags = tf.app.flags flags.DEFINE_string('csv_input', '', 'Path to the CSV input') flags.DEFINE_string('output_path', '', 'Path to output TFRecord') FLAGS = flags.FLAGS # TO-DO replace this with label map def class_text_to_int(row_label): if row_label == 'raccoon': return 1 else: None def split(df, group): data = namedtuple('data', ['filename', 'object']) gb = df.groupby(group) return [data(filename, gb.get_group(x)) for filename, x in zip(gb.groups.keys(), gb.groups)] def create_tf_example(group, path): with tf.gfile.GFile(os.path.join(path, '{}'.format(group.filename)), 'rb') as fid: encoded_jpg = fid.read() encoded_jpg_io = io.BytesIO(encoded_jpg) image = Image.open(encoded_jpg_io) width, height = image.size filename = group.filename.encode('utf8') image_format = b'jpg' xmins = [] xmaxs = [] ymins = [] ymaxs = [] classes_text = [] classes = [] for index, row in group.object.iterrows(): xmins.append(row['xmin'] / width) xmaxs.append(row['xmax'] / width) ymins.append(row['ymin'] / height) ymaxs.append(row['ymax'] / height) classes_text.append(row['class'].encode('utf8')) classes.append(class_text_to_int(row['class'])) tf_example = tf.train.Example(features=tf.train.Features(feature={ 'image/height': dataset_util.int64_feature(height), 'image/width': dataset_util.int64_feature(width), 'image/filename': dataset_util.bytes_feature(filename), 'image/source_id': dataset_util.bytes_feature(filename), 'image/encoded': dataset_util.bytes_feature(encoded_jpg), 'image/format': dataset_util.bytes_feature(image_format), 'image/object/bbox/xmin': dataset_util.float_list_feature(xmins), 'image/object/bbox/xmax': dataset_util.float_list_feature(xmaxs), 'image/object/bbox/ymin': dataset_util.float_list_feature(ymins), 'image/object/bbox/ymax': dataset_util.float_list_feature(ymaxs), 'image/object/class/text': dataset_util.bytes_list_feature(classes_text), 'image/object/class/label': dataset_util.int64_list_feature(classes), })) return tf_example def main(_): writer = tf.python_io.TFRecordWriter(FLAGS.output_path) path = os.path.join(os.getcwd(), 'images') examples = pd.read_csv(FLAGS.csv_input) grouped = split(examples, 'filename') for group in grouped: tf_example = create_tf_example(group, path) writer.write(tf_example.SerializeToString()) writer.close() output_path = os.path.join(os.getcwd(), FLAGS.output_path) print('Successfully created the TFRecords: {}'.format(output_path)) if __name__ == '__main__': tf.app.run() After downloading the file, make one small change: in line 31 instead of the word
raccoon put your own mark. In the example above, these are nodules , nodes. If your model will need to define several kinds of objects, create additional classes.Note. Label numbering should start from one, not from scratch. For example, if you use three kinds of objects, they should be assigned the values 1, 2, and 3, respectively.
To create the train.record file , use the following code:
python generate_tfRecord.py --CSV_input=data/train.CSV --output_path=data/train.record To create the test.record file , use the following code:
python generate_tfrecord.py — CSV_input=data/test.CSV — output_path=data/test.record Step 3: model training
Once the files we need are created, we are almost ready to start learning.
- Choose a model that you will be teaching. You should find a compromise between speed and accuracy: the higher the speed, the lower the accuracy of the determination, and vice versa. As an example,
sd_mobilenet_v1_cocousedsd_mobilenet_v1_coco. - Deciding which model you will work with, download the appropriate configuration file . In this example, this is
ssd_mobilenet_v1_coco.config. - Create an object-detection.pbtxt file that looks like this:
item { id: 1 name: 'nodule' }
Give thenoduleclass a different name. If there are several classes, increase theidvalue and enter new names.
It's time to customize the configuration file, making the following adjustments.
Change the number of classes according to your requirements.
#before num_classes: 90 #After num_classes: 1 If the power of your GPU is insufficient, lower the
batch_size value. batch_size: 24 Specify the path to the
ssd_mobilenet_v1_coco model that we downloaded earlier. #before fine_tune_checkpoint: "PATH_TO_BE_CONFIGURED/model.ckpt" #after fine_tune_checkpoint: "ssd_mobilenet_v1_coco/model.ckpt" Specify the path to the train.record file.
#before train_input_reader: { tf_record_input_reader { input_path: "PATH_TO_BE_CONFIGURED/mscoco_train.record" } label_map_path: "PATH_TO_BE_CONFIGURED/mscoco_label_map.pbtxt" } #after train_input_reader: { tf_record_input_reader { input_path: "data/train.record" } label_map_path: "data/object-detection.pbtxt" } Specify the path to the test.record file .
#before eval_input_reader: { tf_record_input_reader { input_path: "PATH_TO_BE_CONFIGURED/mscoco_val.record" } label_map_path: "PATH_TO_BE_CONFIGURED/mscoco_label_map.pbtxt" shuffle: false num_readers: 1} #after eval_input_reader: { tf_record_input_reader { input_path: "data/test.record" } label_map_path: "data/object-detection.pbtxt" shuffle: false num_readers: 1} Now copy the data / and images / folders into the models / research / object-detection folders. If you are prompted to merge folders, accept it.
In addition, we will need the object-detection / train.py file located in the directory .
cd models/research/object-detection Create in the object-detection folder / training / folder . It is in training / we will save our model. Copy the ssd_mobilenet_v1_coco.config to the training / configuration file . Training is performed using the command:
python train.py --logtostderr \ --train_dir=training/ \ --pipeline_config_path=training/ssd_mobilenet_v1_coco.config If everything goes according to plan, you will see how the loss function changes at each stage.
Step 4: Model Evaluation
Finally, we evaluate the model stored in the training / directory. To do this, run the eval.py file and enter the following command:
python eval.py \ --logtostderr \ --pipeline_config_path=training/ssd_mobilenet_v1_coco.config \ --checkpoint_dir=training/ \ --eval_dir=eval/ The test results are reflected in the eval / folder. They can be visualized using TensorBoard.
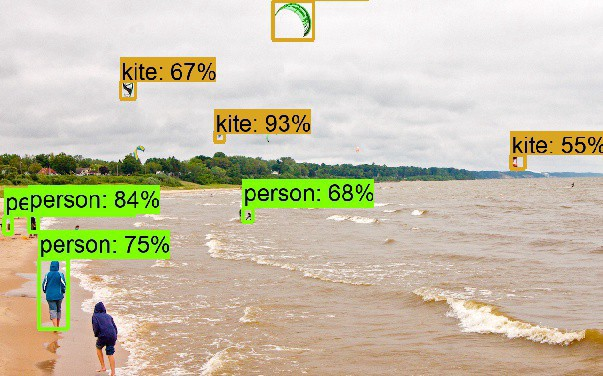
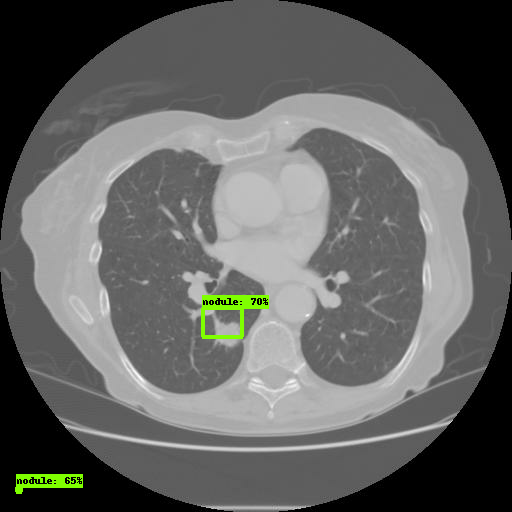
#To visualize the eval results tensorboard --logdir=eval/ #TO visualize the training results tensorboard --logdir=training/ Open the link through the browser. In the Images tab, you will see the results of the model:
That's all, you have successfully configured the TensorFlow Object Detection API.
One of the most common mistakes:
No module named deployment on object_detection/train.pyIt is solved with the help of the command:
# From tensorflow/models/research/ export PYTHONPATH=$PYTHONPATH:`pwd`:`pwd`/slim You can read about how to change Faster-RCNN / SSD parameters here .
Thanks for attention!
Source: https://habr.com/ru/post/422353/
All Articles