Beautiful component structure in the Microsoft Azure cloud
Microsoft Azure is one of the largest cloud platforms in the world. Even despite my lack of sympathy for the corporation that made it, I have to admit that the platform has a number of facilities compared to its competitors. But there is no barrel of honey without a tar spoon, and this spoon in Microsoft Azure are the names of the system components. If in AWS to rename a component is a matter of two clicks, then in Azure the names are tightly attached to the components and it is sometimes impossible to change them without dancing with a tambourine. It is therefore very important when working with Azure to initially create the right structure.

So let's try to create a virtual machine in Microsoft Azure with the name server-01 and default settings. The following picture clearly shows the mess that we have in the end.
')
If everything suits you here, then you can not read further. Well, if you, like me, like the total order in the administered economy, then I would venture to propose a scheme for the beautiful naming of Microsoft Azure components, which I myself have been using for the past few years.
This scheme allows you to bring the entire system to the following unified form:
{Component group} __ {element}
{Component} - {Number} __ {Element} - {number}
So let's get started ...
Add resource group
Create a virtual network and subnet
By default, Microsoft Azure extends the subnet to the entire virtual network. This is not very convenient, since if necessary it will be very difficult to add new subnets (for example, a VPN subnet). Therefore, I usually give up the last two octets (mask 16) for the virtual network, and for the subnet - one last octet (mask 24).
The first few subnet addresses (10.0.0.01 ... 03) Azure uses to fit your needs, so I moved the working addresses to a range above 100. Thus, the server number will correspond to the last digit of the IP address: server-01 = 10.0.0.101, server-02 = 10.0.0.102, server-43 = 10.0.0.143, etc.
External address and security group
If it is planned that the virtual machine will look outside, then create a public address and security group.
In Azure, you can create a security group for both a single machine and the subnet as a whole. Depending on the option, the names will vary.
Option security group for a single host:
Subnet Security Group:
Disk
Unfortunately, Azure does not allow you to create disks with arbitrary names, so you need to do a workaround through the creation of a dummy virtual machine, and then use its disk as a disc to create a working machine.
Create a dummy virtual machine
After creating a dummy machine, you can delete all the components (including the machine itself) marked with the raw suffix except for the disk.
We remove snapshot disk
On the basis of snapshot create a new working disk:
Expand the working machine based on the new disk
Network interfaces
Another omission of Microsoft is that when creating a virtual machine from a disk in the GUI, it is not possible to attach a previously created network interface to it. Therefore, we stop the car, delete the network interface and attach the one we created above to it.
Trash removal
The final touch is the removal of debris that remains from the manipulations we have made.
Delete:
network interface server-01982,
server-01-nsg security group
disk from the dummy machine: server-01-raw_OsDisk ...
snapshot server-01-raw-snapshot
Here's what happened:

You, probably, already noticed that to bring beauty in Azure is quite troublesome. But everything is greatly simplified if you use the command line (CLI). Microsoft Azure provides CLI for both its native PowerShell and the Linux console. The last option will be described below.
Login:
Get a list of available locations
Get the list of virtual machine sizes:
We set the list of network and virtual machine parameters (all subsequent commands will transmit this data via variables):
Create a resource group:
Create a virtual network and subnet:
Create a network interface:
Create a dummy virtual machine:
Normalize the disk:
Remove the dummy machine and deploy the worker:
Remove the dummy drive:
To automate the process of deploying virtual machines in the Microsoft Azure cloud, I brought all the above commands into one bash script azure-create-vm.sh, which can be taken from Github . Open the script in any text editor, drive in your data and you can deploy virtual machines with beautiful names by pressing a few keys.
So let's try to create a virtual machine in Microsoft Azure with the name server-01 and default settings. The following picture clearly shows the mess that we have in the end.
')
If everything suits you here, then you can not read further. Well, if you, like me, like the total order in the administered economy, then I would venture to propose a scheme for the beautiful naming of Microsoft Azure components, which I myself have been using for the past few years.
This scheme allows you to bring the entire system to the following unified form:
{Component group} __ {element}
{Component} - {Number} __ {Element} - {number}
So let's get started ...
Add resource group
Resource groups >> +Add Resource group name: servers Create a virtual network and subnet
By default, Microsoft Azure extends the subnet to the entire virtual network. This is not very convenient, since if necessary it will be very difficult to add new subnets (for example, a VPN subnet). Therefore, I usually give up the last two octets (mask 16) for the virtual network, and for the subnet - one last octet (mask 24).
Virtual networks >> +Add Name: servers__network Address space: 10.0.0.0/16 Subnet: Name: default Address range: 10.0.0.0/24 Network interfaces: +Add Name: server-01__ip-private-01 Virtual network: servers__network Subnet: default Private IP address: Static/10.0.0.101 The first few subnet addresses (10.0.0.01 ... 03) Azure uses to fit your needs, so I moved the working addresses to a range above 100. Thus, the server number will correspond to the last digit of the IP address: server-01 = 10.0.0.101, server-02 = 10.0.0.102, server-43 = 10.0.0.143, etc.
External address and security group
If it is planned that the virtual machine will look outside, then create a public address and security group.
Public IP addresses: +Add Name: server-01__ip-public-01 IP address assignment: Static Public IP addresses >> server-01__ip-public-01 >> Associate: Resource type >> Network interface: server-01__ip-private-01 In Azure, you can create a security group for both a single machine and the subnet as a whole. Depending on the option, the names will vary.
Network security groups >> +Add Option security group for a single host:
Name: server-01__security-group Network interfaces >> +Associate: server-01__ip-private-01 Subnet Security Group:
Name: servers__network-security-group Subnets >> +Associate: Virtual network: servers__network Subnet: default Disk
Unfortunately, Azure does not allow you to create disks with arbitrary names, so you need to do a workaround through the creation of a dummy virtual machine, and then use its disk as a disc to create a working machine.
Create a dummy virtual machine
Virtual machines >> +Add Basics: Name: server-01-raw VM disk type: Premium SSD Username: your-name SSH public key: your-public-key Settings: Availability set: None Network: servers__network Subnet: default Public IP address: None Select public inbound ports: No public inbound ports Monitoring: Disabled After creating a dummy machine, you can delete all the components (including the machine itself) marked with the raw suffix except for the disk.
We remove snapshot disk
Disks >> disk server-01-raw_OsDisk_... >> +Create snapshot Name: server-01-raw-snapshot On the basis of snapshot create a new working disk:
Disks >> +Add Name: server-01__disk-01 Source type: Snapshot Source snapshot: server-01-raw-snapshot Expand the working machine based on the new disk
Disks >> server-01__disk-01 >> + Create VM Basics: Name: server-01 Settings: Availability set: None Network: servers__network Subnet: default Public IP address: None Select public inbound ports: No public inbound ports Monitoring: Disabled Network interfaces
Another omission of Microsoft is that when creating a virtual machine from a disk in the GUI, it is not possible to attach a previously created network interface to it. Therefore, we stop the car, delete the network interface and attach the one we created above to it.
Virtual machines >> VM server-01 >> Stop Virtual machines >> VM server-01 >> Networking: Attach network interface >> server-01__ip-private-01 Detach network interface >> server-01982 Trash removal
The final touch is the removal of debris that remains from the manipulations we have made.
Delete:
network interface server-01982,
server-01-nsg security group
disk from the dummy machine: server-01-raw_OsDisk ...
snapshot server-01-raw-snapshot
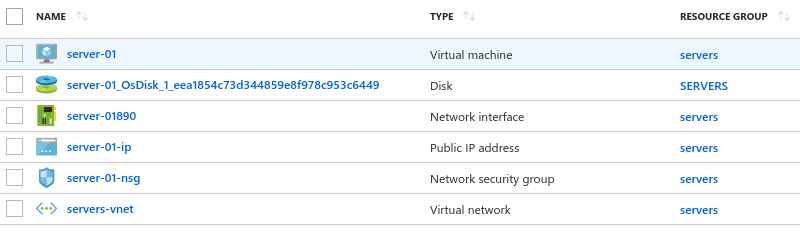
Here's what happened:
CLI
You, probably, already noticed that to bring beauty in Azure is quite troublesome. But everything is greatly simplified if you use the command line (CLI). Microsoft Azure provides CLI for both its native PowerShell and the Linux console. The last option will be described below.
Login:
az login -u AzureUserName Get a list of available locations
az account list-locations Get the list of virtual machine sizes:
az vm list-sizes --location locationName We set the list of network and virtual machine parameters (all subsequent commands will transmit this data via variables):
location="westindia" resource_group="servers" virt_network="servers__network" virt_network_range="10.0.0.0/16" subnet="default" subnet_range="10.0.0.0/24" user="username" ssh_key="ssh-public-key" name="server-01" image="UbuntuLTS" ip="10.0.0.101" interface_suffix="__ip-private-01" disk_suffix="__disk-01" size="Standard_B1s" ### SSD = "Premium_LRS"; HDD = "Standard_LRS" storage_type="Premium_LRS" Create a resource group:
az group create --location ${location} --name ${resource_group} Create a virtual network and subnet:
az network vnet create --location ${location} --resource-group ${resource_group} --name ${virt_network} --address-prefixes ${virt_network_range} az network vnet subnet create --resource-group ${resource_group} --vnet-name ${virt_network} --name ${subnet} --address-prefix ${subnet_range} Create a network interface:
az network nic create --resource-group ${resource_group} --location ${location} --name ${name}${interface_suffix} --subnet ${subnet} --vnet-name ${virt_network} --private-ip-address ${ip} Create a dummy virtual machine:
az vm create --name ${name} --admin-username ${user} --ssh-key-value "${ssh_key}" --resource-group ${resource_group} --location ${location} --image ${image} --size ${size} --nics ${name}${interface_suffix} --storage-sku ${storage_type} Normalize the disk:
az vm stop --name ${name} --resource-group ${resource_group} disk_old=$(az vm get-instance-view --name ${name} --resource-group ${resource_group} | grep -o "${name}_OsDisk[0-9a-z\_]\{1,\}" | head -1) az disk create --location ${location} --resource-group ${resource_group} --name ${name}${disk_suffix} --source ${disk_old} --sku ${storage_type} Remove the dummy machine and deploy the worker:
az vm delete --name ${name} --resource-group ${resource_group} --yes az vm create --name ${name} --resource-group ${resource_group} --location ${location} --size ${size} --nics ${name}${interface_suffix} --attach-os-disk ${name}${disk_suffix} --os-type Linux ${availability_set_as_option} Remove the dummy drive:
az disk delete --resource-group ${resource_group} --name ${disk_old} --yes Automation
To automate the process of deploying virtual machines in the Microsoft Azure cloud, I brought all the above commands into one bash script azure-create-vm.sh, which can be taken from Github . Open the script in any text editor, drive in your data and you can deploy virtual machines with beautiful names by pressing a few keys.
Source: https://habr.com/ru/post/422211/
All Articles