CO2 measurement device
Once, sitting at work and feeling uncomfortable in breathing, I decided to put together a CO2 meter.
After studying several articles on this topic formulated the requirements for the device.
The last point has ambiguously led to the input that the device will be on ESP. Since I do not need great performance, I choose the cheapest option - ESP8266, 07 which. At home a copy with 1 mb of memory was just lying around.
I ordered the missing parts for aliexpress, and they were:
')
Upon receipt of the details, I proceeded to develop a circuit using KiCad.
I’ll say right away that all the source codes will be at the end of the article and having collected the firmware by the diagrams, you should get a fully working device.
The scheme came out like this:
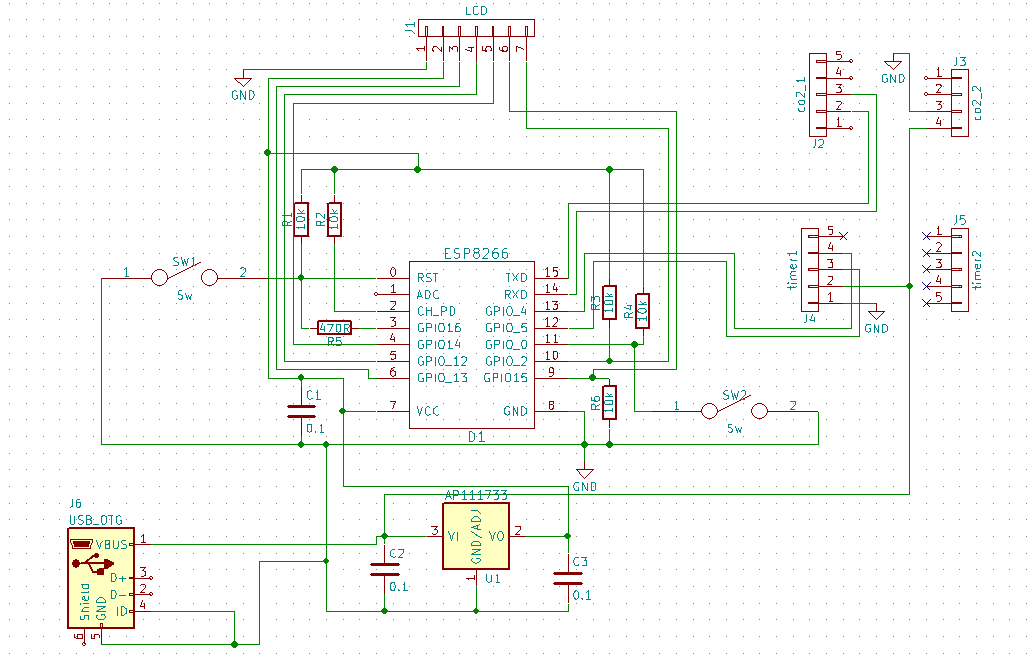
I decided to make the modules removable, so there are no modules on the diagram, but only connectors for them.
Spread fee:

After the manufacture of the PCB and soldering the following happened:


Assembly and work looks like this:

Now about the software part.
The code was written in the Arduine IDE, since I am not a programmer, and I didn’t want to deal with libraries in a visual studio or anywhere else.
In principle, I used the code for the modules in the device from the examples of libraries and from the Internet, so I will not dwell on it. Who wants - easily figured out in the sketch.
But to realize the viewing and display of statistics in time turned out not so easy.
I wanted it this way: from a mobile phone or laptop, it will be as easy as possible to connect to the device, through an HTML browser, go to the data page and view it from as a graph over time.
The first is to create an access point on ESP without passwords and authentication.
The second is to create an array of data in which I record the CO2 data and the time of data acquisition (for this, in fact, I set the clock to the device.
The third is to set up an HTTP server and several HTML pages, on one of which I am outputting data.
Fourth - Java Script on the drawing graphics on the page recorded in the ESP file system.
Since the output of the chart was possible only with the help of Java Script, then, after long experiments, the fourth item was implemented as follows: the simplest Chart.js script was written as a file to the SPIFFS ESP file system, which, a page that displays the result, requests.
In general, by turning on the device, a new sensor reading is displayed on the display every 10-15 seconds, and every 8 minutes the current sensor reading is recorded in the data array.
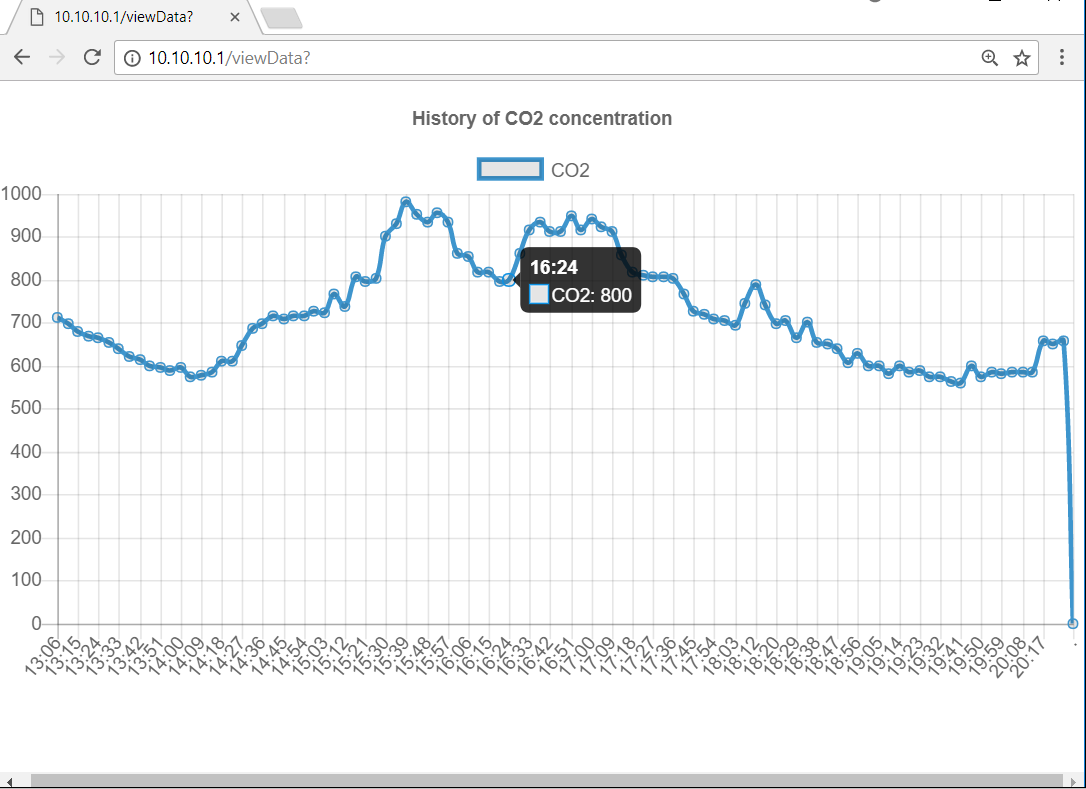
After some time, wanting to analyze the testimony in time, you connect via the phone or laptop to the wifi point “CO2”, after connecting you start the internet browser and enter the IP address “10.10.10.1” in the search bar. Get on the page:

There is a button to go to the data browsing page and a button to go to the time task page (since time sometimes gets lost and just gets lost when replacing the battery).
The output page looks like this:
Source archive here.
The archive contains a sketch, Java Script, Kicad project, signet in Photoshop format at 600dpi, in case you don’t want to work with Kicad.
How to configure Adruino ide for ESP firmware and how to upload files to SPIFS can be easily found on the Internet.
For ESP firmware, it will be necessary to disconnect the CO2 sensor, since it hangs on the TX0 and RX0, which are needed for the firmware. Also, I signed the data line on the board in reverse to connect the TX from the flash driver to the TX on the board, etc.
After studying several articles on this topic formulated the requirements for the device.
- The device must be with the screen, as it must be a portable device.
- The device should not depend on the Internet for the same reason.
- The device must be able to log values in time, which are convenient to view at any time. And this means that it should have its own web server and its Wi-Fi point.
The last point has ambiguously led to the input that the device will be on ESP. Since I do not need great performance, I choose the cheapest option - ESP8266, 07 which. At home a copy with 1 mb of memory was just lying around.
I ordered the missing parts for aliexpress, and they were:
')
- Oled display 96x64 SSD1331.
- MH-Z19B CO2 sensor.
- DS1307 RTC module.
Upon receipt of the details, I proceeded to develop a circuit using KiCad.
I’ll say right away that all the source codes will be at the end of the article and having collected the firmware by the diagrams, you should get a fully working device.
The scheme came out like this:
I decided to make the modules removable, so there are no modules on the diagram, but only connectors for them.
Spread fee:
After the manufacture of the PCB and soldering the following happened:
Assembly and work looks like this:
Now about the software part.
The code was written in the Arduine IDE, since I am not a programmer, and I didn’t want to deal with libraries in a visual studio or anywhere else.
In principle, I used the code for the modules in the device from the examples of libraries and from the Internet, so I will not dwell on it. Who wants - easily figured out in the sketch.
But to realize the viewing and display of statistics in time turned out not so easy.
I wanted it this way: from a mobile phone or laptop, it will be as easy as possible to connect to the device, through an HTML browser, go to the data page and view it from as a graph over time.
The first is to create an access point on ESP without passwords and authentication.
The second is to create an array of data in which I record the CO2 data and the time of data acquisition (for this, in fact, I set the clock to the device.
The third is to set up an HTTP server and several HTML pages, on one of which I am outputting data.
Fourth - Java Script on the drawing graphics on the page recorded in the ESP file system.
Since the output of the chart was possible only with the help of Java Script, then, after long experiments, the fourth item was implemented as follows: the simplest Chart.js script was written as a file to the SPIFFS ESP file system, which, a page that displays the result, requests.
In general, by turning on the device, a new sensor reading is displayed on the display every 10-15 seconds, and every 8 minutes the current sensor reading is recorded in the data array.
After some time, wanting to analyze the testimony in time, you connect via the phone or laptop to the wifi point “CO2”, after connecting you start the internet browser and enter the IP address “10.10.10.1” in the search bar. Get on the page:
There is a button to go to the data browsing page and a button to go to the time task page (since time sometimes gets lost and just gets lost when replacing the battery).
The output page looks like this:
Source archive here.
The archive contains a sketch, Java Script, Kicad project, signet in Photoshop format at 600dpi, in case you don’t want to work with Kicad.
How to configure Adruino ide for ESP firmware and how to upload files to SPIFS can be easily found on the Internet.
For ESP firmware, it will be necessary to disconnect the CO2 sensor, since it hangs on the TX0 and RX0, which are needed for the firmware. Also, I signed the data line on the board in reverse to connect the TX from the flash driver to the TX on the board, etc.
Source: https://habr.com/ru/post/422001/
All Articles