New features FLProg - ESP8266 as a controller, not a modem
A source
Good day.
')
I haven't talked about my FLProg project for a long time. The last post was still on Geektimes.
It's time to fix this mess. From this post I begin a series of lessons on the use of new features of the program.
If you are not familiar with the project, you can see its history in the blog .
The program is currently testing the pre-release version number 3.1.4 . Starting with version 3.1, the program has added support for ESP8266 controllers as a full-fledged controller.
For those who are not familiar with these controllers, a short description
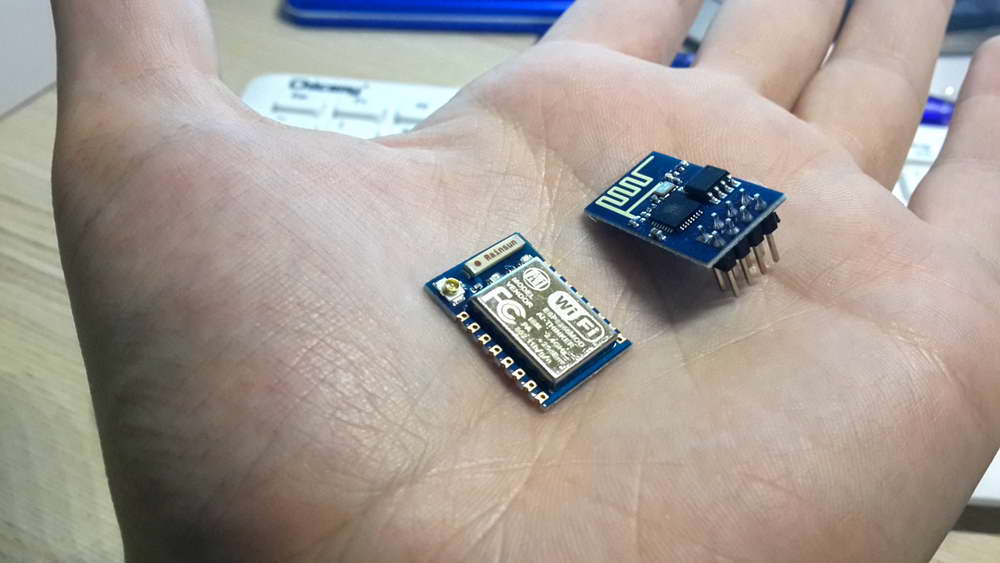
ESP8266 is designed for use in smart sockets, mesh networks, IP cameras, wireless sensors, wearable electronics and so on. In short, ESP8266 was born to become the brain of the coming “Internet of things”.
There are two options for using the chip:
1) as a UART-WIFI bridge, when the ESP8266-based module is connected to an existing solution based on any other microcontroller and controlled by AT-commands, providing connection of the solution with the Wi-Fi infrastructure;
2) implementing a new solution that uses the ESP8266 chip itself as a control microcontroller.
The first scenario was implemented in the FLProg project for a long time. It is implemented using any of the inexpensive Chinese ESP8266 modules. Well suited to lovers of Arduino and those who already have in their hands a ready-made schematics and debugged firmware based on something of their own, beloved.
The second variant of the scenario involves writing an individual firmware for controlling the chip “from the inside”. (Prior to FLProg 3.1, the firmware should be written for the proprietary compiler. Starting from this version, it became possible to write firmware in the FBD and LAD languages in the FLProg environment) .
The scenario of using the chip as a control microcontroller is interesting because it allows you to create devices that are really small and really long in battery life. To work with peripherals on board the ESP8266 have all the necessary features.
Key features
The ESP8266 chip is one of the most highly integrated WiFi solutions. Inside the chip there is a heap of everything that in competing solutions is often part of the outer strapping:
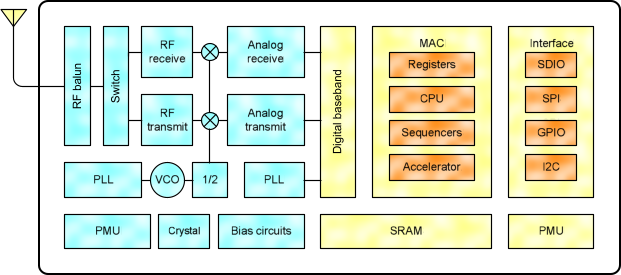
As a result, the typical strapping of the chip consists of only a few elements. Less elements = less cost of components, less cost of soldering, less area of placement, less cost of PCB. What is perfectly confirmed by the current prices of modules based on the hero of our today's review.
Manages all these integrated farms enhanced version of the 32-bit processor Tensilica's L106 Diamond series. What is interesting inside?
• 802.11 b / g / n protocol
• Wi-Fi Direct (P2P), soft-AP
• Integrated TCP / IP protocol stack
• Integrated TR switch, balun, LNA, power amplifier and matching network
• Integrated PLL, regulators, and power management units
• + 20.5dBm output power in 802.11b mode
• Supports antenna diversity
• Power down leakage current of <10uA
• SDIO 2.0, SPI, UART
• STBC, 1x1 MIMO, 2x1 MIMO
• A-MPDU & A-MSDU aggregation & 0.4μs guard interval
• Wake up and transmit packets in <22ms
• Standby power consumption of <1.0mW (DTIM3)
Ultra Low Power Technolog y
Energy consumption is one of the most important characteristics of a solution that claims to be the brain of billions of IoT devices. What is the reason for the popularity of BLE and various own implementations of radio interfaces? After all, in the end, all devices based on these implementations still strive to get into regular Wi-Fi with the help of special devices-bridges.
The secret is simple - it is difficult to create a device connected to WiFi, enough time running on autonomous power. Consumers are not ready to change batteries in sensors every two to three months. Therefore, the "access to the network" had to provide bridges connected to the permanent electricity. ESP8266 should fix this problem. Now Wi-Fi can be used even in stand-alone sensors that run on small batteries. Through the use of advanced power management solutions.
If you look briefly at the characteristics of the consumption of the chip, you can remain in the dark. 215mA in transfer mode - nothing special? Yes, but it's worth reading the datasheet and you begin to understand the prospects for the solution. ESP8266 consumes about 60uA in deep sleep mode (with real-time clock running) and less than 1.0mA (DTIM = 3) or less than 0.5mA (DTIM = 10) in sustain mode
A source
There are two options for using the chip:
1) as a UART-WIFI bridge, when the ESP8266-based module is connected to an existing solution based on any other microcontroller and controlled by AT-commands, providing connection of the solution with the Wi-Fi infrastructure;
2) implementing a new solution that uses the ESP8266 chip itself as a control microcontroller.
The first scenario was implemented in the FLProg project for a long time. It is implemented using any of the inexpensive Chinese ESP8266 modules. Well suited to lovers of Arduino and those who already have in their hands a ready-made schematics and debugged firmware based on something of their own, beloved.
The second variant of the scenario involves writing an individual firmware for controlling the chip “from the inside”. (Prior to FLProg 3.1, the firmware should be written for the proprietary compiler. Starting from this version, it became possible to write firmware in the FBD and LAD languages in the FLProg environment) .
The scenario of using the chip as a control microcontroller is interesting because it allows you to create devices that are really small and really long in battery life. To work with peripherals on board the ESP8266 have all the necessary features.
Key features
The ESP8266 chip is one of the most highly integrated WiFi solutions. Inside the chip there is a heap of everything that in competing solutions is often part of the outer strapping:
As a result, the typical strapping of the chip consists of only a few elements. Less elements = less cost of components, less cost of soldering, less area of placement, less cost of PCB. What is perfectly confirmed by the current prices of modules based on the hero of our today's review.
Manages all these integrated farms enhanced version of the 32-bit processor Tensilica's L106 Diamond series. What is interesting inside?
• 802.11 b / g / n protocol
• Wi-Fi Direct (P2P), soft-AP
• Integrated TCP / IP protocol stack
• Integrated TR switch, balun, LNA, power amplifier and matching network
• Integrated PLL, regulators, and power management units
• + 20.5dBm output power in 802.11b mode
• Supports antenna diversity
• Power down leakage current of <10uA
• SDIO 2.0, SPI, UART
• STBC, 1x1 MIMO, 2x1 MIMO
• A-MPDU & A-MSDU aggregation & 0.4μs guard interval
• Wake up and transmit packets in <22ms
• Standby power consumption of <1.0mW (DTIM3)
Ultra Low Power Technolog y
Energy consumption is one of the most important characteristics of a solution that claims to be the brain of billions of IoT devices. What is the reason for the popularity of BLE and various own implementations of radio interfaces? After all, in the end, all devices based on these implementations still strive to get into regular Wi-Fi with the help of special devices-bridges.
The secret is simple - it is difficult to create a device connected to WiFi, enough time running on autonomous power. Consumers are not ready to change batteries in sensors every two to three months. Therefore, the "access to the network" had to provide bridges connected to the permanent electricity. ESP8266 should fix this problem. Now Wi-Fi can be used even in stand-alone sensors that run on small batteries. Through the use of advanced power management solutions.
If you look briefly at the characteristics of the consumption of the chip, you can remain in the dark. 215mA in transfer mode - nothing special? Yes, but it's worth reading the datasheet and you begin to understand the prospects for the solution. ESP8266 consumes about 60uA in deep sleep mode (with real-time clock running) and less than 1.0mA (DTIM = 3) or less than 0.5mA (DTIM = 10) in sustain mode
A source
The program supports most of the existing boards based on the ESP8266 controller.
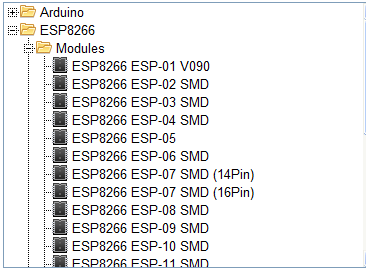
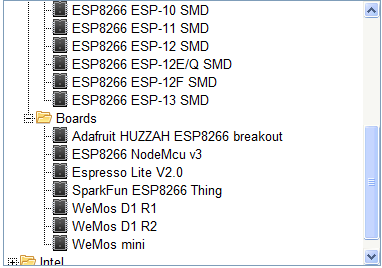
Virtually all functional blocks and peripheral devices that are applicable for programming arduino boards are available for creating firmware.
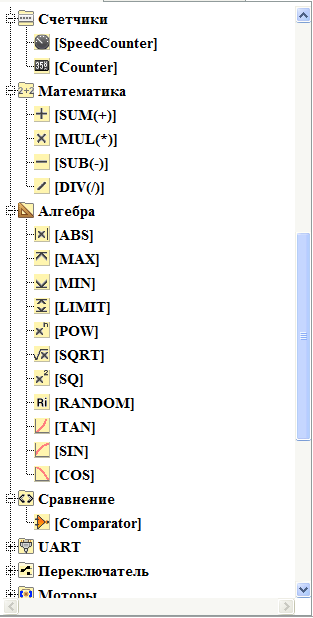
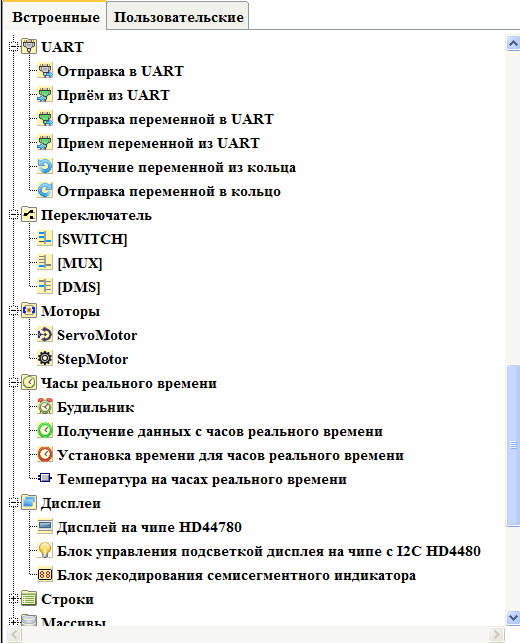

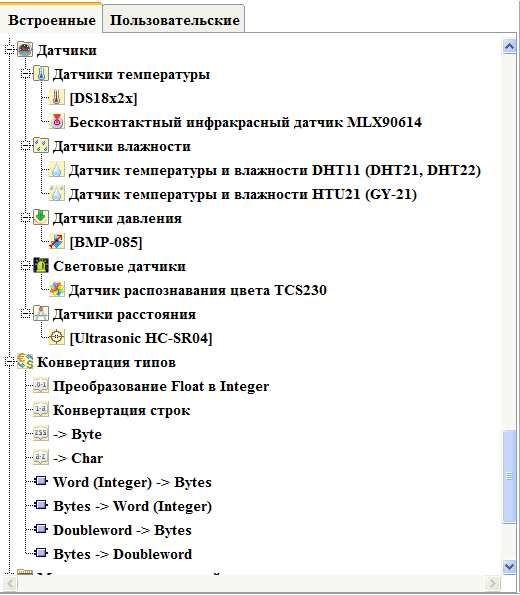
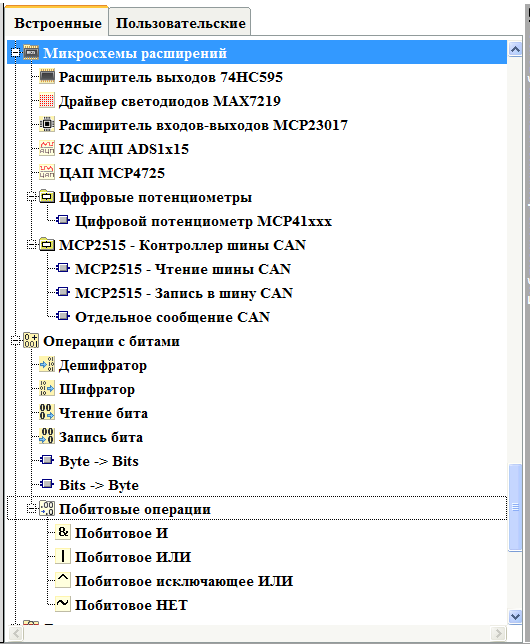
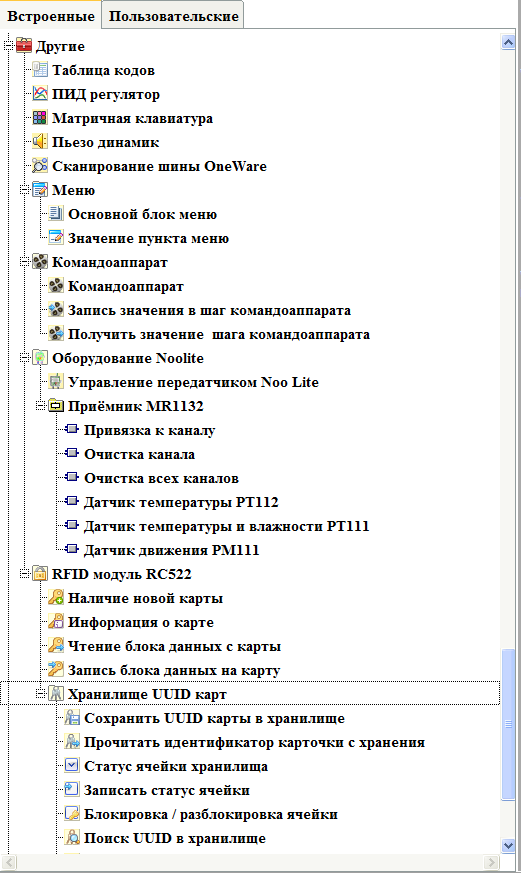

In addition, when choosing an ESP8266 controller, new blocks appear specific to it.
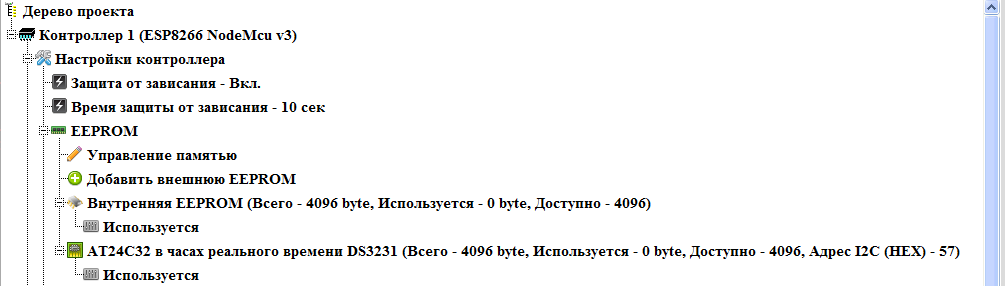
Due to the presence of a WiFi controller onboard, the project tree also changes.
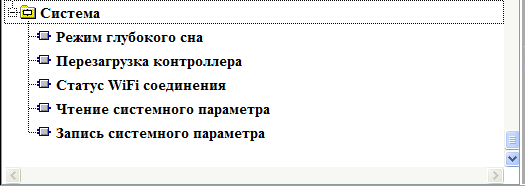
First of all, as for all controllers, there are branches for managing anti-hang protection, and EEPROM memory
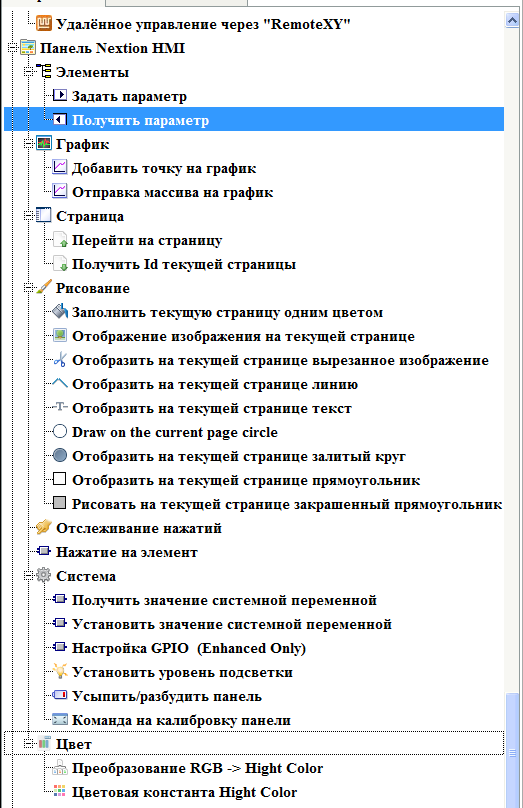
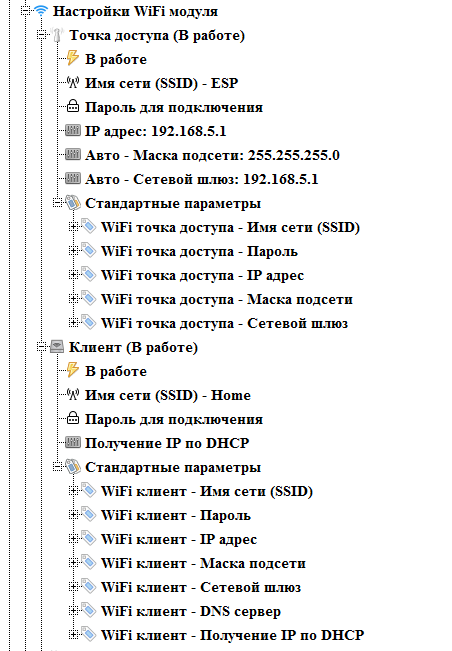
Next come the more specific settings.
Setting up a WiFi client and an access point (their simultaneous operation is possible).
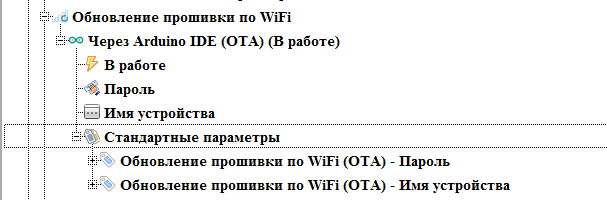
Setting the wireless update mode (for now only Arduino OTA, but plans to implement and update via the browser and automatically download the firmware from the update server)
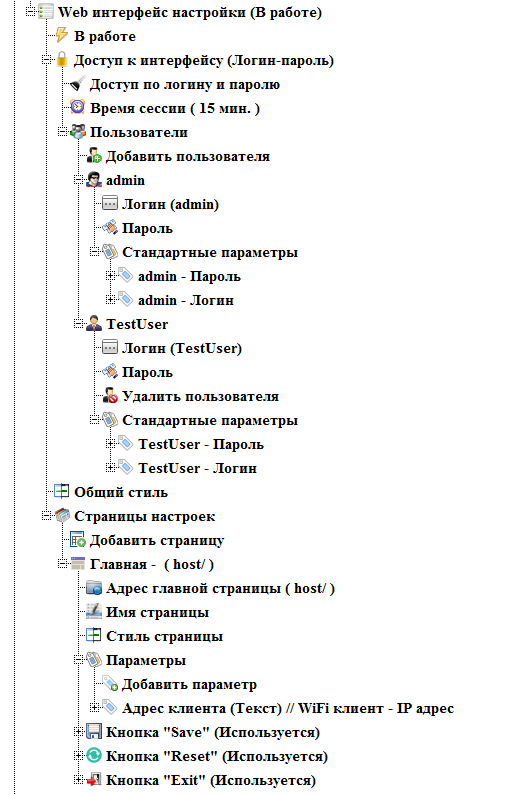
Implemented the ability to create a web interface controller settings. You can create an unlimited number of settings pages, with the required number of parameters. The parameters are used as the standard system parameters of the controller (see screenshots above), and any number of user, used for communication between the firmware and the configuration interface. All pages (except the main one), as well as individual parameters, can be set to access only to certain users (the number of created users is not limited).
And of course, just like for Arduino, support for the Modbus RTU, Modbus TCP and Modbus RTU over TCP exchange protocols is implemented.
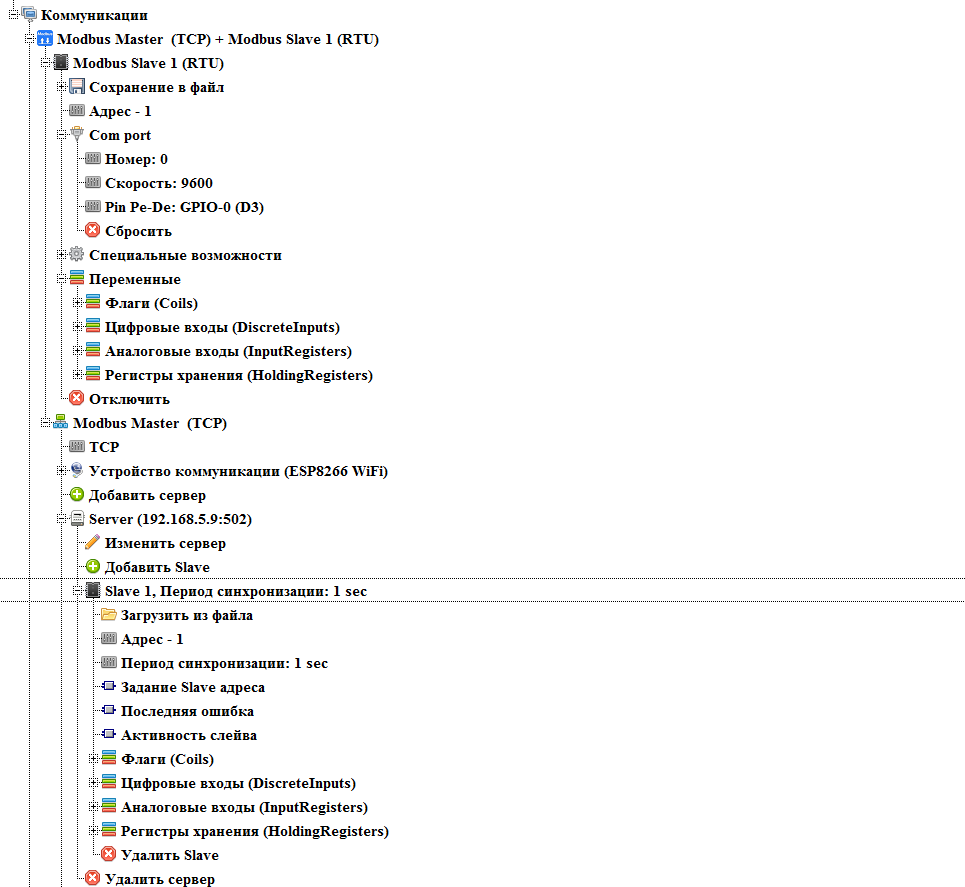
Bridge mode between Modbus RTU and Modbus TCP is also implemented.

In general, I tried to maximize the capabilities of this wonderful controller. Something succeeded.
This post is an overview, and starting in a series, and next we will look at creating a web-based settings interface, and getting time from time servers.
The FLProg project is a non-commercial project, and you can download the program from the project site as they say “free of charge and without SMS” . There are no restrictions in the program. Versions are presented for Windows OS and Linux OS.
PS
After numerous complaints about my diction and the way of presenting the material, I abandoned the idea of recording video lessons (teaching and narration talents were not given to me).
But one of the program users came to my aid.
I want to introduce you to the channel “Arduino Prom” and the site “Arduino Prom” . They are completely devoted to the FLProg project, and today there are about a hundred video lessons on the program.
Here is the latest video, just about creating a clock with synchronization via the Internet.
Source: https://habr.com/ru/post/421975/
All Articles