Jump into the cloud. We build a budget solution for the Internet of things on NodeMCU + Azure IoT Hub
The most popular purpose of IoT devices is telemetry collection. To date, prices for cloud IoT services have decreased so much that an ordinary ordinary user can afford to use them. Today we will talk about how to send data to the cloud from the NodeMCU board using the Lua language.

Note: we continue the series of publications of the full versions of articles from the magazine Hacker. Spelling and punctuation of the author saved.
I give the word to the author.
Since I work in the stack of Microsoft technologies, I use Azure Functions and Table Storage to create the cloud part of the IoT solution, but my PoC for NodeMCU and Lua can also be used with other providers of cloud IoT solutions.
INFO
Expressif NodeMCU is one of the most inexpensive motherboards with Wi-Fi, micro USB and on-board programmer. It is based on the ESP8266 module. The second generation motherboard can be purchased for about 6 - 7 dollars. You can work with the board from the Arduino IDE. In addition, the board supports a scripting language called Lua (translated from Portuguese as "Moon").
Connect and configure the device
In order for a Windows device to be recognized, you need to download the driver from the following link: CP210x USB to UART Bridge VCP Drivers
The standard speed of the serial port NodeMCU is 115'200bps. You can set a different speed, at the first reset of the device, it will return to 115200.
It is important that the driver be set to exactly the same speed:

Firmware
Most likely in the original firmware something will be missed, so ideally flashing the device yourself. You can assemble the firmware image in several ways. Using a cloud service , a Docker image , or using a Linux instruction . I collected using the cloud service. I also advise you this option.
If you need to send data to the cloud, then SNTP, MQTT, HTTP (WiFi, timer, file, GPIO, net, node, UART are already selected by default) are necessary for choosing functions. It is also necessary to mark as necessary TLS / SSL support in Miscellaneous options
Link to the bin file comes in the mail. More precisely, even 2 links come at once. One with the image supporting floating point operations, and the second with non-supporting.
Before flashing the ESP8266 it is necessary to bring in a special mode. The board has a separate FLASH button. Pressing it during power on or pressing reset puts the device in bootloader mode. If suddenly there is no such button in your board modification, then before flashing you need to connect GPIO0 with GND and press reset (this method is suitable for ESP-12).
Firmware can be flashed with PyFlasher utility. Py in the title means that the application is written in Python. There is also a nodemcu flasher , but it has not been updated for a long time. I did not try it.
The PyFlasher window looks like this:

Flash mode is selected depending on what your board. Most modern boards based on the ESP8266 ESP-12 and ESP32 modules fit the DIO mode. ESP8266 01 to 07 Fits faster QIO mode. DOUT is used by ESP8285.
IDE Setup
Download free IDE by link ESPlorer . Alternatively there is ZeroBrane Studio . I liked ESPlorer most of all, so I’ll give an example of working with him. ESPlorer is written in JAVA. Application interface such
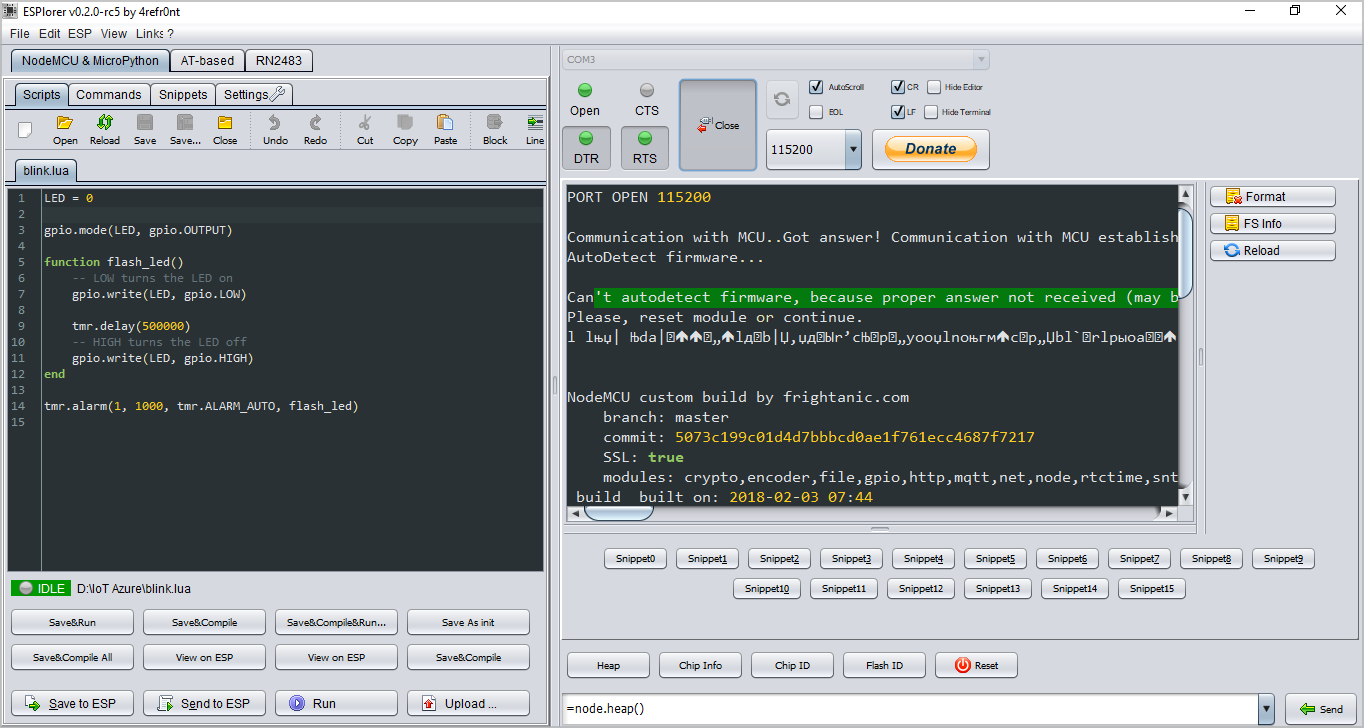
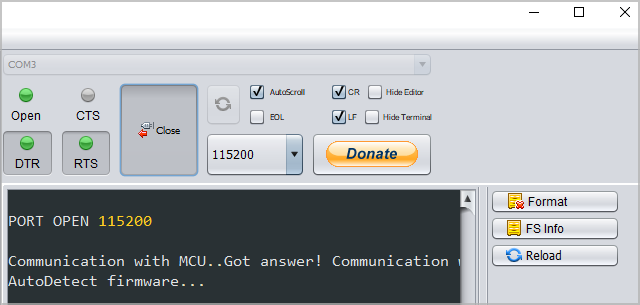
On the left side is the code, settings, and some other similar functionality. On the right - the monitoring window and device control commands. Open the application, select the port. Set the speed at which the exchange will take place (most likely it is 115200) and click Open.
To warm up, you can run a simple script that flashes with the built-in LED:
LED = 0 gpio.mode(LED, gpio.OUTPUT) function flash_led() gpio.write(LED, gpio.LOW) tmr.delay(500000) gpio.write(LED, gpio.HIGH) end tmr.alarm(1, 1000, tmr.ALARM_AUTO, flash_led) If your board does not have a built-in LED (or you are completely bored with examples of blinking with the LED =), then you can try an even simpler script that displays the line:
print("Hello from Lua!") After you create a .lua file (say test.lua), enter the code into it and save it to disk, you can download it to the device. To do this, you must open the port if it is not open (the Open button) and click the Upload button. You can find it among the buttons that are located under the code (on the left).
After uploading the file, you can execute it by sending the command:
dofile("test.lua") The command can be entered manually in the lower field, located on the right under the monitor. Or if you do not want to type any text, you can click the Reload button (the extreme row of buttons on the right). After clicking this button, you will receive a list of buttons with .lua files loaded on the board. Pressing the button with the file name will launch the file for execution.
If you want the file to start immediately after switching on the board, create a file with the name init.lua.
Setting up the cloud part to work with the device
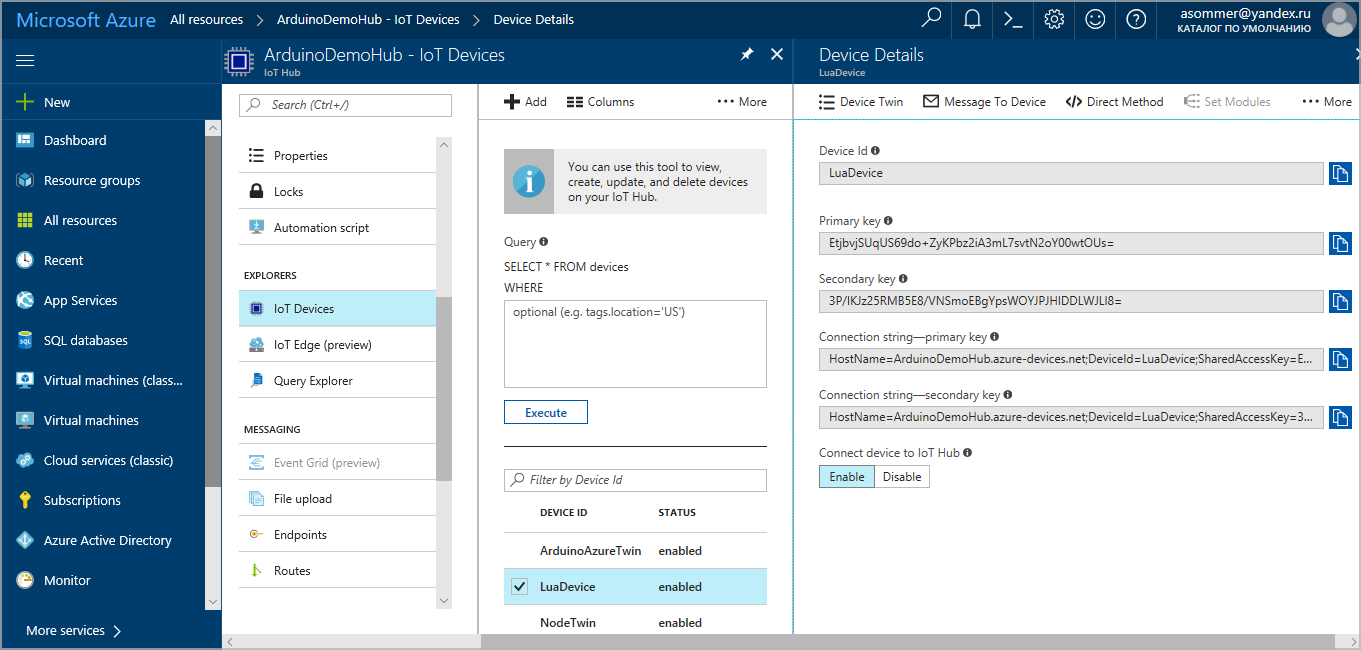
Let's leave our device for some time and create its twin in the cloud. Recently, a device twin can be created right on the Azure portal using the new functionality. In the IoT hub settings group called Explorers, you must select IoT Devices and click “+ Add”
To connect the device to the IoT hub, we need to generate a SAS (shared access signature). To generate SAS, the device double key is used, which can be obtained using any auxiliary utility (Device Explorer, iothub-explorer, IoT Extension for Azure CLI 2.0). But the easiest way to get the key is there, on the Azure portal, by going to IoT Hub -> IoT Devices.
SAS can be generated on the device, or it can be generated using any of its online services. If you use the SDK, then it can generate SAS for you automatically (it is enough to specify the device's twin key in the code).
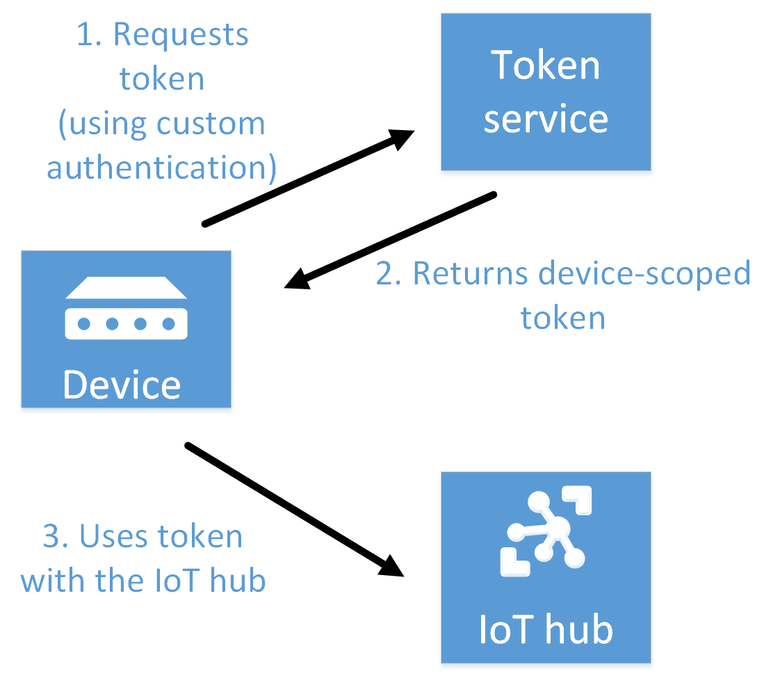
The way in which the SAS token is generated by a web service for a certain limited time is slightly more secure. Although there is a certain nuance. If you send the service only the name of the device, then someone can search through the names to get a token of some other device. Therefore, in order to secure the process a bit, I propose this solution: let's save the device's hash key of the Azure key on the device. And in the service code, before generating SAS, check whether the hash is the same as the device key hash. Thus, you can get SAS only if you know the name of the device and the hash of its key.
The first way in which SAS is generated on the device is simpler and more convenient, but slightly less secure. Since gaining access to the device, an attacker will be able to get the key and generate the SAS devices on his own. In the second case, by gaining access to the device, the attacker will be able to receive only SAS tokens, whose lifetime is limited.
It turns out that both methods are by and large not ideal if the hacker has access to the device. Even protecting a connection using a VPN does not help here. In this case, the transmission channel will be protected, but the one who receives the device in his hands will be able to get access to the channel. Unfortunately, on devices NodeMCU, Arduino, etc. There is no possibility to store keys / passwords in any secure storage. Perhaps the market for low-cost IoT devices requires new hardware functionality.
Creating Azure functions to generate SAS
As an online service, it’s easiest to use Azure functions. These are some kind of snippets that can be written immediately on the Azure portal in the browser. Jokes jokes, but this way you can even program from your smartphone. Of course, no one forbids creating and debugging them from Visual Studio, and only then publish to Azure in compiled form.
The task of the function is to perform some kind of not particularly complicated operation. According to microservice idea, each function is able to do one thing, but very well (the principle of Single responsibility).
You can create an Azure Function App on the portal by filling out a short form.

Consumption Plan allows you to pay only for those function calls that were made. This is the most inexpensive option. At the moment, a million function calls are given for free.
Notice that along with the creation of the function, an auxiliary data storage (Storage) is also created.
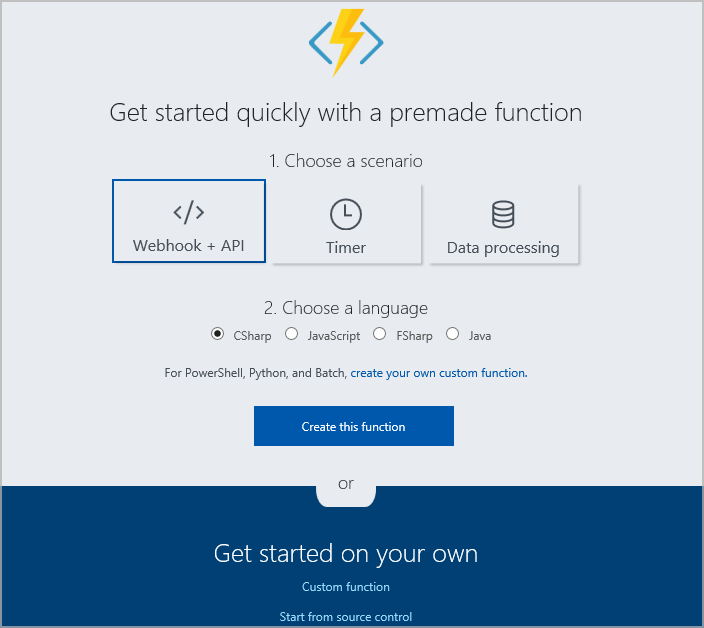
After creating the Function App, you can create the function itself. In this case, we need a function like Webhook + API. The function can be opened to all (anonymous access), or it can be accessed only by the owners of a special code. The code can be obtained from the function window by clicking on the link </> Get function URL:

Functions can be written in various languages. I prefer C #.
using System.Net; using Microsoft.Azure.Devices; using Microsoft.Azure.Devices.Common.Security; using System.Globalization; using System.Security.Cryptography; using System.Text; public static async Task<HttpResponseMessage> Run(HttpRequestMessage req, TraceWriter log) { string deviceid = req.GetQueryNameValuePairs() .FirstOrDefault(q => string.Compare(q.Key, "deviceid", true, CultureInfo.InvariantCulture) == 0).Value; string hash = req.GetQueryNameValuePairs() .FirstOrDefault(q => string.Compare(q.Key, "hash", true, CultureInfo.InvariantCulture) == 0).Value; if (String.IsNullOrEmpty(deviceid)) return req.CreateResponse(HttpStatusCode.BadRequest, "device id missing"); if (String.IsNullOrEmpty(hash)) return req.CreateResponse(HttpStatusCode.BadRequest, "hash missing"); var resourceUri ="ArduinoDemoHub.azure-devices.net/devices/"+deviceid; // taken from IoT Hub user with Connect devices rights (not from Device Explorer) var connectionString = "HostName=ArduinoDemoHub.azure-devices.net;SharedAccessKeyName=iothubowner;SharedAccessKey=cuYBKc42lfJr4oSRGQGQ8IiKWxGQkLre7rprZDZ/ths="; var registryManager = RegistryManager.CreateFromConnectionString(connectionString); var device = await registryManager.GetDeviceAsync(deviceid); var key = device.Authentication.SymmetricKey.PrimaryKey; HMACSHA256 hmac = new HMACSHA256(Encoding.UTF8.GetBytes("somerandomkeyKJBWyfy4gski")); var hashedkey = Convert.ToBase64String(hmac.ComputeHash(Encoding.UTF8.GetBytes(key))); if (hashedkey!=hash) return req.CreateResponse(HttpStatusCode.BadRequest, "wrong hash"); SharedAccessSignatureBuilder sasBuilder = new SharedAccessSignatureBuilder() { Key = key, Target = resourceUri, TimeToLive = TimeSpan.FromDays(Convert.ToDouble(7)) }; var SAS = sasBuilder.ToSignature(); return req.CreateResponse(HttpStatusCode.OK, SAS); } Create a project.json file and add the following content to it:
{ "frameworks": { "net46":{ "dependencies": { "Microsoft.Azure.Devices": "1.4.1" } } } } The code uses the connection string to the IoT hub. It can be confused with the connection string to the device. So that you are not confused I will remind you where you can get it:

You need to take the Connection string from any Policy with Device connect rights.
The connection string itself is best not to be specified in the code, as I did. I did this solely for the sake of example. It is best to go to the Application settings function.

And indicate there is a connection string. After that, you can "get it" from the secure storage using
ConfigurationManager.ConnectionStrings["___"].ConnectionString On the device, we need to save the hashedkey. But first you need to encode characters. HttpUtility.UrlEncode from System.Web space will help us in this.
hashedkey = HttpUtility.UrlEncode(hashedkey); We will send a request using Get, and not all characters can be passed as a parameter value.
Writing code to send data to the cloud
I wrote a small code on Lua sending data to the cloud. It turned out a kind of PoC. You can use it and modify to fit your needs.
Create 2 init.lua and SendDataToCloud.lua files
Content first:
-- print('init.lua ver 1.2') wifi.setmode(wifi.STATION) print('set mode=STATION (mode='..wifi.getmode()..')') print('MAC: '..wifi.sta.getmac()) print('chip: '..node.chipid()) print('heap: '..node.heap()) -- Wifi station_cfg={} station_cfg.ssid="_SSID" station_cfg.pwd="___" station_cfg.save=false wifi.sta.config(station_cfg) wifi_status_codes = { [0] = "Idle", [1] = "Connecting", [2] = "Wrong Password", [3] = "No AP Found", [4] = "Connection Failed", [5] = "Got IP" } sntp_connect_status_codes = { [1] = "DNS lookup failed", [2] = "Memory allocation failure", [3] = "UDP send failed", [4] = "Timeout, no NTP response received" } -- Wi-fi ( ) tmr.alarm(6,1000, 1, function() if wifi.sta.getip()==nil then print("Waiting for IP address! (Status: "..wifi_status_codes[wifi.sta.status()]..")") else print("New IP address is "..wifi.sta.getip()) tmr.stop(6) -- NTP sntp.sync({'pool.ntp.org'}, function(sec, usec, server) print("Clock Synced: "..sec..", "..usec..", "..server) tls.cert.verify(false) -- dofile('SendDataToCloud.lua') end, function(error_code) print("Clock Sync Failed: "..sntp_connect_status_codes[error_code]) end, 1 -- ) end end ) This file connects to the network and executes the code from the SendDataToCloud.lua file in case of a successful connection.
You must specify the data of your Wi-Fi access point as station_cfg.ssid and station_cfg.pwd values.
In the following file, you need to change the device name and IoT hub (variable DEVICE and IOTHUB). The funcurl variable contains the address of the SAS-generating function and the hash key of the device key (which we previously encoded using HttpUtility.UrlEncode) as the value of the hash parameter
-- DEVICE = "LuaDevice" IOTHUB = "ArduinoDemoHub.azure-devices.net" PORT = 8883 USER = "ArduinoDemoHub.azure-devices.net/"..DEVICE.."/api-version=2016-11-14" telemetry_topic="devices/"..DEVICE.."/messages/events/" connected = false local headers = 'Content-Type: application/x-www-form-urlencoded\r\n'.. 'Accept: */*\r\n'.. 'User-Agent: Mozilla/5.0 (Windows NT 6.1; Win64; x64; rv:47.0) Gecko/20100101 Firefox/47.0' funcurl = "https://arduinofunction.azurewebsites.net/api/GenerateSASFunction?code=Jn7j54PbR31BSRa0UZrDwp4ZEltjmWHmblG9zLo0Ne0tyGM7w/wQ7w==" funcurl = funcurl.."&hash=oJzykimyQsTPtzgJxYq90Xfqmw1rZTPTCH%2bJ5sSurKI%3d" funcurl = funcurl.."&deviceid="..DEVICE tmr.alarm(1,5000, 1, function() http.get(funcurl, headers, function(code, data, header) if (code < 0) then print("HTTP request failed") else sas = true print(code, data) if string.match(data, "Shared") then tmr.stop(1) SAS = string.sub(data,2,string.len(data)-1) print(SAS) connect(SAS) end end end) end) function connect(SAS) -- MQTT client = mqtt.Client(DEVICE, 240, USER, SAS) -- IoTHub MQTT print ("Connecting to MQTT broker. Please wait...") tmr.alarm(2,1000, 1, function() client:connect(IOTHUB, PORT, 1, -- Callback function(client) tmr.stop(2) print("Connected to MQTT: "..IOTHUB..":"..PORT.." as "..DEVICE) connected = true senddata() end, -- Callback function(client, reason) print("Error Connecting: "..reason) end ) end) end function senddata() math.randomseed(1) tmr.alarm(3, 1000, tmr.ALARM_AUTO, publish_data) -- , callback client:on("offline", function(client) print("MQTT Disconnected.") connected = false end) end -- function publish_data() if connected == true then somedata = math.random(1,100) -- payload = "{ \"deviceId\" : \""..DEVICE.."\",".. "\"iotdata\" :"..somedata.."}" -- client:publish(telemetry_topic, payload, 1, 0, function(client) print("Data published successfully.") end) end end The data is sent without using the Azure SDK, so you can use this code not only to send data to Azure. There are plenty of alternatives: AWS, Google Cloud IoT, IBM Watson IoT Platform.
The example uses the Message Queuing Telemetry Transport (MQTT) protocol. This is an open protocol designed specifically for IoT devices. Data is sent in JSON format. Where in real projects data are taken from sensors, a random number is generated in the example.
During the handshake process between the device and the IoT hub, the server can send its certificate, or it can request a device certificate. If you remember, the last time when working with an Arduino device, we were flashing it with a certificate. Now, only one sink of code is enough:
tls.cert.verify(false) We are limited to the certificate that the server will send us.
INFO
You may be interested in the fact that you can get the contents of your hub certificates using the following OpenSSL command
openssl s_client -showcerts -connect ArduinoDemoHub.azure-devices.net:8883 For the preparation of the material were used the labs, which are available at the link: Sending Device-to-Cloud (D2C) Messages
The code is not entirely up to date and I had to update it a bit, but in general, the link may be useful.
We work with NodeMCU from Arduino IDE
I can not ignore the topic of using the SDK. Its solution is good, but the SDK is the same code that is already debugged, simplified, and ready for use. A few words about how to configure and use the Arduino IDE to work with NodeMCU.
After installing the Arduino IDE you need to go to the menu File - Preferences

And add a link to an additional card manager - enter the address in the field Additional Boards Manager URLs: http://arduino.esp8266.com/versions/2.4.0/package_esp8266com_index.json
Then go to the Tools menu - Board xxx - Boardx Manager and install ESP8266
Install the AzureIoTHub, AzureIoTUtility, AzureIoTProtocol_MQTT libraries. After installing the latest library in the examples (File - Examples - AzureIoTProtocol_MQTT), you can find an example simplesample_mqtt for ESP8266.
Sample is ready to go. Just fill in the values of the variables in the iot_configs.h file.
I will mention one small minus. Compilation of the project and loading on the board, compared to Lua, takes quite a long time.
Saving data in the Azure cloud
With sending data, everything is clear, but how inexpensive it is to store data in the cloud.
The most inexpensive way to send data from the IoT hub to the database is all the same Azure Functions. And the most inexpensive data storage is Azure Table Storage.
Interestingly, when you create a Function App, the Storage is automatically created and is required for the function itself to work. If you create a separate repository, then the basic settings are desirable to make something like this:

LSR replication is currently the cheapest option. It is selected when automatically creating a repository associated with a function.
What we need now is to receive data from the IoT hub and write it to the storage. For this case, the Quick Start window will not be able to offer the desired option when creating a function.
Therefore, click the link Custom function, located at the bottom and select the option IoT Hub (Event Hub).
Here we will open this window:

In which we can fill in the field Event Hub connection with a simple choice (by pressing new). But to specify the Event Hub name you need to go to the IoT hub. In the hub you need to go to Endpoints (endpoints) and take the Event Hub-compatible name from there.

Let's go to the function code. The following snippet receives data from the IoT hub and stores it in Table Storage:
#r "Microsoft.WindowsAzure.Storage" #r "Newtonsoft.Json" using Microsoft.Azure; // Namespace for CloudConfigurationManager using Microsoft.WindowsAzure.Storage; // Namespace for CloudStorageAccount using Microsoft.WindowsAzure.Storage.Table; // Namespace for Table storage types using Newtonsoft.Json; public static void Run(string myIoTHubMessage, TraceWriter log) { var e = JsonConvert.DeserializeObject<EventDataEntity>(myIoTHubMessage); log.Info($"C# IoT Hub trigger function processed a message: {myIoTHubMessage}"); CloudStorageAccount storageAccount = CloudStorageAccount.Parse ("DefaultEndpointsProtocol=https;AccountName=iotdatademostorage;AccountKey=JgStNcJvlQYeNsVCmpkHQUkWlZiQ7tJwAm6OCL34+lGx3XrR+0CPiY9RoxIDA6VSvMKlOEUrVWL+KWP0qLMLrw==;EndpointSuffix=core.windows.net"); CloudTableClient tableClient = storageAccount.CreateCloudTableClient(); CloudTable table = tableClient.GetTableReference("iottable"); table.CreateIfNotExists(); EventDataEntity edata = new EventDataEntity("IOTpartition", Guid.NewGuid().ToString()); edata.DeviceId = e.DeviceId; edata.IotData = e.IotData; TableOperation insertOperation = TableOperation.Insert(edata); table.Execute(insertOperation); } public class EventDataEntity : TableEntity { public EventDataEntity(string pkey, string rkey) { this.PartitionKey = pkey; this.RowKey = rkey; } public EventDataEntity() { } public string DeviceId { get; set; } public int IotData { get; set; } } https; AccountName = iotdatademostorage; AccountKey = JgStNcJvlQYeNsVCmpkHQUkWlZiQ7tJwAm6OCL34 + lGx3XrR + 0CPiY9RoxIDA6VSvMKlOEUrVWL + KWP0qLMLrw ==; EndpointSuffix = core.windows.net"); #r "Microsoft.WindowsAzure.Storage" #r "Newtonsoft.Json" using Microsoft.Azure; // Namespace for CloudConfigurationManager using Microsoft.WindowsAzure.Storage; // Namespace for CloudStorageAccount using Microsoft.WindowsAzure.Storage.Table; // Namespace for Table storage types using Newtonsoft.Json; public static void Run(string myIoTHubMessage, TraceWriter log) { var e = JsonConvert.DeserializeObject<EventDataEntity>(myIoTHubMessage); log.Info($"C# IoT Hub trigger function processed a message: {myIoTHubMessage}"); CloudStorageAccount storageAccount = CloudStorageAccount.Parse ("DefaultEndpointsProtocol=https;AccountName=iotdatademostorage;AccountKey=JgStNcJvlQYeNsVCmpkHQUkWlZiQ7tJwAm6OCL34+lGx3XrR+0CPiY9RoxIDA6VSvMKlOEUrVWL+KWP0qLMLrw==;EndpointSuffix=core.windows.net"); CloudTableClient tableClient = storageAccount.CreateCloudTableClient(); CloudTable table = tableClient.GetTableReference("iottable"); table.CreateIfNotExists(); EventDataEntity edata = new EventDataEntity("IOTpartition", Guid.NewGuid().ToString()); edata.DeviceId = e.DeviceId; edata.IotData = e.IotData; TableOperation insertOperation = TableOperation.Insert(edata); table.Execute(insertOperation); } public class EventDataEntity : TableEntity { public EventDataEntity(string pkey, string rkey) { this.PartitionKey = pkey; this.RowKey = rkey; } public EventDataEntity() { } public string DeviceId { get; set; } public int IotData { get; set; } } If you use this code in a real project, do not forget to move the connection string to a safer place — in App settings (just like the connection string of the first function).
The connection string itself can be taken in the settings item called Access keys:

View the contents of tables using the free Azure Storage Explorer utility.
Since the cost of Azure Table Storage is quite low, and the Azure Functions and IoT hub offer certain resources monthly for free, the cost of the entire solution per month can be less than $ 1. Of course, it depends on the amount of data. Count yourself. At the moment, 1 GB of data costs 7 cents per month and for every million transactions you will be charged only 4 cents.
INFO
I always advise when using cloud services from any provider to tie a credit card with the minimum amount of money to your account. Quite really accidentally choosing some kind of erroneous setting to pay much more than you expect.
We remind you that this is the full version of an article from Hacker magazine . Its author is Alexey Sommer .
Useful materials
Cloud Application Architecture Guide
 Use a structured approach to developing cloud applications. This 300-page e-book on cloud computing architecture discusses architecture, development, and deployment recommendations that apply regardless of the cloud platform chosen. This guide includes steps to:
- Choosing the right style of the cloud application architecture for your application or solution;
- selection of appropriate computing and data storage technologies;
- implementation of 10 development principles for creating a scalable, fault-tolerant and managed application;
- following the five principles of creating high-quality software that guarantees the success of your cloud application;
- using constructive patterns intended for the problem you are trying to solve.
→ Download
Azure Developer Guide

From this update to the Azure Developer’s Guide, you’ll find out how a complete set of services for the Azure software platform fits your needs. Here you will find information about architectural approaches and the most common situations that arise when creating cloud applications.
→ Download
Microsoft Azure Basics
 This book provides insight into important information about Azure key services for developers and IT professionals who are not familiar with cloud computing. Step-by-step demos are included to help the reader understand how to get started with each of the key services. Each chapter is independent, no practical demonstrations from previous chapters are required to understand a particular chapter.
This book covers the following topics:
- Get started with Azure;
- Azure App Service and Web Apps;
- Virtual machines;
- Storage service;
- Database;
- Additional Azure services.
→ Download
useful links
')
Source: https://habr.com/ru/post/421847/
All Articles