Kivy. Xamarin. React Native. Three frameworks - one experiment (part 3)

The task of comparing frameworks is a very ungrateful task, the preferences of developers are different, the technologies change very quickly. Too fast. This article will become obsolete before I click the “publish” button.
Attempts to compare were, so, about five years ago, the guys (Colin Eberhardt and Chris Price) inspired a number of developers to make an application to search for real estate on a clearly compiled TK. The idea is cool, we even participated and made a version of this application on DevExtreme . But in terms of support, such a project is hell and now the project Property Cross , is of some historical stratum, which causes nostalgia and warm feelings, but is hardly of practical use.
If you take only the js world, then there is a rather lively project todomvc , which compares only the js part, without packaging in a mobile, desktop or any application. The project is alive and supported. Most likely, there are still very cool examples that we did not notice in Google’s issue when we were preparing an article, but we will not be upset about it.
')
Our experiment is less ambitious and shows only the current slice of technology, even its small part. Here is a reference to the first and second article of the experiment.
Further reading this is the third article on how to make an application on React Native on TK. It is very similar to hundreds, and maybe thousands, of other retellings of documentation on how to make an application on React Native. Dear reader, I warned you, my conscience is clear.
Remember TK
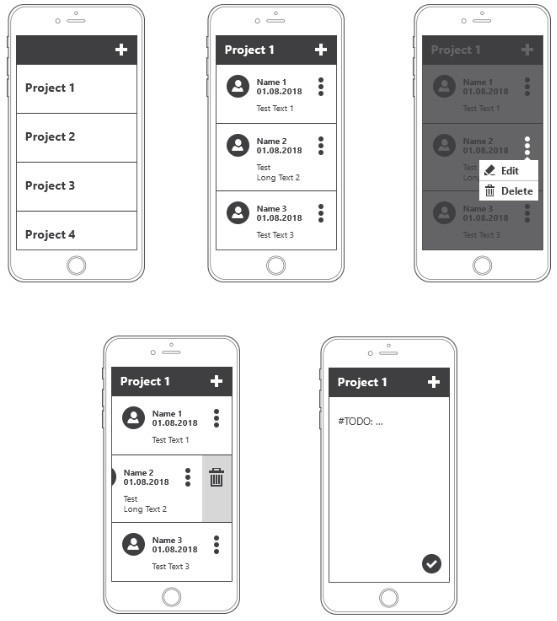
In general, it can be fully viewed in the first article. But I will add a picture of what should be in the end. Pictures is not enough.
Pinch materiel. What is React Native
React Native is a framework for creating cross-platform mobile applications from Facebook. As in the "normal" React for the web, the UI of the application is assembled from building blocks - components that respond to a change in their state (state) and the properties transferred to them (props), but, unlike the web, they are rendered into native controls.
Ideally, the principles of immunity and pure functions are used, which ensures simplicity and isolation of testing. And here it is worth noting that the React itself is very simple, and this simplicity goes into the mobile part.
Additional add-ins in the native and JS code smooth the distinction between platforms when possible. In fact, React Native provides some unification of properties for a component in each operating system.
For example, ScrollView, and HorizontalScrollView are 2 different components in Android. And in iOS, UIScrollView, which supports both horizontal and vertical scrolling. And in React Native we will use the following cross-platform code:
<ScrollView horizontal={true}/> With the right approach, we get an “honest” native application running on iOS and Android.
In an ideal world, when developing with React Native, you don’t have to write in Java or Objective-C. But such an opportunity exists when it is necessary to implement a component that goes beyond the capabilities of React Native.
With this, the developers from Airbnb have played a lot, and we can see a lot of worthy implementations in the community reactor that used to be in their repository. For example, Lottie is a library for importing animations from Adobe After Effects, or cross-platform maps .
JS code in the application is executed on the JavaScriptCore engine. Communication between the native code and JS is performed using an asynchronous bridge (bridge), which allows you to transfer properties (props), trigger events (events) and execute callbacks.
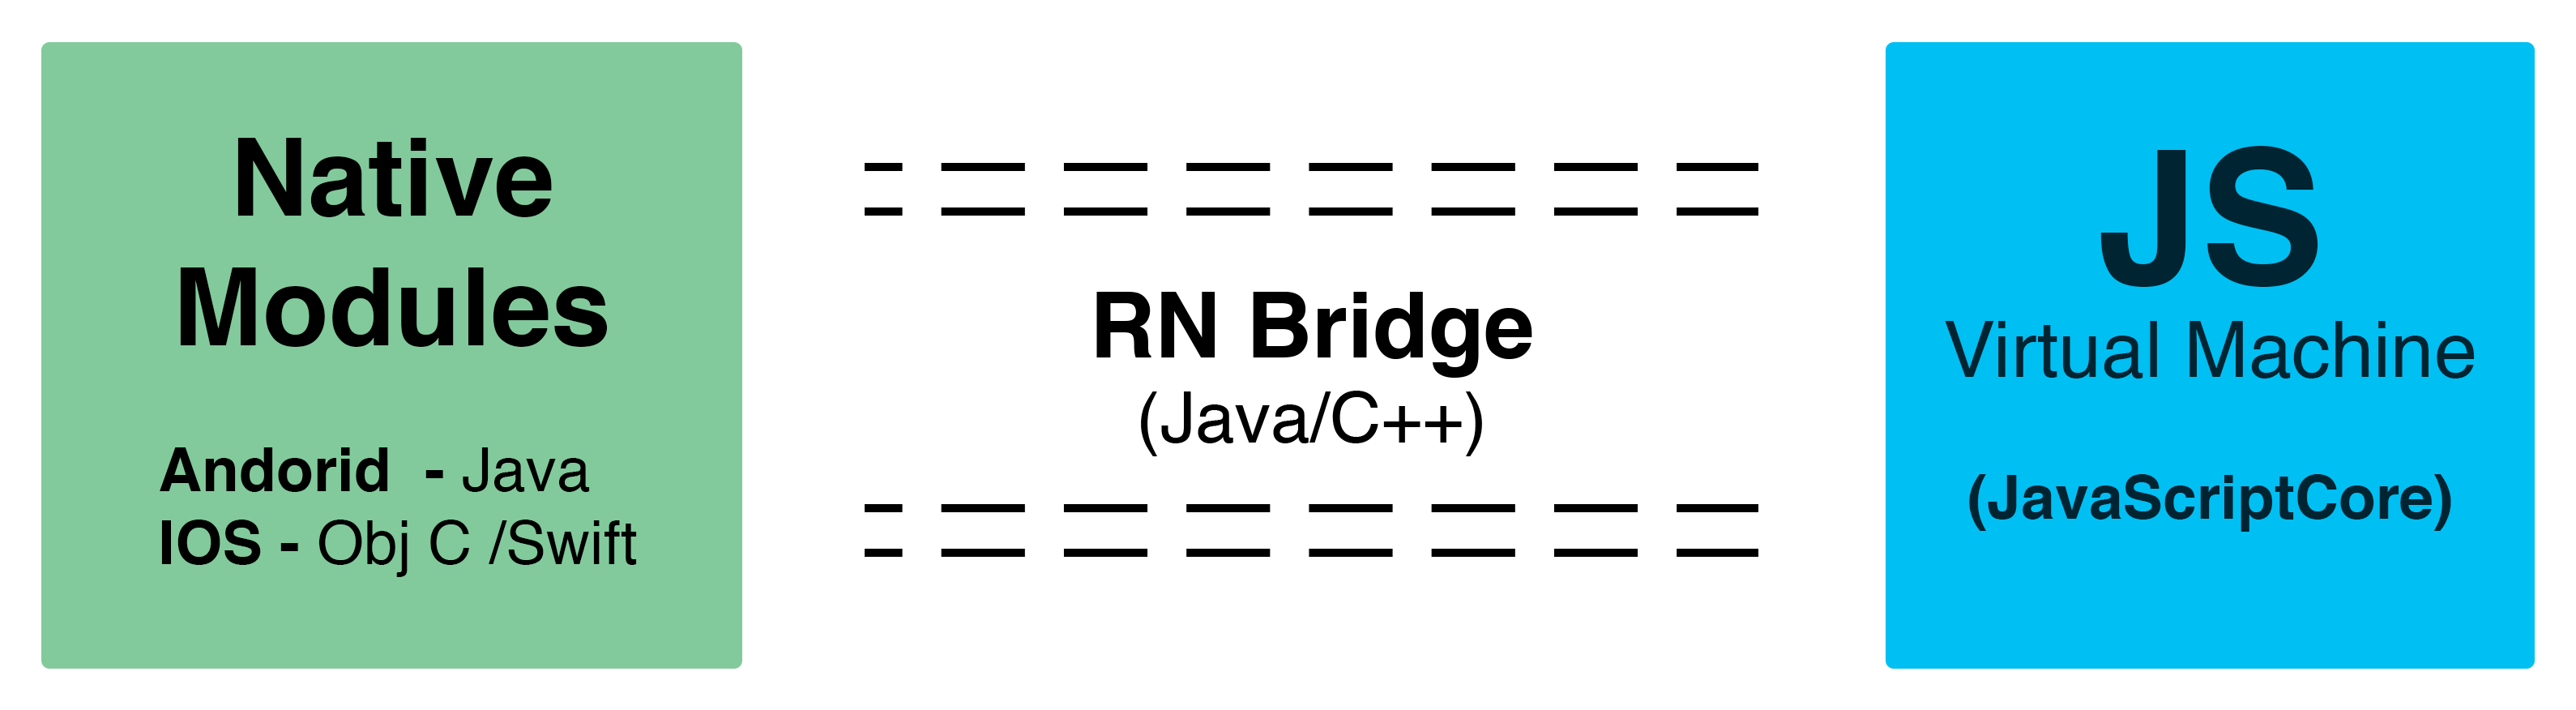
The picture is taken from excellent processing of documentation React Made Native Easy . (I highly recommend reading.)
In the build process, a new-fashioned babel is used to convert the JS code, this allows the use of the new ES6 syntax, as well as some ES8 features (for example, async-await). If you, my dear reader, js developer, understand how good it is when there is a spread operator and how bad it is when there is no spread.
For the layout of the pages, the flexbox technology implemented by the cross-platform engine Yoga is used. It differs from the browser flexbox, but they are minor and mostly relate to defaults. Of course, there are nuances, but you will definitely get lucky, and everything will be only according to the documentation.
Stack preparation and deployment. Lamp terminal
To work with RN, we need Node.js and the npm package manager that comes with it. Not necessarily, but it is very desirable to install the Expo application on your device. It will allow you to run our project on the phone, as well as build and run an application for iOS, when you do not have macOS at hand.
Create a new application. For this we use the create-react-native-app package.
In the terminal we perform:
npm install -g create-react-native-app create-react-native-app notes cd notes npm run start We scan the QR code using Expo, or enter a link from the terminal, or even send the link to our phone, directly from the terminal.
In general, I have a suspicion that the gray-haired old man, who found roguelike toys without ui, when there is only a terminal, and instead of a top-end video card is just your imagination, is the cli cli developer.

But we, in the meantime, have just created and launched the “Hello World” application.
And the whole “Hello World” -a is not enough. Analyzing TK
According to TK, the data structure of the application will be
Note: { userName: string, avatar: string, editTime: string, text: string } Project: { name: string, notes: Array<Note> } Projects: Array<Project> To work with such data, I would take some very fashionable solution based on CQRS. This would preserve the integrity of the data, provide a high reading speed with the possibility of rearranging the projections, as well as a rapid deployment to the cloud with one team. Like Resolve , which is developed by our colleagues.
But I will not take it, we have a simple experiment, without a backend. And for simplicity I will use the flux architecture, in particular its implementation - redux . Data from the state of the application comes to the components as props. Components may call actions to refresh data.
The application will have 3 screens, all according to the TOR:
- list of projects - Projects,
- detailed project page with a list of notes - Project,
- Detailed Note Page - Note
To navigate between the screens I will use the standard react-navigation library. The tsiferki near the graphics on the library page show how many times it is downloaded per week. Now there are about 100 thousand a week. Well, I'm not the only one who chose this library for navigation. And yes, you can see tsiferki from other npm packages, which I have indicated in this article, in order to roughly understand the number of users of this technology at a given time.
Create an application
For React Native, the App component from the App.js file is the entry point into the application.
export default class App extends Component { render() { return ( <Provider store={store}> <Navigator /> </Provider> ) } } The Store with data and application status is connected by the Provider component from the react-redux library. This provides data forwarding for nested components.
Create a navigator to navigate between screens in the application. It clearly reflects the structure of the application, stated in the experiment, and draws animated transitions between screens for each of the platforms.
const Navigator = createStackNavigator({ Projects: { screen: Projects }, Project: { screen: Project }, Note: { screen: Note } }) Navigator screens are components - containers. They get data from the application state.
Project List - Projects
On the screen with the list of projects there will be a list and a button for adding a project - in the header window on the right. We will create a new project on the Project screen.
To navigate, use the navigation object that the parent component, the navigator, passed to props.
export class Projects extends PureComponent { static navigationOptions = ({ navigation }) => ({ headerRight: ( <AddButton onPress={() => navigation.navigate('Project')} /> ) }) navigateProject = project => { this.props.navigation.navigate('Project', { projectId: project.id, name: project.name }) } render() { return ( <ProjectList projects={this.props.projects} onPressProject={this.navigateProject} /> ) } } To display the list of projects, we will use FlatList - a cross-platform list with virtualization:
export class ProjectList extends PureComponent { static propTypes = { projects: ProjectsType, onPressProject: PropTypes.func } renderItem = ({ item }) => ( <ProjectListItem project={item} onPressProject={this.props.onPressProject} /> ) render() { return ( <FlatList data={this.props.projects} keyExtractor={item => item.id} renderItem={this.renderItem} /> ) } } For each element we set a unique key - we have this element id. This is necessary so that the reactant can distinguish elements in the list and update only those that have changed.
Add a component to the list item.
export class ProjectListItem extends PureComponent { static propTypes = { project: ProjectType, onPressProject: PropTypes.func } onPressProject = () => { const { project, onPressProject } = this.props onPressProject(project) } render() { return ( <TouchableOpacity onPress={this.onPressProject}> <View style={styles.project}> <Text style={styles.name}>{this.props.project.name}</Text> </View> </TouchableOpacity> ) } } TouchableOpactity is a touch-sensitive wrapper. When clicked, the nested component becomes more transparent.
View - analog div for web - base markup component.
Text - container for text.
Add styles:
const styles = StyleSheet.create({ project: { paddingVertical: 30, paddingHorizontal: 15, backgroundColor: 'white', borderBottomWidth: StyleSheet.hairlineWidth, borderColor: 'gray' }, name: { fontSize: 16 } }) The syntax of styles is like css, the main difference is that you can only stylize the component itself (for example, you cannot set the font size for the entire application, only for a specific Text component)

Detailed project page with a list of notes - Project
Similarly, create a detailed page. Differences only in the presence of the title in the navigator and additional input. In the navigator, set the title - the name of the project. If the project id is not set, we suggest entering the project name and create a new one.
export class Project extends PureComponent { static navigationOptions = ({ navigation }) => { const projectId = navigation.getParam('projectId') return { title: navigation.getParam('name', ''), headerRight: ( <AddButton onPress={() => navigation.navigate('Note', { projectId })} /> ) } } removeNote = noteId => { const { projectId, removeNote } = this.props removeNote(projectId, noteId) } navigateNote = noteId => { const { projectId, navigation } = this.props navigation.navigate('Note', { noteId, projectId }) } createProject = name => { const newProjectId = shortid.generate() this.props.navigation.setParams({ projectId: newProjectId, name }) this.props.addProject(newProjectId, name) } render() { const { projectId, project } = this.props if (!projectId) { return ( <ProjectNameInput onSubmitEditing={this.createProject} /> ) } return ( <NoteList notes={project.notes} onNavigateNote={this.navigateNote} onRemoveNote={this.removeNote} /> ) } } Project page is a list of notes. For TK for each note there is a context menu with editing and deleting. You can also delete the note with a swipe. In React Native there is a separate list, with the possibility of a swipe - SwipeableFlatList.
<SwipeableFlatList data={this.props.notes} bounceFirstRowOnMount={false} keyExtractor={item => item.id} maxSwipeDistance={MAX_SWIPE_DISTANCE} renderQuickActions={this.renderQuickActions} renderItem={this.renderItem} /> When deleting a note, we will request confirmation, for this we will call the standard system Alert
onRemoveNote = noteId => { Alert.alert( 'Remove Note', 'Do you want to remove note ?', [ { text: 'Cancel', onPress: () => {}}, { text: 'Remove', onPress: () => this.props.onRemoveNote(noteId) } ] ) } 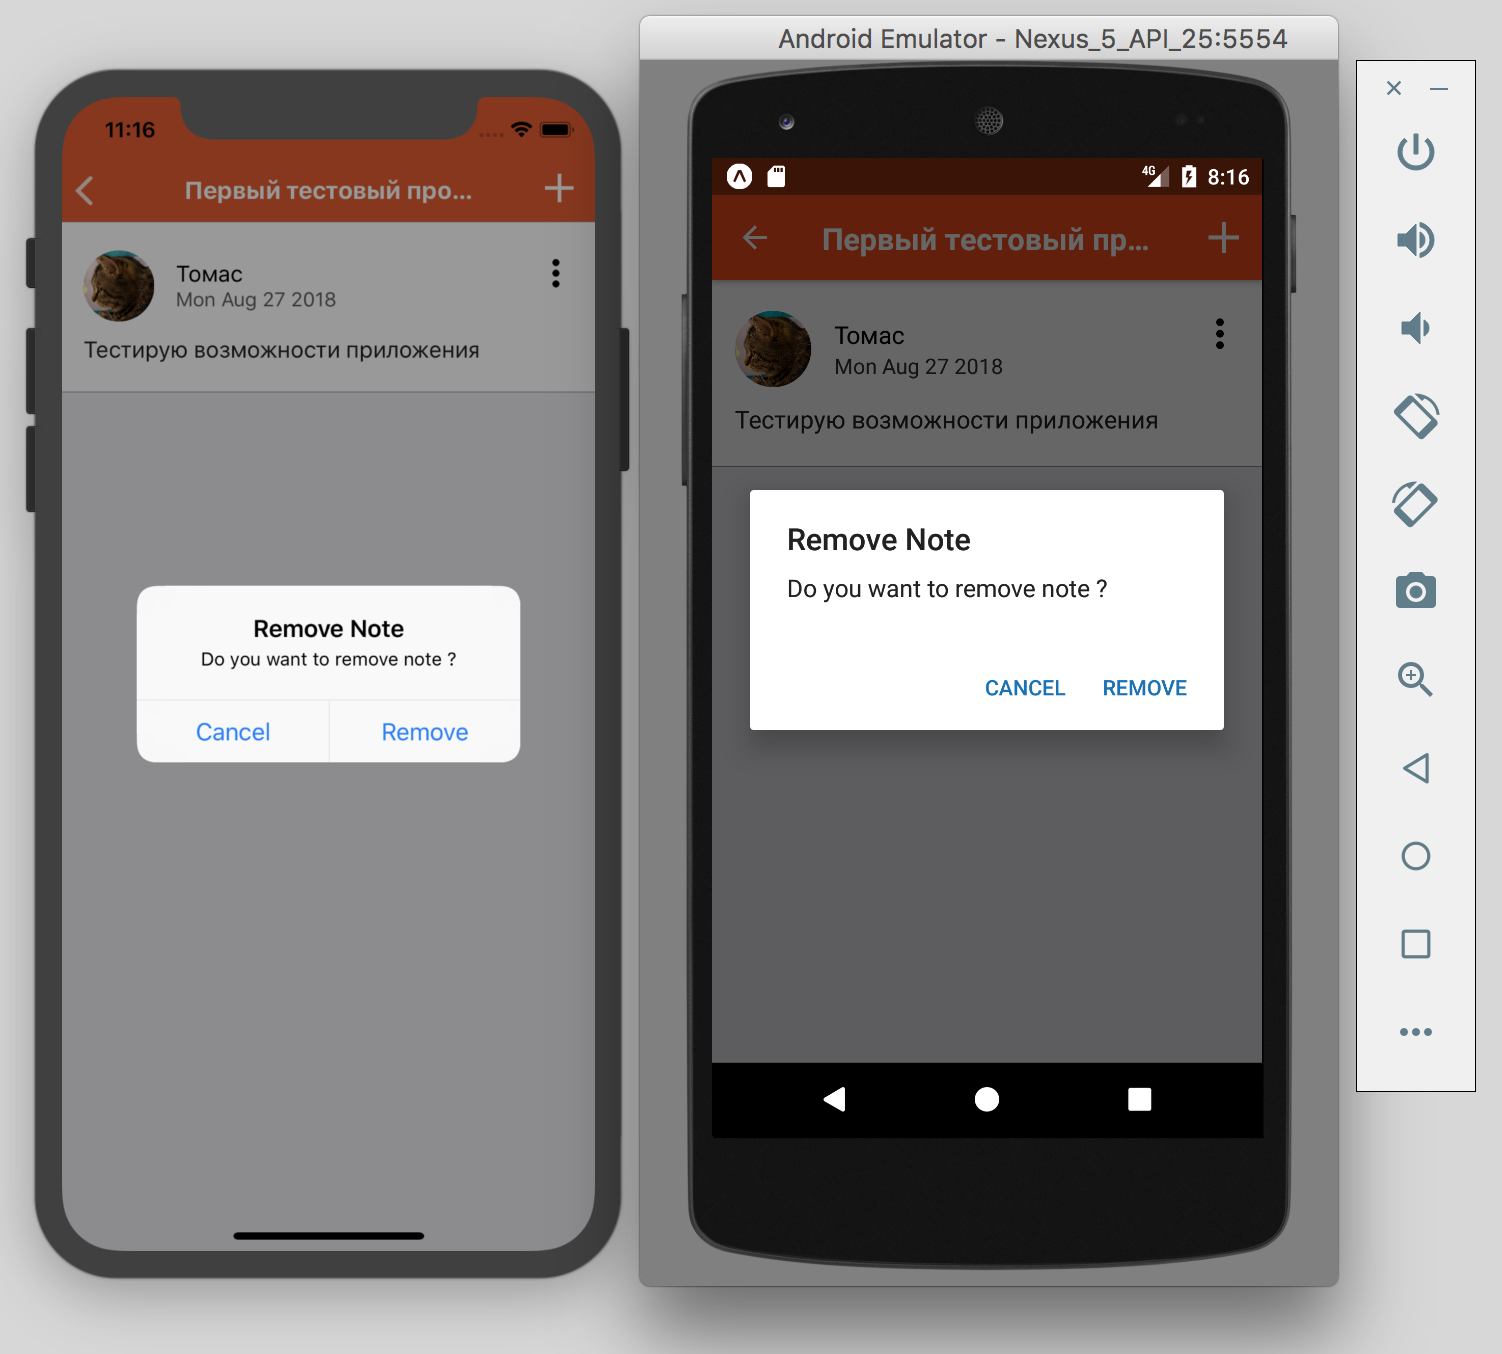
There is an interesting point for the context menu. Unlike the alert, its implementation in the RN for Android and iOS is different.
For android use popup menu
showPopupMenu = () => { const button = findNodeHandle(this._buttonRef) UIManager.showPopupMenu( button, [ 'Edit', 'Delete' ], e => console.error(e), (e, i) => this.onPressMenu(i) ) } For iOS - actionSheet
showActionSheet = () => { ActionSheetIOS.showActionSheetWithOptions({ options: [ 'Edit', 'Delete', 'Cancel' ], destructiveButtonIndex: 1, cancelButtonIndex: 2 }, this.onPressMenu ) } There are several ways to share platform dependent code. We will use the Platform object.
onOpenMenu = Platform.select({ android: this.showPopupMenu, ios: this.showActionSheet }) 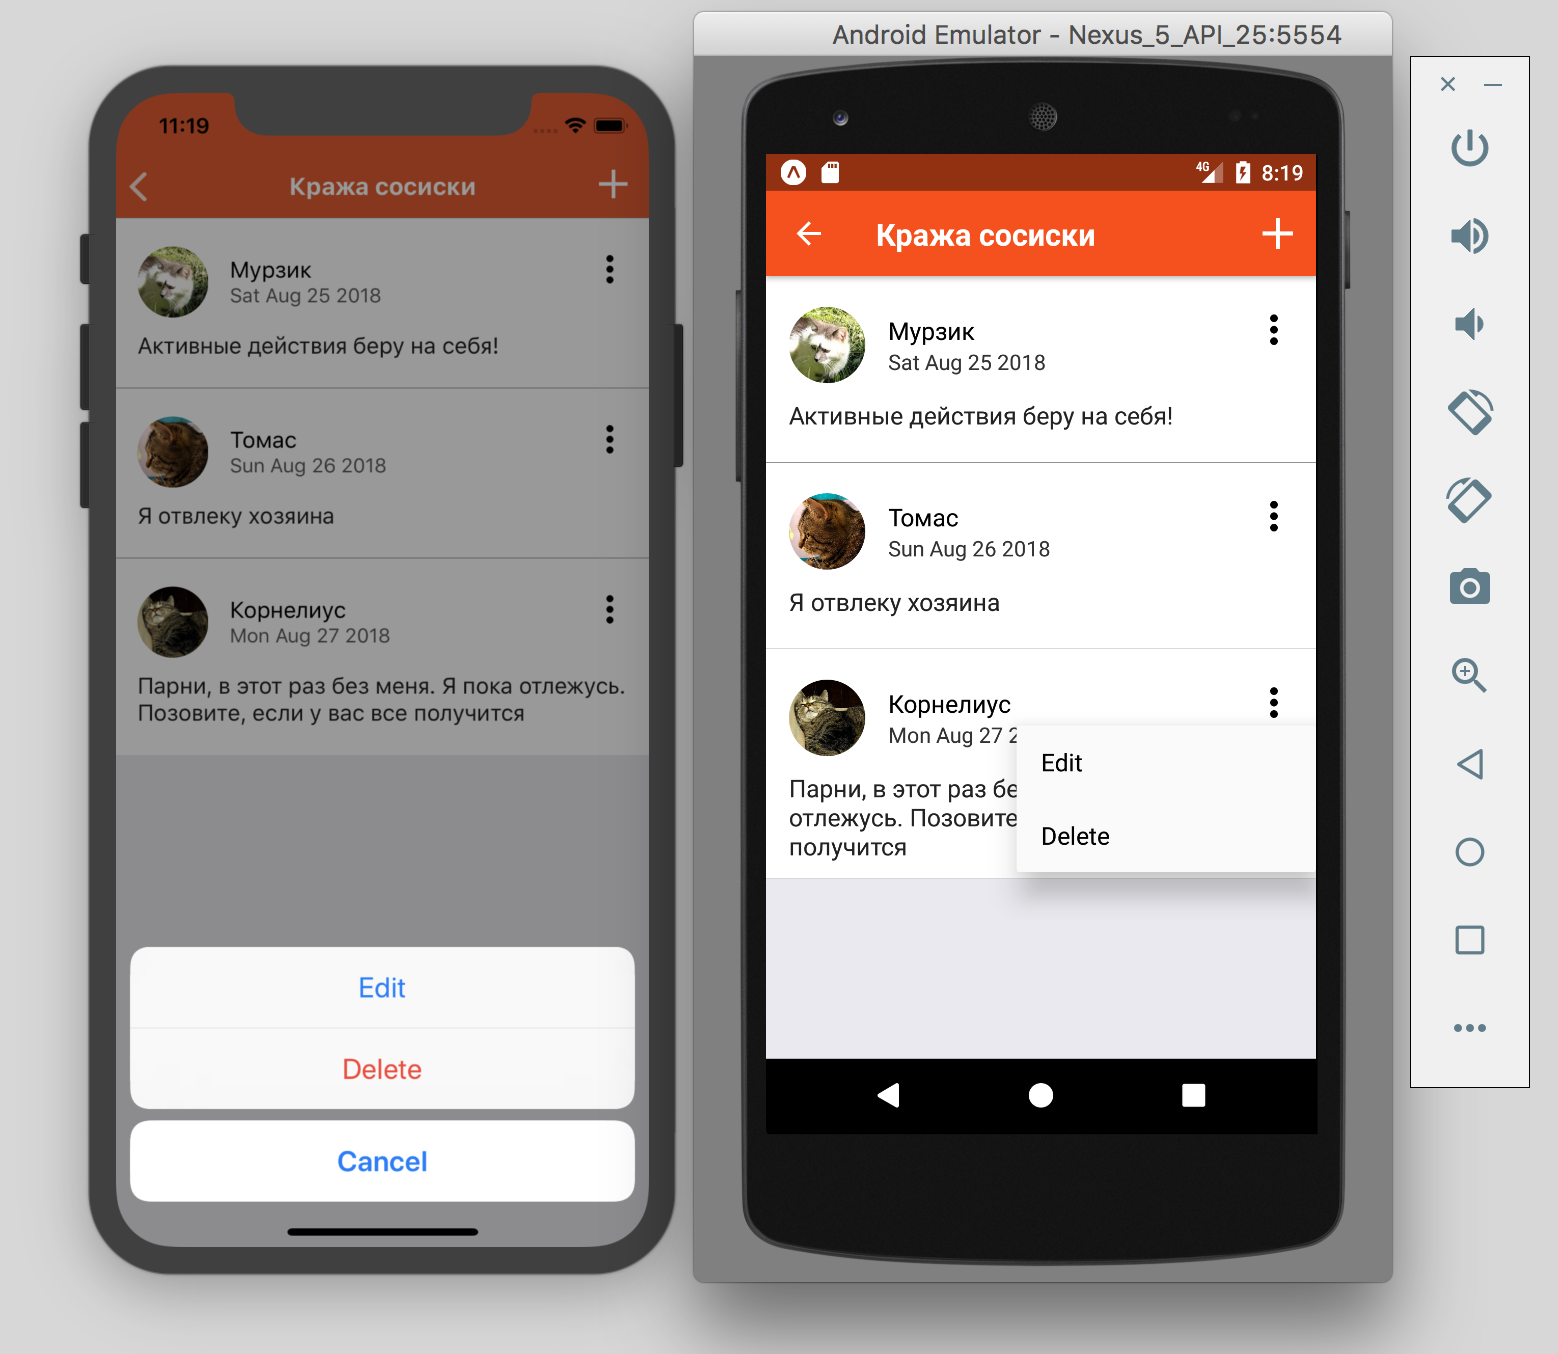
Detailed page notes - Note
The note page is also quite primitive. But, unlike the previous ones, we use state to store intermediate user input results.
export class Note extends PureComponent { static navigationOptions = ({ navigation }) => ({ headerRight: ( <SaveButton onPress={navigation.getParam('onSaveNote')} /> ) }) state = { noteText: '' } componentDidMount() { this.props.navigation.setParams({ onSaveNote: this.onSaveNote }) } onSaveNote = () => { Keyboard.dismiss() const { projectId, noteId, note, navigation, addNote, editNote } = this.props const { noteText } = this.state if (!noteId) { const newNoteId = shortId.generate() navigation.setParams({ noteId: newNoteId }) addNote(projectId, newNoteId, noteText) } else if (noteText && noteText !== note.text) { editNote(projectId, noteId, noteText) } } onChangeNote = noteText => { this.setState({ noteText }) } render() { const initialTextValue = this.props.note ? this.props.note.text : '' const noteText = this.state.noteText || initialTextValue return ( <NoteDetail noteText={noteText} onChangeNoteText={this.onChangeNote} /> ) } } The detailed screen of the note — the classic “stupid” component — reports upward about changing the text and shows the text that the parent sends to it.
export class NoteDetail extends PureComponent { static propTypes = { noteText: PropTypes.string, onChangeNoteText: PropTypes.func } render() { const { noteText, onChangeNoteText } = this.props return ( <View style={styles.note}> <TextInput multiline style={styles.noteText} value={noteText} placeholder="Type note text here ..." underlineColorAndroid="transparent" onChangeText={onChangeNoteText} /> </View> ) } } 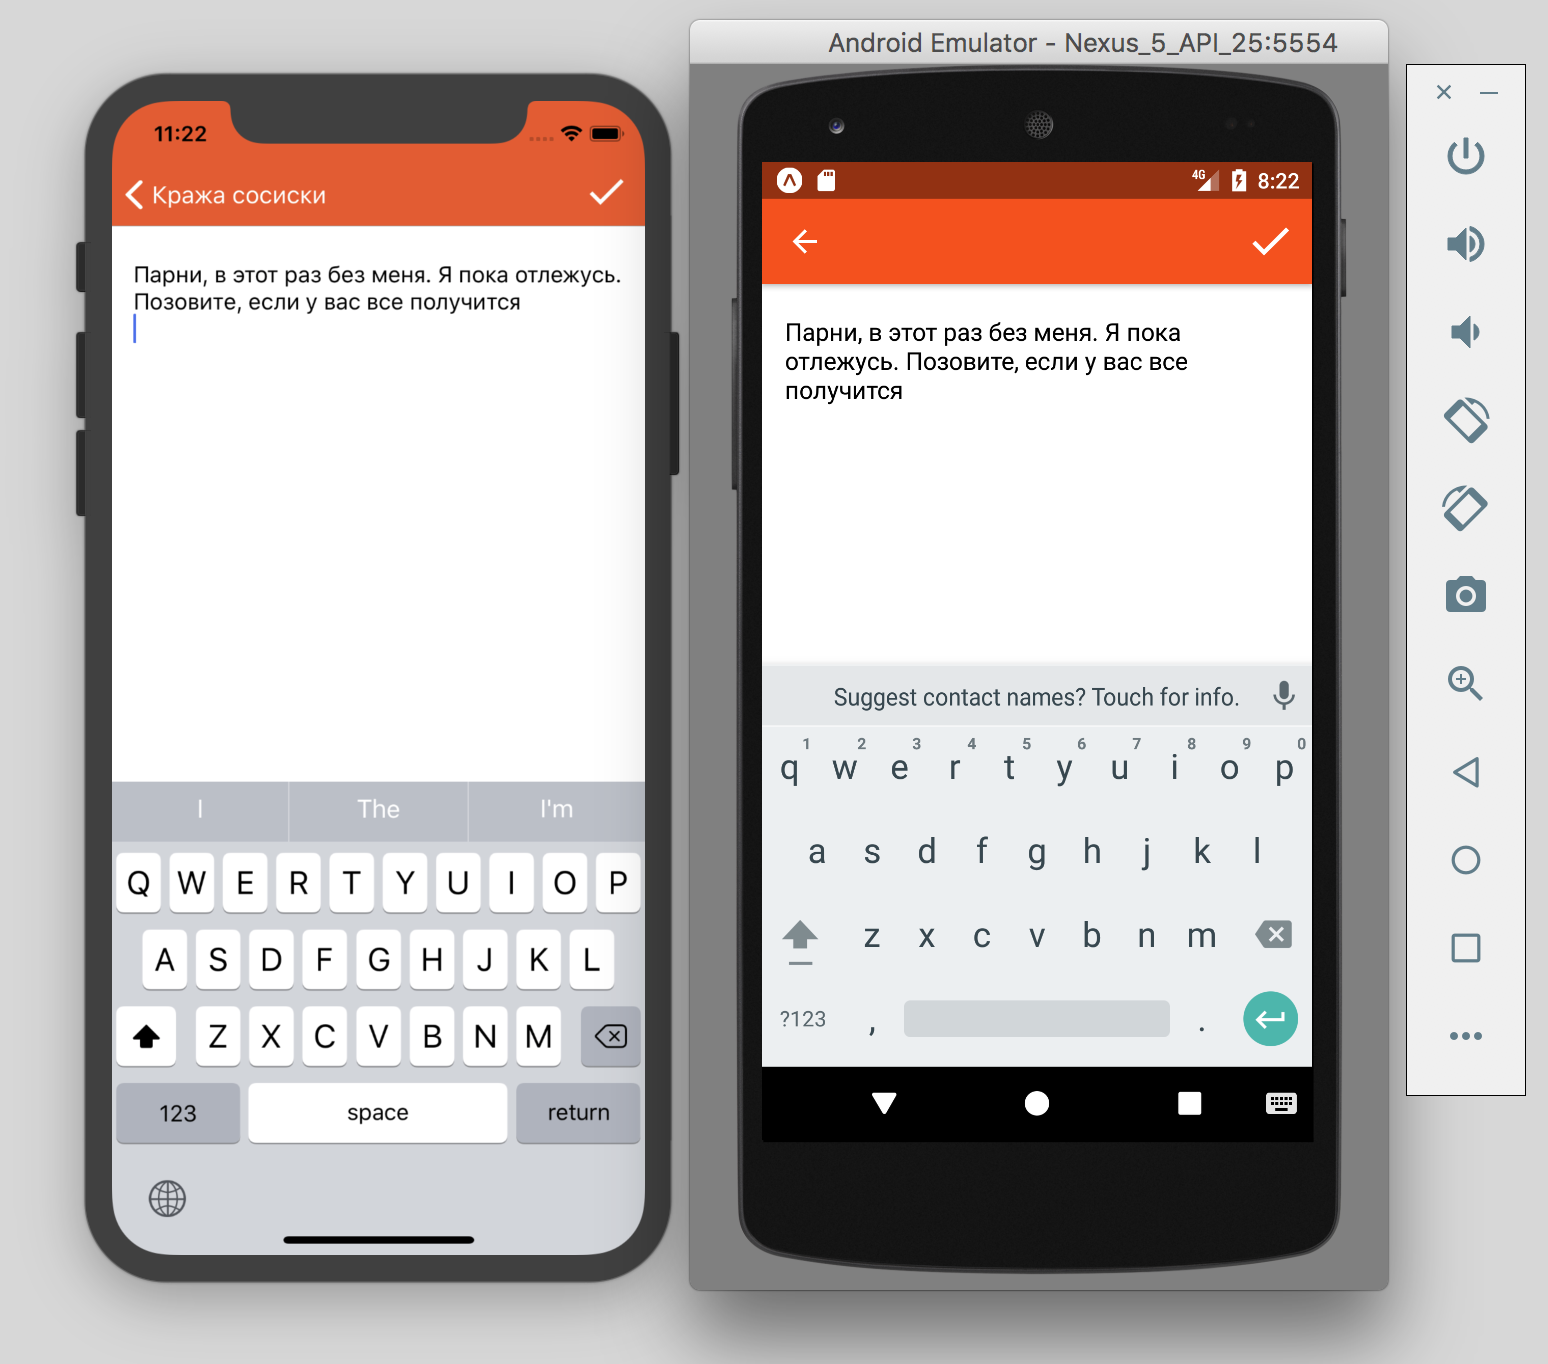
Total we received the application as in TZ. The experiment is complete. The application code can be viewed in the general repository.
Total Pros and Cons React Native
Pros:
React Native is familiar and understood by developers familiar with React and the Node.js infrastructure and npm. There is an opportunity to use all approaches and libraries, as for the usual React.
A huge number of js packages from npm. Most likely, most of the standard tasks have already been solved and possibly under the MIT license.
Big community. Both individual developers and large companies used RN for development, and continue to use.
Many ready-made sets of UI components, such as NativeBase , React Native Elements , libraries from large companies like Facebook, Airbnb, Wix.com.
An intuitive toolkit for convenient application development from Hello World to Instagram .
Minuses:
The application starts slower than the native one and there are some debag difficulties. JS code in debugger and without it works on different engines. Airbnb was very well written about this problem in a series of articles , why they refused to use React Native.
Since the toolkit consists of a set of packages that are developed separately, there is a possibility of a version conflict and a break.
Not everything can be done without native code. And when you make changes to the native code, you lose the opportunity to use Expo and force yourself to build the application using standard native development tools.
Many thanks to Mirimon and HeaTTheatR for inviting me to participate in this experiment. It was fascinating. Lastly add voting.
Source: https://habr.com/ru/post/421571/
All Articles