Analysis of the network traffic of a mobile application on iOS. Part 1 - Proxy

There are situations when, when developing or testing a mobile application, it becomes necessary to view the network traffic of the application. Still viewing mobile app traffic, outputting it to your IDE console? For this task there are more effective tools, for example, a proxy. In this article we will analyze the most popular HTTP (S) proxies, learn how to use them in iOS development, and also compare them according to various criteria.
Next, we will talk about the use of proxies in iOS development, but many things are also applicable in Android development.
Carefully, under the cut a lot of pictures.
Tools that allow analyzing the network traffic of a mobile application can be divided into:
- The proxies that do not require integration into the source code of the application under test:
- Required integration into the source code of the application under test. These include mostly debugging frameworks:
This is the first part of the article, in which we consider the use of proxies and compare them according to various criteria. In the second part of the article we will thoroughly go through debugging frameworks.
Mitmproxy

Mitmproxy is free and open source (~ 12000 stars on github) HTTP (S) -proxy, which consists of Mitmproxy itself, a console utility for traffic proxying, mitmdump, an additional console utility that provides functionality similar to tcpdump, but for HTTP (S) traffic, as well as mitmweb - a web interface for Mitmproxy.
You can install Mitmproxy using Homebrew:
brew install mitmproxy
Or download the desired version from the releases page from the official site .
After successful installation, to analyze HTTP traffic from a simulator or device, you need to specify a proxy in the network settings.
For the simulator, you need to activate the HTTP and HTTPS proxy in the Mac OS network settings (System preferences -> Network -> Advanced -> Proxies):

A small bash script for quick activation / deactivation of proxies in the network settings for Wi-Fi on Mac. (Once we registered the IP and port of the proxy in the settings and then we use the proxy on or proxy off command from the console).
To intercept traffic from a real device, you need to specify a proxy in the iOS network settings, while specifying the IP address of the computer running Mitmproxy as the IP address of the proxy, 8080 as the port. (You can find the IP address of the computer in Settings> Network)

At this stage, we can already intercept HTTP traffic, but to intercept HTTPS traffic, you need to install Mitmproxy certificates on the simulator / device.
To do this, on the simulator, perform the following (for a real device, the actions are similar):
- Make sure that Mitmproxy is running and in the network settings (for the simulator - macOS settings, for the device - iOS settings), the proxy is activated and registered, as described above. Now go to the browser at mitm.it and click on the Apple icon to download the Mitmproxy certificate. An alert will appear with the message that this website is trying to open the iOS settings: click Allow.

- Then install the Mitmproxy certificate.

- And the final touch - for iOS version 10.3 and higher, you need to enable full access to the Mitmproxy root certificate. To do this, go to Settings> General> About> Certificate Trust Settings and activate full access for the Mitmproxy certificate.

Now we can analyze the HTTPS traffic from the simulator. It remains to add a small clarification: the certificate is installed for a specific simulator, that is, if we did this only for the iPhone X simulator, then on the iPhone 8 simulator you need to do the same for the proxy to intercept HTTPS traffic. To intercept HTTPS traffic from a real device, all steps are similar, as long as it is connected to the same local network as the computer with Mitmproxy.
You can then run mitmproxy from the console. and feel like a hacker or the web client mitmweb.
The console client greets us with a tube interface (for GUI lovers there is even mouse support), where all intercepted requests are displayed.

You can view detailed information for each request (request parameters, headers, response, etc.)

Mitmproxy has a powerful query filtering system with regular expression support. You can filter requests by code, request / response body, headers, domain, etc. You can call help on available shortcuts and expressions for filtering by clicking ? . For example, to clear the list of requests for the current session, you can simply press z , and to filter the list of requests by a URL with the word "apple", you need to press f and write a filtering expression by the URL ~u apple , which accepts a regular expression.

Also, Vim fans will be pleased with hjkl support. I almost forgot about a very important shortcut q - it works like a "back" button when moving between screens, and on the main screen with a list of requests, when you click on this shortcut, Mitmproxy will offer to exit the program.
Despite the console interface, using Mitmproxy is a pleasure thanks to convenient shortcuts and simple intuitive controls. Below is a small table with the main shortcuts.
| Shortcut | Description |
|---|---|
| ? | Help |
| z | Clearing the current session list |
| f | Session filtering |
| q | Back (exit on the main screen) |
| d | Remove request from session list |
| r | Retry request |
| e | Save request to file |
| g | To the top of the session list |
| G | At the end of the session list |
If you are still an ardent opponent of the console and recognize only the GUI of the application, here mitmweb is in a hurry to help us, we will launch it from the console as well, later you can make a shortcut to the desktop.

The web client is still in Beta testing and there is only basic mitmproxy functionality (enough for 95% of tasks), which is gradually supplemented with new features with each new release, but despite this, you can use it now and it is very convenient. Some shortcuts from the console version work here, for example, to clear the list of requests for the current session, simply press z . You can also filter the intercepted requests through the "Search" field, as we did in the console application when using the ~u apple filter.

Mitmproxy declares support for the Websocket standard, but unfortunately the display of Websocket frames in the UI has not yet been implemented, and according to the developers, the Websocket functionality is available only for the mitmdump utility.
Charles

Charles is probably the most popular HTTP (S) proxy for MacOS, its only drawback is that it is paid, at the time of this writing, the license costs $ 50. However, there is a trial version - it works for 30 minutes, then the application needs to be restarted, while the entire query history is lost. There are also five second start up delays.
After installation and first launch, Charles will be asked to give access to automatically configure the system proxy, select "Grant privelegies", or change the system proxy settings each time manually. Thus, Charles himself will change and activate the system proxy settings when it is started - this is convenient when debugging on the simulator, but on the real device you will have to manually register the proxy server settings for the network, specify the IP address of the computer running as a proxy server Charles, as a port - 8888.
At this stage, we can view only HTTP traffic, to analyze HTTPS traffic from a simulator or a real device, we need to install the Charles certificate on it, the procedure is the same as installing the Mitmproxy certificate. Make sure that the proxy is running and activated in the iOS network settings (for a real device) or in the macOS network settings (for the simulator). Then go to the simulator / device in the browser at chls.pro/ssl , an alert will appear with the message that this website is trying to open the iOS settings: select Allow. Next, select Install to install the certificate. After installing the certificate for iOS version 10.3 and higher, you must enable full access to the Charles root certificate. To do this, go to Settings> General> About> Certificate Trust Settings and activate full access for Charles certificate.

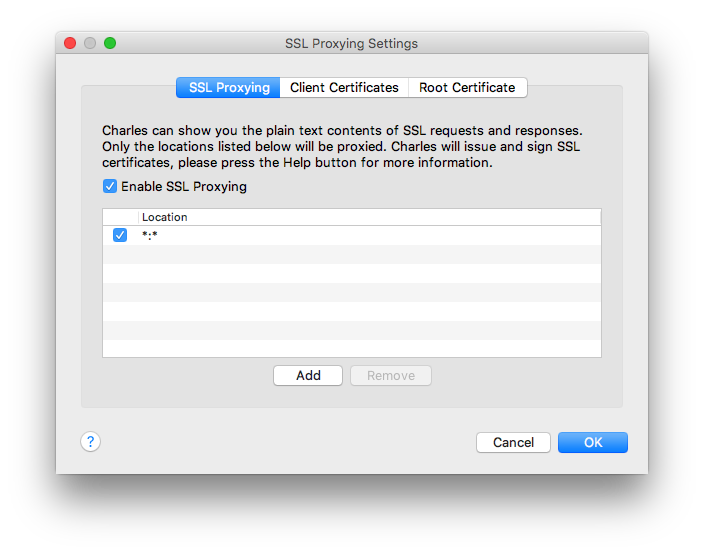
And finally, you need to configure SSL proxying in Charles, by default it does not decrypt HTTPS traffic, even if you installed all the necessary certificates. To activate SSL proxying, go to Proxy> SSL Proxying Setings and activate SSL Proxying, if it is disabled, then we have two options - enable SSL proxying for all domains or only for specific domains. To allow SSL proxying for all domains, you need to add a wildcard location: click the Add button and type * in all fields, so the SSL settings should look like this.
To allow SSl proxying only for specific domains, you need to add them to the list and make sure that the wildcard location is disabled. At the same time, Charles will still intercept all traffic, but HTTPS requests for domains that are not on the list will not be decrypted.
When using Charles, it is convenient to use traffic interception filters that can be configured in the Proxy> Recording Settings menu: you can specify the protocol, URL, port.

Now we have the ability to view HTTPS traffic.

Charles also supports the Websocket protocol and displays messages in the style of iMessage, it looks comfortable.

Special mention deserves the first of its kind proxy Charles for iOS - the mobile version of Charles, the price tag on the App Store at the time of this writing - $ 9. The application has the basic functionality of the desktop version: HTTP (S) traffic proxying, viewing request / response content and convenient automatic installation of proxy settings for a Wi-Fi network.

Burp Suite (Community Edition)

Burp Suite is a Swiss knife of pentesters and hackers, which contains an indecently large amount of tools and functionality. One of the modules in Burp Suite is a proxy, which we will use to analyze HTTP (S) traffic. There are two versions of the application: Professional and Community Edition. Community version is free, there is no vulnerability scanner and there is a limit on the number of requests per unit of time, but despite this, the free version of the application is a complete test tool.
After starting the application, you need to add and activate a proxy by going to Proxy> Options.

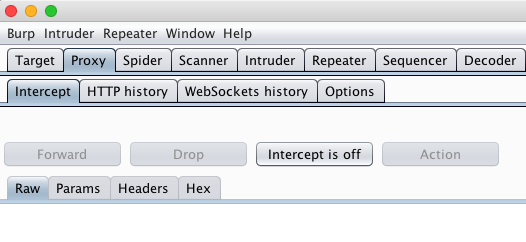
Then you need to make sure that the Intercept request interceptor is turned off, otherwise it will intercept requests and hold them until you tell him what to do with this request - cancel or forward to the server. Therefore, turn it off, now we do not need it.
Next, you need to install the Burp Suite certificate on the simulator / device, this procedure should already be painfully familiar to us after installing the Mitmproxy and Charles certificates. We launch Burp Suite, but do not forget to activate the proxy in the MacOS network settings for the simulator or in iOS for a real device (you can see how to do this in the Mitmproxy section), specify the IP address of the computer running Burp Suite as a proxy server, as port - 8080. Then go to the browser on the simulator and enter the address http: // burp . Next, click on the button on the site "CA Certificate" and download the certificate.

Then install the certificate. After installing the certificate for iOS version 10.3 and higher, you need to enable full access to the Burp Suite root certificate. To do this, go to Settings> General> About> Certificate Trust Settings and activate full access for the certificate Burp Suite.

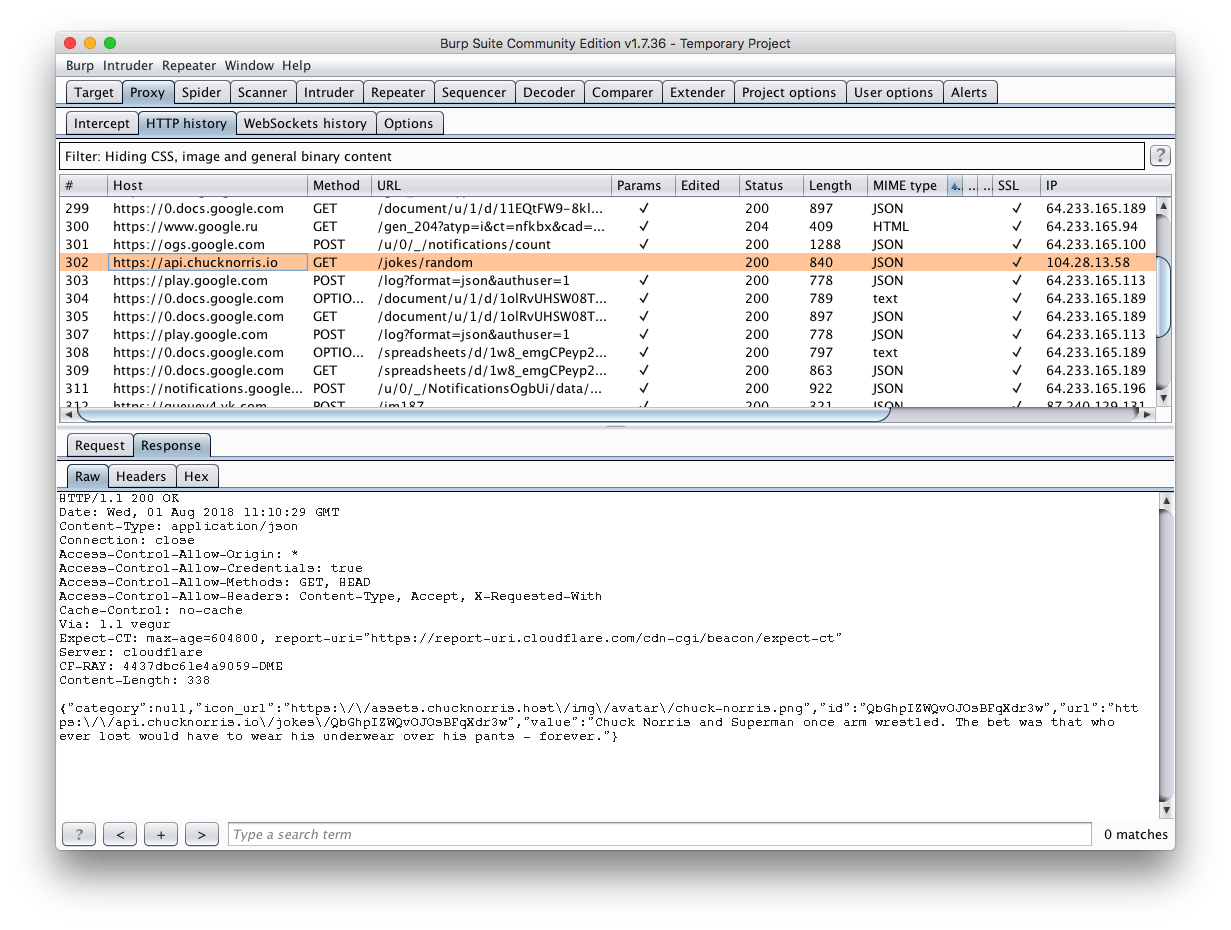
Going to the Proxy -> HTTP history tab, you can view HTTP (S) traffic from a mobile application. It is worth noting that the disadvantage here is the lack of JSON formatting in the body of the request / response.
The problem with JSON formatting can be solved by installing the JSON Beautifier plugin. To install, go to the Extender> BApp Store tab, find in the list of JSON Beautifier plug-ins and click install.

Now there is an additional JSON Beautifier tab with beautiful JSON.

Burp Suite supports the Websocket protocol. Websocket messages can be found in the special tab Proxy> WebSockets history.

OWASP ZAP

Owasp ZAP is the brainchild of the world famous Owasp community in the cyber security environment, and the proxy is also open source. Owasp ZAP is often compared to the Burp Suite, but the latter is inferior in popularity. Owasp ZAP is completely free, there are no PRO versions compared to Burp Suite.
After starting the application, you need to check the settings of the proxy Preferences> Local Proxies, the default settings should look like this.

Then go to Preferences> Dynamic SSL Certificates for exporting an SSL certificate. Click on the Save button and save the certificate, for example, on the desktop.

Then simply drag the certificate file into the simulator and a window opens with a proposal to install the certificate, agree and install. After installing the certificate for iOS version 10.3 and above, you must enable full access to the OWASP ZAP root certificate. To do this, go to Settings> General> About> Certificate Trust Settings and activate full access for the OWASP ZAP certificate.

Now we have the ability to view HTTPS traffic. JSON unfortunately here does not have a beautiful format, and so far we have not been able to remedy this situation, in extreme cases, you can use third-party JSON formatter, for example this one .

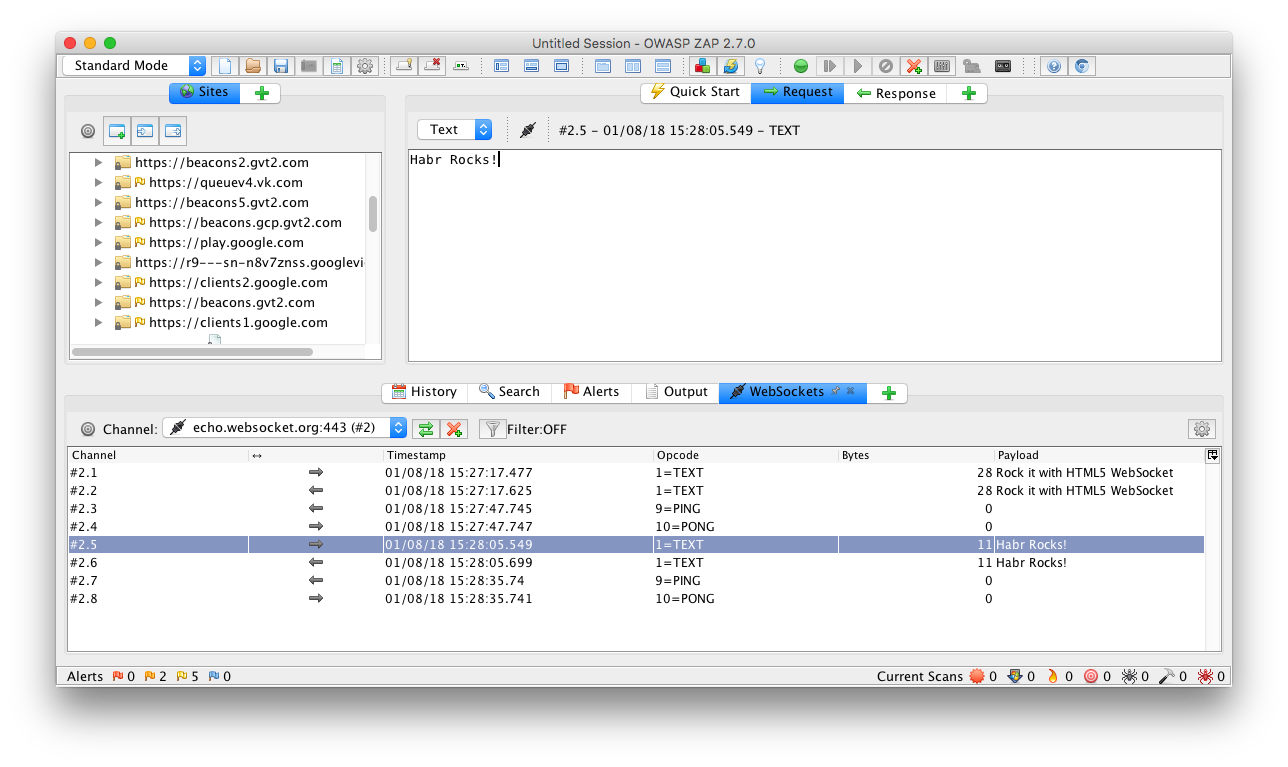
OWASP ZAP supports the Websocket protocol. Websocket messages can be found in the special WebSockets tab, in the same place it is convenient to select the "channel" to filter by domain.
SSL pinning
If SSL Pinning is implemented in your application, then you will not see application traffic being proxied, since the proxy uses its own certificate for SSL, in this case there are 4 options:
- Temporarily disable SSL Pinning while debugging network requests using a proxy.
- Add a proxy certificate / public key to bolted certificates / keys for debug builds.
- Use your server's certificate for proxy instead of its own certificate generated by it.
- Instead of using an external proxy, use the debugging framework (the list of frameworks is listed at the very beginning of the article), which will intercept and show requests and responses directly in the application itself, but this requires integration into the existing application source code, for more information about these tools in the next article.
Results
Let's start with Charles. Perhaps the best proxy for those who need everything to work out of the box and maximally user-friendly, although at some points Charles may surprise the user, the proxy functionality is very extensive, it also has the most beautiful and native interface for macOS of all described in the article proxy. If you do not mind putting $ 50 for such a tool, then it is your choice.
We turn to Burp Suite. The most powerful tool for certain functionality and even ease of use in some cases boldly gives Charles a head start, besides there is a system for expanding the functionality in the form of plug-ins. Burp Suite has long established itself as a very reliable and accurate tool in capable hands. If you lack the functionality of your current proxy, I advise you to pay attention to this instance.
It was the turn of Mitmproxy - a young and promising proxy, actively gaining popularity, which is developing the Open Source community. The most controversial of the proxies we viewed, but no less interesting. Mitmproxy stands out from its competitors in an incredibly user-friendly, simple and functional console UI. It is also possible to use the Mitmweb web interface, but it is now in Beta testing, which makes it rarely possible, but the appearance of bugs is missing some of the advanced functionality of Mitmproxy (gradually being completed), and also slightly inferior in convenience to more native competitors. I also upset the support of the Websocket protocol, it seems to be there, but there is no display in the UI or we simply did not learn how to prepare it, because we could not get Mitmproxy to display Websocket messages, although we didn’t have such problems with other proxies.
And the last in the list, but no less interesting was the Owasp ZAP. One of the advantages is the presence of an extensible plugin system (subjectively, their number is less than for Burp Suite), but unfortunately we could not set up a beautiful JSON display in the body of requests / responses, which is a rather critical criterion when choosing a proxy for mobile development. However, Owasp ZAP has an advanced system for testing Websocket traffic, as well as the big name of the developers of the Owasp community behind its back, so I would not discount it and meant for rare and complex cases.
Below is a subjective summary table, we have analyzed the proxy.
| criterion / proxy | Mitmproxy | Charles | Burpsuite (CE) | Owasp zap |
|---|---|---|---|---|
| JSON formatting | + | + | + | - |
| Editing and repeating requests | + | + | + | + |
| Websocket support | - | + | + | + |
| Free software | + | - | + | + |
We’ll finish this, we hope that the article will be useful, we will also be happy to comment and if you share your experience in the field of testing and monitoring mobile application traffic.
')
Source: https://habr.com/ru/post/421493/
All Articles