Additional security software for NAS

The series of articles is named “Building a Secure NAS” . Therefore, this article will be considered an increase in the level of security. Also, those tools that I did not use will be described, but it is possible to apply.
Who and how?
Who is going to attack the system and how will it do it?
This is usually the first question to be answered before talking about security.
At least, in the case of NAS, there is already an implicit answer. But in order to fully answer this question, build a threat model and a model of the offender.
Companies include the threat modeling phase in their development cycles.
Microsoft has SDL for this, people have other models .
They involve the use of certain techniques, such as STRIDE or DREAD (STRIDE is still more general and well supported instrumentally).
In STRIDE, for example, a model is built from data streams and is usually large, heavy, and poorly understood. However, the tool provides a list of potential threats, which facilitates their consideration.
The threat model is non-public information because it makes it easier for an attacker to analyze the system and search for weak points. If he gets a model, he will not have to build it on his own, because analysts have already taken care of everything.
It was a moment of advertising.

So build a model of serious companies. And if this is interesting, I can somehow describe in a separate article.
Here I will describe what is in English called "hardening" and will deal with the security flaws that were made in the process of building the system.
Basically, maintaining security at this level is accomplished by closing known system vulnerabilities, monitoring it, and periodically checking it.
Related Literature
What to read:
- It is worth starting with the Hardened Linux project , where those who wish can find a lot of useful information .
- The harden-doc package contains the Securing Debian Manual of the old 2012, but running does not interfere with understanding the issue.
- Then, read the Debian 8 Hardening Quick Start Guide .
- And finally, a little tutorial on Hardening deb packages and C / C ++ code , which you probably won't need.
Snapshots and docker
Previously, zfs-autosnapshot was installed. He repeatedly helped me, because I could restore corrupted configurations (for Nextcloud, for example) from snapshots.
However, over time, the system began to slow down, and a few thousand snapshots.
It com.sun:auto-snapshot=false out that when creating the parent file system for containers, I forgot to set the com.sun:auto-snapshot=false flag com.sun:auto-snapshot=false .
In the original article, this problem has already been fixed, here I will show how to get rid of unnecessary snapshots.
First you need to turn off zfs-auto-snapshot on the docker’s parent file system:
zfs set com.sun:auto-snapshot=false tank0/docker/lib Now delete unused containers and images:
docker container prune docker image prune Remove snapshots:
zfs list -t snapshot -o name -S creation | grep -e ".*docker/lib.*@zfs-auto-snap" | tail -n +1500 | xargs -n 1 zfs destroy -vr And turn them off on all image file systems:
zfs list -t filesystem -o name -S creation | grep -e "tank0/docker/lib" | xargs -n 1 zfs set com.sun:auto-snapshot=false More details can be read here .
Ldap
Last time, only one LDAP user was created with an administrative role.
But most services do not need to change anything in the user database. Therefore, it would be nice to add a user only for reading. In order not to create roles manually, it is possible to use the container initialization script.
First, add the settings to enable the read-only user in docker-compose.yml :
- "LDAP_READONLY_USER=true" - "LDAP_READONLY_USER_USERNAME=readonly" - "LDAP_READONLY_USER_PASSWORD=READONLY_PASSWORD" Full file under the spoiler.
version: "2" networks: ldap: docker0: external: name: docker0 services: open-ldap: image: "osixia/openldap" hostname: "open-ldap" restart: always environment: - "LDAP_ORGANISATION=NAS" - "LDAP_DOMAIN=nas.nas" - "LDAP_ADMIN_PASSWORD=ADMIN_PASSWORD" - "LDAP_CONFIG_PASSWORD=CONFIG_PASSWORD" - "LDAP_READONLY_USER=true" - "LDAP_READONLY_USER_USERNAME=readonly" - "LDAP_READONLY_USER_PASSWORD=READONLY_PASSWORD" - "LDAP_TLS=true" - "LDAP_TLS_ENFORCE=false" - "LDAP_TLS_CRT_FILENAME=ldap_server.crt" - "LDAP_TLS_KEY_FILENAME=ldap_server.key" - "LDAP_TLS_CA_CRT_FILENAME=ldap_server.crt" volumes: - ./certs:/container/service/slapd/assets/certs - ./ldap_data/var/lib:/var/lib/ldap - ./ldap_data/etc/ldap/slapd.d:/etc/ldap/slapd.d networks: - ldap ports: - 172.21.0.1:389:389 - 172.21.0.1:636:636 phpldapadmin: image: "osixia/phpldapadmin:0.7.1" hostname: "nas.nas" restart: always networks: - ldap - docker0 expose: - 443 links: - open-ldap:open-ldap-server volumes: - ./certs:/container/service/phpldapadmin/assets/apache2/certs environment: - VIRTUAL_HOST=ldap.* - VIRTUAL_PORT=443 - VIRTUAL_PROTO=https - CERT_NAME=NAS.cloudns.cc - "PHPLDAPADMIN_LDAP_HOSTS=open-ldap-server" #- "PHPLDAPADMIN_HTTPS=false" - "PHPLDAPADMIN_HTTPS_CRT_FILENAME=certs/ldap_server.crt" - "PHPLDAPADMIN_HTTPS_KEY_FILENAME=private/ldap_server.key" - "PHPLDAPADMIN_HTTPS_CA_CRT_FILENAME=certs/ldap_server.crt" - "PHPLDAPADMIN_LDAP_CLIENT_TLS_REQCERT=allow" ldap-ssp: image: openfrontier/ldap-ssp:https volumes: - /etc/ssl/certs/ssl-cert-snakeoil.pem:/etc/ssl/certs/ssl-cert-snakeoil.pem - /etc/ssl/private/ssl-cert-snakeoil.key:/etc/ssl/private/ssl-cert-snakeoil.key restart: always networks: - ldap - docker0 expose: - 80 links: - open-ldap:open-ldap-server environment: - VIRTUAL_HOST=ssp.* - VIRTUAL_PORT=80 - VIRTUAL_PROTO=http - CERT_NAME=NAS.cloudns.cc - "LDAP_URL=ldap://open-ldap-server:389" - "LDAP_BINDDN=cn=admin,dc=nas,dc=nas" - "LDAP_BINDPW=ADMIN_PASSWORD" - "LDAP_BASE=ou=users,dc=nas,dc=nas" - "MAIL_FROM=admin@nas.nas" - "PWD_MIN_LENGTH=8" - "PWD_MIN_LOWER=3" - "PWD_MIN_DIGIT=2" - "SMTP_HOST=" - "SMTP_USER=" - "SMTP_PASS=" Then, you need to make a dump and delete:
$ cd /tank0/docker/services/ldap $ tar czf ~/ldap_backup.tgz . $ ldapsearch -Wx -D "cn=admin,dc=nas,dc=nas" -b "dc=nas,dc=nas" -H ldap://172.21.0.1 -LLL > ldap_dump.ldif $ docker-compose down $ rm -rf ldap_data $ docker-compose up -d So that the server, when recovering from the dump, does not swear at duplicate elements, in the file you need to delete the lines:
dn: dc=nas,dc=nas objectClass: top objectClass: dcObject objectClass: organization o: NAS dc: nas dn: cn=admin,dc=nas,dc=nas objectClass: simpleSecurityObject objectClass: organizationalRole cn: admin description: LDAP administrator userPassword:: PASSWORD_BASE64 And restore users and groups:
$ ldapadd -Wx -D "cn=admin,dc=nas,dc=nas" -H ldap://172.21.0.1 -f ldap_dump.ldif Such a beast will appear in the database:
dn: cn=readonly,dc=nas,dc=nas cn: readonly objectClass: simpleSecurityObject objectClass: organizationalRole userPassword:: PASSWORD_BASE64 description: LDAP read only user Roles in the LDAP server configuration for it will be created by the container.
Perform post-restore checks and delete the backup:
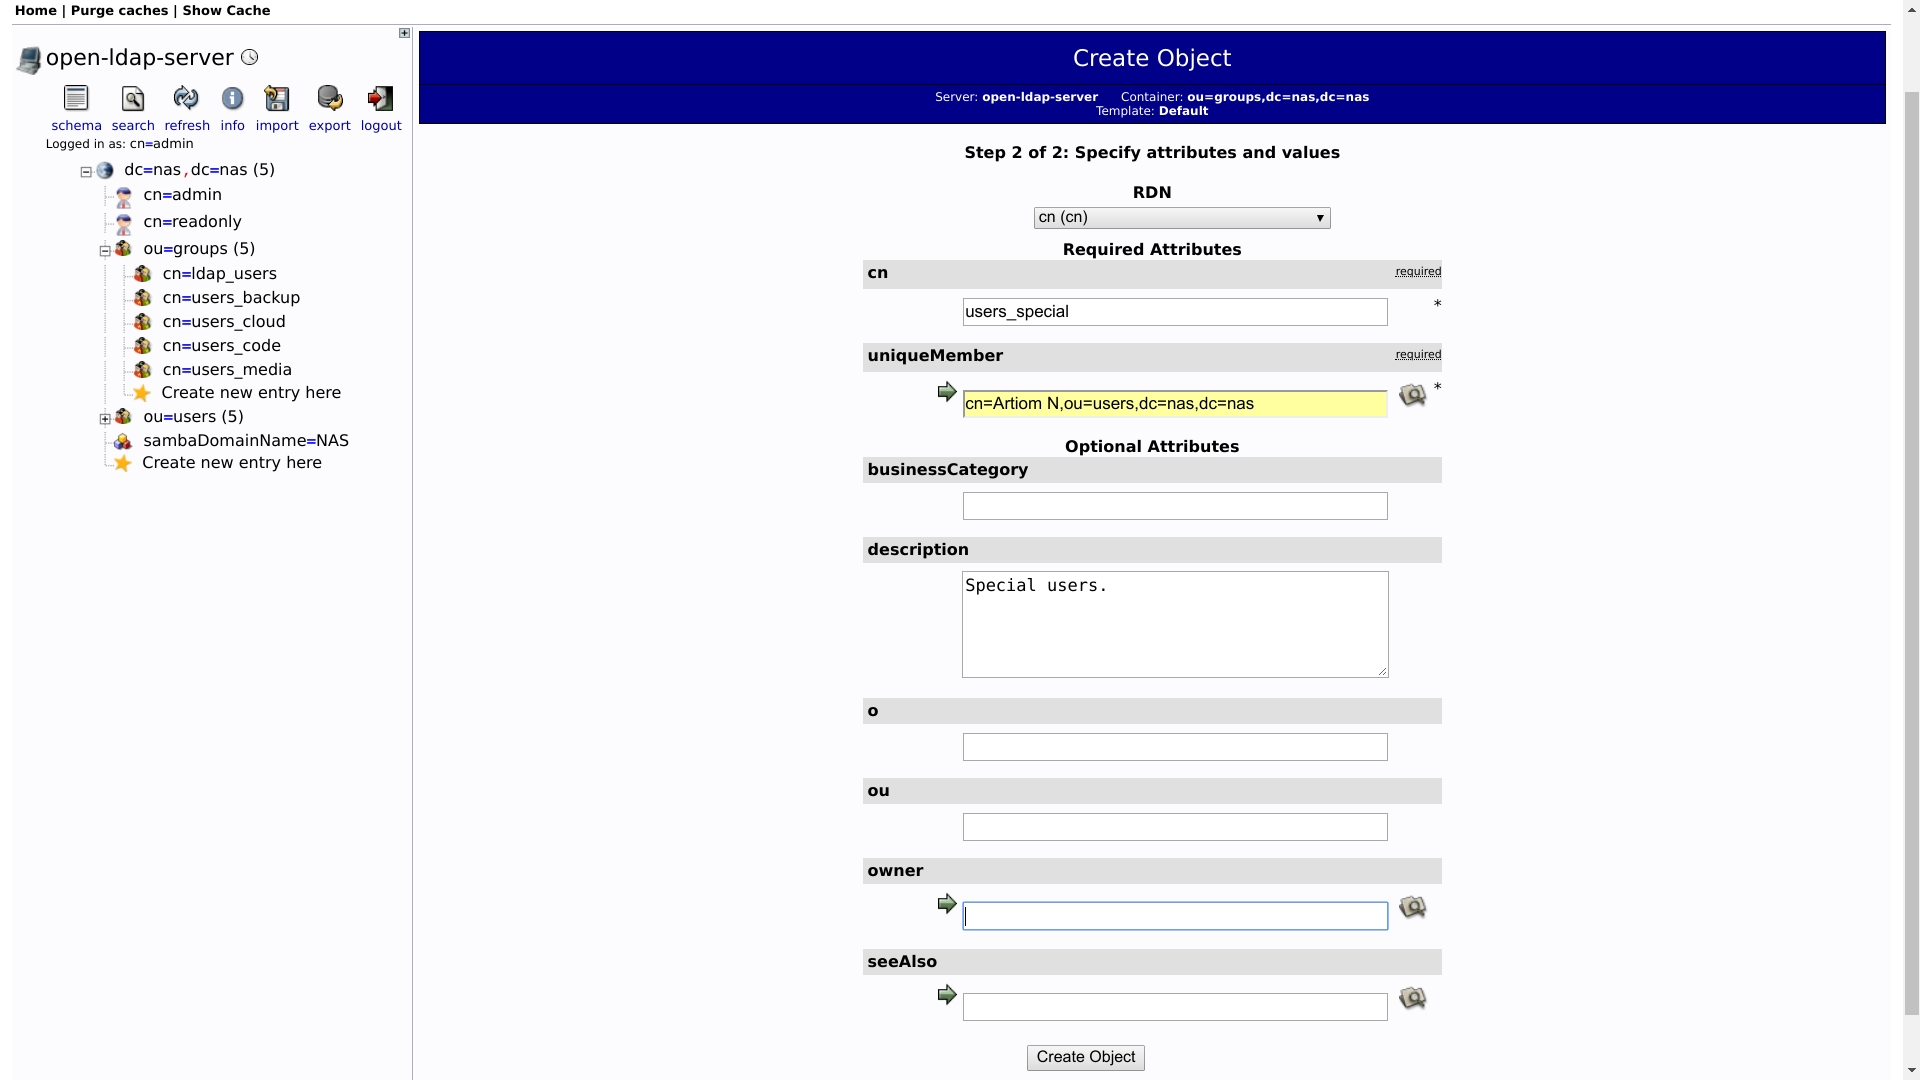
$ rm ~/ldap_backup.tgz Adding groups to LDAP
Convenient is the division of LDAP users into groups similar to POSIX groups in Linux.
For example, it is possible to create groups whose users will have access to repositories, access to the cloud, or access to the library.
Groups are easily added to phpLDAPAdmin, and I will not focus on this.
I note only the following:
- The group is created from the "Default" template. This is not a POSIX group, but a group of names.
- Accordingly, the group has an
objectClassattribute, which includes the valuegroupOfUniqueNames.
Docker
In Docker, almost everything is done for you.
By default, it uses the system call restriction that is enabled in the OMV core:
# grep SECCOMP /boot/config-4.16.0-0.bpo.2-amd64 CONFIG_HAVE_ARCH_SECCOMP_FILTER=y CONFIG_SECCOMP_FILTER=y CONFIG_SECCOMP=y Here it is possible to read a little more about the basic Docker security rules.
Also, if AppArmor is enabled, Docker can integrate with it and forward its profiles to the container .
Network
Eliminate OS detection
The network is located behind the router, but it is possible to do a curious exercise by changing some parameters of the network stack so that the OS cannot be identified by the answers.
There is little real benefit from this, because the attacker will study the banners of the services and anyway understand what kind of OS you are using.
# nmap -O localhost Starting Nmap 7.40 ( https://nmap.org ) at 2018-08-26 14:39 MSK Nmap scan report for localhost (127.0.0.1) Host is up (0.000015s latency). Other addresses for localhost (not scanned): ::1 Not shown: 992 closed ports PORT STATE SERVICE 53/tcp open domain 80/tcp open http 443/tcp open https 5432/tcp open postgresql Device type: general purpose Running: Linux 3.X|4.X OS CPE: cpe:/o:linux:linux_kernel:3 cpe:/o:linux:linux_kernel:4 OS details: Linux 3.8 - 4.6 Network Distance: 0 hops OS detection performed. Please report any incorrect results at https://nmap.org/submit/ . Nmap done: 1 IP address (1 host up) scanned in 4.07 seconds Loading settings from sysctl.conf:
# sysctl -p /etc/sysctl.conf net.ipv4.conf.all.accept_redirects = 0 net.ipv6.conf.all.accept_redirects = 0 net.ipv4.conf.all.send_redirects = 0 net.ipv4.conf.all.accept_source_route = 0 net.ipv6.conf.all.accept_source_route = 0 net.ipv4.tcp_rfc1337 = 1 net.ipv4.ip_default_ttl = 128 net.ipv4.icmp_ratelimit = 900 net.ipv4.tcp_synack_retries = 7 net.ipv4.tcp_syn_retries = 7 net.ipv4.tcp_window_scaling = 1 net.ipv4.tcp_timestamps = 1 And so...
# nmap -O localhost Starting Nmap 7.40 ( https://nmap.org ) at 2018-08-26 14:40 MSK Nmap scan report for localhost (127.0.0.1) Host is up (0.000026s latency). Other addresses for localhost (not scanned): ::1 Not shown: 992 closed ports PORT STATE SERVICE 53/tcp open domain 80/tcp open http 443/tcp open https 5432/tcp open postgresql No exact OS matches for host (If you know what OS is running on it, see https://nmap.org/submit/ ). TCP/IP fingerprint: OS:SCAN(V=7.40%E=4%D=8/26%OT=53%CT=1%CU=43022%PV=N%DS=0%DC=L%G=Y%TM=5B8291C OS:3%P=x86_64-pc-linux-gnu)SEQ(SP=FA%GCD=1%ISR=105%TI=Z%CI=I%TS=8)OPS(O1=MF OS:FD7ST11NW7%O2=MFFD7ST11NW7%O3=MFFD7NNT11NW7%O4=MFFD7ST11NW7%O5=MFFD7ST11 OS:NW7%O6=MFFD7ST11)WIN(W1=AAAA%W2=AAAA%W3=AAAA%W4=AAAA%W5=AAAA%W6=AAAA)ECN OS:(R=Y%DF=Y%T=80%W=AAAA%O=MFFD7NNSNW7%CC=Y%Q=)T1(R=Y%DF=Y%T=80%S=O%A=S+%F= OS:AS%RD=0%Q=)T2(R=N)T3(R=N)T4(R=Y%DF=Y%T=80%W=0%S=A%A=Z%F=R%O=%RD=0%Q=)T5( OS:R=Y%DF=Y%T=80%W=0%S=Z%A=S+%F=AR%O=%RD=0%Q=)T6(R=Y%DF=Y%T=80%W=0%S=A%A=Z% OS:F=R%O=%RD=0%Q=)T7(R=Y%DF=Y%T=80%W=0%S=Z%A=S+%F=AR%O=%RD=0%Q=)U1(R=Y%DF=N OS:%T=80%IPL=164%UN=0%RIPL=G%RID=G%RIPCK=G%RUCK=G%RUD=G)IE(R=Y%DFI=N%T=80%C OS:D=S) Network Distance: 0 hops OS detection performed. Please report any incorrect results at https://nmap.org/submit/ . Nmap done: 1 IP address (1 host up) scanned in 19.52 seconds These settings are required in /etc/sysctl.conf , then each time they are rebooted, they will be read automatically.
################################################################### # Additional settings - these settings can improve the network # security of the host and prevent against some network attacks # including spoofing attacks and man in the middle attacks through # redirection. Some network environments, however, require that these # settings are disabled so review and enable them as needed. # # Do not accept ICMP redirects (prevent MITM attacks) net.ipv4.conf.default.accept_redirects = 0 net.ipv6.conf.default.accept_redirects = 0 net.ipv4.conf.all.accept_redirects = 0 net.ipv6.conf.all.accept_redirects = 0 # _or_ # Accept ICMP redirects only for gateways listed in our default # gateway list (enabled by default) # net.ipv4.conf.all.secure_redirects = 1 # # Do not send ICMP redirects (we are not a router) net.ipv4.conf.all.send_redirects = 0 # # Do not accept IP source route packets (we are not a router) net.ipv4.conf.all.accept_source_route = 0 net.ipv6.conf.all.accept_source_route = 0 ## protect against tcp time-wait assassination hazards ## drop RST packets for sockets in the time-wait state ## (not widely supported outside of linux, but conforms to RFC) net.ipv4.tcp_rfc1337 = 1 # # Log Martian Packets #net.ipv4.conf.all.log_martians = 1 # ################################################################### # Magic system request Key # 0=disable, 1=enable all # Debian kernels have this set to 0 (disable the key) # See https://www.kernel.org/doc/Documentation/sysrq.txt # for what other values do #kernel.sysrq=1 ################################################################### # Protected links # # Protects against creating or following links under certain conditions # Debian kernels have both set to 1 (restricted) # See https://www.kernel.org/doc/Documentation/sysctl/fs.txt #fs.protected_hardlinks=0 #fs.protected_symlinks=0 vm.overcommit_memory = 1 vm.swappiness = 10 ################################################################### # Anti-fingerprinting. # # Def: 64. net.ipv4.ip_default_ttl = 128 # ICMP ( 1000) net.ipv4.icmp_ratelimit = 900 # , . # Def: 5. net.ipv4.tcp_synack_retries = 7 # Def: 5. net.ipv4.tcp_syn_retries = 7 # TCP window timespamp 1323. net.ipv4.tcp_window_scaling = 1 net.ipv4.tcp_timestamps = 1 # Redis requirement. net.core.somaxconn = 511 Protection against defining versions of services is more useful, for which an attacker can also use Nmap:
# nmap -sV -sR --allports --version-trace 127.0.0.1 Not shown: 991 closed ports PORT STATE SERVICE VERSION 22/tcp open ssh OpenSSH 7.4p1 Debian 10+deb9u3 (protocol 2.0) 25/tcp open smtp Postfix smtpd 80/tcp open http nginx 1.13.12 111/tcp open rpcbind 2-4 (RPC #100000) 139/tcp open netbios-ssn Samba smbd 3.X - 4.X (workgroup: WORKGROUP) 443/tcp open ssl/http nginx 1.13.12 445/tcp open netbios-ssn Samba smbd 3.X - 4.X (workgroup: WORKGROUP) 3493/tcp open nut Network UPS Tools upsd 8000/tcp open http Icecast streaming media server 2.4.2 Service Info: Hosts: nas.localdomain, NAS; OS: Linux; CPE: cpe:/o:linux:linux_kernel Final times for host: srtt: 22 rttvar: 1 to: 100000 But not everything is smooth with disguise:
- For each service an individual approach is needed here.
- It is not always possible to remove the version.
For example, for SSH, it is possible to add the DebianBanner no option in /etc/ssh/sshd_confg .
As a result:
22/tcp open ssh OpenSSH 7.4p1 (protocol 2.0) Better, alas, will not work: the version is used by SSH to establish which features are supported, and it is possible to change it only by patching the server .
Port-knocking
Not the most well-known protection technique that allows a remote user who knows the secret to connect to a closed port.
The work resembles a code lock : everyone knows that service daemons are running on the server, but "they are not there" until the code is dialed.
For example, in order to connect to an SSH server, a user needs to tap on ports UDP 7000, TCP 7007, and UDP 7777.
After that, with its IP firewall will be allowed on the closed TCP port 22.
Read more about how this works, it is possible to read here . And in the Debian manual .
I do not recommend using, because fail2ban is usually sufficient.
Firewall
I configure the firewall via OpenMediaVault Web GUI, which I recommend to you.
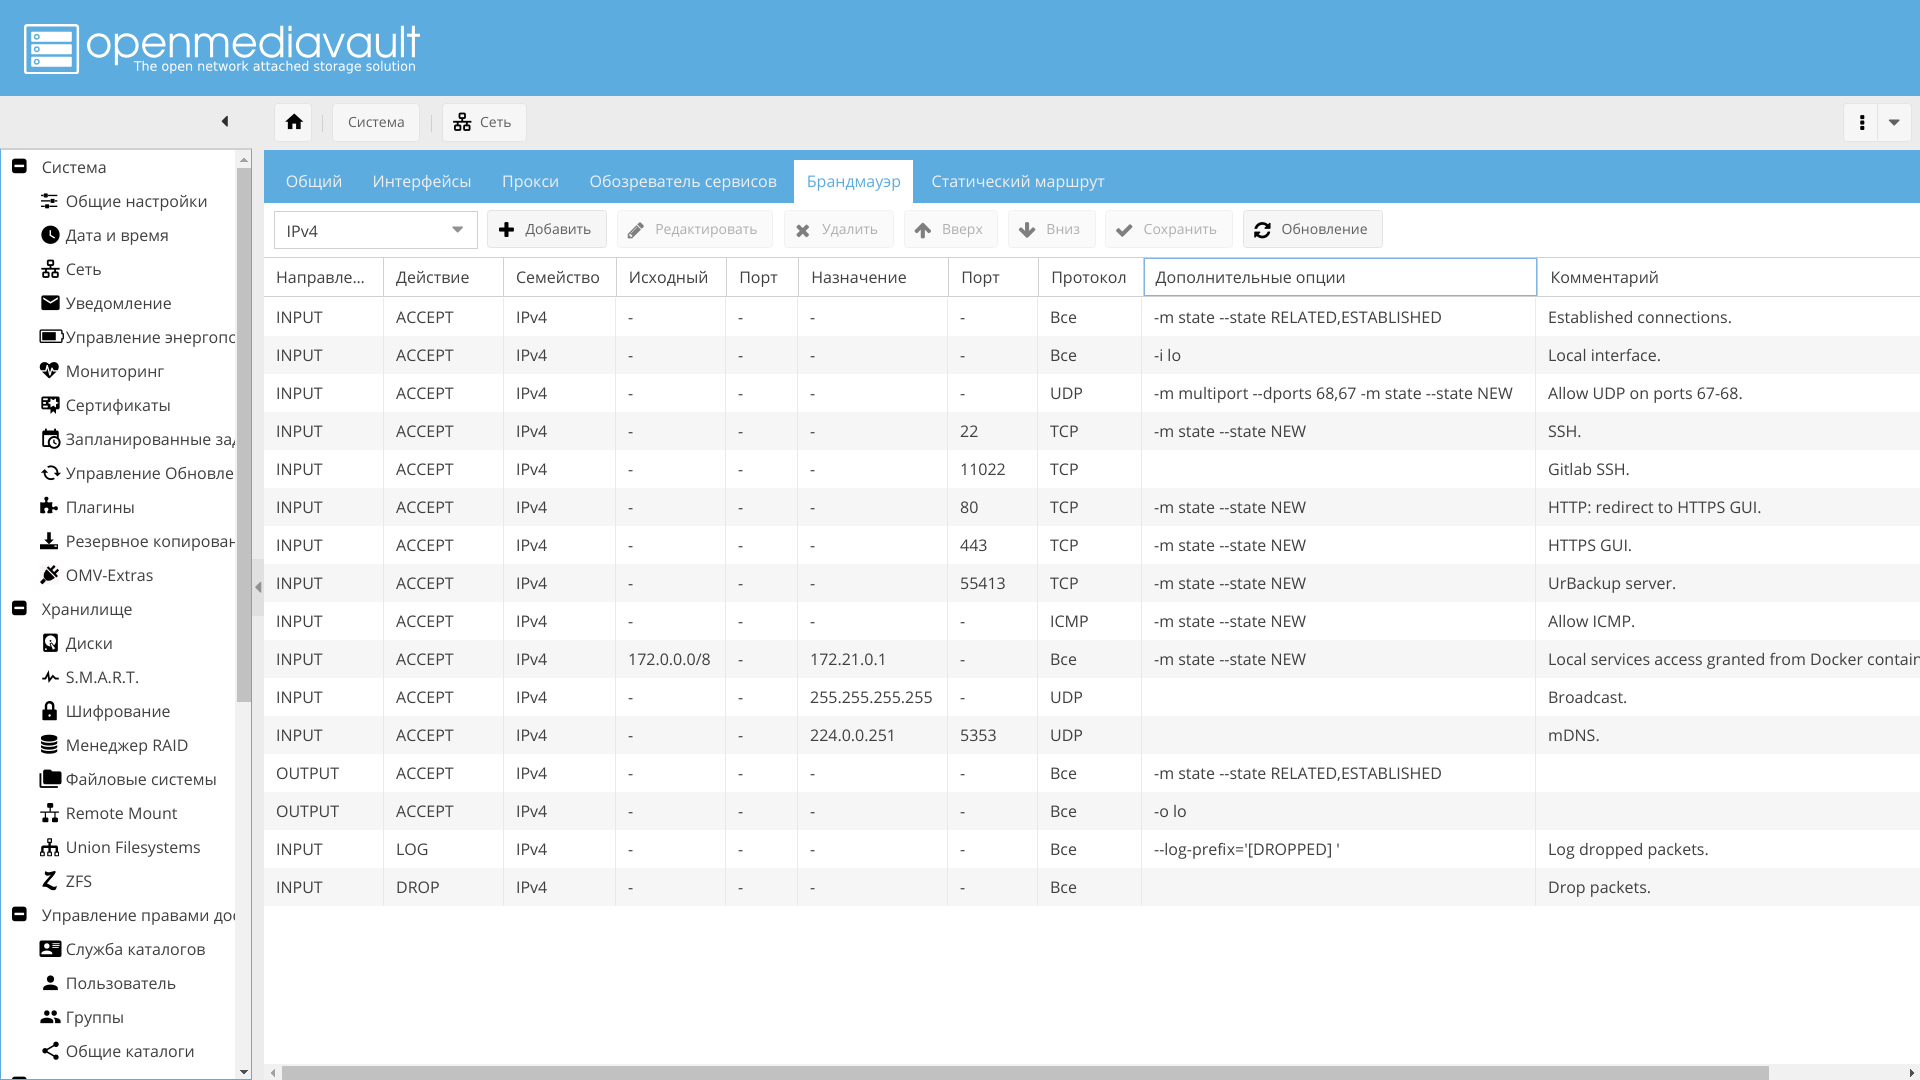
Open the necessary ports, such as 443 and 22, the rest - to taste. Also, it is advisable to enable logging of dropped packets.
Ssh
# grep "invalid user" /var/log/auth.log|head Aug 26 00:07:57 nas sshd[29786]: input_userauth_request: invalid user test [preauth] Aug 26 00:07:59 nas sshd[29786]: Failed password for invalid user test from 185.143.160.137 port 51268 ssh2 Aug 26 00:11:01 nas sshd[5641]: input_userauth_request: invalid user 0 [preauth] Aug 26 00:11:01 nas sshd[5641]: Failed none for invalid user 0 from 5.188.10.180 port 49025 ssh2 Aug 26 00:11:04 nas sshd[5644]: input_userauth_request: invalid user 0101 [preauth] Aug 26 00:11:06 nas sshd[5644]: Failed password for invalid user 0101 from 5.188.10.180 port 59867 ssh2 Aug 26 00:32:55 nas sshd[20367]: input_userauth_request: invalid user ftp [preauth] Aug 26 00:32:56 nas sshd[20367]: Failed password for invalid user ftp from 5.188.10.144 port 47981 ssh2 Aug 26 00:32:57 nas sshd[20495]: input_userauth_request: invalid user guest [preauth] Aug 26 00:32:59 nas sshd[20495]: Failed password for invalid user guest from 5.188.10.144 port 34202 ssh2 At the risk of appearing banal, I’ll remind you what is required:
- Strictly prohibit logging in as root.
- Restrict access to specified users only.
- Change port to non-standard.
- It is advisable to disable password authentication, leaving only the key.
Read more is possible, for example here .
All this is easily done from the OpenMediaVault interface via the menu "Services -> SSH".
Except for the fact that I did not change the port to a non-standard one, leaving 22 in the local network, and simply replacing the port in the NAT router.
# grep "invalid user" /var/log/auth.log|sed 's/.*invalid user \([^ ]*\) .*/\1/'|sort|uniq 0 0101 1234 22 admin ADMIN administrateur administrator admins alfred amanda amber Anonymous apache avahi backup@network bcnas benjamin bin cacti callcenter camera cang castis charlotte clamav client cristina cron CSG cvsuser cyrus david db2inst1 debian debug default denis elvira erik fabio fax ftp ftpuser gary gast GEN2 guest I2b2workdata2 incoming jboss john juan matilda max mia miner muhammad mysql nagios nginx noc office oliver operator oracle osmc pavel pi pmd postgres PROCAL prueba RSCS sales sales1 scaner selena student07 sunos support sybase sysadmin teamspeak telecomadmin test test1 test2 test3 test7 tirocu token tomcat tplink ubnt ubuntu user1 vagrant victor volition www-data xghwzp xxx zabbix zimbra Once this is done, unauthorized entry attempts will be made much less frequently.
To further improve the situation, it is possible to block attackers from certain IPs after several attempts at entry.
What can be used for:
- Fail2ban . A popular utility that works not only for SSH, but also for many other applications.
- Denyhosts . Looks like fail2ban.
- Sshguard , if you wish, you can try to use it, but I was not interested in them in detail.
I am using fail2ban. It will monitor the logs for various unwanted actions by certain IPs, and ban them if the number of triggers is exceeded:
2018-08-29 21:17:25,351 fail2ban.filter [8650]: INFO [sshd] Found 5.188.10.144 2018-08-29 21:17:25,473 fail2ban.actions [8650]: NOTICE [sshd] Ban 5.188.10.144 2018-08-29 21:17:27,359 fail2ban.filter [8650]: INFO [sshd] Found 5.188.10.144 2018-08-29 21:28:13,128 fail2ban.filter [8650]: INFO [sshd] Found 5.188.10.176 2018-08-29 21:28:13,132 fail2ban.filter [8650]: INFO [sshd] Found 5.188.10.176 2018-08-29 21:28:15,137 fail2ban.filter [8650]: INFO [sshd] Found 5.188.10.176 2018-08-29 21:28:20,145 fail2ban.filter [8650]: INFO [sshd] Found 5.188.10.176 2018-08-29 21:28:25,153 fail2ban.filter [8650]: INFO [sshd] Found 5.188.10.176 2018-08-29 21:28:25,421 fail2ban.actions [8650]: NOTICE [sshd] Ban 5.188.10.176 2018-08-29 21:30:05,272 fail2ban.filter [8650]: INFO [sshd] Found 5.188.10.180 2018-08-29 21:30:05,274 fail2ban.filter [8650]: INFO [sshd] Found 5.188.10.180 2018-08-29 21:30:13,285 fail2ban.filter [8650]: INFO [sshd] Found 5.188.10.180 2018-08-29 21:30:13,286 fail2ban.filter [8650]: INFO [sshd] Found 5.188.10.180 2018-08-29 21:30:15,289 fail2ban.filter [8650]: INFO [sshd] Found 5.188.10.180 2018-08-29 21:30:15,803 fail2ban.actions [8650]: NOTICE [sshd] Ban 5.188.10.180 The ban is made by adding a firewall rule. After a specified time, the rule is deleted, and the user can again try to log in.
Initially, only SSH is included, but it is possible to enable control of the logs of the Web server and other services, at least the same OMV .
And also, take out logs from containers and set fail2ban on them too.
I recommend adding services to taste.
You can read more about the configuration, for example, here or on your own Wiki .
Logs
Lwatch
A small utility that should be installed for convenience. Highlight the logs and show them in a beautiful form.
It is possible to use any such utility , as long as errors and problem areas of the logs are highlighted so that their visual analysis is facilitated.
Logcheck
It is worthwhile to install and configure logcheck just so that when identifying problems with the configuration, which is reported in the logs, you immediately see it in the mail.
It helps to see well what is going wrong, although it requires adjustment.
Installation:
# apt-get install logcheck Immediately after installation, it will send reports.
System Events =-=-=-=-=-=-= Oct 2 02:02:15 nas kernel: [793847.981226] [DROPPED] IN=br-ce OUT= PHYSIN=veth6c2a68e MAC=ff:ff:ff:ff:ff:ff: SRC=172.22.0.11 DST=255.255.255.255 LEN=29 TOS=0x00 PREC=0x00 TTL=64 ID=40170 DF PROTO=UDP SPT=35623 DPT=35622 LEN=9 Oct 2 02:02:20 nas hddtemp[13791]: /dev/sdh: Micron_1100 N #020Ђ: 32 C Oct 2 02:02:37 nas kernel: [793869.247128] [DROPPED] IN=br-7ba OUT= MAC= SRC=172.31.0.1 DST=172.31.255.255 LEN=239 TOS=0x00 PREC=0x00 TTL=128 ID=23017 DF PROTO=UDP SPT=138 DPT=138 LEN=219 Oct 2 02:02:37 nas kernel: [793869.247174] [DROPPED] IN=br-7ba OUT= MAC= SRC=172.31.0.1 DST=172.31.255.255 LEN=232 TOS=0x00 PREC=0x00 TTL=128 ID=23018 DF PROTO=UDP SPT=138 DPT=138 LEN=212 Oct 2 02:02:37 nas kernel: [793869.247195] [DROPPED] IN=br-673 OUT= MAC= SRC=192.168.224.1 DST=192.168.239.255 LEN=239 TOS=0x00 PREC=0x00 TTL=128 ID=8959 DF PROTO=UDP SPT=138 DPT=138 LEN=219 Oct 2 02:02:37 nas kernel: [793869.247203] [DROPPED] IN=br-673 OUT= MAC= SRC=192.168.224.1 DST=192.168.239.255 LEN=232 TOS=0x00 PREC=0x00 TTL=128 ID=8960 DF PROTO=UDP SPT=138 DPT=138 LEN=212 Oct 2 02:02:50 nas hddtemp[13791]: /dev/sdh: Micron_1100 N #020Ђ: 32 C It is seen that there is a lot of excess, and further configuration will be reduced to its filtering.
First you need to turn off the hddtemp, which does not work correctly due to non-ASCII characters in the SSD name.
After correcting the hddtemp file, the messages stopped coming:
^\w{3} [ :0-9]{11} [._[:alnum:]-]+ hddtemp\[[0-9]+\]: /dev/([hs]d[az]|sg[0-9]):.*[0-9]+.*[CF] ^\w{3} [ :0-9]{11} [._[:alnum:]-]+ hddtemp\[[0-9]+\]: /dev/([hs]d[az]|sg[0-9]):.*drive is sleeping Then, it is possible to see that logcheck is talking about blocking broadcast traffic with firewall:
[793869.247128] [DROPPED] IN=br-7ba OUT= MAC= SRC=172.31.0.1 DST=172.31.255.255 LEN=239 TOS=0x00 PREC=0x00 TTL=128 ID=23017 DF PROTO=UDP SPT=138 DPT=138 LEN=219 Therefore, it is necessary to allow broadcast traffic from the router and containers:
- Port 35622 from container with urbackup.
- Port 5678 from the router is the discovery of RouterOS neighbors. It is possible to disable it on the router.
- Port 5353 to address 224.0.0.251 is mDNS .
Logcheck check:
sudo -u logcheck logcheck -t -d Finally, problems are visible:
Oct 21 21:58:18 nas systemd[1]: Removed slice User Slice of user. Oct 21 21:58:31 nas systemd[1]: smbd.service: Unit cannot be reloaded because it is inactive. Oct 21 21:58:31 nas root: /etc/dhcp/dhclient-enter-hooks.d/samba returned non-zero exit status 1 It turns out that SAMBA does not start. Indeed, the analysis showed that I had disguised it through the systemctl, and OMV was trying to launch it.
Logcheck will still be spamming with various messages.
For example, zfs-auto-snapshot has passed:
Oct 21 22:00:57 nas zfs-auto-snap: @zfs-auto-snap_frequent-2018-10-21-1900, 16 created, 16 destroyed, 0 warnings. To ignore:
^\w{3} [ :0-9]{11} [._[:alnum:]-]+ zfs-auto-snap: \@zfs-auto-snap_[[:alnum:]-]+, [0-9]+ created, [0-9]+ destroyed, 0 warnings.$ rrdcached also ignore:
^\w{3} [ :[:digit:]]{11} [._[:alnum:]-]+ rrdcached\[[0-9]+\]: flushing old values$ ^\w{3} [ :[:digit:]]{11} [._[:alnum:]-]+ rrdcached\[[0-9]+\]: rotating journals$ ^\w{3} [ :[:digit:]]{11} [._[:alnum:]-]+ rrdcached\[[0-9]+\]: started new journal [./[:alnum:]]+$ ^\w{3} [ :[:digit:]]{11} [._[:alnum:]-]+ rrdcached\[[0-9]+\]: removing old journal [./[:alnum:]]+$ Also, it is advisable to remove zed, if it has not yet been removed:
^\w{3} [ :0-9]{11} [._[:alnum:]-]+ (/usr/bin/)?zed: .*$ ^\w{3} [ :0-9]{11} [._[:alnum:]-]+ (/usr/bin/)?zed\[[0-9]+\]: .*$ Well, and so on. Many believe that logcheck is quite a useless utility.
This is true if you use it as something that you have set and forgotten.
However, if you understand that logcheck is just a customizable log filter, without heuristics, magic, and adaptive algorithms, the question of its usefulness does not arise. Iteratively, examining what he sends and, either by inserting it into the ignore list or correcting it, it is gradually possible to achieve informative reports.
Using an automated tool for analysis is much better than running logs through the same regular expressions with your hands, and often better than using a complete data analysis system like Splunk.
It is possible to read about logcheck and its configuration on Gentoo Wiki here .
Node-level IDS
Here I refer to my own article “A Brief Analysis of Solutions in the Field of IDS and Development of a Neural Network Anomaly Detector in Data Networks” , in which there are several examples.
You can read a more complete review and comparison of similar IDS on the Wiki .
STIG-4
A complex and large script for static analysis of known gaps from RedHat.
There is its port in Debian , which I recommend downloading and running at least once.
# cd root@nas:~# git clone https://github.com/hardenedlinux/STIG-4-Debian Cloning into 'STIG-4-Debian'... remote: Enumerating objects: 572, done. remote: Total 572 (delta 0), reused 0 (delta 0), pack-reused 572 Receiving objects: 100% (572/572), 634.37 KiB | 0 bytes/s, done. Resolving deltas: 100% (316/316), done. root@nas:~# cd STIG-4-Debian/ root@nas:~/STIG-4-Debian# bash stig-4-debian.sh -H Script Run: Mon Nov 12 23:58:34 MSK 2018 Start checking process... [ FAIL ] The cryptographic hash of system files and commands must match vendor values. ... Pass Count: 54 Failed Count: 137 The process of working with this script is something like this:
- Run the script.
- Search the web for every line with
[ FAIL ]. - As a rule, a link to the STIG online database will be found.
- Correct, following the instructions in the database, making a discount on the fact that this is Debian.
- Run the script again.
Rkhunter
Too much has been written about RkHunter .
Used long ago, widely, still evolving. Available in the Debian repository.
Tiger
A modular shell script that performs system auditing and intrusion detection.
In some ways similar to STIG-4.
It can use third-party utilities for analyzing logs, for detecting violation of checksums.
Consists of a large number of different modules.
For example, there is a module that detects services that use deleted files, which happens when the libraries used by the service were changed during the system update, but the service was not restarted for some reason.
There are modules for searching service users that are no longer used, system checks for the absence of security patches, umask checks, etc.
Read more in man .
Already 10 years does not develop (yes, I'm not the only one who throws software)
Samhain
Typical HIDS that can:
- Check the integrity of the entire system using cryptographic hashes.
- Search for various executable files with the installed SUID, which should not be installed.
- Detect hidden processes.
- Sign logs and databases.
Plus, it has centralized monitoring with a web-based interface and centralized logging to the server.
Usually, it is used to check whether the system binary files have changed between updates.
.
, , . , , , , .
- HIDS: .
Samhain, .
Tripwire
, Samhain, Tripwire — .
, .
Lynis
RkHunter .
, .
.
Tiger , , .
, . , , Lynix Tripwire.
Chkrootkit
The name speaks for itself. .
:
- , .
- .
- , latslog, wtmp utmp.
- , , .
.
Ninja
Linux.
ninja-build.
, . UID/GID, Ninja , , (, , ).
(, su).
, .
Ubuntu , Debian.
Linux ( ) .
. , .
, , , .
NAS , AppArmor.
, , .
, , , .
Access Control Lists
, .
, ZFS .
- .
- .
- .
- .
- .
- .
- ACL ( ls).
- ( ACL, "stat").
- .
- .
- .
- .
- , , .
- ACL chmod.
- . chown chgrp .
- , . PRIV_FILE_CHOWN.
- ACL .
- ACL .
- ACL , , . ACL file_inherit, dir_inherit .
- ACL , .
ACL , , , . .
EXT , ZFS ACL setfacl/getfacl , chmod ls .
AppArmor

.
, , exec , , open , exec .
, .
AppArmor , .
, .
capabilites.
, . , , , .
#include <tunables/global> profile ping /{usr/,}bin/ping flags=(complain) { #include <abstractions/base> #include <abstractions/consoles> #include <abstractions/nameservice> capability net_raw, capability setuid, network inet raw, network inet6 raw, /{,usr/}bin/ping mixr, /etc/modules.conf r, # Site-specific additions and overrides. See local/README for details. #include <local/bin.ping> } , , .. . , , ( local/bin.ping ), , .
deb-based .
firejail , .
, , .
SELinux

.
NSA , Debian .
SELinux " " (type enforcement).
, , , SELinux . "".
, , firefox_t .
SELinux , .
Example:
allow firefox_t user_home_t : file { read write }; , , firefox_t , , user_home_t .
Example:
allow user_t user_home_t:file { create read write unlink }; user_t , , user_home_t . user_t , , .
, .
AppArmor -, , , .
- SELinux Linux. su sudo, SELinux . Linux SELinux , 1:1, root.
- , , . " ", "Web-", " ". ,
object_r.
, . - . — , .
- . , , . ,
user_u:user_r:user_t,user_u:object_r:user_home_t. :
user:role:type:range — SELinux user. — , . — MLS .
, , , user_home_t. user_home_t — , , .
- ,
dirfile, , . , . ,file(create), (read), (write) (unlink),unix_stream_socket object( UNIX) (create), (connect), (sendto).
, .
. , (, ), .
, AppArmor, permissive , , .
.
, , AppArmor .
GrSecurity
Debian - . , , .
, ( ), — Gentoo . : hardening .
Debian , GrSecurity PaX.
Tomoyo
. AppArmor, . 2003 .
, , .
, AppArmor, .
Little things
/etc/securetty , root ( ), .
PAM, /etc/security .
, Samhain Tripwire, debsums , .
Conclusion
. , .
, Github , .
')
Source: https://habr.com/ru/post/421279/
All Articles