Kivy. Xamarin. React Native. Three frameworks - one experiment (part 2)

This is the second article from the series, where we compare Kivy, Xamarin.Forms and React Native. In it, I will try to write the same task scheduler, but using Xamarin.Forms. I will see how I can do it, and what I will have to face.
I will not repeat TK, you can see it in the first article: Kivy. Xamarin. React Native. Three frameworks - one experiment
The third part is about React Native: Kivy. Xamarin. React Native. Three frameworks - one experiment (part 3)
To begin with, I will say a few words about the Xamarin.Forms platform and how I will approach the solution of the problem. Xamarin.Forms is an add-on for Xamarin.iOs and Xamarin.Android. After assembly, the common part is “deployed” to the standard native controls, so in essence you get completely native applications for all supported platforms.
')
The syntax of Xamarin.Forms is extremely close to the WPF syntax, and the general part itself is written in .NET Standard. As a result, you get the opportunity to use the MVVM approach when developing an application, as well as access to a huge number of third-party libraries written for .NET Standard and already in NuGet, which you can easily use in your Xamarin.Forms applications.
The source code for the application here is available on GitHub .
So let's create an empty Xamarin.Forms application and get started. We will have a simple data model, just two classes Note and Project:
public class Note { public string UserIconPath { get; set; } public string UserName { get; set; } public DateTime EditTime { get; set; } public string Text { get; set; } } public class Project { public string Name { get; set; } public ObservableCollection<Note> Notes { get; set; } public Project() { Notes = new ObservableCollection<Note>(); } } I will try to adhere to the MVVM approach, but I will not use any special library in order not to complicate the code. All model classes and model views will implement the INotifyPropertyChanged interface. I will remove its implementation in the cited examples of the code for brevity.
The first screen we will have a list of projects with the ability to create a new or delete the current one. We make a twist for him:
public class MainViewModel { public ObservableCollection<Project> Projects { get; set; } public MainViewModel() { Projects = Project.GetTestProjects(); } public void AddNewProject(string name) { Project project = new Project() { Name = name }; Projects.Add(project); } public void DeleteProject(Project project) { Projects.Remove(project); } } Screen code itself:
<ContentPage xmlns="http://xamarin.com/schemas/2014/forms" xmlns:x="http://schemas.microsoft.com/winfx/2009/xaml" xmlns:local="clr-namespace:TodoList.View" x:Class="TodoList.View.ProjectsPage"> <ContentPage.ToolbarItems> <ToolbarItem Clicked="AddNew_Clicked" Icon="plus.png"/> </ContentPage.ToolbarItems> <ListView ItemsSource="{Binding Projects}" ItemTapped="List_ItemTapped"> <ListView.ItemTemplate> <DataTemplate> <TextCell Text="{Binding Name}" TextColor="Black"> <TextCell.ContextActions> <MenuItem Clicked="DeleteItem_Clicked" IsDestructive="true" CommandParameter="{Binding .}" Text="Delete"/> </TextCell.ContextActions> </TextCell> </DataTemplate> </ListView.ItemTemplate> </ListView> </ContentPage> The markup turned out to be quite simple, the only thing I want to stop at is the implementation of the swipe buttons for deleting projects. ListView has the concept of ContextActions, if you set it, then in iOS they will be implemented via svayp, in Android - via long tap. This approach is implemented in Xamarin.Forms, because it is native for each of the platforms. However, if we want svayp in android, we will need to hands to implement it in the native part of the android. I do not have the task to spend a lot of time on it, so I was satisfied with the standard approach :) As a result, the svayp in iOS and the context menu in Android are implemented quite simply:
<TextCell.ContextActions> <MenuItem Clicked="DeleteItem_Clicked" IsDestructive="true" CommandParameter="{Binding .}" Text="Delete"/> </TextCell.ContextActions> Substituting the test data, we get the following list:

We now turn to the event handler. Let's start with a simple - delete project:
MainViewModel ViewModel { get { return BindingContext as MainViewModel; } } async Task DeleteItem_Clicked(object sender, EventArgs e) { MenuItem menuItem = sender as MenuItem; if (menuItem == null) return; Project project = menuItem.CommandParameter as Project; if (project == null) return; bool answer = await DisplayAlert("Are you sure?", string.Format("Would you like to remove the {0} project", project.Name), "Yes", "No"); if(answer) ViewModel.DeleteProject(project); } It is not good to delete something without asking the user, and in Xamarin.Forms it is easy to do this using the standard DisplayAlert method. After calling it, the following window will appear:

This window is from iOs. Android will have its own version of this window.
Next we implement the addition of a new project. It would seem that this is done by analogy, but in Xamarin.Forms there is no dialogue implementation, similar to the one with which I confirmed the deletion, but allowing to enter text. There are two possible solutions:
- write your service, which will raise native dialogues;
- implement some kind of workaround on the Xamarin.Forms side.
I did not want to spend time raising dialogue through the native, and I decided to use the second approach, the implementation of which I took from the thread: How to do a simple InputBox dialog? , namely the Task InputBox (INavigation navigation) method.
async Task AddNew_Clicked(object sender, EventArgs e) { string result = await InputBox(this.Navigation); if (result == null) return; ViewModel.AddNewProject(result); } Now we will process tap in rows to open a project:
void List_ItemTapped(object sender, Xamarin.Forms.ItemTappedEventArgs e) { Project project = e.Item as Project; if (project == null) return; this.Navigation.PushAsync(new NotesPage() { BindingContext = new ProjectViewModel(project) }); } As can be seen from the code above, to go to the project window, we need its view model and the page object of the window.
I would like to say a few words about Navigation. The Navigation property is defined in the VisualElement class, and allows you to work with the navigation bar in any view of your application without pushing it there by hand. However, for this approach to work, you still need to create this panel yourself. Therefore, in App.xaml.cs we write:
NavigationPage navigation = new NavigationPage(); navigation.PushAsync(new View.ProjectsPage() { BindingContext = new MainViewModel() }); MainPage = navigation; Where ProjectsPage is the window that I am describing right now.
The window with notes is very similar to the window with projects, so I will not describe it in detail, I’ll only focus on interesting nuances.
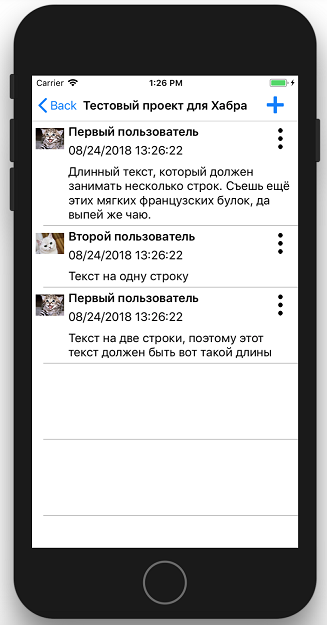
The layout of this window is more complicated, because each line should display more information:
Notes view
<ContentPage xmlns="http://xamarin.com/schemas/2014/forms" xmlns:x="http://schemas.microsoft.com/winfx/2009/xaml" x:Class="TodoList.View.NotesPage" xmlns:local="clr-namespace:TodoList.View" xmlns:utils="clr-namespace:TodoList.Utils" Title="{Binding Project.Name}"> <ContentPage.Resources> <ResourceDictionary> <utils:PathToImageConverter x:Key="PathToImageConverter"/> </ResourceDictionary> </ContentPage.Resources> <ContentPage.ToolbarItems> <ToolbarItem Clicked="AddNew_Clicked" Icon="plus.png"/> </ContentPage.ToolbarItems> <ListView ItemsSource="{Binding Project.Notes}" x:Name="list" ItemTapped="List_ItemTapped" HasUnevenRows="True"> <ListView.ItemTemplate> <DataTemplate> <ViewCell> <local:MyCellGrid Margin="5"> <local:MyCellGrid.RowDefinitions> <RowDefinition Height="40"/> <RowDefinition Height="*"/> </local:MyCellGrid.RowDefinitions> <local:MyCellGrid.ColumnDefinitions> <ColumnDefinition Width="40"/> <ColumnDefinition Width="*"/> <ColumnDefinition Width="40"/> </local:MyCellGrid.ColumnDefinitions> <Image Grid.Row="0" Grid.Column="0" Source="{Binding UserIconPath, Converter={StaticResource PathToImageConverter}}" /> <StackLayout Grid.Row="0" Grid.Column="1"> <Label Text="{Binding UserName}" FontAttributes="Bold"/> <Label Text="{Binding EditTime}"/> </StackLayout> <Button Grid.Row="0" Grid.Column="2" BackgroundColor="Transparent" Image="menu.png" Margin="5" HorizontalOptions="FillAndExpand" Clicked="RowMenu_Clicked"/> <local:MyLabel Grid.Row="1" Grid.Column="1" Margin="0,10,0,0" Grid.ColumnSpan="2" Text="{Binding Text}"/> </local:MyCellGrid> <ViewCell.ContextActions> <MenuItem Clicked="DeleteItem_Clicked" IsDestructive="true" CommandParameter="{Binding .}" Text="Delete"/> </ViewCell.ContextActions> </ViewCell> </DataTemplate> </ListView.ItemTemplate> </ListView> </ContentPage> In the content of the window, we again have a ListView, which is attached to the collection of notes. However, we want the height of the cells by content, but no more than 150, for this we set HasUnevenRows = “True”, so that the ListView allows the cells to take up as much space as they ask. But in such a situation, lines can request a height of more than 150 and the ListView will allow them to appear this way. To avoid this in the cell, I used my successor to the Grid panel: MyCellGrid. This panel on the measure operation requests the height of the internal elements and returns it either to 150 if it is larger:
public class MyCellGrid : Grid { protected override SizeRequest OnMeasure(double widthConstraint, double heightConstraint) { SizeRequest sizeRequest = base.OnMeasure(widthConstraint, heightConstraint); if (sizeRequest.Request.Height <= 150) return sizeRequest; return new SizeRequest(new Size() { Width = sizeRequest.Request.Width, Height = 150 }); } } Since we need to be able to edit and delete besides tapa and svayp as well according to the menu opened by clicking the button in the corner of the line, we will add this button to the cell template and subscribe to tap on it. In this case, if the user presses the button, then it intercepts the gesture and we will not receive the events of clicking on the string.
<Button Grid.Row="0" Grid.Column="2" BackgroundColor="Transparent" Image="menu.png" Margin="5" HorizontalOptions="FillAndExpand" Clicked="RowMenu_Clicked"/> With test data, our form looks like this:
Processing user actions in this form is completely analogous to the one that was written for the project list window. You want to stop only on the context menu on our button in the corner of the line. At first, I thought that I would do it without any problems at the Xamarin.Forms level.
Indeed, we just need to create a view like this:
<StackLayout> <Button Text=”Edit”/> <Button Text=”Delete”/> </StackLayout> And show it next to the button. However, the problem is that we cannot find out exactly where it is “next to the button”. This context menu should be located on top of the ListView and, when opened, be positioned in window coordinates. To do this, you need to know the coordinates of the pressed button relative to the window. We can only get the coordinates of the button relative to the internal ScrollView located in the ListView. So when the lines are not shifted, then everything is fine, but when the lines are scrolled, we must take into account how much the scroll occurred when calculating the coordinates. ListView does not give us the value of the scroll. So, it is necessary to pull it out of the native, which was not very desirable. Therefore, I decided to follow the path of a more standard and simple: show the standard system context menu. As a result, the button click handler will get the following:
async Task RowMenu_Clicked(object sender, System.EventArgs e) { string action = await DisplayActionSheet("Note action:", "Cancel", null, "Edit", "Delete"); if (action == null) return; BindableObject bindableSender = sender as BindableObject; if(bindableSender != null) { Note note = bindableSender.BindingContext as Note; if (action == "Edit") { EditNote(note); } else if(action == "Delete") { await DeleteNote(note); } } } Calling the DisplayActionSheet method just shows the regular context menu:

If you have noticed, the text of the note is displayed in my control of MyLabel, and not in the regular Label. This is what this is done for. When the user changes the text of the note, the binding is triggered, and a new text automatically arrives in the Label. However, Xamarin.Forms does not recalculate the cell size in this case. Developers Xamarin declare that it is quite an expensive operation. Yes, and ListView itself does not have any method that would force it to recalculate its size, InvalidateLayout also does not help. The only thing they have for this is the CellUp's ForceUpdateSize method. Therefore, in order to get to him and at the right moment to pull, I wrote my successor Label and pulled this method for every text change:
public class MyLabel : Label { protected override void OnPropertyChanged([CallerMemberName] string propertyName = null) { base.OnPropertyChanged(propertyName); if (propertyName == "Text") { ((this.Parent as MyCellGrid).Parent as Cell).ForceUpdateSize(); } } } Now after editing the note, the ListView will automatically correct the cell size for the new text.
When editing or creating a new note, a window opens with the Editor in content and the Save button on the toolbar:

This window is slightly different from what we have in the TK: the lack of a round button at the bottom. If you place it just on top of the editor, then it will be blocked by the leaving keyboard. I did not find a beautiful solution of how to move it and not to go away to the Native with a quick search. Therefore, I removed it and left only the Save button in the top panel. This window itself is very simple, so I’ll omit its description.
What I want to say in the end.
Xamarin.Forms is well suited to those who are familiar with the .NET infrastructure and have been working with it for a long time. They will not have to switch to new IDEs and frameworks. As you can see, the application code is not much different from the code of any other XAML based application. In addition, Xamarin allows you to develop and build iOS applications in Visual Studio for Windows. When developing the final application for testing and assembly, you will need to connect to the machine with MacOS. And libraries can be done without it.
In order to start writing applications on Xamarin.Forms, you do not need any red-eye with the console. Just put Visual Studio and write applications. Everything else has already been taken care of for you. In this case, as if Microsoft was not associated with paid products, Xamarin is free and there are free versions of Visual Studio.
The fact that Xamarin.Forms uses the .NET Standard under the hood gives access to a bunch of libraries already written for it that will make life easier when developing your applications.
Xamarin.Forms allows you to add something in the native parts of your application without any special difficulties, if you need to implement something platform specific. There you get the same C #, but the API is native to each of the platforms.
However, of course, it was not without flaws.
The API available in the general part is rather poor, because it contains only what is common to all platforms. For example, as seen in my example, all platforms contain alert messages and context menus, and this item is available in Xamarin.Forms. However, the standard menu that allows you to enter text is only available in iOS, so Xamarin.Forms does not have it.
Similar limitations are found in the use of components. Something can be done, something is impossible. The same swipe for deleting a project or note only works in iOS. In Android, this context action will be presented in the form of a menu that appears on a long tap. And if you want a swipe in android, then welcome to the android part and write it with your hands.
And of course, performance. The speed of the application on Xamarin.Forms in any case will be lower than the speed of the native application. So Microsoft itself says that if you need an application without any frills in terms of design and performance requirements, then Xamarin.Forms is for you. If you need beauty or speed, then you should already go down to the native. Fortunately, Xamarin has versions for the native, which already operate immediately with the native platform API and work faster than forms.
Source: https://habr.com/ru/post/420999/
All Articles