An introduction to programming shaders for web designers
WebGL has been around for a long time, quite a few articles have been written about shaders, there are a series of lessons. But in the bulk they are too complicated for the maker. It is even better to say that they cover large amounts of information that a game engine developer needs rather than a layout designer. They immediately begin with the construction of a complex scene, camera, light ... On a regular site to create a pair of effects with photos, all this knowledge is redundant. As a result, people make very complex architectural structures and write long-long shaders for very simple actions.
All this prompted to create an introduction to those aspects of working with shaders, which are most likely to be useful in the work of the typesetter to create various 2D effects with pictures on the site. Of course, taking into account the fact that they themselves are relatively rarely used in the design of interfaces by themselves. We will make a starting pattern on pure JS without third-party libraries and consider ideas for creating some popular pixel-based effects that are difficult to make on SVG, but they are easily implemented using shaders.
It is assumed that the reader is already familiar with canvas , in general terms represents what WebGL is, and has minimal knowledge of mathematics. Some points will be described in a simplified, non-academic manner, with the goal of giving a practical understanding of the technologies for working with them, rather than a complete theory of their inner kitchen or terms for memorizing. There are smart books for this.Immediately it should be noted that the editors from CodePen integrated into the article tend to affect the performance of what is being done in them. So, before writing a comment that something is slowing down on your MacBook, make sure that the problem does not come from them.
Main ideas
What is a shader?
What is a fragment shader? In essence, this is a small program. It is executed for each pixel on anvas . If we have a canvas of 1000x500px, then this program will run 500,000 times, each time getting as its input parameters the coordinates of the pixel for which it is currently running. This all happens on the GPU in many parallel threads. On a central processor, such calculations would take much longer.
The vertex shader is also a program, but it is executed not for every pixel on the canvas , but for every vertex in the figures, of which everything is built in three-dimensional space. Also parallel for all vertices. Accordingly, it receives the coordinates of the vertex as input, rather than a pixel.
Further in the context of our task, the following happens:
- We take a set of coordinates of the vertices of the rectangle, which then will be "drawn" picture.
- The vertex shader for each vertex counts its location in space. In our case it will be reduced to a special case - a plane parallel to the screen. Photos in 3d, we do not need. The subsequent projection onto the screen plane can be said to do nothing.
- Further, for each visible fragment, and in our context for all pixel fragments, a fragmentary shader is executed, it takes a photo and current coordinates, counts something and gives out color for this particular pixel.
- If there was no logic in the fragment shader, then the behavior of all this would resemble the
drawImage()method. But then we add this very logic and get a lot of interesting things.
This is a very simplified description, but it should be clear who does what.
A little about the syntax
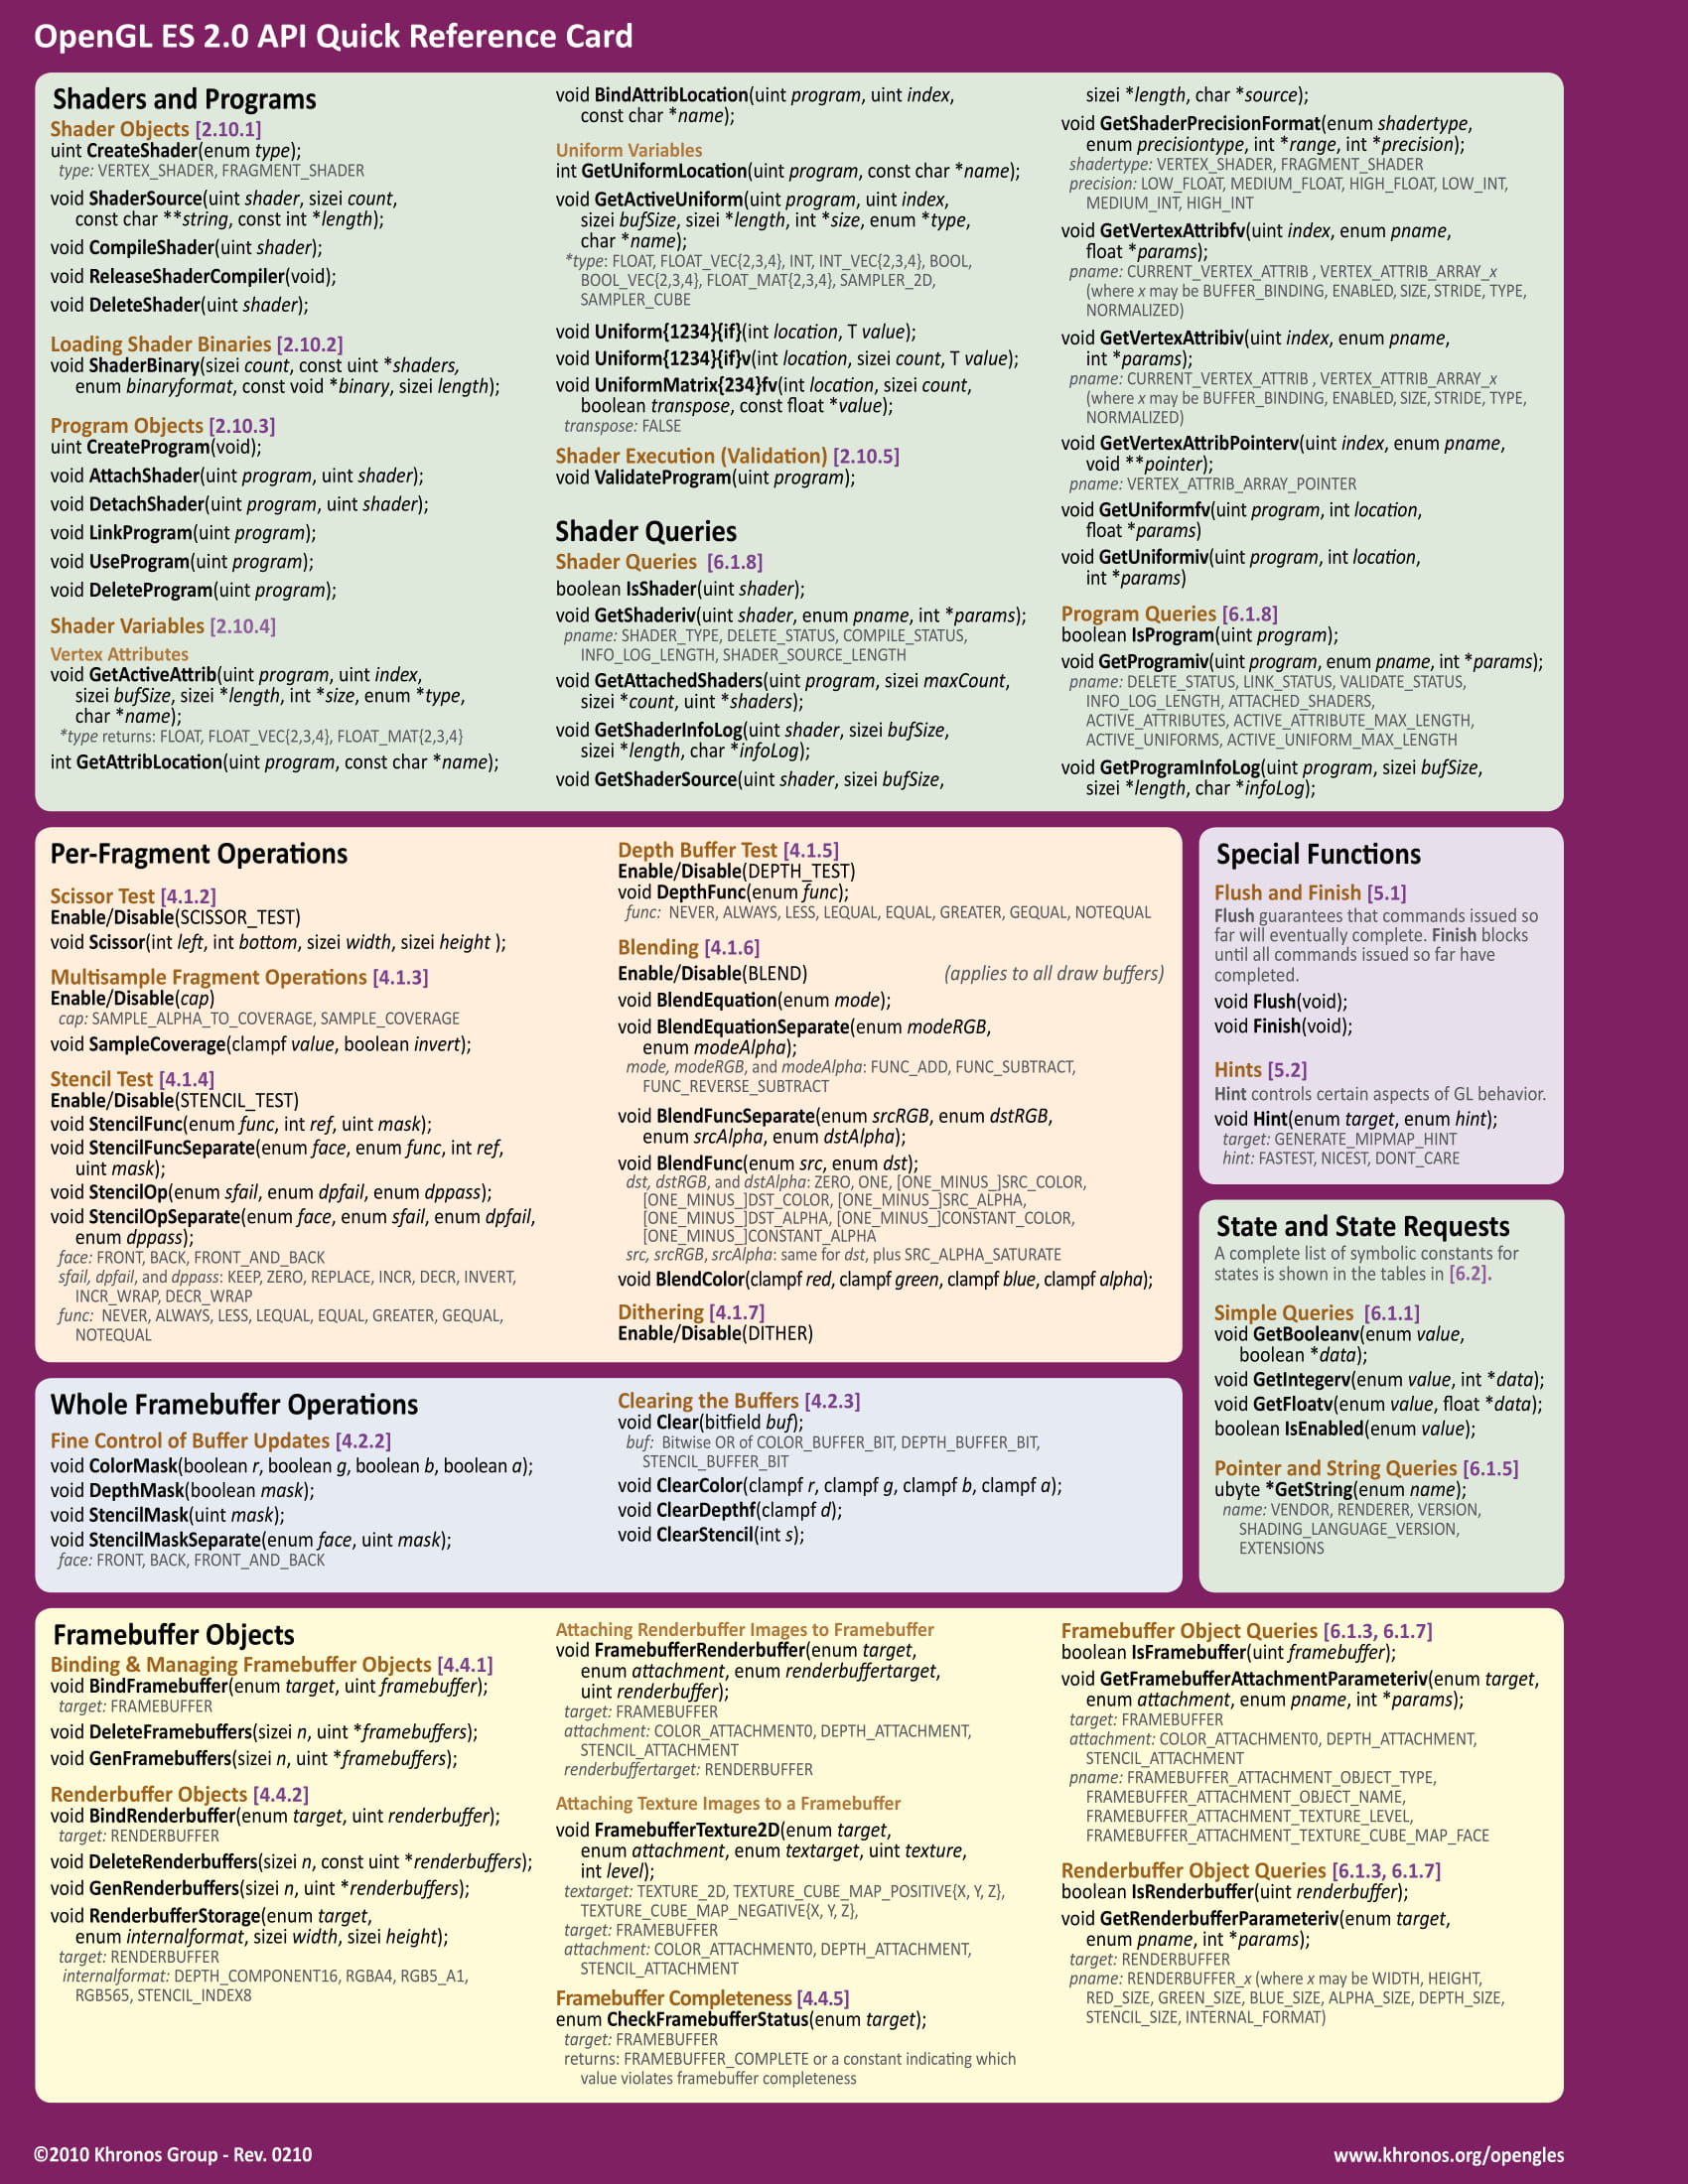
Shaders are written in GLSL - OpenGL Shading Language. This language is very similar to C. It makes no sense to describe the whole syntax and standard methods here, but you can always use the cheat sheet:
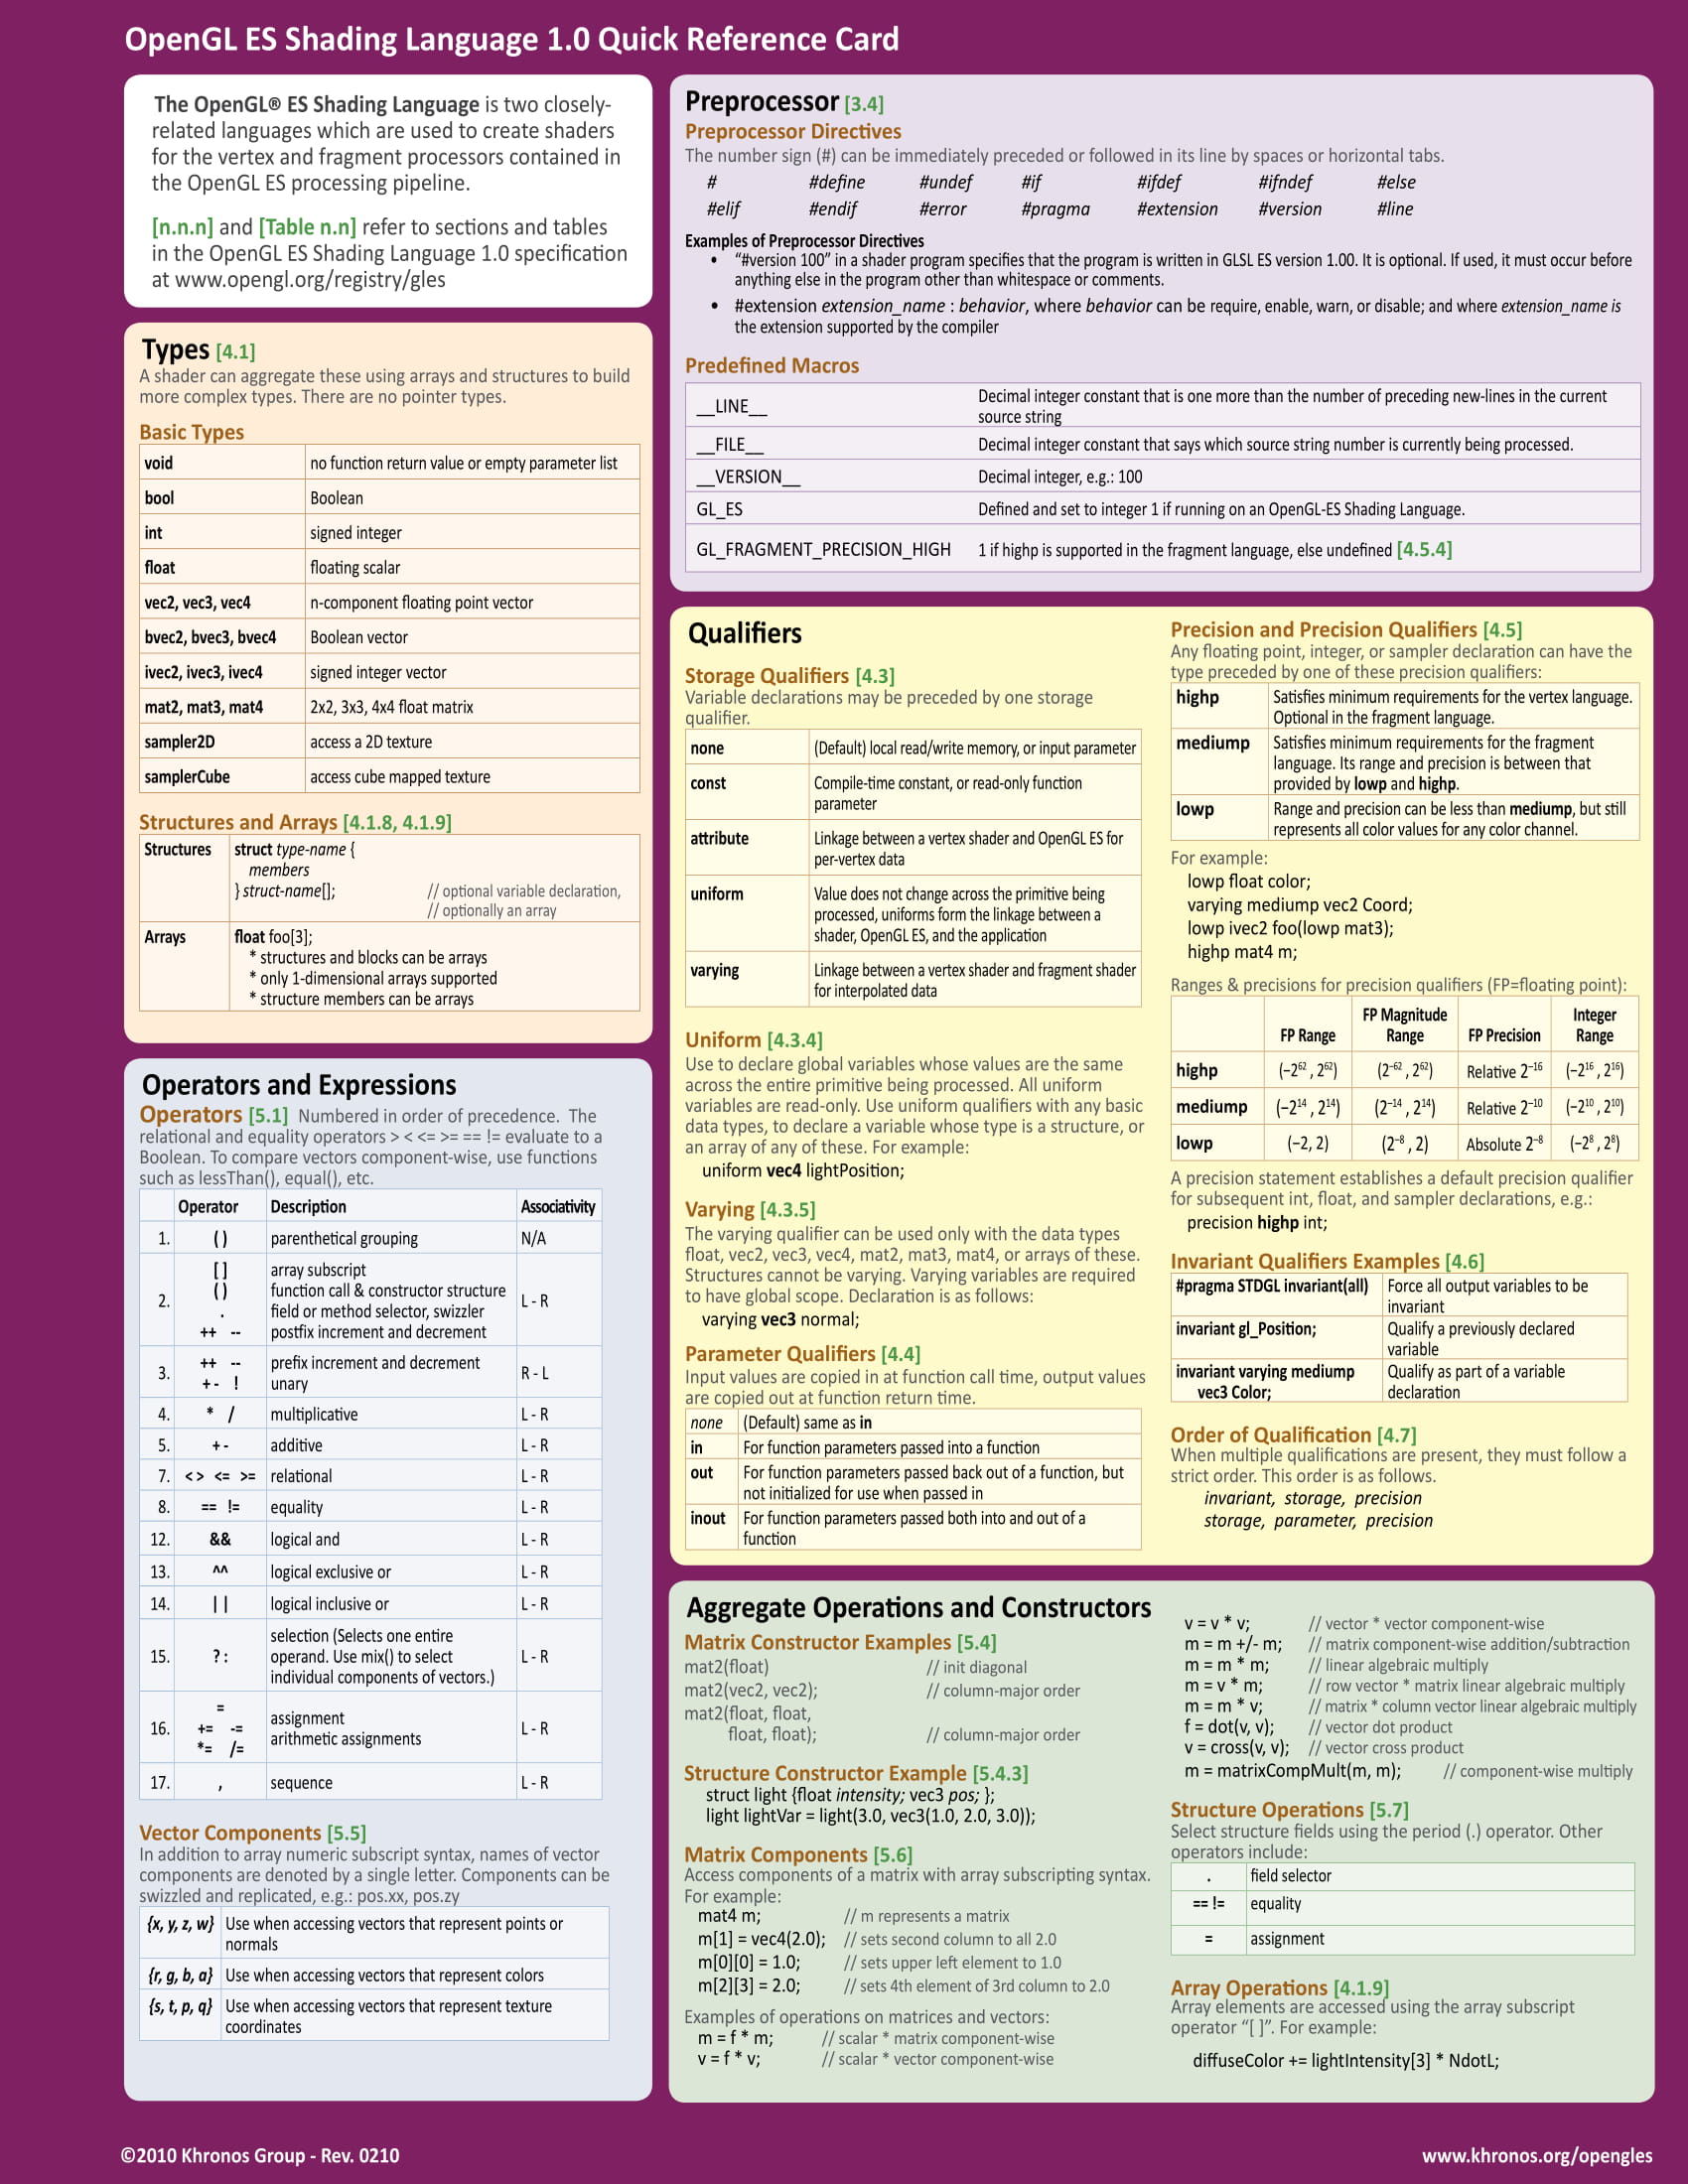
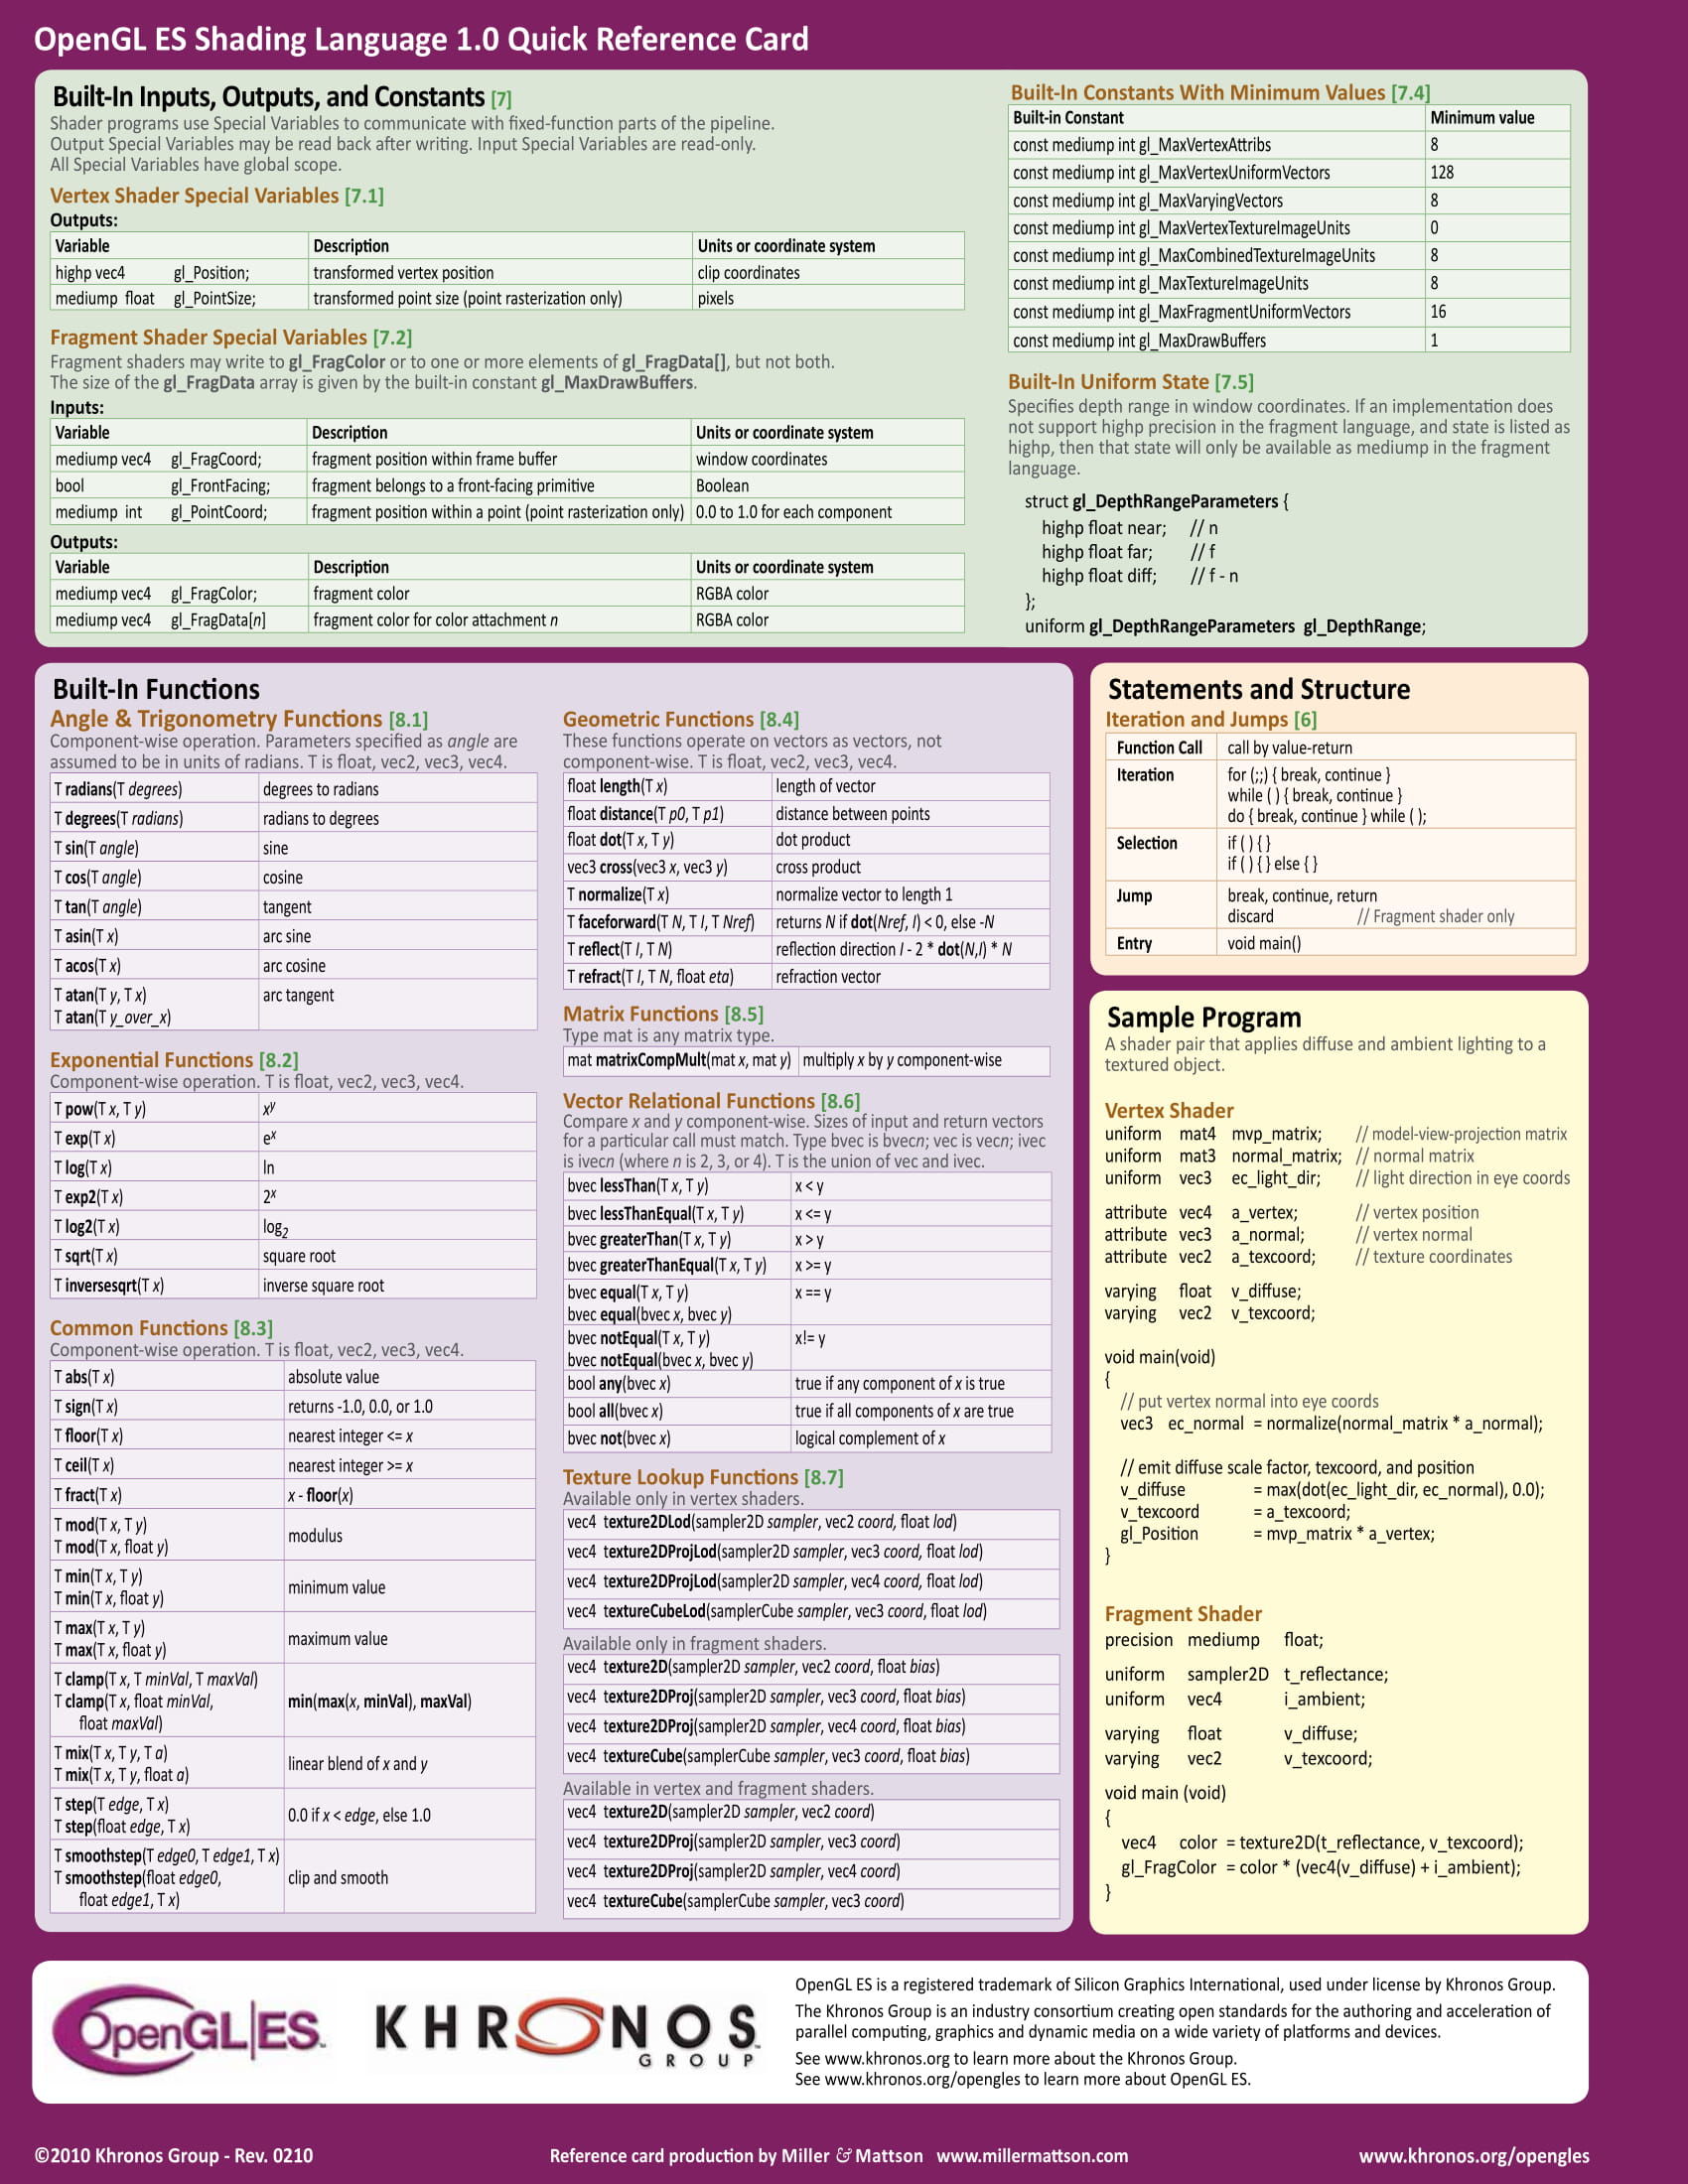

Each shader has a main function with which its execution begins. Standard input parameters for shaders and the output of the results of their work are implemented through special variables with the prefix gl_ . They are reserved in advance and are available inside these shaders. So the vertex coordinates for the vertex shader are in the variable gl_Position , the fragment coordinates (pixel) for the fragment shader are in gl_FragCoord , etc. You will always find the full list of available special variables in the same cheat sheet.
The main types of variables in GLSL are fairly straightforward - void , bool , int , float ... If you worked with some C-like language, you have already seen them. There are other types, in particular vectors of different dimensions - vec2 , vec3 , vec4 . We will constantly use them for coordinates and colors. The variables we can create are of three important modifications:
- Uniform - Global data in every sense. Transmitted from the outside, the same for all calls to vertex and fragment shaders.
- Attribute - This data is already transmitted more precisely and for each shader call can be different.
- Varying - Needed to transfer data from vertex shaders to fragment.
It is useful to prefix u / a / v to all the variables in the shaders to make it easier to understand what data it came from.
I believe that it is worthwhile to proceed to a practical example in order to immediately watch all this in action and not load your memory.
Preparing a start template
Let's start with JS. As is usually the case when working with canvas , we need it and the context. In order not to load the code of the examples, let's make global variables:
const CANVAS = document.getElementById(IDs.canvas); const GL = canvas.getContext('webgl'); Skip the moment associated with the size of the canvas and its recalculation when the browser window is resized. This code is included in the examples and usually depends on the rest of the layout. It makes no sense to focus on it. Let's go straight to the action with WebGL.
function createProgram() { const shaders = getShaders(); PROGRAM = GL.createProgram(); GL.attachShader(PROGRAM, shaders.vertex); GL.attachShader(PROGRAM, shaders.fragment); GL.linkProgram(PROGRAM); GL.useProgram(PROGRAM); } First, we compile the shaders (will be a little lower), create the program, add both our shaders to it, and link it. At this stage, the compatibility of shaders is checked. Remember the varying variables that are passed from the vertex to the fragment? - In particular, their sets are checked here, so that later in the process it would not turn out that something was not transferred or transferred, but not at all. Of course, this check will not reveal logical errors, I think this is understandable.
The coordinates of the vertices will be stored in a special buffer array and will be piece by piece, one vertex, transferred to each shader call. Next we describe some details for working with these pieces. First, we will use the coordinates of the vertex in the shader through the variable attribute a_position . Can be differently called, it does not matter. We get its location (this is something like a pointer in C, but not a pointer, but rather an entity number that exists only within the program).
const vertexPositionAttribute = GL.getAttribLocation(PROGRAM, 'a_position'); Next, we indicate that through this variable an array with coordinates will be transmitted (in the shader itself, we will perceive it as a vector). WebGL will independently figure out exactly which coordinates of which points in our figures are passed to which shader call. We only set the parameters for the array-vector, which will be transmitted: dimension - 2 (we will transmit coordinates (x,y) ), it consists of numbers and is not normalized. Last parameters are not interesting to us, we leave zero by default.
GL.enableVertexAttribArray(vertexPositionAttribute); GL.vertexAttribPointer(vertexPositionAttribute, 2, GL.FLOAT, false, 0, 0); Now create the buffer itself with the coordinates of the vertices of our plane, on which the photo will be displayed later. The coordinates "in 2d" are clearer, and for our tasks this is the most important thing.
function createPlane() { GL.bindBuffer(GL.ARRAY_BUFFER, GL.createBuffer()); GL.bufferData( GL.ARRAY_BUFFER, new Float32Array([ -1, -1, -1, 1, 1, -1, 1, 1 ]), GL.STATIC_DRAW ); } This square will be enough for all our examples. STATIC_DRAW means that the buffer is loaded once and then reused. We will not download anything again.
Before proceeding to the shaders themselves, let's look at their compilation:
function getShaders() { return { vertex: compileShader( GL.VERTEX_SHADER, document.getElementById(IDs.shaders.vertex).textContent ), fragment: compileShader( GL.FRAGMENT_SHADER, document.getElementById(IDs.shaders.fragment).textContent ) }; } function compileShader(type, source) { const shader = GL.createShader(type); GL.shaderSource(shader, source); GL.compileShader(shader); return shader; } Get the shader code from the elements on the page, create a shader and compile it. In theory, you can store the shader code in separate files and load it during assembly as a string in the right place, but CodePen does not provide such an opportunity for examples. Many lessons offer to write code directly in a line in JS, but to call it a convenient language does not turn. Although of course the taste and color ...
If an error occurs during the compilation, the script will continue execution showing a couple of warnings in the console that do not carry much meaning. It is useful to look at the logs after compilation so as not to puzzle over what was not compiled there:
console.log(GL.getShaderInfoLog(shader)); WebGL provides several different options for tracking problems when compiling shaders and creating a program, but in practice it turns out that in real time we still can not fix anything. So often we will be guided by the thought "fell off - it means fell off" and we will not load the code with a bunch of extra checks.
Go to the shaders themselves.
Since we will have only one plane, with which we are not going to do anything, one simple vertex shader is enough for us, which we will do at the very beginning. The main efforts will be focused on fragment shaders and all subsequent examples will be relevant to them.
Try to write shader code with more or less meaningful variable names. In the network, you will find examples where functions of 200 characters of solid text will be assembled from single-letter variables, but the fact that someone does this does not mean that it is worth repeating. Such an approach is not "the specifics of working with GL", it is a banal copy-paste of source codes from the last century, written by people who in their youth had limitations on the length of variable names.
For starters, the vertex shader. The 2d vector with coordinates (x,y) , as we said, will be passed to the variable-attribute a_position . The shader should return a vector of four values (x,y,z,w) . It will not move anything in space, so along the z axis, just zero everything and put the value of w in the standard unit. If you are wondering why there are four coordinates, rather than three, then you can use the online search for the query "homogeneous coordinates".
<script id='vertex-shader' type='x-shader/x-vertex'> precision mediump float; attribute vec2 a_position; void main() { gl_Position = vec4(position, 0, 1); } </script> The result of the work is recorded in a special variable gl_Position . Shaders do not have a return operator in the full sense of the word; they write all results of their work into variables specially reserved for these purposes.
Pay attention to the accuracy specification for the float data type. To avoid some of the problems on mobile devices, the accuracy should be worse than highp and should be the same in both shaders. Here it is shown as an example, but it will be good practice to turn off such beauty with shaders on phones.
To start, the fragment shader will always return the same color. Our square will occupy the entire canvas , so in fact here we set the color for each pixel:
<script id='fragment-shader' type='x-shader/x-fragment'> precision mediump float; #define GOLD vec4(1.0, 0.86, 0.6, 1.0) void main() { gl_FragColor = GOLD; } </script> You can pay attention to the numbers that describe the color. This is familiar to all the RGBA makers, only normalized. Values are not integers from 0 to 255, but fractional values from 0 to 1. The order is the same.
Do not forget to use the preprocessor for all magic constants in real projects - this makes the code more understandable without affecting performance (substitution, like in C, occurs during compilation).
It is worth noting one more thing about the preprocessor:
The use of constant checks #ifdef GL_ES in various lessons is devoid of practical sense, because we have in the browser today, no other options for GL simply do not exist.
But it’s time to look at the result:
Golden square says that shaders work as expected. It makes sense to play around with them a bit before moving on to working with photos.
Gradient and Vector Conversions
Usually in WebGL tutorials, you start by drawing gradients. This has little practical meaning, but it will be useful to note a couple of points.
void main() { gl_FragColor = vec4(gl_FragCoord.zxy / 500.0, 1.0); } In this example, we use the coordinates of the current pixel as the color. You will often see this in the examples in the network. Both are vectors. So no one bothers to mix everything in a pile. TypeScript evangelists should have a seizure here. The important point is how we get out of the vector only part of the coordinates. Properties .x , .y , .z , .xy , .zy , .xyz , .zyx , .xyzw etc. in different sequences allow you to pull out the elements of the vector in a certain order in the form of another vector. Very conveniently implemented. Also, a higher dimension vector can be made from a smaller dimension vector, adding the missing values, as we did.
Always explicitly specify the fractional part of the numbers. There is no automatic conversion of int -> float.
Uniforms and the passage of time
The next useful example is the use of uniforms. This is the most common data for all shader calls. We get their location in almost the same way as for attribute variables, for example:
GL.getUniformLocation(PROGRAM, 'u_time') Then we can set them values before each frame. Also, as with vectors, there are many similar methods starting with the word uniform , followed by the dimension of the variable (1 for numbers, 2, 3 or 4 for vectors) and type (f - float, i - int, v - vector) .
function draw(timeStamp) { GL.uniform1f(GL.getUniformLocation(PROGRAM, 'u_time'), timeStamp / 1000.0); GL.drawArrays(GL.TRIANGLE_STRIP, 0, 4); window.requestAnimationFrame(draw); } In fact, we don't always need 60fps in the interfaces. It is quite possible to add a drag to requestAnimationFrame and reduce the frame redrawing rate.
For example, we will change the fill color. All basic mathematical functions are available in shaders - sin , cos , tan , asin , acos , atan , pow , exp , log , sqrt , abs and others. We use two of them.
uniform float u_time; void main() { gl_FragColor = vec4( abs(sin(u_time)), abs(sin(u_time * 3.0)), abs(sin(u_time * 5.0)), 1.0); } Time in such animations is a relative concept. Here we use the values that requestAnimationFrame provides us, but we can make our "time". The idea is that if some parameters are described by a function of time, then we can turn the time in the opposite direction, slow it down, speed it up or return to its original state. This is very useful.
But enough of abstract examples, let's move on to using pictures.
Load the image into the texture
In order to use a picture, we need to create a texture that will later be rendered on our plane. First, load the image itself:
function createTexture() { const image = new Image(); image.crossOrigin = 'anonymous'; image.onload = () => { // .... }; image.src = 'example.jpg'; } After it loads, we create a texture and indicate that it will go at number 0. In WebGL, there can be many textures at the same time and we must explicitly indicate which subsequent commands will apply to. In our examples there will be only one texture, but we still clearly indicate that it will be zero.
const texture = GL.createTexture(); GL.activeTexture(GL.TEXTURE0); GL.bindTexture(GL.TEXTURE_2D, texture); It remains to add a picture. We also immediately say that it needs to be flipped along the Y axis, since in WebGL, the axis is upside down:
GL.pixelStorei(GL.UNPACK_FLIP_Y_WEBGL, true); GL.texImage2D(GL.TEXTURE_2D, 0, GL.RGB, GL.RGB, GL.UNSIGNED_BYTE, image); In theory, the texture should be square. More precisely, they should even have a size equal to the power of two - 32px, 64px, 128px, etc. But we all understand that no one will process photos and they will each time have different proportions. This will cause errors even if the canvas in size fits the texture perfectly. Therefore, we fill all the space to the edges of the plane with the extreme pixels of the image. This is standard practice, although it seems a bit crutch.
GL.texParameteri(GL.TEXTURE_2D, GL.TEXTURE_WRAP_S, GL.CLAMP_TO_EDGE); GL.texParameteri(GL.TEXTURE_2D, GL.TEXTURE_WRAP_T, GL.CLAMP_TO_EDGE); GL.texParameteri(GL.TEXTURE_2D, GL.TEXTURE_MIN_FILTER, GL.LINEAR); It remains to transfer the texture to the shaders. This is common to all data, so we use the uniform modifier.
GL.uniform1i(GL.getUniformLocation(PROGRAM, 'u_texture'), 0); Now we can use the colors from the texture in the fragment shader. But we also want the image to occupy the entire canvas . If the image and canvas have the same proportions, then this task becomes trivial. To begin with, we pass the size of the canvas to shaders (this should be done every time it is resized):
GL.uniform1f(GL.getUniformLocation(PROGRAM, 'u_canvas_size'), Math.max(CANVAS.height, CANVAS.width)); And divide the coordinates on it:
uniform sampler2D u_texture; uniform float u_canvas_size; void main() { gl_FragColor = texture2D(u_texture, gl_FragCoord.xy / u_canvas_size); } At this point, you can make a short pause and brew tea. We have done all the preparatory work and proceed to the creation of various effects.
Effects
When creating various effects, intuition and experiments play an important role. You can often replace a complex algorithm with something completely simple and giving a similar result. The end user will not notice the difference, and we speed up work and simplify support. WebGL does not provide intelligent tools for debugging shaders, so it is beneficial for us to have small pieces of code that can fit in the whole head.
Less code - less problems. And easier to read. Always check the shaders found on the network for unnecessary actions. It happens that you can delete half of the code and nothing will change.
Let's play a little with the shader. Most of our effects will be based on the fact that we return the color of the wrong pixel on the texture, which should be in this place, and some of the neighboring. It is useful to try to add to the coordinates the result of performing a standard coordinate function. Time will also be useful to use - so the result of execution will be easier to track, and in the end we will still make animated effects. Let's try to use the sine:
gl_FragColor = texture2D(u_texture, gl_FragCoord.xy / u_canvas_size + sin(u_time + gl_FragCoord.y)); The result is strange. Obviously, everything moves with too much amplitude. Let's divide everything into some number:
gl_FragColor = texture2D(u_texture, gl_FragCoord.xy / u_canvas_size + sin(u_time + gl_FragCoord.y) / 250.0); Already better. Now it is clear that there was a slight excitement. The idea is that in order to increase each wave, we need to divide the sine argument - the coordinate. Let's do it:
gl_FragColor = texture2D(u_texture, gl_FragCoord.xy / u_canvas_size + sin(u_time + gl_FragCoord.y / 30.0) / 250.0); Such effects are often accompanied by the selection of coefficients. This is done by eye. As with cooking, at first it will be difficult to guess, but then it will happen by itself. The main thing is to understand at least roughly what a particular coefficient influences in the resulting formula. After the coefficients are selected, it makes sense to put them in macros (as it was in the first example) and give meaningful names.
Curved mirror, bicycles and experiments
Thinking is useful. Yes, there are ready-made algorithms for solving some problems that we can just take and use. But in the process of inventing, we learn ideas that would pass by us.
, " ", . What to do?
, , ? . , rand() - . , , , , . . . , . . . -, . . , , , . , "":
float rand(vec2 seed) { return fract(sin(dot(seed, vec2(12.9898,78.233))) * 43758.5453123); } , , , NVIDIA ATI . , .
, , :
gl_FragColor = texture2D(u_texture, gl_FragCoord.xy / u_canvas_size + rand(gl_FragCoord.xy) / 100.0); :
gl_FragColor = texture2D(u_texture, gl_FragCoord.xy / u_canvas_size + rand(gl_FragCoord.xy + vec2(sin(u_time))) / 250.0); , , :
, . , , . — . How to do it? . .
0 1, - . 5 — . , .
vec2 texture_coord = gl_FragCoord.xy / u_canvas_size; gl_FragColor = texture2D(u_texture, texture_coord + rand(floor(texture_coord * 5.0) + vec2(sin(u_time))) / 100.0); , - . - . , , . ?
, , , - . , . , .. -. , . . , , . .
sin cos , . . .
gl_FragColor = texture2D(u_texture, texture_coord + vec2( noise(texture_coord * 10.0 + sin(u_time + texture_coord.x * 5.0)) / 10.0, noise(texture_coord * 10.0 + cos(u_time + texture_coord.y * 5.0)) / 10.0)); . fract . 1 1 — :
float noise(vec2 position) { vec2 block_position = floor(position); float top_left_value = rand(block_position); float top_right_value = rand(block_position + vec2(1.0, 0.0)); float bottom_left_value = rand(block_position + vec2(0.0, 1.0)); float bottom_right_value = rand(block_position + vec2(1.0, 1.0)); vec2 computed_value = fract(position); // ... } . WebGL smoothstep , :
vec2 computed_value = smoothstep(0.0, 1.0, fract(position)); , . , X :
return computed_value.x; … , , ...
- , , ... .
y — , . ?
return length(computed_value); .
. 0.5 — .
return mix(top_left_value, top_right_value, computed_value.x) + (bottom_left_value - top_left_value) * computed_value.y * (1.0 - computed_value.x) + (bottom_right_value - top_right_value) * computed_value.x * computed_value.y - 0.5; :
, , , .
, , . - .
uniform-, . 0 1, 0 — , 1 — .
uniform float u_intensity; :
gl_FragColor = texture2D(u_texture, texture_coord + vec2(noise(texture_coord * 10.0 + sin(u_time + texture_coord.x * 5.0)) / 10.0, noise(texture_coord * 10.0 + cos(u_time + texture_coord.y * 5.0)) / 10.0) * u_intensity); , .
( 0 1), .
, , , . — requestAnimationFrame. , FPS.
, . uniform-.
document.addEventListener('mousemove', (e) => { let rect = CANVAS.getBoundingClientRect(); MOUSE_POSITION = [ e.clientX - rect.left, rect.height - (e.clientY - rect.top) ]; GL.uniform2fv(GL.getUniformLocation(PROGRAM, 'u_mouse_position'), MOUSE_POSITION); }); , . — , .
void main() { vec2 texture_coord = gl_FragCoord.xy / u_canvas_size; vec2 direction = u_mouse_position / u_canvas_size - texture_coord; float dist = distance(gl_FragCoord.xy, u_mouse_position) / u_canvas_size; if (dist < 0.4) { gl_FragColor = texture2D(u_texture, texture_coord + u_intensity * direction * dist * 1.2 ); } else { gl_FragColor = texture2D(u_texture, texture_coord); } } - . .
. , .
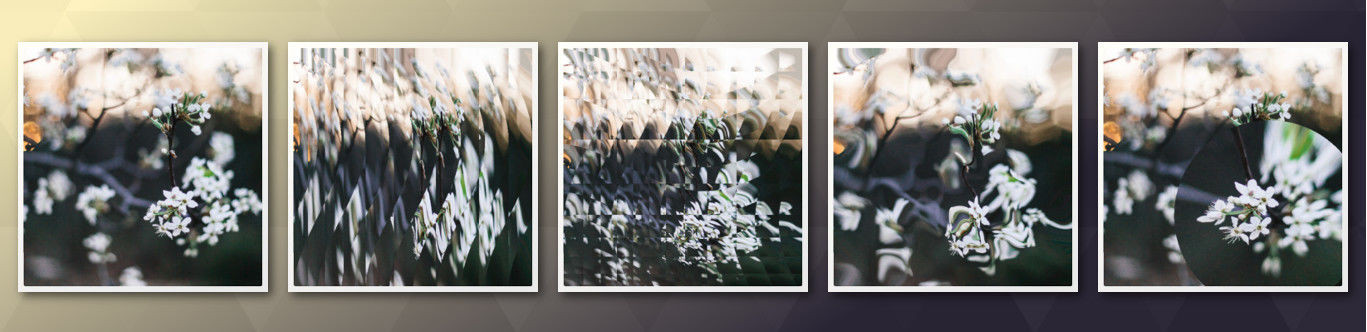
. Glitch- , SVG. . — . ? — , , , .
float random_value = rand(vec2(texture_coord.y, u_time)); if (random_value < 0.05) { gl_FragColor = texture2D(u_texture, vec2(texture_coord.x + random_value / 5.0, texture_coord.y)); } else { gl_FragColor = texture2D(u_texture, texture_coord); } " ?" — , . .
. — , .
float random_value = rand(vec2(floor(texture_coord.y * 20.0), u_time)); . , :
gl_FragColor = texture2D(u_texture, vec2(texture_coord.x + random_value / 4.0, texture_coord.y)) + vec4(vec3(random_value), 1.0); . — . , — .r , .g , .b , .rg , .rb , .rgb , .bgr , ... .
:
float random_value = u_intensity * rand(vec2(floor(texture_coord.y * 20.0), u_time)); What is the result?
, , . , , — .
')
Source: https://habr.com/ru/post/420847/
All Articles