Job System. Review on the other hand
In the new version of unity 2018, finally, they officially added a new system Entity component system or abbreviated ECS, which allows instead of the usual work with object components to work only with their data.
An additional system of tasks suggests that you use parallel computing power to improve the performance of your code.
Together, these two new systems ( ECS and Job Systems ) offer a new level of data processing.
Specifically, in this article I will not disassemble the entire ECS system, which is currently available as a separately downloaded set of tools in the unity , and I will consider only the task system and how it can be used outside the ECS package.
')
Initially, in unity and earlier, it was possible to use multi-threaded calculations, but the developer needed to create all this on his own, solve the problems himself and bypass the pitfalls. And if earlier it was necessary to work directly with such things as creating threads, closing threads, pools, synchronization, now all this work fell on the engine's shoulders, and all that is required of the developer is the creation of tasks and their execution.
To perform any calculations in the new system, it is necessary to use tasks that are objects consisting of methods and data for calculation.
Like any other data in the ECS system, tasks in the Job System are also represented as structures that inherit from one of the three interfaces.
The simplest task interface contains one Execute method that takes nothing in the form of parameters and returns nothing.
The task itself looks like this:
In the Execute method, you can perform the necessary calculations.
Another interface with the same Execute method, which already in turn takes the index numeric parameter.
This IJobParallelFor interface, unlike the IJob interface, offers to perform a task several times and not just to perform, but to break this implementation into blocks that will be distributed between the streams.
Unclear? Do not worry about this, I'll tell you more.
And the last, special interface, which, as the name implies, is designed to work with the object's transform. Also contains the Execute method, with a numeric index parameter and a TransformAccess parameter where the position, size and rotation of the transform are located.
Due to the fact that you cannot work with unity objects directly in the task, this interface can only process the transform data as a separate TransformAccess structure.
Done, now you know how task structures are created, you can proceed to practice.
Let's create a simple task inherited from the IJob interface and execute it. To do this, we need any simple MonoBehaviour script and the task structure itself.
Now cast this script on some object on the scene. In the same script ( TestJob ) below we will write the structure of the task and do not forget to import the necessary libraries.
In the Execute method, for example, we will display a simple line in the console.
Now let's move to the Start method of the TestJob script, where we will create an instance of the task and then execute it.
If you did everything as in the example, then after launching the game you will receive a simple message to the console as in the picture.

What happens here: after calling the Schedule method, the scheduler places the task in the handle and now it can be done by calling the Complete method.
It was an example of a task that simply output text to the console. In order for the task to perform any parallel computing, you need to fill it with data.
As in the ECS system, in tasks there is no access to unity objects, you cannot transfer to the GameObject task and change its name there. All you can do is pass some individual object parameters to the task, change these parameters, and after completing the task, apply these changes back to the object.
There are also several limitations to the data in the task itself: firstly, it must be structures, secondly, it must be non-convertible data types, that is, you cannot transfer the same boolean or string to the task.
And the main condition: the data not enclosed in the container can be available only inside the task!
When working with multi-threaded computing, there is a need to somehow exchange data between threads. In order to transfer data to them and read them back into the task system, containers exist for this purpose. These containers are presented in the form of conventional structures and operate on the principle of a bridge according to which elementary data is synchronized between threads.
There are several types of containers:
NativeArray . The simplest and most frequently used type of container is represented as a simple array with a fixed size.
NativeSlice . Another container - an array, as is clear from the translation, is designed to cut NativeArray into pieces.
These are the two main containers available without connecting an ECS system. In a more advanced version, there are several types of containers.
NativeList . It is a regular list of data.
NativeHashMap . Analog dictionary with key and value.
NativeMultiHashMap . The same NativeHashMap with only a few values under one key.
NativeQueue . List data queue.
Since we work without connecting the ECS system, only NativeArray and NativeSlice are available to us .
Before proceeding to the practical part, it is necessary to analyze the most important point - the creation of copies.
As I said before, these containers are a bridge over which data is synchronized between threads. The task system opens this bridge before starting work and closes it after it is completed. The opening process is called “ allocation ” ( Allocation ) or else “memory allocation” , the closing process is called “ resource release ” ( Dispose ).
It is the allocation that determines how long the task will be able to use the data in the container - in other words, how long the bridge will be open.
In order to better understand these two processes, let's take a look at the picture below.
The lower part shows the life cycle of the main thread ( Main thread ), which is calculated in the number of frames, in the first frame we create another parallel thread ( New thread) that exists a certain number of frames and then closes safely.
In the same New thread and comes the task with the container.
Now take a look at the top of the picture.

The white Allocation bar shows the lifetime of the container. In the first frame there is an allocation of the container - the opening of the bridge, until this point the container did not exist, after all the calculations in the task are completed, the container is released from memory and in the 9th frame the bridge is closed.
Also on this strip ( Allocation ) there are time periods ( Temp , TempJob and Presistent ), each of these segments shows the estimated time of the existence of the container.
What are these segments for !? The fact is that the task may be different in duration, we can perform them directly in the same method where we created it, or we can stretch the time to complete the task if it is rather complicated, and these segments show how urgent and how long the task can use the data in a container.
If it is still not clear, I will analyze each type of allocation using an example.
Now you can go to the practical part of creating containers, to do this, go back to the Start method of the TestJob script and create a new instance of the NativeArray container and do not forget to include the necessary libraries.
To create a new container instance, you need to specify the size and type of allocation in its constructor. In this example, the Temp type is used, since the task will be executed only in the Start method.
Now we initialize the exact same array variable in the SimpleJob task structure itself .
Is done. Now you can create the task itself and pass an array instance to it.
To start the task this time, we will use its JobHandle handle to get it. Call the same Schedule method.
Now you can call the Complete method on its handle and check whether the task is completed to display the text in the console.
If you run the task in this form, then after launching the game you will get a fat red error stating that you did not release the array container from the resources after completing the task.
About this.

To avoid this, call the Dispose method on the container after completing the task.
Then you can safely restart.
But the task does not do anything! - then add a couple of actions to it.
In the Execute method, I multiply the index of each element of the array by itself and write it back to the array to output the result to the console in the Start method.
This is how you can create containers, put them in tasks and perform actions on them.
This was an example using the Temp allocation type, which implies performing the task within one frame. This type is better to use when you need to quickly perform calculations without loading the main thread, but you need to be careful if the task is too complicated or if there are too many of them, then sagging may occur, in this case it is better to use the TempJob type which I will analyze further.
In this example, I will slightly modify the structure of the SimpleJob task and inherit it from another IJobParallelFor interface.
Also, once the task will be performed longer than one frame, we will execute and collect the results of the task in different Awake and Start methods presented in the form of coroutine. To do this, change the appearance of the TestJob class a bit .
In the Awake method, we will create a task and a vector container, and in the Start method, output the data and release the resources.
Here again the container array is created with the type of allocation TempJob , after which we create the task and get its handle by calling the Schedule method with minor changes.
The first parameter in the Schedule method indicates how many times the task is executed, here the same number as the size of the array .
The second parameter indicates the number of blocks to share the task.
What other blocks?
Previously, in order to execute a task, the thread just called the Execute method once, but now it is necessary to call this method 100 times, so the scheduler, so as not to load any particular thread, splits these 100 times the repetitions into blocks that it distributes between the threads. In the example, a hundred repetitions will be divided into 5 blocks of 20 repetitions each, that is, the scheduler will presumably distribute these 5 blocks into 5 threads, where each thread will call the Execute method 20 times. In practice, of course, it’s not a fact that the scheduler will do just that, it all depends on the system load, so maybe all 100 repetitions will occur in one stream.
Now you can call the Complete method on the task handle.
In Corutin Start, we will check the execution of the task and then clean up the container.
We now turn to actions in the task itself.
After completing the task in the Start method, we will display all the elements of the array in the console.
Done, you can run and see the result.
To understand what the difference between IJob and IJobParallelFor is, take a look at the images below.
For example, in IJob , you can use a simple for loop to perform calculations several times, but in any case, the thread can call the Execute method only once for the entire time the task runs - this is how to make one person perform hundreds of the same actions in a row.

IJobParallelFor offers not just to perform the task in one stream several times, but also to distribute these repetitions among other threads.
In general, the TempJob allocation type is great for most tasks that are performed over several frames.
But what if you need to store data even after completing the task, what if after getting the result you don’t need to destroy it immediately. To do this, you need to use the type of allocation Persistent , which implies the release of resources then “ when you need it!” .
Again, go back to the TestJob class and change it. Now we will create tasks in the OnEnable method, check their execution in the Update method and clean up resources in the OnDisable method.
In the example, we will move the object in the Update method, to calculate the trajectory we will use two vector containers - inputArray into which we will place the current position and outputArray from where we will receive the results.
We will also slightly modify the structure of the SimpleJob task by inheriting it from the IJob interface in order to execute it once.
In the task itself, we will also betray two vector containers, one position vector and a numeric delta, which will displace the object to the target.
The ReadOnly and WriteOnly attributes show flow constraints in data-related actions inside containers. ReadOnly offers the stream only to read data from the container, the WriteOnly attribute is the opposite - it allows the stream to only write data to the container. If you need to perform two of these actions at once with one container then you do not need to mark it with an attribute at all.
Let's go to the OnEnable method of the TestJob class where the containers will be initialized.
The sizes of containers will be single since it is necessary to transmit and receive parameters only once. The type of location will be Persistent .
In the OnDisable method, we will free up container resources.
Let's create a separate method CreateJob where we will create a task with its handle and in the same place we will fill it with data.
In fact, inputArray is not really needed here, since you can transfer to the task and just the direction vector, but I think it will be better to understand why these ReadOnly and WriteOnly attributes are needed at all.
In the Update method, we will check whether the task is completed, after which we apply the result obtained to the object's transform and then run it again.
Before starting, we will slightly correct the OnEnable method so that the task is created immediately after the containers are initialized.
Done, now you can go to the task itself and perform the necessary calculations in the Execute method.
To see the result of the work, you can throw the TestJob script on some object and start the game.
For example, my sprite just shifts to the right.
In general, the type of persistent allocation is great for reusable containers, which are not necessary to destroy and re-create each time.
So what type to use !?
The Temp type is better to use for quick calculations, but if the task is too complex and large, there may be a slack.
Type TempJob is great for working with unity objects, so you can change the parameters of objects and apply them, for example, in the next frame.
The Persistent type can be used when speed is not important to you, but you just need to constantly calculate some data on the side, for example, process data over the network, or the work of AI.
Separately, it is still worth analyzing the capabilities of the task handle, because apart from checking the task execution process, this small handle can still create entire networks of tasks through dependencies (although I prefer to call them queues).
For example, if you need to perform two tasks in a certain sequence, then for this you just need to attach the handle of one task to the handle of another.
It looks like this.

Each individual handle initially contains its own task, but when combined we get a new handle with two tasks.
Or so.
The execution sequence is saved and the scheduler will not start to perform the next task until it is satisfied with the previous one, but it is important to remember that the property of the IsCompleted handle will wait for all the tasks in it to be completed.
Static data.
Do not try to use static data in the task ( Random and others), any access to static data will violate the security of the system. In fact, at the moment you can access the static data, but only if you are sure that they do not change during work - that is, they are completely static and read-only.
When to use the task system?
All these examples that are given here in the article are only conditional, and show how to work with this system, and not when to use it. The task system can be used without ECS,you need to understand that the system also consumes resources when working and that for any reason to immediately write tasks, creating heaps of containers is simply meaningless - everything will get worse. For example, recalculating an array of 10 thousand elements will not be correct - you will have more time to work with the scheduler, but recalculate all the polygons of the huge terrain or generate it altogether - the right solution, you can break the terrain into tasks and process each one in a separate stream.
In general, if you are constantly engaged in complex calculations in projects and are constantly looking for new opportunities to make this process less resource-intensive, then Job Systemthis is exactly what you need. If you constantly work with complex calculations inseparable from objects and you want your code to run faster and be supported on most platforms, then ECS will help you with this. If you create projects only for WebGL then this is not for you, at the moment the Job System does not support work in browsers, although this is already a problem not for the developers, but for the browser developers themselves.
Source code with all the examples
An additional system of tasks suggests that you use parallel computing power to improve the performance of your code.
Together, these two new systems ( ECS and Job Systems ) offer a new level of data processing.
Specifically, in this article I will not disassemble the entire ECS system, which is currently available as a separately downloaded set of tools in the unity , and I will consider only the task system and how it can be used outside the ECS package.
')
New system
Initially, in unity and earlier, it was possible to use multi-threaded calculations, but the developer needed to create all this on his own, solve the problems himself and bypass the pitfalls. And if earlier it was necessary to work directly with such things as creating threads, closing threads, pools, synchronization, now all this work fell on the engine's shoulders, and all that is required of the developer is the creation of tasks and their execution.
Tasks
To perform any calculations in the new system, it is necessary to use tasks that are objects consisting of methods and data for calculation.
Like any other data in the ECS system, tasks in the Job System are also represented as structures that inherit from one of the three interfaces.
Ijob
The simplest task interface contains one Execute method that takes nothing in the form of parameters and returns nothing.
The task itself looks like this:
Ijob
public struct JobStruct : IJob { public void Execute() {} } In the Execute method, you can perform the necessary calculations.
IJobParallelFor
Another interface with the same Execute method, which already in turn takes the index numeric parameter.
IJobParallelFor
public struct JobStruct : IJobParallelFor { public void Execute(int index) {} } This IJobParallelFor interface, unlike the IJob interface, offers to perform a task several times and not just to perform, but to break this implementation into blocks that will be distributed between the streams.
Unclear? Do not worry about this, I'll tell you more.
IJobParallelForTransform
And the last, special interface, which, as the name implies, is designed to work with the object's transform. Also contains the Execute method, with a numeric index parameter and a TransformAccess parameter where the position, size and rotation of the transform are located.
IJobParallelForTransform
public struct JobStruct : IJobParallelForTransform { public void Execute(int index, TransformAccess transform) {} } Due to the fact that you cannot work with unity objects directly in the task, this interface can only process the transform data as a separate TransformAccess structure.
Done, now you know how task structures are created, you can proceed to practice.
Task performance
Let's create a simple task inherited from the IJob interface and execute it. To do this, we need any simple MonoBehaviour script and the task structure itself.
Testjob
public class TestJob : MonoBehaviour { void Start() {} } Now cast this script on some object on the scene. In the same script ( TestJob ) below we will write the structure of the task and do not forget to import the necessary libraries.
SimpleJob
using Unity.Jobs; public struct SimpleJob : IJob { public void Execute() { Debug.Log("Hello parallel world!"); } } In the Execute method, for example, we will display a simple line in the console.
Now let's move to the Start method of the TestJob script, where we will create an instance of the task and then execute it.
Testjob
public class TestJob : MonoBehaviour { void Start() { SimpleJob job = new SimpleJob(); job.Schedule().Complete(); } } If you did everything as in the example, then after launching the game you will receive a simple message to the console as in the picture.
What happens here: after calling the Schedule method, the scheduler places the task in the handle and now it can be done by calling the Complete method.
It was an example of a task that simply output text to the console. In order for the task to perform any parallel computing, you need to fill it with data.
Data in the task
As in the ECS system, in tasks there is no access to unity objects, you cannot transfer to the GameObject task and change its name there. All you can do is pass some individual object parameters to the task, change these parameters, and after completing the task, apply these changes back to the object.
There are also several limitations to the data in the task itself: firstly, it must be structures, secondly, it must be non-convertible data types, that is, you cannot transfer the same boolean or string to the task.
SimpleJob
public struct SimpleJob : IJob { public float a, b; public void Execute() { float result = a + b; Debug.Log(result); } } And the main condition: the data not enclosed in the container can be available only inside the task!
Containers
When working with multi-threaded computing, there is a need to somehow exchange data between threads. In order to transfer data to them and read them back into the task system, containers exist for this purpose. These containers are presented in the form of conventional structures and operate on the principle of a bridge according to which elementary data is synchronized between threads.
There are several types of containers:
NativeArray . The simplest and most frequently used type of container is represented as a simple array with a fixed size.
NativeSlice . Another container - an array, as is clear from the translation, is designed to cut NativeArray into pieces.
These are the two main containers available without connecting an ECS system. In a more advanced version, there are several types of containers.
NativeList . It is a regular list of data.
NativeHashMap . Analog dictionary with key and value.
NativeMultiHashMap . The same NativeHashMap with only a few values under one key.
NativeQueue . List data queue.
Since we work without connecting the ECS system, only NativeArray and NativeSlice are available to us .
Before proceeding to the practical part, it is necessary to analyze the most important point - the creation of copies.
Creating containers
As I said before, these containers are a bridge over which data is synchronized between threads. The task system opens this bridge before starting work and closes it after it is completed. The opening process is called “ allocation ” ( Allocation ) or else “memory allocation” , the closing process is called “ resource release ” ( Dispose ).
It is the allocation that determines how long the task will be able to use the data in the container - in other words, how long the bridge will be open.
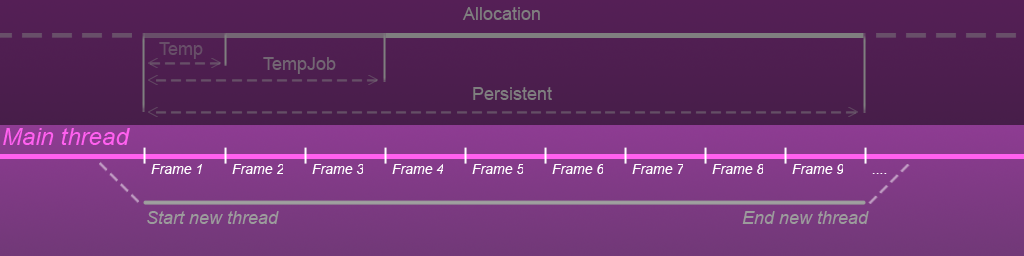
In order to better understand these two processes, let's take a look at the picture below.
The lower part shows the life cycle of the main thread ( Main thread ), which is calculated in the number of frames, in the first frame we create another parallel thread ( New thread) that exists a certain number of frames and then closes safely.
In the same New thread and comes the task with the container.
Now take a look at the top of the picture.
The white Allocation bar shows the lifetime of the container. In the first frame there is an allocation of the container - the opening of the bridge, until this point the container did not exist, after all the calculations in the task are completed, the container is released from memory and in the 9th frame the bridge is closed.
Also on this strip ( Allocation ) there are time periods ( Temp , TempJob and Presistent ), each of these segments shows the estimated time of the existence of the container.
What are these segments for !? The fact is that the task may be different in duration, we can perform them directly in the same method where we created it, or we can stretch the time to complete the task if it is rather complicated, and these segments show how urgent and how long the task can use the data in a container.
If it is still not clear, I will analyze each type of allocation using an example.
Now you can go to the practical part of creating containers, to do this, go back to the Start method of the TestJob script and create a new instance of the NativeArray container and do not forget to include the necessary libraries.
Temp
Testjob
using Unity.Jobs; using Unity.Collections; public class TestJob : MonoBehaviour { void Start() { NativeArray<int> array = new NativeArray<int>(10, Allocator.Temp); } } To create a new container instance, you need to specify the size and type of allocation in its constructor. In this example, the Temp type is used, since the task will be executed only in the Start method.
Now we initialize the exact same array variable in the SimpleJob task structure itself .
SimpleJob
public struct SimpleJob : IJob { public NativeArray<int> array; public void Execute() {} } Is done. Now you can create the task itself and pass an array instance to it.
Start
void Start() { NativeArray<int> array = new NativeArray<int>(10, Allocator.Temp); SimpleJob job = new SimpleJob(); job.array = array; } To start the task this time, we will use its JobHandle handle to get it. Call the same Schedule method.
Start
void Start() { NativeArray<int> array = new NativeArray<int>(10, Allocator.Temp); SimpleJob job = new SimpleJob(); job.array = array; JobHandle handle = job.Schedule(); } Now you can call the Complete method on its handle and check whether the task is completed to display the text in the console.
Start
void Start() { NativeArray<int> array = new NativeArray<int>(10, Allocator.Temp); SimpleJob job = new SimpleJob(); job.array = array; JobHandle handle = job.Schedule(); handle.Complete(); if (handle.IsCompleted) print(" "); } If you run the task in this form, then after launching the game you will get a fat red error stating that you did not release the array container from the resources after completing the task.
About this.
To avoid this, call the Dispose method on the container after completing the task.
Start
void Start() { NativeArray<int> array = new NativeArray<int>(10, Allocator.Temp); SimpleJob job = new SimpleJob(); job.array = array; JobHandle handle = job.Schedule(); handle.Complete(); if (handle.IsCompleted) print("Complete"); array.Dispose(); } Then you can safely restart.
But the task does not do anything! - then add a couple of actions to it.
SimpleJob
public struct SimpleJob : IJob { public NativeArray<int> array; public void Execute() { for(int i = 0; i < array.Length; i++) { array[i] = i * i; } } } In the Execute method, I multiply the index of each element of the array by itself and write it back to the array to output the result to the console in the Start method.
Start
void Start() { NativeArray<int> array = new NativeArray<int>(10, Allocator.Temp); SimpleJob job = new SimpleJob(); job.array = array; JobHandle handle = job.Schedule(); handle.Complete(); if (handle.IsCompleted) print(job.array[job.array.Length - 1]); array.Dispose(); } What will be the result in the console if we display the last element of the array squared?
This is how you can create containers, put them in tasks and perform actions on them.
This was an example using the Temp allocation type, which implies performing the task within one frame. This type is better to use when you need to quickly perform calculations without loading the main thread, but you need to be careful if the task is too complicated or if there are too many of them, then sagging may occur, in this case it is better to use the TempJob type which I will analyze further.
TempJob
In this example, I will slightly modify the structure of the SimpleJob task and inherit it from another IJobParallelFor interface.
SimpleJob
public struct SimpleJob : IJobParallelFor { public NativeArray<Vector2> array; public void Execute(int index) {} } Also, once the task will be performed longer than one frame, we will execute and collect the results of the task in different Awake and Start methods presented in the form of coroutine. To do this, change the appearance of the TestJob class a bit .
Testjob
public class TestJob : MonoBehaviour { private NativeArray<Vector2> array; private JobHandle handle; void Awake() {} IEnumerator Start() {} } In the Awake method, we will create a task and a vector container, and in the Start method, output the data and release the resources.
Awake
void Awake() { this.array = new NativeArray<Vector2>(100, Allocator.TempJob); SimpleJob job = new SimpleJob(); job.array = this.array; } Here again the container array is created with the type of allocation TempJob , after which we create the task and get its handle by calling the Schedule method with minor changes.
Awake
void Awake() { this.array = new NativeArray<Vector2>(100, Allocator.TempJob); SimpleJob job = new SimpleJob(); job.array = this.array; this.handle = job.Schedule(100, 5) } The first parameter in the Schedule method indicates how many times the task is executed, here the same number as the size of the array .
The second parameter indicates the number of blocks to share the task.
What other blocks?
Previously, in order to execute a task, the thread just called the Execute method once, but now it is necessary to call this method 100 times, so the scheduler, so as not to load any particular thread, splits these 100 times the repetitions into blocks that it distributes between the threads. In the example, a hundred repetitions will be divided into 5 blocks of 20 repetitions each, that is, the scheduler will presumably distribute these 5 blocks into 5 threads, where each thread will call the Execute method 20 times. In practice, of course, it’s not a fact that the scheduler will do just that, it all depends on the system load, so maybe all 100 repetitions will occur in one stream.
Now you can call the Complete method on the task handle.
Awake
void Awake() { this.array = new NativeArray<Vector2>(100, Allocator.TempJob); SimpleJob job = new SimpleJob(); job.array = this.array; this.handle = job.Schedule(100, 5); this.handle.Complete(); } In Corutin Start, we will check the execution of the task and then clean up the container.
Start
IEnumerator Start() { while(this.handle.isCompleted == false){ yield return new WaitForEndOfFrame(); } this.array.Dispose(); } We now turn to actions in the task itself.
SimpleJob
public struct SimpleJob : IJobParallelFor { public NativeArray<Vector2> array; public void Execute(int index) { float x = index; float y = index; Vector2 vector = new Vector2(x * x, y * y / (y * 2)); this.array[index] = vector; } } After completing the task in the Start method, we will display all the elements of the array in the console.
Start
IEnumerator Start() { while(this.handle.IsCompleted == false){ yield return new WaitForEndOfFrame(); } foreach(Vector2 vector in this.array) { print(vector); } this.array.Dispose(); } Done, you can run and see the result.
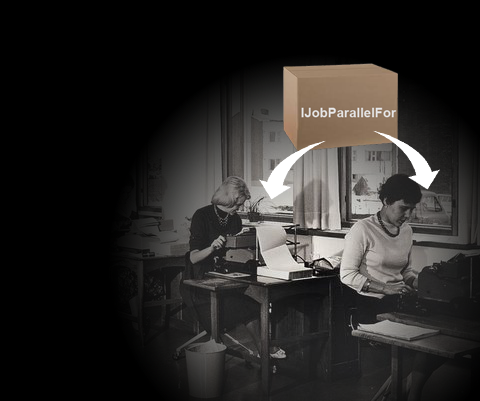
To understand what the difference between IJob and IJobParallelFor is, take a look at the images below.
For example, in IJob , you can use a simple for loop to perform calculations several times, but in any case, the thread can call the Execute method only once for the entire time the task runs - this is how to make one person perform hundreds of the same actions in a row.
IJobParallelFor offers not just to perform the task in one stream several times, but also to distribute these repetitions among other threads.
In general, the TempJob allocation type is great for most tasks that are performed over several frames.
But what if you need to store data even after completing the task, what if after getting the result you don’t need to destroy it immediately. To do this, you need to use the type of allocation Persistent , which implies the release of resources then “ when you need it!” .
Persistent
Again, go back to the TestJob class and change it. Now we will create tasks in the OnEnable method, check their execution in the Update method and clean up resources in the OnDisable method.
In the example, we will move the object in the Update method, to calculate the trajectory we will use two vector containers - inputArray into which we will place the current position and outputArray from where we will receive the results.
Testjob
public class TestJob : MonoBehaviour { private NativeArray<Vector2> inputArray; private NativeArray<Vector2> outputArray; private JobHandle handle; void OnEnable() {} void Update() {} void OnDisable() {} } We will also slightly modify the structure of the SimpleJob task by inheriting it from the IJob interface in order to execute it once.
SimpleJob
public struct SimpleJob : IJob { public void Execute() {} } In the task itself, we will also betray two vector containers, one position vector and a numeric delta, which will displace the object to the target.
SimpleJob
public struct SimpleJob : IJob { [ReadOnly] public NativeArray<Vector2> inputArray; [WriteOnly] public NativeArray<Vector2> outputArray; public Vector2 position; public float delta; public void Execute() {} } The ReadOnly and WriteOnly attributes show flow constraints in data-related actions inside containers. ReadOnly offers the stream only to read data from the container, the WriteOnly attribute is the opposite - it allows the stream to only write data to the container. If you need to perform two of these actions at once with one container then you do not need to mark it with an attribute at all.
Let's go to the OnEnable method of the TestJob class where the containers will be initialized.
OnEnable
void OnEnable() { this.inputArray = new NativeArray<Vector2>(1, Allocator.Persistent); this.outputArray = new NativeArray<Vector2>(1, Allocator.Persistent); } The sizes of containers will be single since it is necessary to transmit and receive parameters only once. The type of location will be Persistent .
In the OnDisable method, we will free up container resources.
Ondisable
void OnDisable() { this.inputArray.Dispose(); this.outputArray.Dispose(); } Let's create a separate method CreateJob where we will create a task with its handle and in the same place we will fill it with data.
CreateJob
void CreateJob() { SimpleJob job = new SimpleJob(); job.delta = Time.deltaTime; Vector2 position = this.transform.position; job.position = position; Vector2 newPosition = position + Vector2.right; this.inputArray[0] = newPosition; job.inputArray = this.inputArray; job.outputArray = this.outputArray; this.handle = job.Schedule(); this.handle.Complete(); } In fact, inputArray is not really needed here, since you can transfer to the task and just the direction vector, but I think it will be better to understand why these ReadOnly and WriteOnly attributes are needed at all.
In the Update method, we will check whether the task is completed, after which we apply the result obtained to the object's transform and then run it again.
Update
void Update() { if (this.handle.IsCompleted) { Vector2 newPosition = this.outputArray[0]; this.transform.position = newPosition; CreateJob(); } } Before starting, we will slightly correct the OnEnable method so that the task is created immediately after the containers are initialized.
OnEnable
void OnEnable() { this.inputArray = new NativeArray<Vector2>(1, Allocator.Persistent); this.outputArray = new NativeArray<Vector2>(1, Allocator.Persistent); CreateJob(); } Done, now you can go to the task itself and perform the necessary calculations in the Execute method.
Execute
public void Execute() { Vector2 newPosition = this.inputArray[0]; newPosition = Vector2.Lerp(this.position, newPosition, this.delta); this.outputArray[0] = newPosition; } To see the result of the work, you can throw the TestJob script on some object and start the game.
For example, my sprite just shifts to the right.
Animation
In general, the type of persistent allocation is great for reusable containers, which are not necessary to destroy and re-create each time.
So what type to use !?
The Temp type is better to use for quick calculations, but if the task is too complex and large, there may be a slack.
Type TempJob is great for working with unity objects, so you can change the parameters of objects and apply them, for example, in the next frame.
The Persistent type can be used when speed is not important to you, but you just need to constantly calculate some data on the side, for example, process data over the network, or the work of AI.
Invalid and None
There are two more types of allocations Invalid and None , but they are needed more for debugging, and do not participate in the work.
Jobhandle
Separately, it is still worth analyzing the capabilities of the task handle, because apart from checking the task execution process, this small handle can still create entire networks of tasks through dependencies (although I prefer to call them queues).
For example, if you need to perform two tasks in a certain sequence, then for this you just need to attach the handle of one task to the handle of another.
It looks like this.
Each individual handle initially contains its own task, but when combined we get a new handle with two tasks.
Start
void Start() { Job jobA = new Job(); JobHandle handleA = jobA.Schedule(); Job jobB = new Job(); JobHandle handleB = jobB.Schedule(); JobHandle result = JobHandle.CombineDependecies(handleA, handleB); result.Complete(); } Or so.
Start
void Start() { JobHandle handle; for(int i = 0; i < 10; i++) { Job job = new Job(); handle = job.Schedule(handle); } handle.Complete(); } The execution sequence is saved and the scheduler will not start to perform the next task until it is satisfied with the previous one, but it is important to remember that the property of the IsCompleted handle will wait for all the tasks in it to be completed.
Conclusion
Containers
- When working with data in containers, do not forget that these are structures, so any rewriting of data in a container does not change them, but creates them again.
- What will happen if I set the type of location Temp and do not clear the resources after the task is completed? Mistake.
- Can I create my own containers? It is possible, the units described in detail the process of creating custom containers here, but it’s better to think a few times: is it worth it, maybe there are enough ordinary containers !?
Security!
Static data.
Do not try to use static data in the task ( Random and others), any access to static data will violate the security of the system. In fact, at the moment you can access the static data, but only if you are sure that they do not change during work - that is, they are completely static and read-only.
When to use the task system?
All these examples that are given here in the article are only conditional, and show how to work with this system, and not when to use it. The task system can be used without ECS,you need to understand that the system also consumes resources when working and that for any reason to immediately write tasks, creating heaps of containers is simply meaningless - everything will get worse. For example, recalculating an array of 10 thousand elements will not be correct - you will have more time to work with the scheduler, but recalculate all the polygons of the huge terrain or generate it altogether - the right solution, you can break the terrain into tasks and process each one in a separate stream.
In general, if you are constantly engaged in complex calculations in projects and are constantly looking for new opportunities to make this process less resource-intensive, then Job Systemthis is exactly what you need. If you constantly work with complex calculations inseparable from objects and you want your code to run faster and be supported on most platforms, then ECS will help you with this. If you create projects only for WebGL then this is not for you, at the moment the Job System does not support work in browsers, although this is already a problem not for the developers, but for the browser developers themselves.
Source code with all the examples
Source: https://habr.com/ru/post/420829/
All Articles