3D printing lessons. Plastic savings when printing non-functional models from 3Dtool
Good day to you company 3Dtool ! This time we decided to figure out how to save plastic when printing non-functional models, that is, those models whose strength characteristics do not matter.
Printing, for example, souvenirs, layouts or interior items, we can save time and plastic, reducing the percentage of internal filling or wall thickness. But there are cases when there is a specific task - to print a part with the minimum possible amount of plastic. For example - printing master models for casting. These are the parts for which only the outer shell is needed, and the less plastic there is inside, the easier it will be to burn it out of the flask. Who is in the subject, he will understand, and who is not - soon we will publish an article about the process of casting on master models from the PLA.
For example, we took the model from here .
')
And we need to print it with a minimum wall thickness and minimum filling.
3D printer for experiments - Hercules Strong .
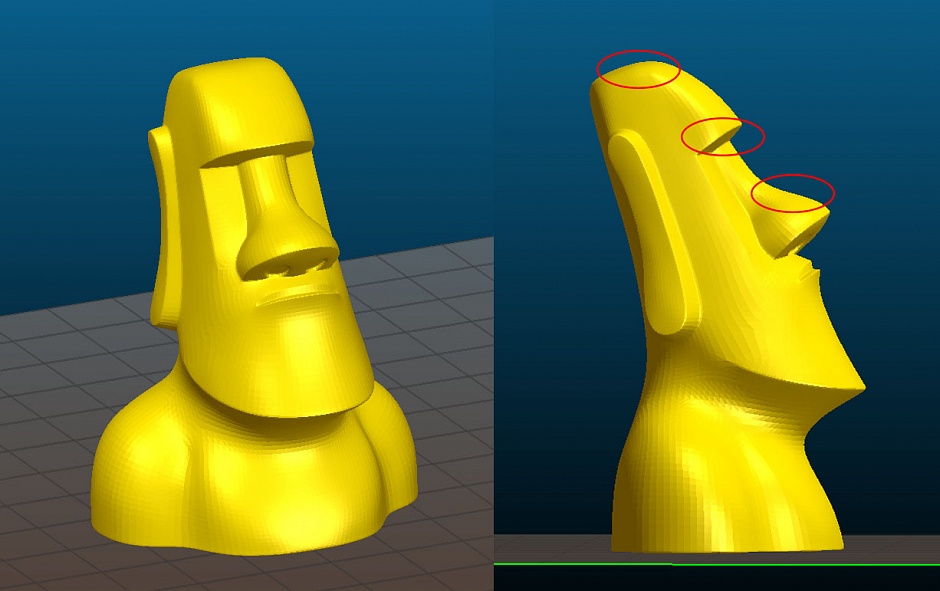
The first thing that comes to mind is to put 1 perimeter and 0% fill. And there are rare cases when it works. We, as always, are more complicated. There are places in the model (indicated in red in the figure), where the angle of inclination of the wall does not allow printing it into one perimeter - the thread simply falls down.
Therefore, we go from simple to complex. To begin with, we will make 3 perimeters and try to print only the “shell” of the model, but what happens.
Nozzle 0.5 mm, layer height 0.2 mm.

40 minutes and 6.9 cu. cm.
Sent to print.

As expected, the threads in difficult places sagged and holes appeared in the model walls.
It would seem that the internal filling that will support the perimeter threads from sagging is not enough. But we need, as we remember, to minimize the amount of plastic. Therefore, we use the option Only infill where needed. This option allows you to build a filling only where it is needed to support the walls hanging at a certain angle. Slic3r itself analyzes the geometry and determines where it needs to build the fill, so this option does not always solve the problem.
But we still try. We configure Slic3r and we consider.


44 minutes and 7.4 cubic centimeters of plastic. We try to print.

Defects this time less, but they are there again. Therefore, in this case, this method did not work.
We invent further.
There is only one option - to use the fill. In this case, setting the extrusion width will help us to save money. Since we only need filling, so that the sheer walls have something to hold on and not fall down, the quality and strength of the filling does not matter. Therefore, we take and unscrew it to a reasonable minimum. For example, 0.15 mm
As we remember from previous publications, when changing the extrusion width, Slic3r changes the density of the fill grid, so do not forget to check this parameter!
These are the settings we have:
The nozzle is 0.5 mm, the layer height is 0.2 mm, the filling is 5%, the extrusion width at the filling is 0.15 mm. Since the filling grid is quite dense, the number of perimeters will be reduced to 2. This will save both printing time and plastic.


Printing time is just over an hour, plastic volume is 6.3 cm cubic! We are printing.

The model was put on the stamp at the end of the working day, so for the sake of curiosity we broke it down to see what it was all about.

The photo shows that the filling is printed with a thin web, extrusion in some places is terminated. Nevertheless, this thin mesh is enough to hold the overhanging walls.
The model was printed without defects in 2 perimeters. We did not save time, but the main task - to print the master model for casting with a minimum of plastic - was successfully completed.
Results for comparison:

If the geometry of the part allows to use the first method, then it is also possible to reduce the width of the extrusion in the filling. This saves time and plastic even more.
Using these methods, it is necessary to take into account the specific features of the geometry of your part and the properties of the plastic with which you print. When reducing the extrusion width, it is important not to forget that during the filling printing a thin thread can break, therefore the speed and filling pattern will have to be selected every time. Therefore, the savings in each case will be different.
→ Reliable 3D Hercules Strong Printer
→ General catalog of 3D printers
Do not forget to subscribe to our YouTube channel (new videos come out every week).

Printing, for example, souvenirs, layouts or interior items, we can save time and plastic, reducing the percentage of internal filling or wall thickness. But there are cases when there is a specific task - to print a part with the minimum possible amount of plastic. For example - printing master models for casting. These are the parts for which only the outer shell is needed, and the less plastic there is inside, the easier it will be to burn it out of the flask. Who is in the subject, he will understand, and who is not - soon we will publish an article about the process of casting on master models from the PLA.
For example, we took the model from here .
')
And we need to print it with a minimum wall thickness and minimum filling.
3D printer for experiments - Hercules Strong .
The first thing that comes to mind is to put 1 perimeter and 0% fill. And there are rare cases when it works. We, as always, are more complicated. There are places in the model (indicated in red in the figure), where the angle of inclination of the wall does not allow printing it into one perimeter - the thread simply falls down.
Therefore, we go from simple to complex. To begin with, we will make 3 perimeters and try to print only the “shell” of the model, but what happens.
Nozzle 0.5 mm, layer height 0.2 mm.
40 minutes and 6.9 cu. cm.
Sent to print.
As expected, the threads in difficult places sagged and holes appeared in the model walls.
It would seem that the internal filling that will support the perimeter threads from sagging is not enough. But we need, as we remember, to minimize the amount of plastic. Therefore, we use the option Only infill where needed. This option allows you to build a filling only where it is needed to support the walls hanging at a certain angle. Slic3r itself analyzes the geometry and determines where it needs to build the fill, so this option does not always solve the problem.
But we still try. We configure Slic3r and we consider.
44 minutes and 7.4 cubic centimeters of plastic. We try to print.
Defects this time less, but they are there again. Therefore, in this case, this method did not work.
We invent further.
There is only one option - to use the fill. In this case, setting the extrusion width will help us to save money. Since we only need filling, so that the sheer walls have something to hold on and not fall down, the quality and strength of the filling does not matter. Therefore, we take and unscrew it to a reasonable minimum. For example, 0.15 mm
As we remember from previous publications, when changing the extrusion width, Slic3r changes the density of the fill grid, so do not forget to check this parameter!
These are the settings we have:
The nozzle is 0.5 mm, the layer height is 0.2 mm, the filling is 5%, the extrusion width at the filling is 0.15 mm. Since the filling grid is quite dense, the number of perimeters will be reduced to 2. This will save both printing time and plastic.
Printing time is just over an hour, plastic volume is 6.3 cm cubic! We are printing.
The model was put on the stamp at the end of the working day, so for the sake of curiosity we broke it down to see what it was all about.
The photo shows that the filling is printed with a thin web, extrusion in some places is terminated. Nevertheless, this thin mesh is enough to hold the overhanging walls.
The model was printed without defects in 2 perimeters. We did not save time, but the main task - to print the master model for casting with a minimum of plastic - was successfully completed.
Results for comparison:
If the geometry of the part allows to use the first method, then it is also possible to reduce the width of the extrusion in the filling. This saves time and plastic even more.
Using these methods, it is necessary to take into account the specific features of the geometry of your part and the properties of the plastic with which you print. When reducing the extrusion width, it is important not to forget that during the filling printing a thin thread can break, therefore the speed and filling pattern will have to be selected every time. Therefore, the savings in each case will be different.
→ Reliable 3D Hercules Strong Printer
→ General catalog of 3D printers
Do not forget to subscribe to our YouTube channel (new videos come out every week).
Source: https://habr.com/ru/post/420803/
All Articles