GitLab for Continuous Delivery project on InterSystems technologies: Containers
This article is a continuation of an article about the organization of Continuous Integration / Continuous Delivery processes that automate the assembly, testing and delivery of applications applicable to solutions on the InterSystems platform.
Consider topics such as:
- Containers 101
- Containers at different stages of the software development cycle
- Continuous Delivery with Containers
Containers 101
A lot of articles and books have been written about containers and containerization, so here I will make a small introduction, which, however, does not pretend to any finality. So, let's begin.
Containers, technically, is a virtualization method in which the operating system kernel supports several isolated instances of user space (containers), instead of one. It clearly looks like this:
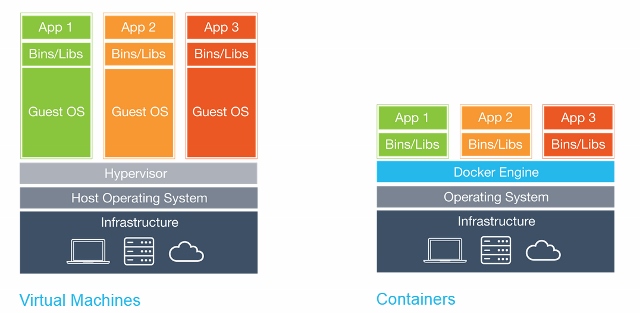
It is important to note that containers are not virtual machines, here’s a good article about their differences.
Container Benefits
There are several advantages to using containers:
- Portability
- Efficiency
- Insulation
- Ease
- Immutability
Portability
The container contains the application along with all the dependencies. This makes it easy to run applications in various environments, such as physical servers, virtual machines, testing environments and product environments, clouds.
Also portability is that after the Docker image is assembled and it works correctly, it will work anywhere if the Docker works there. on Windows, Linux and MacOS servers.
Efficiency
When working with virtual machine applications, are OS processes, system programs, etc. really necessary? As a rule, no, only the process of your application is interesting. Containers provide just that: only those processes that are obviously needed, and nothing more, are started in the container. Because containers do not require a separate operating system, they use fewer resources. A virtual machine often takes several gigabytes, but a container can be just a few megabytes in size, which allows you to run many more containers than virtual machines on a single server.
Because containers have a higher level of server utilization, less hardware is required, which leads to cost savings.
Insulation
Containers isolate the application from all other processes, and although several containers can run on the same server, they can be completely independent of each other. Any interaction between containers must be explicitly declared. If one container fails, it does not affect other containers and can be quickly restarted. Security is also enhanced by this isolation. For example, exploiting a web server's vulnerability on a host could give an attacker access to the entire server, but in the case of a container, an attacker would gain access to the web server container only.
Ease
Since containers do not require a separate OS, they can be started, stopped or reloaded in a matter of seconds, which will speed up all related processes, including Continuous Integration processes. You can start developing faster and not waste time on setting up the environment.
Immutability
The immutable infrastructure consists of immutable components that are replaced for each deployment and not updated. Constancy reduces inconsistency and allows you to easily and quickly replicate and move between different states of your application. More on immutability .
New opportunities
All these advantages allow you to manage your infrastructure and applications in new ways.
Orchestration
Over the course of time, virtual machines and servers often acquire "individuality", which leads to many usually unpleasant surprises in the future. One of the solutions to this problem is Infrastructure as a code (IoC) - infrastructure management using a descriptive model using a version control system.
When using IoC, the environment deployment command always brings the target environment into the same configuration, regardless of the initial state of the environment. This is achieved by automatically setting up the existing environment or by re-creating the environment from scratch.
Using IoC, developers make changes to the description of the environment. Subsequently, the target environment is modified to the new state. If it is necessary to make changes on Wednesday, its description is edited.
All this is much easier to do with containers. Turning off the container and launching a new one takes a few seconds, and allocating a new virtual machine takes several minutes.
Scaling
Orchestration tools can also scale out based on the current load. It is possible to run as many containers as currently required, and scale the application accordingly. All this also reduces the cost of the application.
Containers at different stages of the software life cycle
Consider the advantages of containers at different stages of the software life cycle.
Development
The most important advantage is the ease of starting development. After installing Docker , just run two commands: docker pull to load the image and docker run to launch it. All dependencies are already resolved at the application build stage.
Debugging
All environments are consistent and their definitions exist, and it’s easy to deploy the necessary environment. It is enough to make a docker pull the container of interest and launch it.
Testing / QA
In case of an error, the problematic environment and the conditions for the reproduction of the error can be transferred with the container. All infrastructure changes are “documented”. The number of variables decreases - versions of libraries, frameworks, OS ... It is possible to launch several containers to parallelize tests.
Delivery
The use of containers allows you to build once, in addition to the use of containers requires a high level of automation of the processes of assembly and deployment of the application. Shipping an application using containers can be safer with additional isolation.
Continuous delivery
Let's move from theory to practice. Here is a general view of our solution for automating assembly and delivery:
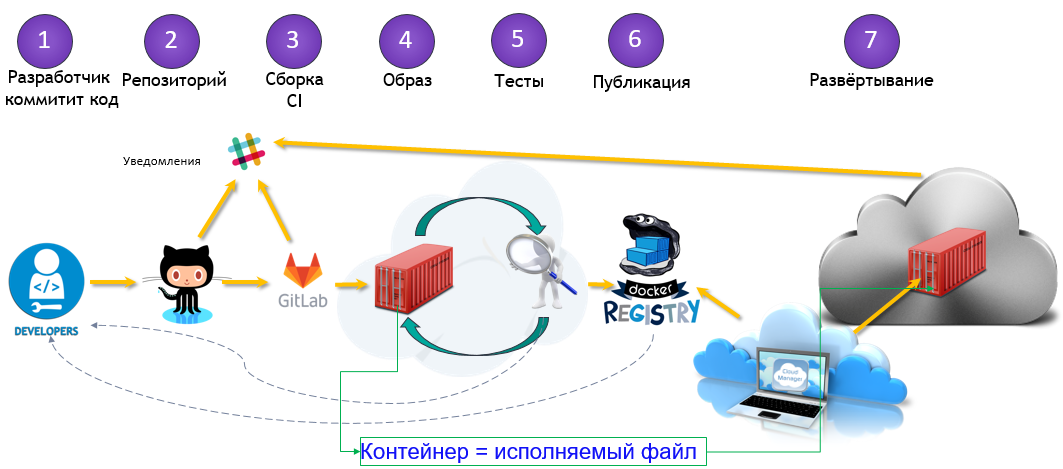
There are three main stages:
- Assembly
- Delivery
- Launch
Assembly
In the previous article, the build was incremental — we considered the difference between the current environment and the new code base and modified our environment to match the new code base. With containers each assembly is complete. The result of the assembly is a Docker Image image that can be run anywhere.
Delivery
After our image is compiled and tested, it is downloaded to the Docker Registry - a specialized application for hosting Docker Image. There he can replace the previous image with the same name (tag). For example, because of a new commit to the master branch, we have compiled a new image ( MyProject/MyApp:master ), and if the tests are passed, we can update the image in the Docker Registry and everyone who downloads MyProject/MyApp:master will receive a new version.
Launch
Finally, the image needs to be run. A CD system, such as GitLab, can manage it both directly and with the help of a specialized orchestrator, but the process is generally the same - some images are run, periodically checked for performance and updated if a new version becomes available.
Watch the webinar explaining these steps.
Alternatively, in terms of commit:

In our continuous delivery configuration, we:
- Commit the code to the GitLab repository.
- We collect image
- We test it
- We publish a new image in our Docker Registry
- Let's update the old container to the new version from Docker Registry
For this we need:
- Docker
- Docker registry
- Registered Domain (optional, but desirable)
- GUI tools (optional)
Docker
First of all, we need to run Docker. I would advise starting with a single server with a common version of Linux, such as Ubuntu, RHEL or Suse. I do not recommend starting with distributions such as CoreOS, RancherOS, etc. - they are not aimed at beginners. Remember to switch the storage driver to devicemapper .
If we talk about large-scale deployment, then using the tools of orchestration, such as Kubernetes, Rancher or Swarm, you can automate most of the tasks, but we will not discuss them (at least in the framework of this article).
Docker registry
This is the first container that we need to run, a standalone application that allows you to store and distribute Docker images. You need to use the Docker Registry if you want:
- Control where your images are stored
- Own an image distribution server
- Integrate the storage and distribution of images in the development process
Here is the documentation for launching and configuring Docker Registry.
Connecting Docker Registry and GitLab
To connect the Docker Registry to GitLab, you need to run Docker Registry with HTTPS support . I use Let's Encrypt to get certificates, and I followed this instruction to get a certificate. After making sure that the Docker Registry is available over HTTPS (you can check it in the browser), follow these instructions for connecting the Docker Registry to GitLab. These instructions vary depending on your GitLab installation and the required configuration. In my case, the configuration was to add the Docker Registry certificate and key in /etc/gitlab/ssl , and these lines in /etc/gitlab/gitlab.rb :
registry_external_url 'https://docker.domain.com' gitlab_rails ['registry_api_url'] = "https://docker.domain.com" After reconfiguring GitLab , a new Registry tab has appeared, which provides information on how to properly name the created images so that they appear here.
Domain
In our configuration of continuous delivery, we will automatically create an image for each branch, and if the image passes tests, it will be published in the Docker Registry and launched automatically, so our application will be automatically deployed from all branches, for example:
- Several
<featureName>.docker.domain.combranches at<featureName>.docker.domain.com - Test version on
master.docker.domain.com - Experienced version on
preprod.docker.domain.com - Product version on
prod.docker.domain.com
To do this, we need a domain name and a wildcard DNS record that redirects requests to * .docker.domain.com to the * .docker.domain.com IP address. Alternatively, you can use different ports.
Nginx
Since we have several environments, we need to automatically redirect requests to subdomains to the correct container. For this we can use Nginx as a reverse proxy. Here is a guide .
GUI Tools
To get started with containers, you can use either the command line or one of the graphical interfaces. There are many available, for example:
- Rancher
- Microbadger
- Portainer
- Simple docker ui
- ...
They allow you to create containers and manage them from the GUI instead of the CLI. This is what the Rancher looks like:
Gitlab runner
As before, to run scripts on other servers, we need to install the GitLab runner. This question is described in detail in the previous article .
Note that you need to use the executor Shell, not the Docker. Executor Docker is used when you need something from inside the image, for example, when creating an Android application in a java container, and only need apk. In our case, the artifact is a container entirely, and for this you need an executor Shell.
Continuous Delivery Configuration
Now that all the necessary components are configured, you can begin to create a configuration for continuous delivery.
Assembly
First, we need to build an image.
Our code, as always, is stored in the repository, the CD configuration in gitlab-ci.yml , but in addition (for increased security) we will store several image files on the build server.
GitLab.xml
Contains callback code for CD. It was developed in a previous article and is available on GitHub . This is a small library for downloading code, running various callbacks and test code. It is preferable to use git submodules to include this project or something similar in your repository. Sub-modules are better because it is easier to keep them up to date. Another alternative is to create a release on GitLab and load it with the ADD command already at build.
iris.key
License key. It can be loaded during container assembly, and not stored on the server. It is not safe to store the key in the repository. You can get a trial key on the WRC or try the InterSystems IRIS Experience .
pwd.txt
The file containing the default password. Again, storing a password in the repository is pretty insecure.
load_ci.script
A script that:
- Enables OS authentication with InterSystems IRIS
- Downloads GitLab.xml
- Initializes GitLab callback settings
- Loads the code
set sc = ##Class(Security.System).Get("SYSTEM",.Properties) write:('sc) $System.Status.GetErrorText(sc) set AutheEnabled = Properties("AutheEnabled") set AutheEnabled = $ZBOOLEAN(+AutheEnabled,16,7) set Properties("AutheEnabled") = AutheEnabled set sc = ##Class(Security.System).Modify("SYSTEM",.Properties) write:('sc) $System.Status.GetErrorText(sc) zn "USER" do ##class(%SYSTEM.OBJ).Load(##class(%File).ManagerDirectory() _ "GitLab.xml","cdk") do ##class(isc.git.Settings).setSetting("hooks", "MyApp/Hooks/") do ##class(isc.git.Settings).setSetting("tests", "MyApp/Tests/") do ##class(isc.git.GitLab).load() halt Note that the first line is intentionally left blank. If this initial script is always the same, you can simply save it in the repository.
gitlab-ci.yml
Now, let's move on to the configuration of continuous delivery:
build image: stage: build tags: - test script: - cp -r /InterSystems/mount ci - cd ci - echo 'SuperUser' | cat - pwd.txt load_ci.script > temp.txt - mv temp.txt load_ci.script - cd .. - docker build --build-arg CI_PROJECT_DIR=$CI_PROJECT_DIR -t docker.domain.com/test/docker:$CI_COMMIT_REF_NAME . What's going on here?
First of all, since the image build process can access only the subdirectories of the base directory — in our case, the root directory of the repository, you need to copy the “secret” directory (in which there is GitLab.xml , iris.key , pwd.txt and load_ci.skript ) to cloned repository.
Further, access to the terminal requires a user / password, so we add them to load_ci.script (for this we need an empty line at the beginning of load_ci.script ).
Finally, we create a Docker Image and call it: docker.domain.com/test/docker:$CI_COMMIT_REF_NAME
where $CI_COMMIT_REF_NAME is the name of the branch. Please note: the first part of the image tag must match the repository name in GitLab so that it can be seen on the Registry tab (more complete instructions on correct tagging are available there too).
Dockerfile
Docker Image is created using Dockerfile , here it is:
FROM docker.intersystems.com/intersystems/iris:2018.1.1.613.0 ENV SRC_DIR=/tmp/src ENV CI_DIR=$SRC_DIR/ci ENV CI_PROJECT_DIR=$SRC_DIR COPY ./ $SRC_DIR RUN cp $CI_DIR/iris.key $ISC_PACKAGE_INSTALLDIR/mgr/ \ && cp $CI_DIR/GitLab.xml $ISC_PACKAGE_INSTALLDIR/mgr/ \ && $ISC_PACKAGE_INSTALLDIR/dev/Cloud/ICM/changePassword.sh $CI_DIR/pwd.txt \ && iris start $ISC_PACKAGE_INSTANCENAME \ && irissession $ISC_PACKAGE_INSTANCENAME -U%SYS < $CI_DIR/load_ci.script \ && iris stop $ISC_PACKAGE_INSTANCENAME quietly The following actions are performed:
- We take the image of InterSystems IRIS as a basis. It should be in your Docker Registry. If you didn’t work with Docker before, try First Look: Docker , which describes how to get the InterSystems IRIS image, add it to the Docker Registry and start it manually.
- First of all, copy our repository (and “secret” directory) inside the container.
- Copy the license key and
GitLab.xmlin the directorymgr. - Change the password to the value from
pwd.txt. Note thatpwd.txtis deleted during this operation. - Runs InterSystems IRIS.
- Running
load_ci.script. - InterSystems IRIS stops.
Running with gitlab-runner 10.6.0 (a3543a27) on docker 7b21e0c4 Using Shell executor... Running on docker... Fetching changes... Removing ci/ Removing temp.txt HEAD is now at 5ef9904 Build load_ci.script From http://gitlab.eduard.win/test/docker 5ef9904..9753a8d master -> origin/master Checking out 9753a8db as master... Skipping Git submodules setup $ cp -r /InterSystems/mount ci $ cd ci $ echo 'SuperUser' | cat - pwd.txt load_ci.script > temp.txt $ mv temp.txt load_ci.script $ cd .. $ docker build --build-arg CI_PROJECT_DIR=$CI_PROJECT_DIR -t docker.eduard.win/test/docker:$CI_COMMIT_REF_NAME . Sending build context to Docker daemon 401.4kB Step 1/6 : FROM docker.intersystems.com/intersystems/iris:2018.1.1.613.0 ---> cd2e53e7f850 Step 2/6 : ENV SRC_DIR=/tmp/src ---> Using cache ---> 68ba1cb00aff Step 3/6 : ENV CI_DIR=$SRC_DIR/ci ---> Using cache ---> 6784c34a9ee6 Step 4/6 : ENV CI_PROJECT_DIR=$SRC_DIR ---> Using cache ---> 3757fa88a28a Step 5/6 : COPY ./ $SRC_DIR ---> 5515e13741b0 Step 6/6 : RUN cp $CI_DIR/iris.key $ISC_PACKAGE_INSTALLDIR/mgr/ && cp $CI_DIR/GitLab.xml $ISC_PACKAGE_INSTALLDIR/mgr/ && $ISC_PACKAGE_INSTALLDIR/dev/Cloud/ICM/changePassword.sh $CI_DIR/pwd.txt && iris start $ISC_PACKAGE_INSTANCENAME && irissession $ISC_PACKAGE_INSTANCENAME -U%SYS < $CI_DIR/load_ci.script && iris stop $ISC_PACKAGE_INSTANCENAME quietly ---> Running in 86526183cf7c . Waited 1 seconds for InterSystems IRIS to start This copy of InterSystems IRIS has been licensed for use exclusively by: ISC Internal Container Sharding Copyright (c) 1986-2018 by InterSystems Corporation Any other use is a violation of your license agreement %SYS> 1 %SYS> Using 'iris.cpf' configuration file This copy of InterSystems IRIS has been licensed for use exclusively by: ISC Internal Container Sharding Copyright (c) 1986-2018 by InterSystems Corporation Any other use is a violation of your license agreement 1 alert(s) during startup. See messages.log for details. Starting IRIS Node: 39702b122ab6, Instance: IRIS Username: Password: Load started on 04/06/2018 17:38:21 Loading file /usr/irissys/mgr/GitLab.xml as xml Load finished successfully. USER> USER> [2018-04-06 17:38:22.017] Running init hooks: before [2018-04-06 17:38:22.017] Importing hooks dir /tmp/src/MyApp/Hooks/ [2018-04-06 17:38:22.374] Executing hook class: MyApp.Hooks.Global [2018-04-06 17:38:22.375] Executing hook class: MyApp.Hooks.Local [2018-04-06 17:38:22.375] Importing dir /tmp/src/ Loading file /tmp/src/MyApp/Tests/TestSuite.cls as udl Compilation started on 04/06/2018 17:38:22 with qualifiers 'c' Compilation finished successfully in 0.194s. Load finished successfully. [2018-04-06 17:38:22.876] Running init hooks: after [2018-04-06 17:38:22.878] Executing hook class: MyApp.Hooks.Local [2018-04-06 17:38:22.921] Executing hook class: MyApp.Hooks.Global Removing intermediate container 39702b122ab6 ---> dea6b2123165 [Warning] One or more build-args [CI_PROJECT_DIR] were not consumed Successfully built dea6b2123165 Successfully tagged docker.domain.com/test/docker:master Job succeeded Launch
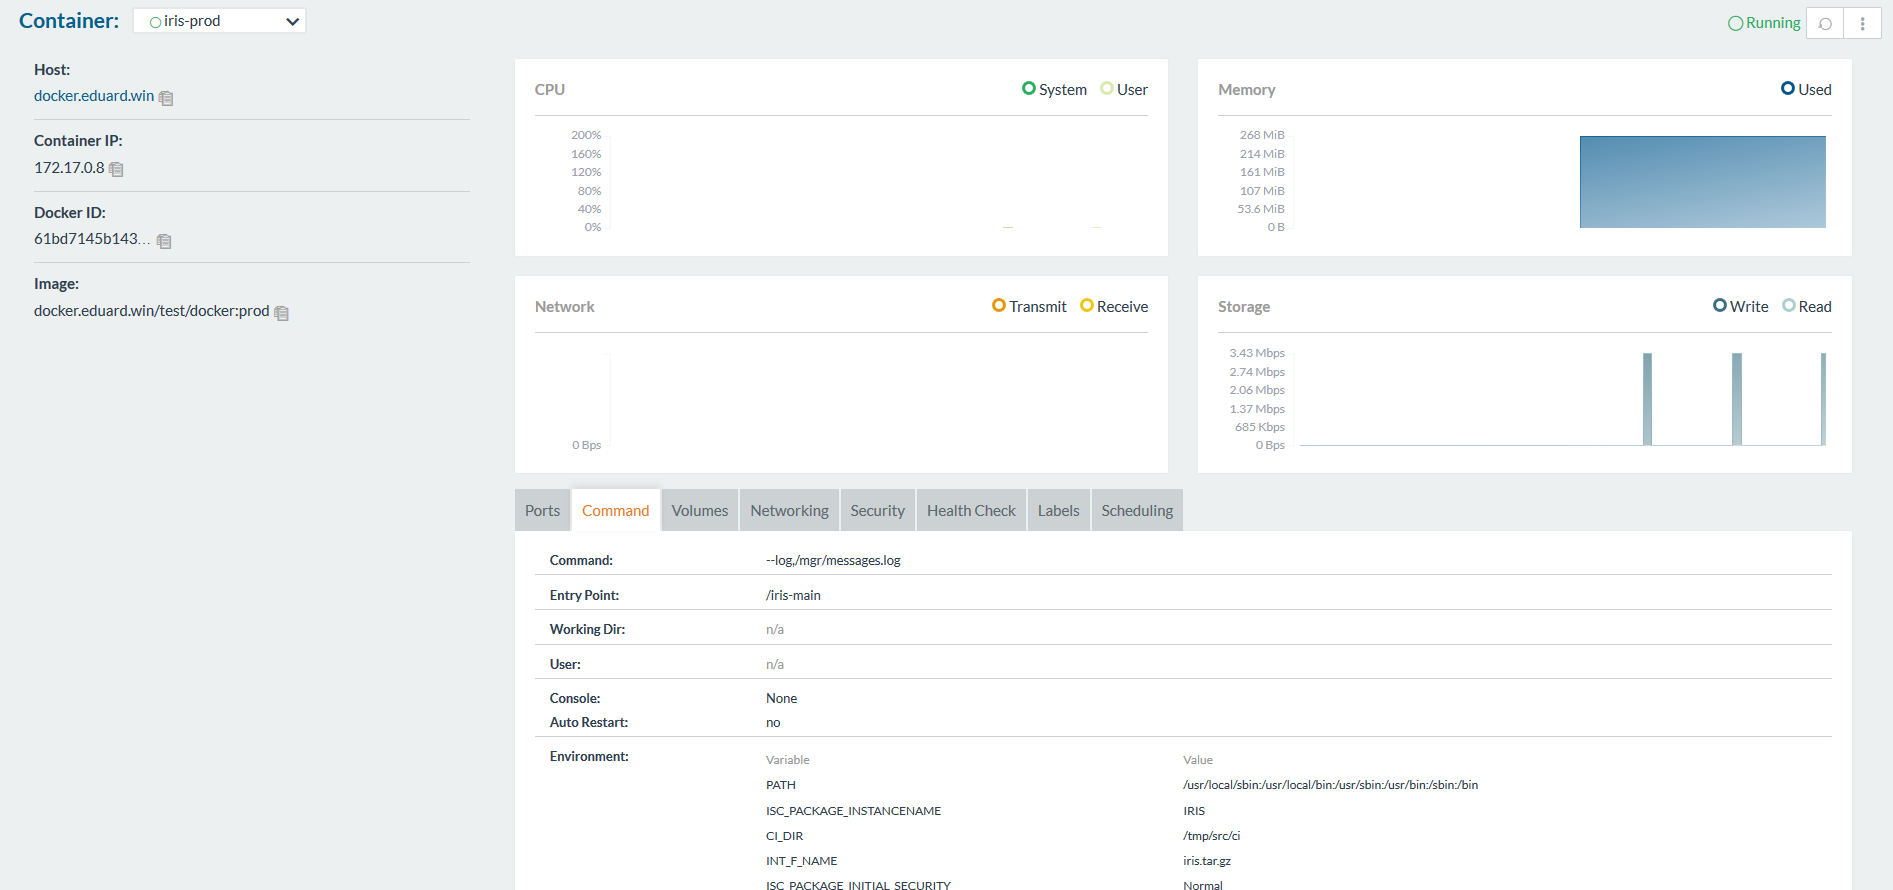
We have an image, run it. In the case of feature branches, you can simply destroy the old container and start a new one. In the case of the product environment, we can start the temporary container first and replace the environment container in case of passing the tests.
First, the script to delete the old container.
destroy old: stage: destroy tags: - test script: - docker stop iris-$CI_COMMIT_REF_NAME || true - docker rm -f iris-$CI_COMMIT_REF_NAME || true This script destroys the running container and always completes successfully (by default, Docker returns an error when trying to stop / delete a nonexistent container).
After that we launch a new container and register it as an environment.
run image: stage: run environment: name: $CI_COMMIT_REF_NAME url: http://$CI_COMMIT_REF_SLUG.docker.eduard.win/index.html tags: - test script: - docker run -d --expose 52773 --volume /InterSystems/durable/$CI_COMMIT_REF_SLUG:/data --env ISC_DATA_DIRECTORY=/data/sys --env VIRTUAL_HOST=$CI_COMMIT_REF_SLUG.docker.eduard.win --name iris-$CI_COMMIT_REF_NAME docker.eduard.win/test/docker:$CI_COMMIT_REF_NAME --log $ISC_PACKAGE_INSTALLDIR/mgr/messages.log The Nginx container automatically redirects requests using the VIRTUAL_HOST environment VIRTUAL_HOST to the specified port - in this case 52773.
Since it is necessary to store some data (passwords,% SYS, application data), the Durable% SYS functionality exists on the host in InterSystems IRIS, allowing you to store data on the host such as:
iris.cpfis the main configuration file./cspwith web application files./httpd/httpd.confwith Apache private server configuration.- Directory
/mgr, which stores:IRISSYS,IRISTEMP,IRISAUDIT,IRIS,USERdatabases.IRIS.WIJ.- Directory
/journalstoring journals. /tempdirectory for temporary files.- Logs
messages.log,journal.log,SystemMonitor.log.
To enable Durable% SYS, the volume argument is the mount directory of the host and the variable ISC_DATA_DIRECTORY sets the directory for storing the Durable% SYS files. This directory should not exist, it will be created automatically.
Thus, the architecture of our containerized application is as follows:
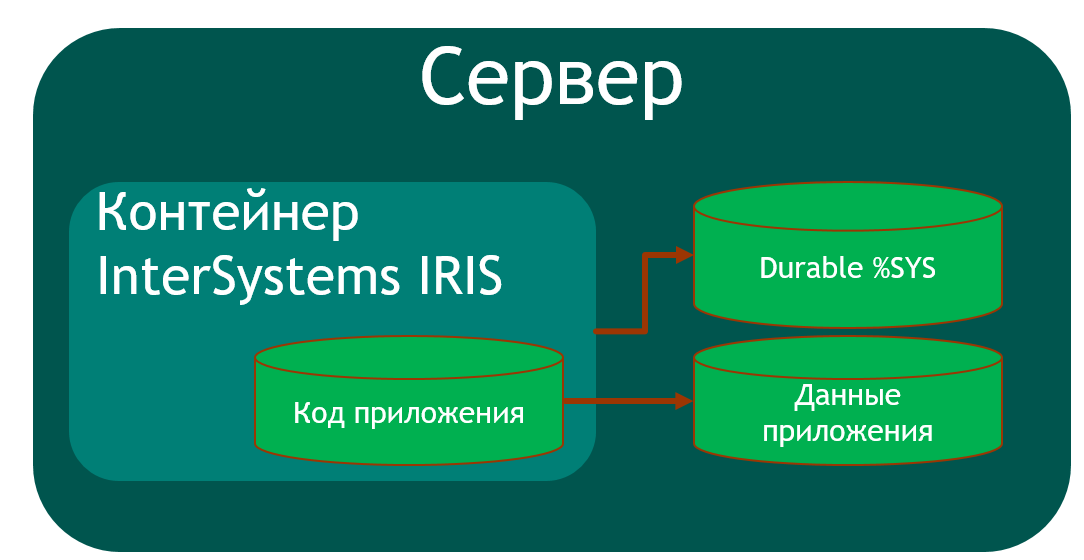
To build such an application, we must at least create one additional database (to save the application code) and create its mapping into the application area. I used the USER area to store application data, because this area is added by default to Durable% SYS. The application code is stored in a container so that it can be updated.
Based on the above, % Installer should:
- Create
APPArea / Database - Upload code to
APParea - Create mapping classes of our application in the
USERarea - Perform other configuration (I created a CSP web application and a REST web application)
Class MyApp.Hooks.Local { Parameter Namespace = "APP"; /// See generated code in zsetup+1^MyApp.Hooks.Local.1 XData Install [ XMLNamespace = INSTALLER ] { <Manifest> <Log Text="Creating namespace ${Namespace}" Level="0"/> <Namespace Name="${Namespace}" Create="yes" Code="${Namespace}" Ensemble="" Data="IRISTEMP"> <Configuration> <Database Name="${Namespace}" Dir="/usr/irissys/mgr/${Namespace}" Create="yes" MountRequired="true" Resource="%DB_${Namespace}" PublicPermissions="RW" MountAtStartup="true"/> </Configuration> <Import File="${Dir}Form" Recurse="1" Flags="cdk" IgnoreErrors="1" /> </Namespace> <Log Text="End Creating namespace ${Namespace}" Level="0"/> <Log Text="Mapping to USER" Level="0"/> <Namespace Name="USER" Create="no" Code="USER" Data="USER" Ensemble="0"> <Configuration> <Log Text="Mapping Form package to USER namespace" Level="0"/> <ClassMapping From="${Namespace}" Package="Form"/> <RoutineMapping From="${Namespace}" Routines="Form" /> </Configuration> <CSPApplication Url="/" Directory="${Dir}client" AuthenticationMethods="64" IsNamespaceDefault="false" Grant="%ALL" Recurse="1" /> </Namespace> </Manifest> } /// This is a method generator whose code is generated by XGL. /// Main setup method /// set vars("Namespace")="TEMP3" /// do ##class(MyApp.Hooks.Global).setup(.vars) ClassMethod setup(ByRef pVars, pLogLevel As %Integer = 0, pInstaller As %Installer.Installer) As %Status [ CodeMode = objectgenerator, Internal ] { Quit ##class(%Installer.Manifest).%Generate(%compiledclass, %code, "Install") } /// Entry point ClassMethod onAfter() As %Status { try { write "START INSTALLER",! set vars("Namespace") = ..#Namespace set vars("Dir") = ..getDir() set sc = ..setup(.vars) write !,$System.Status.GetErrorText(sc),! set sc = ..createWebApp() } catch ex { set sc = ex.AsStatus() write !,$System.Status.GetErrorText(sc),! } quit sc } /// Modify web app REST ClassMethod createWebApp(appName As %String = "/forms") As %Status { set:$e(appName)'="/" appName = "/" _ appName #dim sc As %Status = $$$OK new $namespace set $namespace = "%SYS" if '##class(Security.Applications).Exists(appName) { set props("AutheEnabled") = $$$AutheUnauthenticated set props("NameSpace") = "USER" set props("IsNameSpaceDefault") = $$$NO set props("DispatchClass") = "Form.REST.Main" set props("MatchRoles")=":" _ $$$AllRoleName set sc = ##class(Security.Applications).Create(appName, .props) } quit sc } ClassMethod getDir() [ CodeMode = expression ] { ##class(%File).NormalizeDirectory($system.Util.GetEnviron("CI_PROJECT_DIR")) } } I note that to create a database not on the host, I use the /usr/irissys/mgr directory, because the call to ##class(%File).ManagerDirectory() returns the path to the directory for Durable% SYS.
Tests
Now run the tests.
test image: stage: test tags: - test script: - docker exec iris-$CI_COMMIT_REF_NAME irissession iris -U USER "##class(isc.git.GitLab).test()" Delivery
Tests passed, publish our image in the Docker Registry.
publish image: stage: publish tags: - test script: - docker login docker.domain.com -u user -p pass - docker push docker.domain.com/test/docker:$CI_COMMIT_REF_NAME Login / password can be transferred using secret variables .
Now the image is displayed on GitLab.
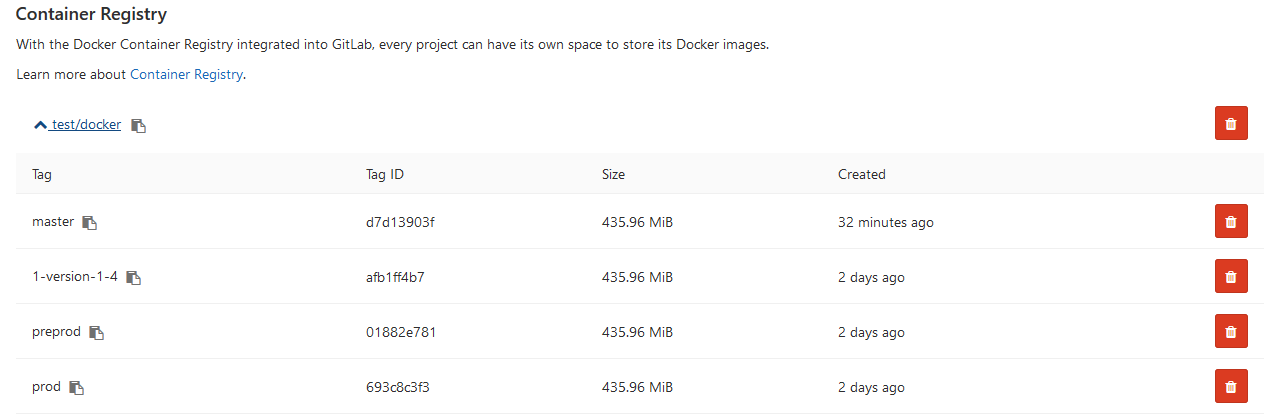
And other developers can download it from the Docker Registry. On the Environments tab, all of our environments are available for viewing:
findings
This series of articles discusses general approaches to continuous integration. Automating the assembly, testing and delivery of your application on InterSystems platforms is possible and easy to implement.
The use of containerization technologies will help optimize the development and deployment of applications. Eliminating inconsistencies between environments makes testing and debugging easier. Orchestration allows you to create scalable applications.
Links
')
Source: https://habr.com/ru/post/420749/
All Articles