Kivy. Xamarin. React Native. Three frameworks - one experiment
Greetings to all! As soon as the smoke from the hot discussion in the comments to my Kivy article - a framework for cross-platform development №1 donkey, and among others a worthy comment came through , we ( Mirimon , SeOd ) thought that it would be interesting for us and our readers to compare Kivy, Xamarin.Forms and React Native, having written the same application on them, accompany it with a corresponding article on Habré, turnips on GitHub and honestly tell who faced what difficulties during implementation. Having gathered in the Telegram and having discussed the details, we set to work.
For this comparison, we decided to write a simple task scheduler with three screens. To make a certain cut of the state of these three platforms today on the example of something more voluminous than the example that we have chosen, in view of the employment of each in our projects / at work / at home, for too long. Despite the simplicity of our application, it will allow you to visually show the principles of application development in each environment, work with data, UI, etc.
Three frameworks are one experiment. Xamarin.Forms. Part 2
Three frameworks are one experiment. React Native. Part 3
')
This article is the first in the cycle, so you want to start with the TK, which we threw for ourselves, so that the result would be similar.
Option TK:
- Notes must be structured by project.
- Notes can be added by different people, so the author of the note should be listed.
- Notes within the project should be added / deleted / edited.
- Notes must be content-sized, but not more than 150 pixels.
- Deleting notes should be both through the context menu of the note itself, and through the swipe
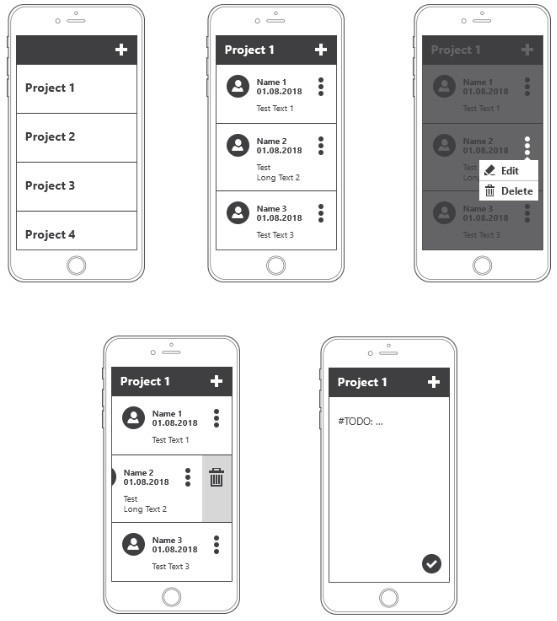
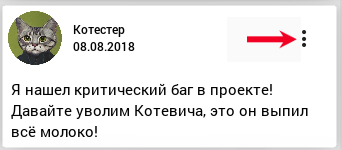
An approximate UI should look something like this:
Before starting, a little Kivy help:
Kivy is a cross-platform graphical framework written in the Python / Cython programming language, based on OpenGL ES 2, aimed at creating modern user interfaces, more focused on working with touch devices. Kivy apps run on platforms such as Linux, OS X, Windows, Android, iOS, and Rapberry Pi. In development, you have access to a wide range of Python libraries ranging from Requests to NumPy and OpenCV. Kivy has access to almost all native mobile APIs (GPS, Camera, Accelerometer, Google APIs for Android) through PyJNIus (Android) and PyOBJus (iOS), which automatically wrap Java / Objective-C code into Python interface .
Kivy is fast This applies to both application development and application execution speed. All critical functions are implemented at the C level. Kivy also uses the GPU wherever it makes sense. The GPU does most of the work, thereby greatly increasing performance.
Kivy is very flexible. This means that the rapidly developing Kivy development allows you to instantly adapt to new technologies. Kivy developers have repeatedly added support for new external devices and software protocols, sometimes even before their release. Kivy can be used in combination with a large number of different third-party solutions. For example, in Windows, Kivy supports WM_TOUCH, which means that any device with Windows 7 Pen & Touch drivers will work with Kivy. In OS X, you can use Apple Multi-Touch devices, such as trackpads and mice. In Linux, you can use HID input input events. In addition, Kivy supports TUIO (Tangible User Interface Objects) and several other input sources.
You can write a simple application with a few lines of code. Kivy programs are created using the Python programming language, which is incredibly versatile and powerful, yet easy to use. In addition, Kivy developers have created their own GUI markup language to create complex custom GUIs. This language allows you to quickly customize, connect and organize the elements of the application.
And yes, Kivy is completely free. You can use it everywhere! In a commercial product or in Open Source.
I will give all the application code and show in some detail how certain elements are implemented when developing for mobile platforms. As an IDE, I always use PyCharm , which perfectly supports the syntax Kv Language - a special DSL language in which the UI representation of your application is written. The application skeleton is created using the console tool CreatorKivyProject , which provides basic screens using the MVVM template.
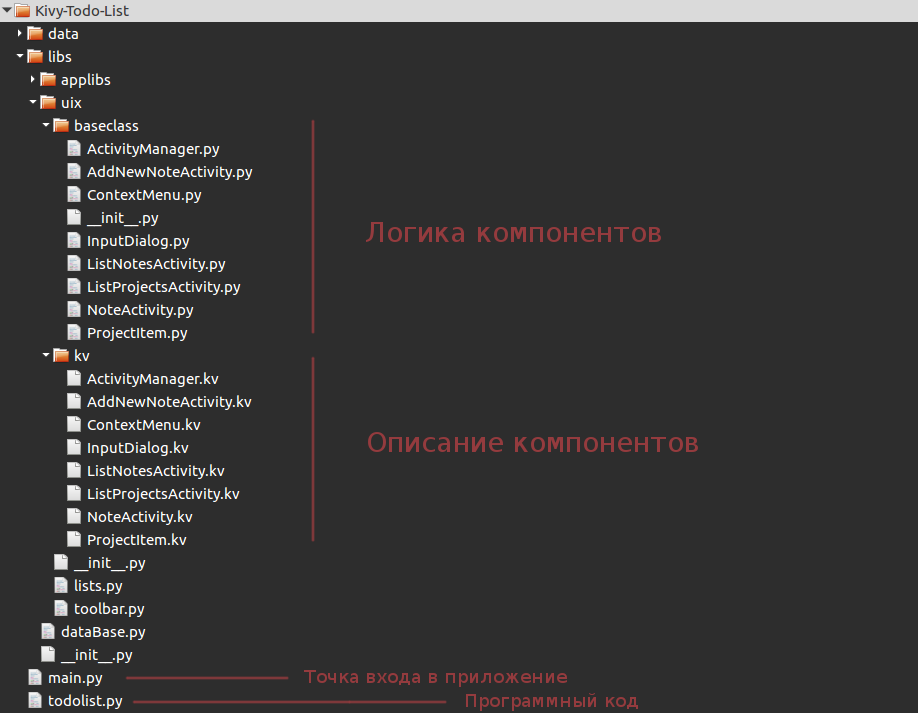
The baseclass folder contains the logic of widgets and controllers implemented in the Python programming language, and kv contains the interface description files in the Kv Language language . The applibs directory is used for third-party libraries, the data folder contains media content, databases and other data. The main.py file is the entry point of the application. He doesn’t do anything except launch the UI renderer TodoList (). Run () , catch an error if it occurs and display a window for sending a report bug, created automatically by the CreatorKivyProject utility, has nothing to do with writing our application, and therefore is not considered.
The todolist.py file with program code implements the TodoList class, which loads the interface layouts, initializes their instances, monitors the hard keys of the device, and returns our first screen, which are listed in the Activity Manager. After TodoList (). Run () , the build function is called and returns the widget that will be displayed on the screen.
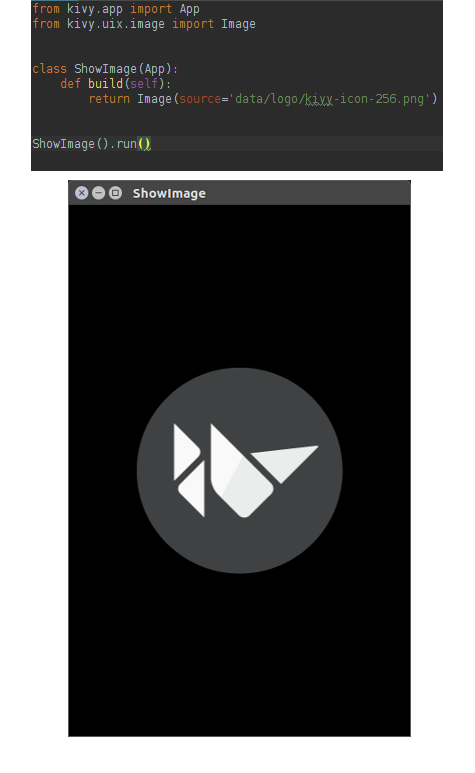
For example, a simple program code that displays one screen with an image will look like this:
And here is the diagram of our application class:

todolist.py:
# -*- coding: utf-8 -*- import os from kivy.app import App from kivy.lang import Builder from kivy.core.window import Window from kivy.factory import Factory from libs.applibs.kivymd.theming import ThemeManager from libs.dataBase import DataBase class TodoList(App, DataBase): title = 'Todo List' icon = 'icon.png' theme_cls = ThemeManager() theme_cls.primary_palette = 'BlueGrey' def __init__(self, **kvargs): super(TodoList, self).__init__(**kvargs) Window.bind(on_keyboard=self.eventsProgram) Window.softinput_mode = 'below_target' self.Window = Window self.pathToBase = '%s/data/dataProjects.json' % self.directory self.nameAuthor = u' ' def build(self): self.setDataProjects() self.loadAllKvFiles(os.path.join(self.directory, 'libs', 'uix', 'kv')) self.rootScreen = Factory.RootScreen() # # Activity. self.activityManager = self.rootScreen.ids.activityManager self.listProjectsActivity = self.rootScreen.ids.listProjectsActivity self.listNotesActivity = self.rootScreen.ids.listNotesActivity self.addNewNoteActivity = self.rootScreen.ids.addNewNoteActivity return self.rootScreen def loadAllKvFiles(self, directory_kv_files): for kv_file in os.listdir(directory_kv_files): kv_file = os.path.join(directory_kv_files, kv_file) if os.path.isfile(kv_file): Builder.load_file(kv_file) def on_start(self): self.listProjectsActivity.setListProjects(self) def eventsProgram(self, instance, keyboard, keycode, text, modifiers): if keyboard in (1001, 27): if self.activityManager.current == 'add new note activity': self.activityManager.backActivity( 'list notes activity', self.addNewNoteActivity.ids.floatingButton) if self.activityManager.current == 'list notes activity': self.activityManager.current = 'list project activity' return True Our application consists of only three Activities , which are switched by the screen manager ( ScreenMenager ), which we returned to the build function:
#:import ListProjectsActivity libs.uix.baseclass.ListProjectsActivity.ListProjectsActivity #:import ListNotesActivity libs.uix.baseclass.ListNotesActivity.ListNotesActivity #:import AddNewNoteActivity libs.uix.baseclass.AddNewNoteActivity.AddNewNoteActivity #:import ActivityManager libs.uix.baseclass.ActivityManager.ActivityManager <RootScreen@BoxLayout>: orientation: 'vertical' spacing: dp(2) ActivityManager: id: activityManager ListProjectsActivity: id: listProjectsActivity ListNotesActivity: id: listNotesActivity AddNewNoteActivity: id: addNewNoteActivity When the application starts, the Activity that is specified first in the ActivityManager will be installed. In our case, this is ListProjectsActivity . In the application for lists of projects and tasks I used ScrollView . Although it was more correct - RecycleView . Because the first, if posts and projects will be over a hundred, will not cope. More precisely, it will be very long to render lists. RecycleView allows you to display lists of any length almost instantly. But since in any case with large lists, one would have to use either dynamic loading of data into the list or pagination, and this was not discussed in the TOR, I used the ScrollView . The second reason is that I was too lazy to redo the lists under RecycleView (and it is completely different in use from ScrollView ), and there wasn’t much time, because the entire application was written in four hours in smoke breaks and coffee breaks.
The start screen with a list of projects (ListProjectsActivity.kv and ListProjectsActivity.py) looks like this:

Since the screen layout of the ListProjectsActivity is already shown in the screenshot, I’ll show you what its control class looks like:
# -*- coding: utf-8 -*- from kivy.app import App from kivy.uix.screenmanager import Screen as Activity from libs.uix.baseclass.InputDialog import InputDialog from . ProjectItem import ProjectItem class ListProjectsActivity(Activity): objApp = App.get_running_app() def setListProjects(self, objApp): for nameProject in objApp.dataProjects.keys(): self.ids.layoutContainer.add_widget(ProjectItem(projectName=nameProject)) def createNewProject(self, projectName): if projectName and not projectName.isspace(): self.ids.layoutContainer.add_widget(ProjectItem(projectName=projectName)) self.objApp.addProjectInBase(projectName) def deleteProject(self, instance): for projectName in self.objApp.dataProjects: if instance.projectName == projectName: self.objApp.deleteProjectFromBase(projectName) break def showDialogCreateProject(self, *args): InputDialog( title=' ', hintText=' ', textButtonCancel='', textTuttonOk='', eventsCallback=self.createNewProject).show() Call diology window:
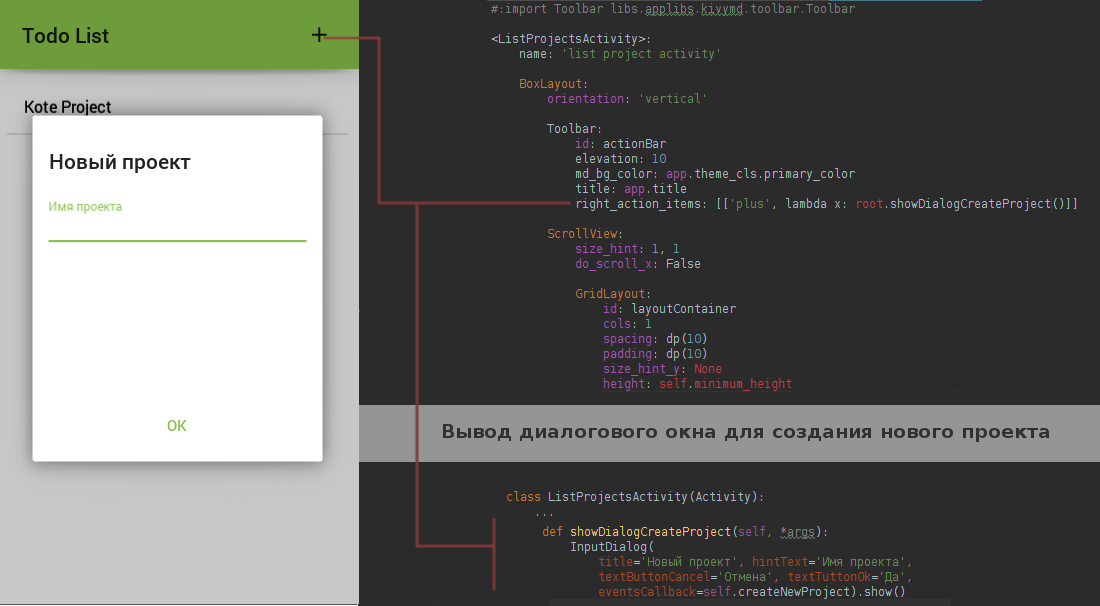
In operation, the window call and the creation of a new project will look like this:
 |  |
On the question of application data, I will not stop, because the data is a regular dictionary of the form
{"Name Project": [{"pathToAvatar": "", "nameDate": "", "nameAuthor": "", "textNote": ""}]} and which is stored in the data directory as a simple json file.
Let's see what is the item with the name of the project and how in Kivy to use deleting an item from the list by swipe? To do this, we must inherit the behavior of the widget in the list from the SwipeBehavior class of the SwipeToDelete library:
ProjectItemActivity.py
from kivy.properties import StringProperty from kivy.uix.boxlayout import BoxLayout from libs.applibs.swipetodelete import SwipeBehavior class ProjectItemActivity(SwipeBehavior, BoxLayout): projectName = StringProperty() def on_touch_down(self, touch): if self.collide_point(touch.x, touch.y): self.move_to = self.x, self.y return super(ProjectItemActivity, self).on_touch_down(touch) def on_touch_move(self, touch): if self.collide_point(touch.x, touch.y): self.reduce_opacity() return super(ProjectItemActivity, self).on_touch_move(touch) def on_touch_up(self, touch): if self.collide_point(touch.x, touch.y): self.check_for_left() self.check_for_right() return super(ProjectItemActivity, self).on_touch_up(touch) And the description of the project item in Kv markup:
ProjectItemActivity.kv
<ProjectItemActivity>: swipe_rectangle: self.x, self.y , self.width, self.height swipe_timeout: 1000000 swipe_distance: 1 event_after_swipe: app.listActivity.deleteProject OneLineListItem: text: root.projectName on_press: app.listActivity.setNotesProject(root.projectName) In general, every widget in Kivy has an on_touch method with which you can catch any events occurring on the screen. Here is a small part of the list of available events:
['double_tap_time', 'grab_state', 'is_double_tap', 'is_mouse_scrolling', 'is_touch', 'is_triple_tap', 'move', 'push', 'push_attrs', 'push_attrs_stack', 'scale_for_screen', 'time_end', 'time_start', 'time_update', 'triple_tap_time', 'ungrab', 'update_time_end']  |  |  |  |
Implementing the context menu for Android ...
There were no problems here either, it’s just a standard DropDown widget. Thanks to the fact that you can customize all the widgets and controllers in Kivy as much as your imagination allows you, I easily got a nice menu. Left base dropdown, right is mine:
 |  |
Layout context menu list:
ContextMenuAndroidActivity.kv
#:import MDSeparator libs.applibs.kivymd.card.MDSeparator #:import MenuItem libs.applibs.animdropdown.MenuItem <ContextMenuAndroidActivity>: MenuItem: text: '' menu: root on_press: root.tapOnItem(self.text) MDSeparator: MenuItem: text: '' menu: root on_press: root.tapOnItem(self.text) The program part of the context menu:
ContextMenuAndroidActivity.kv
from kivy.app import App from kivy.clock import Clock from libs.applibs.animdropdown import AnimMenuDropDown class ContextMenuAndroidActivity(AnimMenuDropDown): def tapOnItem(self, textItem): objApp = App.get_running_app() if textItem == '': objApp.listActivity.deletePost() else: objApp.activityManager.current = 'add new note activity' Clock.schedule_once(objApp.addNewNoteActivity.editNote, .5) Next, we import the MenuDropDown button from the animdropdown library, pass it the object of our context menu as a parameter, and after that we add this button to the screen we need. In our application, this is the button on the right in the note card:
Activity layout cards notes:

Base class NoteActivity :
from kivy.app import App from kivy.properties import StringProperty from kivy.uix.boxlayout import BoxLayout from libs.applibs.animdropdown import MenuButton from libs.applibs.swipetodelete import SwipeBehavior from . ContextMenu import ContextMenu class NoteActivity(SwipeBehavior, BoxLayout): nameDate = StringProperty() textNote = StringProperty() pathToAvatar = StringProperty() def __init__(self, **kwargs): super(NoteActivity, self).__init__(**kwargs) self.objApp = App.get_running_app() menuButton = MenuButton( dropdown_cls=ContextMenu, icon='dots-vertical', _on_dropdown_fnc=self.setCurrentPost) self.ids.titleBox.add_widget(menuButton) def setCurrentPost(self, *args): self.objApp.listNotesActivity.checkCurentPost = self 
Software implementation of ListNotesActivity :
# -*- coding: utf-8 -*- from kivy.app import App from kivy.uix.screenmanager import Screen as Activity from kivy.properties import ObjectProperty from . NoteActivity import NoteActivity class ListNotesActivity(Activity): checkCurentPost = ObjectProperty() objApp = App.get_running_app() def clearList(self): if self.objApp.activityManager.current == 'list project activity': self.ids.layoutContainer.clear_widgets() def addNewNote(self, objApp): objApp.activityManager.current = 'add new note activity' def setDefaultcheckCurentPost(self): self.checkCurentPost = lambda x: None def setNotesProject(self, nameProject): self.ids.toolBar.title = nameProject for dataProject in self.objApp.dataProjects[nameProject][1]: self.ids.layoutContainer.add_widget(NoteActivity( textNote=dataProject['textNote'], nameDate=dataProject['nameDate'], pathToAvatar=dataProject['pathToAvatar'])) def deletePost(self, instance=None): # . if not self.checkCurentPost: checkCurentPost = instance else: checkCurentPost = self.checkCurentPost self.ids.layoutContainer.remove_widget(self.checkCurentPost) nameProject = self.ids.toolBar.title self.objApp.deleteNoteFromBase(nameProject, checkCurentPost.textNote) def checkScroll(self): if self.checkCurentPost and type(self.checkCurentPost) is not NoteActivity: self.checkCurentPost(self) How to manage Activity apps? In order to switch from one Activity to another, we must specify the name of the new Activity to the screen manager:
class ListNotesActivity(Activity): ... def addNewNote(self, *args): self.objApp.activityManager.current = 'add new note activity' ... where 'add new note activity' is the name of the Activity to add a new note.
Screen and Layout Activity AddNewNoteActivity :
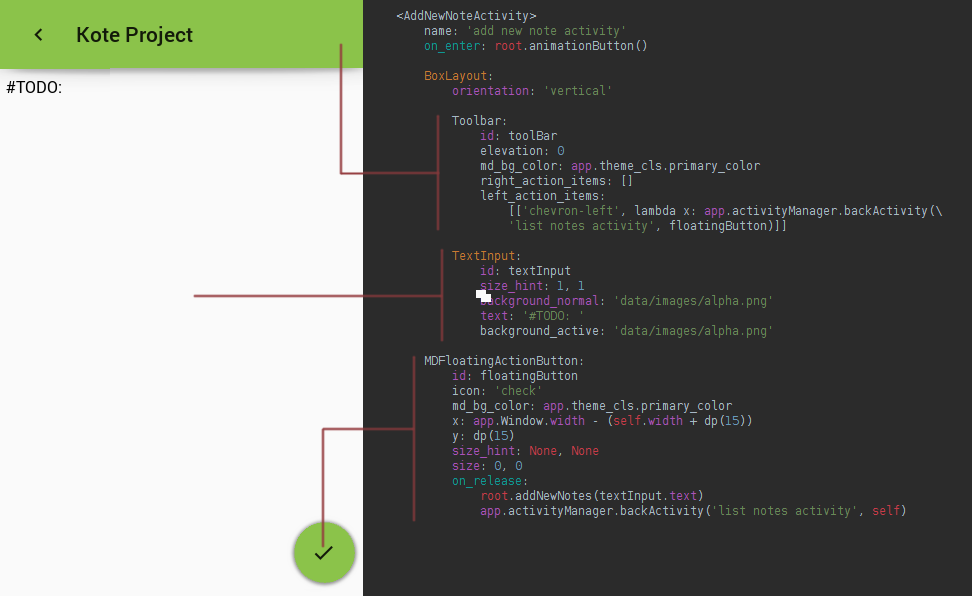
Base class:
from kivy.app import App from kivy.animation import Animation from kivy.uix.screenmanager import Screen as Activity from kivy.metrics import dp from libs.uix.baseclass.NoteActivity import NoteActivity class AddNewNoteActivity(Activity): objApp = None edit = False oldTextNote = '' def animationButton(self): self.objApp = App.get_running_app() self.ids.toolBar.title = self.objApp.listNotesActivity.ids.toolBar.title Animation(size=(dp(56), dp(56)), d=.5, t='in_out_cubic').start(self.ids.floatingButton) def addNewNotes(self, textNote): if self.edit: nameProject = self.ids.toolBar.title self.objApp.addEditNoteInBase(nameProject, textNote, self.oldTextNote) self.objApp.activityManager.backActivity('list notes activity', self.ids.floatingButton) self.objApp.listNotesActivity.checkCurentPost.textNote = textNote self.edit = False return self.objApp.listNotesActivity.ids.layoutContainer.add_widget( NoteActivity( textNote=textNote, nameDate='%s\n%s' % ( self.objApp.nameAuthor, self.objApp.getDate()), pathToAvatar='data/images/avatar.png')) self.objApp.addNoteInBase(self.ids.toolBar.title, textNote, 'data/images/avatar.png') def editNote(self, interval): self.edit = True self.ids.textInput.text = self.objApp.listNotesActivity.checkCurentPost.textNote self.oldTextNote = self.ids.textInput.text To animate the button, I used the on_enter event, which is called when the Activity is installed on the screen:
In the markup:
<AddNewNoteActivity> on_enter: root.animationButton() In Python code:
class AddNewNoteActivity(Activity): def animationButton(self): Animation(size=(dp(56), dp(56)), d=.5, t='in_out_cubic').start(self.ids.floatingButton) 
Unlike Xamarin.Forms, the UI in Kivy will look the same everywhere. So, if you are writing an application for two platforms (Android and iOS), you should take this into account when marking up the interface and specifying properties for widgets. Or do two markup for the two platforms (the logic remains unchanged). This is a plus, since the UI render and events do not depend on the platform features, you do not use native APIs to manage these actions, which allows your application to run smoothly on almost any platform. All graphics are rendered using native OpenGL and SDL2 calls on the GPU, which allows you to very quickly draw menus, buttons and other graphical user interface features including 2D and 3D graphics.
This application uses Android UI MaterialDesign. For example, my last project had an adaptive interface:


But a demonstration of the possibilities in the style of Material Design
As I said before, Kivy does not use native APIs for rendering UI, so it allows you to emulate various models of devices and platforms using the screen module. It is enough to launch your project with the necessary parameters, so that the application's test window opens on your computer as if it were running on a real device. It sounds weird, but since Kivy is abstracted from the platform in the UI drawing, this makes it possible not to use heavy and slow emulators for tests. This only applies to UI. For example, the test application described in this article was tested with the parameters -m screen: droid2, portrait, scale = .75 that one-to-one corresponds to my real device.
Full list of parameters of the screen module:
devices = { # device: (name, width, height, dpi, density) 'onex': ('HTC One X', 1280, 720, 312, 2), 'one': ('HTC One', 1920, 1080, 468, 3), 'onesv': ('HTC One SV', 800, 480, 216, 1.5), 's3': ('Galaxy SIII', 1280, 720, 306, 2), 'note2': ('Galaxy Note II', 1280, 720, 267, 2), 'droid2': ('Motorola Droid 2', 854, 480, 240, 1.5), 'xoom': ('Motorola Xoom', 1280, 800, 149, 1), 'ipad': ('iPad (1 and 2)', 1024, 768, 132, 1), 'ipad3': ('iPad 3', 2048, 1536, 264, 2), 'iphone4': ('iPhone 4', 960, 640, 326, 2), 'iphone5': ('iPhone 5', 1136, 640, 326, 2), 'xperiae': ('Xperia E', 480, 320, 166, 1), 'nexus4': ('Nexus 4', 1280, 768, 320, 2), 'nexus7': ('Nexus 7 (2012 version)', 1280, 800, 216, 1.325), 'nexus7.2': ('Nexus 7 (2013 version)', 1920, 1200, 323, 2), # taken from design.google.com/devices # please consider using another data instead of # a dict for autocompletion to work # these are all in landscape 'phone_android_one': ('Android One', 854, 480, 218, 1.5), 'phone_htc_one_m8': ('HTC One M8', 1920, 1080, 432, 3.0), 'phone_htc_one_m9': ('HTC One M9', 1920, 1080, 432, 3.0), 'phone_iphone': ('iPhone', 480, 320, 168, 1.0), 'phone_iphone_4': ('iPhone 4', 960, 640, 320, 2.0), 'phone_iphone_5': ('iPhone 5', 1136, 640, 320, 2.0), 'phone_iphone_6': ('iPhone 6', 1334, 750, 326, 2.0), 'phone_iphone_6_plus': ('iPhone 6 Plus', 1920, 1080, 400, 3.0), 'phone_lg_g2': ('LG G2', 1920, 1080, 432, 3.0), 'phone_lg_g3': ('LG G3', 2560, 1440, 533, 3.0), 'phone_moto_g': ('Moto G', 1280, 720, 327, 2.0), 'phone_moto_x': ('Moto X', 1280, 720, 313, 2.0), 'phone_moto_x_2nd_gen': ('Moto X 2nd Gen', 1920, 1080, 432, 3.0), 'phone_nexus_4': ('Nexus 4', 1280, 768, 240, 2.0), 'phone_nexus_5': ('Nexus 5', 1920, 1080, 450, 3.0), 'phone_nexus_5x': ('Nexus 5X', 1920, 1080, 432, 2.6), 'phone_nexus_6': ('Nexus 6', 2560, 1440, 496, 3.5), 'phone_nexus_6p': ('Nexus 6P', 2560, 1440, 514, 3.5), 'phone_samsung_galaxy_note_4': ('Samsung Galaxy Note 4', 2560, 1440, 514, 3.0), 'phone_samsung_galaxy_s5': ('Samsung Galaxy S5', 1920, 1080, 372, 3.0), 'phone_samsung_galaxy_s6': ('Samsung Galaxy S6', 2560, 1440, 576, 4.0), 'phone_sony_xperia_c4': ('Sony Xperia C4', 1920, 1080, 400, 2.0), 'phone_sony_xperia_z_ultra': ('Sony Xperia Z Ultra', 1920, 1080, 348, 2.0), 'phone_sony_xperia_z1_compact': ('Sony Xperia Z1 Compact', 1280, 720, 342, 2.0), 'phone_sony_xperia_z2z3': ('Sony Xperia Z2/Z3', 1920, 1080, 432, 3.0), 'phone_sony_xperia_z3_compact': ('Sony Xperia Z3 Compact', 1280, 720, 313, 2.0), 'tablet_dell_venue_8': ('Dell Venue 8', 2560, 1600, 355, 2.0), 'tablet_ipad': ('iPad', 1024, 768, 132, 1.0), 'tablet_ipad_mini': ('iPad Mini', 1024, 768, 163, 1.0), 'tablet_ipad_mini_retina': ('iPad Mini Retina', 2048, 1536, 326, 2.0), 'tablet_ipad_pro': ('iPad Pro', 2732, 2048, 265, 2.0), 'tablet_ipad_retina': ('iPad Retina', 2048, 1536, 264, 2.0), 'tablet_nexus_10': ('Nexus 10', 2560, 1600, 297, 2.0), 'tablet_nexus_7_12': ('Nexus 7 12', 1280, 800, 216, 1.3), 'tablet_nexus_7_13': ('Nexus 7 13', 1920, 1200, 324, 2.0), 'tablet_nexus_9': ('Nexus 9', 2048, 1536, 288, 2.0), 'tablet_samsung_galaxy_tab_10': ('Samsung Galaxy Tab 10', 1280, 800, 148, 1.0), 'tablet_sony_xperia_z3_tablet': ('Sony Xperia Z3 Tablet', 1920, 1200, 282, 2.0), 'tablet_sony_xperia_z4_tablet': ('Sony Xperia Z4 Tablet', 2560, 1600, 297, 2.0)TodoList() app.run() } What can be said in conclusion? Is Kivy good? Undoubtedly good! If you own a wonderful programming language Python, you can easily make applications for mobile (and not only) platforms with a no less remarkable Kivy framework.
Advantages of application development using the Kivy framework:
- Since we are dealing with Python, application development speed is much faster than development speed in any other programming language or framework.
- Megatons of ready-made Python libraries that you can use in your projects: OpenCV, Django, Flask, NumPy, ffmpeg, sqlite3, lxml and thousands of others.
- Since Kivy uses OpenGL and GPU for drawing graphics, as well as its own widgets and controllers, the UI render speed is very high and you are completely relieved of the headache that is present in other frameworks that need to be used for the implementation of some parts of the interface.
- You use the native only where you need access to specific platform functions, which simply cannot be in a truly cross-platform framework: for example, access to geolocation, access to a camera, BlueTooth technology ...
Implementing access to the native Android API for IMEI and device models using PyJnius:
def _get_model_android(): from jnius import autoclass Build = autoclass('android.os.Build') return str(Build.DEVICE) def _get_imei_android(): from jnius import autoclass Service = autoclass('org.renpy.android.PythonActivity').mActivity Context = autoclass('android.content.Context') TelephonyManager = Service.getSystemService(Context.TELEPHONY_SERVICE) return str(TelephonyManager.getDeviceId()) 
For example, the implementation of a native getting IMEI device in Java:
import android.content.Context; import android.telephony.TelephonyManager; public class GetImeiAndroid { public String getImeiAndroid() { TelephonyManager tm = (TelephonyManager)getSystemService(Context.TELEPHONY_SERVICE); String IMEINumber = tm.getDeviceId(); return IMEINumber; } } - You can use third-party jar libraries in your projects when it comes to Android.
- You fully own all the events occurring on the screen: touch, multitouch, svayp, pushing and other events without leaving the native so it is an integral part of Kivy.
Kivy features in Touch devices:
Despite all the advantages, Kivy has several disadvantages:
- The speed of “cold start”, that is, the first launch of the application from the moment when all the libraries will be deployed, is quite long. The subsequent ones are ordinary, but longer than the native depends on the load of the processor of the mobile device.
- Work with lists. It is possible to display a list of 100,000 points in half a second (for example, user cards, shop windows, quotes), but with one condition - all cards must be of the same height. If you display a list, for example, quotes, with an unknown amount of text, but in its entirety, you cannot display more than ten points at a time, as this will take about 10-15 seconds. In this case, you will have to load 10-15 items each while scrolling through the list.
- It is impossible to display text whose size exceeds 6500 characters (3.5 pages of printed text) - we get a black screen. This is solved by splitting the text and then gluing it, which still seems to be a crutch. However, it is not clear who might have thought of displaying such amount of text at a time. Especially when it comes to mobile platforms.
→ More articles on Kivy
The virtual machine (the first message from ZenCODE) from Kivy developers is ready and configured to build projects for both Python branches.
Source: https://habr.com/ru/post/420691/
All Articles