Learn OpenGL. Lesson 5.7 - HDR

When writing to the framebuffer, the brightness values of the colors are reduced to the interval from 0.0 to 1.0. Because of this, at first glance innocuous, features, we always have to choose such values for lighting and colors so that they fit into this restriction. This approach works and gives decent results, but what happens if we find a particularly bright area with a large number of bright light sources, and the total brightness exceeds 1.0? As a result, all values greater than 1.0 will be reduced to 1.0, which does not look very nice:
Since for a large number of fragments the color values are reduced to 1.0, large image areas are obtained, filled with the same white color, a significant amount of image detail is lost, and the image itself begins to look unnatural.
The solution to this problem may be to reduce the brightness of the light sources so that there are no fragments brighter than 1.0 on the stage: this is not the best solution forcing the use of unrealistic lighting values. The best approach is to allow brightness values to temporarily exceed 1.0 brightness and at the final step change colors so that brightness returns to the range from 0.0 to 1.0, but without losing image details.
The computer display is able to show colors with a brightness in the range from 0.0 to 1.0, but we have no such limitation when calculating the lighting. By allowing the fragment colors to be brighter than one, we get a much higher brightness range for work - HDR (high dynamic range) . With hdr, bright things look bright, dark things can be really dark, and at the same time we'll see the details.
Part 1. Start
- Opengl
- Creating a window
- Hello window
- Hello triangle
- Shaders
- Textures
- Transformations
- Coordinate systems
- Camera
Part 2. Basic lighting
Part 3. Loading 3D Models
')
Part 4. OpenGL advanced features
- Depth test
- Stencil test
- Mixing colors
- Face clipping
- Frame buffer
- Cubic cards
- Advanced data handling
- Advanced GLSL
- Geometric shader
- Instancing
- Smoothing
Part 5. Advanced Lighting
Initially, high dynamic range was used in photography: the photographer made several identical photographs of the scene with different exposures, capturing colors of almost any brightness. The combination of these photographs forms an hdr image in which most of the details become visible due to the mixing of images with different exposure levels. For example, below in the left image you can see well-lit parts of the image (look at the window), but these details disappear when using high exposure. However, high exposure makes the details visible in dark areas of the image that were not visible before.

This is similar to how the human eye works. With a lack of light, the eye adapts, so that dark details become well distinguishable, and likewise for bright areas. We can say that the human eye has an automatic exposure setting, depending on the brightness of the scene.
HDR rendering works much the same. When rendering, we allow a large range of brightness values to collect information about bright and dark details of the scene, and at the end we convert the values from the HDR range back to LDR (low dynamic range, range from 0 to 1). This transformation is called tone mapping , there are a large number of algorithms aimed at preserving most of the image details when converting to LDR. These algorithms often have an exposure parameter that allows you to better show bright or dark areas of the image.
Using HDR when rendering will allow us not only to exceed the LDR range from 0 to 1 and to keep more image details, but also makes it possible to indicate the actual brightness of the light sources. For example, the sun has a much greater brightness of the light than something like a flashlight, so why not adjust the sun like this (for example, assign it a brightness of 10.0)? This will allow us to better adjust the scene lighting with more realistic brightness settings, which would be impossible with LDR rendering and a brightness range from 0 to 1.
Since the display only shows brightness from 0 to 1, we are forced to convert the used HDR value range back to the monitor range. Simply scaling the range will not be a good solution, as bright areas will begin to dominate the image. However, we can use different equations or curves to convert HDR values to LDR, which will give us full control over the brightness of the scene. This transformation is called tone mapping and is the final step in HDR rendering.
Floating point framebuffers
To implement HDR rendering, we need a way to prevent the conversion of values to the range from 0 to 1 of the results of the fragment shader. If the framebuffer uses the normalized fixed-point format (GL_RGB) for color buffers, OpenGL automatically limits the values before saving to the framebuffer. This restriction applies to most framebuffer formats other than floating point formats.
To store values outside the [0.0..1.0] range, we can use a color buffer with the following formats: GL_RGB16F, GL_RGBA16F, GL_RGB32F or GL_RGBA32F . This is great for hdr rendering. Such a buffer will be called a floating point framebuffer.
Creating a floating point buffer differs from a regular buffer only in that it uses a different internal format:
glBindTexture(GL_TEXTURE_2D, colorBuffer); glTexImage2D(GL_TEXTURE_2D, 0, GL_RGBA16F, SCR_WIDTH, SCR_HEIGHT, 0, GL_RGBA, GL_FLOAT, NULL); OpenGL framebuffer by default uses only 8 bits to store each color. In floating point framebuffer with GL_RGB32F or GL_RGBA32F formats, 32 bits are used to store each color - 4 times more. If very high accuracy is not required, the GL_RGBA16F format will be GL_RGBA16F .
If a floating point buffer for color is attached to the framebuffer, we can render the scene into it taking into account that the color values will not be limited to the range from 0 to 1. In the code for this article, we first render the scene at floating point framebuffer and then output the contents color buffer to half-screen rectangle. It looks like this:
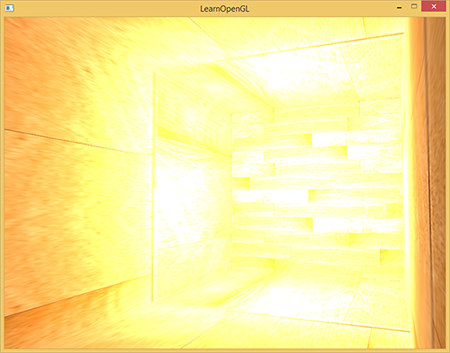
glBindFramebuffer(GL_FRAMEBUFFER, hdrFBO); glClear(GL_COLOR_BUFFER_BIT | GL_DEPTH_BUFFER_BIT); // [...] hdr glBindFramebuffer(GL_FRAMEBUFFER, 0); // hdr 2 hdrShader.use(); glActiveTexture(GL_TEXTURE0); glBindTexture(GL_TEXTURE_2D, hdrColorBufferTexture); RenderQuad(); Here, the color values contained in the color buffer may be greater than 1. For this article, a scene was created with a large elongated cube that looks like a tunnel with four point light sources, one of which is located at the end of the tunnel and has an enormous brightness.
std::vector<glm::vec3> lightColors; lightColors.push_back(glm::vec3(200.0f, 200.0f, 200.0f)); lightColors.push_back(glm::vec3(0.1f, 0.0f, 0.0f)); lightColors.push_back(glm::vec3(0.0f, 0.0f, 0.2f)); lightColors.push_back(glm::vec3(0.0f, 0.1f, 0.0f)); Rendering to a floating point buffer is exactly the same as if we were rendering the scene in a regular framebuffer. New is only a fragmentary hdr shader, which is engaged in a simple fill of a full-screen rectangle with values from the texture, which is a floating-point color buffer. To begin with, we will write a simple shader that sends input data unchanged:
#version 330 core out vec4 FragColor; in vec2 TexCoords; uniform sampler2D hdrBuffer; void main() { vec3 hdrColor = texture(hdrBuffer, TexCoords).rgb; FragColor = vec4(hdrColor, 1.0); } We take the input data from the floating point color buffer and use it as the output shader values. However, since the 2D rectangle is rendered into the default framebuffer, the output values of the shader will be limited to an interval from 0 to 1, despite the fact that in some places the values are greater than 1.
It becomes obvious that too large color values at the end of the tunnel are limited to one, since much of the image is completely white, and we lose image details that are brighter than one. Since we use HDR values directly as LDR, this is equivalent to the absence of HDR. To fix this, we need to display different color values back into the range from 0 to 1 without losing any image detail. For this, apply tonal compression.
Tonal compression
Tonal compression - converting color values to fit in the range from 0 to 1 without losing image detail, often in combination with giving the image the desired white balance.
The simplest tone compression algorithm is known as the Reinhard tone mapping algorithm. It displays any HDR values in the LDR range. Add this algorithm to the previous fragment shader, as well as apply gamma correction (and using SRGB textures).
void main() { const float gamma = 2.2; vec3 hdrColor = texture(hdrBuffer, TexCoords).rgb; // vec3 mapped = hdrColor / (hdrColor + vec3(1.0)); // - mapped = pow(mapped, vec3(1.0 / gamma)); FragColor = vec4(mapped, 1.0); } Note per. - for small values of x, the function x / (1 + x) behaves approximately as x, for large x it tends to unity. Function graph:

With Reinhard tonal compression, we no longer lose detail in bright areas of the image. The algorithm favors bright areas, making dark areas less distinct.

Here you can again see such details at the end of the image, like wood texture. With this relatively simple algorithm, we can clearly see any colors from the HDR range and can control the lighting of the scene without losing image detail.
It is worth noting that we can use tonal compression directly at the end of our shader to calculate the lighting, and then we will not need a floating point framebuffer at all. However, on more complex scenes, you will often encounter the need to store intermediate HDR values in floating point buffers, so this will be useful to you.
Another interesting feature of tone compression is the use of the exposure parameter. You may remember that in the images at the beginning of the article different details were visible at different exposure values. If we have a scene where day and night take turns, it makes sense to use low exposure by day and high at night, which is similar to the adaptation of the human eye. With this exposure parameter, we will be able to adjust the lighting parameters that will work both day and night under different lighting conditions.
A relatively simple algorithm of tone compression with exposure looks like this:
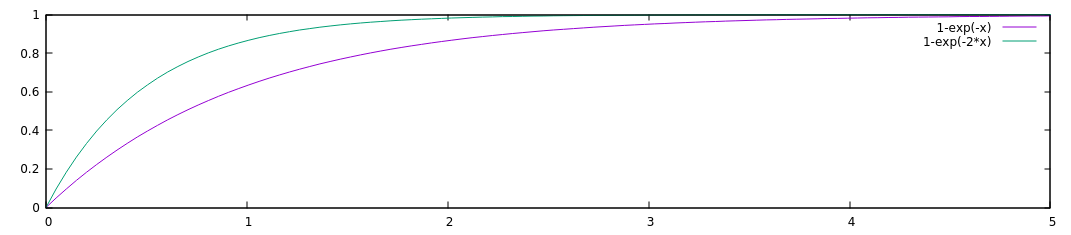
uniform float exposure; void main() { const float gamma = 2.2; vec3 hdrColor = texture(hdrBuffer, TexCoords).rgb; // vec3 mapped = vec3(1.0) - exp(-hdrColor * exposure); // - mapped = pow(mapped, vec3(1.0 / gamma)); FragColor = vec4(mapped, 1.0); } Note lane: add a graph for this function with exposure 1 and 2:
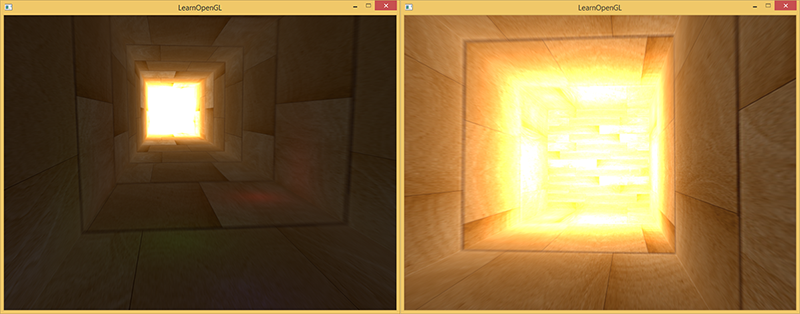
Here we defined a variable for the exposure, which is equal to 1 by default and allows us to more precisely choose the balance between the display quality of dark and bright areas of the image. For example, with a large exposure, we see significantly more details on dark areas of the image. Conversely, a small exposure makes the dark areas indistinguishable, but allows you to better see the bright areas of the image. Below are images of a tunnel with different exposure levels.

These images clearly show the advantages of hdr rendering. When the exposure level changes, we see more scene details that would have been lost during normal rendering. Take for example the end of the tunnel - with normal exposure, the texture of the tree is barely visible, but at low exposure the texture is perfectly visible. Similarly, with high exposure, details are clearly visible in dark areas.
The source code for the demo is here.
More HDR
The two tone compression algorithms that have been shown are only a small part among a large number of more advanced algorithms, each of which has its own strengths and weaknesses. Some algorithms better emphasize certain colors / brightness, some algorithms show both dark and bright areas, producing more colorful and detailed images. There are also many ways, known as automatic exposure adjustment (automatic exposure adjustment) or eye adaptation (eye adaptation) . They determine the brightness of the scene in the previous frame and (slowly) change the exposure parameter, so that the dark scene slowly becomes brighter and bright - darker: similar to the addiction of the human eye.
The real advantages of HDR are best seen on large and complex scenes with serious lighting algorithms. For the purposes of teaching, this article used the simplest scene possible, since creating a large scene can be difficult. Despite the simplicity of the scene, some of the advantages of hdr rendering are visible: in dark and light areas of the image, details are not lost, as they are preserved by tonal compression, adding multiple light sources does not result in white areas, and the values do not have to fit in LDR range.
Moreover, HDR rendering also makes some interesting effects more believable and realistic. One such effect is bloom, which we will discuss in the next article .
Additional resources:
- A stackexchange question with an excellent long answer, which describes some of the benefits of HDR rendering: does bloom not be applied?
- Another interesting answer with good images as examples of tone mapping. What is tone mapping? How does it relate to HDR?
PS We have a telegram-konf to coordinate transfers. If there is a serious desire to help with the translation, then you are welcome!
Source: https://habr.com/ru/post/420409/
All Articles