Vuex: structuring large projects and working with modules
Vuex is the official, well-documented library for managing application health, designed specifically for the Vue.js framework. The author of the material, the translation of which we are publishing today, believes that using this library is much more pleasant than Redux, because, firstly, it takes less template code to work with Vuex, and secondly, because with asynchronous mechanisms, no additional libraries are needed here. Moreover, since the Vuex library was created by the same team that is working on Vue, this library integrates very well with this framework. Unfortunately, in working with Vuex you can still encounter one difficulty, which is the correct preparation of the structure of projects in which you plan to use this library.

In this article, you will find a description of how to structure large projects using Vuex, and a script designed to automate the process of creating Vuex modules.
One of the developers of Vue, Chris Fritz, created a great template for Vue, the project structure presented in which is designed to use Vuex. In particular, this template allows Vuex to automatically register modules based on files in the
')

Project structure and inconvenient code placement
When using this template, it is necessary that the state, getters, actions and mutations be in the same file. Personally, I prefer to keep them in separate files, which allows, given the fact that Vuex modules are sometimes quite large, it is convenient to navigate in programs, without having to scroll through huge chunks of code. Following this idea, we will change the code from the template so that what belongs to the individual modules can be decomposed into folders for these modules. That is, the project structure will change and will be similar to the one shown below.
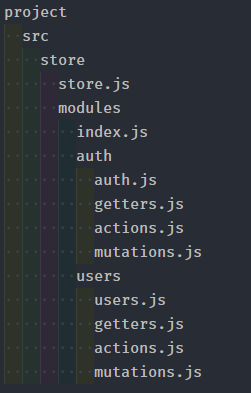
The structure of the project with the division of materials of the modules into separate files that are in the folders of the modules
So, we are going to organize work with Vuex so that it would be possible to use in our projects folder and file structures like the one shown in the previous figure. In order to do this, we first create a new project using Vue CLI 3 .
After you have the project template ready to continue working with it, install Vuex and Lodash by running the command
Now create a folder and file structure similar to the one shown in the previous figure.
Let's start working with the file
Vue and Vuex are imported here, since we can't do without them. In addition, we import modules from
Now it's time to work with the
In this code, we first import the
Now it remains only to go through all the modules and form a single object with all of them. Here it is necessary to exclude all files in the name of which there is a
As a matter of fact, this is exactly how the project can be structured, in which the state, getters, actions and mutations are stored separately and are conveniently organized. Now let's talk about how to write a script to automatically create Vuex modules.
Create a new folder in the project folder with the name
In the
As you can see, we write all the arguments to
Here we need to check the length of the
At this point, we have a name for the module and the path given by the
The module name will be in the element of the

Sample error message
Next you need to create constants in which there will be data for the files. As you can imagine,
Now we just need to form the paths for the module files and create them.
First we declare four constants, each of which contains the path for the corresponding file. Next we need to create a folder for the module. We have already checked whether such a folder exists and generated an error if this is the case. Therefore, there should be no problems with creating a folder. And finally, we use the
In order to use this script, it is enough to go to the
After reading this material, you learned about a template for structuring large projects that plan to use Vuex, and a script that simplifies the creation of Vuex modules. We hope this knowledge will be useful to you. The project code, examples from which we considered, can be found here .
Dear readers! How do you structure large Vue applications that use Vuex?

In this article, you will find a description of how to structure large projects using Vuex, and a script designed to automate the process of creating Vuex modules.
The vue-enterprise-boilerplate pattern and project structure problem
One of the developers of Vue, Chris Fritz, created a great template for Vue, the project structure presented in which is designed to use Vuex. In particular, this template allows Vuex to automatically register modules based on files in the
modules folder. The project folder structure may look something like the following figure.')
Project structure and inconvenient code placement
When using this template, it is necessary that the state, getters, actions and mutations be in the same file. Personally, I prefer to keep them in separate files, which allows, given the fact that Vuex modules are sometimes quite large, it is convenient to navigate in programs, without having to scroll through huge chunks of code. Following this idea, we will change the code from the template so that what belongs to the individual modules can be decomposed into folders for these modules. That is, the project structure will change and will be similar to the one shown below.
The structure of the project with the division of materials of the modules into separate files that are in the folders of the modules
Development of a template that supports a convenient project structure
So, we are going to organize work with Vuex so that it would be possible to use in our projects folder and file structures like the one shown in the previous figure. In order to do this, we first create a new project using Vue CLI 3 .
After you have the project template ready to continue working with it, install Vuex and Lodash by running the command
npm install vuex lodash -save in the terminal. To work with modules, we need the camelCase function from Lodash, which is designed to convert strings to camel style.Now create a folder and file structure similar to the one shown in the previous figure.
Let's start working with the file
store.js . Here is his code: import Vue from 'vue' import Vuex from 'vuex' import modules from './modules' Vue.use(Vuex) const store = new Vuex.Store({ modules, strict: process.env.NODE_ENV !== 'production' }) // `init` for (const moduleName of Object.keys(modules)) { if (modules[moduleName].actions.init) { store.dispatch(`${moduleName}/init`) } } export default store Vue and Vuex are imported here, since we can't do without them. In addition, we import modules from
/modules/index.js . Next, we initialize the repository and loop through all the modules. If the module has an init action, we initialize the module. This is very useful for those modules that need to be initialized when launching the application. As a result, of course, we export the store , after which, usually, it is imported into the main.js file and added to the Vue instance.Now it's time to work with the
index.js file, which is located in the /store/modules folder. // Vuex , . import camelCase from 'lodash/camelCase'; // const requireModule = require.context( // '.', // true, // index.js, , // 'actions', 'mutations', 'getters' . // , .js /^(?!.*(actions|mutations|getters|index)).*\.js$/ ); const modules = {}; requireModule.keys().forEach(fileName => { // if (/\.unit\.js$/.test(fileName)) return; // modules[camelCase(fileName.split('/')[1].replace(/(\.\/|\.js)/g, ''))] = { namespaced: true, ...requireModule(fileName).default }; }); export default modules; In this code, we first import the
camelCase function from Lodash. Then we use the require.context method to connect the modules. As the third parameter, we pass in a regular expression there, which will filter the index.js file, as well as files with the names actions , mutations and getters in their names. They will be imported into the state file, for example, in auth.js , and then exported. For example, here’s how the auth.js file from the src/store/modules/auth/ folder might look like at the beginning of work: import actions from './actions'; import mutations from './mutations'; import getters from './getters'; const state = { user: null }; export default { state, mutations, getters, actions }; Now it remains only to go through all the modules and form a single object with all of them. Here it is necessary to exclude all files in the name of which there is a
unit line, since they are needed only for tests, and not for development or for the deployment of a project in production. After that, we add a new property to the modules object, which will have the name of a state file, for example, auth or users . In addition, we use the camelCase function to make property names look uniform. Then we populate the modules object, requireModule through the requireModule and use the ...requireModule(fileName).default , and then export the modules .As a matter of fact, this is exactly how the project can be structured, in which the state, getters, actions and mutations are stored separately and are conveniently organized. Now let's talk about how to write a script to automatically create Vuex modules.
Script to automatically create Vuex modules
Create a new folder in the project folder with the name
scripts , create the generateVuexModule.js file in it. For this project, we need Node.js, so if you don’t have this platform installed, now is the time to fix it . Our script has only one dependency - the chalk package, which is used to decorate the materials output to the console. You can install this package with the npm install -save-dev chalk .▍Step 1
In the
generateVuexModule.js file, you need to connect three modules: fs , path and chalk . Also here you need a constant with the path to the folder with modules ( src/store/modules ) and another constant - args , which will get the arguments passed to the script when it is launched. const fs = require('fs'); const path = require('path'); const chalk = require('chalk'); const modulesPath = 'src/store/modules'; const args = process.argv.slice(2); const error = (...args) => { console.log(chalk.red(...args)); }; const success = (...args) => { console.log(chalk.green(...args)); }; if (!args.length) { error('You must provide a name for the module!'); return; } As you can see, we write all the arguments to
args except the first two, since they represent the path to node.exe and to the script file, and we don’t need this information. We are interested only in the third parameter - the name of the new module. In addition, there are a couple of functions, error and success , which use the above-mentioned package chalk to display messages with texts of different colors.Here we need to check the length of the
args array in order to find out if the module name has been transferred to our script, and if this is not the case, give an error message. Therefore, if you try to run this script using the node generateVuexModule.js command, without sending anything else to it, you will see an error message in the terminal.▍Step 2
At this point, we have a name for the module and the path given by the
modulesPath constant. However, we still need to work with this data. Namely, extract the name from the args array and collect the full path to the module, not to mention the formation of its contents. const moduleName = args[0]; const modulePath = path.join(__dirname, '../', modulesPath, moduleName); if (fs.existsSync(modulePath)) { error(`${moduleName} directory already exists!`); return; } const stateContent = `import getters from './getters'; import actions from './actions'; import mutations from './mutations'; const state = {}; export default { state, getters, actions, mutations }; `; const exportFileContent = `import * as types from '@/store/types'; export default { }; `; The module name will be in the element of the
args array with the index 0. At this stage of the program, we can count on the presence of this element, as we previously attempted to extract it from process.argv , and then checked the length of the args array. In addition, we prepared a full path using the path module and the join method. We obtained the current directory using the __dirname construction, went one level up, since the generateVuexModule.js file is located in the scripts project folder. Then we simply add the contents of the modulesPath constant and the name of the module to the modulesPath . At this point, the modulePath constant should contain something like pathToYourProject/project/src/store/modules/moduleName . This is where the module will be created. Now, since we have the full path, we can check if the given directory exists. We would not want to accidentally overwrite existing module files. As a result, if the directory in which you plan to create a new module exists, we will output, in red letters, thanks to chalk , an error message.Sample error message
Next you need to create constants in which there will be data for the files. As you can imagine,
stateContent used for a state file, that is, for example, for auth.js , and exportFileContent is used for getters.js , actions.js , and mutations.js . If necessary, you can add to this list everything that is required in your project.▍Step 3
Now we just need to form the paths for the module files and create them.
const statePath = `${path.join(modulePath, `${moduleName}.js`)}` const gettersPath = `${path.join(modulePath, 'getters.js')}` const actionsPath = `${path.join(modulePath, 'actions.js')}` const mutationsPath = `${path.join(modulePath, 'mutations.js')}` fs.mkdirSync(modulePath); fs.appendFileSync(statePath, stateContent); fs.appendFileSync(gettersPath, exportFileContent); fs.appendFileSync(actionsPath, exportFileContent); fs.appendFileSync(mutationsPath, exportFileContent); success('Module', moduleName, 'generated!'); First we declare four constants, each of which contains the path for the corresponding file. Next we need to create a folder for the module. We have already checked whether such a folder exists and generated an error if this is the case. Therefore, there should be no problems with creating a folder. And finally, we use the
fs.appendFileSync , placing new files with the contents specified in the process of their creation in the newly created directory. At the end of the script displays a message about the successful completion of the operation.In order to use this script, it is enough to go to the
scripts folder of your project in the terminal and execute the command of the type node generateVuexModule.js yourModuleName . After successful completion of the script, you will see a message about the creation of the module.Results
After reading this material, you learned about a template for structuring large projects that plan to use Vuex, and a script that simplifies the creation of Vuex modules. We hope this knowledge will be useful to you. The project code, examples from which we considered, can be found here .
Dear readers! How do you structure large Vue applications that use Vuex?
Source: https://habr.com/ru/post/420357/
All Articles