Step-by-step instructions for restoring access to a Linux Amazon EC2 instance when you lose a pem file
If you didn’t create a key pair (KeyPair) to access it via SSH or lost it when creating a Linux instance in AWS, then you need to perform a number of operations to gain access to the machine. It is not possible to add keys to an already running instance via the AWS console. There are three ways we can restore SSH access to the instance.
The easiest way is to configure the key using the cloud-init mechanism (thanks for the hint yusman ). But it does not work if the rights to the
The second way is to create an image (Amazon Machine Image) from an existing instance and then launch a new instance based on it, but with the creation of a key. Thus, an existing machine will actually be cloned with the only difference that at the last stage it is possible to create new keys. Creating an image can take a long time for an instance with large volume disks, and you will have to configure all services tied to this machine again. Therefore, this method in most cases will take more time.
')
The official documentation from Amazon describes another way . It allows you to restore access and minimize the cost of reconfiguring services (compared to the second method), which are tied to the instance to which access is lost. The article gives a step by step description.
Attention! This method works only for instances that use block storage (Amazon Elastic Block Store) as the root device, and does not work for local storage of instances (Amazon EC2 Instance Store).
To find out what type of root device you are using, open the Amazon EC2 console, go to Instances , select an instance and check the Root device type parameter in the details pane.

If your machine is EBS , then this method is suitable for you.
First you need to save some information so that you do not have to be distracted and do not switch to other screens (especially it will be very inconvenient). All data can be found in the detailed information of the instance (you already know how to get there). Record the following settings:
For an instance running in a VPC , save the value of the VPC ID .
For EC2-classic : if an elastic IP address ( Elastic IP ) is created for the instance, then its value must be saved.
 Image is clickable
To get the block storage identifier ( EBS ID ), click on the Root device name.

The next step is to create an instance, with which you will restore the keys on the original instance. You can skip this step if you have another running instance that is in the same zone (Availability zone) as the one being restored, and at the same time it is created using the same AMI or the version of the operating system on it allows you to connect the disk from the original instance and copy ssh keys to it. If there is no such instance, then do the following:
First you need to disconnect the disk from the original instance and connect it to a temporary one. Since this is the root disk, the original instance will have to be stopped before it is disconnected.
Linux users do not need to generate any additional keys. It is only necessary to give permissions to read this file:
Connect on port 22 using the key. The username depends on which AMI was used to create the instance. You recorded it at the very beginning. The following usernames are possible:
The name of the host you want to connect to is user@aws-host.amazon.com , where user is the name described above, and aws-host.amazon.com is the ip-address of your instance, which can be found on the detailed information tab (from it you saved parameters at the very beginning). The parameter is called IPv4 Public IP . Please note that if you do not use Elastic IP , each time the instance starts, it will have a new ip address.
Mount the volume that you connected to the temporary instance so that you can access its file system.
Copy the SSH keys from the temporary instance to the mounted partition.
Attention! Use the username specified on the command line. This is necessary because, despite the fact that you have successfully connected with a standard username, which depends on the operating system (described in step 5), in the AMI from the AWS Marketplace it may be different after logging in. For example, for AMI WordPress Certified by Bitnami, when logging in via SSH, the standard Ubuntu username is
Unmount the partition:
Connect to the restored access instance using the generated key.
If the name of the new key pair is different from the previous one, make sure that you connect using the new private key.
If you created a new temporary instance to perform all operations, rather than using an existing one, stop it if you no longer need it:
Thus, you have restored access to a Linux Amazon EC2 instance.
The easiest way is to configure the key using the cloud-init mechanism (thanks for the hint yusman ). But it does not work if the rights to the
/home directory are damaged or the distribution does not support cloud-init directives.The second way is to create an image (Amazon Machine Image) from an existing instance and then launch a new instance based on it, but with the creation of a key. Thus, an existing machine will actually be cloned with the only difference that at the last stage it is possible to create new keys. Creating an image can take a long time for an instance with large volume disks, and you will have to configure all services tied to this machine again. Therefore, this method in most cases will take more time.
')
The official documentation from Amazon describes another way . It allows you to restore access and minimize the cost of reconfiguring services (compared to the second method), which are tied to the instance to which access is lost. The article gives a step by step description.
Attention! This method works only for instances that use block storage (Amazon Elastic Block Store) as the root device, and does not work for local storage of instances (Amazon EC2 Instance Store).
To find out what type of root device you are using, open the Amazon EC2 console, go to Instances , select an instance and check the Root device type parameter in the details pane.
If your machine is EBS , then this method is suitable for you.
Step 1. Preparation
First you need to save some information so that you do not have to be distracted and do not switch to other screens (especially it will be very inconvenient). All data can be found in the detailed information of the instance (you already know how to get there). Record the following settings:
- Instance ID
- AMI ID
- EBS ID
- Root device
- Availability zone
For an instance running in a VPC , save the value of the VPC ID .
For EC2-classic : if an elastic IP address ( Elastic IP ) is created for the instance, then its value must be saved.
To get the block storage identifier ( EBS ID ), click on the Root device name.
Step 2. Create a temporary instance
The next step is to create an instance, with which you will restore the keys on the original instance. You can skip this step if you have another running instance that is in the same zone (Availability zone) as the one being restored, and at the same time it is created using the same AMI or the version of the operating system on it allows you to connect the disk from the original instance and copy ssh keys to it. If there is no such instance, then do the following:
- Go to the EC2 console (on the dashboard or in the Instances menu) and click Launch Instance
- On the AMI ( Choose an Amazon Machine Image ) page, select the one that was used to create the original instance (you recorded it in the first step - AMI ID ). If for some reason this AMI is not available, you can create an image from the original instance and use it, or select the type of AMI to which you can connect the root disk of the instance to be restored.
- On the Choose an Instance Type page, select the cheapest type available.
- On the Configure Instance Details page, specify the same zone ( Availability Zone ) as in our instance. If it is running in a VPC, select in the Network item the same VPC and specify a subnet in this zone.
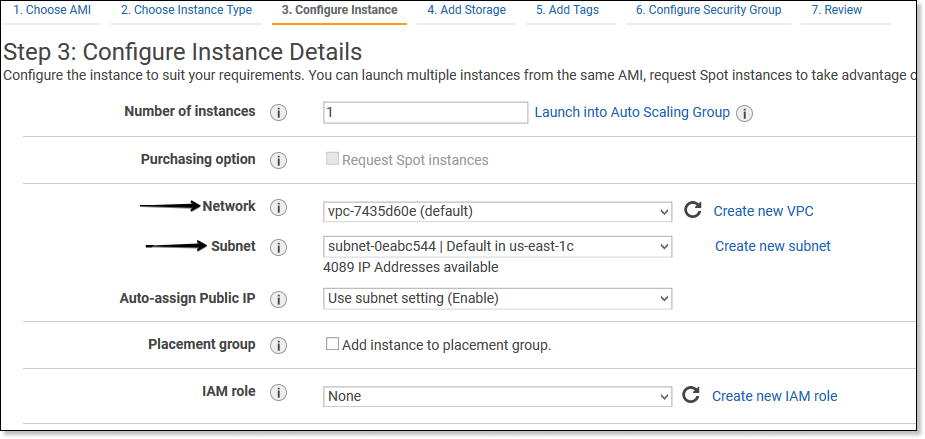
However, the Network Interfaces settings do not need to be changed. - No changes are required on the Add Storage page
- On the Tags page ( Add Tags ), add a name for the temporary instance so that it is easy to identify and then do not waste time checking Instance ID and EBS ID , as on the pages where you will need to determine which instance or volume you are working in the title this value will appear.

- Click Review and Launch , and then Launch
- The last stage is the selection of an existing key pair or the creation of a new one. Download the key file (pem) and do not forget to backup so that all operations do not have to be performed again.
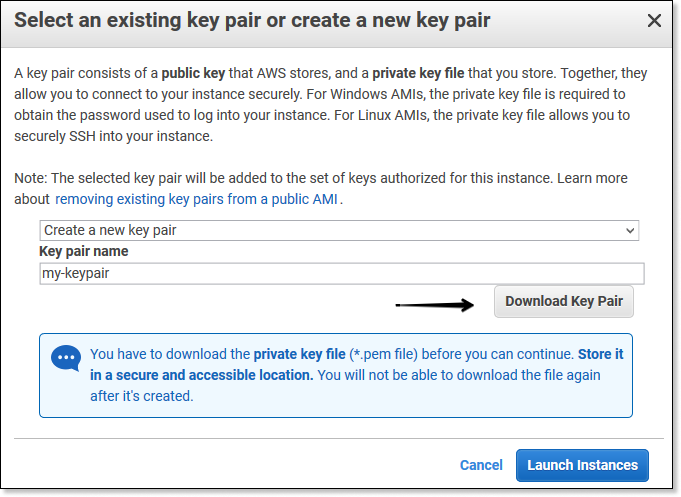
- After you save the file, launch the instance with the Launch Instances button.
Step 3. Connecting the root disk from the restored machine to the temporary instance
First you need to disconnect the disk from the original instance and connect it to a temporary one. Since this is the root disk, the original instance will have to be stopped before it is disconnected.
- Go to the EC2 section of the Instances console and select the original instance (it can be identified by the previously recorded Instance ID or by a name that differs from the one you specified when creating the temporary instance).

Next in the menu Actions - Instance State - Stop .
Attention! When the instance stops, all data in local storage (Amazon EC2 Instance Store) is erased. If you have data on such volumes, take care of their safety by transferring them to permanent storage, if necessary. - After the instance is stopped, go to the Elastic Block Store - Volumes section and select the root volume of the original instance. It can be determined by the saved Volume ID or based on information from the Attachment Information column, which contains the name of the instance.
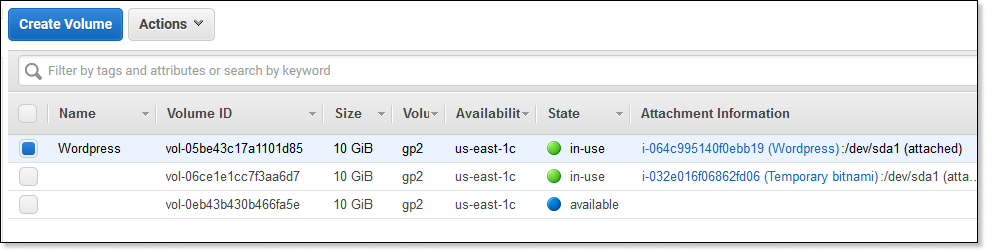
Further in the menu Actions - Detach Volume - Connect this volume to a temporary instance. To do this, select it again, then in the Actions - Attach Volume menu and in the dialog box that appears, specify your temporary instance.
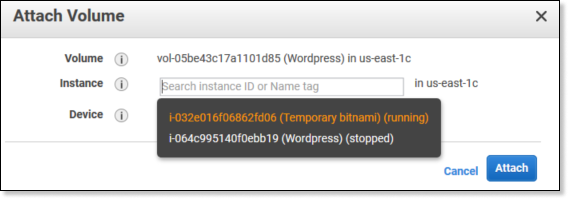
Then click Attach . If the original instance was created through the AWS Marketplace AMI and the section contains the AWS Marketplace codes, you will get an error stating that you cannot connect the section with the codes to a working instance.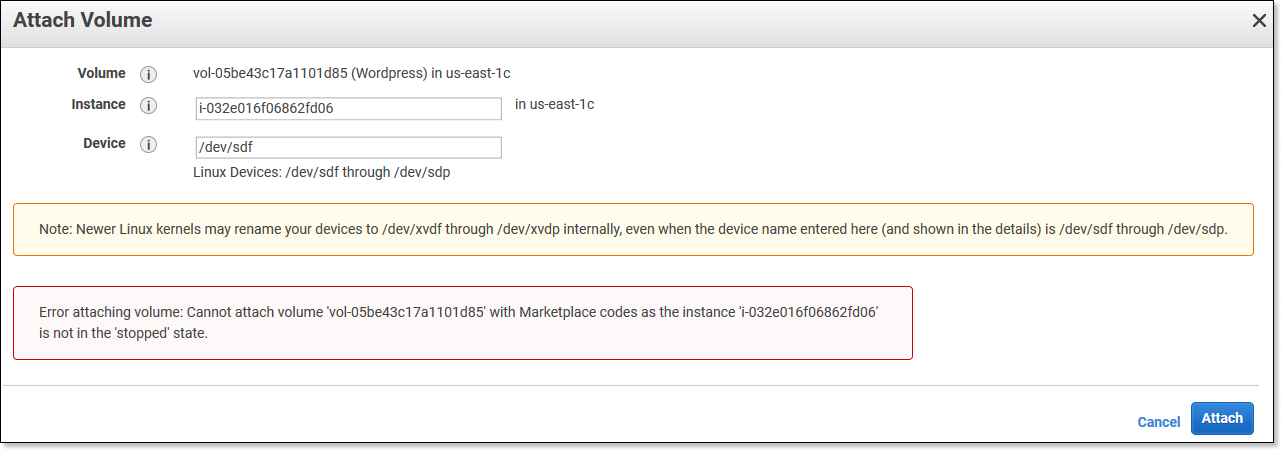
In this case, stop our temporary instance and re-perform the steps to connect the root volume of the original instance to the temporary instance. The second attempt should be successful. - You should now see that both disks are connected to a temporary instance.

- If you stopped the instance, run it:
- Go to the Instances section in the navigation bar.
- Choose a temporary instance
- Next in the menu Actions - Instance State - Start .
Step 4. Preparing keys for connecting to the instance over SSH
Linux users do not need to generate any additional keys. It is only necessary to give permissions to read this file:
chmod 400 my-keypair.pemKey preparation, if you are working under Windows
To connect to a Linux machine, we will use the PuTTY utility, so if you do not have it installed, download it. To connect via SSH with its help, you need a ppk-key , while with AWS the key was saved in pem format. In order to get the key to the desired format, do the following:
The key is ready.
- Open PuTTYgen (installed with PuTTY)
- Select RSA 2048 bits in the parameters.

- Load the saved pem-key by clicking Load (Load an existing private key file)
- Specify a passphrase and confirm it ( confirm passphrase ). It is not necessary to do this, but it is safer. The only difference is that when connecting using this key, you will always be prompted to enter this phrase to confirm the entry.
- Save the file with the name you specified when creating the key pair ( KeyPair ) during the creation of the temporary instance (the name is the same as the name of the pem key )
The key is ready.
Step 5. Connecting to a temporary instance over SSH
Connect on port 22 using the key. The username depends on which AMI was used to create the instance. You recorded it at the very beginning. The following usernames are possible:
- Amazon Linux 2 or Amazon Linux AMI - ec2-user
- Centos AMI - centos
- Debian AMI - admin or root
- Fedora AMI - ec2-user or fedora
- RHEL AMI - ec2-user or root
- SUSE AMI - ec2-user or root
- Ubuntu AMI - Ubuntu
- For others, if the names ec2-user and root do not work - contact your AMI provider.
The name of the host you want to connect to is user@aws-host.amazon.com , where user is the name described above, and aws-host.amazon.com is the ip-address of your instance, which can be found on the detailed information tab (from it you saved parameters at the very beginning). The parameter is called IPv4 Public IP . Please note that if you do not use Elastic IP , each time the instance starts, it will have a new ip address.
Connection instructions for Windows users
- Run PuTTY
- In the Host Name address in the format username @ ip-address

- Go to the Connection - SSH - Auth section and download the ppk-key (Private key file for authentication)
- Click Open and then agree to trust the server.
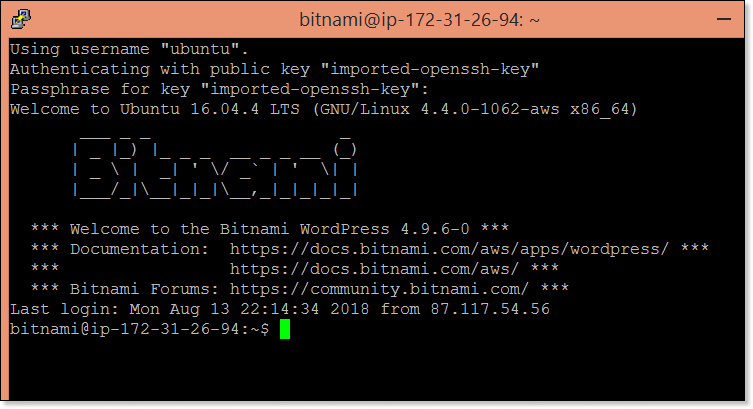
- If you specified a password phrase (passphrase) when creating a ppk key, enter it to confirm the entry:
Using username "ubuntu". Authenticating with public key "imported-openssh-key" Passphrase for key "imported-openssh-key": - You are on the server.
Step 6. Copying keys from the temporary instance to the original one
Mount the volume that you connected to the temporary instance so that you can access its file system.
Mounting a partition
For example, if the disk name is
/dev/sdf (it may appear differently on your instance), use the following operations to mount the volume in /mnt/tempvol :- Determine the partition names of the mounted drive:
[user ~]$ lsblkNAME MAJ:MIN RM SIZE RO TYPE MOUNTPOINT xvda 202:0 0 10G 0 disk └─xvda1 202:1 0 10G 0 part / xvdf 202:80 0 10G 0 disk └─xvdf1 202:81 0 10G 0 part/dev/xvda1and/dev/xvdf1- disk partitions./dev/xvdf1does not have a mount point (MOUNTPOINT), so this is the partition of the disk that we connected earlier. - Create a temporary directory to mount the partition:
[user ~]$ sudo mkdir /mnt/tempvol - Mount the partition in the created directory:
[user ~]$ sudo mount /dev/ xvdf1 /mnt/tempvol
Copy the SSH keys from the temporary instance to the mounted partition.
Attention! Use the username specified on the command line. This is necessary because, despite the fact that you have successfully connected with a standard username, which depends on the operating system (described in step 5), in the AMI from the AWS Marketplace it may be different after logging in. For example, for AMI WordPress Certified by Bitnami, when logging in via SSH, the standard Ubuntu username is
ubuntu . However, the username after login is bitnamiCopy keys
For example, if the username is
If you do not have permissions to edit files in
ubuntu , use the following command to copy:[user ~]$ cp .ssh/authorized_keys /mnt/tempvol/home/ ubuntu /.ssh/authorized_keys
If you do not have permissions to edit files in
/mnt/tempvol , then copy the files using sudo and check the permissions to make sure that you can go to the original instance:- Check file permissions:
[user ~]$ sudo ls -l /mnt/tempvol/home/ ubuntu /.ssh/authorized_keystotal 4-rw------- 1 200 500 392 Aug 15 00:06 authorized_keys
In the example, 200 is the user ID and 500 is the group ID. - Restart the key copy command using
sudo:[user ~]$ sudo cp .ssh/authorized_keys /mnt/tempvol/home/ ubuntu /.ssh/authorized_keys - Check if the file permissions have changed:
[user ~]$ sudo ls -l /mnt/tempvol/home/ ubuntu /.ssh/authorized_keys
If the rights have changed, restore them:[user ~]$ sudo chown 200 : 500 /mnt/tempvol/home/ ubuntu /.ssh/authorized_keys
Unmount the partition:
[user ~]$ sudo umount /mnt/tempvolStep 7. Starting an instance with restored access via SSH
- In the EC2 console, select the drive that you connected to the temporary one, and in the menu: Actions - Detach Volume . Wait until the state of the disk becomes available (you can use the Refresh button to update the information).
Do not forget to stop the instance first, if the section contains AWS Marketplace codes. - For the same disk, go to the menu Actions - Attach Volume
- Select the original instance and specify the name of the root disk that you recorded at the very beginning.Image is clickable
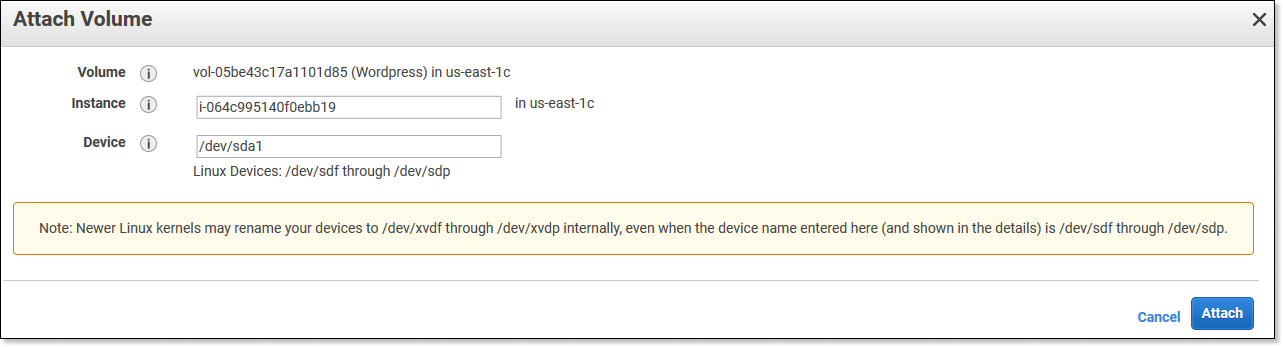
Click Attach - Run instance
- For EC2-classic : if Elastic IP was configured for the original instance, re-associate it with it:
- Go to the Elastic IP section in the navigation pane.
- Select the Elastic IP address you recorded at the very beginning
- Next Actions - Associate address
- Select the original instance ID and click Associate.
Step 8. Access check
Connect to the restored access instance using the generated key.
If the name of the new key pair is different from the previous one, make sure that you connect using the new private key.
Step 9. The final stage
If you created a new temporary instance to perform all operations, rather than using an existing one, stop it if you no longer need it:
- Go to the Instances section of the navigation bar.
- Choose a temporary instance
- Next in the menu Actions - Instance State - Terminate
Thus, you have restored access to a Linux Amazon EC2 instance.
Source: https://habr.com/ru/post/420297/
All Articles