Guide on Simple Queues in Mikrotik
There are a lot of articles on the Internet devoted to speed limits and traffic dividing on MikroTik equipment, but almost all of them consider only Queue Tree, which requires deep understanding and in many tasks are redundant and can be replaced by Simple Queues.
Simplified queues - the mechanism of dividing the bandwidth of the channel and prioritizing traffic associated with a specific goal (target). Incoming and outgoing traffic is calculated relative to the target.
There are three options for goals: ip, subnet, interface. You can add multiple target for one rule.
Theoretical part
Shapers, Planners and Queues
The data transfer rate is measured in relation to the transmitted information in bits per second of time - bit / sec. Bit unit is small, so they use prefixes kilo (kbit / sec), mega (Mbit / sec), giga (Gbit / sec).
The transmission rate of packets over communication networks is always equal to the transmission rate of the medium (for example, 100Mbit / sec for Ethernet 100BASE-TX). If it is necessary to reduce this speed, an intermediate device, such as a router, receiving packets from one interface at maximum speed sends them from the other with a certain delay, if the packets exceed the set speed limit, they are stored in the queue and sent as First In, First Out ( FIFO) if the queue is full (missing or has zero size), the router drops packets.
Limit - administrative speed limit for outgoing traffic from the interface.
Shaper (Shaper) - a software algorithm that delays and discards unnecessary packets.
Scheduler (Sheduler) - an algorithm that decides how to store and send packets that go beyond the limit.
Queues — storage and prioritization algorithms for passing traffic.
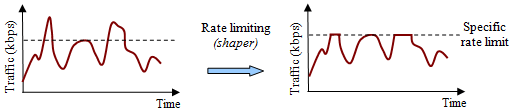
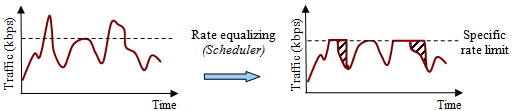
Graphic examples of the work of the shaper and the scheduler.
Using the shaper out of turn
Using the shaper with a scheduler
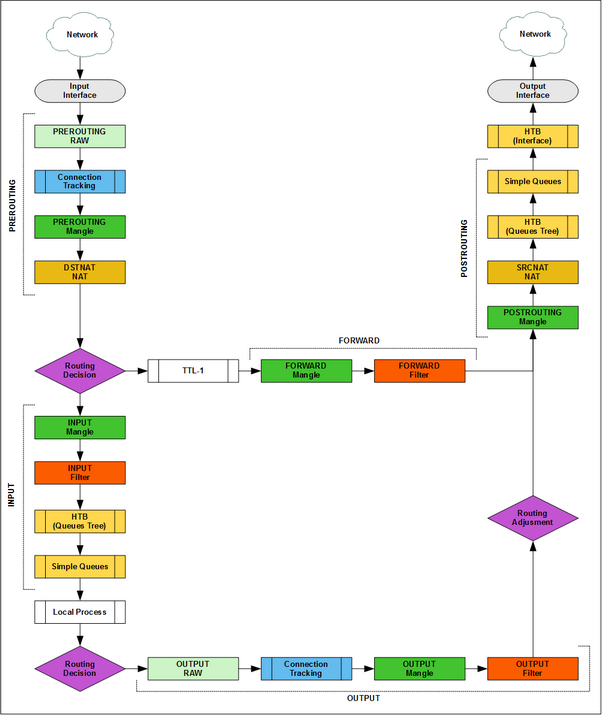
Simple Queues on Packet Flow
Simple Queues come after Queues Tree, sometimes simple queues are used to quickly limit traffic to one (or several) users, without interfering with Queues Tree.
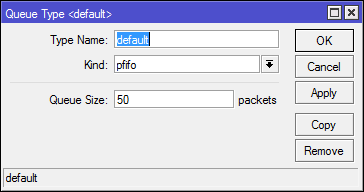
The mechanics of the queues: none, pfifo, pcq
none - there is no queue; if the limit is exceeded, all new packets are discarded.
pfifo is a packet oriented fifo algorithm. Stores the number of packages specified in the settings. Used by default in Simple Queues.
pcq (Per Connection Queuing) - all traffic is broken into sub-queues depending on a set of conditions. Part of the traffic is sent alternately from each sub-queue. The vacant place is occupied by the newly arrived traffic. If the place in the sub-queue ends, then the packets destined for it are discarded.
Consider a small part of the settings:
Rate : The speed limit for each of the sub-queues.
Limit : sub-queue size in kilobytes.
Total limit : the total size of all sub-queues in kilobytes.
The ratio Limit / Total limit is selected based on the situation. By default, 40 queues (2000/50), subject to their maximum filling traffic.
Burst : about him will be lower.
Classifier : based on what to divide traffic into queues.
The categorizer is divided into queues of various connections (connections), if you enter [IP] -> [Firewall] -> [Connections], then you can note that most of the connections contain the address and port of the recipient (src. Address, src. Port) and the sender ( dst. address, dst. port).
We discuss simple queues, so for simplicity we will assume that we filter only traffic coming from the wan interface, in which case relative to target outgoing (upload) traffic will be classified by src. address, and incoming (download) by dst. address.
Classification by port will help to avoid the situation with blocking a queue of traffic from one application, if one application breeds many outgoing connections (for example, torrent or web browser with a bunch of tabs), then they will have different src. port and traffic will also be divided into queues.
Dynamic PCQ shaping
If the Rate is set rigidly, then each sub-stream will have a specified speed and will not be able to exceed it until the total speed of all sub-streams exceeds the upper limit (in Simple Queues this is Total Limit), in this case the speed of all sub-streams will decrease in proportion.
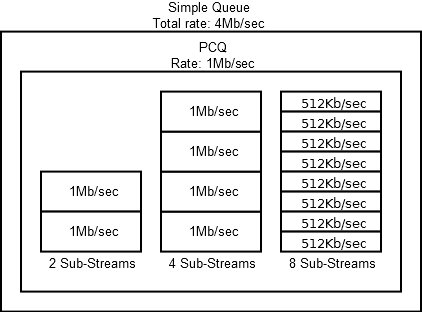
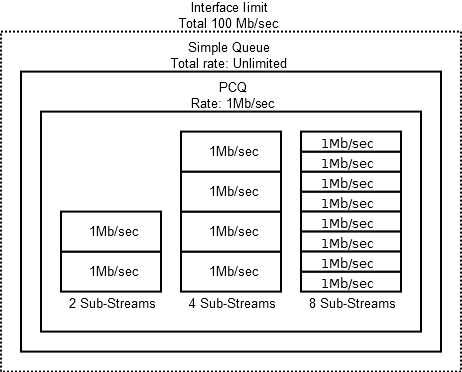
If Rate is set as 0, then the higher limit will be shared between all sub-threads. In fact, this is dynamic shaping.
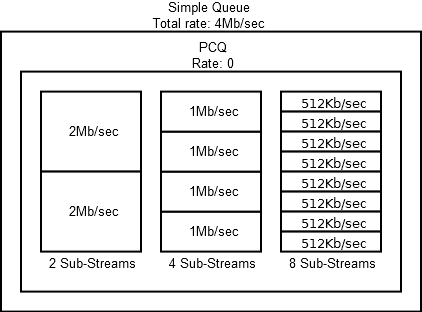
If Rate is set as 0 and Total Limit is not specified for Simple Queues, then the speed between sub-threads will be divided based on a higher limit, if queues are not nested, then this is a limit of the physical interface. If your tariff plan is lower, then part of the traffic will be killed on the equipment of the provider and there will be no benefit from the queues.
The remaining types of queues (SFQ, RED) have their own features and applications, and they can be used including for Simple Queues, but now they are not of interest to us.
Package marking
Yes, in simple queues you can use tagged traffic. This is not a mandatory condition (unlike Queue Tree), but allows you to move away from the target restrictions.
Traffic marking occurs in [IP] -> [Firewall] -> [Mangle], there are three types of labels in total: Connection, Packet, Route. Each package can contain one tag of each type. Getting into the mangle, the package passes in turn according to all the rules, if there are two lines that set the label, then the lower rule will overwrite the label from the higher one. To prevent overwriting, you can turn off the packet down the chain in the first rule ( passtrought=no ).
When configuring queues, you can only use packet labels ( action=mark-packet ). But to improve performance (connection labels are checked faster than examining the conditions in each of the packages) it is recommended to first mark the connections ( action=mark-connection ), and then the packages in this connection ( action=mark-package ). The rule with pre-marking of connections is not always true, but if you have reached this understanding when building queues, then you should use the Queue Tree.
You can mark transit traffic in any of the Packet Flow chains, but in most cases I prefer to use forward, because at this stage, the recipient's addresses with the sender and the names of the incoming and outgoing interfaces are known.

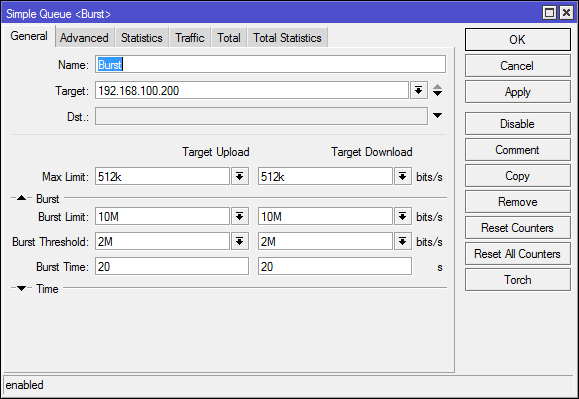
/ip firewall mangle add action=mark-connection chain=forward connection-state=new dst-port=5060,10000-20000 new-connection-mark=output-sip-and-rtp passthrough=yes protocol=udp src-address=192.168.100.0/24 add action=mark-packet chain=forward connection-mark=output-sip-and-rtp new-packet-mark=output-packet-sip-and-rtp passthrough=no What is Burst
Usually, a speed limit refers to a certain static value of the limit per second upon reaching which packets are dropped or queued. Burst operates with an average value per unit of time, this makes it possible to use higher (peak) speeds in short periods of time and limits the speed at a constant load on the channel.
Max Limit - the main limitation.
Burst Limit - peak speed, takes precedence over Max Limit, subject to a given average speed.
Burst Threshold - speed limit.
Burst Time - time.
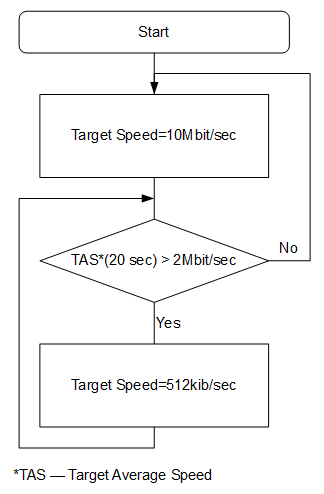
Target gets speed from Burst Limit, but every second the average speed for Burst time will be calculated. If the average speed in a given time exceeds the Burst Threshold, then the user will be limited to Max Limit, if the average speed returns to normal, then the target will again receive Burst Limit.
Rule Burst:
The block diagram showing the change in speed target:
And what does the speed change for target look like?
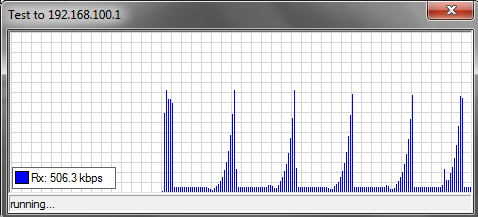
If you are interested in the topic of Burst, then I recommend reading the information on the wiki , there are graphs and tables based on which it will be better understood how the Threshold and Time values affect the speed limit.
Difference Limit at and Max Limit
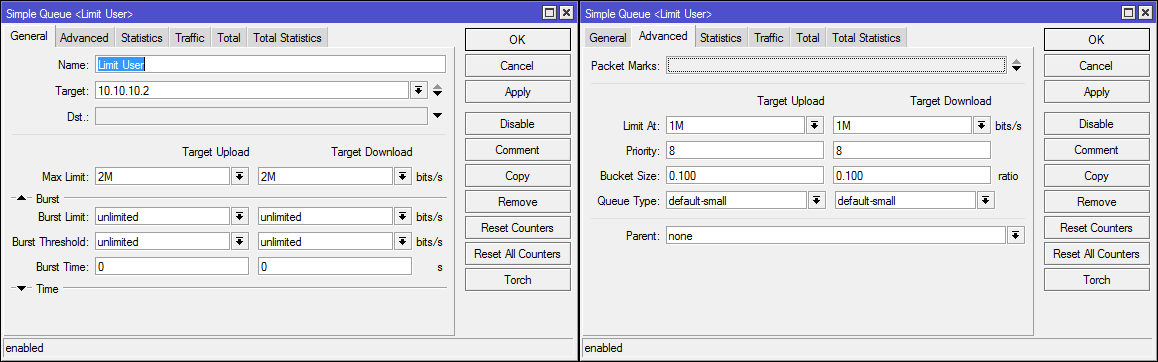
Limit at - guaranteed speed for the rule. It is desirable that the sum of all Limit at does not exceed the bandwidth of the channel. Always less than the maximum.
Max Limit - the maximum speed for the rule. If the "budget" of the queue allows, then the maximum bandwidth will be allocated.
Usually, only Max Limit is specified in simplified queues and it works normally, but in a configuration with cascading queues, both limits should be specified.
Practical part
Simple queues are configured in [Queues] -> [Simple Queues].
Rules are processed alternately from top to bottom, the first matching rule is applied to the passing packet. In fact, from any rule you can make an "exception" by placing a more specific rule above.
Speed limit for a specific host / subnet / interface
Usually used when you need to kill the speed of a particular user.
Name: any name
Target: address, subnet or interface.
Target Upload: outbound speed limit.
Targer Download: incoming speed limit.
Speed limit to 1Mbit / sec:
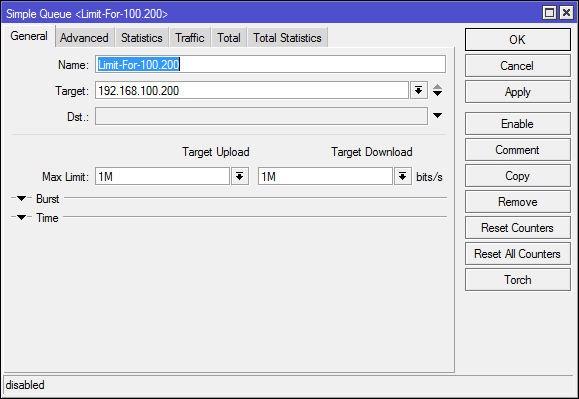
/queue simple add max-limit=1M/1M name=Limit-For-100.200 queue=default/default target=192.168.100.200/32 In Statistics, you can look at the current speed for the target, the number of packets in the queue and the number of dropped packets.
Speed limit for remote resource
Option without labeling packages.
In the dst field, similarly to the target, the following can be specified: ip, subnet, interface. In the conditions of the modern Internet this is not enough, but it can be useful for small companies and speed limits between offices.
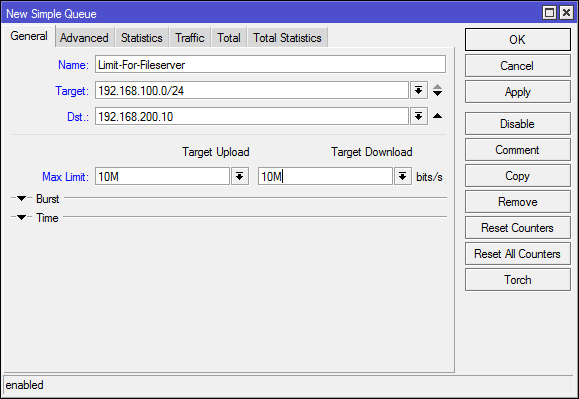
/queue simple add dst=192.168.200.10/32 max-limit=10M/10M name=Limit-For-Fileserver target=192.168.100.0/24 Equal division of the channel between the participants of the subnet (pcq)
One rule that will save your home or office subnet from exclusive channel capture (in the example 50Mb / sec, adjust for your channel) by one user.

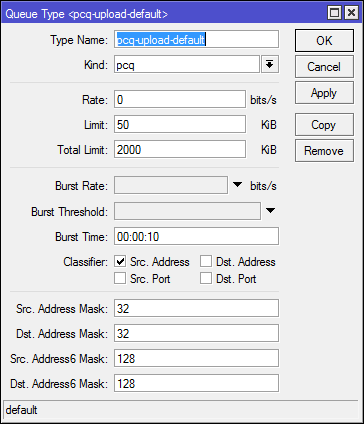
The specified pcq queues are present in the basic configuration, but I attach screenshots in case of changes.
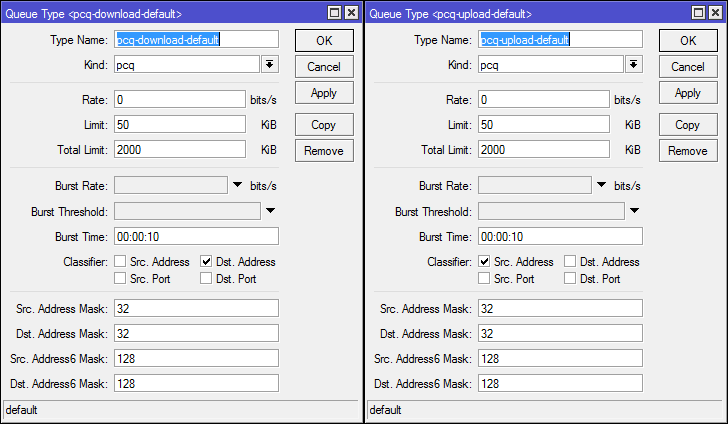
# /queue type add kind=pcq name=pcq-upload-default pcq-burst-rate=0 pcq-burst-threshold=0 pcq-burst-time=10s pcq-classifier=src-address pcq-dst-address-mask=32 pcq-dst-address6-mask=128 pcq-limit=50KiB pcq-rate=0 pcq-src-address-mask=32 pcq-src-address6-mask=128 pcq-total-limit=2000KiB add kind=pcq name=pcq-download-default pcq-burst-rate=0 pcq-burst-threshold=0 pcq-burst-time=10s pcq-classifier=dst-address pcq-dst-address-mask=32 pcq-dst-address6-mask=128 pcq-limit=50KiB pcq-rate=0 pcq-src-address-mask=32 pcq-src-address6-mask=128 pcq-total-limit=2000KiB # Simple queues /queue simple add max-limit=50M/50M name=Limit-Equivalent queue=pcq-upload-default/pcq-download-default target=192.168.100.0/24 On the Statistics tab, you can see how many pcq threads are currently in the queue.

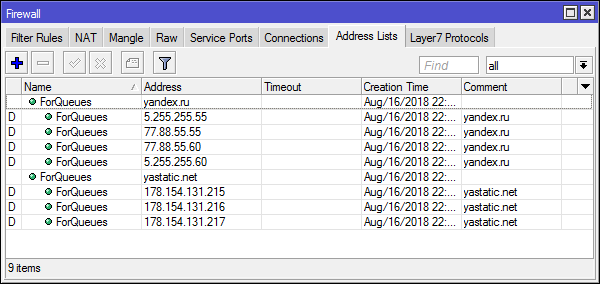
Tagged traffic
The dst option is quite limited and if you want to use domain names or address lists, you will have to resort to marking the traffic. For example, we will cancel the restrictions for the yandex.ru domain (yes, a bunch of cdn'ok and other things are connected there and you will need to add them for normal operation).
In one of the recent versions, it became possible to add domain names to address lists, mikrotik automatically resolves them and adds dynamic entries.
Traffic marking http / https (connection and packets in connection) for the specified addresses:
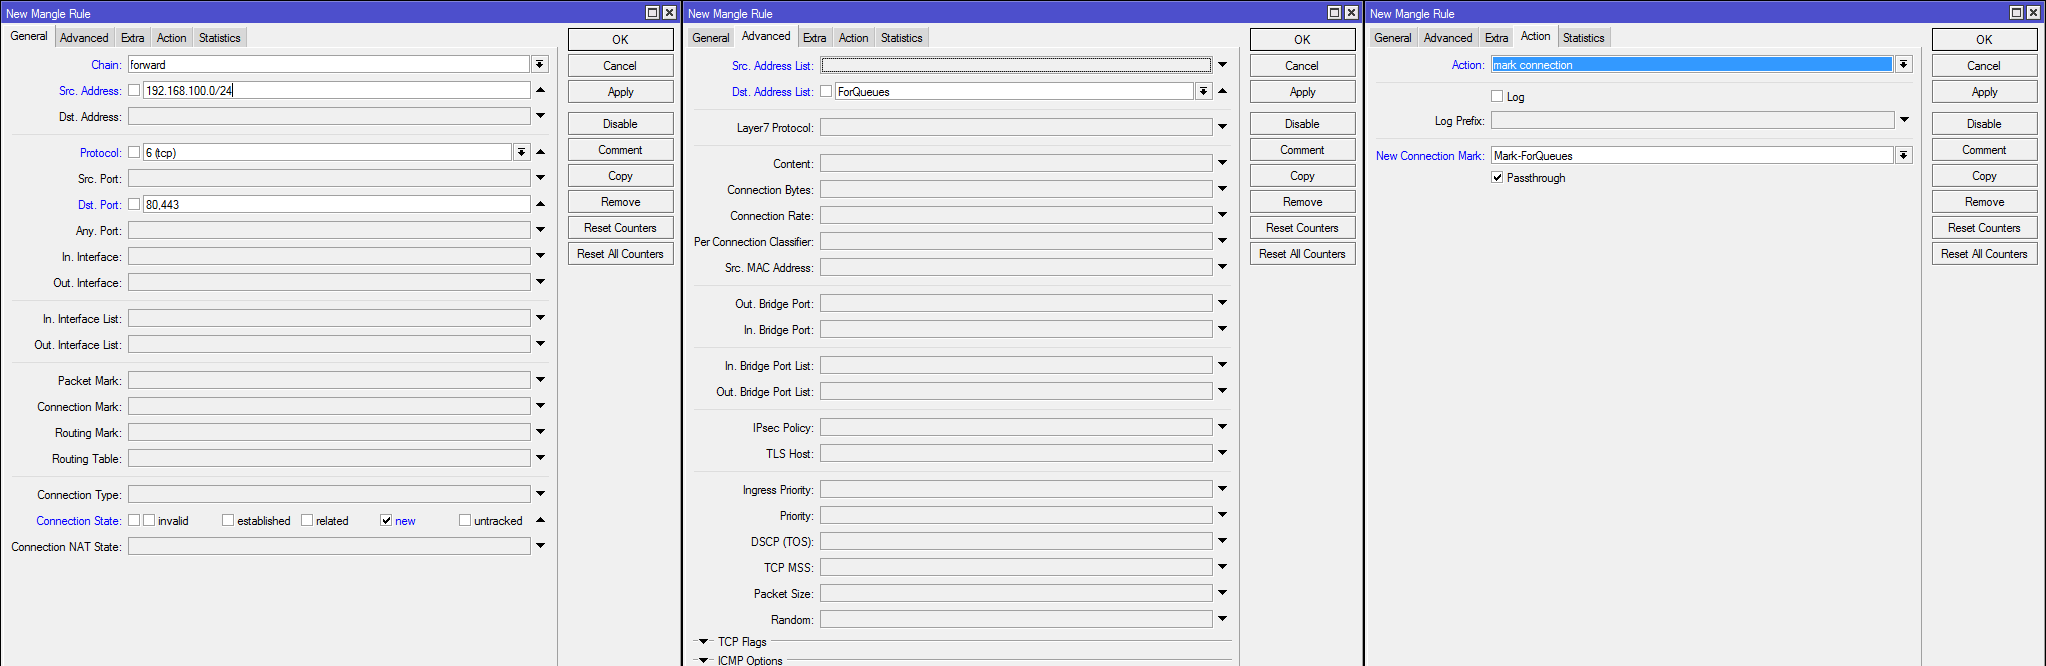
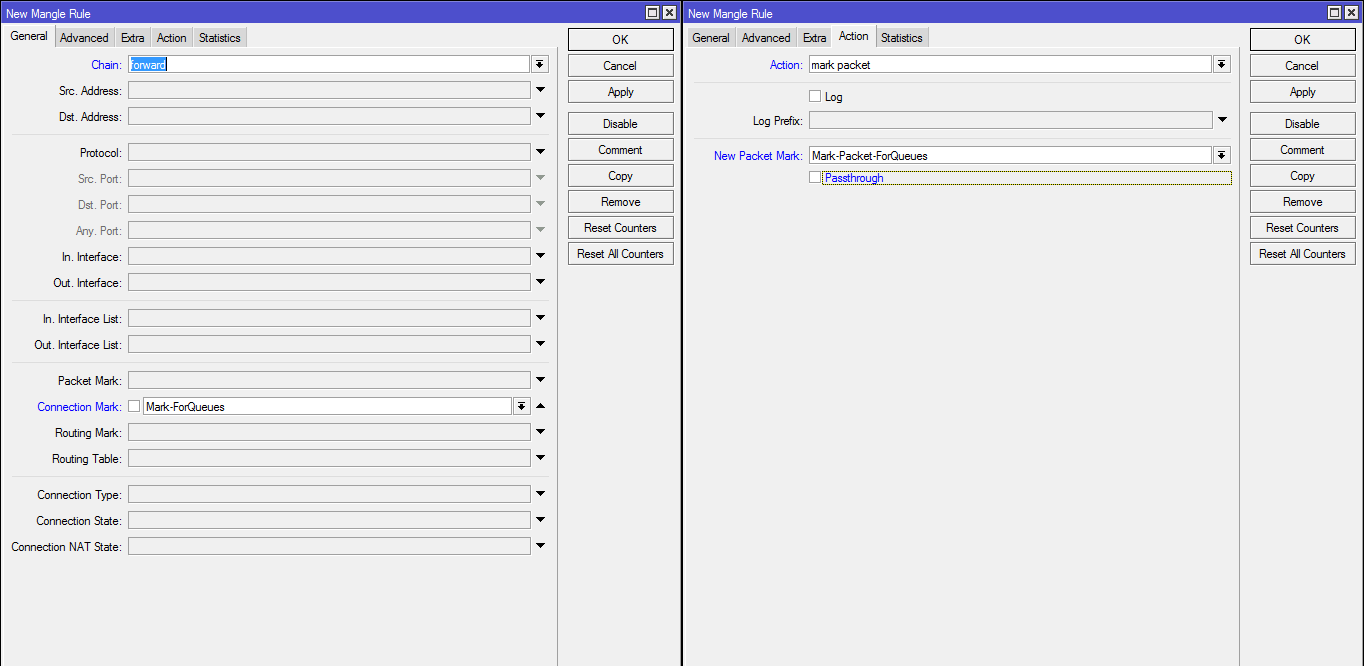
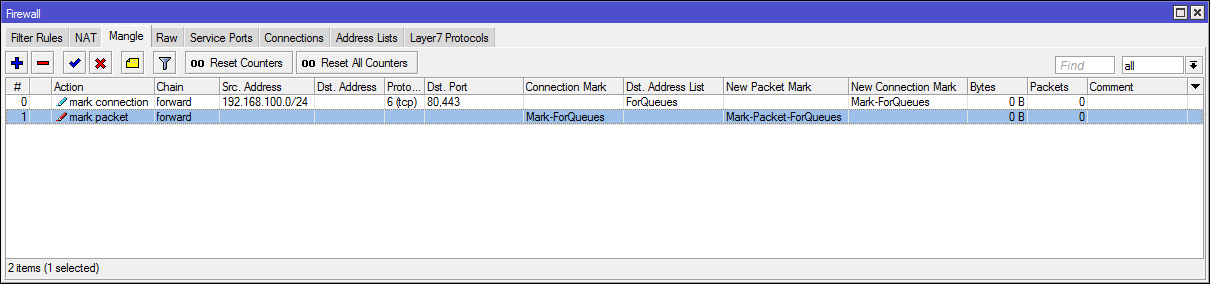
Rule in Simple Queue:
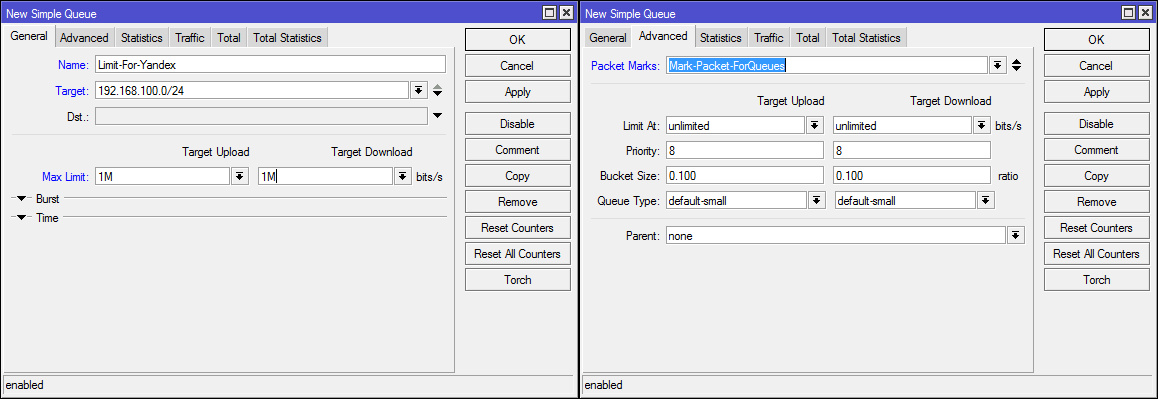
# /ip firewall address-list add address=yandex.ru list=ForQueues add address=yastatic.net list=ForQueues # /ip firewall mangle add action=mark-connection chain=forward connection-state=new dst-address-list=ForQueues dst-port=80,443 new-connection-mark=Mark-ForQueues passthrough=yes protocol=tcp src-address=192.168.100.0/24 add action=mark-packet chain=forward connection-mark=Mark-ForQueues new-packet-mark=Mark-Packet-ForQueues passthrough=no # Simple Queue /queue simple add max-limit=1M/1M name=Limit-For-Yandex packet-marks=Mark-Packet-ForQueues target=192.168.100.0/24 Cascading queues
All that is said above relates to limiting and dividing the speed between network participants, the time has come to touch on the topic of prioritizing traffic. It is usually required for interactive traffic (voip, vcs, ssh, rdp, ...) in a limited and loaded channel environment.
For cascading queues, the Parent parameter is responsible, which refers to the "parent" queue. To work, all traffic from the "child" queues must be captured by the parent.
The Priority parameter is responsible for what traffic will be previously added to the queue, it works only in child queues (or in "parent" if they have no "child"), can take values from 1 (highest priority) to 8 and has nothing common with QoS (DSCP; TOS) tags.
Traffic pre-marking:

/ip firewall mangle add action=mark-connection chain=forward connection-state=related,new dst-port=5060,10000-20000 in-interface=br-lan new-connection-mark=mark-conn-voip passthrough=yes protocol=udp add action=mark-packet chain=forward connection-mark=mark-conn-voip new-packet-mark=mark-pkg-voip passthrough=no add action=mark-connection chain=forward connection-state=new dst-port=80,443 in-interface=br-lan new-connection-mark=mark-conn-web passthrough=yes protocol=tcp The queue in SimpleQueue:
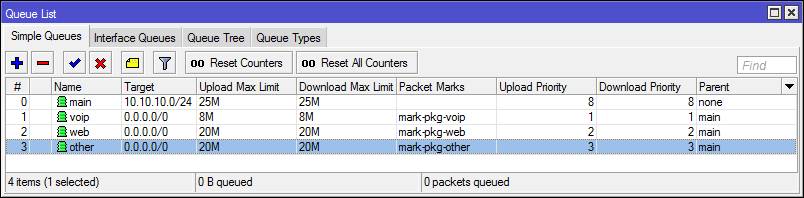
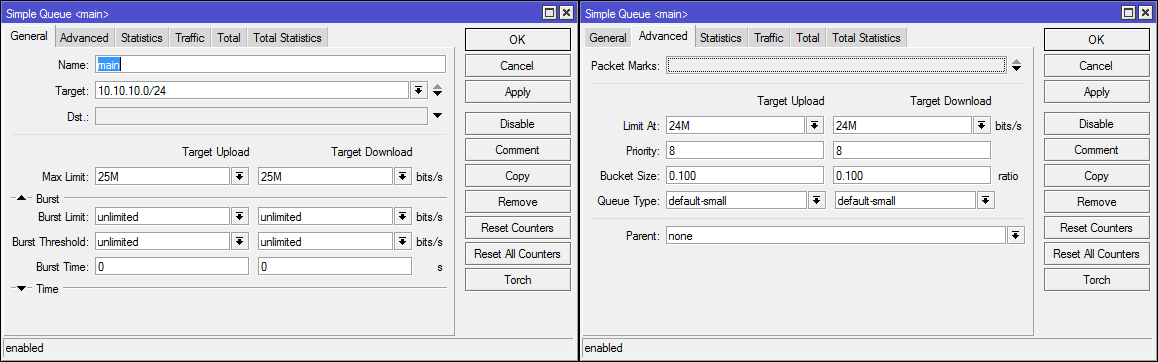
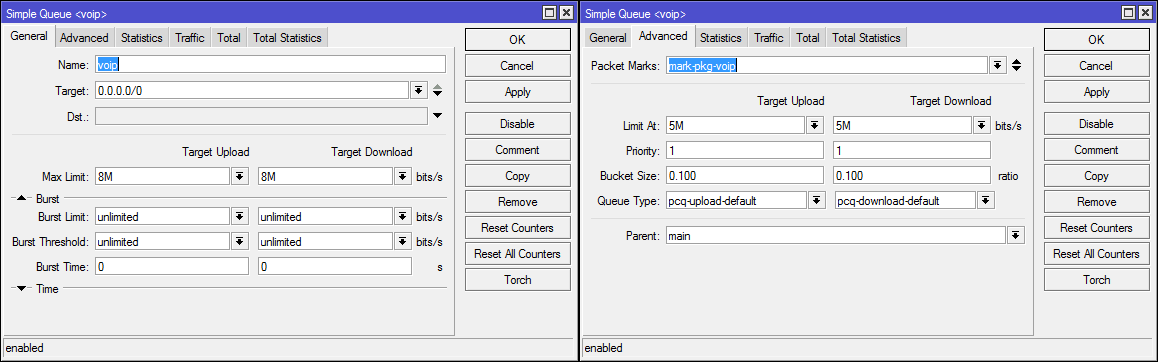
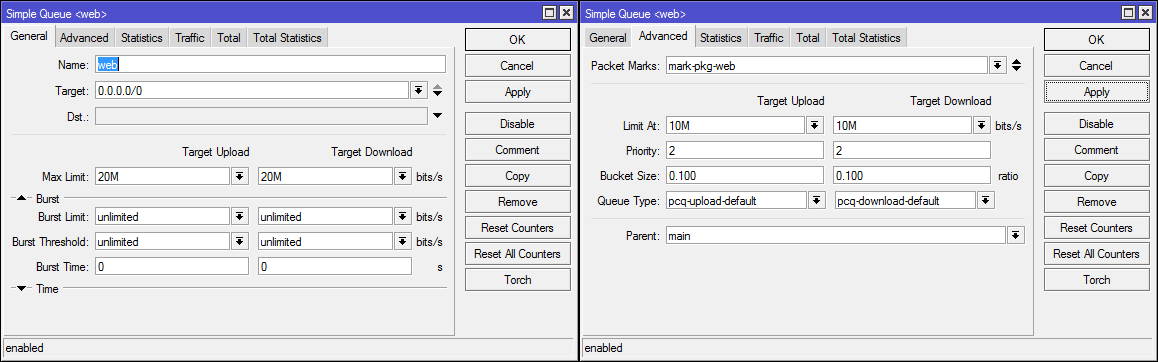
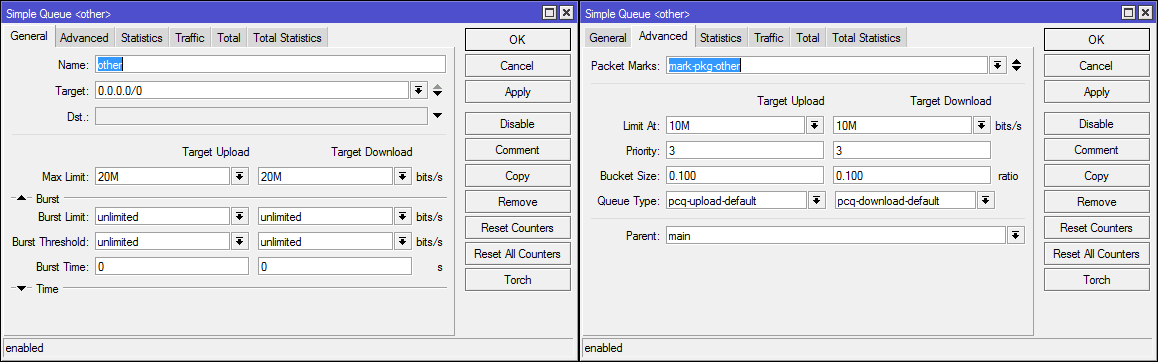
/queue simple add limit-at=24M/24M max-limit=25M/25M name=main target=10.10.10.0/24 add limit-at=5M/5M max-limit=8M/8M name=voip packet-marks=mark-pkg-voip parent=main priority=1/1 queue=pcq-upload-default/pcq-download-default target="" add limit-at=10M/10M max-limit=20M/20M name=web packet-marks=mark-pkg-web parent=main priority=2/2 queue=pcq-upload-default/pcq-download-default target="" add limit-at=10M/10M max-limit=20M/20M name=other packet-marks=mark-pkg-other parent=main priority=3/3 queue=pcq-upload-default/pcq-download-default target="" Now, if you need to make a restriction for one IP, just put a rule in front of a cascade of queues.
Afterword
Simple Queues is quite an interesting and functional tool for home and SOHO configurations; by a single rule (without labeling traffic), you can solve the problem of capturing a channel with one device. But, if you use FastTrack, then forget about the queues - the traffic will pass by them.
For more complex configurations, there are Queues tree (HTB trees).
')
Source: https://habr.com/ru/post/420117/
All Articles