Ivy Research - New Angular Compiler
“ I think compilers are very interesting ,” says Uri Sheked, the author of the material, the translation of which we are publishing today. Last year, he wrote an article in which he talked about the reverse engineering of the Angular compiler and about the imitation of certain stages of the compilation process, which helps to understand the features of the internal structure of this mechanism. It should be noted that usually what the author of this material refers to as a “compiler” is called a “rendering engine”.
When Uri heard that a new version of the Angular compiler, called Ivy, was released, he immediately wanted to take a closer look at it and find out what changed in it compared to the old version. Here, just as before, templates and components created by Angular, which are converted into plain HTML and JavaScript code, understandable by Chrome and other browsers, come to the input of the compiler.

')
If we compare the new version of the compiler with the previous one, it turns out that Ivy uses the tree-shaking algorithm. This means that the compiler automatically removes unused code fragments (this also applies to Angular code), reducing the size of project bundles. Another improvement concerns the fact that now each file is compiled independently, which reduces the recompile time. If in a nutshell, thanks to a new compiler, we get smaller builds, faster re-compilation of projects, more simple ready-made code.
Understanding how the compiler works is interesting in itself (at least, the author of the material hopes for it), but it also helps to better understand the internal mechanisms of Angular. This leads to the improvement of the skills of “Angular-thinking”, which, in turn, makes it possible to more effectively use this framework for web development.
By the way, do you know why the new compiler was called Ivy? The fact is that this word sounds like a combination of the letters "IV", read aloud, which represents the number 4, written in Roman numerals. "4" is the fourth generation of Angular compilers.
Ivy is still in the process of intensive development, you can watch this process here . Although the compiler itself is not yet suitable for use in combat conditions, the RendererV3 abstraction, which it will use, is already quite functional and comes with Angular 6.x.
Although Ivy is not quite ready yet, we can still look at the results of his work. How to do it? Creating a new Angular project:
After that, you need to enable Ivy by adding the following lines to the
And finally, we run the compiler by executing the
That's all. Now you can explore the generated code, located in the folder
The code generated for this template can be found by looking into the file
It is in this JavaScript code that Ivy transforms the component template. Here's how the same thing was done in the previous version of the compiler:
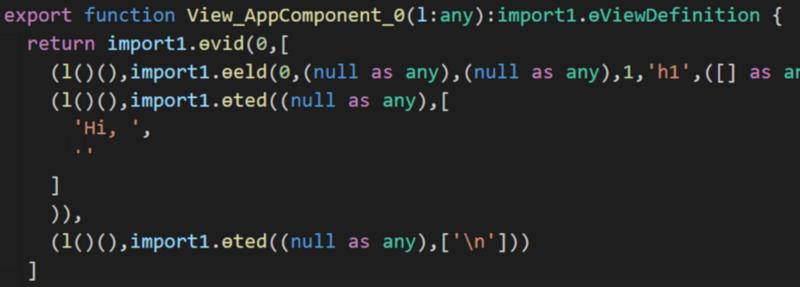
The code that produces the previous version of the Angular compiler
There is a feeling that the code that generates the Ivy is much easier. You can experiment with the component template (it is in
Let's try to parse the generated code and see what actions it performs. For example, let's look for an answer to the question about the meaning of calls like
If you look at the beginning of the generated file, there we will find the following expression:
Thus,
So all these methods are private APIs exported by Angular. It’s easy to understand their functionality by opening a project in VS Code and analyzing the tooltips:
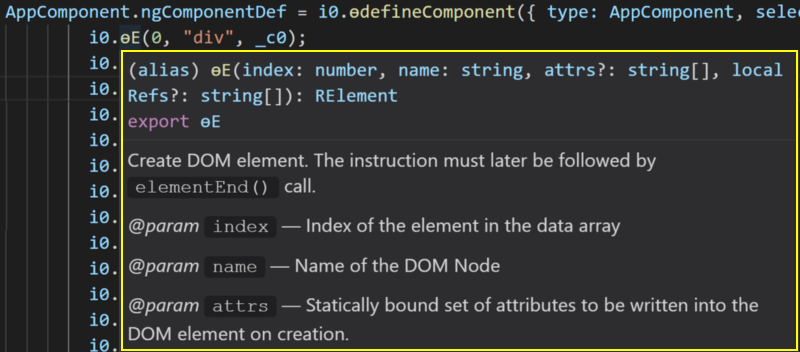
Code Analysis in VS Code
Even though a JavaScript file is analyzed here, VS Code uses type information from TypeScript to identify the call signature and find the documentation for a particular method. If, selecting the method name, use the Ctrl + click combination (Cmd + click on Mac), we find out that the real name of this method is
This technique made it possible to find out that the name of the method
And, as already mentioned, this code corresponds to the following text from the HTML template:
After analyzing this all, it is easy to notice the following:
The first argument to the
The third argument is also passed to the
So far, we have analyzed the part of the generated code that is responsible for rendering the template for the component. This code is actually in a larger code snippet, which is assigned by
Now that we, in general terms, understand what the generated code looks like, we can try to create, from scratch, our own component using the same RendererV3 API that Ivy uses.
The code that we are going to create will be similar to the code that the compiler produces, but we will make it so that it is easier to read.
Let's start by writing a simple component, and then manually translate it into code, similar to the one that comes out of the Ivy output:
The compiler takes as input information for the
We define the metadata for the compiled component by calling
At this stage, we do not use the
In order to display components on the screen, Angular exports a method called
That's all. Now we have a minimal self-made Angular application consisting of only 16 lines of code. You can experiment with the finished application on StackBlitz .
So, we have a working example. Can you add interactivity to it? Say, how about something interesting, like using the Angular change detection system here?
Modify the component so that the user can customize the greeting text. That is, instead of the component always displaying the text
We start by adding the
So far all this does not look particularly impressive, but the most interesting is ahead.
Next, we edit the template function so that, instead of the unchanged text, it displays the contents of the
You may have noticed that we wrapped the template instructions in
So, when the component is displayed for the first time, we create all the elements, and then, when changes are detected, we only update what could have changed. The internal method
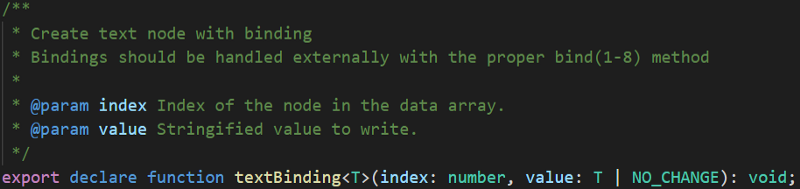
TextBinding function
So, the first parameter is the index of the item to be updated, the second is the value. In this case, we create an empty text element with index 2
At the moment, when this component is displayed, the text
To make the application truly interactive, we will add a data entry field with an event listener, which calls the
Event binding is performed in the
The above code is equivalent to writing the following HTML code in a template:
Now you can edit the contents of the
Here we use another built-in rendering system method,
Now our example is finally ready. We implemented, from scratch, two-way data binding using the Ivy rendering system API. This is just great.
Here you can experiment with ready-made code.
Now we are familiar with most of the basic building blocks of the new Ivy compiler. We know how to create elements and text nodes, how to bind properties and configure event listeners, how to use the change detection system.
Before we finish the Ivy study, consider another interesting topic. Namely, let's talk about how the compiler works with subpatterns. These are the templates that are used for
First you need to install the
Now, in order to be able to use
We are going to use the
I found this definition in the Angular source code , along with the
Next, we define a subpattern only for the partition bounded by
Suppose you need to display an image here. Let us define a new function for this template inside the template function:
This feature of the template is no different from the one we have already written. It uses the same constructs to create an
And finally, we can put all this together by adding the
Note the call to the new method at the beginning of the code (
In the line
The above code is equivalent to the following HTML code:
Here it can be noted that the new compiler produces not the most compact code, but it is not so bad in comparison with what is now.
You can experiment with a new example here . In order to see the
We pretty much traveled on the features of the Ivy compiler. Hope this trip has sparked your interest in further Angular research. If this is so, then now you have everything you need to experiment with Ivy. Now you know how to "translate" templates in JavaScript, how to access the same Angular mechanisms that Ivy uses, without using this compiler itself. I think all this will give you the opportunity to explore the new mechanisms of Angular as deeply as you like.
Here , here and here - three materials in which you can find useful information about the Ivy. And here is the source code for Render3.
Dear readers! How do you feel about the new features Ivy?

When Uri heard that a new version of the Angular compiler, called Ivy, was released, he immediately wanted to take a closer look at it and find out what changed in it compared to the old version. Here, just as before, templates and components created by Angular, which are converted into plain HTML and JavaScript code, understandable by Chrome and other browsers, come to the input of the compiler.
')
If we compare the new version of the compiler with the previous one, it turns out that Ivy uses the tree-shaking algorithm. This means that the compiler automatically removes unused code fragments (this also applies to Angular code), reducing the size of project bundles. Another improvement concerns the fact that now each file is compiled independently, which reduces the recompile time. If in a nutshell, thanks to a new compiler, we get smaller builds, faster re-compilation of projects, more simple ready-made code.
Understanding how the compiler works is interesting in itself (at least, the author of the material hopes for it), but it also helps to better understand the internal mechanisms of Angular. This leads to the improvement of the skills of “Angular-thinking”, which, in turn, makes it possible to more effectively use this framework for web development.
By the way, do you know why the new compiler was called Ivy? The fact is that this word sounds like a combination of the letters "IV", read aloud, which represents the number 4, written in Roman numerals. "4" is the fourth generation of Angular compilers.
Ivy application
Ivy is still in the process of intensive development, you can watch this process here . Although the compiler itself is not yet suitable for use in combat conditions, the RendererV3 abstraction, which it will use, is already quite functional and comes with Angular 6.x.
Although Ivy is not quite ready yet, we can still look at the results of his work. How to do it? Creating a new Angular project:
ng new ivy-internals After that, you need to enable Ivy by adding the following lines to the
tsconfig.json file located in the new project folder: "angularCompilerOptions": { "enableIvy": true } And finally, we run the compiler by executing the
ngc command in the newly created project folder: node_modules/.bin/ngc That's all. Now you can explore the generated code, located in the folder
dist/out-tsc . For example, take a look at the following fragment of the AppComponent template: <div style="text-align:center"> <h1> Welcome to {{ title }}! </h1> <img width="300" alt="Angular Logo" src="…"> </div> Here are some links to help you start:
The code generated for this template can be found by looking into the file
dist/out-tsc/src/app/app.component.js : i0.ɵE(0, "div", _c0); i0.ɵE(1, "h1"); i0.ɵT(2); i0.ɵe(); i0.ɵE(3, "img", _c1); i0.ɵe(); i0.ɵe(); i0.ɵE(4, "h2"); i0.ɵT(5, "Here are some links to help you start: "); i0.ɵe(); It is in this JavaScript code that Ivy transforms the component template. Here's how the same thing was done in the previous version of the compiler:
The code that produces the previous version of the Angular compiler
There is a feeling that the code that generates the Ivy is much easier. You can experiment with the component template (it is in
src/app/app.component.html ), compile it again and see how the changes made to it affect the generated code.Parsing the generated code
Let's try to parse the generated code and see what actions it performs. For example, let's look for an answer to the question about the meaning of calls like
i0.ɵE and i0.ɵTIf you look at the beginning of the generated file, there we will find the following expression:
var i0 = require("@angular/core"); Thus,
i0 is just an Angular kernel module, and all of these are functions exported by Angular. The letter ɵ used by the Angular development team to indicate that some methods are intended solely to support the internal mechanisms of the framework, that is, users should not call them directly, since the API’s invariance of these methods is not guaranteed when new versions of Angular are released (in fact, I would say that their API is almost guaranteed to change).So all these methods are private APIs exported by Angular. It’s easy to understand their functionality by opening a project in VS Code and analyzing the tooltips:
Code Analysis in VS Code
Even though a JavaScript file is analyzed here, VS Code uses type information from TypeScript to identify the call signature and find the documentation for a particular method. If, selecting the method name, use the Ctrl + click combination (Cmd + click on Mac), we find out that the real name of this method is
elementStart .This technique made it possible to find out that the name of the method
ɵT is text , the name of the method ɵe is elementEnd . Armed with this knowledge, we can "translate" the generated code, turning it into something that will be easier to read. Here is a small piece of this "translation": var core = require("angular/core"); //... core.elementStart(0, "div", _c0); core.elementStart(1, "h1"); core.text(2); core. (); core.elementStart(3, "img", _c1); core.elementEnd(); core.elementEnd(); core.elementStart(4, "h2"); core.text(5, "Here are some links to help you start: "); core.elementEnd(); And, as already mentioned, this code corresponds to the following text from the HTML template:
<div style="text-align:center"> <h1> Welcome to {{ title }}! </h1> <img width="300" alt="Angular Logo" src="…"> </div> Here are some links to help you start:
After analyzing this all, it is easy to notice the following:
- Each opening HTML tag corresponds to a call to
core.elementStart(). - The closing tags correspond to the
core.elementEnd()calls. - Text nodes correspond to
core.text()calls.
The first argument to the
elementStart and text methods is a number, the value of which increases with each call. It is probably an index in some kind of array in which Angular stores references to the created elements.The third argument is also passed to the
elementStart method. After studying the above materials, we can conclude that the argument is optional and contains a list of attributes for the DOM node. You can check this by looking at the _c0 value and finding out that it contains a list of attributes and their values for the div element: var _c0 = ["style", "text-align:center"]; NgComponentDef note
So far, we have analyzed the part of the generated code that is responsible for rendering the template for the component. This code is actually in a larger code snippet, which is assigned by
AppComponent.ngComponentDef , a static property that contains all the metadata about the component, such as CSS selectors, its change detection strategy (if specified), and the template. If you feel adventurous, you can now figure out how it works, although we'll talk about it below.Homemade ivy
Now that we, in general terms, understand what the generated code looks like, we can try to create, from scratch, our own component using the same RendererV3 API that Ivy uses.
The code that we are going to create will be similar to the code that the compiler produces, but we will make it so that it is easier to read.
Let's start by writing a simple component, and then manually translate it into code, similar to the one that comes out of the Ivy output:
import { Component } from '@angular/core'; @Component({ selector: 'manual-component', template: '<h2><font color="#3AC1EF">Hello, Component</font></h2>', }) export class ManualComponent { } The compiler takes as input information for the
@component decorator, creates instructions, and then draws it all in the form of a static property of the component class. Therefore, in order to imitate the activity of Ivy, we remove the @component decorator and replace it with the ngComponent static property: import * as core from '@angular/core'; export class ManualComponent { static ngComponentDef = core.ɵdefineComponent({ type: ManualComponent, selectors: [['manual-component']], factory: () => new ManualComponent(), template: (rf: core.ɵRenderFlags, ctx: ManualComponent) => { // }, }); } We define the metadata for the compiled component by calling
ɵdefineComponent . Metadata includes the type of component (used earlier for dependency injection), the CSS selector (or selectors) that will call this component (in our case, manual-component is the name of the component in the HTML template), a factory that returns a new instance component, and then the function that defines the pattern for the component. This template displays a visual representation of the component and updates it when the component properties change. In order to create this template, we will use the methods that we found above: ɵE , ɵe and ɵT . template: (rf: core.ɵRenderFlags, ctx: ManualComponent) => { core.ɵE(0, 'h2'); // h2 core.ɵT(1, 'Hello, Component'); // core.ɵe(); // h2 }, At this stage, we do not use the
rf or ctf parameters provided by our template function. We will come back to them. But first, let's look at how to bring our first homemade component to the screen.First application
In order to display components on the screen, Angular exports a method called
ɵrenderComponent . All that needs to be done is to check that the index.html file has an HTML tag that corresponds to the element selector, <manual-component> , and then add the following to the end of the file: core.ɵrenderComponent(ManualComponent); That's all. Now we have a minimal self-made Angular application consisting of only 16 lines of code. You can experiment with the finished application on StackBlitz .
Change detection mechanism
So, we have a working example. Can you add interactivity to it? Say, how about something interesting, like using the Angular change detection system here?
Modify the component so that the user can customize the greeting text. That is, instead of the component always displaying the text
Hello, Component , we are going to allow the user to change the part of the text that comes after Hello .We start by adding the
name property and the method to update the value of this property to the component class: export class ManualComponent { name = 'Component'; updateName(newName: string) { this.name = newName; } // ... } So far all this does not look particularly impressive, but the most interesting is ahead.
Next, we edit the template function so that, instead of the unchanged text, it displays the contents of the
name property: template: (rf: core.ɵRenderFlags, ctx: ManualComponent) => { if (rf & 1) { // : core.ɵE(0, 'h2'); core.ɵT(1, 'Hello, '); core.ɵT(2); // <-- name core.ɵe(); } if (rf & 2) { // : core.ɵt(2, ctx.name); // ctx - } }, You may have noticed that we wrapped the template instructions in
if expressions that check the rf values. This parameter is used by Angular to indicate whether the component is being created for the first time (the least significant bit will be set ), or we just need to update the dynamic content during the change detection process (this is the second if expression that is directed).So, when the component is displayed for the first time, we create all the elements, and then, when changes are detected, we only update what could have changed. The internal method
ɵt responsible for this (note the lower-case letter t ), which corresponds to the textBinding function exported by Angular:TextBinding function
So, the first parameter is the index of the item to be updated, the second is the value. In this case, we create an empty text element with index 2
core.ɵT(2); command core.ɵT(2); . It plays the role of placeholder for name . We update it with the core.ɵt(2, ctx.name); command core.ɵt(2, ctx.name); when a change in the corresponding variable is detectedAt the moment, when this component is displayed, the text
Hello, Component will still appear, although we can change the value of the name property, which will change the text on the screen.To make the application truly interactive, we will add a data entry field with an event listener, which calls the
updateName() component method: template: (rf: core.ɵRenderFlags, ctx: ManualComponent) => { if (rf & 1) { core.ɵE(0, 'h2'); core.ɵT(1, 'Hello, '); core.ɵT(2); core.ɵe(); core.ɵT(3, 'Your name: '); core.ɵE(4, 'input'); core.ɵL('input', $event => ctx.updateName($event.target.value)); core.ɵe(); } // ... }, Event binding is performed in the
core.ɵL('input', $event => ctx.updateName($event.target.value)); line core.ɵL('input', $event => ctx.updateName($event.target.value)); . Namely, the ɵL method ɵL responsible for setting the event listener for the most recent of the declared elements. The first argument is the name of the event (in this case, input is the event that is called when the content of the <input> element changes), the second argument is the callback. This callback accepts event data as an argument. Then we retrieve the current value from the target element of the event, that is, from the <input> element, and pass it to the function in the component.The above code is equivalent to writing the following HTML code in a template:
Your name: <input (input)="updateName($event.target.value)" /> Now you can edit the contents of the
<input> element and observe how the text in the component changes. However, the input field is not filled when the component is loaded. In order for everything to work that way, you need to add another instruction to the template function code that is executed when a change is detected: template: (rf: core.ɵRenderFlags, ctx: ManualComponent) => { if (rf & 1) { ... } if (rf & 2) { core.ɵt(2, ctx.name); core.ɵp(4, 'value', ctx.name); } } Here we use another built-in rendering system method,
ɵp , which updates the property of an element with a given index. In this case, the method is passed an index of 4, which is the index assigned to the input element, and instructs the method that it should put the value of ctx.name in the value property of this element.Now our example is finally ready. We implemented, from scratch, two-way data binding using the Ivy rendering system API. This is just great.
Here you can experiment with ready-made code.
Now we are familiar with most of the basic building blocks of the new Ivy compiler. We know how to create elements and text nodes, how to bind properties and configure event listeners, how to use the change detection system.
About * ngIf and * ngFor blocks
Before we finish the Ivy study, consider another interesting topic. Namely, let's talk about how the compiler works with subpatterns. These are the templates that are used for
*ngIf or *ngFor . They are processed in a special way. Let's look at how to use *ngIf in the code of our self-made template.First you need to install the
@angular/common npm-package - it is here that *ngIf . Next, you need to import the directive from this package: import { NgIf } from '@angular/common'; Now, in order to be able to use
NgIf in a template, you need to provide it with some metadata, since the @angular/common module was not compiled using Ivy (at least during the writing of the material, and in the future this will probably change from introduction ngcc ).We are going to use the
ɵdefineDirective method, which is related to the already familiar ɵdefineComponent method. It defines metadata for directives: (NgIf as any).ngDirectiveDef = core.ɵdefineDirective({ type: NgIf, selectors: [['', 'ngIf', '']], factory: () => new NgIf(core.ɵinjectViewContainerRef(), core.ɵinjectTemplateRef()), inputs: {ngIf: 'ngIf', ngIfThen: 'ngIfThen', ngIfElse: 'ngIfElse'} }); I found this definition in the Angular source code , along with the
ngFor . Now that we have prepared NgIf for use in Ivy, we can add the following to the list of directives for the component: static ngComponentDef = core.ɵdefineComponent({ directives: [NgIf], // ... }); Next, we define a subpattern only for the partition bounded by
*ngIf .Suppose you need to display an image here. Let us define a new function for this template inside the template function:
function ifTemplate(rf: core.ɵRenderFlags, ctx: ManualComponent) { if (rf & 1) { core.ɵE(0, 'div'); core.ɵE(1, 'img', ['src', 'https://pbs.twimg.com/tweet_video_thumb/C80o289UQAAKIqp.jpg']); core.ɵe(); } } This feature of the template is no different from the one we have already written. It uses the same constructs to create an
img element inside the div element.And finally, we can put all this together by adding the
ngIf directive to the component template: template: (rf: core.ɵRenderFlags, ctx: ManualComponent) => { if (rf & 1) { // ... core.ɵC(5, ifTemplate, null, ['ngIf']); } if (rf & 2) { // ... core.ɵp(5, 'ngIf', (ctx.name === 'Igor')); } function ifTemplate(rf: core.ɵRenderFlags, ctx: ManualComponent) { // ... } }, Note the call to the new method at the beginning of the code (
core.ɵC(5, ifTemplate, null, ['ngIf']); ). It declares a new container element, that is, an element that has a template. The first argument is the element index; we have already seen such indexes. The second argument is the sub-template function that we have just defined. It will be used as a template for the container element. The third parameter is the tag name for the element, which does not make sense here, and finally there is a list of directives and attributes associated with this element. This is where ngIf comes into ngIf .In the line
core.ɵp(5, 'ngIf', (ctx.name === 'Igor')); the element state is updated by binding the ngIf attribute to the value of the logical expression ctx.name === 'Igor' . Here we check whether the name property of the component is equal to the string Igor .The above code is equivalent to the following HTML code:
<div *ngIf="name === 'Igor'"> <img align="center" src="..."> </div> Here it can be noted that the new compiler produces not the most compact code, but it is not so bad in comparison with what is now.
You can experiment with a new example here . In order to see the
NgIf section in action, enter the name Igor in the field Your name .Results
We pretty much traveled on the features of the Ivy compiler. Hope this trip has sparked your interest in further Angular research. If this is so, then now you have everything you need to experiment with Ivy. Now you know how to "translate" templates in JavaScript, how to access the same Angular mechanisms that Ivy uses, without using this compiler itself. I think all this will give you the opportunity to explore the new mechanisms of Angular as deeply as you like.
Here , here and here - three materials in which you can find useful information about the Ivy. And here is the source code for Render3.
Dear readers! How do you feel about the new features Ivy?
Source: https://habr.com/ru/post/419995/
All Articles