Features of ExtremeXOS Switch Configuration
This article aims to reduce the amount of time required to understand the principles of working with ExtremeXOS (XOS) . When I started getting acquainted with XOS, I really missed such an article on Habré.
Below I will talk about the configuration of Extreme and the problems that I encountered. Hopefully it will help network engineers who are just starting to work with XOS. Regardless of the switch model, the CLI syntax is exactly the same.
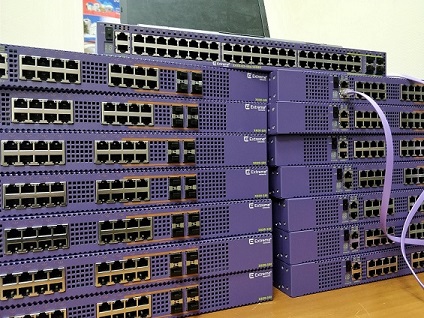
Extreme Switch Stand
To business
For hardware virtualization, I use Eve-Ng and the Virtual ExtremeOS ( XOS ) image. You can also use GNS3.
How does the switch setup look like ? In XOS, there is no need to switch operating modes; all commands are entered from the normal mode marked with # in the case of the admin account; and > in the case of a user.
To begin, I would like to identify the "basic" principles of teams in EOS. Everything is built on three commands and their antonyms: create , configure , enable ( delete , unconfigure , disable, respectively). That is: we create, we configure, we activate. It looks logical.
create vlan 10 configure vlan 10 ipaddress 192.168.1.1/24 You should also understand that most configurations are configured on the VLAN . That is, in XOS almost everything is tied to VLANs. Even assigning a VLAN to a port occurs in the VLAN configuration, that is, the port hangs on vlan.
I would like to pay special attention to virtual routers ( VR ), which are by default in the switch. There is VR-Default, which owns all the ports, and VR-mgmt, which owns mgmt. port. In XOS, for all commands that send traffic somewhere (ping, ssh, telnet, download, etc.) you must specify VR.
ping vr "VR-Default" 192.168.1.1 XOS Switch Update
In XOS, there are two partitions under OS: primary and secondary. Functionally, they are no different, only the names. You can install updates only in the currently inactive section. You can use the inactive argument for this. After the upgrade, a reboot is required, and the switch will boot from another (just updated) partition. This leaves the possibility of a quick rollback, in case of problems, simply by selecting another partition at boot (the one where the old OS remained). Also note that all the images with patches are a complete image, that is, do not put a major version, and then a few minor ones. When loading tftp is used:
download image 192.168.1.1 summitX-21.1.4.4-patch1-3.xos vr "VR-Default" inactive You can find out which section is currently being used by:
show system … Image Selected: primary Image Booted: secondary Primary ver: 22.3.1.4 Secondary ver: 21.1.1.4 Switch stacking
To stack XOS switches, you must enable stacking support and reboot the switch:
enable stacking-support reboot It is very convenient that switches of different models can be combined into a stack, while the master will be a switch with the highest performance. For example, it may be necessary for a stack of 10G switches for 16 ports for servers, to which a 48-port 1G switch is added, to which mgmt.-interfaces are included.
For stacking, switches must have the same OS version. Stacking is performed through certain Ethernet ports, for each model is different, which can be found in the documentation. If you assemble the switches according to the 1 in 2, 2 in 1 port, then Extreme switches can be stacked using the easy-stack simplified procedure, which itself will bind the mac addresses to the slot number and other settings. In this case, the first will be the switch on which you apply enable stacking, the rest will be assigned numbers along the chain. This is quite a convenient way to save a lot of time. After stacking, the ports will look like SLOT: PORT (1: 1, 2:35).
X440G2-48p-10G4.1 # show stacking Stack Topology is a Ring This node is not in an Active Topology Node MAC Address Slot Stack State Role Flags ------------------ ---- ----------- ------- --- *00:04:96:xx:xx:xx - Disabled Master --- 00:04:96:xx:xx:xx - Disabled Master --- 00:04:96:xx:xx:xx - Disabled Master --- 00:04:96:xx:xx:xx - Disabled Master --- 00:04:96:xx:xx:xx - Disabled Master --- * - Indicates this node Flags: (C) Candidate for this active topology, (A) Active Node (O) node may be in Other active topology X440G2-48p-10G4.2 # enable stacking You have not yet configured all required stacking parameters. Would you like to perform an easy setup for stacking operation? (y/N) Yes Executing "configure stacking easy-setup" command... For every node in the 5-node stack, this command will: - enable stacking - configure a stack MAC address - choose and configure a slot number (this node will be assigned to slot 1) - configure redundancy to minimal (slot 1 will be the master node) - configure the stacking protocol to enhanced Upon completion, the stack will automatically be rebooted into the new configuration. Warning: If stacking is already configured, this command will alter that configuration. Do you wish to proceed? (y/N) Yes Stacking configuration is complete. Rebooting... Updating the stack is that the master is updated, and then he in turn spills the new version into the remaining slots. A reboot is required .
Licensing
Each switch comes with a pre-installed license (edge, advanced edge, core, etc.). Each license has its own set of features that can be activated on the switch, for example, the number of ports that can be used in OSPF. There are also licenses for individual feature. Read more here .
One of the most frequent licenses is the license for feature: Dual-10GB-Uplink . This license for the edge-1G switch allows the use of 2x 10GbE port. For example, on X440-G2-48p.
Licenses are available in the personal account on the Extreme website, after which they are activated (without rebooting) and checked by the team.
enable license XXXX-XXXX show licenses In the event that different licenses are used in the switch stack, the smallest one will be used.
Customization
A small digression: In order to see the results of the commands below, as well as any other information, in most cases you can use show, replacing create and configure. For example, show vlan.
Hint: When using show ports, XOS will build a table that is updated every few seconds, which allows you to monitor the status of the interfaces in real time. In order to get output without refreshing, you must use “show ports no-refresh”.
The first thing that comes to mind is that you need to configure this hostname . It would seem to be something like this:
configure hostname Ex_sw_1
But not everything is so simple, in fact it is done this way:
configure snmp sysName Ex-sw-1 Create a VLAN:
create vlan My_Vlan_Five tag 5 Or so, and this is what will be displayed in the config:
create vlan My_Vlan10 configure vlan My_Vlan10 tag 10 Considering the practical experience and realities of the output of commands and XOS settings, I created a rule for myself: in the vlan name, append its tag at the end, which makes it easier to read and configure:
create vlan users-10 tag 10 In XOS there are no such as trunk and access ports. Instead, the following concepts are used: tagged and untagged traffic on an interface tied to vlan. There can be one untagged and many tagged vlan. Ports are numbered (or slot: port on the stack), it's very simple.
configure vlan My_Vlan-5 add ports 1 tagged configure vlan My_Vlan1 add ports 1 untagged Accordingly, all traffic without a tag coming to the interface will be tagged as “ My_Vlan1 ”.
In this case, vlan can be specified both through < Name > and through < tag >, and in any combination (using vlan_list , that is, numeric by tags). Without an attribute, < untagged > is used at the end:
onfigure vlan 1,5-10,15-20 add ports 1-8, 48 tagged configure vlan web-110 add ports 5 onfigure vlan 20 add ports 30-40,45 untagged Since most SummitX series switches are L3 switches, this is how SVI is configured:
configure vlan 125 ipaddress 192.168.125.1/24 After that, you need to apply this command, otherwise vlan will remain non-routable:
enable ipforwarding vlan 125 enable ipforwarding vlan 10-50,60 To see what vlan is on the interface, you can use the command:
show ports 2 vlan The following commands are used to view and save the configuration and there are primary and secondary configuration files:
save save secondary show configuration Channel aggregation
One of the inconvenient moments that I met is aggregation of channels. (port-channel). The general essence is as follows: you assign a master port and up to seven secondary interfaces to it. Further, all settings are made only on a specific master port, there are no logical interfaces of the form po1 . The downside is that if you want to change the master port, you need to transfer all the settings to another port with your hands, because when you remove an aggregated channel, the entire config on it flies . The solution to this inconvenience is in this article , but it still does not work out perfectly. In XOS, aggregation is called sharing .
To enable such a port, you need to apply a command like this:
enable sharing [MASTER_PORT] grouping [PORT_LIST] [lacp] enable sharing 1 grouping 1-2 lacp On the version lower than 22.X, it is necessary to add the "balancing" algorithm:
enable sharing 1 grouping 1-2 algorithm address-based L2 lacp OSI Second Level Loop Protection
On the Summit-X commutator in C major version 22.2, the second level loop protection protocol was disabled by default. (STP and others). At the time of this writing, the software recommended by the vendor is 21.1.5.2.
ELRP
In one of my projects, I used the proprietary protocol ELRP , which is designed to detect and prevent loops. During the tests, he showed good results (speed of shutdown of the port with a loop, etc.). This protocol sends multicast PDUs , and if the sender receives it again, then there is a loop.
The interval is responsible for the frequency of the PDU distribution, in this case 2 seconds. In the case of a loop, the port will be blocked for 180 seconds, after which the PDU will be sent again. Alert options: log, trap, log-and-trap. In the case of trap, the snmp trap is sent accordingly.
This protocol is configured per-vlan, as well as most configurations in XOS.
enable elrp-client configure elrp-client periodic Buh-123 ports all interval 2 log disable-port ingress duration 180 To prevent ELRP from blocking uplink access switches or critical connections, the command to exclude ports from blocking is used.
configure elrp-client disable-port exclude 35 configure elrp-client disable-port exclude 1:1 STP
STP is configured a little wiser, but in general there are no special problems. In XOS, this protocol is referred to as “stpd”, in all commands to configure STP, it is used. You can make it per-vlan using different STP domains. “Domain-id” and “vlan-id” must match. Ports in STP can be added either manually or using vlan auto-bind. As soon as a port is added to the vlan, this port is automatically added to the STP. Such is the logic. Setting mode: dot1d STP, dot1w - RSTP:
configure stpd "s0" priority 4096 configure stpd s0 mode dot1w enable stpd s0 enable stpd "s0" auto-bind "VLAN_0005" VRRP
VRRP is one type of FHRP , an analogue of HSRP in Cisco. For each network (vlan), it is necessary to use a vrid, which can be from 1 to 255. I was pleased with the ability to route traffic from the backup-vrrp-L3 switch using the fabric-routing option. By default, the priority is 100. Which of the switches has a higher priority becomes “Master”.
create vrrp vlan test1 vrid 125 configure vrrp vlan test1 vrid 125 priority 50 configure vrrp vlan test1 vrid 125 fabric-routing on enable vrrp vlan test1 vrid 125 MLAG
About what it is and why, very well described here : it is, in fact, an analogue of Cisco VPC. ISC - connection between mlag-pair switches.
In my case, the following scheme was usually used: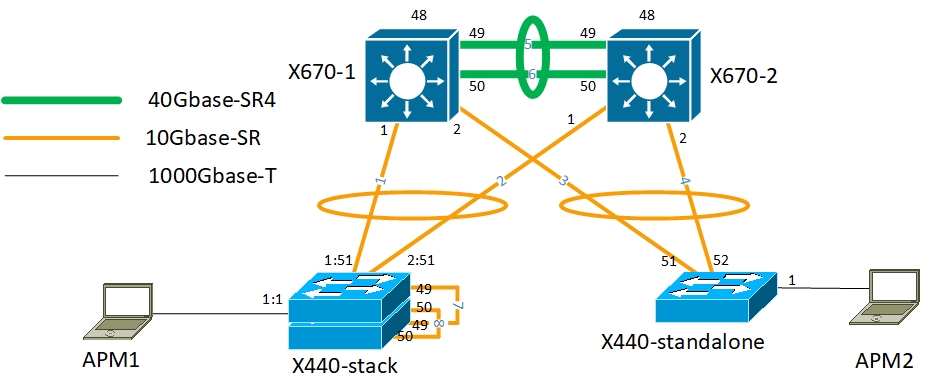
It is necessary to create a neighbor (peer) in order to be able to assign specific mlag ports to a specific neighbor, since Extreme supports the possibility of using several neighbors. For ISC, a vlan is needed, used only for ISC and having an IP address. Accordingly, the peer for X670-1 will be X670-2, and the mlag ports will be x440. For operation, it is necessary to create an aggregation channel, and on x670 for one port in the x440 direction, and an aggregated channel in the X670-2 direction, in which there will be ALL Vlans participating in the mlag.
On x670:
Enable sharing 1 grouping 1 lacp create mlag peer "mlag1" configure mlag peer "mlag1" ipaddress 10.255.255.2 vr VR-Default enable mlag port 1 peer "mlag1" id 1 On x440 stack:
enable sharing 1:51 grouping 1:51,2:51 lacp MLAG + VRRP
During testing of commutators on the stand, the problem was found that VRRP takes the Master role before all other interfaces (ISC rises first) and protocols rise, which resulted in network downtime of about a minute.
This problem was solved by the following commands, but they are available only with “EXOS 21.1.3.7-patch1-4” and “EXOS 22.3”:
configure mlag ports reload-delay 60 enable mlag port reload-delay Routing
Static routes are defined as follows, there should be no problems. You can set the mask in any version.
configure iproute add 10.0.66.0 255.255.255.0 172.16.1.1 configure iproute add 10.0.0.1/32 10.255.255.255 configure iproute add default 172.16.0.1 Ospf
For routing, in my practice, OSPF with one zone was used. To ensure operability, you must specify a router-id, as well as add each vlan that needs to be announced (by analogy in Cisco: network).
configure ospf routerid 192.168.1.1 enable ospf configure ospf add vlan routing-5 area 0.0.0.0 configure ospf add vlan Voip-32 area 0.0.0.0 passive The rest of the little things
DHCP Relay
Configured as follows:
configure bootprelay add 192.168.12.5 vr VR-Default enable bootprelay ipv4 vlan servers-500 When creating a new vlan, you need to add it manually to the vlan list with DHCP Relay.
SSH + ACL for SSH
Ssh is included as follows:
enable ssh2 To restrict access to ssh, you must create a separate policy file of the form NAME.pol and hang it on SSH.
vi ssh.pol Politics:
Entry AllowTheseSubnets { if match any { source-address 192.168.0.0 /16; source-address 10.255.255.34 /32; } Then { permit; } } Team to apply policy:
enable ssh2 access-profile ssh.pol Description + display-string
For convenience of configuration and subsequent operation, you can set the "name" and "description" of the interface.
onfigure port 1 description “this is port number one” Interface description will be displayed only in commands like:
show ports description The name of the interface will replace almost everywhere its number in the output of commands. The name must not contain a space and is limited to a length of 20 characters.
onfigure port 1 display-string UserPort EXOS-VM.8 # sh port vlan Untagged Port /Tagged VLAN Name(s) -------- -------- ------------------------------------------------------------ UserPort Untagged Default 2 Untagged Default 3 Untagged Default Conclusion
XOS also allows you to automate many actions and adjust the system to your needs, as it natively supports Python and the built-in mechanism for creating and running scripts using command line commands ( CLI-Scripting ).
I am open to suggestions for improving the article and correcting inaccuracies / errors, as well as questions.
UPD : LLDP for IP phones is configured using the commands in this comment .
')
Source: https://habr.com/ru/post/419965/
All Articles