Making a smart controller for an air conditioner on an ESP8266
Summer has arrived, with it - the heat, as well as the time to turn on the air conditioning. And if you are fond of modern technology and smart home, then the management of air conditioners want to do something smart (or at least modern). Below is a series of notes about my attempt to integrate weather in the house with voice control and a cross-platform interface.
The apartment has four air conditioners, they need to learn how to manage:
Perhaps I will not even tell. The decision from the manufacturer of my air conditioners suggested a bunch of wires, at least two additional modules for each unit, and a price of about $ 200 per room. Plus a proprietary protocol, an ancient application, and so on. Cross out.
')
Approximately $ 100 per room, works natively with Google Assistant and IFTTT, it looks beautiful, but it's still expensive.
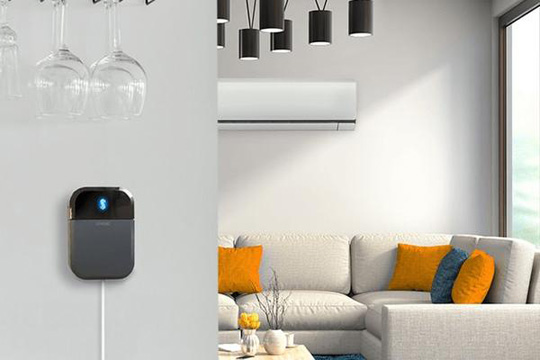
tado ° - similar (and even more expensive).
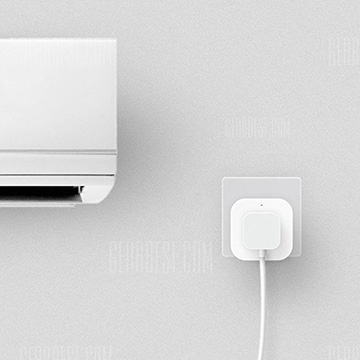
Universal IR transmitters, some theoretically support the necessary out-of-the-box conditioners, integrate with Home Assistant with sin, but on the whole - so-so solution, although the price tag is already much closer to the affordable ($ 20-35 per room, depending on the possibilities ). Yes, and applications in Chinese (in some cases) - this is not what I wanted.
The cheapest and most flexible way, which I will discuss in more detail.
There is something to think about, but in general we will need:
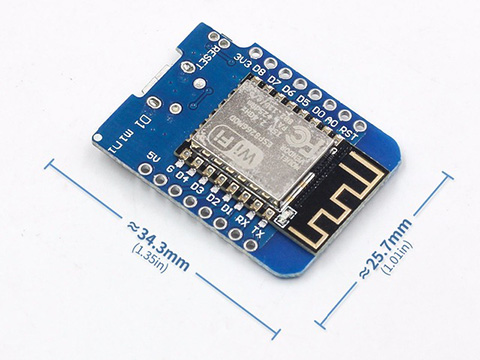
Stupidly take the ESP8266, and for ease of firmware and power supply, we use D1 mini. Manage the system, obviously, we will via WiFi.
For the prototype we will use a simple IR LED, resistance and a transistor, then we will think about how this can be improved.
With him, more fun, you can set the target temperature, and do automatic on / off. For starters, stupidly take DHT22.

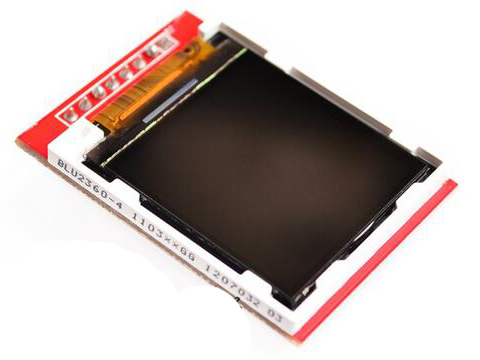
On it we will display the current state of the system (for debugging), and maybe the current ip-address (what if it comes in handy?).
We will implement everything in the Arduino IDE (with which I have never worked before) using open libraries.
Much later, when the project was already working, I switched to Visual Studio Code with the PlatformIO plugin.
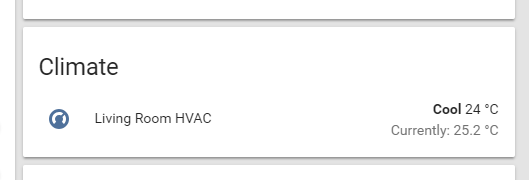
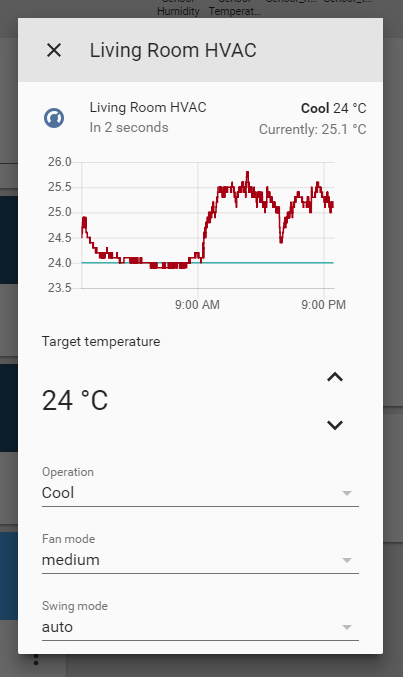
We will communicate with Home Assistant through MQTT ( PubSubClient library), since This is an open protocol, and there is a special component for it.
The configuration will look, for example, something like this:
The HeatpumpIR library will help us send signals to the air conditioner (the air conditioner model is still hard-coded).
More libraries will be needed for the timer , to work with the temperature sensor and the screen , but these are trifles. With a familiar gesture, add WiFiManager and ArduinoOTA to update the firmware via the web interface, not USB.
We buy random components on aliexpress, we gather together on the brainboard, we test the idea.
We understand that:
But in general, the idea works! In the interface Home Assistant appears "native" component of HVAC, which means that control from anywhere in the world we already have "in your pocket." Native integration of Home Assistant with Google Assistant adds voice commands and feedback: you can ask the assistant about the temperature in the room, and he will answer both the target and the current temperature.
The change in the target temperature, airflow speed and air conditioner mode in the web interface is also in place (and, most importantly, it works!).
Let's change a couple of components: we will order a smaller screen, and in order to work through I2C (and the library will apply another one ).

Also replace the IR LED on the finished module.
It turned out that modules with one LED (in the photo on the left) on the aliexpress should not be ordered: they do not contain a transistor, and one of the legs (VCC) they, in fact, are sham.
But if you order a module with two LEDs (in the photo on the right), then all the necessary components are already in place, and such a module is connected easily and easily, and finishes a little further.
It was also time to collect all this on my PCB ... It was one of the most difficult moments for a person who had never designed PCBs, and for sure I did everything wrong.
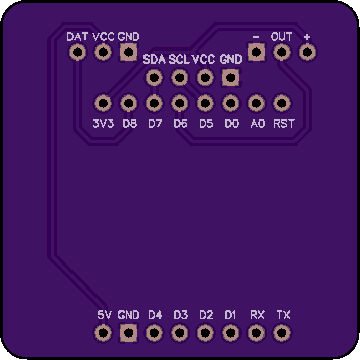
For the design, I used EasyEDA, I ordered the finished products on OSHPark (again, you could certainly find a cheaper option), and as a result I got something like this:

The button was added at the last moment, and the place for it was found quite by accident. It turned out that everything is a little more fun with the button, you can not keep the screen on all the time (which is harmful for OLED), but show the status by pressing.
Well, already not bad, it remains to add the case. To do this, run Blender, make a handful of parallelepipeds, use a series of boolean operations ...
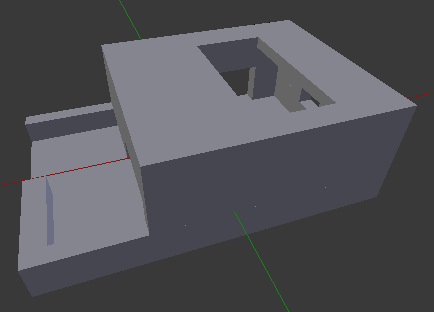
And send to a 3D printer.
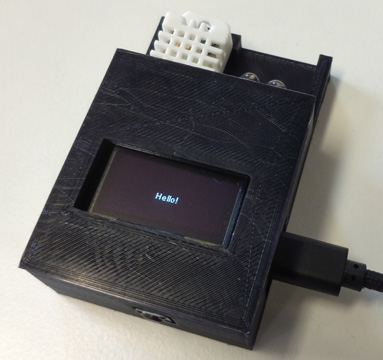
Overall, it turned out cheap (less than $ 10 per copy), flexible (will work with almost any air conditioner), easily integrated, controlled by voice and through the web, consistently finishes from five meters. In general, about what I wanted.
How could all this be done a little better? ..
There are a number of ways to improve the resulting product (more precisely, the possibilities for improvement, which would allow turning the experiment into a product):
It was a glorious adventure, and I understood a lot. For example, I understood why serial devices cost so much, and how much effort I would have to put in to get to the same level with them. On the other hand, I did a lot for the first time in this project (working in the Arduino IDE, ordering printed circuit boards, creating a model for a 3D printer), and getting this experience was invaluable. Source codes, however, I will not show: it is a shame to me for them :)
But I nevertheless achieved my goal, but cheap and flexible control of air conditioners turned out to be quite achievable.
Task
The apartment has four air conditioners, they need to learn how to manage:
- From the web interface (I have this Home Assistant, spinning on a separate Raspberry Pi, but ideally I want a simple connection to any system);
- Voice (Google Assistant will do, then think about Alice);
- Scripts;
- Cheap...
Market research
Native Solution
Perhaps I will not even tell. The decision from the manufacturer of my air conditioners suggested a bunch of wires, at least two additional modules for each unit, and a price of about $ 200 per room. Plus a proprietary protocol, an ancient application, and so on. Cross out.
')
Sensibo sky
Approximately $ 100 per room, works natively with Google Assistant and IFTTT, it looks beautiful, but it's still expensive.
tado ° - similar (and even more expensive).
Xiaomi Aqara / Mi Home, Broadlink RM Pro / Mini
Universal IR transmitters, some theoretically support the necessary out-of-the-box conditioners, integrate with Home Assistant with sin, but on the whole - so-so solution, although the price tag is already much closer to the affordable ($ 20-35 per room, depending on the possibilities ). Yes, and applications in Chinese (in some cases) - this is not what I wanted.
DIY
The cheapest and most flexible way, which I will discuss in more detail.
Component selection
There is something to think about, but in general we will need:
Iron
Controller
Stupidly take the ESP8266, and for ease of firmware and power supply, we use D1 mini. Manage the system, obviously, we will via WiFi.
IR transmitter
For the prototype we will use a simple IR LED, resistance and a transistor, then we will think about how this can be improved.
temperature sensor
With him, more fun, you can set the target temperature, and do automatic on / off. For starters, stupidly take DHT22.
Screen
On it we will display the current state of the system (for debugging), and maybe the current ip-address (what if it comes in handy?).
Soft
IDE
We will implement everything in the Arduino IDE (with which I have never worked before) using open libraries.
Much later, when the project was already working, I switched to Visual Studio Code with the PlatformIO plugin.
Protocol
We will communicate with Home Assistant through MQTT ( PubSubClient library), since This is an open protocol, and there is a special component for it.
The configuration will look, for example, something like this:
climate: - platform: mqtt name: Living Room HVAC modes: - "off" - "auto" - "heat" - "cool" - "dry" - "fan" swing_modes: - "auto" - "off" fan_modes: - "auto" - "low" - "medium" - "high" mode_command_topic: "livingroom/meteo/mode/set" mode_state_topic: "livingroom/meteo/mode" temperature_command_topic: "livingroom/meteo/target/set" temperature_state_topic: "livingroom/meteo/target" fan_mode_command_topic: "livingroom/meteo/fan/set" fan_mode_state_topic: "livingroom/meteo/fan" swing_mode_command_topic: "livingroom/meteo/swing/set" swing_mode_state_topic: "livingroom/meteo/swing" current_temperature_topic: "livingroom/meteo/temperature" Control
The HeatpumpIR library will help us send signals to the air conditioner (the air conditioner model is still hard-coded).
miscellanea
More libraries will be needed for the timer , to work with the temperature sensor and the screen , but these are trifles. With a familiar gesture, add WiFiManager and ArduinoOTA to update the firmware via the web interface, not USB.
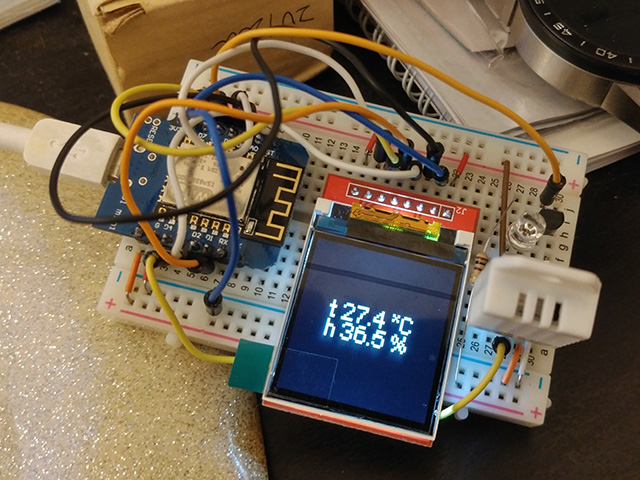
Prototype (00)
We buy random components on aliexpress, we gather together on the brainboard, we test the idea.
We understand that:
- The screen has been ordered too large and has too many legs.
- One LED does not hit very far, and not very reliably.
But in general, the idea works! In the interface Home Assistant appears "native" component of HVAC, which means that control from anywhere in the world we already have "in your pocket." Native integration of Home Assistant with Google Assistant adds voice commands and feedback: you can ask the assistant about the temperature in the room, and he will answer both the target and the current temperature.
The change in the target temperature, airflow speed and air conditioner mode in the web interface is also in place (and, most importantly, it works!).
Test sample (01)
Let's change a couple of components: we will order a smaller screen, and in order to work through I2C (and the library will apply another one ).
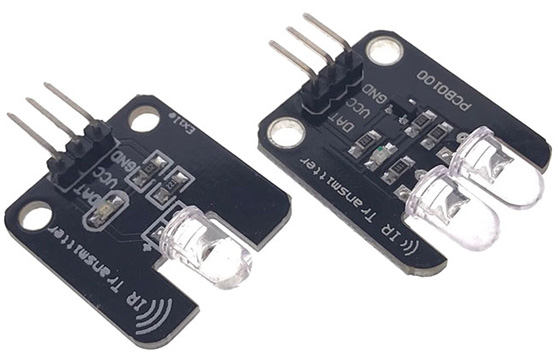
Also replace the IR LED on the finished module.
It turned out that modules with one LED (in the photo on the left) on the aliexpress should not be ordered: they do not contain a transistor, and one of the legs (VCC) they, in fact, are sham.
But if you order a module with two LEDs (in the photo on the right), then all the necessary components are already in place, and such a module is connected easily and easily, and finishes a little further.
It was also time to collect all this on my PCB ... It was one of the most difficult moments for a person who had never designed PCBs, and for sure I did everything wrong.
For the design, I used EasyEDA, I ordered the finished products on OSHPark (again, you could certainly find a cheaper option), and as a result I got something like this:
 |  |
The button was added at the last moment, and the place for it was found quite by accident. It turned out that everything is a little more fun with the button, you can not keep the screen on all the time (which is harmful for OLED), but show the status by pressing.
Well, already not bad, it remains to add the case. To do this, run Blender, make a handful of parallelepipeds, use a series of boolean operations ...
And send to a 3D printer.
Overall, it turned out cheap (less than $ 10 per copy), flexible (will work with almost any air conditioner), easily integrated, controlled by voice and through the web, consistently finishes from five meters. In general, about what I wanted.
How could all this be done a little better? ..
Series Model (02)
There are a number of ways to improve the resulting product (more precisely, the possibilities for improvement, which would allow turning the experiment into a product):
- The temperature sensor can be taken smaller and more accurate, for example, BME280, HTU21D or Si7021, which allows you to hang it on the same legs as the screen (I2C), significantly reduce the size of the finished device and simplify the PCB layout. In practice, it turned out that the same BME280 begins to be strongly influenced by the heating of the ESP8266 itself, and the readings given out need to be corrected.

- (follows from the first point) Keeping ESP8266 constantly working is not comme il faut, you need to go to Deep Sleep periodically, only waking up occasionally to send readings and receive commands;
- (follows from the second point) The usual MQTT is no longer very suitable, you need to use MQTT-SN, so that the control commands are remembered and delivered to the controller at the time of waking up;
- Implementation of the above items will allow you to change the "wired" power to the battery;
- The current method of fastening components to a printed circuit board (conventional soldering) is difficult to implement and not flexible enough: it makes sense to solder the headers so that the same temperature sensors can be changed like gloves;
- Finally (contrary to the previous point), all the same, ready-made modules are good and simple, but slightly cumbersome, ideally instead of D1 mini there would be a bare ESP8266, and the temperature sensor, the button and the IR LEDs would be unsoldered on one board ( as it is done in serial products), which would reduce the size of the device and its serial price;
- And in general, it would be great to provide in the firmware the possibility of an easy choice of your air conditioner model with one click ...
Conclusion
It was a glorious adventure, and I understood a lot. For example, I understood why serial devices cost so much, and how much effort I would have to put in to get to the same level with them. On the other hand, I did a lot for the first time in this project (working in the Arduino IDE, ordering printed circuit boards, creating a model for a 3D printer), and getting this experience was invaluable. Source codes, however, I will not show: it is a shame to me for them :)
But I nevertheless achieved my goal, but cheap and flexible control of air conditioners turned out to be quite achievable.
Source: https://habr.com/ru/post/419963/
All Articles