Implementing the Spring Framework API from scratch. Step-by-step guide for beginners. Part 1

The Spring Framework is one of the most difficult frameworks to understand and learn. Most developers learn it slowly through practical tasks and Google. This approach is not effective, since it does not provide a complete picture and at the same time is costly.
I would like to offer you a fundamentally new approach to the study of Spring. It lies in the fact that a person goes through a series of specially prepared tutorials and independently implements the functionality of the spring. The peculiarity of this approach is that, in addition to a 100% understanding of the aspects of Spring being studied, there is still a big increase in Java Core (Annotations, Reflection, Files, Generics).
')
The article will give you an unforgettable experience and will allow you to feel like a Pivotal developer. Step by step, you will make your classes bean and organize their life cycle (the same as in real spring). The classes you will implement are BeanFactory , Component , Service , BeanPostProcessor , BeanNameAware , BeanFactoryAware , InitializingBean , PostConstruct , PreDestroy , DisposableBean , ApplicationContext , ApplicationListener , ContextClosedEvent .
A little bit about yourself
My name is Jaroslav, and I am Java Developer with 4 years of experience. At the moment I work in the company EPAM Systems (SPB), and with interest I delve into the technologies that we use. Quite often, we have to deal with spring, and I see in it a certain middle ground in which you can develop (Java knows everything well, and too specific tools and technologies can come and go).
A couple of months ago, I passed the certification Spring Professional v5.0 (without passing courses). After that, I thought about how to teach other people to spring. Unfortunately, at the moment there is no effective teaching methodology. Most developers have a very superficial understanding of the framework and its features. Debugging the source code of the spring is too hard and absolutely not effective from the point of view of training (I was somehow into it). Make 10 projects? Yes, you will be able to deepen your knowledge somewhere and get a lot of practical experience, but much of what is “under the hood” will not open up to you. Read the book Spring in Action? Cool, but costly in effort. I've worked for her 40% (during preparation for certification), but it was not easy.
The only way to fully understand something is to develop it yourself. Recently, I had the idea that you can take a person through an interesting tutorial that will oversee the development of your DI framework. Its main feature will be that the API will coincide with the studied API. Awesome of this approach is that in addition to a deep (without gaps) understanding of the spring, a person will receive a HUGE amount of experience in Java Core. I admit honestly, I myself learned a lot of new things during the preparation of the article, both in Spring and in Java Core. Let's start developing!
Project from scratch
So, the first thing to do is open your favorite IDE and create a project from scratch. No Maven, no third-party libraries, we will not connect. Even Spring-dependencies will not connect. Our goal is to develop an API that is as close to Spring as possible, and implement it yourself.
In a clean project, create 2 main packages. The first package is your application (
com.kciray ), and the Main.java class inside it. The second package is org.springframework. Yes, we will duplicate the structure of the packages of the original spring, the name of its classes and their methods. There is such an interesting effect - when you create something of your own, it starts to seem simple and clear. Then, when you work in large projects, it will seem to you that everything is created on the basis of your workpiece. Such an approach can have a very positive effect on the understanding of the operation of the system as a whole, its improvement, correction of bugs, problem solving, and so on.If you have some problems, you can take a working project here .
Create a container
To begin with, we set the task. Imagine that we have 2 classes -
ProductFacade and PromotionService . Now imagine that you want to connect these classes with each other, but so that the classes themselves do not know about each other (Pattern DI). We need a separate class that will manage all these classes and determine the dependencies between them. Let's call it a container. Create a class Container ... But no, wait! In Spring, there is no single container class. We have many container implementations, and all of these implementations can be divided into 2 types - bean factories and contexts. The bean factory creates bins and binds them together (dependency injection, DI), and the context does roughly the same thing, plus adds some additional functions (for example, internationalizing messages). But we do not need these additional functions now, so we will work with the bins factory.Create a new
BeanFactory class and place it in the org.springframework.beans.factory package. Let the Map<String, Object> singletons stored inside this class, in which the id bean is mapped onto the bean itself. Add the Object getBean(String beanName) method to it, which pulls the beans by ID. public class BeanFactory { private Map<String, Object> singletons = new HashMap(); public Object getBean(String beanName){ return singletons.get(beanName); } } Note that
BeanFactory and FactoryBean are different things. The first is the bins factory (container), and the second is the bin factory, which sits inside the container and also produces bins. Factory inside the factory. If you are confused between these definitions, you can remember that in English the second noun is the leading one, and the first is something like an adjective. In the word Bean Factory The main word is the factory, and in the Factory Bean - bin.Now, let's create the
ProductService and PromotionsService classes. ProductService will return the product from the database, but before that you need to check whether any discounts (Promotions) apply to this product. In e-commerce, work with discounts is often allocated to a separate class-service (and sometimes to a third-party web service). public class PromotionsService { } public class ProductService { private PromotionsService promotionsService; public PromotionsService getPromotionsService() { return promotionsService; } public void setPromotionsService(PromotionsService promotionsService) { this.promotionsService = promotionsService; } } Now we need to make our container (
BeanFactory ) discover our classes, create them for us and inject one into the other. Operations of type new ProductService() must be inside the container and be done for the developer. Let's use the most modern approach (scanning classes and annotations). To do this, we need to use pens to create the @Component annotation ( org.springframework.beans.factory.stereotype ). @Retention(RetentionPolicy.RUNTIME) public @interface Component { } By default, annotations are not loaded into memory during program operation (
RetentionPolicy.CLASS ). We changed this behavior through a new retention policy ( RetentionPolicy.RUNTIME ).Now add
@Component before the ProductService classes and before the PromotionService . @Component public class ProductService { //... } @Component public class PromotionService { //... } We need
BeanFactory scan our package ( com.kciray ) and find in it classes that are annotated with @Component . This task is not trivial at all. In Java Core there is no ready solution , and we should make a crutch most. Thousands of applications in spring use component scanning through this crutch. You have learned the terrible truth. You will have to extract ClassLoader names from ClassLoader and check ClassLoader they end in ".class" or not, and then build their full name and pull class objects out of it!I just want to warn you that there will be a lot of checked exceptions, so be prepared to wrap them. But first, let's define what we want. We want to add a special method in the
BeanFactory and call it in Main : //BeanFactory.java public class BeanFactory{ public void instantiate(String basePackage) { } } //Main.java BeanFactory beanFactory = new BeanFactory(); beanFactory.instantiate("com.kciray"); Next, we need to get a
ClassLoader . It is responsible for loading the classes, and it’s pretty simple to mine: ClassLoader classLoader = ClassLoader.getSystemClassLoader(); Probably you have already noticed that the packages are separated by a dot, and the files - straight forward slash. We need to convert the batch path to the folder path, and get something like a
List<URL> (paths in your file system that can be used to search for class files). String path = basePackage.replace('.', '/'); //"com.kciray" -> "com/kciray" Enumeration<URL> resources = classLoader.getResources(path); So wait!
Enumeration<URL> is not a List<URL> . What is it all about? Oh horror, this is the old progenitor Iterator , available since the days of Java 1.0. This is the legacy we have to deal with. If you can walk through Iterable with for (all collections implement it), then in the case of Enumeration you will have to do a walk around with handles, through while(resources.hasMoreElements()) and nextElement() . And yet there is no possibility to remove items from the collection. Only 1996, only hardcore. Oh yes, in Java 9, we added the Enumeration.asIterator() method, so you can work through it.Let's go further. We need to extract the folders and work out the contents of each. Convert the URL to a file, and then get its name. Here it should be noted that we will not scan nested packages in order not to complicate the code. You can complicate your task and make recursion, if you want.
while (resources.hasMoreElements()) { URL resource = resources.nextElement(); File file = new File(resource.toURI()); for(File classFile : file.listFiles()){ String fileName = classFile.getName();//ProductService.class } } Next, we need to get the file name without the extension. In the courtyard of 2018, Java has developed File I / O (NIO 2) for many years, but still cannot separate the extension from the file name. You have to create your bike, because we decided not to use third-party libraries like Apache Commons. Let's use the old old-fashioned method
lastIndexOf(".") : if(fileName.endsWith(".class")){ String className = fileName.substring(0, fileName.lastIndexOf(".")); } Next, we can get a class object by the full name of the class (for this we call the class
Class : Class ): Class classObject = Class.forName(basePackage + "." + className); Ok, now our classes are in our hands. Further, it remains only to highlight among them those that have the
@Component annotation: if(classObject.isAnnotationPresent(Component.class)){ System.out.println("Component: " + classObject); } Run and check. The console should have something like this:
Component: class com.kciray.ProductService Component: class com.kciray.PromotionsService Now we need to create our bin. We need to do something like
new ProductService() , but for each bin we have our own class. Reflection in Java provides us with a universal solution (the default constructor is called): Object instance = classObject.newInstance();//=new CustomClass() Next, we need to put this bean in
Map<String, Object> singletons . To do this, select the name of the bean (its id). In Java, we call variables like classes (only the first lowercase letter). This approach can be applicable to bins too, because Spring is a Java framework! Transform the name of the bin so that the first letter is small, and add it to the map: String beanName = className.substring(0, 1).toLowerCase() + className.substring(1); singletons.put(beanName, instance); Now make sure everything works. The container must create the beans, and they must be retrieved by name. Note that the name of your method is
instantiate() and the name of the method classObject.newInstance(); have a common root. Moreover, instantiate() is part of the bin's life cycle. In Java, everything is interconnected! //Main.java BeanFactory beanFactory = new BeanFactory(); beanFactory.instantiate("com.kciray"); ProductService productService = (ProductService) beanFactory.getBean("productService"); System.out.println(productService);//ProductService@612 Also try implementing the
org.springframework.beans.factory.stereotype.Service annotation. It performs exactly the same function as @Component , but is called differently. The whole point is in the title - you demonstrate that the class is a service, not just a component. This is something like conceptual typing. In the certification for the spring there was a question “What annotations are stereotyped? (of the listed). So, stereotypical annotations are those that are in the stereotype package.We fill properties
Look at the diagram below for the beginning of the life cycle of a bin. What we did before this is Instantiate (creating bins via
newInstance() ). The next step is the cross injection of the bins (dependency injection, also known as control inversion (IoC)). You need to go through the properties of the bins and understand exactly what properties you need to inject. If you call productService.getPromotionsService() , you will get null , because dependency not yet added.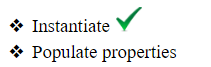
First, create the
org.springframework.beans.factory.annotation package and add the @Autowired annotation to @Autowired . The idea is to mark with this annotation those fields that are dependencies. @Retention(RetentionPolicy.RUNTIME) public @interface Autowired { } Next, add it to the property:
@Component public class ProductService { @Autowired PromotionsService promotionsService; //... } Now we need to teach our
BeanFactory find these annotations and inject dependencies on them. Add a separate method for this, and call it from Main : public class BeanFactory { //... public void populateProperties(){ System.out.println("==populateProperties=="); } } Next, we just need to just go through all our bins in the
singletons map, and for each bean go through all its fields ( object.getClass().getDeclaredFields() returns all fields, including private ones). And check if the field has @Autowired annotation: for (Object object : singletons.values()) { for (Field field : object.getClass().getDeclaredFields()) { if (field.isAnnotationPresent(Autowired.class)) { } } } Next, we need to go through all the bins one more time and see their type - suddenly this is the type who wants to take our bean. Yes, we have a three-dimensional cycle!
for (Object dependency : singletons.values()) { if (dependency.getClass().equals(field.getType())) { } } Further, when we find a dependency, we need to inject it. The first thing you can think of is to write down the field of
promotionsService using reflection directly. But spring doesn't work that way. After all, if a field has a private modifier, we will first have to set it as public , then write our value, then set it to private again (to preserve integrity). Sounds like a big crutch. Let's make a small crutch instead of a large crutch (we will form the name of the setter and call it): String setterName = "set" + field.getName().substring(0, 1).toUpperCase() + field.getName().substring(1);//setPromotionsService System.out.println("Setter name = " + setterName); Method setter = object.getClass().getMethod(setterName, dependency.getClass()); setter.invoke(object, dependency); Now start your project and make sure that when you call
productService.getPromotionsService() our bean is returned instead of null .What we have implemented is type injection. There is another injection by name (annotation
javax.annotation.Resource ). It differs in the fact that instead of the field type, its name will be extracted, and according to it - dependence from mapy. It's all the same, even in something easier. I recommend that you experiment and create some kind of your own bin, and then inject it with @Resource and extend the populateProperties() method.Supporting beans that know their name
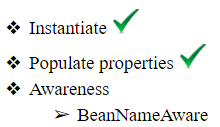
There are cases when inside a bin you need to get its name. Such a need does not arise often, because Bins, in essence, should not know about each other and that they are bins. In the first versions of the spring, it was assumed that the bean is a POJO (Plain Old Java Objec, good old Java object), and the entire configuration is rendered into XML files and separated from the implementation. But we implement this functionality, since the injection of a name is part of the life cycle of a bean.
How do we know which bean wants to know his name, and which one does not want? The first thing that comes to mind is to make a new annotation like
@InjectName and sculpt it into fields of type String. But this solution will be too general and allows you to shoot yourself in the foot many times (place this annotation on the fields of unsuitable types (not String), or try to inject the name into several fields in the same class). There is another solution, more accurate - to create a special interface with one setter method. All the bins that implement it get their name. Create a BeanNameAware class in the org.springframework.beans.factory package: public interface BeanNameAware { void setBeanName(String name); } Next, let our
PromotionsService implement it: @Component public class PromotionsService implements BeanNameAware { private String beanName; @Override public void setBeanName(String name) { beanName = name; } public String getBeanName() { return beanName; } } Finally, add a new method to the bins factory. Everything is simple - we go through our bin-singletons, check if the bean implements our interface, and call the setter:
public void injectBeanNames(){ for (String name : singletons.keySet()) { Object bean = singletons.get(name); if(bean instanceof BeanNameAware){ ((BeanNameAware) bean).setBeanName(name); } } } Run and make sure everything works:
BeanFactory beanFactory = new BeanFactory(); beanFactory.instantiate("com.kciray"); beanFactory.populateProperties(); beanFactory.injectBeanNames(); //... System.out.println("Bean name = " + promotionsService.getBeanName()); It should be noted that there are other similar interfaces in the spring. I recommend that you independently implement the BeanFactoryAware interface, which allows bins to get a link to the bean factory. It is implemented similarly.
We initialize bins
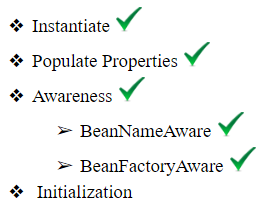
Imagine that you have a situation where you need to run some code after the dependencies have been injected (the properties of the bean are set). In simple terms, we need to give Bina the ability to initialize himself. Alternatively, we can create an
InitializingBean interface, and put the signature of the void afterPropertiesSet() method in it. The implementation of this mechanism is absolutely similar to that presented for the BeanNameAware interface, so the solution is under the spoiler. Practice and do it yourself in a minute:Bean Initialization Solution
//InitializingBean.java package org.springframework.beans.factory; public interface InitializingBean { void afterPropertiesSet(); } //BeanFactory.java public void initializeBeans(){ for (Object bean : singletons.values()) { if(bean instanceof InitializingBean){ ((InitializingBean) bean).afterPropertiesSet(); } } } //Main.java beanFactory.initializeBeans(); Add post processors
Imagine yourself in the place of the first developers of the spring. Your framework is growing and is very popular among developers, every day we receive emails with requests to add this or that useful feature. If for each such feature you add your own interface and check it in the life cycle of a bin, then it (the life cycle) will be clogged with unnecessary information. Instead, we can create one universal interface that will allow you to add some logic to the execution (absolutely any, be it an annotation check, replace a bin with another bin, set some special properties, and so on).
Let's think about what this interface is for. It should do some post-processing of the bins, hence it can be called a BeanPostProcessor. But we are faced with a difficult question - when should logic be executed? After all, we can execute it before initialization, and we can execute it after. For some tasks, the first option is better, for others - the second ... How to be?
We can allow both options at once. Let one post-processor carry two logic, two methods. One is executed before initialization (before the
afterPropertiesSet() method), and the other after. Now let's think about the methods themselves - what parameters should they have? Obviously, there must be a bin itself ( Object bean ). For convenience, in addition to the bean, you can pass the name of this bean. You remember that bin itself does not know its name. And we do not want to force all beans to implement the BeanNameAware interface. But, at the post processor level, the name of the bean can be very useful. So we add it as the second parameter.And what should the method return when post processing a bean? Let's make it so that it returns the bin itself. This gives us super-flexibility, because instead of Bina, you can slip a proxy object that wraps its calls (and adds security). Or you can return another object altogether, recreating the bin again. Developers are given a very large freedom of action. Below is the final version of the designed interface:
package org.springframework.beans.factory.config; public interface BeanPostProcessor { Object postProcessBeforeInitialization(Object bean, String beanName); Object postProcessAfterInitialization(Object bean, String beanName); } Next, we need to add a list of simple processors to our bins factory and the ability to add new ones. Yes, this is the usual ArrayList.
//BeanFactory.java private List<BeanPostProcessor> postProcessors = new ArrayList<>(); public void addPostProcessor(BeanPostProcessor postProcessor){ postProcessors.add(postProcessor); } Now we will change the
initializeBeans method so that it takes into account post-processors: public void initializeBeans() { for (String name : singletons.keySet()) { Object bean = singletons.get(name); for (BeanPostProcessor postProcessor : postProcessors) { postProcessor.postProcessBeforeInitialization(bean, name); } if (bean instanceof InitializingBean) { ((InitializingBean) bean).afterPropertiesSet(); } for (BeanPostProcessor postProcessor : postProcessors) { postProcessor.postProcessAfterInitialization(bean, name); } } } Let's create a small post-processor that simply traces calls to the console, and add it to our bean factory:
public class CustomPostProcessor implements BeanPostProcessor { @Override public Object postProcessBeforeInitialization(Object bean, String beanName) { System.out.println("---CustomPostProcessor Before " + beanName); return bean; } @Override public Object postProcessAfterInitialization(Object bean, String beanName) { System.out.println("---CustomPostProcessor After " + beanName); return bean; } } //Main.java BeanFactory beanFactory = new BeanFactory(); beanFactory.addPostProcessor(new CustomPostProcessor()); Now run and make sure everything works. As a training task, create a post-processor that will provide the
@PostConstruct (javax.annotation.PostConstruct) annotation @PostConstruct (javax.annotation.PostConstruct) . It provides an alternative method of initialization (having roots in Java, and not in the spring). Its essence is that you place an annotation on a method, and this method will be called BEFORE standard spring initialization (InitializingBean).Be sure to create all annotations and packages (even javax.annotation) manually, do not connect dependencies! This will help you see the difference between the core of the spring and its extensions (javax support), and remember it. This will allow you to stick to one style in the future.
You will be interested in the fact that in a real spring the abstract
@PostConstructis implemented exactly this way, through the post-processor CommonAnnotationBeanPostProcessor. But do not peek there, write your implementation.Lastly, I recommend that you add a method
void close()to the class BeanFactoryand work out two more mechanisms. The first is the abstract @PreDestroy (javax.annotation.PreDestroy), intended for methods that must be called when the container is closed. The second is the interface org.springframework.beans.factory.DisposableBeanthat contains the method void destroy(). All bins that execute this interface will be able to destroy themselves (free up resources, for example).@PreDestroy + DisposableBean
//DisposableBean.java package org.springframework.beans.factory; public interface DisposableBean { void destroy(); } //PreDestroy.java package javax.annotation; import java.lang.annotation.Retention; import java.lang.annotation.RetentionPolicy; @Retention(RetentionPolicy.RUNTIME) public @interface PreDestroy { } //DisposableBean.java public void close() { for (Object bean : singletons.values()) { for (Method method : bean.getClass().getMethods()) { if (method.isAnnotationPresent(PreDestroy.class)) { try { method.invoke(bean); } catch (IllegalAccessException e) { e.printStackTrace(); } catch (InvocationTargetException e) { e.printStackTrace(); } } } if (bean instanceof DisposableBean) { ((DisposableBean) bean).destroy(); } } } Full life cycle bean
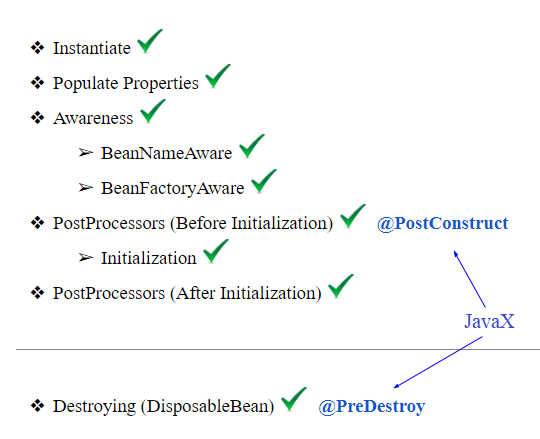
So we implemented the full life cycle of Bina, in its modern form. I hope that this approach will help you to remember it.
Our favorite context
Programmers often use the term context, but not everyone understands what it really means. Now we will put everything in shelves. As I noted at the beginning of the article, the context is a container implementation, as well as
BeanFactory. But, besides the basic functions (DI), it also adds some cool features. One of these features is sending and processing events between bins.The article was too big and the content was cut off, so I put the information on the context under the spoiler.
We realize context
.
, .
But no. .
, , . , , , , :
, , , — . , :
ApplicationListener:
, Main , , :
org.springframework.context , ApplicationContext . BeanFactory . , close() . public class ApplicationContext { private BeanFactory beanFactory = new BeanFactory(); public ApplicationContext(String basePackage) throws ReflectiveOperationException{ System.out.println("******Context is under construction******"); beanFactory.instantiate(basePackage); beanFactory.populateProperties(); beanFactory.injectBeanNames(); beanFactory.initializeBeans(); } public void close(){ beanFactory.close(); } } Main , , : ApplicationContext applicationContext = new ApplicationContext("com.kciray"); applicationContext.close(); , .
close() , « » - . , : package org.springframework.context.event; public class ContextClosedEvent { } ApplicationListener , . , ( ApplicationListener<E> ). , Java-, . , , : package org.springframework.context; public interface ApplicationListener<E>{ void onApplicationEvent(E event); } ApplicationContext . close() , , . ApplicationListener<ContextClosedEvent> , onApplicationEvent(ContextClosedEvent) . , ? public void close(){ beanFactory.close(); for(Object bean : beanFactory.getSingletons().values()) { if (bean instanceof ApplicationListener) { } } } But no. .
bean instanceof ApplicationListener<ContextClosedEvent> . Java. (type erasure) , <T> <Object>. , ? , ApplicationListener<ContextClosedEvent> , ?, , . , , , , :
for (Type type: bean.getClass().getGenericInterfaces()){ if(type instanceof ParameterizedType){ ParameterizedType parameterizedType = (ParameterizedType) type; } } , , , — . , :
Type firstParameter = parameterizedType.getActualTypeArguments()[0]; if(firstParameter.equals(ContextClosedEvent.class)){ Method method = bean.getClass().getMethod("onApplicationEvent", ContextClosedEvent.class); method.invoke(bean, new ContextClosedEvent()); } ApplicationListener:
@Service public class PromotionsService implements BeanNameAware, ApplicationListener<ContextClosedEvent> { //... @Override public void onApplicationEvent(ContextClosedEvent event) { System.out.println(">> ContextClosed EVENT"); } } , Main , , :
//Main.java void testContext() throws ReflectiveOperationException{ ApplicationContext applicationContext = new ApplicationContext("com.kciray"); applicationContext.close(); } Conclusion
Initially, I planned this article for Baeldung in English, but then I thought that the audience could positively evaluate this approach to learning. If you like my ideas, be sure to support the article. If she scores a rating of more than 30, then I promise to continue. When writing this article, I tried to show exactly the knowledge of Spring Core that is used most often, and also based on Core Spring 5.0 Certification Study Guide . In the future, using such tutorials, you can cover all the certification and make the spring more accessible to Java developers.
Update 10/05/2018
I constantly receive letters with questions "and when the continuation, we are waiting for him." But there is no time at all, and other personal projects are in priority. However, if some of you really liked the idea, you can study the narrow section of the spring and write an article-sequel. If you do not have a habry account, then I can publish an article from my acca or help you get an invite.
Topics distribution:
Spring Container - [username]
Spring AOP - [username]
Spring Web - [username]
Spring Cloud - [username]
Source: https://habr.com/ru/post/419679/
All Articles