Java REST at the HeadHunter School of Programmers
Hi Habr, we want to tell about one of the projects of the school of programmers HeadHunter 2018. Below is an article of our graduate, in which he will tell about the experience gained during training.

Hello. This year I graduated from the School of Programmers hh and in this post I will talk about the educational project in which I participated. While studying at school, and especially at the project, I lacked an example of a combat application (and even better a guide) in which it would be possible to look at how to properly divide logic and build a scalable architecture. All the articles I found were difficult to understand for a beginner, because either they actively used IoC without exhaustive explanations of how to add new components or modify old ones, or they were archaic and contained a ton of configs on xml and frontend on jsp. I tried to focus on my level before learning, i.e. almost zero with a few reservations, so this article should be useful for future students of the school, as well as self-taught enthusiasts who have decided to start writing in java.
Given (problem statement)
Team - 5 people. Term - 3 months, at the end of each - a demo. The goal is to make an application that helps HR accompany employees on a trial period, automating all the processes that will work out. At the entrance, they explained to us how the probationary period (IS) is arranged: as soon as it becomes known that a new employee is coming out, HR begins to kick the future leader so that he sets tasks for the IP, and this should be done before the first working day. On the day when the employee comes to work, HR conducts a welcome meeting, talks about the company's infrastructure, and handles tasks to the IS. After 1.5 and 3 months, an intermediate and final meeting of the HR, the manager and the employee are held, where the progress of the discussion is discussed and a form of the results is drawn up. In case of success, after the final meeting, the employee is handed a printed questionnaire of a novice (questions in the “appreciate the pleasure of IP” style) and turn on the HR task in jira to issue a DMS officer.
Design
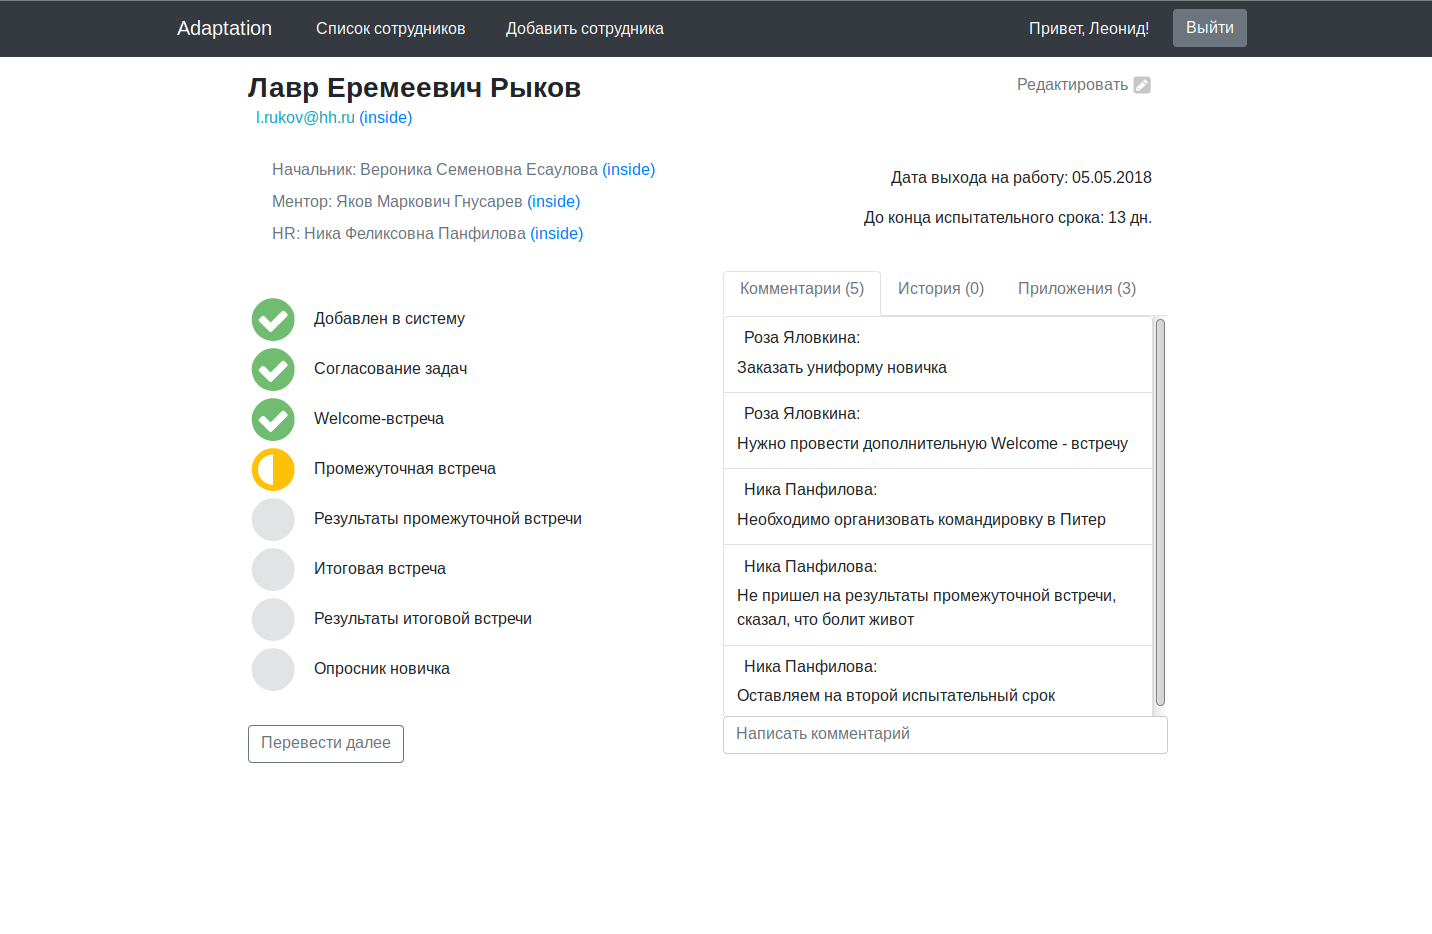
We decided to make for each employee a personal page on which general information will be displayed (name, department, manager, etc.), a field for comments and a history of changes, attachments (tasks on the IP, questionnaire) and employee’s workflow reflecting level of passage of IP. Vorkflou was decided to split into 8 stages, namely:
- 1st stage - adding an employee: becomes executed immediately after a new employee is registered in the HR system. At the same time, three calendars are sent to HRU for a good, intermediate and final meeting.
- Stage 2 - coordination of tasks on the IS: the head is sent a form for setting tasks on the IS, which after filling out will receive HR. HR then prints them, signs them, and marks the end of the stage in the interface.
- Stage 3 - welcome meeting: HR holds a meeting and presses the “Stage completed” button.
- 4th stage - intermediate meeting: similar to the third stage
- Stage 5 - the results of the interim meeting: HR fills in the results on the employee’s page and clicks Next.
- 6th stage - final meeting: similar to the third stage
- 7th stage - the results of the final meeting: similar to the fifth stage
- The 8th stage is the completion of the IP: in case of successful completion of the IP, a link with the form of the questionnaire is sent to the employee by e-mail, and jira automatically creates a task for the design of the VHI (before us the task was started by hands).
All stages have time after which the stage is considered overdue and is highlighted in red, and a notification arrives by mail. The end time must be editable, for example, in case an interim meeting falls on a holiday or due to some circumstances it is necessary to postpone the meeting.
Unfortunately, the prototypes painted on the leaflets / boards have not been preserved, but at the end there will be screenshots of the finished application.
Exploitation
One of the goals of the school is to prepare students for work in large projects, so the process of releasing tasks was appropriate for us.
At the end of the work on the task, we give it to the review_1 to another student from the team to correct obvious errors / exchange of experience. Then there is a review_2 - the task is checked by two mentors, who make sure that we don’t let govnod for a couple with a reviewer_1. Further testing was supposed, but this stage is not very appropriate, given the scale of the school project. So after passing the review, we thought the task was ready for release.
Now a few words about the warmth. The application must always be available on the network from any computers. To do this, we bought a cheap virtual machine (for 100 rubles / month), but, as I learned later, everything could be arranged for free and in a fashionable way in the AWS docker . For continuous integration, we have chosen Travis. If someone does not know (I personally never heard of continuous integration before school), it’s such a cool thing that will monitor your github and when a new commit appears (as configured), collect the code in jar, send it to the server and restart the application automatically. How exactly to build, is described in the Travis yamle in the root of the project, it is quite similar to bash, so I think no comments will be required. We also bought a domain www.adaptation.host , so as not to register an ugly IP address in the address bar on a demo. We also set up postfix (for sending mail), apache (not nginx, since apache was out of the box) and jira (trial) server. The frontend and backend were made by two separate services that will communicate over http (# 2-18, # microservices). This part of the article "at school HeadHunter programmers" smoothly ends, and we turn to the java rest service.
Backend
0. Introduction
We used the following technologies:
- JDK 1.8;
- Maven 3.5.2;
- Postgres 9.6;
- Hibernate 5.2.10;
- Jetty 9.4.8;
- Jersey 2.27.
As a framework, we took NaB 3.5.0 from hh. Firstly, it is used in HeadHunter, and secondly, it contains jetty, jersey, hibernate, embedded postgres out of the box, which is written on the githabe. Let me briefly explain for beginners: jetty is a web server that is engaged in identifying clients and organizing a session for each of them; jersey - a framework that helps to conveniently create a RESTful service; hibernate - ORM to simplify work with the database; maven is a java project builder.
I will show a simple example of how to work with it. I created a small test repository in which I added two entities: a user and a resume, as well as the resources to create and receive them with the OneToMany / ManyToOne connection. To run it is enough to clone the repository and run mvn clean install exec: java in the project root. Before commenting on the code, I’ll tell you about the structure of our service. It looks like this:
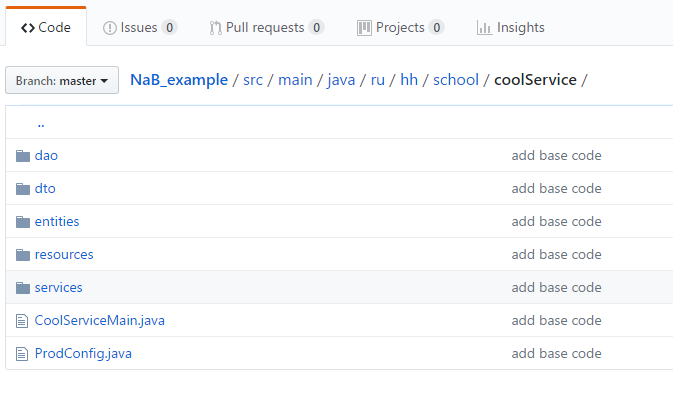
Main directories:
- Services is the main directory in the application; all business logic is stored here. In other places working with data without good reason should not be.
- Resources - URL handlers, the layer between services and the frontend. Here validation of incoming data and conversion of outgoing data are allowed, but not business logic.
- Dao (Data Access Object) - the layer between the database and services. Tao must contain only fundamental basic operations: add, count, update, delete one / all.
- Entity - objects that ORM exchanges with the base. As a rule, they correspond directly to the tables and must contain all the fields as the entity in the database with the corresponding types.
- Dto (Data Transfer Object) is an analogue of an entity, only for resources (front), it helps to generate json from the data that we want to send / receive.
1. Base
I should use the installed postgres side by side, as in the main application, but I wanted the test example to be simple and run with one command, so I took the built-in HSQLDB. Connecting the database to our infrastructure is done by adding a DataSource to ProdConfig (also remember to tell hibernate which database you are using):
@Bean(destroyMethod = "shutdown") DataSource dataSource() { return new EmbeddedDatabaseBuilder() .setType(EmbeddedDatabaseType.HSQL) .addScript("db/sql/create-db.sql") .build(); } I created the table creation script in the create-db.sql file. You can add other scripts that initialize the database. In our lightweight example with in_memory base, you could do without scripts at all. If hibernate.hbm2ddl.auto=create specified in the hibernate.properties settings, hibernate will create tables by entity when the application is started. But if you need to have something in the database that is not in the entity, then you cannot do without a file. Personally, I’m used to separating the base and the application, so I usually don’t trust hibernate to do such things.db/sql/create-db.sql :
CREATE TABLE employee ( id INTEGER IDENTITY PRIMARY KEY, first_name VARCHAR(256) NOT NULL, last_name VARCHAR(256) NOT NULL, email VARCHAR(128) NOT NULL ); CREATE TABLE resume ( id INTEGER IDENTITY PRIMARY KEY, employee_id INTEGER NOT NULL, position VARCHAR(128) NOT NULL, about VARCHAR(256) NOT NULL, FOREIGN KEY (employee_id) REFERENCES employee(id) ); 2. Entity
entities/employee :
@Entity @Table(name = "employee") public class Employee { @Id @GeneratedValue(strategy = GenerationType.IDENTITY) @Column(name = "id", nullable = false) private Integer id; @Column(name = "first_name", nullable = false) private String firstName; @Column(name = "last_name", nullable = false) private String lastName; @Column(name = "email", nullable = false) private String email; @OneToMany(mappedBy = "employee") @OrderBy("id") private List<Resume> resumes; //..geters and seters.. } entities/resume :
@Entity @Table(name = "resume") public class Resume { @Id @GeneratedValue(strategy = GenerationType.IDENTITY) private Integer id; @ManyToOne(fetch = FetchType.LAZY) @JoinColumn(name = "employee_id") private Employee employee; @Column(name = "position", nullable = false) private String position; @Column(name = "about") private String about; //..geters and seters.. } Entities are not referenced by the class field, but by the parent / heir object entirely. Thus, we can get recursion when we try to take a resume from the Employee database for which we’ve got resumes for which ... To prevent this from happening, we specified the annotations @OneToMany(mappedBy = "employee") and @ManyToOne(fetch = FetchType.LAZY) . They will be taken into account in the service, when performing a transaction to read / write from the database. Setting up FetchType.LAZY is optional, but using lazy communication makes the transaction easier. So, if in a transaction we receive a resume from the database and do not contact the owner, then the employee entity will not be loaded. You can see for yourself: remove FetchType.LAZY and see in the debug what is returned from the service along with the resume. But you should be careful - if we did not load the employee into the transaction, then accessing the employee fields outside the transaction can cause a LazyInitializationException .
3. Dao
In our case, EmployeeDao and ResumeDao are almost identical, so here’s just one of them.EmployeeDao :
public class EmployeeDao { private final SessionFactory sessionFactory; @Inject public EmployeeDao(SessionFactory sessionFactory) { this.sessionFactory = sessionFactory; } public void save(Employee employee) { sessionFactory.getCurrentSession().save(employee); } public Employee getById(Integer id) { return sessionFactory.getCurrentSession().get(Employee.class, id); } } The @Inject means that in the constructor of our dao, Dependency Injection is used. In my past life, a physicist who has parsed a file, built graphs based on the results of a number and, at the very least, figured out the OOP, in java guides such constructions seemed something insane. And at school, perhaps, this topic is the most non-obvious, IMHO. Fortunately, there are a lot of materials about DI on the Internet. If you are too lazy to read, then the first month you can follow the rule: register new resources / services / dao in our context-config , add the entity to the mapping . If there is a need to use some services / dao in others, they need to be added to the designer with the inject annotation, as shown above, and the spring initializes everything for you. But then you still have to deal with DI.
4. Dto
Dto, like dao, is almost identical for employee and resume. Consider here only employeeDto. We will need two classes: EmployeeCreateDto , required when creating an employee; EmployeeDto , used when receiving (contains additional id and resumes ). The id field has been added so that in the future, on requests from the outside, we can work with the employee without conducting a preliminary search for the entity via email . Field resumes to receive an employee along with all his resumes in one request. It would be possible to manage with one dto for all operations, but then for the list of all resumes of a specific employee we would have to create an additional resource, like getResumesByEmployeeEmail, pollute the code with custom queries to the database and cross out all the conveniences provided by ORM.EmployeeCreateDto :
public class EmployeeCreateDto { public String firstName; public String lastName; public String email; } EmployeeDto :
public class EmployeeDto { public Integer id; public String firstName; public String lastName; public String email; public List<ResumeDto> resumes; public EmployeeDto(){ } public EmployeeDto(Employee employee){ id = employee.getId(); firstName = employee.getFirstName(); lastName = employee.getLastName(); email = employee.getEmail(); if (employee.getResumes() != null) { resumes = employee.getResumes().stream().map(ResumeDto::new).collect(Collectors.toList()); } } } Once again I draw attention to the fact that it is so indecent to write logic in dto that all fields are denoted as public in order not to use getters and setters.
5. Service
EmployeeService :
public class EmployeeService { private EmployeeDao employeeDao; private ResumeDao resumeDao; @Inject public EmployeeService(EmployeeDao employeeDao, ResumeDao resumeDao) { this.employeeDao = employeeDao; this.resumeDao = resumeDao; } @Transactional public EmployeeDto createEmployee(EmployeeCreateDto employeeCreateDto) { Employee employee = new Employee(); employee.setFirstName(employeeCreateDto.firstName); employee.setLastName(employeeCreateDto.lastName); employee.setEmail(employeeCreateDto.email); employeeDao.save(employee); return new EmployeeDto(employee); } @Transactional public ResumeDto createResume(ResumeCreateDto resumeCreateDto) { Resume resume = new Resume(); resume.setEmployee(employeeDao.getById(resumeCreateDto.employeeId)); resume.setPosition(resumeCreateDto.position); resume.setAbout(resumeCreateDto.about); resumeDao.save(resume); return new ResumeDto(resume); } @Transactional(readOnly = true) public EmployeeDto getEmployeeById(Integer id) { return new EmployeeDto(employeeDao.getById(id)); } @Transactional(readOnly = true) public ResumeDto getResumeById(Integer id) { return new ResumeDto(resumeDao.getById(id)); } } Those transactions which save us from LazyInitializationException (and not only). To understand transactions in hibernate, I recommend excellent work on Habré ( read more ... ), which helped me a lot in due time.
6. Resources
Finally, add the resources to create and retrieve our entities:EmployeeResource :
@Path("/") @Singleton public class EmployeeResource { private final EmployeeService employeeService; public EmployeeResource(EmployeeService employeeService) { this.employeeService = employeeService; } @GET @Produces("application/json") @Path("/employee/{id}") @ResponseBody public Response getEmployee(@PathParam("id") Integer id) { return Response.status(Response.Status.OK) .entity(employeeService.getEmployeeById(id)) .build(); } @POST @Produces("application/json") @Path("/employee/create") @ResponseBody public Response createEmployee(@RequestBody EmployeeCreateDto employeeCreateDto){ return Response.status(Response.Status.OK) .entity(employeeService.createEmployee(employeeCreateDto)) .build(); } @GET @Produces("application/json") @Path("/resume/{id}") @ResponseBody public Response getResume(@PathParam("id") Integer id) { return Response.status(Response.Status.OK) .entity(employeeService.getResumeById(id)) .build(); } @POST @Produces("application/json") @Path("/resume/create") @ResponseBody public Response createResume(@RequestBody ResumeCreateDto resumeCreateDto){ return Response.status(Response.Status.OK) .entity(employeeService.createResume(resumeCreateDto)) .build(); } } Produces(“application/json”) needed so that json and dto are correctly converted into each other. It requires the pom.xml dependency:
<dependency> <groupId>org.glassfish.jersey.media</groupId> <artifactId>jersey-media-json-jackson</artifactId> <version>${jersey.version}</version> </dependency> Other json-converters for some reason expose an invalid mediaType.
7. Result
Run and check what we got ( mvn clean install exec:java in the project root). The port on which the application is launched is specified in service.properties . Create a user and resume. I do this with curl, but you can use postman if you despise the console.
curl --header "Content-Type: application/json" \ --request POST \ --data '{"firstName": "Jason", "lastName": "Statham", "email": "jasonst@t.ham"}' \ http://localhost:9999/employee/create curl --header "Content-Type: application/json" \ --request POST \ --data '{"employeeId": 0, "position": "Voditel", "about": "Opyt raboty perevozchikom 15 let"}' \ http://localhost:9999/resume/create curl --header "Content-Type: application/json" --request GET http://localhost:9999/employee/0 curl --header "Content-Type: application/json" --request GET http://localhost:9999/employee/0 Everything works perfectly. Thus, we got a backend providing api. Now you can start the service with the front-end and draw the appropriate forms. This is a good foundation of the application, which you can use to start your own, configuring various components as the project progresses.
Conclusion
The main application code is contained in working condition on a githaba with instructions for launching it in a wiki tab. Screenshots that have been promised:
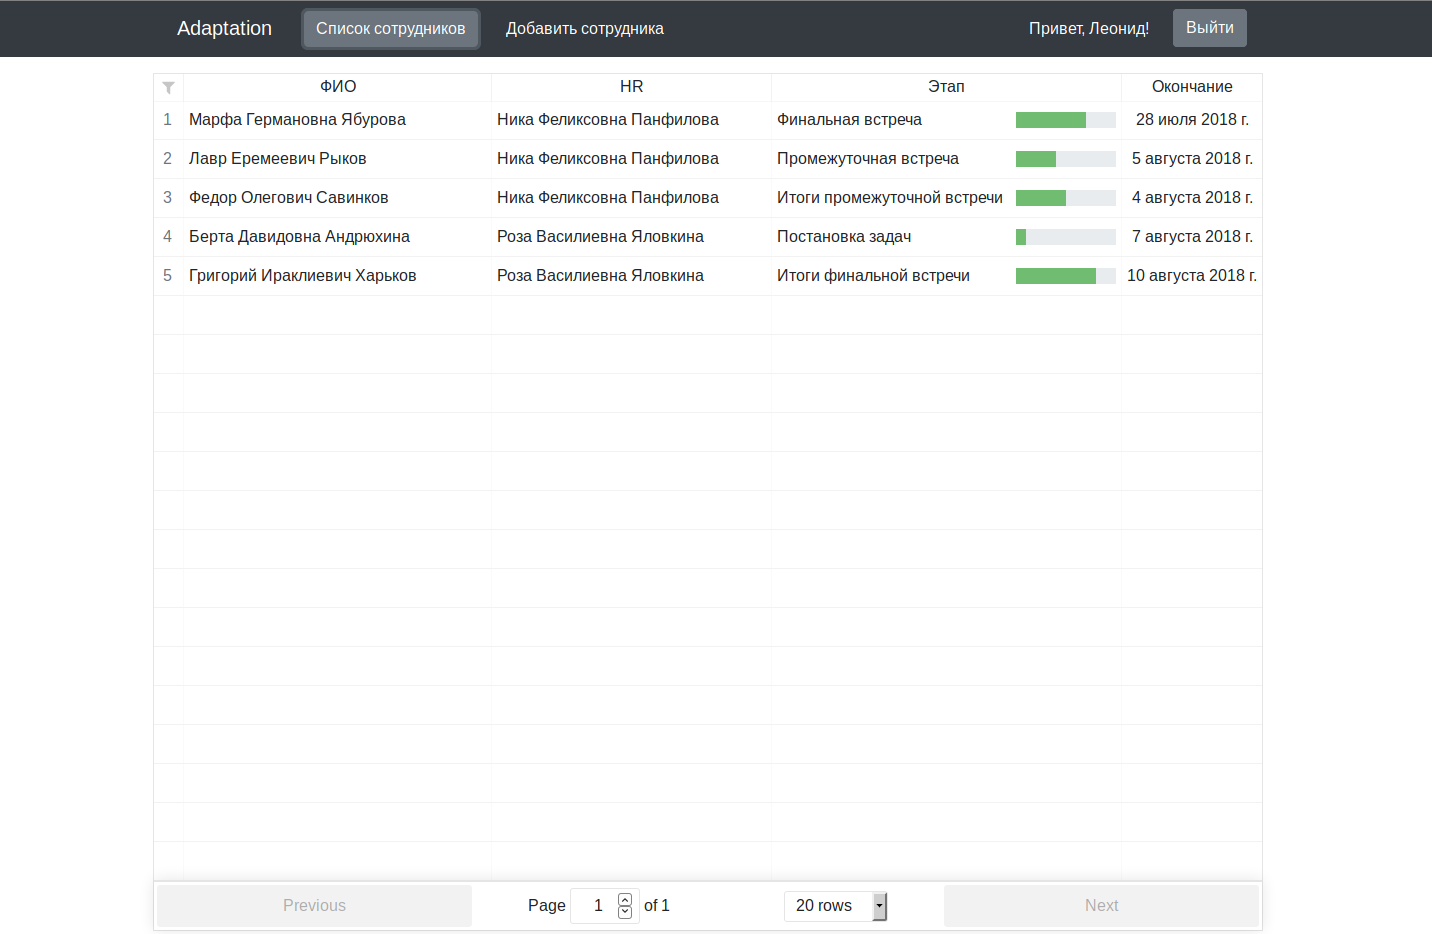
For a multi-million dollar project, it looks a bit damp, of course, but as an excuse, let me remind you that we worked on it in the evening, after work / study.
If the number of interested ones exceeds the number of slippers, in the future I can turn it into a cycle of articles, where I will tell you about the front, the backdocking and the nuances we encountered when working with mail / grease / dock files.
PS After some time, having gone through the shock of the school, the team’s remnants gathered and, after analyzing the flights, decided to make an adaptation of 2.0, taking into account all the errors. The main objective of the project is the same - to learn how to make serious applications, build a well-thought-out architecture and be in-demand specialists in the market. You can follow the work in the same repository. Pool requests are welcome. Thank you for your attention and wish us good luck!
buns
')
Source: https://habr.com/ru/post/419599/
All Articles