Comparing React and Vue on a practical example
The author of the material, the translation of which we publish today, says that he has to use Vue at work, and he has studied this framework well. However, he was always curious to find out how things were going on in other worlds, namely, in the React universe.
He read the documentation, watched several training videos, and although it all seemed very useful to him, he really wanted to understand what the difference was between React and Vue. For him, the search for differences between frameworks was not to find out if they support the virtual object model of the document, or how they render the pages. He wanted someone to explain to him the features of the code, to show what was going on in him. He hoped to find an article that was devoted to the disclosure of precisely such differences, reading which one who previously knew only Vue or React (or a completely new person in web development) could better understand the differences between these frameworks.

')
However, he could not find such an article. This fact led him to understand that he himself had to take such an article and write, in passing understanding the similarities and differences between React and Vue. As a matter of fact, you have a description of his experiment comparing these two frameworks.

Vue or React?
For the experiment, I decided to create a couple of fairly standard To-Do applications that allow the user to add items to the to-do list and remove them from it. Both applications are developed using standard CLI (
Now I propose to look at the appearance of the applications in question here.

Applications created by Vue and React
Here are the repositories with the code of these applications: Vue ToDo , React ToDo .
Both here and there absolutely identical CSS-code is used, the only difference is in exactly where the corresponding files are located. Given this, let's take a look at the project structure.
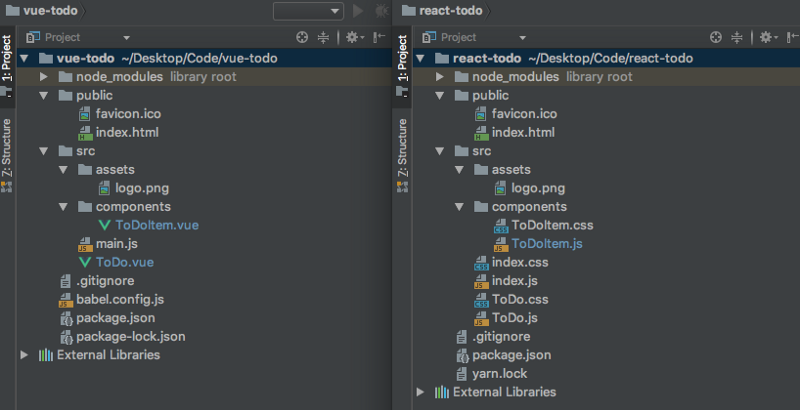
Structure of projects using Vue and React
As you can see, the structure of these two projects is almost identical. The only major difference is that the React application has three CSS files, while the Vue application does not have them at all. The reason for this is that when using
As a result, both approaches allow achieving the same goal, while, if you wish, nothing prevents you from organizing styles differently from Vue and React. In fact, it all comes down to the personal preferences of the person who creates the web project. For example, the topic of CSS structuring is constantly discussed in the developer communities. For now, we will simply follow the standard approaches to working with CSS laid down in the CLI of the frameworks under consideration.
However, before we go any further, let's take a look at what a typical Vue and React component looks like.
Here is the code for the Vue component (in our project it is in the
Here is the code for the React component (the
Now it's time to dive into the details.
Changing data is also called a "data mutation." We are talking about changes made to the data stored by our application. So, if we need to change the name of a certain person from “John” to “Mark”, then we are talking about “data mutation”. The key difference between React and Vue lies in the approach to changing data. Namely, Vue creates a
Here’s what the
Here’s what the
As you can see, in both cases we describe the same data, they are simply decorated in different ways. As a result, it can be said that the transfer of the initial data to the components in Vue and React looks very, very similar. But, as already mentioned, the approaches to changing existing data in these frameworks are different.
Suppose we have a data item like
In Vue, you can access this data using the construction of
In React, the same data can be accessed using the construction of
The result of such an operation is the same as that obtained after performing a simpler operation in Vue. In React, you have to write more code, but in Vue there is something like a special version of the
Now let us ask ourselves questions about why things are so arranged in React, and why the
Now that we’ve dealt with the data changes, let's talk about how, in both versions of our application, add new items to the to-do list.
This is how it is done in React.
Here, the employee's data
The
Now, when the user clicks the
Finally, an empty string is written to
To add a new item to the to-do list in Vue, use the following construct.
In Vue, the input field has a
The
If there are already some data here, something like
Now let's recall the
In React, this operation is performed as follows.
While the
Here we first pass the function, which makes it accessible to child components. In addition, we bind
All you need to do in order to access a function that is in the parent component is to use the construction of
Deleting a list item in Vue is done as follows.
Vue requires a slightly different approach to removing elements than the one we used in React. Namely, here it is necessary to perform three actions.
First, here is what you need to do in the element for which you want to call its delete function.
Then you need to create the
Further, you can notice that we, by adding
This is what is called a custom event listener. It responds to
In addition, it is worth noting that in the example using Vue, you could just write code related to the
This would reduce the number of steps required to remove a list item from three to two. How exactly to do - a question of developer preferences.
If we summarize this section, we can say that in React, access to the functions described in the parent components is organized through
In React, event listeners for something simple, like a click event, are quite simple. Here is an example of creating a
Everything is arranged very simply, it is very similar to handling similar events using pure JavaScript.
It should be noted that setting up event listeners for pressing buttons on the keyboard, for example,
The
Event handlers in Vue are very easy to configure. It is enough to use the
For example, you can use the following code to add a click event listener.
Note that
There are many abbreviations that simplify the writing of listeners that respond to keystrokes on the keyboard. In React, as we said, it takes longer than in Vue. Here it is done very simply.
In React, properties are passed to the child component when it is created. For example:
Here you can see two properties passed to the
For example, in order to access the
In Vue, properties are also passed to child components when they are created.
After that, they are passed to the
In React, the function is first passed to the child component, as a property, where the child component is called. Then you schedule calls to this function, for example, by adding it as an
When using Vue, in a child component, it suffices to write a function that passes the data to the parent function. A function is written in the parent component that listens for value transfer events. When such an event occurs, such a function is called. As with React, a description of this process can be found in the section on removing items from the list.
We talked about how to add, delete, and modify data in applications based on Vue and React, how to pass data as properties from parent components to children, and how to send data from children to parents. We believe that after analyzing the examples of similarities and differences, Vue and React are visible, as they say, with the naked eye.
There are, of course, many other small differences between React and Vue, but I hope that what we have reviewed here will provide a good basis for understanding how these frameworks work. Frameworks are often analyzed when choosing a suitable platform for a new project. We hope this material will help make this choice.
Dear readers! What differences between React and Vue, in your opinion, are the most important, influencing the choice of this or that framework, for example, as the basis for a certain project?

He read the documentation, watched several training videos, and although it all seemed very useful to him, he really wanted to understand what the difference was between React and Vue. For him, the search for differences between frameworks was not to find out if they support the virtual object model of the document, or how they render the pages. He wanted someone to explain to him the features of the code, to show what was going on in him. He hoped to find an article that was devoted to the disclosure of precisely such differences, reading which one who previously knew only Vue or React (or a completely new person in web development) could better understand the differences between these frameworks.
')
However, he could not find such an article. This fact led him to understand that he himself had to take such an article and write, in passing understanding the similarities and differences between React and Vue. As a matter of fact, you have a description of his experiment comparing these two frameworks.
General provisions
Vue or React?
For the experiment, I decided to create a couple of fairly standard To-Do applications that allow the user to add items to the to-do list and remove them from it. Both applications are developed using standard CLI (
create-react-app for React and vue-cli for Vue). The CLI is, if anyone does not know, the abbreviation, which is decoded as the Command Line Interface, that is, the command line interface.Now I propose to look at the appearance of the applications in question here.
Applications created by Vue and React
Here are the repositories with the code of these applications: Vue ToDo , React ToDo .
Both here and there absolutely identical CSS-code is used, the only difference is in exactly where the corresponding files are located. Given this, let's take a look at the project structure.
Structure of projects using Vue and React
As you can see, the structure of these two projects is almost identical. The only major difference is that the React application has three CSS files, while the Vue application does not have them at all. The reason for this is that when using
create-react-app , React components are equipped with accompanying CSS files, and CLI Vue uses a different approach when styles are declared within a particular component file.As a result, both approaches allow achieving the same goal, while, if you wish, nothing prevents you from organizing styles differently from Vue and React. In fact, it all comes down to the personal preferences of the person who creates the web project. For example, the topic of CSS structuring is constantly discussed in the developer communities. For now, we will simply follow the standard approaches to working with CSS laid down in the CLI of the frameworks under consideration.
However, before we go any further, let's take a look at what a typical Vue and React component looks like.
Here is the code for the Vue component (in our project it is in the
ToDoItem.vue file). <template> <div class="ToDoItem"> <p class="ToDoItem-Text">{{todo.text}}</p> <div class="ToDoItem-Delete" @click="deleteItem(todo)">- </div> </div> </template> <script> export default { name: "to-do-item", props: ['todo'], methods: { deleteItem(todo) { this.$emit('delete', todo) } } } </script> <style> .ToDoItem { display: flex; justify-content: center; align-items: center; } .ToDoItem-Text { width: 90%; background-color: white; border: 1px solid lightgrey; box-shadow: 1px 1px 1px lightgrey; padding: 12px; margin-right: 10px; } .ToDoItem-Delete { width: 20px; padding: 5px; height: 20px; cursor: pointer; background: #ff7373; border-radius: 10px; box-shadow: 1px 1px 1px #c70202; color: white; font-size: 18px; margin-right: 5px; } .ToDoItem-Delete:hover { box-shadow: none; margin-top: 1px; margin-left: 1px; } </style> Here is the code for the React component (the
ToDoItem.js file). import React, {Component} from 'react'; import './ToDoItem.css'; class ToDoItem extends Component { render() { return ( <div className="ToDoItem"> <p className="ToDoItem-Text">{this.props.item}</p> <div className="ToDoItem-Delete" onClick={this.props.deleteItem}>-</div> </div> ); } } export default ToDoItem; Now it's time to dive into the details.
How is the data changed?
Changing data is also called a "data mutation." We are talking about changes made to the data stored by our application. So, if we need to change the name of a certain person from “John” to “Mark”, then we are talking about “data mutation”. The key difference between React and Vue lies in the approach to changing data. Namely, Vue creates a
data object in which the data is located, and the contents of which can be freely changed. React creates a state object that stores the state of the application, and when working with it, some additional effort is required to change the data. However, in React everything is arranged that way, not without reason, below we will talk about it, but first we will consider the above-mentioned objects.Here’s what the
data object used in Vue looks like. data() { return { list: [ { todo: 'clean the house' }, { todo: 'buy milk' } ], } }, Here’s what the
state object used in React looks like: constructor(props) { super(props); this.state = { list: [ { 'todo': 'clean the house' }, { 'todo': 'buy milk' } ], }; }; As you can see, in both cases we describe the same data, they are simply decorated in different ways. As a result, it can be said that the transfer of the initial data to the components in Vue and React looks very, very similar. But, as already mentioned, the approaches to changing existing data in these frameworks are different.
Suppose we have a data item like
name: 'Sunil' . Here I assigned my own name to the name property.In Vue, you can access this data using the construction of
this.name . And here is how to change them: this.name = 'John' . I don’t know exactly how I would feel if my name really changed, but in Vue it works that way.In React, the same data can be accessed using the construction of
this.state.name . But you cannot change them by writing something like this.state.name = 'John' , since there are restrictions in React that prevent such changes in data. Therefore, in React you have to use something like this.setState({name: 'John'}) .The result of such an operation is the same as that obtained after performing a simpler operation in Vue. In React, you have to write more code, but in Vue there is something like a special version of the
setState function, which is called when, as it seems, a simple data change. Therefore, to sum up, React requires the use of the setState with passing description of the data to be changed, and Vue works on the assumption that the developer would like to use something like this by changing the data inside the data object.Now let us ask ourselves questions about why things are so arranged in React, and why the
setState function is needed at all. You can find answers to these questions from Revanta Kumar : “This is so because React seeks to re-execute, as the state changes, certain life-cycle hooks, such as componentWillReceiveProps , shouldComponentUpdate , componentWillUpdate , render , componentDidUpdate . It learns that the state has changed when you call the setState function. If you were changing the state directly, React would have to do much more work to track changes, to determine which life cycle hooks need to be run, and so on. As a result, React uses setState to make life easier for itself. ”Now that we’ve dealt with the data changes, let's talk about how, in both versions of our application, add new items to the to-do list.
Adding new items to the to-do list
▍React
This is how it is done in React.
createNewToDoItem = () => { this.setState( ({ list, todo }) => ({ list: [ ...list, { todo } ], todo: '' }) ); }; Here, the employee's data
input field ( input ) has a value attribute. This attribute is updated automatically through the use of a pair of interrelated functions that form what is called two-way data binding (if you have not heard of this before - wait a bit, we'll talk about this in the section on adding elements in a Vue application). We create this kind of two-way communication due to the presence of an additional onChange event onChange attached to the input field. Take a look at the code of this field so that you can understand what is happening here. <input type="text" value={this.state.todo} onChange={this.handleInput}/> The
handleInput function handleInput called when the value of the input field changes. This leads to updating the todo element, which is inside the state object, by setting it to the value that is in the input field. Here is the handleInput function. handleInput = e => { this.setState({ todo: e.target.value }); }; Now, when the user clicks the
+ button on the application page to add a new record to the list, the createNewToDoItem function calls the method this.setState and passes the function to it. This function takes two parameters. The first is the entire list array from the state object, and the second is the todo element, updated by the handleInput function. The function then returns a new object that contains the old list array, and adds a new todo element to the end of this array. Working with the list is organized using the spread operator (if you have not met with it before - know that this is one of the new features of ES6, and look for details about it).Finally, an empty string is written to
todo , which automatically updates the value of value in the input field.▍Vue
To add a new item to the to-do list in Vue, use the following construct.
createNewToDoItem() { this.list.push( { 'todo': this.todo } ); this.todo = ''; } In Vue, the input field has a
v-model directive. It allows you to organize two-way data binding. Take a look at the code of this field and talk about what is happening here. <input type="text" v-model="todo"/> The
v-model directive binds the field to a key that is in the data object called toDoItem . When the page loads, an empty line is written to toDoItem , it looks like todo: '' .If there are already some data here, something like
todo: 'add some text here' , then the same text will appear in the input field, that is, 'add some text here' . In any case, if you go back to the example with an empty line, the text that we enter in the field will be, due to the data binding, in the todo property. This is a two-way data binding, that is, entering new data into the field results in writing this data into the data object, and updating the data in the object results in the appearance of this data in the field.Now let's recall the
createNewToDoItem() function, which we talked about above. As you can see, we put the contents of todo in the list array, and then write an empty string in todo .Removing items from the list
▍React
In React, this operation is performed as follows.
deleteItem = indexToDelete => { this.setState(({ list }) => ({ list: list.filter((toDo, index) => index !== indexToDelete) })); }; While the
deleteItem function is in the ToDo.js file, you can easily access it from ToDoItem.js by first passing this function as a property to <ToDoItem/> . Here's what it looks like: <ToDoItem deleteItem={this.deleteItem.bind(this, key)}/> Here we first pass the function, which makes it accessible to child components. In addition, we bind
this and pass the key parameter. This parameter is used by the function to distinguish the ToDoItem element to be removed from other items. Then, inside the ToDoItem component, we do the following. <div className="ToDoItem-Delete" onClick={this.props.deleteItem}>-</div> All you need to do in order to access a function that is in the parent component is to use the construction of
this.props.deleteItem .▍Vue
Deleting a list item in Vue is done as follows.
onDeleteItem(todo){ this.list = this.list.filter(item => item !== todo); } Vue requires a slightly different approach to removing elements than the one we used in React. Namely, here it is necessary to perform three actions.
First, here is what you need to do in the element for which you want to call its delete function.
<div class="ToDoItem-Delete" @click="deleteItem(todo)">-</div> Then you need to create the
emit function as a method in the child component (in this case, in ToDoItem.vue ), which looks like this. deleteItem(todo) { this.$emit('delete', todo) } Further, you can notice that we, by adding
ToDoItem.vue inside ToDo.vue , access the function. <ToDoItem v-for="todo in list" :todo="todo" @delete="onDeleteItem" // <-- this :) :key="todo.id" /> This is what is called a custom event listener. It responds to
emit calls with the string delete . If it captures a similar event, it calls the onDeleteItem function. It is inside ToDo.vue , and not in ToDoItem.vue . This function, as mentioned above, simply filters the todo array located in the data object in order to remove the element it clicked from.In addition, it is worth noting that in the example using Vue, you could just write code related to the
emit function inside the @click . It may look like this. <div class="ToDoItem-Delete" @click="$emit('delete', todo)">-</div> This would reduce the number of steps required to remove a list item from three to two. How exactly to do - a question of developer preferences.
If we summarize this section, we can say that in React, access to the functions described in the parent components is organized through
this.props (taking into account that props passed to child components, which is a standard technique that can be found literally everywhere). In Vue, the child components must trigger events using the emit function, and these events are already handled by the parent component.Work with event listeners
▍React
In React, event listeners for something simple, like a click event, are quite simple. Here is an example of creating a
click event handler for a button that creates a new to-do item. <div className="ToDo-Add" onClick={this.createNewToDoItem}>+</div> Everything is arranged very simply, it is very similar to handling similar events using pure JavaScript.
It should be noted that setting up event listeners for pressing buttons on the keyboard, for example,
Enter , takes a little longer than in Vue. Here it is necessary that the onKeyPress event onKeyPress handled as follows. Here is the code for the input field. <input type="text" onKeyPress={this.handleKeyPress}/> The
handleKeyPress function calls the createNewToDoItem function when it recognizes pressing Enter . It looks like this. handleKeyPress = (e) => { if (e.key === 'Enter') { this.createNewToDoItem(); } }; ▍Vue
Event handlers in Vue are very easy to configure. It is enough to use the
@ symbol, and then specify the type of listener that we want to use.For example, you can use the following code to add a click event listener.
<div class="ToDo-Add" @click="createNewToDoItem()">+</div> Note that
@click is short for v-on:click . Vue event listeners are good in that they can be managed very finely. For example, if you attach a .once construct to a .once , this will cause the listener to work only once.There are many abbreviations that simplify the writing of listeners that respond to keystrokes on the keyboard. In React, as we said, it takes longer than in Vue. Here it is done very simply.
<input type="text" v-on:keyup.enter="createNewToDoItem"/> Passing data to child components
▍React
In React, properties are passed to the child component when it is created. For example:
<ToDoItem key={key} item={todo} /> Here you can see two properties passed to the
ToDoItem component. From this point on, they can be accessed in the child component via this.props .For example, in order to access the
item.todo property, it suffices to use the construction of this.props.item .▍Vue
In Vue, properties are also passed to child components when they are created.
<ToDoItem v-for="todo in list" :todo="todo" :key="todo.id" @delete="onDeleteItem" /> After that, they are passed to the
props array of the child component, for example, using the props: [ 'todo' ] construct. You can refer to these properties in child components by name, in our case this name is 'todo' .Passing data to the parent component
▍React
In React, the function is first passed to the child component, as a property, where the child component is called. Then you schedule calls to this function, for example, by adding it as an
onClick handler, or by calling it by calling this.props.whateverTheFunctionIsCalled . This leads to a function call that is in the parent component. This process is described in the section on removing items from the list.▍Vue
When using Vue, in a child component, it suffices to write a function that passes the data to the parent function. A function is written in the parent component that listens for value transfer events. When such an event occurs, such a function is called. As with React, a description of this process can be found in the section on removing items from the list.
Results
We talked about how to add, delete, and modify data in applications based on Vue and React, how to pass data as properties from parent components to children, and how to send data from children to parents. We believe that after analyzing the examples of similarities and differences, Vue and React are visible, as they say, with the naked eye.
There are, of course, many other small differences between React and Vue, but I hope that what we have reviewed here will provide a good basis for understanding how these frameworks work. Frameworks are often analyzed when choosing a suitable platform for a new project. We hope this material will help make this choice.
Dear readers! What differences between React and Vue, in your opinion, are the most important, influencing the choice of this or that framework, for example, as the basis for a certain project?
Source: https://habr.com/ru/post/419373/
All Articles