LEMP stack with PHP 7 on CentOS 7 + Let's Encrypt on Google Cloud for deploying the Symfony 4 application
Good afternoon, dear Habr!
I will say right away that I am a developer, and I think many colleagues will support me, there are often not enough system administrators in our projects, somewhere first, somewhere always. We have to study new materials for us in this area, and in my opinion, it’s correct to share our experience with each other. This article does not claim the laurels of the complete CentOS setup guide, and yes, SELinux is disabled in it, and no additional MySQL users are created, it only describes what is said in the header, and the minimum working configuration. In the configuration, which then can always be completed by a specialist, but which will allow you to deploy the required project in the shortest possible time. I will be grateful to the guru for their advice and comments, always for constructive criticism, on the basis of which I will make edits if necessary. For the rest, I would like to quote AntonShevchuk : “If you do not agree with the author of the article, describe your point of view, why should you gloatfully lower his karma?” Thank you, let's go ...
In this post, I will provide specific steps for installing and configuring the Nginx + MySQL + PHP7 bundle on CentOS 7. It is worth noting that this article will cover setting up the system for one domain. The site will be used by an instance on the Google Cloud Platform, with the creation of which I will begin:
We proceed directly to the installation of LEMP. Under the rights of the current user, create variables for future use:
Switch to superuser mode, all the above actions will be performed on its behalf, unless explicitly stated otherwise.
We update the system and remove the "orphaned" packages:
Add support for Fedora repositories, install the nano text editor and the wget utility to be able to get files from remote servers. To deploy applications to symfony (and not only), I use git repository cloning, to implement this method, install git support, also symfony needs zip support (the -y option means an automatic answer "Y" to all questions arising from the installer):
You need to specify the correct host name, for this we edit the network configuration file:
Save the file and install it using the hostnamectl utility:
Install nginx:
Run nginx:
Add nginx to autoload:
Install MySQL, launch and add to autoload:
Perform the initial configuration of MySQL, answer all the questions in the script with "Y" and specify the superuser password:
Add support for Let's Encrypt:
Since at the time of this writing PHP 7 is not in the CentOS repositories, nor in Fedora, we will install it from the REMI repository:
All the necessary software is installed, go to its settings, initially edit the configuration file php-fpm:
In this file, you must specify the user name and the group under which you will run the application, in our minimum configuration it is the user by whom you initially logged in to the system, the same name group for it is created by the system automatically.
Next, we specify the socket - it is necessary to add the following under the line listen = 127.0.0.1:9000:
And finally, at the end of the file, change the folder for storing session files:
Save the changes, then run and add php-fpm to the autoload:
Disable SELINUX:
With this command you disable SELINUX only in the current user session, so that after rebooting the settings are saved, you must edit its configuration file:
where to specify SELINUX = disabled
Save the changes and exit the superuser mode . Next, we will create a directory for the project in the home directory and put an index file there - a stub to check the functionality of the created stack:
Let the contents of the file be as follows (replace __YOUR_ROOT_PASSWORD__ with the password of the MySQL superuser specified during its configuration):
Again, log in as the superuser and open the nginx configuration file for editing:
Change the username like the php-fpm configuration:
user username_system_;
Change the default server directive configuration as follows:
Save the changes and let the nginx command re-read the configuration:
On the domain name __YOURD_DOMAGENNOE_IMA__ the page we created is a stub.
Let's start creating a certificate:
After generating keys, we change the nginx configuration to support HTTPS, in this configuration the “main” domain is without a www and the redirection to a secure connection is configured. So:
We change the server directive we created 2 steps back to the following:
Save the result and tell nginx to re-read the configuration:
Since Let's Encrypt need to be updated every three months, we will configure automatic renewal in the scheduler, for example, on Monday night
15 4 * * 1 / usr / bin / certbot renew --quiet
18 4 * * 1 / usr / bin / systemctl reload nginx
So that the application being deployed does not have rights problems, we change the owner of the following folder:
That's it, the system is ready. Reboot to make sure that all the necessary software is configured correctly and will not behave differently after the reboot, then you can delete the project folder we created in the user directory and clone the necessary working repository in it. Do not forget to create a folder for storing user sessions:
UPD :
On the advice of Amet13 , teams use variables + package bundling into a consistent "silent" installation.
UDP 2 :
In PHP-FPM settings, the folder for storing sessions has been changed to the “local” project folder to prevent problems with access rights.
I will say right away that I am a developer, and I think many colleagues will support me, there are often not enough system administrators in our projects, somewhere first, somewhere always. We have to study new materials for us in this area, and in my opinion, it’s correct to share our experience with each other. This article does not claim the laurels of the complete CentOS setup guide, and yes, SELinux is disabled in it, and no additional MySQL users are created, it only describes what is said in the header, and the minimum working configuration. In the configuration, which then can always be completed by a specialist, but which will allow you to deploy the required project in the shortest possible time. I will be grateful to the guru for their advice and comments, always for constructive criticism, on the basis of which I will make edits if necessary. For the rest, I would like to quote AntonShevchuk : “If you do not agree with the author of the article, describe your point of view, why should you gloatfully lower his karma?” Thank you, let's go ...
In this post, I will provide specific steps for installing and configuring the Nginx + MySQL + PHP7 bundle on CentOS 7. It is worth noting that this article will cover setting up the system for one domain. The site will be used by an instance on the Google Cloud Platform, with the creation of which I will begin:
Creating an instance on Google Cloud with generating SSH keys
Select in the main menu, select "Compute Engine" and click "Create an instance." Depending on the expected load, we choose the type of the machine, but not lower than g1-small , since Composer for Symfony 4 is demanding of RAM and will not be able to load dependencies on f1-micro.
The proposed boot disk image is changed to CentOS 7, the minimum disk size of 10GB is quite suitable for deploying the system, all the necessary libraries and dependencies.
')
To access the server you are creating via SSH, you need to generate the corresponding key, for MacOS X or Linux users there is a command for this
where __FILE__ is the path to the saved key with the file name, and __USER__ is the user name under which you will login to the system. When executing this command, the system will ask you to specify a key phrase that will serve as a password when using this key, its input is optional, do not enter anything to skip and press Enter, then confirm the previous action. After executing this command, the system will create the private key specified in __FILE__, and next to it - the public key named __FILE__.pub
The last thing that remains to be done with the key for MacOS X and Linux users is to deny write access to everyone except the owner of the key;
Windows users can use PuTTYgen. Open the program, click Generate and follow the instructions set by default. The parameters are suitable for most cases, but Google insists on 2048-bit keys, do not forget to set this parameter. The “Key comment” field is used to set the user name, and to set the key phrase - “Key passphrase”. After generation is complete, the program will display the public key. To save a private key with the .ppk extension, click “Save private key”.
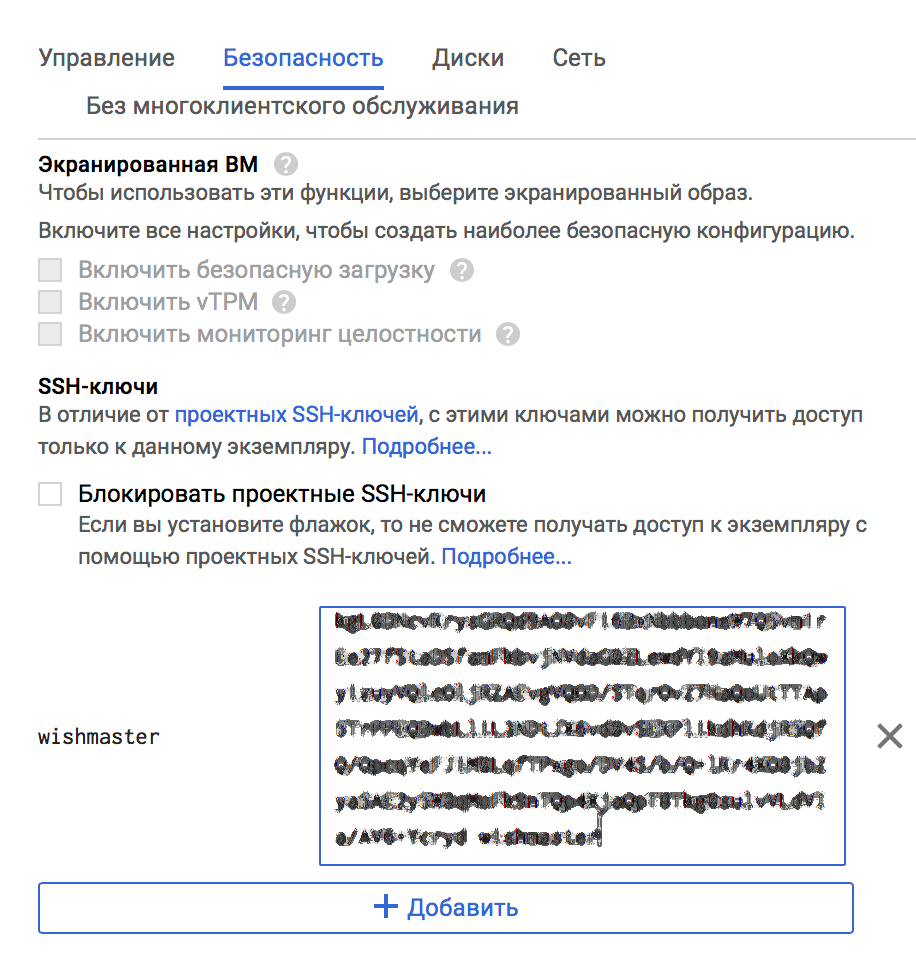
Copy the contents of the public key (from the file __FILE__.pub for MacOS X / Linux or from the PuTTYgen window for Windows) and paste it into the appropriate field on the Security tab:
Do not forget to allow HTTP and HTTPS traffic by ticking the appropriate fields. At this stage, everything is ready, click "Create".
After creation, the system displays the external IP address assigned to the instance, connect to it via SSH using the private key:
The proposed boot disk image is changed to CentOS 7, the minimum disk size of 10GB is quite suitable for deploying the system, all the necessary libraries and dependencies.
')
To access the server you are creating via SSH, you need to generate the corresponding key, for MacOS X or Linux users there is a command for this
ssh-keygen -t rsa -f __FILE__ -C __USER__ where __FILE__ is the path to the saved key with the file name, and __USER__ is the user name under which you will login to the system. When executing this command, the system will ask you to specify a key phrase that will serve as a password when using this key, its input is optional, do not enter anything to skip and press Enter, then confirm the previous action. After executing this command, the system will create the private key specified in __FILE__, and next to it - the public key named __FILE__.pub
The last thing that remains to be done with the key for MacOS X and Linux users is to deny write access to everyone except the owner of the key;
chmod 400 __FILE__ Windows users can use PuTTYgen. Open the program, click Generate and follow the instructions set by default. The parameters are suitable for most cases, but Google insists on 2048-bit keys, do not forget to set this parameter. The “Key comment” field is used to set the user name, and to set the key phrase - “Key passphrase”. After generation is complete, the program will display the public key. To save a private key with the .ppk extension, click “Save private key”.
Copy the contents of the public key (from the file __FILE__.pub for MacOS X / Linux or from the PuTTYgen window for Windows) and paste it into the appropriate field on the Security tab:
Do not forget to allow HTTP and HTTPS traffic by ticking the appropriate fields. At this stage, everything is ready, click "Create".
After creation, the system displays the external IP address assigned to the instance, connect to it via SSH using the private key:
ssh -i __FILE__ __USER__@__IP__ We proceed directly to the installation of LEMP. Under the rights of the current user, create variables for future use:
export USER_NAME=______ export DOMAIN_NAME=______ Switch to superuser mode, all the above actions will be performed on its behalf, unless explicitly stated otherwise.
We update the system and remove the "orphaned" packages:
yum clean all yum update yum autoremove Add support for Fedora repositories, install the nano text editor and the wget utility to be able to get files from remote servers. To deploy applications to symfony (and not only), I use git repository cloning, to implement this method, install git support, also symfony needs zip support (the -y option means an automatic answer "Y" to all questions arising from the installer):
yum install epel-release nano wget git-core zip unzip -y You need to specify the correct host name, for this we edit the network configuration file:
cat << EOF > /etc/sysconfig/network HOSTNAME=${DOMAIN_NAME} EOF Save the file and install it using the hostnamectl utility:
hostnamectl set-hostname ${DOMAIN_NAME} Install nginx:
yum install nginx -y Run nginx:
systemctl start nginx Add nginx to autoload:
systemctl enable nginx Install MySQL, launch and add to autoload:
yum install mariadb mariadb-server -y systemctl start mariadb systemctl enable mariadb Perform the initial configuration of MySQL, answer all the questions in the script with "Y" and specify the superuser password:
mysql_secure_installation Add support for Let's Encrypt:
yum install certbot -y Since at the time of this writing PHP 7 is not in the CentOS repositories, nor in Fedora, we will install it from the REMI repository:
yum install http://rpms.remirepo.net/enterprise/remi-release-7.rpm yum-utils -y yum-config-manager --enable remi-php72 yum --enablerepo=remi,remi-php72 install php-fpm php-common php-opcache php-cli php-pear php-pdo php-mysqlnd php-gd php-mcrypt php-xml php-zip -y All the necessary software is installed, go to its settings, initially edit the configuration file php-fpm:
nano /etc/php-fpm.d/www.conf In this file, you must specify the user name and the group under which you will run the application, in our minimum configuration it is the user by whom you initially logged in to the system, the same name group for it is created by the system automatically.
user = ______ group = ______ listen.owner = ______ listen.group = ______ Next, we specify the socket - it is necessary to add the following under the line listen = 127.0.0.1:9000:
listen = /var/run/php-fpm/php-fpm.sock And finally, at the end of the file, change the folder for storing session files:
php_value[session.save_path] = /home/______/______/var/sessions Save the changes, then run and add php-fpm to the autoload:
systemctl start php-fpm systemctl enable php-fpm Disable SELINUX:
setenforce 0 With this command you disable SELINUX only in the current user session, so that after rebooting the settings are saved, you must edit its configuration file:
nano /etc/selinux/config where to specify SELINUX = disabled
Save the changes and exit the superuser mode . Next, we will create a directory for the project in the home directory and put an index file there - a stub to check the functionality of the created stack:
cd mkdir -p ${DOMAIN_NAME}/public cd ${DOMAIN_NAME}/public nano index.php Let the contents of the file be as follows (replace __YOUR_ROOT_PASSWORD__ with the password of the MySQL superuser specified during its configuration):
<html> <head> <h2>LEMP test</h2> </head> <body> <?php echo '<p>Hello!</p>'; $host = "localhost"; $username = "root"; $password = "__YOUR_ROOT_PASSWORD__"; $connection = mysqli_connect($host, $username, $password); if (!$connection) print '<p>DB connect failed with error: ' . mysqli_connect_error() . '</p>'; else print '<p>DB connection established</p>'; ?> </body> </html> Again, log in as the superuser and open the nginx configuration file for editing:
nano /etc/nginx/nginx.conf Change the username like the php-fpm configuration:
user username_system_;
Change the default server directive configuration as follows:
server { set $USER_NAME ______; server_name $hostname www.$hostname; root /home/$USER_NAME/$hostname/public; location / { # try to serve file directly, fallback to index.php try_files $uri /index.php$is_args$args; } location ~ ^/index\.php(/|$) { fastcgi_pass unix:/var/run/php-fpm/php-fpm.sock; fastcgi_split_path_info ^(.+\.php)(/.*)$; include fastcgi_params; fastcgi_param SCRIPT_FILENAME $realpath_root$fastcgi_script_name; fastcgi_param DOCUMENT_ROOT $realpath_root; internal; } location ~ \.php$ { return 404; } error_log /var/log/nginx/______.error.log; access_log /var/log/nginx/______.access.log; } Save the changes and let the nginx command re-read the configuration:
nginx -s reload On the domain name __YOURD_DOMAGENNOE_IMA__ the page we created is a stub.
Let's start creating a certificate:
openssl dhparam -out /etc/ssl/certs/dhparam.pem 2048 certbot certonly --webroot -w /home/${USER_NAME}/${DOMAIN_NAME}/public -d ${DOMAIN_NAME} certbot certonly --webroot -w /home/${USER_NAME}/${DOMAIN_NAME}/public -d www.${DOMAIN_NAME} After generating keys, we change the nginx configuration to support HTTPS, in this configuration the “main” domain is without a www and the redirection to a secure connection is configured. So:
nano /etc/nginx/nginx.conf We change the server directive we created 2 steps back to the following:
server { set $USER_NAME ______; listen 443 ssl; server_name $hostname; ssl_certificate /etc/letsencrypt/live/______/fullchain.pem; ssl_certificate_key /etc/letsencrypt/live/______/privkey.pem; ssl_protocols TLSv1 TLSv1.1 TLSv1.2; ssl_prefer_server_ciphers on; ssl_ciphers "EECDH+AESGCM:EDH+AESGCM:AES256+EECDH:AES256+EDH"; ssl_ecdh_curve secp384r1; ssl_session_cache shared:SSL:10m; ssl_session_tickets off; ssl_stapling on; ssl_stapling_verify on; resolver 8.8.8.8 8.8.4.4 valid=300s; resolver_timeout 5s; add_header Strict-Transport-Security "max-age=63072000; includeSubdomains"; add_header X-Frame-Options DENY; add_header X-Content-Type-Options nosniff; ssl_dhparam /etc/ssl/certs/dhparam.pem; root /home/$USER_NAME/$hostname/public; location / { # try to serve file directly, fallback to index.php try_files $uri /index.php$is_args$args; } location ~ ^/index\.php(/|$) { fastcgi_pass unix:/var/run/php-fpm/php-fpm.sock; fastcgi_split_path_info ^(.+\.php)(/.*)$; include fastcgi_params; fastcgi_param SCRIPT_FILENAME $realpath_root$fastcgi_script_name; fastcgi_param DOCUMENT_ROOT $realpath_root; internal; } location ~ \.php$ { return 404; } error_log /var/log/nginx/______.error.log; access_log /var/log/nginx/______.access.log; } server { listen 443 ssl; server_name www.$hostname; ssl_certificate /etc/letsencrypt/live/www.______/fullchain.pem; ssl_certificate_key /etc/letsencrypt/live/www.______/privkey.pem; ssl_protocols TLSv1 TLSv1.1 TLSv1.2; return 301 https://$hostname$request_uri; } server { server_name $hostname www.$hostname; return 301 https://$hostname$request_uri; } Save the result and tell nginx to re-read the configuration:
nginx -s reload Since Let's Encrypt need to be updated every three months, we will configure automatic renewal in the scheduler, for example, on Monday night
crontab -e 15 4 * * 1 / usr / bin / certbot renew --quiet
18 4 * * 1 / usr / bin / systemctl reload nginx
So that the application being deployed does not have rights problems, we change the owner of the following folder:
chown -R ${USER_NAME}:${USER_NAME} /var/lib/nginx That's it, the system is ready. Reboot to make sure that all the necessary software is configured correctly and will not behave differently after the reboot, then you can delete the project folder we created in the user directory and clone the necessary working repository in it. Do not forget to create a folder for storing user sessions:
mkdir -p ${DOMAIN_NAME}/var/sessions UPD :
On the advice of Amet13 , teams use variables + package bundling into a consistent "silent" installation.
UDP 2 :
In PHP-FPM settings, the folder for storing sessions has been changed to the “local” project folder to prevent problems with access rights.
Source: https://habr.com/ru/post/419121/
All Articles