Intel Virtual World. Practice
In this article, I want to explore the practical aspects of creating a simple hypervisor based on Intel VMX hardware virtualization technology.
Hardware virtualization is a highly specialized area of system programming and does not have a large community, in Russia for sure. I hope that the material of the article will help those who want to discover hardware virtualization and the opportunities it provides. As mentioned at the beginning, I want to consider the practical aspect without immersing in theory, so it is assumed that the reader is familiar with the x86-64 architecture and has at least a general understanding of the mechanisms of VMX. Sources to the article .
Let's start with setting tasks for the hypervisor:
As a guest OS, I chose Windows 7 x32, in which the following restrictions were set:
')
In order for the hypervisor to start when the PC starts, I chose the easiest way, namely, I recorded my bootloader in the MBR disk sector on which the guest OS is installed. It was also necessary to place the hypervisor code somewhere on the disk. In my case, the original MBR reads the bootloader starting from sector 2048, which gives a conditionally free area for writing to (2047 * 512) KB. This is more than enough to accommodate all components of the hypervisor.
Below is the layout of the hypervisor on the disk, all values are given in sectors.

The loading process is as follows:
I want to draw attention to the fact that after the switch to long mode, the loader can no longer use the BIOS services for working with physical disks, so I used the Advance Host Controller Interface to read the disk.
More details about which can be read here .
After the hypervisor gets control, its first task is to initialize the environment in which it is to work, for this, the following functions are called:
Next, you need to make sure that the processor supports VMX, the check is performed by the CheckVMXConditions () function:
If everything is in order and the hypervisor is running on a processor that supports hardware virtualization, go to the initial initialization of VMX, look at the InitVMX () function:
The execution of the guest OS will start in real mode from the address 0x7C00 at which, as we remember, the loader.main loader places win7.mbr. In order to recreate a virtual environment identical to the one in which mbr is usually executed, the InitGuestRegisterState () function is called, which sets the vmx non-root registers as follows:
It should be noted that the limit field of the descriptor cache for the DS and ES segment registers is 0xFFFFFFFF. This is an example of using unreal mode — an x86 processor feature that allows you to bypass the segment limit in real mode. More about this can be found here .
Being in vmx not-root mode, the guest OS may encounter a situation where it is necessary to return control to the host to vmx root mode. In such a case, a VM exit occurs during which the current state of the vmx non-root is maintained and the vmx-root is loaded. Initialization of vmx-root is performed by the InitHostStateArea () function, which sets the following register value:
Next, the guest physical address space is created (the InitEPT () function). This is one of the most important moments when creating a hypervisor, because an incorrectly specified size or type on any of the memory areas can lead to errors that may not immediately manifest themselves, but are more likely to result in unexpected brakes or hangs in the guest OS. In general, there is little pleasant and it is better to pay enough attention to memory settings.
The following image shows the model of the guest physical address space:
So, what we see here:
I used the information from the RAMMap utility (Physical Ranges tab) to create such areas. I also used data from the Windows Device Manager. Of course, on a different PC, the address ranges are likely to be different. Regarding the type of guest memory, in my implementation, the type is determined only by the value specified in the EPT tables. This is simple, but not entirely correct, and in general you should take into account the type of memory that the guest OS wants to install in its paging addressing.
After the creation of the guest address space is completed, you can go to the VM Execution control field settings (InitExecutionControlFields () function). This is a fairly large set of options that allow you to specify the operating conditions of the guest OS in vmx not-root mode. You can, for example, track calls to I / O ports or monitor changes in MSR registers. But in our case, I only use the ability to control the setting of certain bits in the CR0 register. The fact is that 30 (CD) and 29 (NW) bits are common for both vmx non-root and vmx root modes, and if the guest OS sets these bits to 1, this will negatively affect performance.
The process of setting up the hypervisor is almost complete, it remains only to establish control over the transition to guest mode vmx non-root and return to host mode vmx root. Settings are set in functions:
InitVMEntryControl () settings for switching to non-root vmx:
InitVMExitControl () settings for switching to vmx root:
Now that all settings have been made, the VMLaunch () function places the processor in non-root vmx mode and starts the guest OS. As I mentioned earlier, in the settings of the vm execution control conditions can be set, on occurrence of which the hypervisor will return control in vmx root mode. In my simple example, I give the guest OS complete freedom of action, but in some cases, the hypervisor will still have to intervene and adjust the operation of the OS.
Written as an example to an article, the hypervisor is fully capable of maintaining stable operation of the guest OS, although of course it is not a complete solution. Intel VT-d is not used, support of only one logical processor is implemented, there is no control over interruptions and operation of peripheral devices. In general, I have used almost nothing from the rich set of tools that Intel provides for hardware virtualization. However, if the community is interested, I will continue to write about Intel VMX, especially since there is something to write about.
Yes, I almost forgot, it is convenient to debug the hypervisor and its components using Bochs. For the first time it is an indispensable tool. Unfortunately, loading the hypervisor in Bochs is different from loading on a physical PC. At one time I did a special assembly to simplify this process, I will try to put the source code in order and also upload it with the project in the near future.
That's all. Thanks for attention.
Hardware virtualization is a highly specialized area of system programming and does not have a large community, in Russia for sure. I hope that the material of the article will help those who want to discover hardware virtualization and the opportunities it provides. As mentioned at the beginning, I want to consider the practical aspect without immersing in theory, so it is assumed that the reader is familiar with the x86-64 architecture and has at least a general understanding of the mechanisms of VMX. Sources to the article .
Let's start with setting tasks for the hypervisor:
- Run before loading the guest OS
- Supports one logical processor and 4 GB of guest physical memory
- Ensuring the correct operation of the guest OS with devices projected in the physical memory
- VMexits processing
- Guest OS from the first commands should be performed in a virtual environment.
- Output debugging information through the COM port (universal way, easy to implement)
As a guest OS, I chose Windows 7 x32, in which the following restrictions were set:
')
- Only one log CPU is involved.
- The PAE option is disabled, which allows a 32-bit OS to use more physical memory than 4GB
- BIOS in legacy mode, UEFI disabled
Description of the loader
In order for the hypervisor to start when the PC starts, I chose the easiest way, namely, I recorded my bootloader in the MBR disk sector on which the guest OS is installed. It was also necessary to place the hypervisor code somewhere on the disk. In my case, the original MBR reads the bootloader starting from sector 2048, which gives a conditionally free area for writing to (2047 * 512) KB. This is more than enough to accommodate all components of the hypervisor.
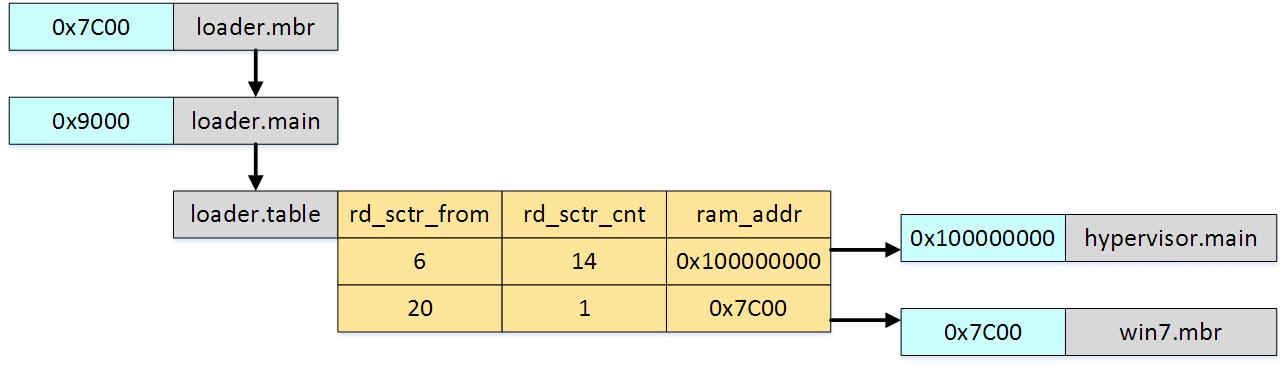
Below is the layout of the hypervisor on the disk, all values are given in sectors.
The loading process is as follows:
- loader.mbr reads the bootloader code, loader.main, from the disk and transfers control to it.
- loader.main performs the transition to long mode, and then reads the table of loadable loader.table elements, based on which further loading of the hypervisor components into memory is performed.
- After the loader has completed its work in physical memory, the hypervisor code is located at 0x100000000, this address was chosen so that the range from 0 to 0xFFFFFFFF can be used for direct mapping to the guest physical memory.
- The original Windows mbr is loaded at the physical address 0x7C00.
I want to draw attention to the fact that after the switch to long mode, the loader can no longer use the BIOS services for working with physical disks, so I used the Advance Host Controller Interface to read the disk.
More details about which can be read here .
Hypervisor Job Description
After the hypervisor gets control, its first task is to initialize the environment in which it is to work, for this, the following functions are called:
- InitLongModeGdt () - creates and loads a table of 4 descriptors: NULL, CS64, DS64, TSS64
- InitLongModeIdt (isr_vector) - initializes the first 32 interrupt vectors with a common handler, or rather its stub
- InitLongModeTSS () - initializes the task status segment
- InitLongModePages () - initialization of page addressing:
[0x00000000 - 0xFFFFFFFF] - page size 2MB, cache disable;
[0x100000000 - 0x13FFFFFFF] - page size 2 MB, cache write back, global pages;
[0x140000000 - n] - not present; - InitControlAndSegmenRegs () - reloading segment registers
Next, you need to make sure that the processor supports VMX, the check is performed by the CheckVMXConditions () function:
- CPUID.1: ECX.VMX [bit 5] should be set to 1
- In the MSR register IA32_FEATURE_CONTROL bit 2 must be set - enables VMXON outside SMX operation and bit 0 - Lock (actual when debugging in Bochs)
If everything is in order and the hypervisor is running on a processor that supports hardware virtualization, go to the initial initialization of VMX, look at the InitVMX () function:
- VMXON and VMCS (virtual-machine control data structures) memory sizes of 4096 bytes are created. In the first 31 bits of each of the areas is recorded VMCS revision identifier taken from MSR IA32_VMX_BASIC.
- A check is performed that in the system registers CR0 and CR4 all bits are set in accordance with the requirements of the VMX.
- The logical processor is transferred to the vmx root mode with the VMXON command (as an argument, the physical address of the VMXON region).
- The VMCLEAR (VMCS) command sets the VMCS launch state to Clear, and also sets the implementation-specific values to VMCS.
- The VMPTRLD (VMCS) command loads the current VMCS pointer address of the VMCS passed as an argument.
The execution of the guest OS will start in real mode from the address 0x7C00 at which, as we remember, the loader.main loader places win7.mbr. In order to recreate a virtual environment identical to the one in which mbr is usually executed, the InitGuestRegisterState () function is called, which sets the vmx non-root registers as follows:
CR0 = 0x10 CR3 = 0 CR4 = 0 DR7 = 0 RSP = 0xFFD6 RIP = 0x7C00 RFLAGS = 0x82 ES.base = 0 CS.base = 0 SS.base = 0 DS.base = 0 FS.base = 0 GS.base = 0 LDTR.base = 0 TR.base = 0 ES.limit = 0xFFFFFFFF CS.limit = 0xFFFF SS.limit = 0xFFFF DS.limit = 0xFFFFFFFF FS.limit = 0xFFFF GS.limit = 0xFFFF LDTR.limit = 0xFFFF TR.limit = 0xFFFF ES.access rights = 0xF093 CS.access rights = 0x93 SS.access rights = 0x93 DS.access rights = 0xF093 FS.access rights = 0x93 GS.access rights = 0x93 LDTR.access rights = 0x82 TR.access rights = 0x8B ES.selector = 0 CS.selector = 0 SS.selector = 0 DS.selector = 0 FS.selector = 0 GS.selector = 0 LDTR.selector = 0 TR.selector = 0 GDTR.base = 0 IDTR.base = 0 GDTR.limit = 0 IDTR.limit = 0x3FF It should be noted that the limit field of the descriptor cache for the DS and ES segment registers is 0xFFFFFFFF. This is an example of using unreal mode — an x86 processor feature that allows you to bypass the segment limit in real mode. More about this can be found here .
Being in vmx not-root mode, the guest OS may encounter a situation where it is necessary to return control to the host to vmx root mode. In such a case, a VM exit occurs during which the current state of the vmx non-root is maintained and the vmx-root is loaded. Initialization of vmx-root is performed by the InitHostStateArea () function, which sets the following register value:
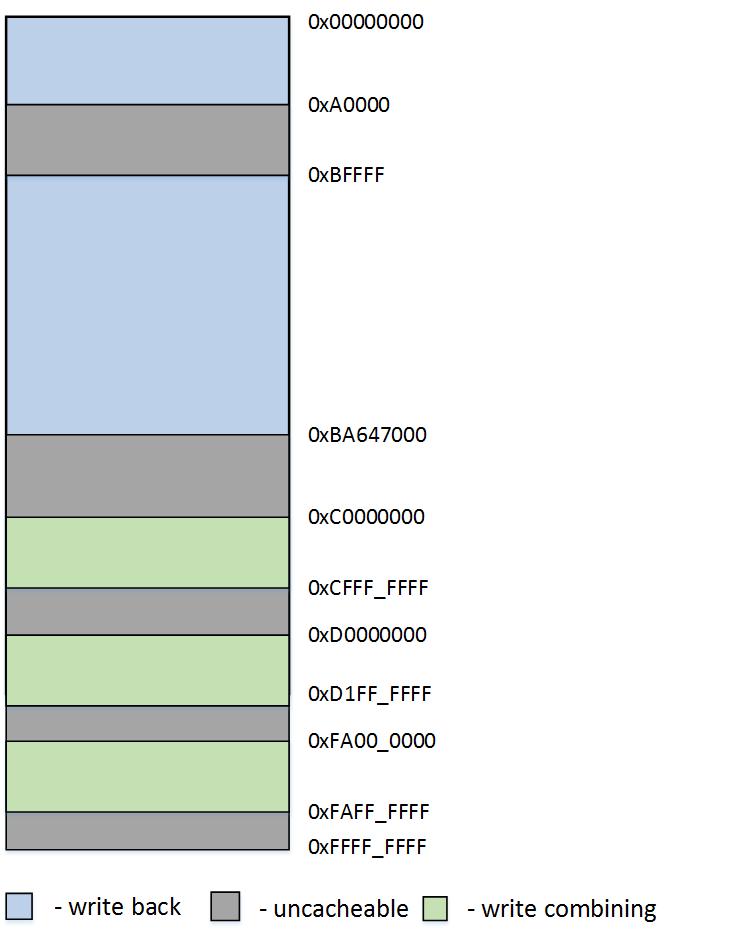
CR0 = 0x80000039 CR3 = PML4_addr CR4 = 0x420A1 RSP = STACK64 RIP = VMEXIT_handler ES.selector = 0x10 CS.selector = 0x08 SS.selector = 0x10 DS.selector = 0x10 FS.selector = 0x10 GS.selector = 0x10 TR.selector = 0x18 TR.base = TSS GDTR.base = GDT64 IDTR.base = IDTR Next, the guest physical address space is created (the InitEPT () function). This is one of the most important moments when creating a hypervisor, because an incorrectly specified size or type on any of the memory areas can lead to errors that may not immediately manifest themselves, but are more likely to result in unexpected brakes or hangs in the guest OS. In general, there is little pleasant and it is better to pay enough attention to memory settings.
The following image shows the model of the guest physical address space:
So, what we see here:
- [0 - 0xFFFFFFFF] the whole range of guest address space. Default type: write back
- [0xA0000 - 0xBFFFFF] - Video ram. Type: uncacheable
- [0xBA647000 - 0xFFFFFFFF] - Devices ram. Type: uncacheable
- [0x0000000 - 0xCFFFFFFF] - Video ram. Type: write combining
- [0xD0000000 - 0xD1FFFFFF] - Video ram. Type: write combining
- [0xFA000000 - 0xFAFFFFFF] - Video ram. Type: write combining
I used the information from the RAMMap utility (Physical Ranges tab) to create such areas. I also used data from the Windows Device Manager. Of course, on a different PC, the address ranges are likely to be different. Regarding the type of guest memory, in my implementation, the type is determined only by the value specified in the EPT tables. This is simple, but not entirely correct, and in general you should take into account the type of memory that the guest OS wants to install in its paging addressing.
After the creation of the guest address space is completed, you can go to the VM Execution control field settings (InitExecutionControlFields () function). This is a fairly large set of options that allow you to specify the operating conditions of the guest OS in vmx not-root mode. You can, for example, track calls to I / O ports or monitor changes in MSR registers. But in our case, I only use the ability to control the setting of certain bits in the CR0 register. The fact is that 30 (CD) and 29 (NW) bits are common for both vmx non-root and vmx root modes, and if the guest OS sets these bits to 1, this will negatively affect performance.
The process of setting up the hypervisor is almost complete, it remains only to establish control over the transition to guest mode vmx non-root and return to host mode vmx root. Settings are set in functions:
InitVMEntryControl () settings for switching to non-root vmx:
- Load Guest IA32_EFER
- Load Guest IA32_PAT
- Load Guest MSRs (IA32_MTRR_PHYSBASE0, IA32_MTRR_PHYSMASK0, IA32_MTRR_DEF_TYPE)
InitVMExitControl () settings for switching to vmx root:
- Load Host IA32_EFER;
- Save Guest IA32_EFER;
- Load Host IA32_PAT;
- Save Guest IA32_PAT;
- Host.CS.L = 1, Host.IA32_EFER.LME = 1, Host.IA32_EFER.LMA = 1;
- Save Guest MSRs (IA32_MTRR_PHYSBASE0, IA32_MTRR_PHYSMASK0, IA32_MTRR_DEF_TYPE);
- Load Host MSRs (IA32_MTRR_PHYSBASE0, IA32_MTRR_PHYSMASK0, IA32_MTRR_DEF_TYPE);
Now that all settings have been made, the VMLaunch () function places the processor in non-root vmx mode and starts the guest OS. As I mentioned earlier, in the settings of the vm execution control conditions can be set, on occurrence of which the hypervisor will return control in vmx root mode. In my simple example, I give the guest OS complete freedom of action, but in some cases, the hypervisor will still have to intervene and adjust the operation of the OS.
- If the guest OS tries to change the CD and NW bits in the CR0 register, the VM Exit handler
corrects the data written to CR0. The CR0 read shadow field is also modified so that when reading CR0, the guest OS gets the recorded value. - Execute the xsetbv command. This command always calls VM Exit, regardless of the settings, so I just added its execution in vmx root mode.
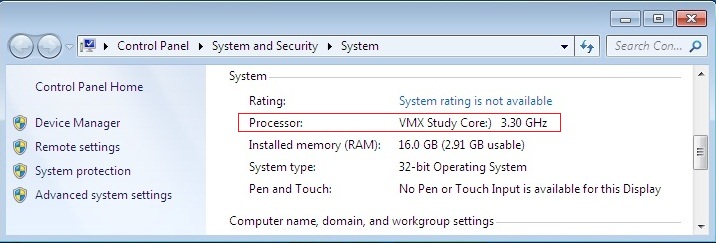
- Run the cupid command. This command also calls unconditional VM Exit. But I made a small change to its handler. If, as an argument in eax, the values 0x80000002 are 0x80000004, cpuid returns not the name of the processor brand, but the line: VMX Study Core:) The result can be seen in the screenshot:
Results
Written as an example to an article, the hypervisor is fully capable of maintaining stable operation of the guest OS, although of course it is not a complete solution. Intel VT-d is not used, support of only one logical processor is implemented, there is no control over interruptions and operation of peripheral devices. In general, I have used almost nothing from the rich set of tools that Intel provides for hardware virtualization. However, if the community is interested, I will continue to write about Intel VMX, especially since there is something to write about.
Yes, I almost forgot, it is convenient to debug the hypervisor and its components using Bochs. For the first time it is an indispensable tool. Unfortunately, loading the hypervisor in Bochs is different from loading on a physical PC. At one time I did a special assembly to simplify this process, I will try to put the source code in order and also upload it with the project in the near future.
That's all. Thanks for attention.
Source: https://habr.com/ru/post/419065/
All Articles