How to remove and “glue” a spherical panorama on DJI Mavic Air
With the release of Dji Mavic Air, the process of creating spherical panoramas seems to be simplified to the limit - pressed the button and the sphere is ready. So it was said in the advertisement. To be honest, I already expected that our entire ball would be shot in the very first months of sales, but for some reason this did not happen.
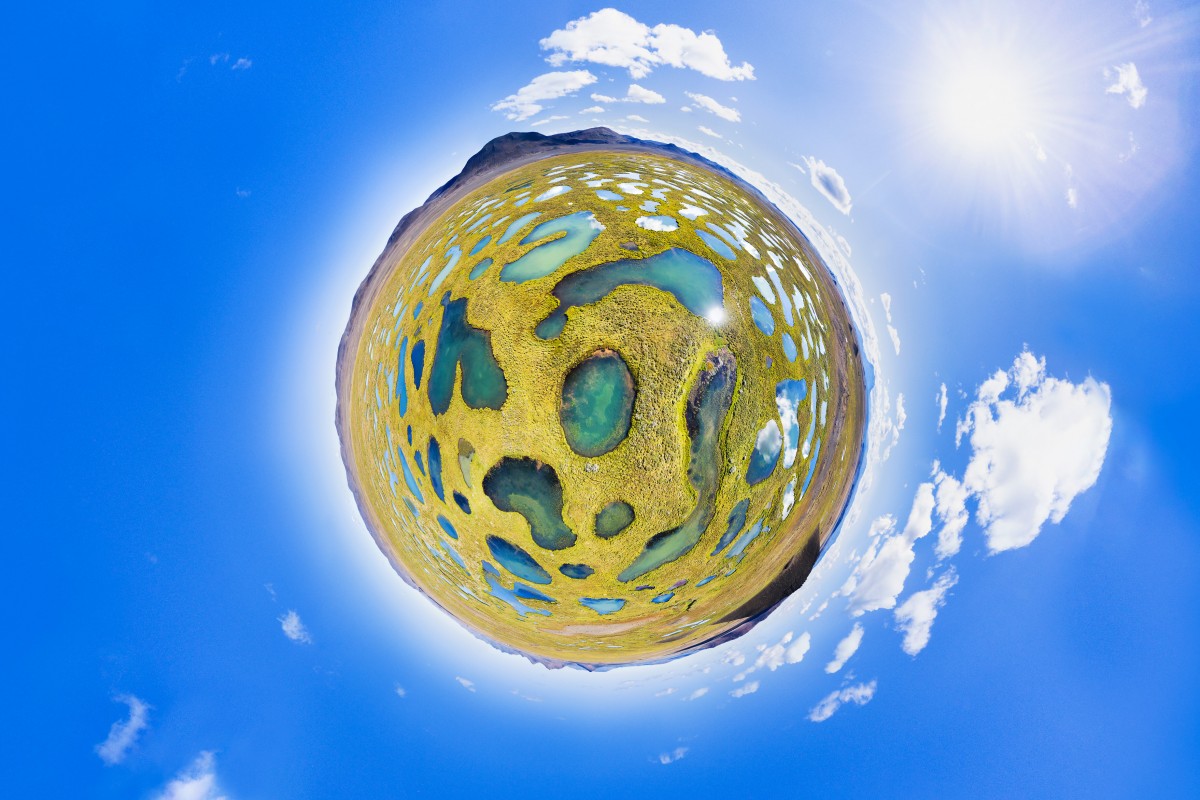
photo by Paul Oostveen
Most likely there are several reasons - the built-in software is extremely primitive and is not capable of making a decent panorama, if the conditions are even slightly different from the ideal ones. Above the water or over the snow in cloudy weather, you can get pieces of the sky on the ground and other “beauties”, well, I'm not talking about the mediocre colors of the finished jpeg file and exactly no resolution. Also a problem are objects located close to the camera - for example, to remove a sphere where a tower will stand in the foreground or something like that on an automaton most likely will not work. The reason for this is parallax, namely, the displacement of the copter during the shooting (despite the very good retention of Mavic Air by GPS - a dozen centimeters will be enough to introduce the automation of embedded systems into a stupor).
In advertising, the resolution of the panorama is 32mp, but is it so much when we shoot 360 degrees, and everywhere screens with a resolution of 4K and even higher? Plus, the built-in software does not know how to glue the sky and does not understand what the correct colors are, and this is impossible. Although the copter can shoot at +15 degrees, this is still not enough to get a “roof”.
')

But it is not all that bad. If you are determined to get a good panorama - it is quite possible with Mavic Air. At first, I was somewhat skeptical about the standard shooting of 25 frames, but then I concluded that this is quite enough. Earlier, when shooting with a DJI Phantom ¾ or DJI Mavic Pro with the help of Litchi, I tried to make from 32 to 48 photos. Plus or minus. At first, the 25 proposed Mavic Airs seemed to me a little, I tried Litchi, but there was no special increase. In the process of training, I developed a clear technique and optimized the process. Now, for one not very big battery, I manage to make up to 4-5 spheres, and gluing with color correction takes about 10-15 minutes. At the exit we have a panorama with a resolution of up to 177MP with good colors, a normal sky and full control of what is happening.
So, what is needed to achieve a good result?
First of all, it is desirable to remove everything correctly in order to minimize processing time. Of course, shooting at sunrise / sunset is very beautiful, but due to the low sun and possible glare, gluing can be difficult. You can use an additional hood - it will facilitate the work, but still you will have shots where the sun shines directly into the camera. For the first experiments, choose a clock closer to noon - then the sun will not be able to get into the frame. Also avoid objects that are very close to the copter. Select plans with equidistant objects. Large spaces without obvious lake textures / sea / snow / sand can complicate the gluing. I recommend turning off the automatic exposure of the camera. Look around and select the average shutter speed and aperture (in the case of the DJI Phantom 4 Pro), fix the sensitivity (ISO). Even if in some direction the exposure is not perfect - it can be corrected in Lightroom when converting from RAW. It is much easier than dealing with automation errors that may occur if the camera is directed towards the sun or below solid wood / water and similar surfaces.
Make sure that saving originals is enabled. When all parameters are set - you can start shooting. In the process, I recommend to monitor that removes the device. If there is any main object in the frame, then you need to make sure that it was shot as a whole frame, that is, it does not fall on the junction of 2 frames and is not too close to the edge of the frame. If it still happened - it is better to stop the shooting at the end of the shooting, using only the rotation around its axis and tilting the camera to make several frames of the object manually - this can greatly simplify the gluing. For a beautiful panorama does not necessarily rise too high. The panoramas look great, where you, as it were, sink inside, you can be not higher, but between the objects of the survey, but you need to make sure that the copter is able to remove the upper boundaries of the objects so that they do not blur.
An example in which the copter was too low. Panorama glued built-in software DJI Mavic Air. Although, it is likely, if you take the source code and glue it with an external panorama program, you can save it.
And now - frames are received - we proceed to processing. DJI Go 4 saves all the sources in a separate folder - “Panorama” - copy the contents of the desired folder to your hard drive and upload to Lightroom. Our task is to prepare individual frames for gluing in PTGUI - for this it is important not only to deal with the exposure and color of each frame, but also to make all the parts of the future panorama as close as possible in terms of brightness and contrast.
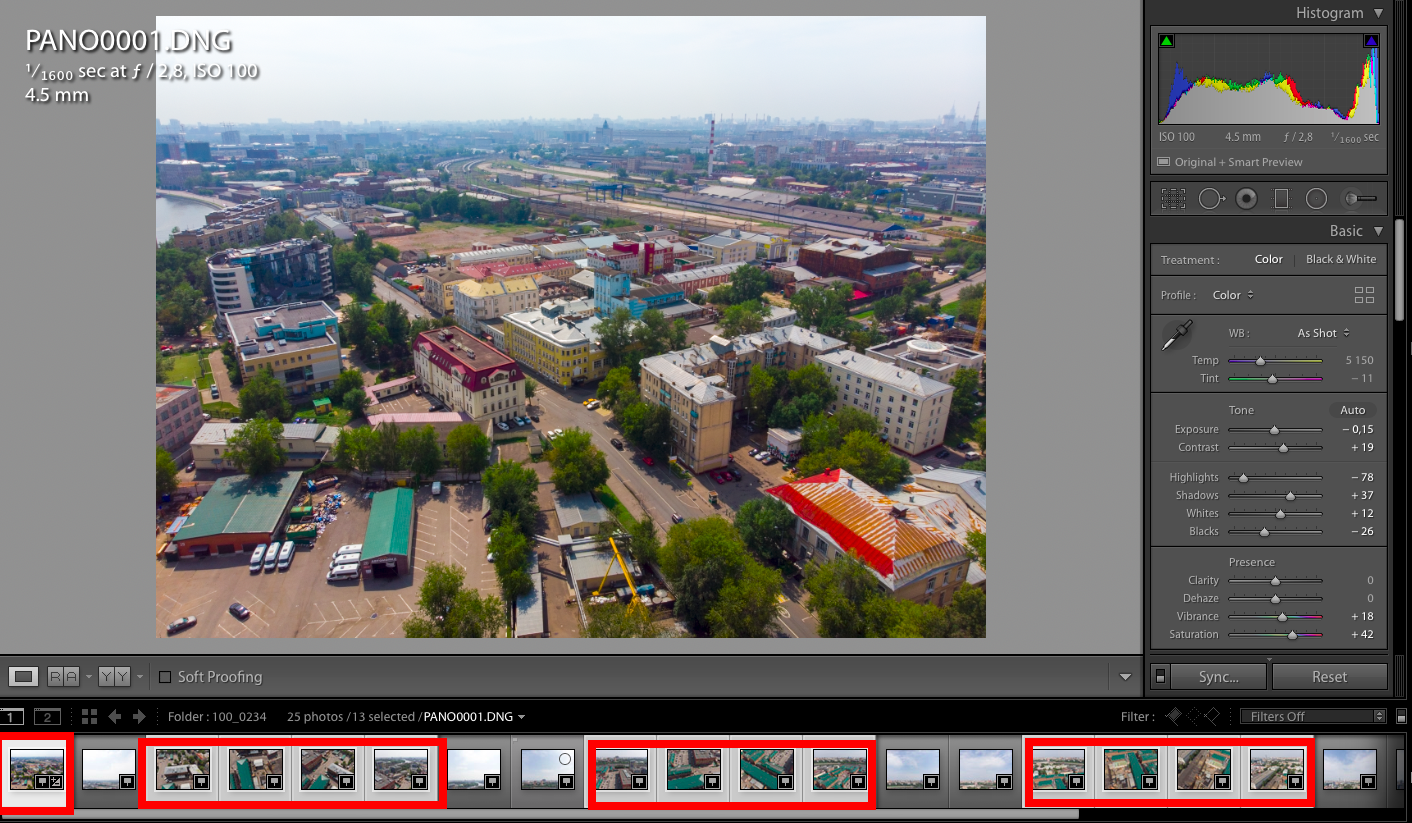
If local brightness correction is used - pull out an object - make sure that on all frames where it is present this is done as close as possible. In PTGUI there is a brightness leveling function, but it is better to do this in advance. Further, the resulting material can be exported (I recommend using Tiff with LZW compression of 8/16 bits per channel depending on the power of your PC).

The next step will be the assembly of the panorama itself. Load the files into PTGUI PRO and click Align images.
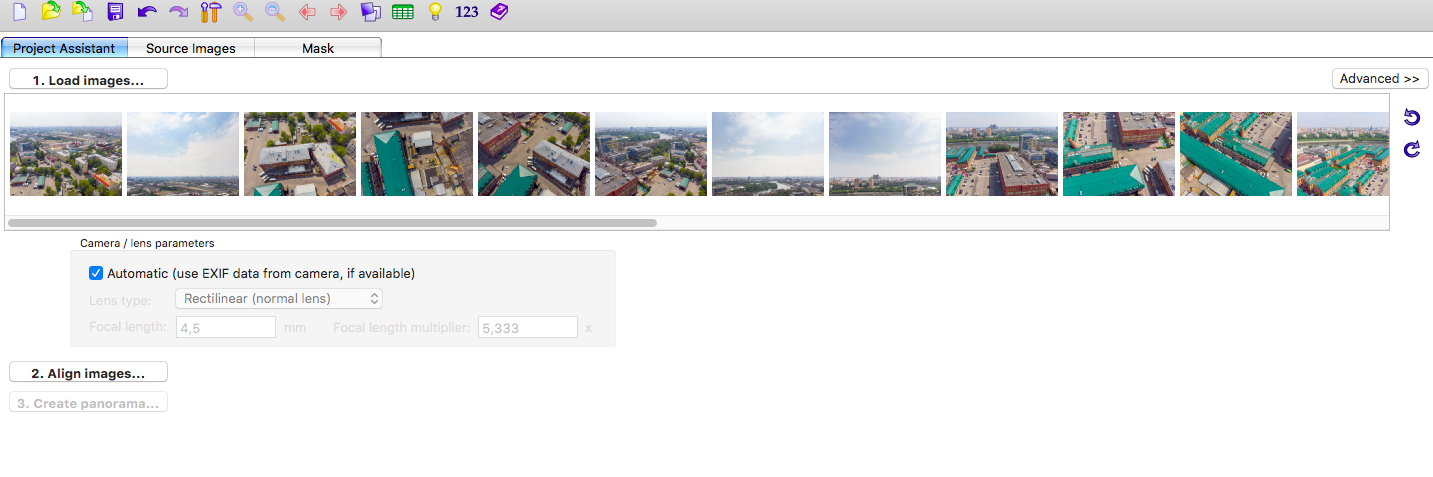
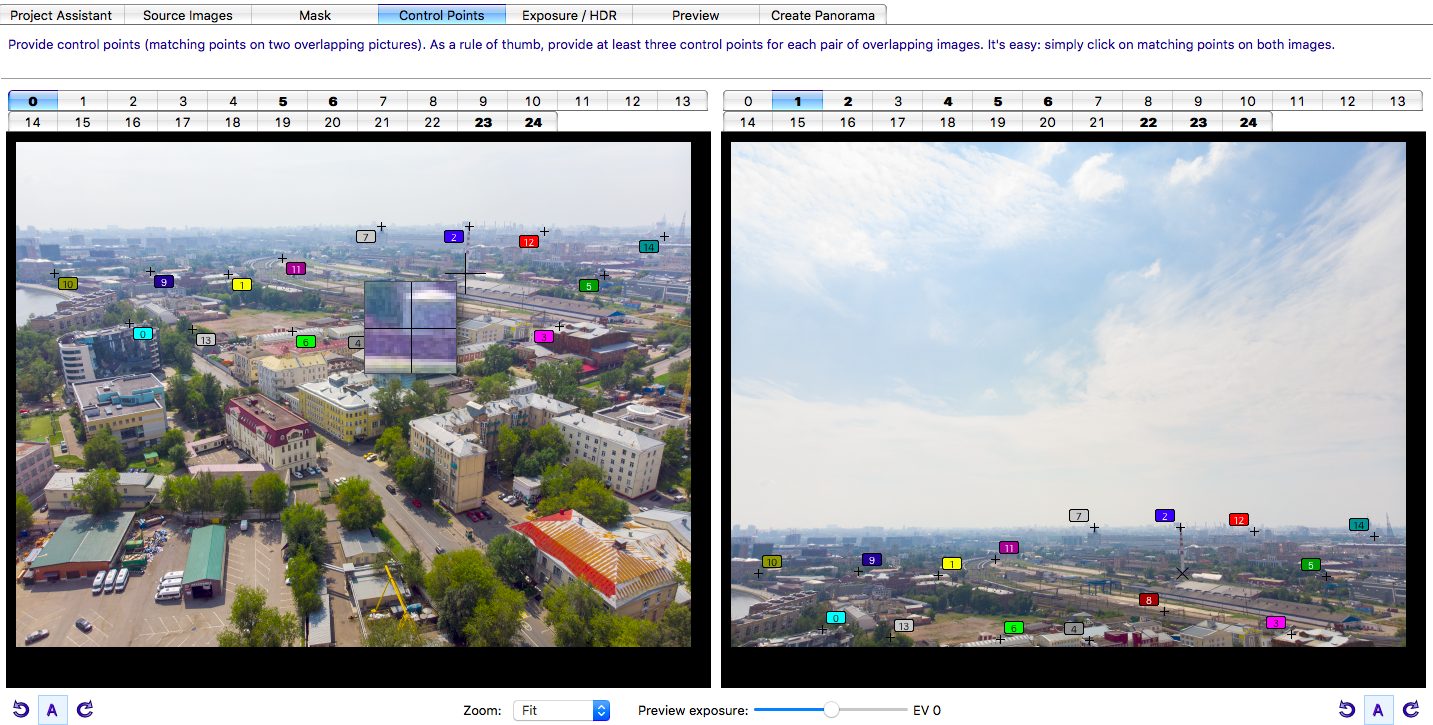
The system analyzes the data and tries to match the frames at checkpoints.
In some cases (water / snow, etc.), the program may display a message about the absence of matches on some frames - this means that you will have to set control points manually.
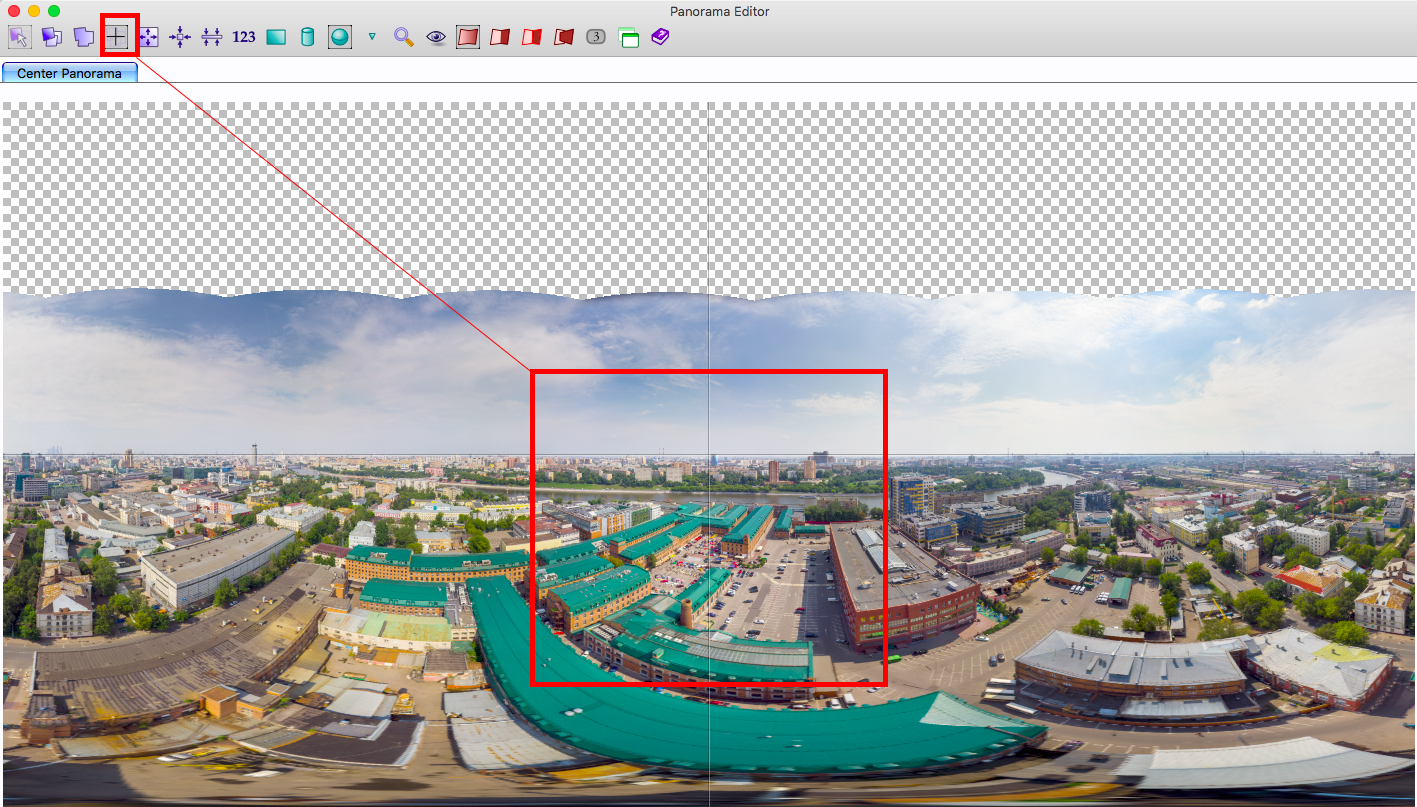
If this is not the case - the program will give us a window with a scan of the panorama, where it is desirable to set the center - the place that will be displayed when loading - the face of the panorama, you can also correct the horizon.
Next, we can open a preview of the panorama, which can be rotated and pre-evaluate the result.
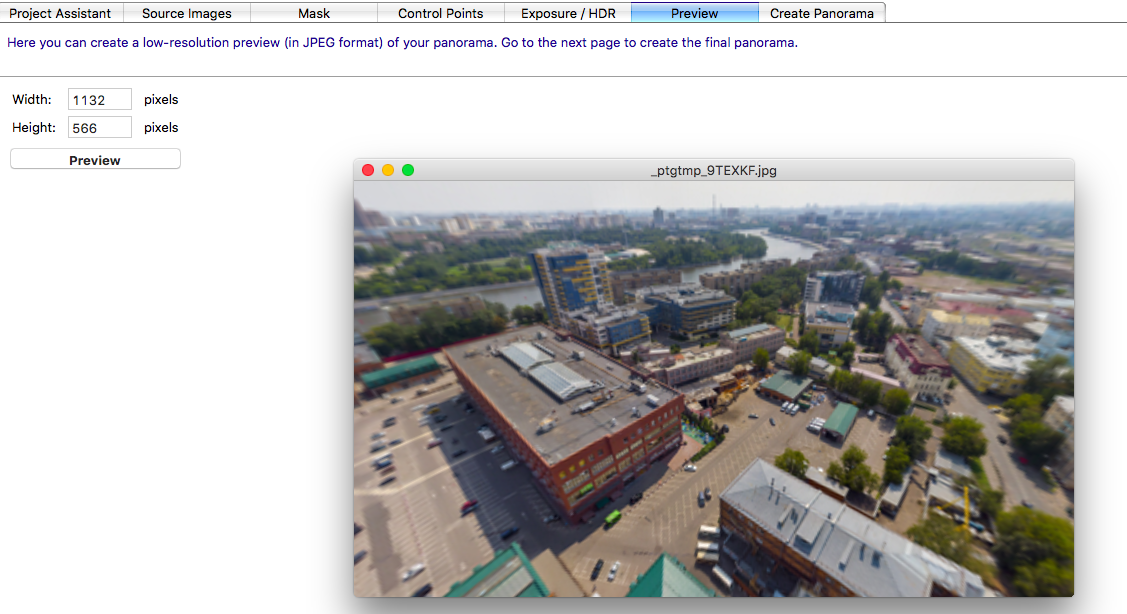
Here you can notice especially strong problems and, if there are any, go to the editing of control points and try to fix it.
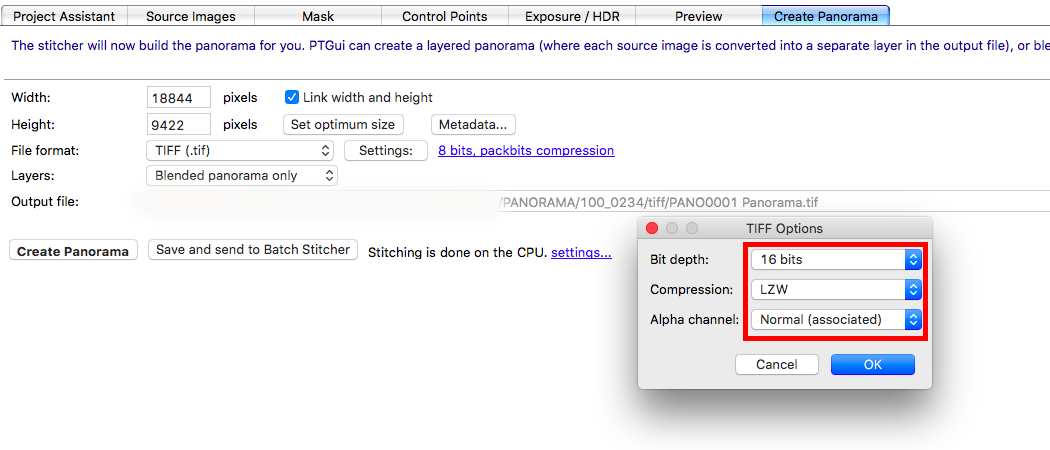
If there are no special problems - the last tab - Create Panorama - is also exposed as in Lightroom - Tiff with LZW compression.
The next stage is the inspection and final fit in Photoshop. Slowly we look at the whole panorama in parts for inconsistencies - especially the horizon and problems on the main objects are striking. Well, if the joint on the object without much texture.
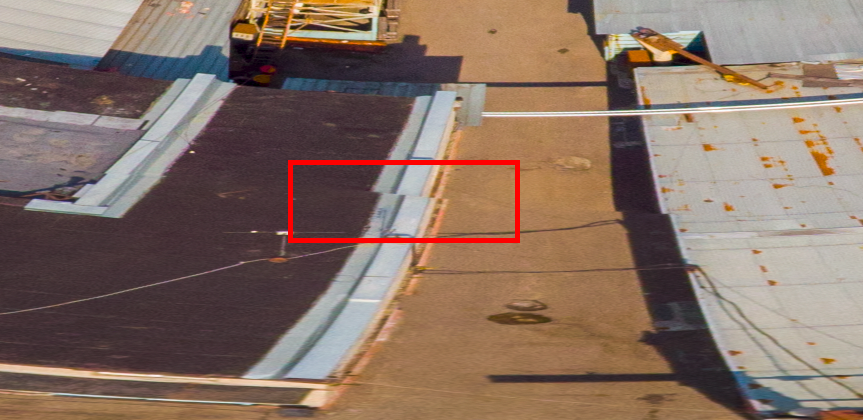
Here all the means are good - first we try to select a polygonal selection for the divergence, then a transformation - a distortion and other options - we adjust the “dropped” piece. You can set the selection to small feathering - 1-2 pixels, and sometimes it is better to leave sharp edges, the empty areas resulting from the shift are closed as usual with a stamp or with a healing brush.
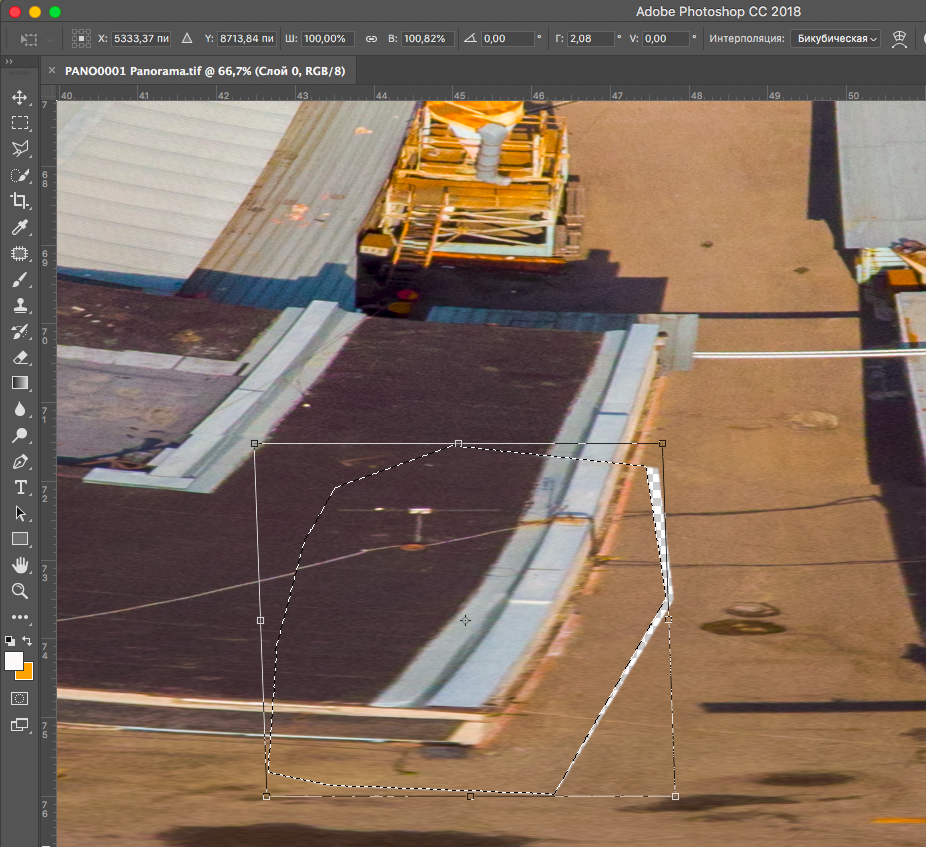
Of course, there are more complicated cases - then open a separate file with the object, copy it to a new layer, adjust the scale, delete the excess - we get a patch. In the case of the use of deformations, it is very important to limit the points and not to touch the edges of the panorama, especially puppet deformation, otherwise it will not stick together.
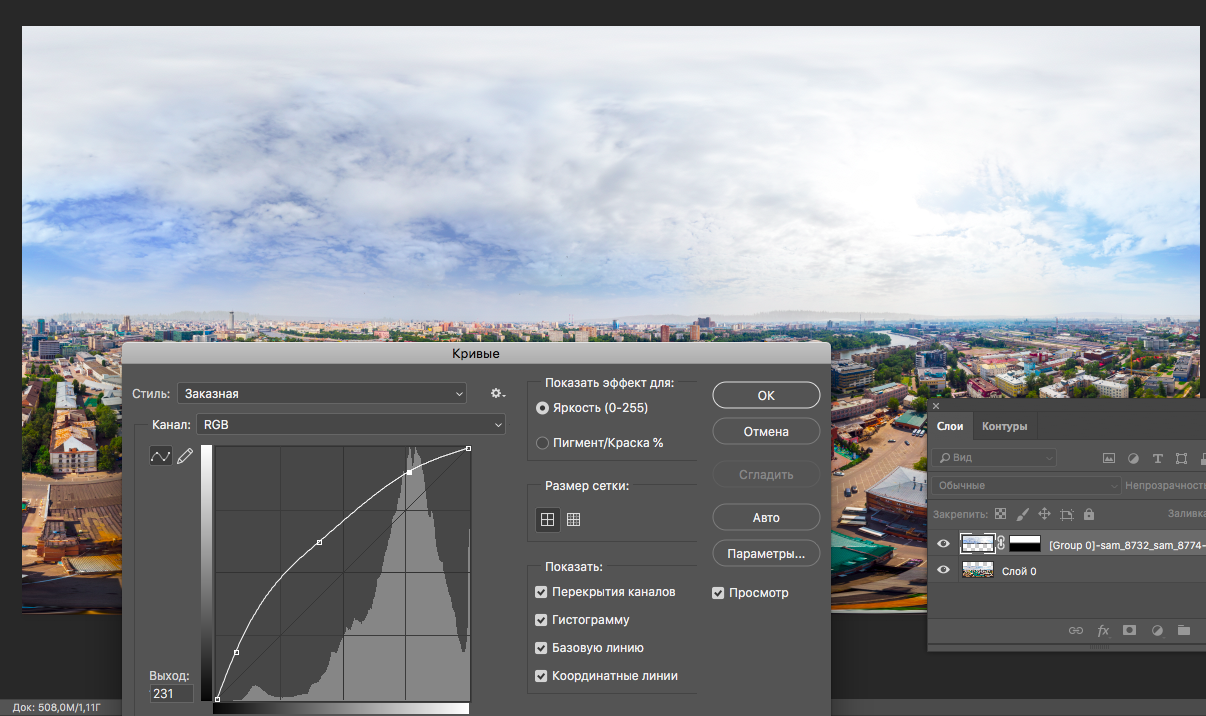
It is time to give effect and juiciness panorama. Now we can safely twist levels / curves / color to achieve the desired effect. You may need to use the tools of Dodge / burn, work on individual objects - for the sake of this moment we actually exported all the way to Tiff and put up with huge file sizes.
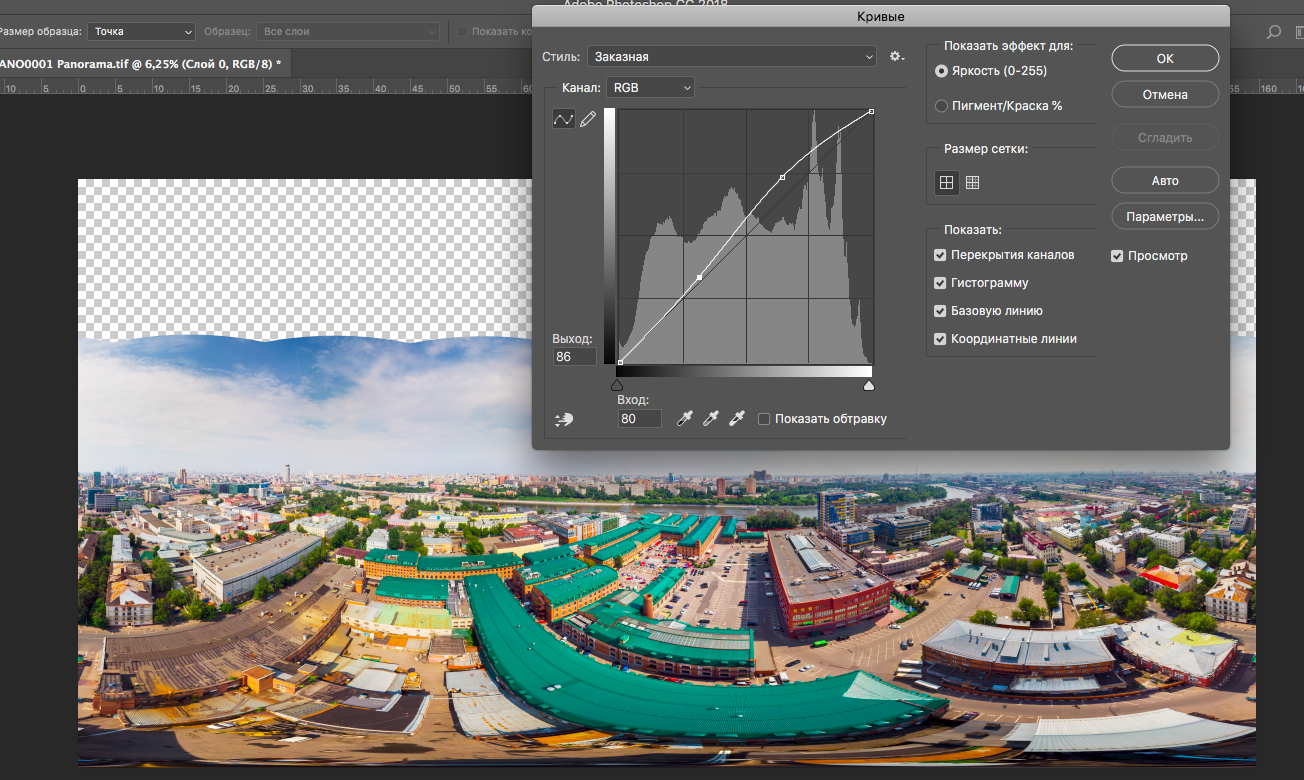
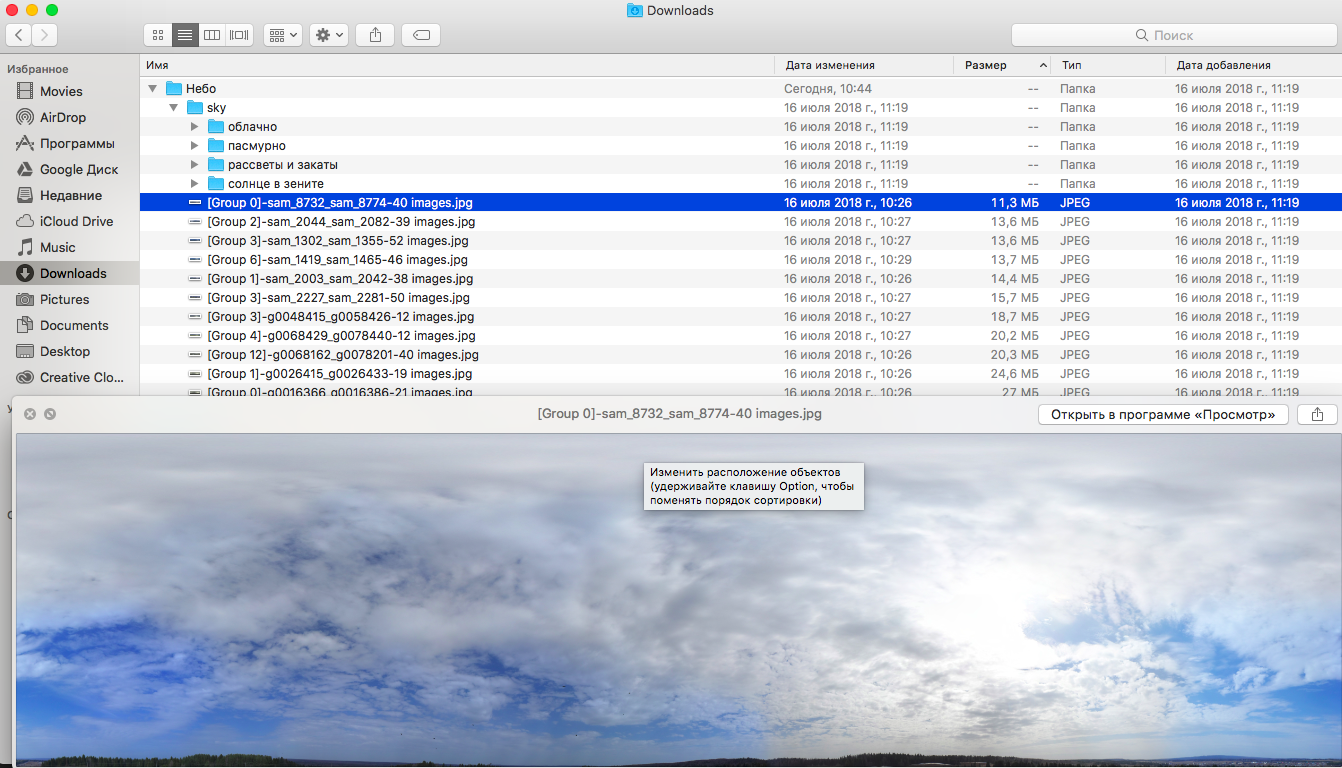
In the end, you must pick up the sky. I have already accumulated a certain amount from my reserves + I found something on the net. If there are no reserves or saved options, simply stretch the sky up to the stop. it will not be very beautiful, but at least not a black dome.
We insert the sky object, we immediately rasterize it (if before you have made the panorama of the sky correctly, then no changes will be required), then make a mask, transition from the sky to our background with a gradient and adjust the brightness of the inserted layer with curves. Pay attention to the junction of the sky and your panorama, maybe even when using a mask and a gradient - dark objects can shine through and you can easily get translucent mountains above the city. It is better to turn off the panorama layer and slowly, if you want to erase all suspicious with an eraser.
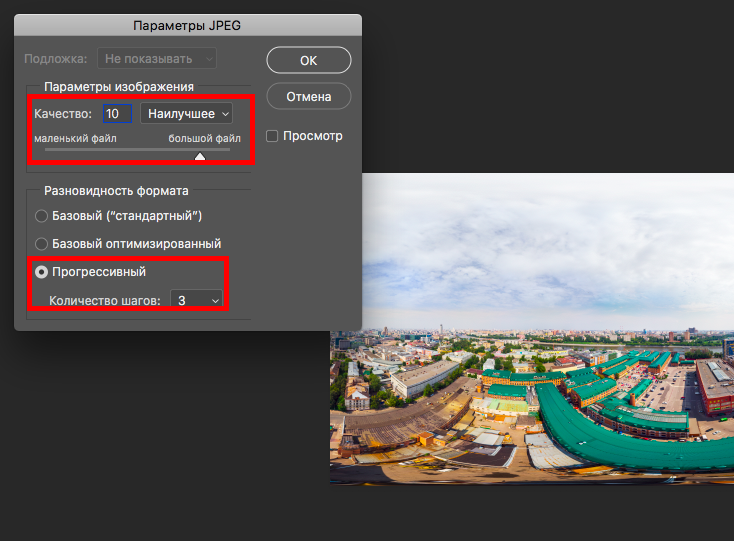
On this you can and finish. We glue in one layer with the “perform flattening” function in order to minimize the volume, save Tiff just in case, then reduce the image to 10,000 points under the long side, most services (Sferika.ru or the same Google Maps) will not miss too large a panorama - Yes, and to such a huge load (for phones on 4g it will be very heavy at all). We save the result of works in JPEG - the quality is quite 10 and at the output we have a panorama of 50 megapixels and a file size of 10-15 mb (depending on the details).
Our panorama is ready - it remains only to find a service for publication.
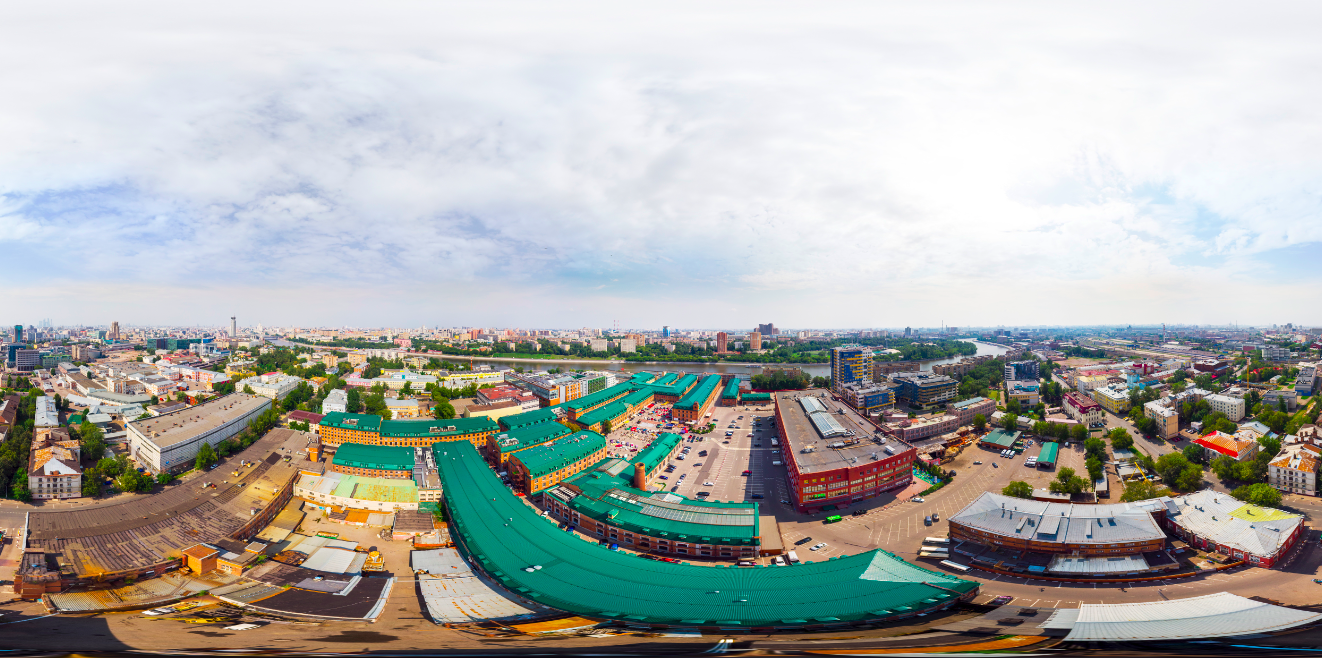
→ Ready panorama here
photo by Paul Oostveen
Most likely there are several reasons - the built-in software is extremely primitive and is not capable of making a decent panorama, if the conditions are even slightly different from the ideal ones. Above the water or over the snow in cloudy weather, you can get pieces of the sky on the ground and other “beauties”, well, I'm not talking about the mediocre colors of the finished jpeg file and exactly no resolution. Also a problem are objects located close to the camera - for example, to remove a sphere where a tower will stand in the foreground or something like that on an automaton most likely will not work. The reason for this is parallax, namely, the displacement of the copter during the shooting (despite the very good retention of Mavic Air by GPS - a dozen centimeters will be enough to introduce the automation of embedded systems into a stupor).
In advertising, the resolution of the panorama is 32mp, but is it so much when we shoot 360 degrees, and everywhere screens with a resolution of 4K and even higher? Plus, the built-in software does not know how to glue the sky and does not understand what the correct colors are, and this is impossible. Although the copter can shoot at +15 degrees, this is still not enough to get a “roof”.
')
But it is not all that bad. If you are determined to get a good panorama - it is quite possible with Mavic Air. At first, I was somewhat skeptical about the standard shooting of 25 frames, but then I concluded that this is quite enough. Earlier, when shooting with a DJI Phantom ¾ or DJI Mavic Pro with the help of Litchi, I tried to make from 32 to 48 photos. Plus or minus. At first, the 25 proposed Mavic Airs seemed to me a little, I tried Litchi, but there was no special increase. In the process of training, I developed a clear technique and optimized the process. Now, for one not very big battery, I manage to make up to 4-5 spheres, and gluing with color correction takes about 10-15 minutes. At the exit we have a panorama with a resolution of up to 177MP with good colors, a normal sky and full control of what is happening.
So, what is needed to achieve a good result?
- Standard software DJI GO 4 and save shot in DNG Raw
- Adobe Lightroom
- PtGui Pro
- Adobe Photoshop ... 10-20 minutes for each panorama
First of all, it is desirable to remove everything correctly in order to minimize processing time. Of course, shooting at sunrise / sunset is very beautiful, but due to the low sun and possible glare, gluing can be difficult. You can use an additional hood - it will facilitate the work, but still you will have shots where the sun shines directly into the camera. For the first experiments, choose a clock closer to noon - then the sun will not be able to get into the frame. Also avoid objects that are very close to the copter. Select plans with equidistant objects. Large spaces without obvious lake textures / sea / snow / sand can complicate the gluing. I recommend turning off the automatic exposure of the camera. Look around and select the average shutter speed and aperture (in the case of the DJI Phantom 4 Pro), fix the sensitivity (ISO). Even if in some direction the exposure is not perfect - it can be corrected in Lightroom when converting from RAW. It is much easier than dealing with automation errors that may occur if the camera is directed towards the sun or below solid wood / water and similar surfaces.
Make sure that saving originals is enabled. When all parameters are set - you can start shooting. In the process, I recommend to monitor that removes the device. If there is any main object in the frame, then you need to make sure that it was shot as a whole frame, that is, it does not fall on the junction of 2 frames and is not too close to the edge of the frame. If it still happened - it is better to stop the shooting at the end of the shooting, using only the rotation around its axis and tilting the camera to make several frames of the object manually - this can greatly simplify the gluing. For a beautiful panorama does not necessarily rise too high. The panoramas look great, where you, as it were, sink inside, you can be not higher, but between the objects of the survey, but you need to make sure that the copter is able to remove the upper boundaries of the objects so that they do not blur.
An example in which the copter was too low. Panorama glued built-in software DJI Mavic Air. Although, it is likely, if you take the source code and glue it with an external panorama program, you can save it.
And now - frames are received - we proceed to processing. DJI Go 4 saves all the sources in a separate folder - “Panorama” - copy the contents of the desired folder to your hard drive and upload to Lightroom. Our task is to prepare individual frames for gluing in PTGUI - for this it is important not only to deal with the exposure and color of each frame, but also to make all the parts of the future panorama as close as possible in terms of brightness and contrast.
If local brightness correction is used - pull out an object - make sure that on all frames where it is present this is done as close as possible. In PTGUI there is a brightness leveling function, but it is better to do this in advance. Further, the resulting material can be exported (I recommend using Tiff with LZW compression of 8/16 bits per channel depending on the power of your PC).
The next step will be the assembly of the panorama itself. Load the files into PTGUI PRO and click Align images.
The system analyzes the data and tries to match the frames at checkpoints.
In some cases (water / snow, etc.), the program may display a message about the absence of matches on some frames - this means that you will have to set control points manually.
If this is not the case - the program will give us a window with a scan of the panorama, where it is desirable to set the center - the place that will be displayed when loading - the face of the panorama, you can also correct the horizon.
Next, we can open a preview of the panorama, which can be rotated and pre-evaluate the result.
Here you can notice especially strong problems and, if there are any, go to the editing of control points and try to fix it.
If there are no special problems - the last tab - Create Panorama - is also exposed as in Lightroom - Tiff with LZW compression.
The next stage is the inspection and final fit in Photoshop. Slowly we look at the whole panorama in parts for inconsistencies - especially the horizon and problems on the main objects are striking. Well, if the joint on the object without much texture.
Here all the means are good - first we try to select a polygonal selection for the divergence, then a transformation - a distortion and other options - we adjust the “dropped” piece. You can set the selection to small feathering - 1-2 pixels, and sometimes it is better to leave sharp edges, the empty areas resulting from the shift are closed as usual with a stamp or with a healing brush.
Of course, there are more complicated cases - then open a separate file with the object, copy it to a new layer, adjust the scale, delete the excess - we get a patch. In the case of the use of deformations, it is very important to limit the points and not to touch the edges of the panorama, especially puppet deformation, otherwise it will not stick together.
It is time to give effect and juiciness panorama. Now we can safely twist levels / curves / color to achieve the desired effect. You may need to use the tools of Dodge / burn, work on individual objects - for the sake of this moment we actually exported all the way to Tiff and put up with huge file sizes.
In the end, you must pick up the sky. I have already accumulated a certain amount from my reserves + I found something on the net. If there are no reserves or saved options, simply stretch the sky up to the stop. it will not be very beautiful, but at least not a black dome.
We insert the sky object, we immediately rasterize it (if before you have made the panorama of the sky correctly, then no changes will be required), then make a mask, transition from the sky to our background with a gradient and adjust the brightness of the inserted layer with curves. Pay attention to the junction of the sky and your panorama, maybe even when using a mask and a gradient - dark objects can shine through and you can easily get translucent mountains above the city. It is better to turn off the panorama layer and slowly, if you want to erase all suspicious with an eraser.
On this you can and finish. We glue in one layer with the “perform flattening” function in order to minimize the volume, save Tiff just in case, then reduce the image to 10,000 points under the long side, most services (Sferika.ru or the same Google Maps) will not miss too large a panorama - Yes, and to such a huge load (for phones on 4g it will be very heavy at all). We save the result of works in JPEG - the quality is quite 10 and at the output we have a panorama of 50 megapixels and a file size of 10-15 mb (depending on the details).
Our panorama is ready - it remains only to find a service for publication.
→ Ready panorama here
Source: https://habr.com/ru/post/418775/
All Articles