Adaptation of the project MR under HoloLens
This is the end of our series of articles on Windows Mixed Reality. In it, we developed from scratch an application with mixed reality on Unity in the lab work format. Today is the final chord in which we will talk about a very interesting topic - about HoloLens and the adaptation of the project for this device. Join now!
So far, our application works only with an immersive headset. However, having made only a few changes to the application, we can implement support for the entire range of Mixed Reality devices (including HoloLens).
Since we used the Mixed Reality Toolkit to control the camera, implement the interaction, and add buttons, we need to make a few changes to the project.
We need to write a script that would determine on which device our application runs - on an immersive headset or on a HoloLens device. If the application runs on a HoloLens device, we need to hide the virtual room so that the user can interact with the real environment. To do this, we first add the Tag element to the RoomPrefab prefab, and then we will access this tag in our script.
1. Select the RoomPrefab prefab in the Hierarchy panel.
2. In the Inspector pane, in the Tag drop-down list, select Add Tag ... (Add Tag ...).

3. Click the “+” icon to create a new tag, and give this tag the name HMDUOnly.

4. Now again click the RoomPrefab prefab in the Hierarchy panel and select the HMDUOnly tag from the Tag drop-down menu in the Inspector panel.
You can select game objects in the script in various ways . We can add a tag to any object that needs to be hidden (if we have several objects), and then sequentially hide each of them. Calling the FindGameObjectsWithTag method is not the best way, but it is quite suitable for us.
5. In the top Unity menu, select GameObject -> Create Empty (Game Object -> Create Empty).
6. In the Hierarchy panel, change the name of the added empty GameObject object to GameManager.
7. In the Inspector panel, click Add Component -> New Script (Add Component -> New Script) and give this script the name GameManager, choosing C sharp as the programming language. Click Create and Add to create a script.
8. To open the GameManager script, double-click it in the Inspector panel or the Assets panel.
9. Replace the GameManager script code with the code below. This test needs to be performed only once, when the application starts. We will execute it inside the Start () function, and we will remove the Update () function.
Finally, to ensure proper operation of the application on the HoloLens device, we must turn the background of the camera black.
10. In the Hierarchy panel, select the MixedRealityCameraParent-> MixedRealityCamera object. Scroll down the Inspector panel and select black as the value of the Mixed Reality Camera Manager -> Transparent Display Settings -> Background Color option -> Mixed Reality -> Transparent Display Settings -> Background Color).

Almost everything is ready! Now we need to enable spatial mapping . The space mapping technology provides a detailed view of the physical surfaces in the HoloLens environment, allowing developers to create impressively realistic applications of mixed reality. In our case, spatial mapping will allow the user to place the speakers in a natural way so that they are not obscured by physical surfaces.
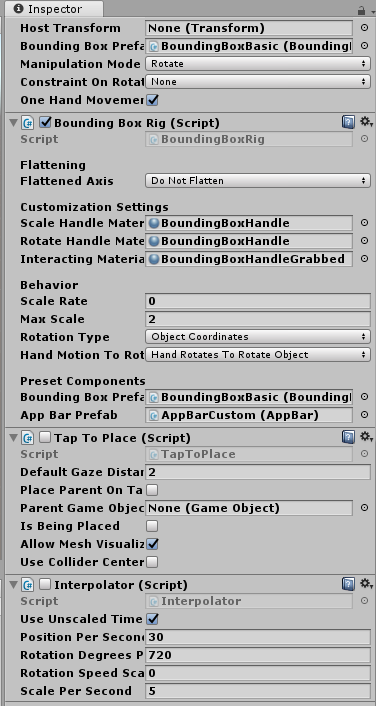
To begin with, we will ensure that the controls of the Bounding Box object (bounding box) that are responsible for moving and rotating are not hidden.
1. Find the AppBarCustom Prefab in the Assets -> Prefabs folder (Resources -> Prefabs) in the Project panel.
2. Set the value of 0 for the Hover Offset Y Scale property (Y-axis offset when hovering).

Now let's add spatial mapping components to the scene.
3. Find the SpatialMapping prefab in the Assets -> HoloTookit -> SpatialMapping -> Prefabs folder (Resources -> HoloTookit -> Spatial mapping -> Prefabs).
4. Drag it to the Hierarchy panel of our scene.

Until now, all types of interaction in our application were carried out using motion controllers. If the application will run on the HoloLens device (or its emulator), we need to use another way to move the speaker and switch to it in the program code. The BoundingBox method can also be reused for HoloLens, but we want to optimize the interaction by making a few changes.
1. Select the Speaker prefab in the Project panel.
2. Click Add Component -> Tap To Place (Add Component -> Touch Placement). This is the script for the HoloLens from the MR Toolkit kit, allowing the user to touch objects or holograms and easily move them in space.
3. Disable it so that it does not start by default. To disable a script, simply uncheck the box next to its name in the Inspector panel. This component will also add an Interpolator script to the Speaker Prefab.
4. Add a script to the Speaker prefab by selecting the Add Component -> New Script command, and name this script SpeakerMovement.
5. Edit the script — double-click it and replace the script code with the code below.
After specifying the namespace for the scripts used, we will use the same test that was used in the GameManager script to hide the room. This time, when a HoloLens device is detected, the test will disable one script and enable another. Since we changed the Speaker prefab, this change will affect all speakers in the scene. If you have changed one of the instances of the Speaker prefab, in the upper right corner of the Inspector panel, click Apply to update this prefab.
Done! Now you can build the app and run it on an immersive headset or HoloLens device, and then place the speakers anywhere in the room, rotate and control them.
Let's see how you can improve the visual aspect of our application, because even a small improvement can significantly change its perception. If you want to learn how to easily make the application even more attractive, you can use the instructions below.
1. In the top menu, select Window -> Lighting -> Settings (Window -> Lighting -> Parameters).
2. Drag the Cloudymorning.mat skybox from the Assets -> Textures folder (Resources -> Textures) to the Skybox Material property.
Note. The following actions can be performed for any camera scene, but they can not be viewed in the editor.
1. Select the MixedRealityCameraParent -> MixedRealityCamera item in the Hierarchy panel of the scene.
2. Click Add Component -> Post Processing Behavior (Add Component -> Post Processing Behavior).
3. Find the CustomProfile.asset element in the Assets -> PostProcessing folder (Resources -> Postprocessing) and drag it to the Profile property of the Post Processing Behavior script (Postprocessing behavior).
Experiment with the postprocessing profile as you need, but remember that postprocessing consumes resources .
Congratulations! You have completed this practice.
Original
Authors: Eric Ahlstrom, cbarkerms, Madison Hight
The entire manual will consist of 5 parts. It will be updated every week. Below you can go to the part you need.
')
Part 1: Export a UWP for Windows Mixed Reality application from Unity ;
Part 2: Setting up the environment (VR) ;
Part 3: Controllers ;
Part 4: Spatial sound ;
Part 5: HoloLens and graphics .
Hololens
So far, our application works only with an immersive headset. However, having made only a few changes to the application, we can implement support for the entire range of Mixed Reality devices (including HoloLens).
Since we used the Mixed Reality Toolkit to control the camera, implement the interaction, and add buttons, we need to make a few changes to the project.
Hiding a virtual room
We need to write a script that would determine on which device our application runs - on an immersive headset or on a HoloLens device. If the application runs on a HoloLens device, we need to hide the virtual room so that the user can interact with the real environment. To do this, we first add the Tag element to the RoomPrefab prefab, and then we will access this tag in our script.
1. Select the RoomPrefab prefab in the Hierarchy panel.
2. In the Inspector pane, in the Tag drop-down list, select Add Tag ... (Add Tag ...).
3. Click the “+” icon to create a new tag, and give this tag the name HMDUOnly.
4. Now again click the RoomPrefab prefab in the Hierarchy panel and select the HMDUOnly tag from the Tag drop-down menu in the Inspector panel.
You can select game objects in the script in various ways . We can add a tag to any object that needs to be hidden (if we have several objects), and then sequentially hide each of them. Calling the FindGameObjectsWithTag method is not the best way, but it is quite suitable for us.
5. In the top Unity menu, select GameObject -> Create Empty (Game Object -> Create Empty).
6. In the Hierarchy panel, change the name of the added empty GameObject object to GameManager.
7. In the Inspector panel, click Add Component -> New Script (Add Component -> New Script) and give this script the name GameManager, choosing C sharp as the programming language. Click Create and Add to create a script.
8. To open the GameManager script, double-click it in the Inspector panel or the Assets panel.
9. Replace the GameManager script code with the code below. This test needs to be performed only once, when the application starts. We will execute it inside the Start () function, and we will remove the Update () function.
using System.Collections; using System.Collections.Generic; using UnityEngine; // We need the UnityEngine.XR.WSA namespace to access Holographic Settings which contain // functions which effect the performance and presentation of Holograms on Windows // Holographic platforms. using UnityEngine.XR.WSA; public class GameManager : MonoBehaviour { void Start () { // Check if the MR headset display is transparent (not opaque). if(!HolographicSettings.IsDisplayOpaque){ // If that is the case, then we need to hide the virtual living room GameObject[] HMDUOnlyObjects = GameObject.FindGameObjectsWithTag("HMDUOnly"); for (int i = 0; i < HMDUOnlyObjects.Length; i++){ // Set active to false disables the object. HMDUOnlyObjects[i].SetActive(false); } } } } Finally, to ensure proper operation of the application on the HoloLens device, we must turn the background of the camera black.
10. In the Hierarchy panel, select the MixedRealityCameraParent-> MixedRealityCamera object. Scroll down the Inspector panel and select black as the value of the Mixed Reality Camera Manager -> Transparent Display Settings -> Background Color option -> Mixed Reality -> Transparent Display Settings -> Background Color).
Adding Spatial Mapping
Almost everything is ready! Now we need to enable spatial mapping . The space mapping technology provides a detailed view of the physical surfaces in the HoloLens environment, allowing developers to create impressively realistic applications of mixed reality. In our case, spatial mapping will allow the user to place the speakers in a natural way so that they are not obscured by physical surfaces.
To begin with, we will ensure that the controls of the Bounding Box object (bounding box) that are responsible for moving and rotating are not hidden.
1. Find the AppBarCustom Prefab in the Assets -> Prefabs folder (Resources -> Prefabs) in the Project panel.
2. Set the value of 0 for the Hover Offset Y Scale property (Y-axis offset when hovering).
Now let's add spatial mapping components to the scene.
3. Find the SpatialMapping prefab in the Assets -> HoloTookit -> SpatialMapping -> Prefabs folder (Resources -> HoloTookit -> Spatial mapping -> Prefabs).
4. Drag it to the Hierarchy panel of our scene.
HoloLens gestures
Until now, all types of interaction in our application were carried out using motion controllers. If the application will run on the HoloLens device (or its emulator), we need to use another way to move the speaker and switch to it in the program code. The BoundingBox method can also be reused for HoloLens, but we want to optimize the interaction by making a few changes.
1. Select the Speaker prefab in the Project panel.
2. Click Add Component -> Tap To Place (Add Component -> Touch Placement). This is the script for the HoloLens from the MR Toolkit kit, allowing the user to touch objects or holograms and easily move them in space.
3. Disable it so that it does not start by default. To disable a script, simply uncheck the box next to its name in the Inspector panel. This component will also add an Interpolator script to the Speaker Prefab.
4. Add a script to the Speaker prefab by selecting the Add Component -> New Script command, and name this script SpeakerMovement.
5. Edit the script — double-click it and replace the script code with the code below.
using System.Collections; using System.Collections.Generic; using UnityEngine; using UnityEngine.XR.WSA; // namespace for the TwoHandManipulatable script using HoloToolkit.Unity.InputModule.Utilities.Interactions; // namespace for the TapToPlace script using HoloToolkit.Unity.SpatialMapping; public class SpeakerMovement : MonoBehaviour { void Start () { if(!HolographicSettings.IsDisplayOpaque){ GetComponent<TwoHandManipulatable>().enabled = false; GetComponent<TapToPlace>().enabled = true; } } } After specifying the namespace for the scripts used, we will use the same test that was used in the GameManager script to hide the room. This time, when a HoloLens device is detected, the test will disable one script and enable another. Since we changed the Speaker prefab, this change will affect all speakers in the scene. If you have changed one of the instances of the Speaker prefab, in the upper right corner of the Inspector panel, click Apply to update this prefab.
Done! Now you can build the app and run it on an immersive headset or HoloLens device, and then place the speakers anywhere in the room, rotate and control them.
Graphics (optional)
Let's see how you can improve the visual aspect of our application, because even a small improvement can significantly change its perception. If you want to learn how to easily make the application even more attractive, you can use the instructions below.
Adding a custom skybox
1. In the top menu, select Window -> Lighting -> Settings (Window -> Lighting -> Parameters).
2. Drag the Cloudymorning.mat skybox from the Assets -> Textures folder (Resources -> Textures) to the Skybox Material property.
Post processing
Note. The following actions can be performed for any camera scene, but they can not be viewed in the editor.
1. Select the MixedRealityCameraParent -> MixedRealityCamera item in the Hierarchy panel of the scene.
2. Click Add Component -> Post Processing Behavior (Add Component -> Post Processing Behavior).
3. Find the CustomProfile.asset element in the Assets -> PostProcessing folder (Resources -> Postprocessing) and drag it to the Profile property of the Post Processing Behavior script (Postprocessing behavior).
Experiment with the postprocessing profile as you need, but remember that postprocessing consumes resources .
Congratulations! You have completed this practice.
Original
Authors: Eric Ahlstrom, cbarkerms, Madison Hight
Source: https://habr.com/ru/post/418665/
All Articles