Windows Mixed Reality: Developer Guide (Part 1)
Hi, Habr! Today we begin a series of articles on Windows Mixed Reality. Within its framework, we will develop an application with mixed reality on Unity from scratch. By the way, all this will take place in the lab work format (laboratory work), that is, you will be able to create such an application in parallel with the publication of articles. Join now!
Mixed reality is the unification of the real world with virtual content, a hybrid environment in which physical and digital objects exist together and interact with each other.
In this practice, you will create an application for immersive Windows Mixed Reality (VR) headsets and Microsoft HoloLens (AR) devices. With Unity, you will create a virtual room in which users interact with a speaker that reproduces spatial sound. Users will hear the sound by teleporting to different points in the room or moving the speaker itself around the room.
The application will be created using the Mixed Reality Toolkit for maximum compatibility with HoloLens. Toward the end of the lesson, you will make a few changes to the application to make the experience optimized for the HoloLens device out of a virtual reality app.
After completing the lesson, you:
Note. If you do not have access to an immersive headset or HoloLens device, you can look at the operation of your application in the Mixed Reality simulator or the HoloLens emulator. See links below.
• Visual Studio 2017 . Any release, including the free Community Edition, will do. During installation, you must select the following components and workloads:
Note. In Visual Studio, you can access various toolboxes using the Tools -> Get Tools and Features menu (Tools -> Get Tools and Features).
• Unity 2017.4.3 (when selecting components during installation, you must add .Net Scripting Backend);
• Windows 10 Fall Creators Update (or later versions);
• [Optional] HoloLens Emulator or Mixed Reality Simulator .
For this practical exercise, we need to import several necessary resources. Download these two Unity packages and save them to your computer.
After receiving the resource files, we can create a Unity project.
1. Open the Unity editor and click New.
2. Select a name for the project (for example, SpeakerPlacement).
3. Turn on 3D for the template, turn off the analytics and click
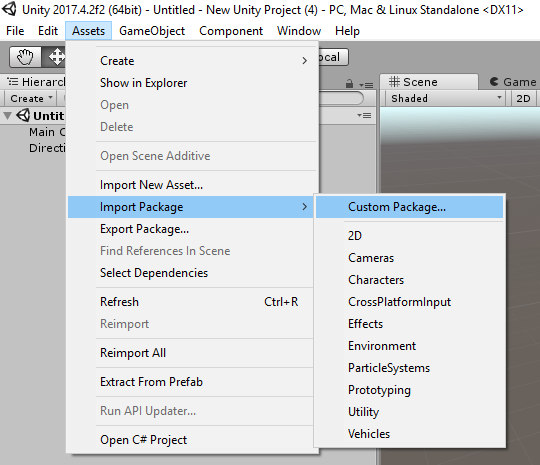
4. To import Unity packages, select the menu item Assets -> Import Package -> Custom Package (Resources -> Import Package -> Custom Package) and navigate to the previously saved Holotoolkit.unitypackage package.
5. Do not deselect items to import all files. Click
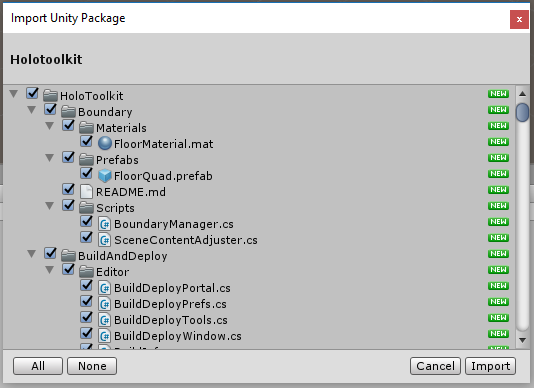
The import process consists of several steps and may take several minutes. If the package is imported successfully, a folder with the name Holotoolkit will appear in the project window under the Assets folder.
6. Also import the SpatialSoundLab.UnityPackage file, repeating the steps above.
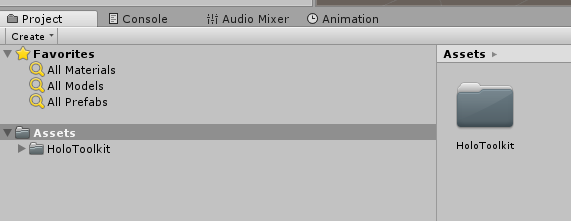
7. The Assets folder should now contain both packages.

Next, you need to configure our Unity project to build an application for Windows Mixed Reality. This task will help us to complete the Mixed Reality Toolkit.
1. In the top menu, go to the Mixed Reality Toolkit -> Configure (Mixed Reality Toolkit -> Settings) section and select Apply Mixed Reality Project Settings.
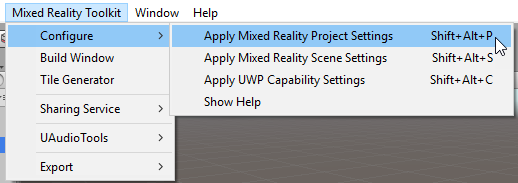
2. Check the Use Toolkit-specific InputManager Axes check box and click Apply.

For reference purposes, we give a description of each of the parameters:
We have provided support for Mixed Reality, but you need to configure a few more parameters related to the universal Windows platform.
3. In the top menu, go to the Mixed Reality Toolkit -> Configure (Mixed Reality Toolkit -> Settings) and select Apply UWP Capability Settings (Apply UWP compatibility settings).
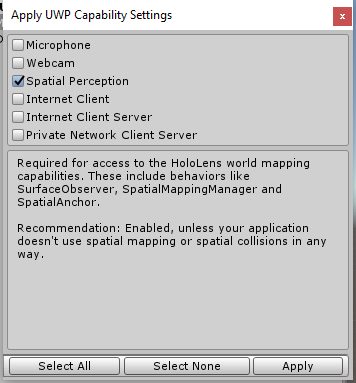
4. Check the Spatial Perception checkbox if you intend to transfer this application to a HoloLens device. This will allow us to map the environment and find the surfaces to place the speakers.
5. Click the
6. Next, open the File -> Build Settings dialog box using the keyboard shortcut Ctrl + Shift + B, select the Universal Windows Platform, then click Switch Platform. Add an open scene to the assembly by checking the box next to the scene name and clicking the Add Open Scenes button. Confirm the offer to save the scene and select a suitable name for it. We called our scene Main.
Now we need to customize the scene. Let's add objects that will handle camera movement and signals from the controller.
1. In the top menu, go to the Mixed Reality Toolkit -> Configure (Mixed Reality Toolkit -> Settings) and select Apply Mixed Reality Project Settings.
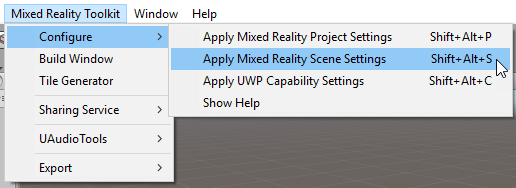
2. Leave all default options selected and click Apply.
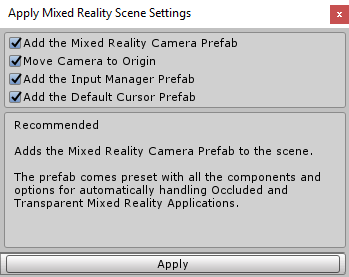
For reference purposes, we give a description of all these parameters:
All added objects will be visible in the Unity Hierarchy panel.
This completes the setup and preparation of the project and the scene for creating the UWP application for MR.
Save the scene and the project.
3. Click File -> Save Scenes (File -> Save Scenes). When prompted to select a name for the scene, name it Main (or think of any other suitable name).
4. Click File -> Save Project (File -> Save Project).
Note. For a detailed description of all the parameters used here, see this guide for setting up Mixed Reality projects.
Now it is not required to do this, but if you decide to build a project, use the following instructions for launching it.
Deploying the project to an immersive headset
1. Go to the Mixed Reality Toolkit -> Build Window (Mixed Reality Toolkit -> Build Window).
2. Click
Note. If a message is displayed in Unity that there is no open solution for the project, and you are asked if you want to build, select Yes, Build.
3. After the build is complete, Unity launches Visual Studio.
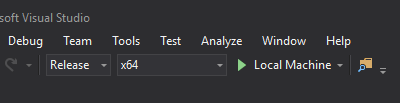
4. On the Visual Studio Standard Toolbar, change the active solution platform from ARM to x64. For the deployment target, select Local Machine.
If you are not debugging, we also recommend changing the build type from Debug (Debug) to Release (Release), since Unity debug builds are often slower.
5. Start the application by clicking the play button.
Deploying the project to a HoloLens device
The process of deploying a project on a HoloLens device is very similar to the above procedure for immersive headsets, with the only exception that you need to select another target device and choose x86 as the platform.
1. Go to the Mixed Reality Toolkit -> Build Window (Mixed Reality Toolkit -> Build Window).
2. Click
Note. If a message is displayed in Unity that there is no open solution for the project, and you are asked if you want to build, select Yes, Build.
3. After the build is complete, Unity launches Visual Studio.
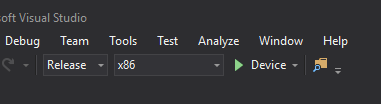
4. On the Visual Studio Standard Toolbar, change the active solution platform from ARM to x86 and select the appropriate deployment target:
If you are not debugging, we also recommend changing the build type from Debug (Debug) to Release (Release), since Unity debug builds are often slower.
5. Start the application by clicking the play button.
For information on publishing applications to the Microsoft Store, see the Windows developer site .
In the Speaker Placement application developed by us, the following features will be available to the user:
Below is a list of the models and music resources we have prepared.
The remaining features will be implemented using the Mixed Reality Toolkit. The components of this set will be used to add interaction capabilities.
Original
Authors: Eric Ahlstrom, cbarkerms, Madison Hight
The entire manual will consist of 5 parts. It will be updated every week. Below you can go to the part you need.
')
Part 1: Export a UWP for Windows Mixed Reality application from Unity ;
Part 2: Setting up the environment (VR) ;
Part 3: Controllers ;
Part 4: Spatial sound ;
Part 5: HoloLens and graphics .
Mixed reality is the unification of the real world with virtual content, a hybrid environment in which physical and digital objects exist together and interact with each other.
In this practice, you will create an application for immersive Windows Mixed Reality (VR) headsets and Microsoft HoloLens (AR) devices. With Unity, you will create a virtual room in which users interact with a speaker that reproduces spatial sound. Users will hear the sound by teleporting to different points in the room or moving the speaker itself around the room.
The application will be created using the Mixed Reality Toolkit for maximum compatibility with HoloLens. Toward the end of the lesson, you will make a few changes to the application to make the experience optimized for the HoloLens device out of a virtual reality app.
After completing the lesson, you:
- learn how to create virtual reality applications with Unity, and consolidate this knowledge;
- Learn how to configure Unity to build UWP applications for Mixed Reality;
- Learn how to use the standard Mixed Reality (MR) functions, such as camera setup, input processing (view control, motion controllers and gestures), as well as spatial playback in MR applications;
- Learn how to create Mixed Reality applications that are suitable for both virtual reality glasses and HoloLens.
equipment requirements
- Computer with MR support
- [Optional] Immersive Windows Mixed Reality Headset with Motion Controllers
- [Optional] HoloLens Device
Note. If you do not have access to an immersive headset or HoloLens device, you can look at the operation of your application in the Mixed Reality simulator or the HoloLens emulator. See links below.
Software Requirements
• Visual Studio 2017 . Any release, including the free Community Edition, will do. During installation, you must select the following components and workloads:
- development for a universal Windows platform;
- game development using tools for working with Unity;
- Windows 10 Fall Creators Update or later SDK (included in the latest version of Visual Studio 2017);
Note. In Visual Studio, you can access various toolboxes using the Tools -> Get Tools and Features menu (Tools -> Get Tools and Features).
• Unity 2017.4.3 (when selecting components during installation, you must add .Net Scripting Backend);
• Windows 10 Fall Creators Update (or later versions);
- To enable the developer mode, go to Settings -> Update & security (System Settings -> Update and Security) -> For developers (For Developers).
• [Optional] HoloLens Emulator or Mixed Reality Simulator .
Exporting a UWP application for Windows Mixed Reality from Unity
1. Creating a Unity project and importing resources
For this practical exercise, we need to import several necessary resources. Download these two Unity packages and save them to your computer.
- Holotoolkit.Unitypackage
This is a snapshot of the Microsoft Mixed Reality Toolkit - a set of scripts and components that allows you to accelerate the development of applications for Microsoft HoloLens and headsets that support Windows Mixed Reality. - SpatialSoundLab.Unitypackage
Special package prepared for this practical lesson. Contains resources (models, materials and audio clips) that will be used to work with spatial sound.
After receiving the resource files, we can create a Unity project.
1. Open the Unity editor and click New.
2. Select a name for the project (for example, SpeakerPlacement).
3. Turn on 3D for the template, turn off the analytics and click
Create project .4. To import Unity packages, select the menu item Assets -> Import Package -> Custom Package (Resources -> Import Package -> Custom Package) and navigate to the previously saved Holotoolkit.unitypackage package.
5. Do not deselect items to import all files. Click
Import .The import process consists of several steps and may take several minutes. If the package is imported successfully, a folder with the name Holotoolkit will appear in the project window under the Assets folder.
6. Also import the SpatialSoundLab.UnityPackage file, repeating the steps above.
7. The Assets folder should now contain both packages.
2. Application of project parameters
Next, you need to configure our Unity project to build an application for Windows Mixed Reality. This task will help us to complete the Mixed Reality Toolkit.
1. In the top menu, go to the Mixed Reality Toolkit -> Configure (Mixed Reality Toolkit -> Settings) section and select Apply Mixed Reality Project Settings.
2. Check the Use Toolkit-specific InputManager Axes check box and click Apply.
For reference purposes, we give a description of each of the parameters:
- Target Windows Universal UWP (Build for Windows Universal UWP) - Indicates the target platform for Unity. Other options for the target platform can be viewed by selecting File -> Build Settings (File -> Build Settings).
- Build for Direct3D (Build for Direct3D): Sets the D3D value for the Build Type parameter in the Build Settings section. For Mixed Reality applications designed for closed headsets, XAML is not supported.
- Setting the Enable XR option is equivalent to setting the Virtual Reality Supported option in Player Settings -> XR Settings (Player Settings -> XR Settings).
- Setting Enable .NET scripting is equivalent to setting .NET for Player Settings -> Other Settings -> Scripting Backend (Player Settings -> Other Settings -> Script Platform). The IL2CPP option would also work, but for consistency in this practice session, we recommend using the .NET option.
- The Use Toolkit-specific InputManager axis parameter changes the axes of the Edit -> Project Settings -> Input Manager section to enable support for all axes that are used in the toolbox. . In other words, it includes support for the Xbox gamepad and controllers for Mixed Reality.
- If you create applications for immersive headsets only, you can select the Target Occluded Devices check box. Since we are going to transfer our application to the HoloLens device, we will not check this box.
We have provided support for Mixed Reality, but you need to configure a few more parameters related to the universal Windows platform.
3. In the top menu, go to the Mixed Reality Toolkit -> Configure (Mixed Reality Toolkit -> Settings) and select Apply UWP Capability Settings (Apply UWP compatibility settings).
4. Check the Spatial Perception checkbox if you intend to transfer this application to a HoloLens device. This will allow us to map the environment and find the surfaces to place the speakers.
5. Click the
Apply button to save your changes.6. Next, open the File -> Build Settings dialog box using the keyboard shortcut Ctrl + Shift + B, select the Universal Windows Platform, then click Switch Platform. Add an open scene to the assembly by checking the box next to the scene name and clicking the Add Open Scenes button. Confirm the offer to save the scene and select a suitable name for it. We called our scene Main.
3. Applying Scene Parameters and Adding Mixed Reality Objects
Now we need to customize the scene. Let's add objects that will handle camera movement and signals from the controller.
1. In the top menu, go to the Mixed Reality Toolkit -> Configure (Mixed Reality Toolkit -> Settings) and select Apply Mixed Reality Project Settings.
2. Leave all default options selected and click Apply.
For reference purposes, we give a description of all these parameters:
- A MixedRealityCameraParent prefab is added to the scene. This prefab adds a standard (main) camera to the origin (0,0,0), and also adds support for motion controllers and borders.
- A pre-fab InputManager is added to the scene. It provides input support (control of look, gestures, using touch input or Xbox gamepad).
- The DefaultCursor prefab is added to the scene.
All added objects will be visible in the Unity Hierarchy panel.
This completes the setup and preparation of the project and the scene for creating the UWP application for MR.
Save the scene and the project.
3. Click File -> Save Scenes (File -> Save Scenes). When prompted to select a name for the scene, name it Main (or think of any other suitable name).
4. Click File -> Save Project (File -> Save Project).
Note. For a detailed description of all the parameters used here, see this guide for setting up Mixed Reality projects.
4. Deploying the application on headsets
Now it is not required to do this, but if you decide to build a project, use the following instructions for launching it.
Deploying the project to an immersive headset
1. Go to the Mixed Reality Toolkit -> Build Window (Mixed Reality Toolkit -> Build Window).
2. Click
Open in Visual Studio . This action will take several minutes to complete - during this time all resources will be compiled and a solution for Visual Studio created or updated.Note. If a message is displayed in Unity that there is no open solution for the project, and you are asked if you want to build, select Yes, Build.
3. After the build is complete, Unity launches Visual Studio.
4. On the Visual Studio Standard Toolbar, change the active solution platform from ARM to x64. For the deployment target, select Local Machine.
If you are not debugging, we also recommend changing the build type from Debug (Debug) to Release (Release), since Unity debug builds are often slower.
5. Start the application by clicking the play button.
Deploying the project to a HoloLens device
The process of deploying a project on a HoloLens device is very similar to the above procedure for immersive headsets, with the only exception that you need to select another target device and choose x86 as the platform.
1. Go to the Mixed Reality Toolkit -> Build Window (Mixed Reality Toolkit -> Build Window).
2. Click
Open in Visual Studio . This action will take several minutes to complete - during this time all resources will be compiled and a solution for Visual Studio created or updated.Note. If a message is displayed in Unity that there is no open solution for the project, and you are asked if you want to build, select Yes, Build.
3. After the build is complete, Unity launches Visual Studio.
4. On the Visual Studio Standard Toolbar, change the active solution platform from ARM to x86 and select the appropriate deployment target:
- if you are deploying via USB, select Device;
- If the deployment is performed via Wi-Fi, you must select the Remote machine and configure the parameters of the remote computer.
If you are not debugging, we also recommend changing the build type from Debug (Debug) to Release (Release), since Unity debug builds are often slower.
5. Start the application by clicking the play button.
For information on publishing applications to the Microsoft Store, see the Windows developer site .
Speaker Placement application
In the Speaker Placement application developed by us, the following features will be available to the user:
- With the help of motion controllers, the user can teleport to various points of the virtual living room or move around it;
- You can also choose speakers, move, rotate, turn them on and off and listen to the surround sound throughout the room.
Below is a list of the models and music resources we have prepared.
- Prefabs -> RoomPrefab.prefab - a virtual living room for an immersive headset.
- Models -> Speaker.3DS - model of our speakers, which we turn into a working prefab.
- Audio -> ChillBlueLagoon.mp3 - music file (you can use any file in MP3, OGG, WAV or AIFF format).
The remaining features will be implemented using the Mixed Reality Toolkit. The components of this set will be used to add interaction capabilities.
Original
Authors: Eric Ahlstrom, cbarkerms, Madison Hight
Source: https://habr.com/ru/post/418655/
All Articles