Review and Comparison of Gateway Quantum Software Platforms
Hi, Habr! I present to your attention the translation of the article "Overview and Comparison of Gate Level Quantum Software Platforms" by Ryan LaRose.
Quantum computers are available for use in the cloud infrastructure, but at the same time, the recent rapid growth of quantum software platforms can be overwhelming for those who will decide what to use. This article offers a current picture of the rapidly developing landscape of quantum computing by comparing four software platforms — Forest (pyQuil), QISKit, ProjectQ and the Quantum Development Kit — which allow researchers to use real and simulated quantum devices. This analysis covers the requirements and installation, the syntax of the language on the example of programs, support at the library level and the capabilities of the quantum simulator for each platform. For platforms with quantum computer support, we compare hardware, quantum assembly languages, and quantum compilers. In conclusion, we consider the features of each of them and briefly mention other software packages for quantum computing.
Content
I. Introduction
Ii. Software platforms
A. pyQuil
B. QISKit
C. ProjectQ
D. Quatum Development Kit
Iii. Comparison
A. Library Support
B. Quantum hardware
C. Quantum Compilers
D. Simulator performance
E. Features
Iv. Discussion and conclusions
Bibliography
Appendix A. Other Software Platforms
Appendix B. Testing Simulator Performance
Appendix C. Sample Program: Teleportation Scheme
I. Introduction
Quantum programming languages were considered at least two decades ago [1-3], but they were mostly theoretical and without existing equipment. Quantum computers are now a reality, and there are quantum programming languages that allow anyone who has access to the Internet to use them. A sufficient number of researchers, both in industry and in academic circles, created small quantum devices that operate on a circuit model of quantum computing. These computers are small, noisy and not as powerful as modern classic computers. But they are emerging, growing steadily, and foreshadowing future unimaginably large computational powers for the tasks of chemistry [4, 5], machine learning [6, 7], optimization [8], financial sphere [9] and more [10]. These devices are a test bench for training the next generation of quantum software engineers to solve the currently existing classically complex computer problems. Indeed, cloud quantum computing has already been used to calculate the deuteron coupling energy [11] and test subroutines in machine learning algorithms [12, 13].
Recently, there has been a rapid growth of software for quantum computing in a wide variety of classical computer languages. A list of open source projects with more than fifty is available in [14], and a list of quantum computer simulators is available in [15]. This huge number of programs that positively reflect the growth in the field makes it difficult for students and researchers to decide which software package to use so as not to get lost in the documentation or not be shocked by the necessary basic knowledge.
This article is expected to provide a brief overview and comparison of the main software platforms for general-purpose quantum computing at the gate level. Four were chosen from the long list: three that provide the user with the ability to connect to real quantum devices — pyQuil from Rigetti [16], QISKit from IBM [17] and ProjectQ from ETH Zurich [18, 19] —and one with similar functionality, but without the current ability to connect to a quantum computer - Microsoft's Quantum Development Kit [20]. In favor of the choice of these platforms was the ability to connect to a real quantum device. Because of this, and for the sake of brevity, a number of respectable programs are intentionally omitted. Some of them are mentioned in Appendix A.
At the moment, the main goal is to present a picture of the landscape of quantum computation arising from these four platforms. In Section II, we will look at each platform in turn, discussing requirements and installation, documentation and tutorials, language syntax, and quantum equipment. Section III offers a detailed comparison of the platforms. It includes: support at the level of libraries of quantum algorithms in III A , quantum hardware support in III B , compilers of quantum circuits in III C and quantum computer simulators III D. Section IV discusses some subjective remarks about each platform. Appendix A contains information about other quantum software, Appendix B contains detailed information about testing quantum circuit simulators, and Appendix C shows the code for a quantum teleportation scheme in each of the four languages for side-by-side comparison.
Ii. Software platforms
Figure 1 shows various quantum computers and software used to connect to devices. Currently, four software platforms allow you to connect to four different quantum computers - one from Rigetti, an 8-qubit quantum computer, you can connect using pyQuil [41]; and three from IBM, with the largest available number of 16 qubits, which can be connected using QISKit or ProjectQ. In addition, IBM offers a fourth 20-qubit quantum computer, but this device is available only to members of the IBM Q Network [42]: a group of companies, universities, and national laboratories interested in and investing in quantum computing. Figure 1 also shows the quantum computers of companies such as Google, IBM, and Intel, which were announced but are not currently available to regular users.
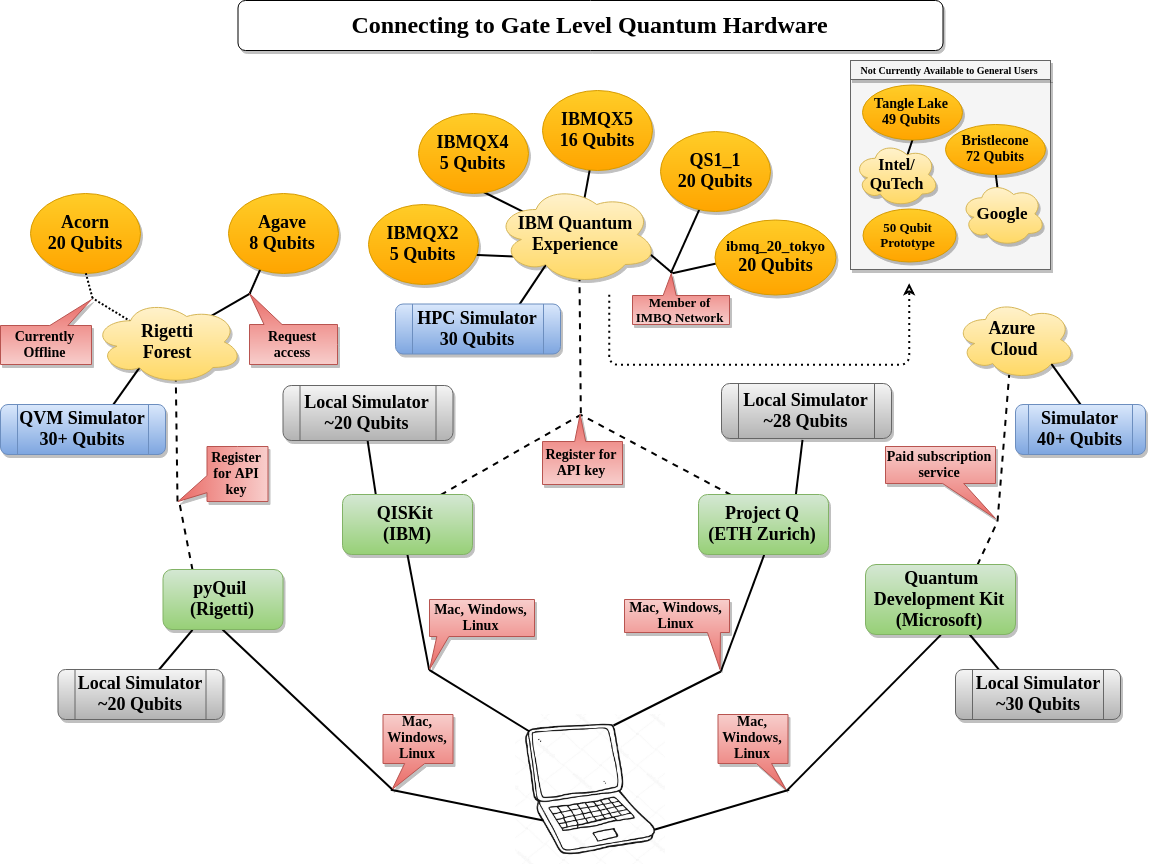
Figure 1. A schematic diagram showing how to connect a personal computer to a quantum computer used at the gate level. Starting from a personal computer (bottom center), green nodes show software that can be installed on a user's personal computer. Gray nodes indicate that simulators are running locally (that is, on the user's computer). Dotted lines indicate API / cloud connections to company resources shown in yellow "clouds". Quantum simulators and used quantum computers provided by these cloud resources are shown in blue and gold, respectively. Red boxes show requirements on the selected method. For example, to connect to Rigetti Forest and use the Agave 8 qubit quantum computer, you need to download and install pyQuil (available on MacOS, Windows and Linux), register on the Rigetti website to get the API key, and then request access to the device via the online form. Notes: (i) The quantum virtual machine Rigetti requires elevation for more than 30 qubits, (ii) local simulators depend on the user's computer, therefore the numbers are approximate, and (iii) quantum computers are shown in the gray box, but they were announced currently unavailable for regular users.
The technology of quantum equipment is changing rapidly. It is very likely that new computers will appear by the end of the year, and in two or three years this list may be completely outdated. However, what remains is the software used to connect to this technology. It would be very simple to use new quantum computers, changing just a few lines of code, without actually changing the syntax used to generate or run a quantum scheme. For example, in QISKit, you just need to change the name of the backend device when executing the schema:
execute(quantum_circuit, backend="name", ...) Listing 1. The string "name" points to the backend device for running quantum programs using QISKit. When the future quantum computers are released, performing on the new hardware will be as simple as changing the name.
Although the software also changes with the release of the new version [43], these are, for the most part, relatively minor syntax changes that do not significantly change the functionality of the software.
In this section, we will examine each of the four platforms in turn, discussing requirements and installation, documentation and manuals, language syntax, quantum language, quantum equipment, and simulator capabilities. This review is not intended to complete language learning, but it gives the reader an understanding of each platform before diving into one (or more) of the selected platforms. The current analysis includes sufficient information to run algorithms on quantum computers. However, the reader, when he has chosen a specific platform, is sent to special documentation for full information. Links to documentation and tutorial sources for each software package have been added. It is also assumed that there is a basic knowledge of quantum computing, for which there are now many good references [21, 22].
All code snippets and programs included in this document were tested and run on a Dell XPS 13 Developer Edition laptop running Linux Ubuntu 16.04 LTS, the full specifications of which are listed in [23]. Although all software packages work in all three major operating systems, the author’s experience makes it much easier to install and use software on the platform on which it was developed. Under Linux Ubuntu, there were no difficulties or unusual error messages when installing these software packages.
| pyQuil | QISKit | ProjectQ | QDK | |
|---|---|---|---|---|
| Institution | Rigetti | Ibm | ETH Zurich | Microsoft |
| First release | v0.0.2 on Jan 15, 2017 | 0.1 on March 7, 2017 | v0.1.0 on Jan 3, 2017 | 0.1.1712.901 on Jan 4, 2018 (pre-release) |
| Current Version | v1.9.0 on June 6, 2018 | 0.5.4 on June 11, 2018 | v0.3.6 on Feb 6, 2018 | 0.2.1802.2202 on Feb 26, 2018 (pre-release) |
| Open Source? | ✅ | ✅ | ✅ | ✅ |
| License | Apache-2.0 | Apache-2.0 | Apache-2.0 | MIT |
| Homepage | Home | Home | Home | Home |
| Github | Git | Git | Git | Git |
| Documentation | Docs , Tutorials ( Grove ) | Docs , Tutorial Notebooks , Hardware | Docs , Example Programs , Paper | Docs |
| OS | Mac, Windows, Linux | Mac, Windows, Linux | Mac, Windows, Linux | Mac, Windows, Linux |
| Requirements | Python 3, Anaconda (recommended) | Python 3.5+, Jupyter Notebooks (for tutorials), Anaconda 3 (recommended) | Python 2 or 3 | Visual Studio Code (strongly recommended) |
| Classical Language | Python | Python | Python | Q # |
| Quantum Language | Quil | Openqasm | none / hybrid | Q # |
| Quantum Hardware | 8 qubits | IBMQX2 (5 qubits), IBMQX4 (5 qubits), IBMQX5 (16 qubits), QS1_1 (20 qubits) | no dedicated hardware, can connect to ibm backends | none |
| Simulator | ∼20 qubits locally, 26 qubits with most API keys to QVM, 30+ w / private access | ∼25 qubits locally, 30 through cloud | ∼28 qubits locally | 30 qubits locally, 40 through Azure cloud |
| Features | Generate Quil code, Slack channel, algorithms in Grove, topology-specific compiler, noise capabilities in simulator, community | Generate QASM code, community cable, circuit drawer, ACQUA library | Draw circuits, connect to IBM backends, multiple library plug-ins | Built-in algorithms, example algorithms |
A. pyQuil
pyQuil is an open source Python library developed by Rigetti for creating, analyzing and executing quantum programs. It is built on the basis of the Quil language — an open language of quantum instructions (or just a quantum language ), specially developed for the nearest promising quantum computers and based on a common model of classical / quantum memory [24] (this means that both quits and classic bits). pyQuil is one of the main libraries developed by Forest, which is a key platform for all Rigetti software. Forest also includes Grove and Reference QVM, which will be described later.
a. Requirements and installation
To install and use pyQuil, Python 2 or 3 versions are required, although Python 3 is strongly recommended, as future functions will only support Python 3. In addition, the Anaconda Python distribution is recommended for various Python module dependencies, although this is not required.
The easiest way to install pyQuil is to use the Python package manager command. Linux Ubuntu command line is entered
pip install pyquil for successful software installation. Alternatively, if Anaconda is installed, you can install pyQuil by typing
conda install −c rigetti pyquil on the command line. Another alternative is to download the source code from the git repository and install the software. To do this, enter the following commands:
git clone https://github.com/rigetticomputing/pyquil cd pyquil pip install −e This latter method is recommended for all users who can contribute to pyQuil. For more information, see the GitHub Contributions Guide.
b. Documentation and tutorials
pyQuil has excellent documentation hosted on the Internet, with an introduction to quantum computing, installation instructions, basic programs and gate operations, a simulator known as a quantum virtual machine (QVM), a real quantum computer and Quil with a compiler. By downloading the pyQuil source code from GitHub, you will also get an example folder in Jupyter notebooks, common Python examples and a program. $ inline $ \ textsf {run_quil.py} $ inline $ that can run text documents written in Quil using a quantum virtual machine. Finally, mention Grove , a set of quantum algorithms built using pyQuil and the Rigetti Forest environment.
c. Syntax
The pyQuil syntax is very simple and practical. The main element for writing quantum circuits is a program and can be imported from textsfpyquil.quil . Gate operations can be found in textsfpyquil.gates . Module textsfapi allows you to run quantum schemes on a virtual machine. One of the nice features of pyQuil is that qubit registers and classical registers do not have to be defined a priori and can be dynamically allocated in memory. Qbits in the qubit register are referred to by indices (0, 1, 2, ...) and similarly for bits in the classical register. Thus, the random generator circuit can be written as follows:
# random number generator circuit in pyQuil from pyquil.quil import Program import pyquil.gates as gates from pyquil import api qprog = Program() qprog += [gates.H(0), gates.MEASURE(0, 0)] qvm = api.QVMConnection() print(qvm.run(qprog)) Listing 2. PyQuil code for a random number generator.
The first three lines import the minimum required to declare a quantum scheme / program (line 2), to perform gate operations on qubits (line 3) [44], and to execute the scheme (line 4). In line 6, a quantum program is created, and in lines 7-8, a list of instructions is transmitted to it: first, let us act with Hadamard gate H above the qubit under the index 0, then we measure the same qubit into the classic bit under the index 0. In line 10 a connection with QVM is established, and at 11 the result of our circuit is launched and output. This program prints the standard output of pyQuil as a list of lists of integers: in our case textsf[[0]] or textsf[[1]] . In general, the number of items in an external list is the number of tests performed. Integer numbers in internal lists are the final dimensions in a classic register. Since we performed only one trial (this is indicated as an argument in textsfapi.QVMConnection.run , which by default is set to one), we get only one internal list. Since in the classical register we had only one bit, we get only one integer.
d. Quantum language
Quil is a quantum instruction language or simply a quantum language that transmits commands to a quantum computer. This is similar to assembler on classic computers. The core of Quil syntax is textsfGATEindex where textsfGATE is a quantum gate that applies to qubit indexed textsfindex (0, 1, 2, ...). pyQuil has a function to generate Quil code from a given program. For example, in the aforementioned quantum random number generator, we could add the line:
print(qprog) at the end to get the Quil-code, which is shown below:
H 0 MEASURE 0 [0] Listing 3. Quil code for a random number generator.
Perhaps, if someone begins to understand Quil, write quantum schemes in a text editor in the Quil language, and then execute a QVM scheme using the program $ inline $ \ textsf {run_quil.py} $ inline $ . You can also modify $ inline $ \ textsf {run_quil.py} $ inline $ to run the circuit on QPU. Note that the pyQuil compiler (also referred to as the Quil compiler in the documentation) converts the given scheme into Quil code that a real quantum computer can understand. We will discuss this in more detail in section III C.
f. Quantum hardware
Rigetti has a quantum processor that can be used by those requesting access. To request access, you must visit the Rigetti website and provide the full name, email address, organization name, and a description of the basis for accessing the QPU. Once this is done, a company representative will email to schedule the time to give the user access to the QPU. The advantage of this scheduling process, unlike the QISKit queuing system, which will be discussed further, is that many tasks can be performed in a distributed time interval with deterministic execution time, which is key to variational and hybrid algorithms. These types of algorithms send data in the opposite and forward direction between classical and quantum computers - the need to wait in line makes this process much longer. The disadvantage (perhaps) is that the tasks cannot be executed at any time when QPU is available and you need to specify and agree on a specific time.
According to the author’s experience, staff are ready to help, and the process is usually successful. The current device, the topology of which is shown in Figure 2, consists of an 8 qubit with the nearest neighbor connected. We will look at this computer in more detail in section III B.
g. Simulator
A quantum virtual machine (QVM) is the main utility used to execute quantum circuits. This program, written to run on a classical processor, receives Quil code and simulates the development of a process on a real quantum computer. To connect to QVM, you need to register an API key for free at https://www.rigetti.com/forest , specifying your name and email address. Then you will receive an email containing the API key and the user ID that must be configured at startup:
pyquil−config−setup on the command line (after installing pyQuil, of course). Then you will be prompted to enter the keys from the email.
According to the documentation, most API keys provide access to QVM for up to 30 qubits, and you can request access to more qubits. The author's API key gives access to 26 qubits (no updates were requested).
In addition, the Forest library contains a local simulator, written in Python and open source, referred to as Reference QVM . It is not as productive as QVM, but users can run circuits with the number of qubits limited by the amount of memory on local machines. As a rule, it is possible to run circuits with a number of qubit less than 20 on a wide range of equipment. Reference QVM must be installed separately, which can be done using textsfpip :
pip install referenceqvm To use Reference QVM instead of QVM, simply import textsfapi of textsfreferenceqvm instead of pyQuil:
import referenceapi.api as api 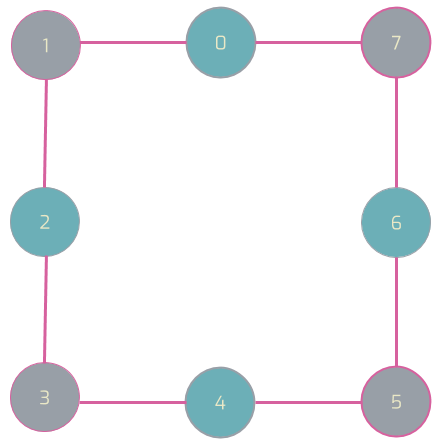
Figure 2. Schematic diagram showing the topology (connectivity) of an 8-qubit Agave QPU Rigetti. Qubits are marked with integers 0, 1, ..., 7, and the lines connecting qubits indicate that a two qubit operation can be performed between these qubits. For example, we can execute Controlled- Z over qubits 0 and 1, but not between 0 and 2. To do this, the Quil compiler transforms Controlled- Z (0, 2) in operations that QPU can perform. This diagram is taken from the pyQuil documentation.
B. QISKit
The Quantum Information Software Kit, or QISKit, is an open source software development kit (SDK) for working with the OpenQASM quantum language and quantum processors in the IBM Q platform. It is available for Python, JavaScript, and Swift, but here we only discuss version of python.
a. Requirements and installation
QISKit is available on MacOS, Windows and Linux. Installing QISKit requires Python 3.5+. Additional useful, but not mandatory components are Jupyter Notebooks for tutorials and the Python Anaconda 3 distribution, which contains all the necessary dependencies.
The easiest way to install QISKit is to use the pip package manager for Python. At the command prompt, to install the software, we enter:
pip install qiskit note that textsfpip automatically handles all dependencies and will always install the latest version. Users who may be interested in contributing to QISKit can install the source code by typing the following in the command line, assuming git is installed:
git clone https://github.com/QISKit/qiskit−core cd qiskit−core python −m pip install −e For information on contributions, see the online documentation for the contributions guide on GitHub.
b. Documentation and training materials
The QISKit documentation can be found online at https://qiskit.org/documentation/ . It contains instructions for installing and configuring, examples of programs and connecting to real quantum devices, project organization, a QISKit overview and developer documentation. Basic information about quantum computing can also be found for users who are new to this field. A very good resource is a link to the SDK where users can find information about the source code documentation.
QISKit also contains a large number of tutorials in a separate GitHub repository (similar to pyQuil and Grove). These include entangled states; standard algorithms, such as the Deutsch-Yozha, Grover’s algorithm, phase estimation, and the quantum Fourier transform; also more complex algorithms, such as solving a quantum variational eigenvalue problem and applying to fermion Hamiltonians; and even some fun games like quantum sea battle. In addition, the ACQUA library (Algorithms for Circuits for QUantum Applications) contains multi-disciplinary algorithms for chemistry and artificial intelligence with numerous examples.
There is also very detailed documentation for each of the four quantum backends containing information about connectivity, coherence time, and gate time. Finally, mention the IBM Q experience website and user guides. The website contains a graphical interface for the quantum scheme, in which users can drag gates onto the scheme, which is useful for studying quantum schemes. User manuals contain more instructions on quantum computing and the QISKit language.
c. Syntax
The syntax QISKit can be viewed in the following sample program. Here, unlike pyQuil, you need to explicitly allocate quantum and classical registers. The following shows the program for the random number scheme in QISKit:
# random number generator circuit in QISKit from qiskit import QuantumRegister, ClassicalRegister, QuantumCircuit, execute qreg = QuantumRegister(1) creg = ClassicalRegister(1) qcircuit = QuantumCircuit(qreg , creg) qcircuit.h(qreg[0]) qcircuit.measure(qreg[0], creg[0]) result = execute(qcircuit, 'local qasm simulator').result() print(result.get_counts()) Listing 4. QISKit code for a random number generator.
Line 2 imports the tools for creating quantum and classical registers, a quantum circuit, and a function to execute this circuit. Then we create a quantum register with one qubit (line 4), a classical register with one bit (line 5) and a quantum circuit with both of these registers (line 6). Now that the scheme has been created, we begin to give instructions: in line 8, we apply the Hadamard gate to the zero qubit in our quantum register (which is the only qubit in the quantum register); in line 9 we measure this qubit in the classical bit, indexed by zero in our classical register (which is the only one in the classical register) [45]. Now that the quantum scheme has been built, we will execute it in line 11 and print the result in line 12. Through the output $ inline $ \ textsf {result.get_counts ()} $ inline $ we get “calculations” of the scheme, that is, a dictionary of output data and how many times each result was obtained. For our case, the only possible outputs are 0 or 1, and an example of the output of the above program is textsf′0′:532,′1′:492 , which indicates that we received 532 instances of 0 and 492 instances of 1. (By default, the number of cycles to run the circuit, called textsfshots in QISKit, it is 1024.)
d. Quantum language
OpenQASM (open language quantum assembler [25], which we can simply call QASM) is a quantum language that provides instructions for real quantum devices similar to assembler on classical computers. The core of the QASM syntax is textsfgatequbit where textsfgate sets the quantum valve operation, and textsfqubit - qubit. QISKit has a function for generating QASM code from a schema. In the example of the random number scheme above, we could add a line.
print(qcircuit.qasm()) at the end to get the QASM code for the circuit shown below:
OPENQASM 2.0; include ”qelib1.inc”; qreg q0[1]; creg c0[1]; h q0[0]; measure q0[0] −> c0[0]; Listing 5. OpenQASM code for a random number generator.
The first two lines are included in each QASM file. Line 3 (4) creates a quantum (classical) register, and lines 5 and 6 give instructions for the circuit. In OpenQASM, you can write small schemes like these, but for larger schemes it is better to use tools in QISKit for free and effective programming of quantum computers.
e. Quantum hardware
There is a huge amount of documentation for quantum backends supported by QISKit. These devices include IBMQX2 (5 qubits), IBMQX4 (5 qubits), IBMQX5 (16 qubits) and QS1_1 (20 qubits, accessible only by members of the IBM Q Network). Documentation for each is available on GitHub. We will look at IBMQX5 in detail in section III B, the topology of which is shown in Figure 3.
f. Simulator
IBM , . , 12 , , 25 . , III D.

Figure 3. Schematic topology IBMQX5, taken from [30]. Directional arrows indicate the possibility of entanglement. For example, we could perform an operation (in QASM) cx Q1, Q2 , but not operation cx Q2, Q1 . To do this, the compiler translates instruction into equivalent gates, which are executed in the topology and set of gates.
')
C. ProjectQ
ProjectQ — IBM, . ProjectQ Thomas Häner Damien S. Steiger Matthias Troyer ETH Zurich, .
a.
ProjectQ Python (2.7 3.4+). . pip :
python −m pip install −−user projectq ( ). :
git clone https://github.com/ProjectQ−Framework/ProjectQ cd projectq python −m pip install −−user , , . ProjectQ GitHub.
b.
ProjectQ . , . - ( , ). — / , . [18, 19] , , - .
c. Syntax
ProjectQ , . ProjectQ ( ProjectQ), — / . , :
# random number generator circuit in ProjectQ from projectq import MainEngine import projectq.ops as ops eng = MainEngine() qbits = eng.allocate_qureg(1) ops.H | qbits[0] ops.Measure | qbits[0] eng.flush() print(int(qbits[0])) 6. ProjectQ .
2 , 3 . 5 (engine) MainEngine , 6 . 8 9 : 0, . « » . — operation | qubit , H|0> , . , /. pyQuil QISKit, ProjectQ . , qbits[0] 9, , int , 12.
d.
, ProjectQ . ProjectQ IBM, OpenQASM: IBM.
e.
ProjectQ . , IBM ProjectQ.
f.
ProjectQ , C++, , , Python. , ProjectQ ClassicalSimulator (stabilizer circuits), . . , , , CNOT [26]. , , , , . , C++ Simulator .
C++ Simulator ProjectQ . [23]() (, ), 26 5 , 28 20 — . [III D]() 6.
h. ProjectQ
ProjectQ , , . , pyQuil ProjectQ [27], Microsoft QDK Thomas Häner Damian Steiger ETH Zurich [28], . ( , , QDK ProjectQ C++, .)
D. Quantum Development Kit
Rigetti IBM, Microsoft . [29] , , , . , Microsoft , Quantum Development Kit (QDK), , . , QDK «-» Q#, Visual Studio Visual Studio Code 30 . 2018 , -, MacOS, Windows Linux.
a.
, Visual Studio Code , . ( VS Code, Visual Studio . - - , , VS Code.) , QDK , Bash:
dotnet new −i "Microsoft.Quantum.ProjectTemplates::0.2 −*" QDK GitHub ( , QDK), :
git clone https://github.com/Microsoft/Quantum.git cd Quantum code b.
— Q#, - , , , Q# . ; , .
c. Syntax
Q# . C#: , Python, , C#. , :
// random number generator circuit in QDK operation random (count: Int, initial: Result) : (Int, Int) { body { mutable numOnes = 0; using ( qubits = Qubit[1]) { for (test in 1..count) { Set(initial, qubits[0]); H(qubits[0]); let res = M(qubits[0]); // count the number of ones if (res == One) { set numOnes = numOnes + 1; } } Set(Zero, qubits[0]); } // return statistics return (count − numOnes, numOnes); } } 7. Q# .
, , /, , . . , , , . — .qs Q#, Driver.cs .qs , .csproj , . , 65 . -, , «Quickstart» .
, QDK , . , — (a+b) , . QDK , , ( C , , , , .
d. /
, QDK . Q# / .
e.
QDK , 30 . , QDK ProjectQ, , ProjectQ. ( III D.) Azure , 40 . QDK , .
, QDK (trace simulator), , , , . , . , . , , - , . . . - QDK.
Iii. Comparison
Later in this section, when the basics of each platform were considered, we will compare each of the additional characteristics, including support at the level of libraries, quantum equipment, and the quantum compiler. We will also list some noteworthy and useful features of each platform.
A. Library Support
« » ( ) (, language.DoQuantumFourierTransform (...) ). . , , 4.
, , , . , , , .
, pyQuil, QISKit QDK . ProjectQ FermiLib, FermiLib, OpenFermion, . , , , ProjectQ. Microsoft QDK , , . , QDK , , QDK, . QISKit .
B.
pyQuil QISKit, . , — — « ». ( ), , / . , , --. IBMQX5 Agave, . - .
a. IBMQX5
IBMQX5 — 16- ( 3). (T2) 31±5 0- , — 89±17 15- . 80 10 . CNOT - , 170- cx q[6], q[7] 348 cx q[3], q[14] . 99,5% ( = 1 — ). - 94,9% . 12,4% 6%. [30].
, , IBM , , . Agave Rigetti, -, , . , .
b. Agave
Agave 8 (transmon) , 2. (T2) 9,2 1- , 15,52 2- . Controlled- Z 118 195 . 96,2% ( , = 1 — ) 93,2%. - 87% - . . - pyQuil.
| Algorithm | pyQuil | QISKit | ProjectQ | QDK |
|---|---|---|---|---|
| Random Number Generator | (T) | (T) | (T) | (T) |
| Teleportation | (T) | (T) | (T) | (T) |
| Swap Test | (T) | |||
| Deutsch-Jozsa | (T) | (T) | (T) | |
| Grover's Algorithm | (T) | (T) | (T) | (B) |
| Quantum Fourier Transform | (T) | (T) | (B) | (B) |
| Shor's Algorithm | (T) | (D) | ||
| Bernstein Vazirani | (T) | (T) | (T) | |
| Phase Estimation | (T) | (T) | (B) | |
| Optimization/QAOA | (T) | (T) | ||
| Simon's Algorithm | (T) | (T) | ||
| Variational Quantum Eigensolver | (T) | (T) | (P) | |
| Amplitude Amplification | (T) | (B) | ||
| Quantum Walk | (T) | |||
| Ising Solver | (T) | (T) | ||
| Quantum Gradient Descent | (T) | |||
| Five Qubit Code | (B) | |||
| Repetition Code | (T) | |||
| Steane Code | (B) | |||
| Draper Adder | (T) | (D) | ||
| Beauregard Adder | (T) | (D) | ||
| Arithmetic | (B) | (D) | ||
| Fermion Transforms | (T) | (T) | (P) | |
| Trotter Simulation | (D) | |||
| Electronic Structure (FCI, MP2, HF, etc.) | (P) | |||
| Process Tomography | (T) | (T) | (D) | |
| Meyer-Penny Game | (D) | |||
| Vaidman Detection Test | (T) | |||
| Battleships Game | (T) | |||
| Emoji Game | (T) | |||
| Counterfeit Coin Game | (T) |
4. , . « » (T), (D), (B) (P).
C.
, , , . / . — , , . QISKit Rigetti, .
IBMQX5 u1 , u2 , u3 and CNOT where

, u1 Rz(θ) , u2 and u3 — Rx(π/2)

, .

Where X and Z — . IBM Rz(θ) « », , . , z , z () , .
IBMQX5 3. , CNOT , CNOT

, CNOT QISKit, , , QISKit CNOT, . QISKit , , .
8- Agave Rigetti Rx(kπ/2) k∈Z , Rz(θ) Controlled- Z . , , Controlled- Z ( CZ )

Agave 2. QISKit, pyQuil ( ).
, , 5. , pyQuil, Agave, QISKit — IBMQX5. , QISKit (. . ), pyQuil. , - . , IBMQX5 , , pyQuil, . , ( ) - - (, , [32]), . [46], .

5. ( ), pyQuil 8- Agave Rigetti ( ) , QISKit IBM IBMQX5 16- . , Agave, 0, 1 2 ( 2), , IBMQX5, 0, 1 2. , H , Rx and Rz . CNOT IBMQX5, Agave — pyQuil CNOT Controlled- Z . ProjectQ.
D.
, . , , (. . ) . , , , , , . . QISKit , C++, ProjectQ , B . QVM pyQuil.
a. pyQuil
Rigetti, Quantum Virtual Machine (QVM), , . , API. API 30- , . 16- 10 2,61 . 23 10 56,33 , , QVM API. - - , QVM , QVM , ProjectQ QISKit.
QVM . , . , , . Noise and Quantum Computation pyQuil.
b. QISKit
QISKit , : , , , and . . () . , / . [33], [34-36] . ClassicalSimulator ProjectQ, (stabilizer circuits), .
, 10 10 23,55 . — 239,97 , 12 1000 ( 17 ). , n 2n×2n .
C . 25 . 20 . 6 7.
with. ProjectQ
ProjectQ C++, . , , 28 , (569,71 ) 20-. [18]. 6 7.

6. QISKit () ProjectQ C++ (), ( ) ( ). , ( ). **B**.

7. , ProjectQ C++ QISKit, . , √X , CNOT, . , . ProjectQ.
E.
pyQuil Grove, GitHub, pyQuil. Rigetti , Slack Rigetti Forest. Quil ( ). , pyQuil OpenFermion [37], Python , .
QISKit JavaScript Swift. Python - . Grove, QISKit . , ACQUA QISKit . . IBM , . 3 , QISKit, 80000 , 60 , IBM [31]. QISKit Slack , , . , QISKit .
, ProjectQ . , TikZ TEX . ProjectQ. ProjectQ , . ProjectQ , IBM. , ProjectQ , OpenFermion, .
QDK Windows , 2018 macOS Linux. QDK, . , Q# , , . QDK , , , , , . .
Iv.
, , , (-) (-) . — , . / .
, , :
- , , QISKit ( ProjectQ) pyQuil — .
- , , QISKit, pyQuil QDK — .
- , , Python — .
- , C/C#, QDK — .
- , , , ProjectQ — .
- , - , pyQuil — .
- , , Strawberry Fields .
, , . . , , .
Bibliography
- Bernhard Ömer, A procedural formalism for quantum computing , Master's thesis, Department of Theoretical Physics, Technical University of Vienna, 1998.
- S. Bettelli, L. Serafini, T. Calarco, Toward an architecture for quantum programming , Eur. Phys. J. D, Vol. 25, No. 2, pp. 181-200 (2003).
- Peter Selinger (2004), A brief survey of quantum programming languages , in: Kameyama Y., Stuckey PJ (eds) Functional and Logic Programming. FLOPS 2004. Lecture Notes in Computer Science, vol 2998. Springer, Berlin, Heidelberg.
- Benjamin P. Lanyon, James D. Whitfield, Geoff G. Gillet, Michael E. Goggin, Marcelo P. Almeida, Ivan Kassal, Jacob D. Biamonte, Masoud Mohseni, Ben J. Powell, Marco Barbieri, Alaґn Aspuru-Guzik, Andrew G. White, Towards quantum chemistry on a quantum computer , Nature Chemistry 2 , pages 106-111 (2010), doi:10.1038/nchem.483.
- Jonathan Olson, Yudong Cao, Jonathan Romero, Peter Johnson, Pierre-Luc Dallaire-Demers, Nicolas Sawaya, Prineha Narang, Ian Kivlichan, Michael Wasielewski, Alaґn Aspuru-Guzik, Quantum information and computation for chemistry , NSF Workshop Report, 2017.
- Jacob Biamonte, Peter Wittek, Nicola Pancotti, Patrick Rebentrost, Nathan Wiebe, Seth Lloyd, Quantum machine learning , Nature volume 549 , pages 195-202 (14 September 2017).
- Seth Lloyd, Masoud Mohseni, Patrick Rebentrost, Quantum principal component analysis , Nature Physics volume 10 , pages 631-633 (2014).
- Vadim N. Smelyanskiy, Davide Venturelli, Alejandro Perdomo-Ortiz, Sergey Knysh, and Mark I. Dykman, Quantum annealing via environment-mediated quantum diffusion , Phys. Rev. Lett. 118 , 066802, 2017.
- Patrick Rebentrost, Brajesh Gupt, Thomas R. Bromley, Quantum computational finance: Monte Carlo pricing of financial derivatives , arXiv preprint (arXiv:1805.00109v1), 2018.
- IM Georgescu, S. Ashhab, Franco Nori, Quantum simulation , Rev. Mod. Phys. 86, 154 (2014), DOI: 10.1103/RevModPhys.86.153.
- EF Dumitrescu, AJ McCaskey, G. Hagen, GR Jansen, TD Morris, T. Papenbrock, RC Pooser, DJ Dean, P. Lougovski, Cloud quantum computing of an atomic nucleus , Phys. Rev. Lett. 120 , 210501 (2018), DOI: 10.1103/PhysRevLett.120.210501.
- Lukasz Cincio, Yigit Subasi, Andrew T. Sornborger, and Patrick J. Coles, Learning the quantum algorithm for state overlap , arXiv preprint (arXiv:1803.04114v1), 2018
- Patrick J. Coles, Stephan Eidenbenz, Scott Pakin, et al., Quantum algorithm implementations for beginners , arXiv preprint (arXiv:1804.03719v1), 2018.
- Mark Fingerhuth, Open-Source Quantum Software Projects , accessed May 12, 2018.
- Quantiki: List of QC Simulators , accessed May 12, 2018
- R. Smith, MJ Curtis and WJ Zeng, A practical quantum instruction set architecture , 2016.
- QISKit, originally authored by Luciano Bello, Jim Challenger, Andrew Cross, Ismael Faro, Jay Gambetta, Juan Gomez, Ali Javadi-Abhari, Paco Martin, Diego Moreda, Jesus Perez, Erick Winston, and Chris Wood, https://github.com/QISKit/qiskit-sdk-py .
- Damian S. Steiger, Thomas Häner, and Matthias Troyer ProjectQ: An open source software framework for quantum computing , 2016.
- Thomas Häner, Damian S. Steiger, Krysta M. Svore, and Matthias Troyer A software methodology for compiling quantum programs , 2016.
- The Quantum Development Kit by Microsoft, homepage: https://www.microsoft.com/en — us/quantum/development-kit, github: https://github.com/Microsoft/Quantum .
- Michael A. Nielsen and Isaac L. Chuang, Quantum Computation and Quantum Information 10th Anniversary Edition, Cambridge University Press, 2011.
- Doug Finke, Education , Quantum Computing Report, https://quantumcomputingreport.com/resources/education/ , accessed May 26, 2018.
- All code in this paper was run and tested on a Dell XPS 13 Developer Edition laptop running 64 bit Ubuntu 16.04 LTS with 8 GB RAM and an Intel Core i7-8550U CPU at 1.80 GHz. Programs were run primarily from the command line but the Python developer environment Spyder was also used for Python programs and Visual Studio Code was used for C# (Q#) programs.
- Forest: An API for quantum computing in the cloud, https://www.rigetti.com/index.php/forest , accessed May 14, 2018.
- Andrew W. Cross, Lev S. Bishop, John A. Smolin, Jay M. Gambetta, Open quantum assembly language , 2017.
- Scott Aaronson, Daniel Gottesman, Improved Simulation of Stabilizer Circuits , Phys. Rev. A 70 , 052328, 2004.
- pyQuil Lisence, github.com/rigetticomputing/pyquil/blob/master/LICENSE#L204 , accessed June 7, 2018.
- Microsoft Quantum Development Kit License, marketplace.visualstudio.com/items/quantum.DevKit/license , accessed June 7, 2018.
- Hao Zhang, Chun-Xiao Liu, Sasa Gazibegovic, et al. Quantized Majorana conductance , Nature 556 , 74-79 (05 April 2018).
- 16-qubit backend: IBM QX team, “ibmqx5 backend specification V1.1.0,” (2018). Retrieved from https://ibm.biz/qiskit-ibmqx5 and https://quantumexperience.ng.bluemix.net/qx/devices on May 23, 2018.
- Talia Gershon, Celebrating the IBM Q Experience Community and Their Research , March 8, 2018.
- M. Reck, A. Zeilinger, HJ Bernstein, and P. Bertani, Experimental realization of any discrete unitary operator , Physical Review Letters, 73, p. 58, 1994.
- Ryan LaRose, Distributed memory techniques for classical simulation of quantum circuits , arXiv preprint (arXiv:1801.01037v1), 2018.
- Thomas Haner, Damian S. Steiger, 0.5 petabyte simulation of a 45-qubit quantum circuit , arXiv preprint (arXiv:1704.01127v2), September 18, 2017.
- Jianxin Chen, Fang Zhang, Cupjin Huang, Michael Newman, Yaoyun Shi, Classical simulation of intermediate-size quantum circuits , arXiv preprint (arXiv:1805.01450v2), 2018.
- Alwin Zulehner, Robert Wille, Advanced simulation of quantum computations , arXiv preprint ( arXiv:1707.00865v2 ), November 7, 2017.
- Jarrod R. McClean, Ian D. Kivlichan, Kevin J. Sung, et al., OpenFermion: The electronic structure package for quantum computers , arXiv:1710.07629, 2017.
- Nathan Killoran, Josh Izaac, Nicols Quesada, Ville Bergholm, Matthew Amy, Christian Weedbrook, Strawberry Fields: A Software Platform for Photonic Quantum Computing , arXiv preprint (arXiv:1804.03159v1), 2018.
- IonQ website, https://ionq.co/ , accessed June 15, 2018.
- D-Wave: The quantum computing company, https://www.dwavesys.com/home , accessed June 20, 2018.
- 4 2018 Rigetti 20- , . , 8- «- ». , 20- (, , ).
- IBMQ Network , 2017 — JP Morgan Chase , Daimler , Samsung , Honda , Oak Ridge National Lab , — , 2018 — Zapata Computing , Strangeworks , QxBranch , Quantum Benchmark , QC Ware , Q-CTRL , Cambridge Quantum Computing (CQC) , 1QBit . North Carolina State University , IBM Q Hub, University of Oxford University of Melbourne . https://www.research.ibm.com/ibmq/network/ .
- , - - . QISKit, ACQUA , pyQuil.
- pyQuil : , from pyquil.gates import H, MEASURE . pyquil.gates , , , .
- , () . , () , , .
- IBM, 31 2018 , « » Python Cython, .
A.
, . Players Quantum Computing Report [22]. , , . / — .
a. Strawberry Fields
Xanadu , , Strawberry Fields Python , [38]. Xanadu «qumodes» ( ), , , . Strawberry Fields Numpy TensorFlow, Blackbird. GitHub, , , , . , Xanadu https://www.xanadu.ai/ , .
b. IonQ
IonQ — -, College Park , . IonQ , . 171 Yb , IonQ T2 () 15- , T2 1 . , T1 ( ) 20 000 , 10−4 . , -- - , «» . , .
IonQ , IonQ . . , - [39].
c. D-Wave Systems
D-Wave [40], , . D-Wave, 1999 , , , ,
D-Wave , — 2048 , Matlab, C/C++ Python . /, D-Wave . D-Wave .
B.
ProjectQ C++. Dell XPS 13 Developer Edition 64- Ubuntu 16.04 LTS 8 Intel Core i7-8550U 1,80 .
# ------------------------------------------------------------------------------ # imports # ------------------------------------------------------------------------------ from projectq import MainEngine import projectq.ops as ops from projectq.backends import Simulator import sys import time # ------------------------------------------------------------------------------ # number of qubits and depth # ------------------------------------------------------------------------------ if len(sys.argv) > 1: n = int(sys.argv[1]) else: n = 16 if len(sys.argv) > 1: depth = int(sys.argv[2]) else: depth = 10 # ------------------------------------------------------------------------------ # engine and qubit register # ------------------------------------------------------------------------------ eng = MainEngine(backend=Simulator(gate_fusion=True), engine_list=[]) qbits = eng.allocate_qureg(n) # ------------------------------------------------------------------------------ # circuit # ------------------------------------------------------------------------------ # timing -- get the start time start = time.time() # random circuit for level in range(depth): for q in qbits: ops.H | q ops.SqrtX | q if q != qbits[0]: ops.CNOT | (q, qbits[0]) # measure for q in qbits: ops.Measure | q # flush the engine eng.flush() # timing -- get the end time runtime = time.time() - start # print out the runtime print(n, depth, runtime) , , 7. , QISKit — .
C. :
. , QDK , , . — , — — . . , , , — , .
, , . , QISKit.

8. , circuit_drawer , QISKit v0.5.4.
pyQuil
#!/usr/bin/env python3 # -*- coding: utf-8 -*- # ============================================================================== # teleport.py # # Teleportation circuit in pyQuil. # ============================================================================== # ------------------------------------------------------------------------------ # imports # ------------------------------------------------------------------------------ from pyquil.quil import Program from pyquil import api import pyquil.gates as gate # ------------------------------------------------------------------------------ # program and simulator # ------------------------------------------------------------------------------ qprog = Program() qvm = api.QVMConnection() # ------------------------------------------------------------------------------ # teleportation circuit # ------------------------------------------------------------------------------ # teleport |1> to qubit three qprog += gates.X(0) # main circuit qprog += [gates.H(1), gates.CNOT(1, 2), gates.CNOT(0, 1), gates.H(0), gates.MEASURE(0, 0), gates.MEASURE(1, 1)] # conditional operations qprog.if_then(0, gates.Z(2)) qprog.if_then(1, gates.X(2)) # measure qubit three qprog.measure(2, 2) # ------------------------------------------------------------------------------ # run the circuit and print the results # ------------------------------------------------------------------------------ print(qvm.run(qprog)) # optionally print the quil code print(qprog) QISKit
#!/usr/bin/env python3 # -*- coding: utf-8 -*- # ============================================================================== # teleport.py # # Teleportation circuit in QISKit. # ============================================================================== # ------------------------------------------------------------------------------ # imports # ------------------------------------------------------------------------------ from qiskit import QuantumRegister, ClassicalRegister, QuantumCircuit, execute # ------------------------------------------------------------------------------ # registers and quantum circuit # ------------------------------------------------------------------------------ qreg = QuantumRegister(3) creg = ClassicalRegister(3) qcircuit = QuantumCircuit(qreg, creg) # ------------------------------------------------------------------------------ # do the circuit # ------------------------------------------------------------------------------ # teleport |1> to qubit three qcircuit.x(qreg[0]) # main circuit qcircuit.h(qreg[0]) qcircuit.cx(qreg[1], qreg[2]) qcircuit.cx(qreg[0], qreg[1]) qcircuit.h(qreg[0]) qcircuit.measure(qreg[0], creg[0]) qcircuit.measure(qreg[1], creg[1]) # conditional operations qcircuit.z(qreg[2]).c_if(creg[0][0], 1) qcircuit.x(qreg[2]).c_if(creg[1][0], 1) # measure qubit three qcircuit.measure(qreg[2], creg[2]) # ------------------------------------------------------------------------------ # run the circuit and print the results # ------------------------------------------------------------------------------ result = execute(qcircuit, 'local_qasm_simulator').result() counts = result.get_counts() print(counts) # optionally print the qasm code print(qcircuit.qasm()) # optionally draw the circuit from qiskit.tools.visualization import circuit_drawer circuit_drawer(qcircuit) ProjectQ
#!/usr/bin/env python3 # -*- coding: utf-8 -*- # ============================================================================== # teleport.py # # Teleportation circuit in ProjectQ. # ============================================================================== # ------------------------------------------------------------------------------ # imports # ------------------------------------------------------------------------------ from projectq import MainEngine from projectq.meta import Control import projectq.ops as ops # ------------------------------------------------------------------------------ # engine and qubit register # ------------------------------------------------------------------------------ # engine eng = MainEngine() # allocate qubit register qbits = eng.allocate_qureg(3) # ------------------------------------------------------------------------------ # teleportation circuit # ------------------------------------------------------------------------------ # teleport |1> to qubit three ops.X | qbits[0] # main circuit ops.H | qbits[1] ops.CNOT | (qbits[1], qbits[2]) ops.CNOT | (qbits[0], qbits[1]) ops.H | qbits[0] ops.Measure | (qbits[0], qbits[1]) # conditional operations with Control(eng, qbits[1]): ops.X | qbits[2] with Control(eng, qbits[1]): ops.Z | qbits[2] # measure qubit three ops.Measure | qbits[2] # ------------------------------------------------------------------------------ # run the circuit and print the results # ------------------------------------------------------------------------------ eng.flush() print("Measured:", int(qbits[2])) Quantum Developer Kit
// ============================================================================= // teleport.qs // // Teleportation circuit in QDK. // ============================================================================= operation Teleport(msg : Qubit, there : Qubit) : () { body { using (register = Qubit[1]) { // get auxiliary qubit to prepare for teleportation let here = register[0]; // main circuit H(here); CNOT(here, there); CNOT(msg, here); H(msg); // conditional operations if (M(msg) == One) { Z(there); } if (M(here) == One) { X(there); } // reset the "here" qubit Reset(here); } } } operation TeleportClassicalMessage(message : Bool) : Bool { body { mutable measurement = false; using (register = Qubit[2]) { // two qubits let msg = register[0]; let there = register[1]; // encode message to send if (message) { X(msg); } // do the teleportation Teleport(msg, there); // check what message was sent if (M(there) == One) { set measurement = true; } // reset all qubits ResetAll(register); } return measurement; } } Source: https://habr.com/ru/post/418505/
All Articles