Conference DEFCON 23. How I lost my second eye, or further research in the field of data destruction. Part 2
Start here:
Conference DEFCON 23. How I lost my second eye, or further research in the field of data destruction. Part 1
Stearic acid, it turns out, is a really important component of this explosive, and if you use the wrong proportions, nothing happens. In this test video, you can see what happens if it is not enough in relation to aluminum - just an explosion and everything flew apart. This is a complete failure. When the content of stearic acid is correct, it turns out that the explosion on the video is directional and looks like a rocket launch.
')
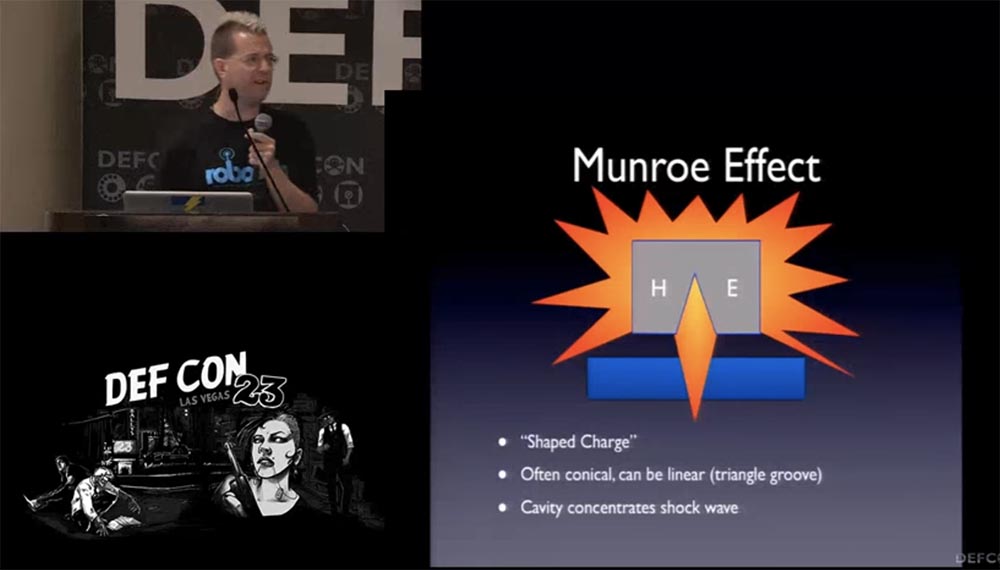
We needed a directed explosion with a cumulative effect, which is called the “Monroe Effect”. When we say “shaped charge”, it means that you have to give it a special cone shape. It may be flat, but must have a special notch - a funnel that will concentrate the shock wave. You can fill the cavity with copper or tantalum, which, when exploded, forms a liquid jet stream that can cut everything that is cut. This principle is used in anti-tank armor-piercing shells, and for this there are several design solutions.
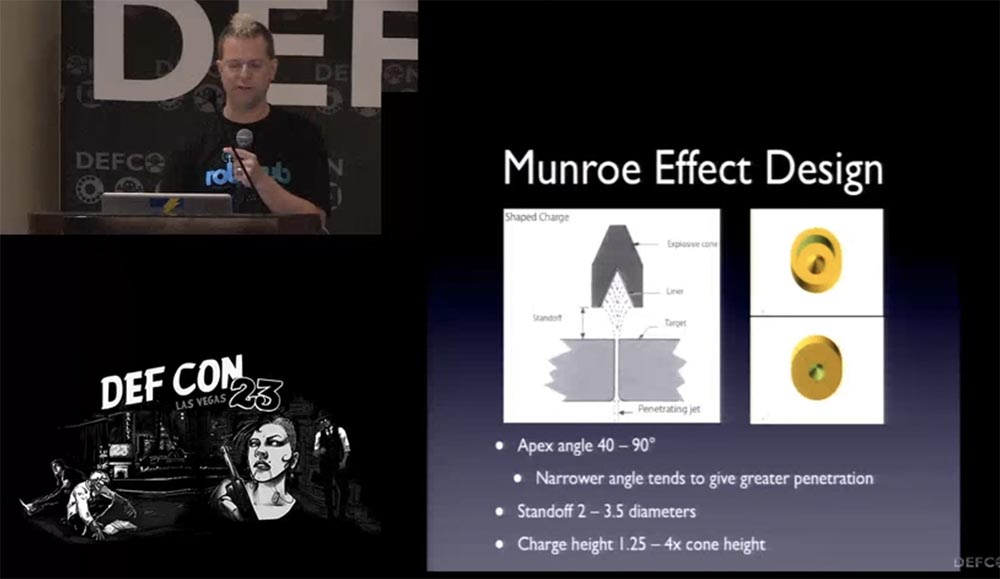
I drew with CAD using a special form for FELIX - it was a “glass” with a cone-shaped notch in the center, the angle of inclination of the surface of the cone should be 40 to 90 °, and the steeper the cone, the greater the depth of penetration. Your projectile should be located from the target surface at a distance of 2-2.5 of its diameter, and the height of the explosive inside the glass should be 1.25-4 times higher than the cone-shaped notch.
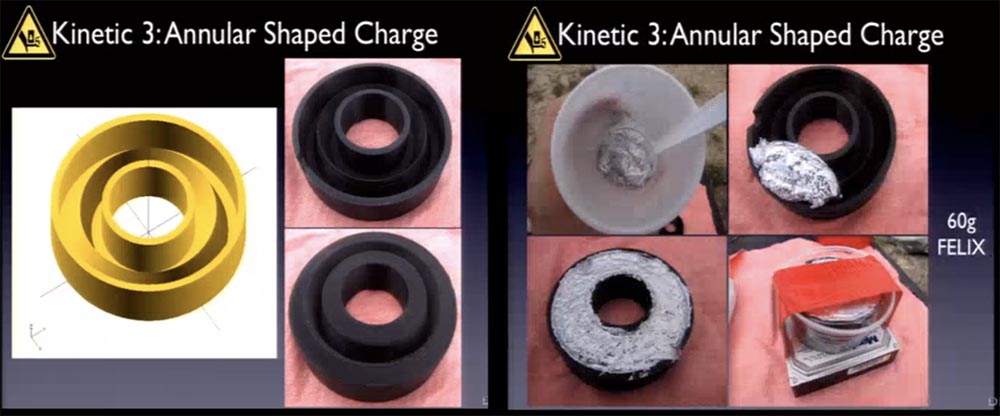
I thought that it was possible to arrange a linear shaped charge in the form of a ring, which would be mounted on the top of the HDD, then if there were an explosion around the disk disk plates, there would be a lot of burned holes. I designed the “glass” ring design for the Felix charge and printed it on a 3-D printer, this is how the form looks from above and below. I filled it with 60 grams of "Felix" and fixed on top of the HDD.
The video shows how the explosion occurred. At this stage of the experiment, I did not care about localizing the explosion and keeping it in some kind of protective cavity, I was going to work on it later.
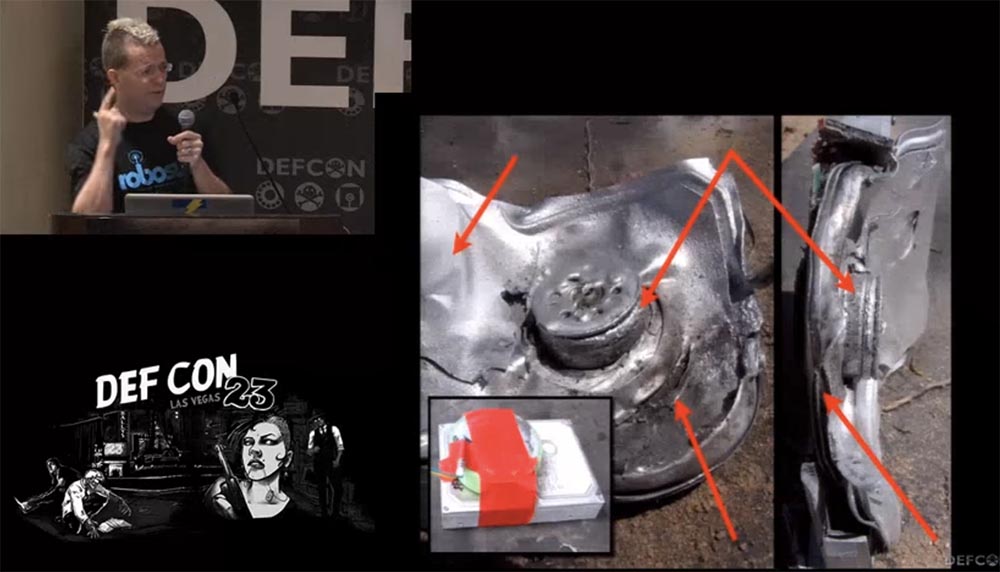
The consequences of the directional explosion did not please me too much - the disk plates were just twisted, so, probably, the composition of the explosives was chosen incorrectly. Only in one place the disks were cut through, it was the place where the glass with explosives was located. So we did the right thing, but we misplaced it, because the blast of the charge did not spread around the ring in the way we did.
I developed another model of “glass” with radial jumpers, and at the same time I thought about how to keep the charge so that it does not fly around. Therefore, a layer of aluminum was laid inside the glass, and a hole was made in the wall to feed the detonating cord. Here is how it looked on the drawings and in kind. The charge weighed 100 g of Felix; we also used 80 g of a detonating cord 45 cm long.
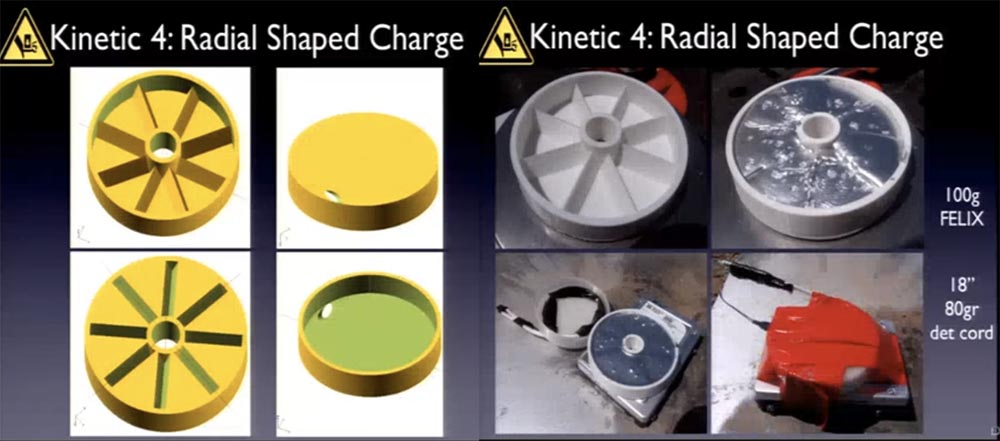
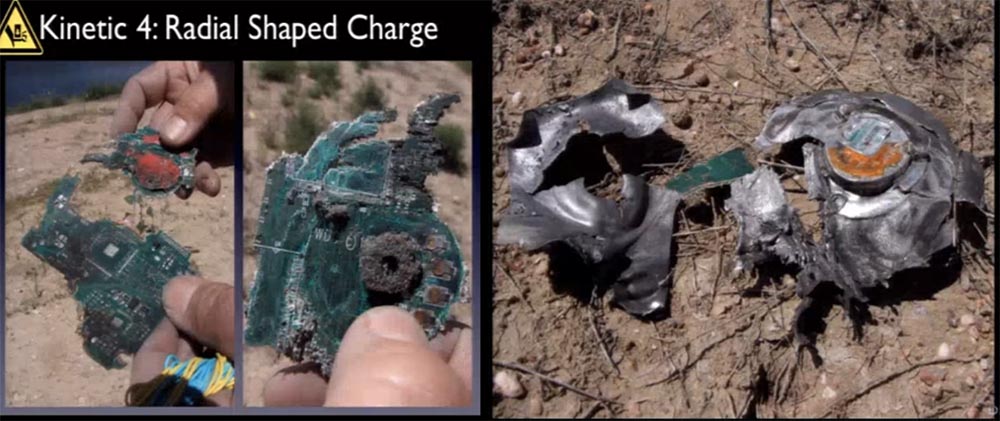
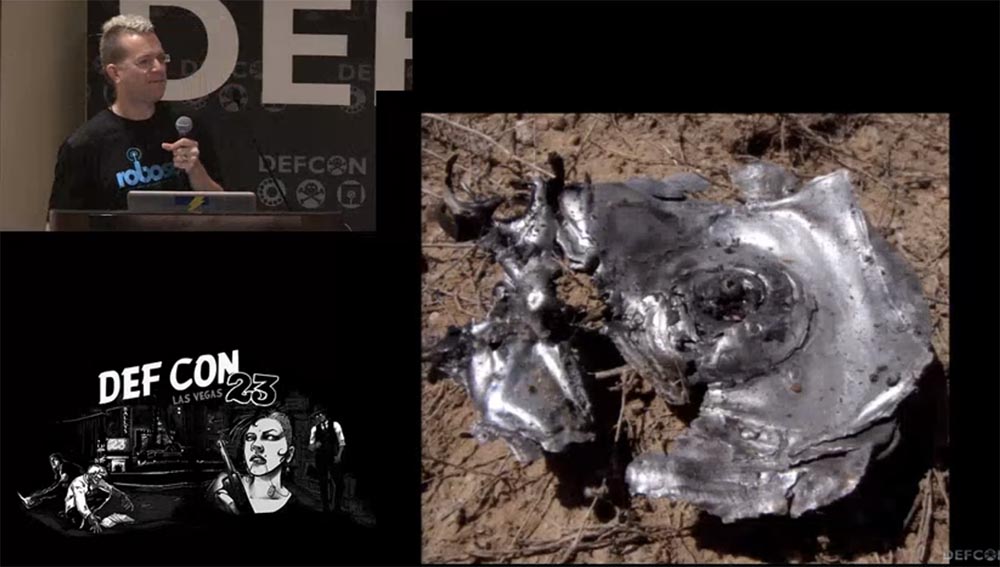
In this video, you see an explosion - but where did the drive go? In slow motion, it is noticeable how the video camera located next to the object shook the shock wave. The following fragment shows a shot from my GoPro camera, it was further away, and here you can see in which direction the part of the HDD was thrown off by the explosion. They were not too big - you can see on the slides what the remnants of the HDD were after such an explosion. We picked up the pieces of the PCB and the corrupted plates, so the test result fully satisfied us.
Then we decided to try an explosion that would do something like compression welding, welding the disc plates together. To do this, we decided to arrange a ring charge on both sides of the HDD - top and bottom, so that the explosions act towards each other and squeeze the contents of the drive into one.
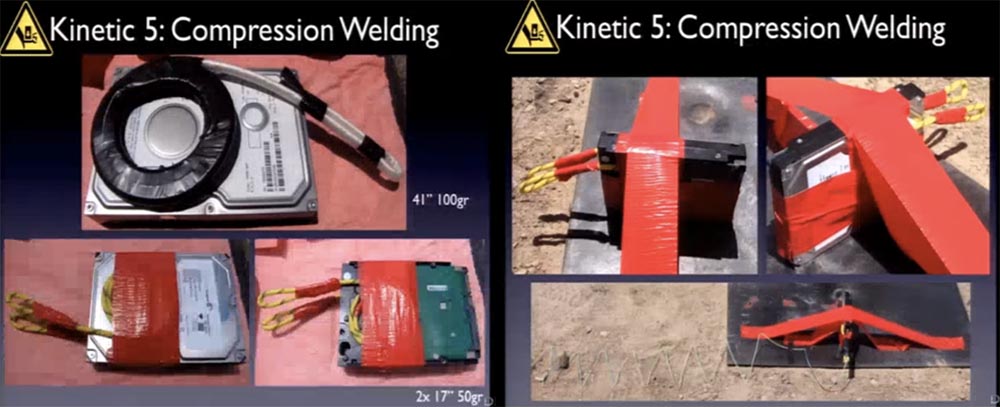
This slide shows a one-sided charge of 100 g of explosives and a cord 1 m long and a two-sided charge of 2x50 g with two cords 50 cm long. You can see how we positioned our disk before the explosion of a two-sided charge. I will demonstrate the one-sided charge explosion a little later.
The video shows that the disk flew just a few feet from the explosion site. You can see that the disk plates did not come off the drive core, as happened in the case of the Felix, but the explosion perfectly pressed them together.
A double explosion did not cause such damage as the previous version of explosives, but we saved 40% of the explosives and got excellent plate deformation. On the next slides you can see what the recording head has become, how the plates are curved and what the HDD case covers look like after the explosion.
A one-sided explosion also deforms the plates quite well, arching them in the shape of a plate, but they did not weld to each other. Next, the Seagate HDD is shown on the slide, by the way, in almost all the tests we used the HDD of this particular brand.
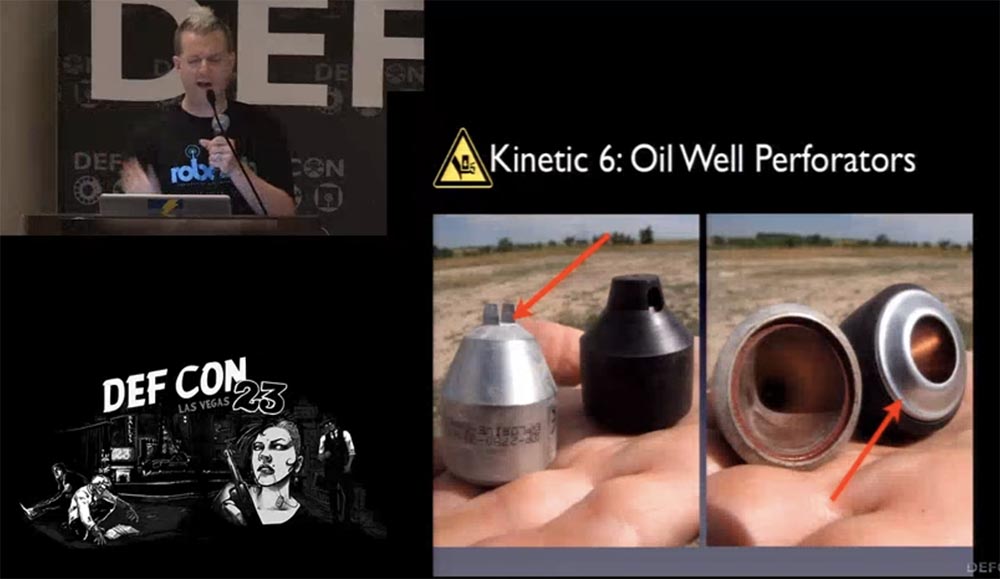
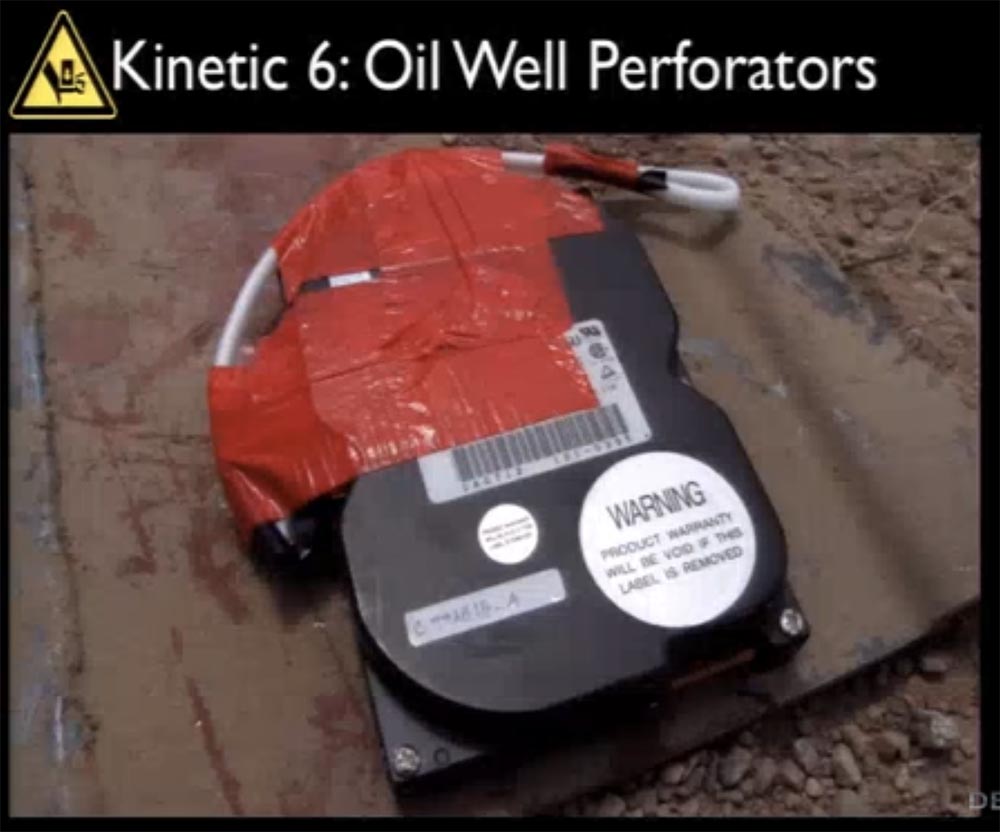
In the squadron of sappers Bomb Squad there were hundreds of such drills for oil wells. When the well is drilled, its walls are reinforced with concrete. Then such a thing with a charge is lowered into the pipe, it explodes and makes a small hole in pipes and concrete through which oil from the well rushes upward. When you are friends with the sappers and they want to share something with you, you have to agree!
In these perforators a very fast powerful explosive type HMX is placed, on top of the head there is placed a little foil to form an explosive shock wave. This is a classic cumulative charge with a notch covered with a layer of copper.
We used two of these perforators, located side by side, and in this video you can see what an explosion looks like in slow motion - two torches of flame, directed upwards. So, we installed such a punch on the edge of the HDD and made an explosion.
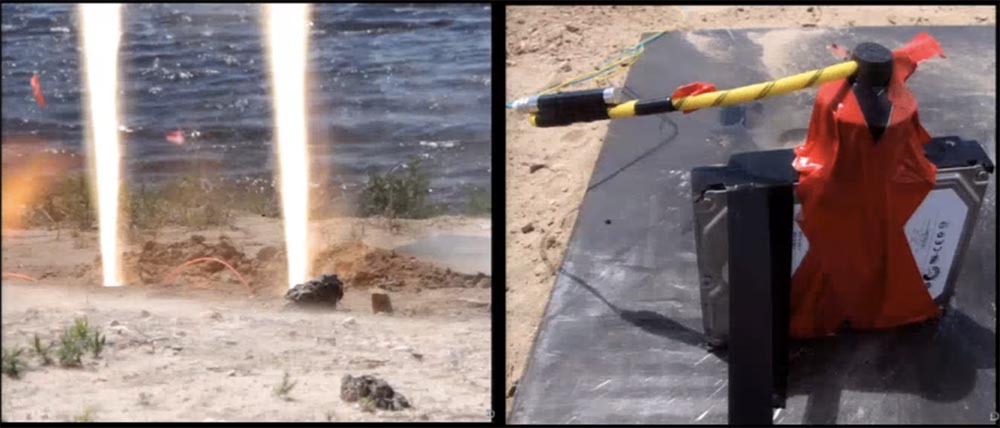
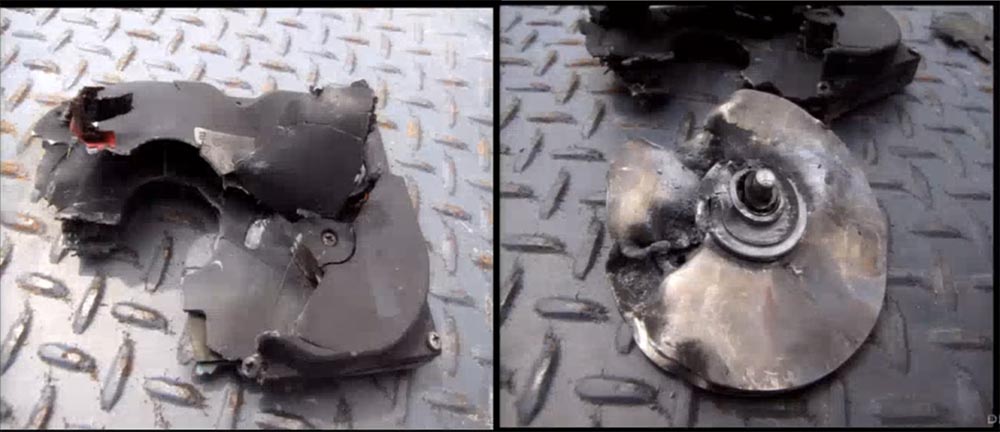
In slow motion, you see a piece of the drive, flying up and to the left. The following slides show what the HDD case and disk plates look like.
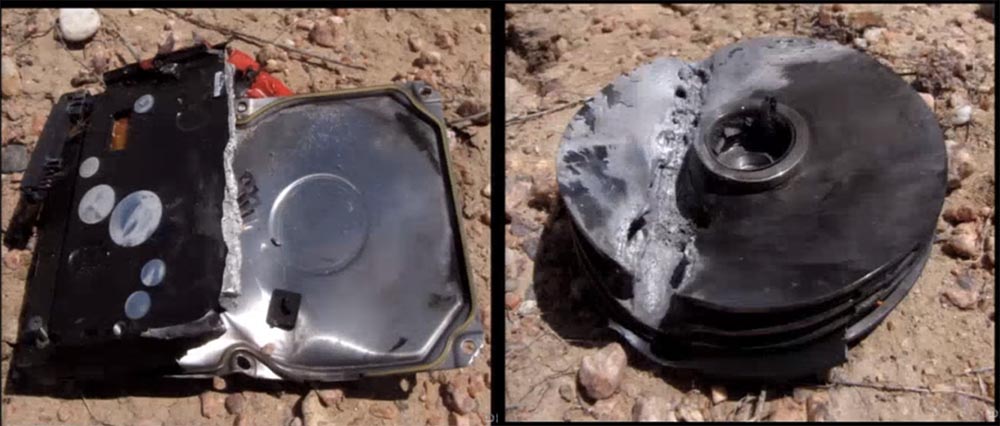
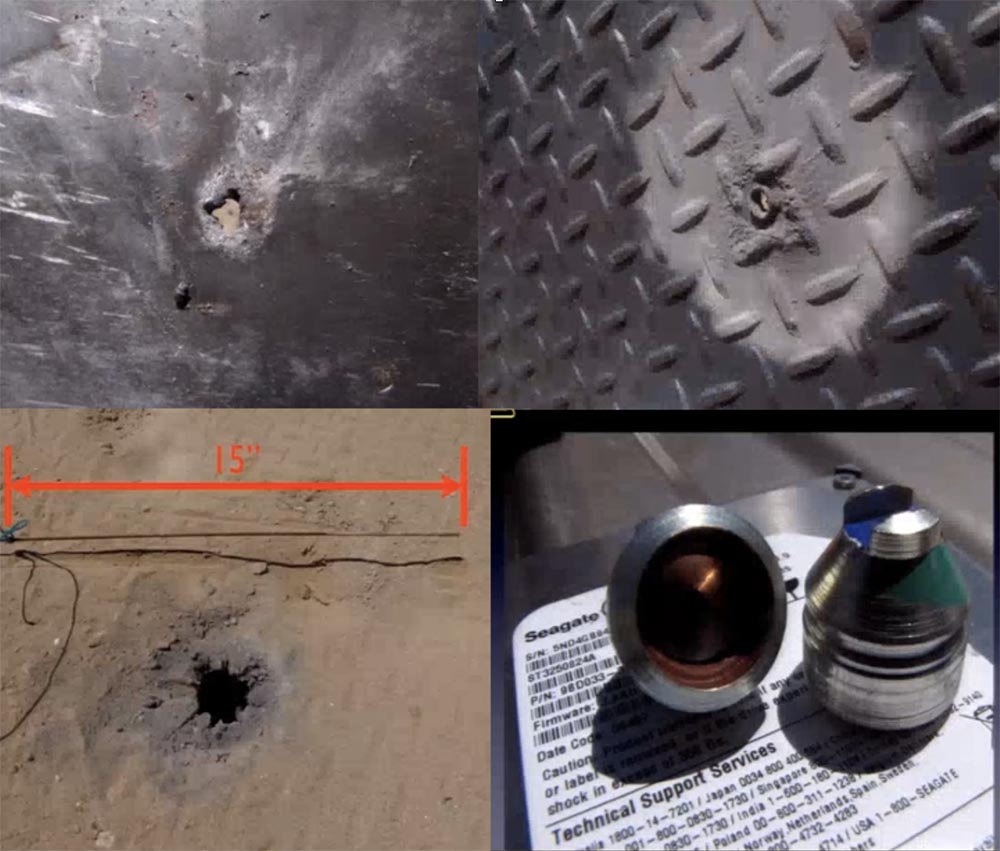
And here we have collected all that remains of the HDD after the explosion. Note the hole marked by the arrow. It was formed on a metal sheet, which we used as a substrate for the tested HDD. This is the place where the jet explosive cumulative jet fell.

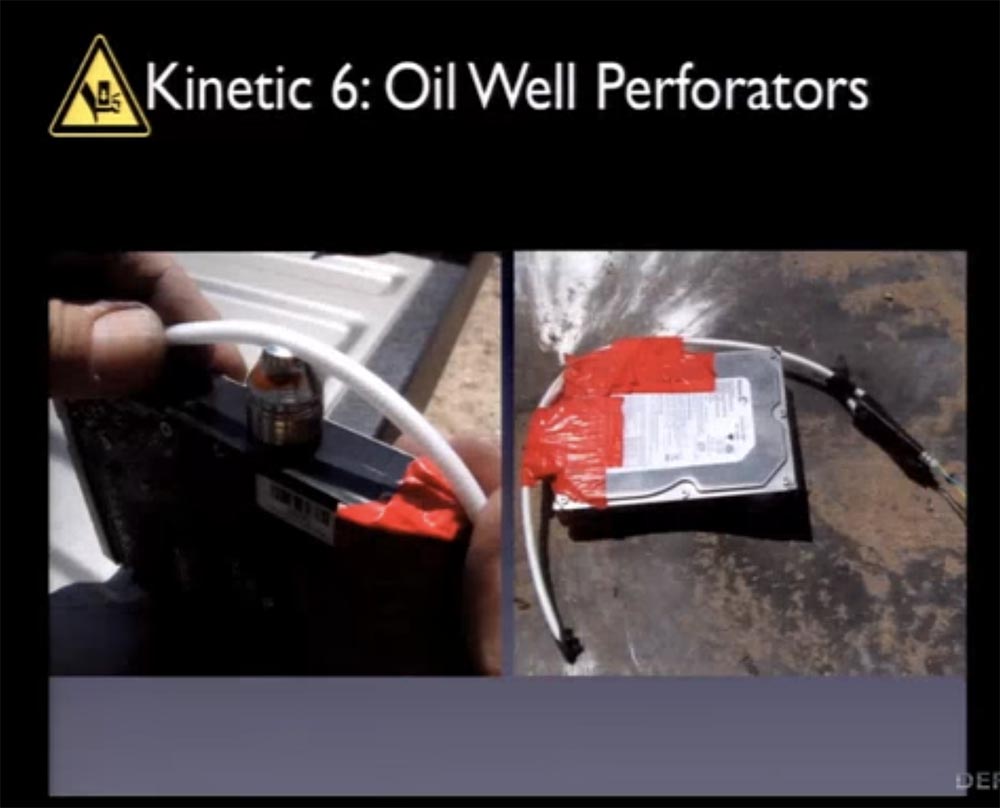
The following slides show what this hole looks like from the outside of the sheet under our drive, what the exit from the back of the sheet looks like, and what the hole made in the soil by a blast looks like. So the next time we decided to use a smaller version of the punch - this is how it looks on the lid of the HDD.
We again used a Seagate drive with a half terabyte capacity. If you remember, it was then that a tsunami happened in Asia and the quality control of the discs produced at that time was probably not carried out, since all the plants temporarily stopped working. So if you look at the statistics, you will see that almost every Seagate HDD produced at that time was defective.
This time we placed on the adjacent lateral sides of the disk 2 punch at an angle of 90 °.
In the video, which was filmed with a GoPro camera, you can see how the drive pieces after the explosion fly high up and away. We did not manage to find all the pieces of the drive to make full conclusions. We found only the burnt part of the case and the printed circuit board, but did not find the disk plates. Therefore, we decided to make an explosion again.
We used another Seagate CD, as you can see, I didn’t even remove the warranty label, just to be safeguarded (just to be safe). We placed a steel plate on top of the HDD to prevent fragments from flying out that could not be found later. The video shows how it flies up during the explosion.
This is what happened to the HDD case after the explosion and what the plates looked like. We were able to deform them, but the explosion did not affect the disk drive itself.
I thought that we still can adjust the location of the explosives in such a way as to achieve the desired effect and destroy the disk in other places.
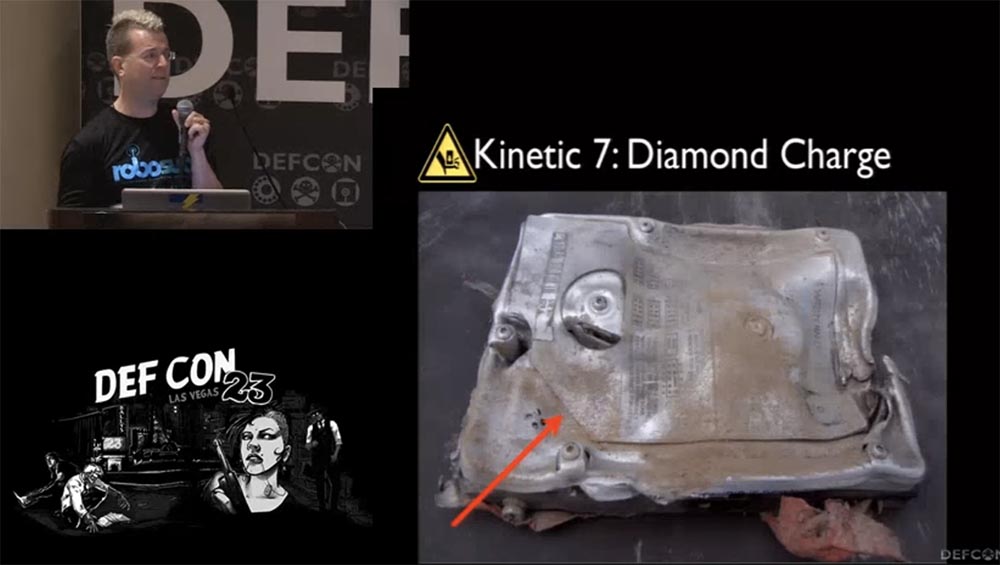
Therefore, then I used the so-called "Diamond charge", which is used by the guys from EOD - the division for the destruction of ammunition, for their division into parts. This is a flat layer of explosives, expanding towards the middle, therefore, when undermining from two sides, two blast waves, increasing, go towards a friend. As a result, in the place where they meet, they turn 90 ° down and cut what is located below, into 2 parts.
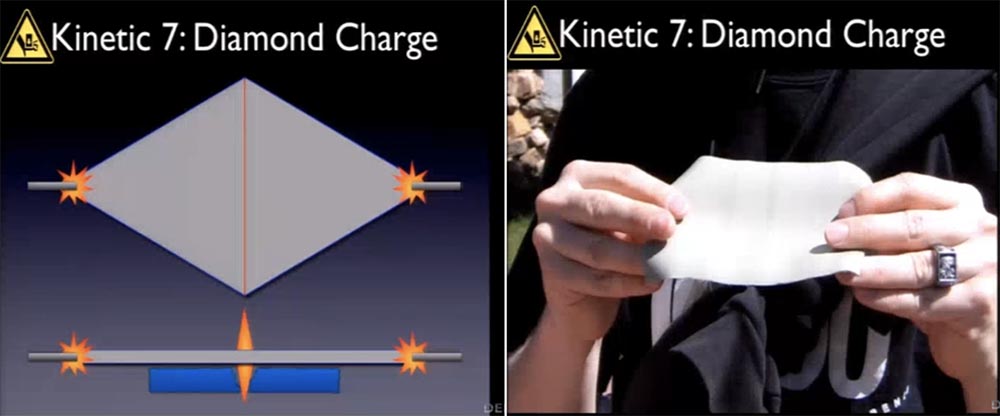
For this experiment, I wanted to use a patented roll-on explosive that rolls flat on the surface. But it needs to be transported only in the original packaging, and no matter how much such explosives you really need, you can still order only a whole roll. We could get it, but we couldn't bring it. Therefore, we had to abandon the use of industrially manufactured rolled explosives and again turn to "Felix".
I printed a container on a 3-D printer, filled it with 60 g of “Felix” and attached it to the HDD. We covered the drive with a large steel sheet 8 mm thick. Near you see a steel sheet with a thickness of 12 mm, under which there are 3 extra small punch, which we wanted to get rid of.
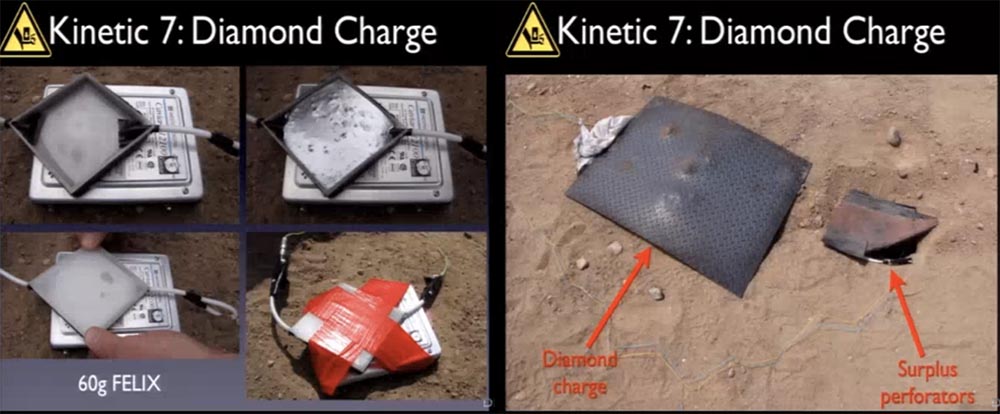
The video shows how, after the explosions, at first a large steel sheet of smaller thickness falls into place, and a small sheet of greater thickness, covering the perforators, later falls directly into the lake. The damage to the disc was so minor that we abandoned the idea of using "diamond" explosives. However, it was still interesting.
We had enough fun making all those explosions, but now we had to decide how to place our explosive device inside the equipment.
So, the following kinetic method was Blast Supression, or “Tamed explosion”. We needed to meet several conditions:
I decided to use the first option with a ring charge - 100 g of explosive and 10 cm of the ignition cord. I learned this method from a blasting instructor, they use it when they need to knock out the cylinder of a door lock. They set the "glass" with a charge around the cylinder and knock it out. Shaving foam quenches noise and reduces fragmentation. I placed all this inside a cardboard box.
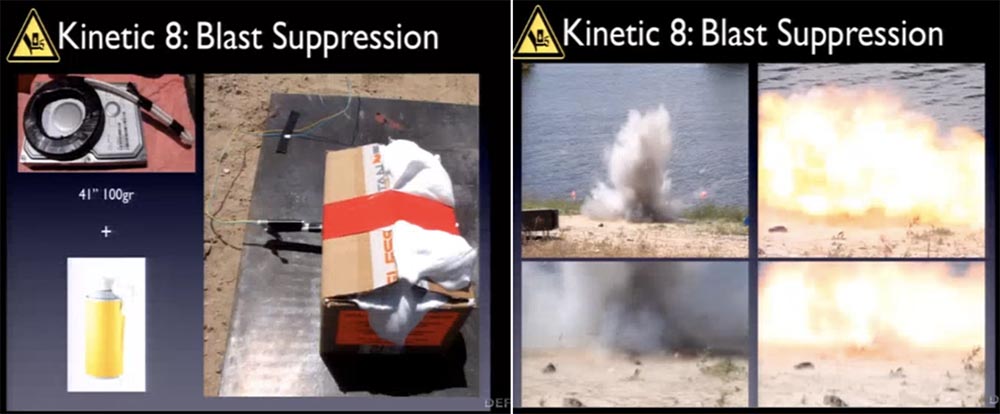
Let's look at the video that we got. For comparison, I give shots using shaving foam and without it - as you can see, it significantly reduced the formation and spread of flame during the explosion.
Then I decided to use the more powerful explosive “Felix” in the amount of 75 g. The slide shows steel corners that serve as racks for HDD disks in the data center, and filling the entire space between them with shaving foam.
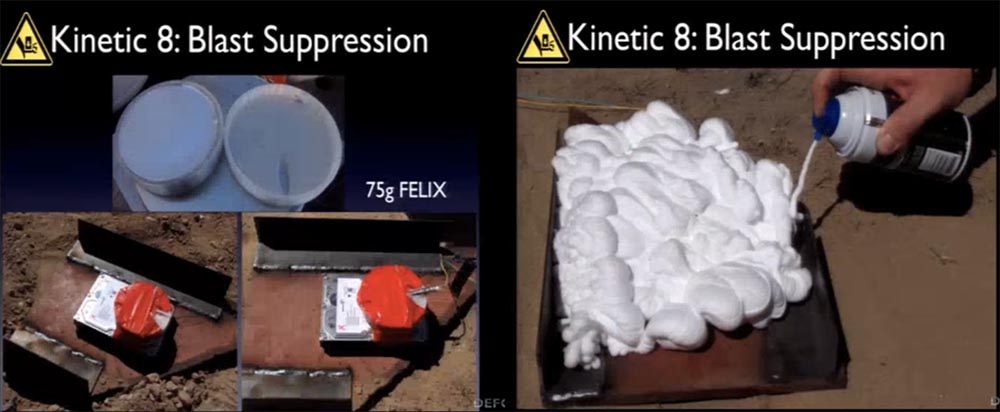
We covered this entire structure with a steel plate on which we laid a bag of sand. We tried to simulate the real situation and see what happens.
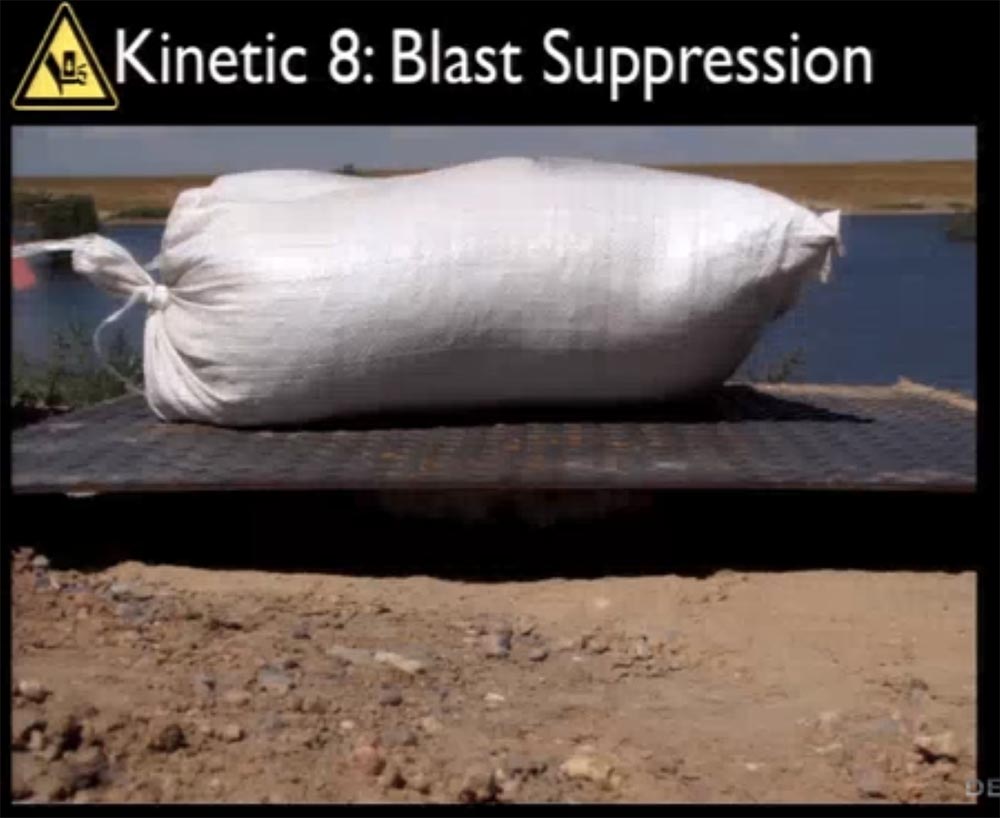
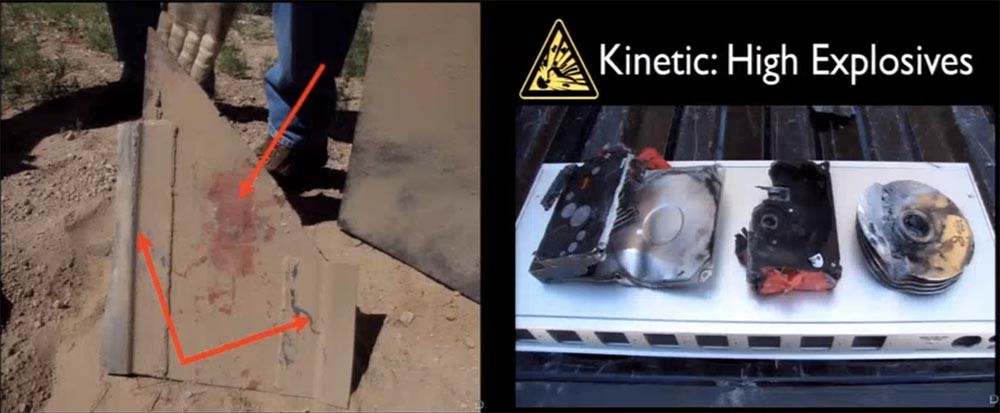
I think it was very impressive. The video shows how the bag flies up, breaks, and sand pours out of it. The slides show the imprint that the HDD left on the plate on which it was installed. Both plates and corners are practically intact, no through holes. And you see what the body of the disk and the plate turned into after such an explosion. I believe that this method can be used!
The last method of exposure is electricity. You know that you don’t really think up with him, so the goal was to use the existing energy resources of data centers to destroy disks, in particular, SSD. Unrealized ideas — perhaps I will return to them later — included massive demagnetization of HDDs, electromagnetic or microwave effects on drives, or the use of radio frequency attacks.
What I wanted to do was create an exploding wire bridge based on a battery of capacitors and old-fashioned vacuum tubes. Unfortunately, no one was able to provide me with an unusable SSD, because this is new equipment and it has not failed yet. I love you all, but I'm not ready to spend $ 1000 on new SSDs, so I used the stuffing from a USB flash drive, it is structurally very similar to what is located inside the SSD. Therefore, we can conclude what will happen inside the SSD when exposed to a discharge with a large amperage.
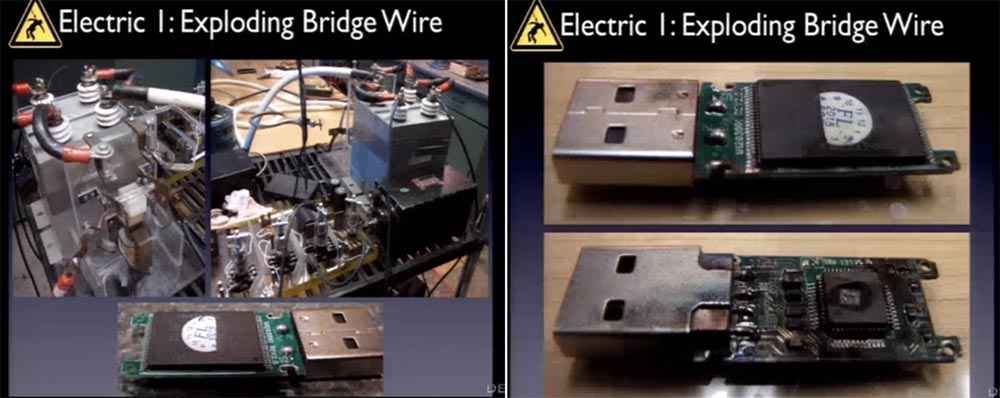
In the video, you can see that practically nothing happened to the flash drive chip - it was simply tilted away intact. The controller itself looked fine, but on the reverse side everything was melted. However, this method as a whole was not applicable for the complete destruction of SSD.
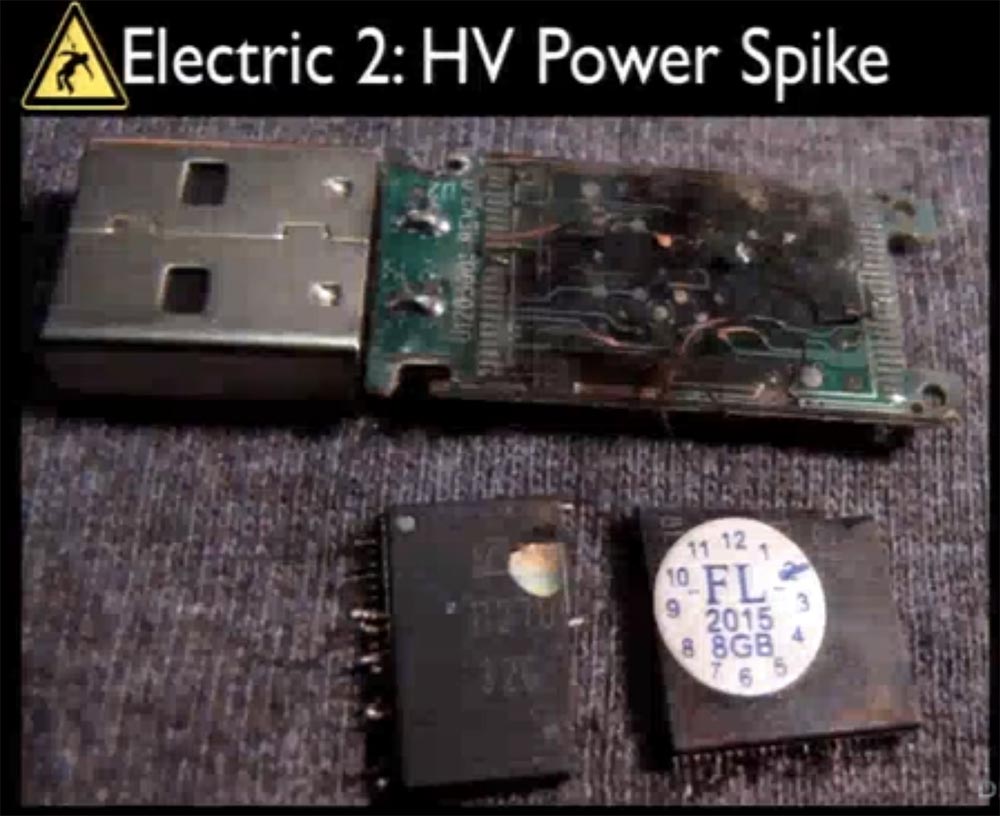
Then I decided to see what happens with the flash drive filling, if we connect the power supply to the “ground” and skip a sharp surge of voltage through it, creating something like a spark gap.
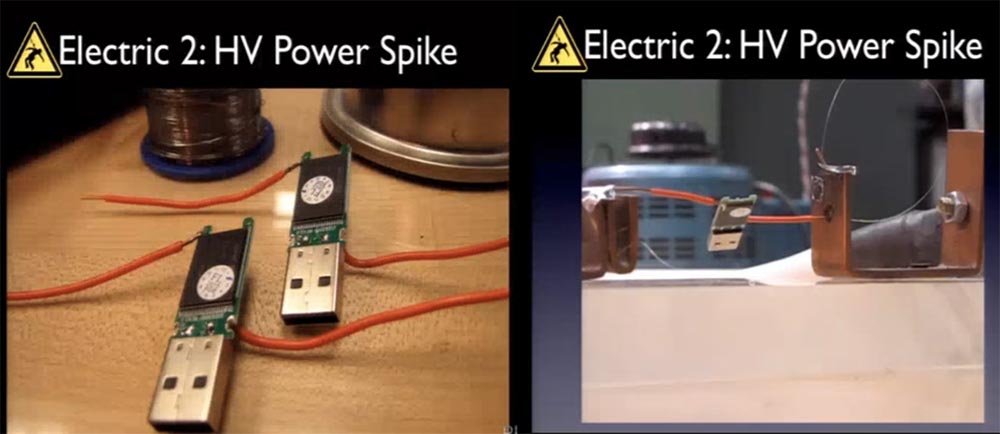
In this case, we were able to inflict more significant damage - the chip was torn off from the printed circuit board and broke into 2 parts. I was interested in how the remnants of the “flash drive” were to be restored, if using an electron microscope or something like that, but I could not check it. But potentially this method can be used, so it quickly destroys things and I do not think that information from them will be easily recovered.
The following way of destruction, I called the "inductive deformation." In the next slides, you see the inductive deformation of the soda can, around which the coil wires are wrapped. The bank was literally ripped in half.
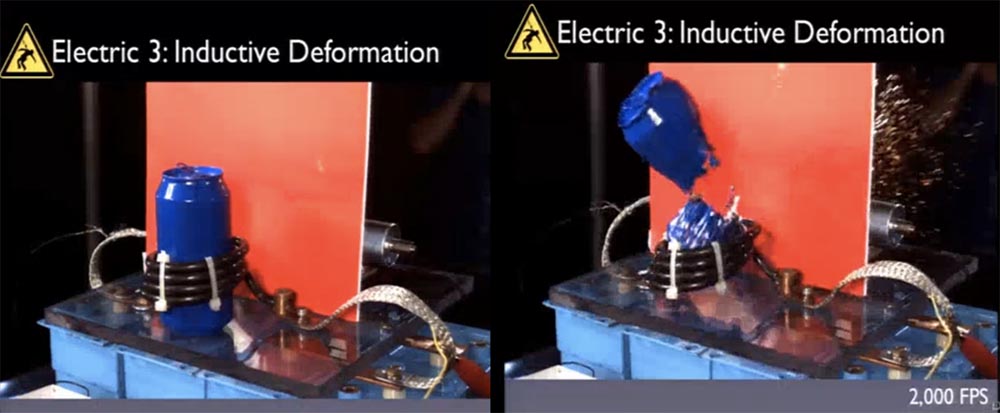
It is clear that there is a big difference between a tin can and a solid-state drive. The following video shows a more impressive explosion of a can of water; he even scattered the coil rings. In slow-motion, you can see how the bank is first pinched in the middle under the influence of an induction field, this compression occurs very quickly, in 10 ms, and with an increase in the internal pressure it breaks.
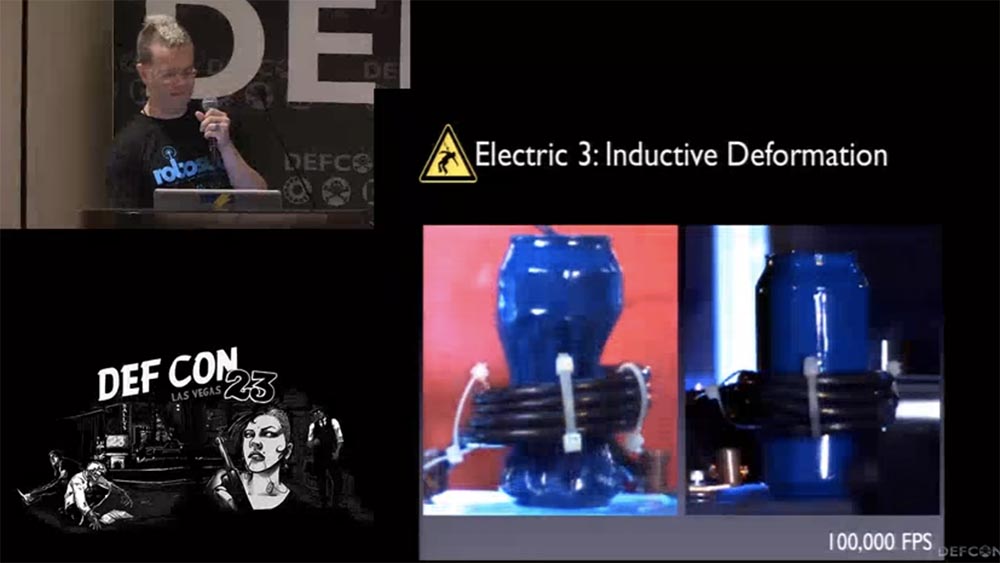
However, it is not known what kind of power electricity would have to act on the hard drive in order to achieve a similar result. Therefore, this method does not suit us. Maybe later I will return to it and get into a really crazy science.
So let's summarize the tests.
The most appropriate methods for destroying hard drives are:
The number of eyes lost during the experiments was 0 pieces!
There is one more thing that I would like to mention is mobile solutions. We are talking about data centers, but when Ross’s owner, Ross William Ulbricht, also known as Dread Pirate Roberts, was arrested, they took him in the hall of the public library. Along with him was an “unlocked” laptop, and from there they were able to pump out everything that made it possible to imprison its owner for committing federal crimes.
Therefore, I note that in our time it is easy to steal data from an unprotected laptop or computer by simply connecting to it via Bluetooth.
Feel free to contact me about important ideas for you. Perhaps at another time we will hold another DefCon conference to continue the discussion on this topic. Thank you for attention!
Thank you for staying with us. Do you like our articles? Want to see more interesting materials? Support us by placing an order or recommending to friends, 30% discount for Habr users on a unique analogue of the entry-level servers that we invented for you: The whole truth about VPS (KVM) E5-2650 v4 (6 Cores) 10GB DDR4 240GB SSD 1Gbps from $ 20 or how to share the server? (Options are available with RAID1 and RAID10, up to 24 cores and up to 40GB DDR4).
Dell R730xd 2 times cheaper? Only we have 2 x Intel Dodeca-Core Xeon E5-2650v4 128GB DDR4 6x480GB SSD 1Gbps 100 TV from $ 249 in the Netherlands and the USA! Read about How to build an infrastructure building. class c using servers Dell R730xd E5-2650 v4 worth 9000 euros for a penny?
Conference DEFCON 23. How I lost my second eye, or further research in the field of data destruction. Part 1
Stearic acid, it turns out, is a really important component of this explosive, and if you use the wrong proportions, nothing happens. In this test video, you can see what happens if it is not enough in relation to aluminum - just an explosion and everything flew apart. This is a complete failure. When the content of stearic acid is correct, it turns out that the explosion on the video is directional and looks like a rocket launch.
')
We needed a directed explosion with a cumulative effect, which is called the “Monroe Effect”. When we say “shaped charge”, it means that you have to give it a special cone shape. It may be flat, but must have a special notch - a funnel that will concentrate the shock wave. You can fill the cavity with copper or tantalum, which, when exploded, forms a liquid jet stream that can cut everything that is cut. This principle is used in anti-tank armor-piercing shells, and for this there are several design solutions.
I drew with CAD using a special form for FELIX - it was a “glass” with a cone-shaped notch in the center, the angle of inclination of the surface of the cone should be 40 to 90 °, and the steeper the cone, the greater the depth of penetration. Your projectile should be located from the target surface at a distance of 2-2.5 of its diameter, and the height of the explosive inside the glass should be 1.25-4 times higher than the cone-shaped notch.
I thought that it was possible to arrange a linear shaped charge in the form of a ring, which would be mounted on the top of the HDD, then if there were an explosion around the disk disk plates, there would be a lot of burned holes. I designed the “glass” ring design for the Felix charge and printed it on a 3-D printer, this is how the form looks from above and below. I filled it with 60 grams of "Felix" and fixed on top of the HDD.
The video shows how the explosion occurred. At this stage of the experiment, I did not care about localizing the explosion and keeping it in some kind of protective cavity, I was going to work on it later.
The consequences of the directional explosion did not please me too much - the disk plates were just twisted, so, probably, the composition of the explosives was chosen incorrectly. Only in one place the disks were cut through, it was the place where the glass with explosives was located. So we did the right thing, but we misplaced it, because the blast of the charge did not spread around the ring in the way we did.
I developed another model of “glass” with radial jumpers, and at the same time I thought about how to keep the charge so that it does not fly around. Therefore, a layer of aluminum was laid inside the glass, and a hole was made in the wall to feed the detonating cord. Here is how it looked on the drawings and in kind. The charge weighed 100 g of Felix; we also used 80 g of a detonating cord 45 cm long.
In this video, you see an explosion - but where did the drive go? In slow motion, it is noticeable how the video camera located next to the object shook the shock wave. The following fragment shows a shot from my GoPro camera, it was further away, and here you can see in which direction the part of the HDD was thrown off by the explosion. They were not too big - you can see on the slides what the remnants of the HDD were after such an explosion. We picked up the pieces of the PCB and the corrupted plates, so the test result fully satisfied us.
Then we decided to try an explosion that would do something like compression welding, welding the disc plates together. To do this, we decided to arrange a ring charge on both sides of the HDD - top and bottom, so that the explosions act towards each other and squeeze the contents of the drive into one.
This slide shows a one-sided charge of 100 g of explosives and a cord 1 m long and a two-sided charge of 2x50 g with two cords 50 cm long. You can see how we positioned our disk before the explosion of a two-sided charge. I will demonstrate the one-sided charge explosion a little later.
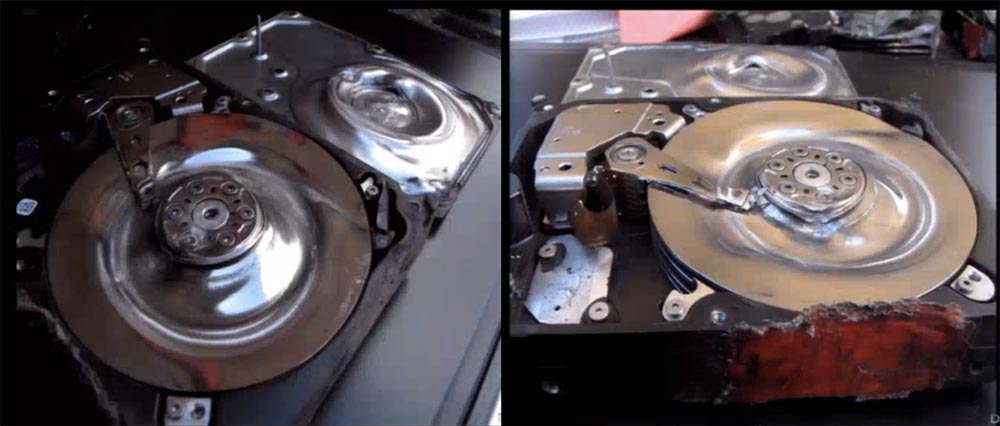
The video shows that the disk flew just a few feet from the explosion site. You can see that the disk plates did not come off the drive core, as happened in the case of the Felix, but the explosion perfectly pressed them together.
A double explosion did not cause such damage as the previous version of explosives, but we saved 40% of the explosives and got excellent plate deformation. On the next slides you can see what the recording head has become, how the plates are curved and what the HDD case covers look like after the explosion.
A one-sided explosion also deforms the plates quite well, arching them in the shape of a plate, but they did not weld to each other. Next, the Seagate HDD is shown on the slide, by the way, in almost all the tests we used the HDD of this particular brand.
In the squadron of sappers Bomb Squad there were hundreds of such drills for oil wells. When the well is drilled, its walls are reinforced with concrete. Then such a thing with a charge is lowered into the pipe, it explodes and makes a small hole in pipes and concrete through which oil from the well rushes upward. When you are friends with the sappers and they want to share something with you, you have to agree!
In these perforators a very fast powerful explosive type HMX is placed, on top of the head there is placed a little foil to form an explosive shock wave. This is a classic cumulative charge with a notch covered with a layer of copper.
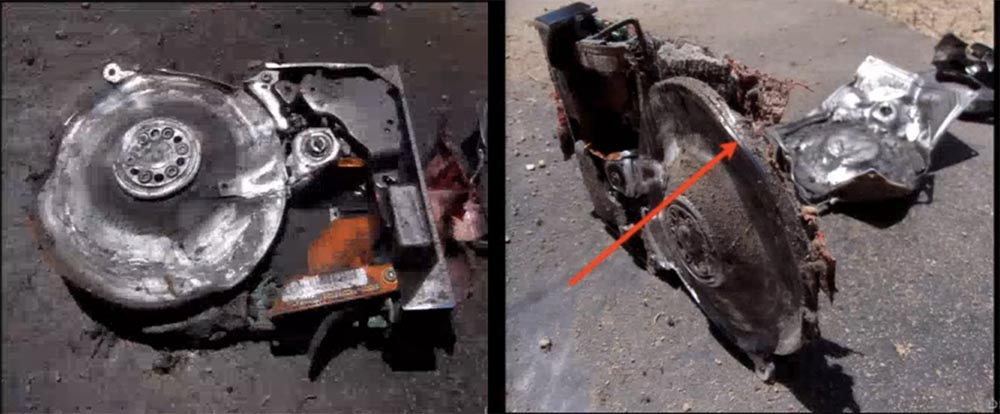
We used two of these perforators, located side by side, and in this video you can see what an explosion looks like in slow motion - two torches of flame, directed upwards. So, we installed such a punch on the edge of the HDD and made an explosion.
In slow motion, you see a piece of the drive, flying up and to the left. The following slides show what the HDD case and disk plates look like.
And here we have collected all that remains of the HDD after the explosion. Note the hole marked by the arrow. It was formed on a metal sheet, which we used as a substrate for the tested HDD. This is the place where the jet explosive cumulative jet fell.
The following slides show what this hole looks like from the outside of the sheet under our drive, what the exit from the back of the sheet looks like, and what the hole made in the soil by a blast looks like. So the next time we decided to use a smaller version of the punch - this is how it looks on the lid of the HDD.
We again used a Seagate drive with a half terabyte capacity. If you remember, it was then that a tsunami happened in Asia and the quality control of the discs produced at that time was probably not carried out, since all the plants temporarily stopped working. So if you look at the statistics, you will see that almost every Seagate HDD produced at that time was defective.
This time we placed on the adjacent lateral sides of the disk 2 punch at an angle of 90 °.
In the video, which was filmed with a GoPro camera, you can see how the drive pieces after the explosion fly high up and away. We did not manage to find all the pieces of the drive to make full conclusions. We found only the burnt part of the case and the printed circuit board, but did not find the disk plates. Therefore, we decided to make an explosion again.
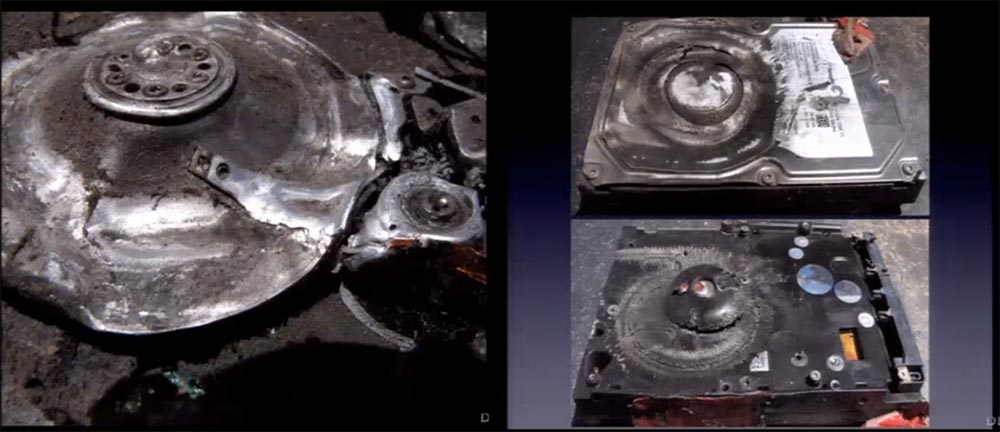
We used another Seagate CD, as you can see, I didn’t even remove the warranty label, just to be safeguarded (just to be safe). We placed a steel plate on top of the HDD to prevent fragments from flying out that could not be found later. The video shows how it flies up during the explosion.
This is what happened to the HDD case after the explosion and what the plates looked like. We were able to deform them, but the explosion did not affect the disk drive itself.
I thought that we still can adjust the location of the explosives in such a way as to achieve the desired effect and destroy the disk in other places.
Therefore, then I used the so-called "Diamond charge", which is used by the guys from EOD - the division for the destruction of ammunition, for their division into parts. This is a flat layer of explosives, expanding towards the middle, therefore, when undermining from two sides, two blast waves, increasing, go towards a friend. As a result, in the place where they meet, they turn 90 ° down and cut what is located below, into 2 parts.
For this experiment, I wanted to use a patented roll-on explosive that rolls flat on the surface. But it needs to be transported only in the original packaging, and no matter how much such explosives you really need, you can still order only a whole roll. We could get it, but we couldn't bring it. Therefore, we had to abandon the use of industrially manufactured rolled explosives and again turn to "Felix".
I printed a container on a 3-D printer, filled it with 60 g of “Felix” and attached it to the HDD. We covered the drive with a large steel sheet 8 mm thick. Near you see a steel sheet with a thickness of 12 mm, under which there are 3 extra small punch, which we wanted to get rid of.
The video shows how, after the explosions, at first a large steel sheet of smaller thickness falls into place, and a small sheet of greater thickness, covering the perforators, later falls directly into the lake. The damage to the disc was so minor that we abandoned the idea of using "diamond" explosives. However, it was still interesting.
We had enough fun making all those explosions, but now we had to decide how to place our explosive device inside the equipment.
So, the following kinetic method was Blast Supression, or “Tamed explosion”. We needed to meet several conditions:
- perform several explosions on the HDD to ensure that the surface of the plates is destroyed;
- to protect equipment from explosive impact, that is, use explosives only against HDD and use damping material between explosives and equipment envelope;
- as an insulating, damping material use: alternative compressible or incompressible sealer, liquid or gaseous foam, inexpensive and one that could be inserted into the HDD, if necessary, however, so that it does not fill it completely. As correctly noted from the floor, it is shaving foam!
I decided to use the first option with a ring charge - 100 g of explosive and 10 cm of the ignition cord. I learned this method from a blasting instructor, they use it when they need to knock out the cylinder of a door lock. They set the "glass" with a charge around the cylinder and knock it out. Shaving foam quenches noise and reduces fragmentation. I placed all this inside a cardboard box.
Let's look at the video that we got. For comparison, I give shots using shaving foam and without it - as you can see, it significantly reduced the formation and spread of flame during the explosion.
Then I decided to use the more powerful explosive “Felix” in the amount of 75 g. The slide shows steel corners that serve as racks for HDD disks in the data center, and filling the entire space between them with shaving foam.
We covered this entire structure with a steel plate on which we laid a bag of sand. We tried to simulate the real situation and see what happens.
I think it was very impressive. The video shows how the bag flies up, breaks, and sand pours out of it. The slides show the imprint that the HDD left on the plate on which it was installed. Both plates and corners are practically intact, no through holes. And you see what the body of the disk and the plate turned into after such an explosion. I believe that this method can be used!
The last method of exposure is electricity. You know that you don’t really think up with him, so the goal was to use the existing energy resources of data centers to destroy disks, in particular, SSD. Unrealized ideas — perhaps I will return to them later — included massive demagnetization of HDDs, electromagnetic or microwave effects on drives, or the use of radio frequency attacks.
What I wanted to do was create an exploding wire bridge based on a battery of capacitors and old-fashioned vacuum tubes. Unfortunately, no one was able to provide me with an unusable SSD, because this is new equipment and it has not failed yet. I love you all, but I'm not ready to spend $ 1000 on new SSDs, so I used the stuffing from a USB flash drive, it is structurally very similar to what is located inside the SSD. Therefore, we can conclude what will happen inside the SSD when exposed to a discharge with a large amperage.
In the video, you can see that practically nothing happened to the flash drive chip - it was simply tilted away intact. The controller itself looked fine, but on the reverse side everything was melted. However, this method as a whole was not applicable for the complete destruction of SSD.
Then I decided to see what happens with the flash drive filling, if we connect the power supply to the “ground” and skip a sharp surge of voltage through it, creating something like a spark gap.
In this case, we were able to inflict more significant damage - the chip was torn off from the printed circuit board and broke into 2 parts. I was interested in how the remnants of the “flash drive” were to be restored, if using an electron microscope or something like that, but I could not check it. But potentially this method can be used, so it quickly destroys things and I do not think that information from them will be easily recovered.
The following way of destruction, I called the "inductive deformation." In the next slides, you see the inductive deformation of the soda can, around which the coil wires are wrapped. The bank was literally ripped in half.
It is clear that there is a big difference between a tin can and a solid-state drive. The following video shows a more impressive explosion of a can of water; he even scattered the coil rings. In slow-motion, you can see how the bank is first pinched in the middle under the influence of an induction field, this compression occurs very quickly, in 10 ms, and with an increase in the internal pressure it breaks.
However, it is not known what kind of power electricity would have to act on the hard drive in order to achieve a similar result. Therefore, this method does not suit us. Maybe later I will return to it and get into a really crazy science.
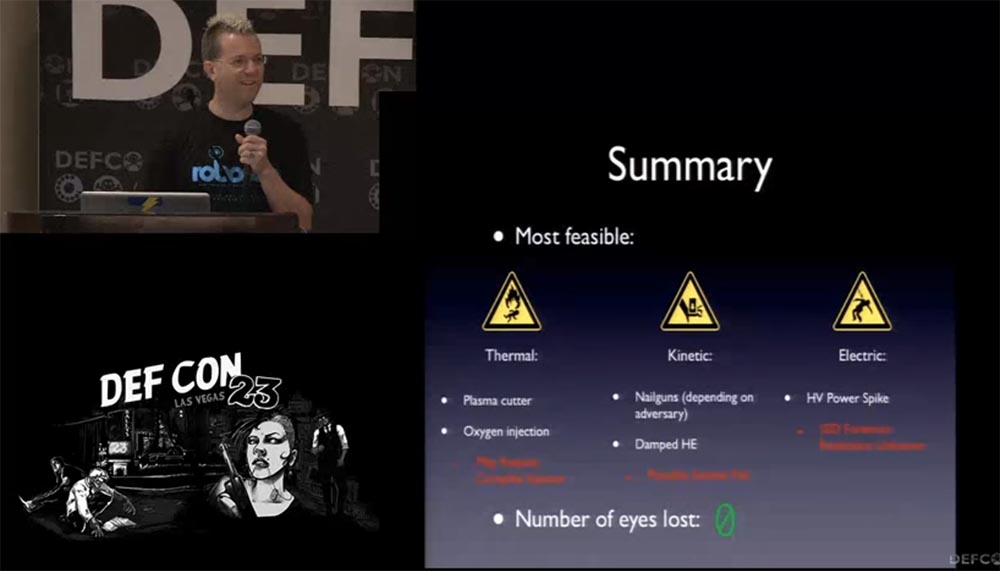
So let's summarize the tests.
The most appropriate methods for destroying hard drives are:
- thermal. Excellent results showed plasma torch and oxygen injection, and the use of combustible mixtures such as termite did not justify itself;
- kinetic. Here the construction pistol is in the lead, depending on its design - gunpowder or pneumatic, and high-power explosives;
- electric. Here the high voltage electricity of the spark gap type worked best.
The number of eyes lost during the experiments was 0 pieces!
There is one more thing that I would like to mention is mobile solutions. We are talking about data centers, but when Ross’s owner, Ross William Ulbricht, also known as Dread Pirate Roberts, was arrested, they took him in the hall of the public library. Along with him was an “unlocked” laptop, and from there they were able to pump out everything that made it possible to imprison its owner for committing federal crimes.
Therefore, I note that in our time it is easy to steal data from an unprotected laptop or computer by simply connecting to it via Bluetooth.
Feel free to contact me about important ideas for you. Perhaps at another time we will hold another DefCon conference to continue the discussion on this topic. Thank you for attention!
Thank you for staying with us. Do you like our articles? Want to see more interesting materials? Support us by placing an order or recommending to friends, 30% discount for Habr users on a unique analogue of the entry-level servers that we invented for you: The whole truth about VPS (KVM) E5-2650 v4 (6 Cores) 10GB DDR4 240GB SSD 1Gbps from $ 20 or how to share the server? (Options are available with RAID1 and RAID10, up to 24 cores and up to 40GB DDR4).
Dell R730xd 2 times cheaper? Only we have 2 x Intel Dodeca-Core Xeon E5-2650v4 128GB DDR4 6x480GB SSD 1Gbps 100 TV from $ 249 in the Netherlands and the USA! Read about How to build an infrastructure building. class c using servers Dell R730xd E5-2650 v4 worth 9000 euros for a penny?
Source: https://habr.com/ru/post/418479/
All Articles