Development of multi-tenant applications on the SAP Cloud Platform in the Neo environment, part 2: authorization and authentication
In the second article from the cycle about developing applications on the SAP Cloud Platform in the Neo environment, we will address one of the most important aspects - the management of user authorization and authentication.
In this article, we will show how to establish a connection between the SAP Cloud Platform and an identity provider (IDP) of an imaginary client “ABC PetroCorp”, and also add users to IDP. Next, we will look at how to assign roles for users from a client’s company in a specific application (from IDP), as well as how to configure SAML attributes to transfer them from IDP to the SCP cloud platform application.
In the sub-account of the fictional client “ABC PetroCorp” from the first article , a subscription to the SCP pollution monitoring applications provided by ITeLO Consulting is already established. Now the ABC PetroCorp employee needs to make this application available to other colleagues.
A SAP Cloud Platform user can connect his corporate IDP to a cloud platform and customize security and authentication management for his application loaded into SCP.
')
ABC PetroCorp has connected the SAP Cloud Platform Identity Authentication service, which allows access to business processes, applications and data. This service provides a SCI-tenant, within which the application configuration and user authorization management takes place.
Emily, an imaginary hero from the first article, has access to this SCI tenant - she is his administrator and can customize user authorization in a particular application. She wants to figure out how to create these configurations using the Identity Authentication service.
Requirements:
Emily needs to perform the following steps in the Identity Authentication service administration console and SCP control panel to make the application in the cloud platform available to other employees of ABC PetroCorp:
Step 1: Establish a trust relationship between the SCI-tenant and the SCP subaccount.
Step 2: Import users into SCI-tenant and update (add) necessary attributes.
Step 3: Assign roles to users at the application level in the SCP.
Step 4: Configure the attributes in the SCI tenant and the SCP control panel to transfer them to the application.
Step 5: Check the settings.
Step 1: Establish a trust relationship between the SCI-tenant and the SCP subaccount
Emily is the administrator of the ABC PetroCorp subaccount and SCI tenant, which gives her the opportunity to apply the necessary settings for using the SCI tenant as a “user repository” for the multi-tenant application provided by the provider ITeLO Consulting.
To start, Emily needs to establish a trust relationship between the SCI-tenant and the client's ABC PetroCorp sub-account SCP.
Let's go to the administration console of the Identity Authentication service using the link "https: //.accounts.ondemand.com/admin", where is the identifier of the SCI-tenant. This link can be found in the registration letter that comes to the tenant administrator of the Identity Authentication service. The identifier of the tenant is also indicated there.
The administration console of the Identity Authentication service looks like this:

In another tab of the browser, open the control panel for the subaccount of the client “ABC PetroCorp” and go to the tab “Security” -> “Trust”.

In the “Trust Management” menu that opens, go to the “Local Service Provider” tab and click “Edit”.

Then we perform the following steps:

Click on “Get Metadata” to download the metadata file in “xml” format, which contains the previously described configurations. It will be used to establish a trust relationship with the SCI-tenant.
Let's go back to the administration console of the Identity Authentication service and go to the tab “Applications & Resources” -> “Applications” in the left menu. In the "Applications" area, click the "Add" button to designate a new application deployed in the ABC PetroCorp subaccount.
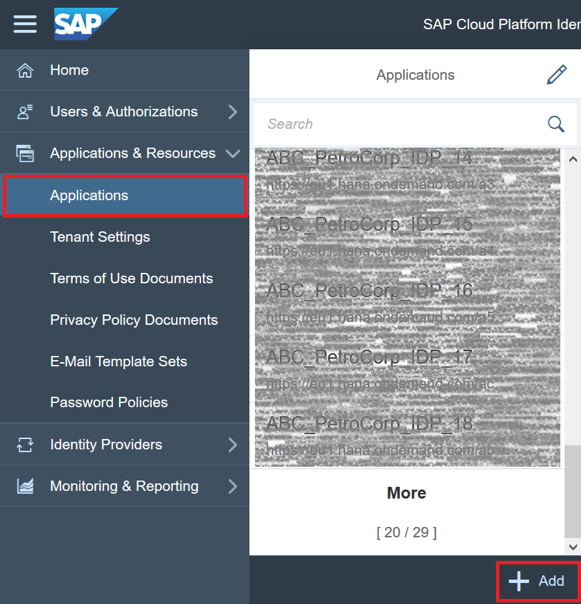
In the window that appears, enter the name of the application (for example, ABC_PetroCorp_IDP) and click "Save". After that, a new point will be created in the tenant for our application.
In the created application, go to the “Trust” tab and select the “SAML 2.0 Configuration” option.

In the “Define from Metadata” section, click “Browse” and select the metadata file in the “xml” format, which we downloaded earlier when setting up trust relationships in the SCP subaccount. Details regarding the SAML 2.0 configuration will be automatically filled in after the file is downloaded. Click "Save" - now the SAML 2.0 configuration is created and saved for this application.

Go back to the point of the application called ABC_PetroCorp_IDP in the tenant, click on the “Home URL” and enter the URL of the type “https: // pollutionmonitoringui- <subaccount name> .dispatcher. <Regional_host>”.
This URL can be found in the description of the HTML5 application to which the client is subscribed (subaccount "ABC PetroCorp"). To do this, go to the subaccount of the client in the tab “Applications” -> “Subscriptions” and select the signed HTML5 application.

In the tab "Overview" will be the URL we need.

Then we return to the application point in the SCI-tenant, designate the URL-applications in the “Home URL” and click “Save”.

Now we are going to the tab “Applications & Resources” -> “Tenant Settings” in the administration console of the Identity Authentication service. On the tenant settings page, select "SAML 2.0 Configuration".

In the window that opens, click “Download Metadata File” to download an “xml” file containing the configurations of the SCI-tenant. It will be used later to set up a trust relationship with the client subaccount in the SCP.
Go back to the sub-account “ABC PetroCorp” and go to the menu “Security” -> “Trust”, in the opened window select the tab “Application Identity Provider”. Click on “Add Trusted Identity Provider” to add details about the SCI-tenant.

In the “General” tab, click “Browse” and select the metadata file in the “xml” format downloaded from the administration console of the Identity Authentication service. Configuration details are automatically filled after the file is downloaded. Remove the checkmark from the field “Only for IDP-Initiated SSO” and click “Save”.

Now the trust relationship between the sub-account of the client “ABC PetroCorp” and its SCI-tenant has been successfully established. The same settings can be applied for subaccounts of other clients (for example, for the client “XYZ EnergyCorp”).
Step 2: Import users into SCI-tenant and update (add) necessary attributes
Emily needs to register the users of the application in ABC PetroCorp's corporate IDP.
Ideally, a corporate IDP (in our case, a SCI tenant) would already include a list of all users in the company. For clarity, we import some users into the SCI tenant, after which they will receive appropriate permissions to access the application.
Demo users for the application are stored in a csv file on github in Github .
Download the “CSV” file for “ABC PetroCorp” from GitHub. In the csv format file, two users are designated:

The “CSV” file for “ABC PetroCorp” contains the fictional email addresses of users. They need to be replaced with real ones, since then they will receive letters to activate accounts. For example, if your real mail is “john.smith@sap.com”, then you need to replace the designation <> with “john.smith”, and << insert_your_company >> with “sap”.

Let's go to the administration console of the Identity Authentication service and select the tab “Users & Authorizations” -> “Import Users”. Select the previously created application point “ABC_PetroCorp_IDP” and click “Browse”, then select the file “ABCPetroCorp.csv” describing our demo users - and click the “Import” button.

Users must activate their account. To receive an e-mail with a link to activate, you must click "Send" in the window "Send E-Mails".
Before you activate the user, you need to change some configurations.
Go to the tab "Users & Authorizations" -> "User Management". Two users appeared in the user lists: "Area Manager" and "Plant Supervisor". They are automatically assigned identifiers: P000011 and P000010. These identifiers can be used as logins to enter the tenant (and into the application, when all the necessary settings have been made).

Let us go to the user P000011 or “Area Manager” and add a name that can also be used as a login to login. To do this, click on the edit icon in the "Personal Information" field and fill in the "Login Name" (in our case, this is Johan).

Then click "Save".
Now let's do the same with P000010 or Plant Supervisor, but let's call it Smith.

The Plant Supervisor user should be able to view information only about his plant, then in the section with information about the company it is necessary to designate the company identifier (how this identifier will be used will be explained in Step 4).
To do this, go to the "Company Information" section and enter the identifier of the plant, namely "101", in the "Company" field.
Now information about our users is changed. To activate them, go to the mailboxes specified in the "csv" file and click on the link to activate, or click "Click here to activate your account".

So, we have successfully imported users into the SCI tenant, updated the information about them and activated them.
Step 3: Assigning Roles to Application-Level Users in the SAP Cloud Platform
The multi-tenant “Pollution Monitoring” application, created by Robert from ITeLO Consulting, provides two predefined PlantSupervisor and AreaManager roles that control user authorization in the application and determine what the end user sees.
Let's see how role separation is achieved at the level of the project code.
Let's go to the file "web.xml", located along the path "/ pollutionmonitoring
/src/main/webapp/WEB-INF/web.xml "in the project folder.
Open the file and make sure that the above two roles are defined in the application.

Now let's go to the file “PollutionDataService.java” located along the path “/pollutionmonitoring/src/main/java/com/sap/hana/cloud/samples/pollutionmonitoring/api/PollutionDataService.java” of the project and open it.
In this file, the “getCompanyPollutionData ()” method is indicated. It allows you to check whether the user is an administrator (manager). If yes, then the application displays data for all plants; if not, data is filtered by plant identifier (plant_id). Also, the application will display information only for those plants whose identifiers correspond to those indicated in the user information.

For greater clarity, you can refer to the “isUserAdmin ()” method, which allows you to determine by role whether a user is an administrator (manager) or not.

A similar algorithm is used to extract plant data from local systems.

Now Emily, as an employee of ABC PetroCorp, needs to allocate area managers and plant managers, assigning them appropriate roles (“ABCPlant Supervisor” and “ABCAreaManager”) in the SCP application.
Go to the ABC PetroCorp client subaccount and select the pollutionmonitoring java application provided by ITeLO Consulting (it is located in the Applications -> Subscriptions tab).

Next, go to the tab "Roles" (at the application level).
In the window that opens, a list of roles indicated in the application will appear. Select the role of "PlantSupervisor" and click "Assign". In the window that appears, enter the user ID, indicated in the SCI-tenant as "ABCPlantSupervisor". In our case, the identifier of such a user would be P000010.
Then select the role “AreaManager” and click “Assign”. In the window that appears, enter the user ID, indicated in the SCI-tenant as “ABCAreaManager” (in our case, the user ID will be P000011).

So, we have successfully compared the roles of the application with the corresponding users of the ABC PetroCorp from the SCI tenant.
The same settings can be applied in the subaccount of another client (for example, "XYZ EnergyCorp").
Step 4: Setting Attributes in the SCI Tenant and the SCP Control Panel for Transferring to the Application
Robert from ITeLO Consulting has programmed a multi-tenant application in such a way that he needs to transfer the plant identifier of the user to PlantSupervisor so that the plant data can be filtered in the application for this particular plant identifier.
In the previous steps, we added a plant identifier to the PlantSupervisor user in the SCI-tenant in the Company Information field, which we now need to transfer to the multi-tenant application. It can then be used in an application for displaying data related to a specific plant. The user of “AreaManager” is essentially an administrator who can view data from all plants.
Let's see how this is organized at the level of the application code.
Open the file "PollutionDataService.java" located along the path "/pollutionmonitoring/src/main/java/com/sap/hana/cloud/samples/pollutionmonitoring/api/PollutionDataService.java" in the project.
This file describes the getPlantId () method. This method describes getting the username and checking the PLANT_ID attribute, which is used to filter pollution level data and plant data.

We can transfer user attributes from the SCI tenant to the application via SAML Assertion Attributes. This is necessary so that the user attribute from the SCI tenant containing the company information is read by the SCP when the user logs on. It is necessary that the so-called “Assertion Attribute” (attribute of approval) defined for the user be transferred to the pollution monitoring application.
To do this, first create an “Assertion Attribute” in the SCI-tenant, then denote the approval attribute in the main attribute (“Principal Attribute”) in the “ABC PetroCorp” subaccount, which can be read by the application code, as shown above.
Let's go to the administration console of the Identity Authentication service and select the tab “Applications & Resources” -> “Applications”. Select the application we need (ABC_PetroCorp_IDP) and in the “Trust” tab click on “Assertion Attributes”.

A list of already existing attributes will appear, we need one more in it. To do this, click on the button "Add" and select the attribute "Company".
Then we add “plant_id” to the attribute value (case sensitive) and click “Save”.

Now let's move on to the sub-account “ABC PetroCorp” in the SCP and go to the tab “Security” -> “Trust”. In the “Trust Management” window, go to the “Application Identity Provider” tab and select the IdP associated with the subaccount.

In the opened window, go to the “Attributes” tab and click “Add Assertion-Based Attribute”. In the “Assertion Attribute” field, enter the value “plant_id” (as in the SCI-tenant), and in the “Principal Attribute” field, enter “PLANT_ID” (this value will be transferred to the application as the plant code) and click “Save”.
So, we have successfully configured the attributes in the SCI-tenant and in the SCP control panel to transfer them to the application.
Step 5: Verify Settings
Now Emily can check if the SCI-tenant (IdP) settings for the sub-account “ABC PetroCorp” in the SCP and for the application provided by the provider are correctly defined.
To do this, go to the sub-account "ABC PetroCorp" and turn to the HTML5-application "pollutionmonitoringui" (it is located in the tab "Applications" -> "Subscriptions").
Copy the link to the application. Open a new tab in the browser in incognito mode and insert a link to the HTML5 application. A window will appear to enter the application, where the name indicated in the SCI-tenant will be displayed.
If everything is set up correctly, then you should be able to enter the application under the users of the AreaManager and PlantSupervisor, indicated in the SCI-tenant.
In our case, the area manager is the user Johan (P000011), and the plant manager is Smith (P000010). Under these users, you can log in to the application, using either the username or its identifier as a login.
Note: when entering the application at this stage, no data will be displayed. This is normal, as the configuration is not yet complete and the local system is not connected.
So, we set up an identity provider (IDP) connection with our SCP pollution monitoring application. We also imported users and assigned them the correct roles for accessing the application, ensured the transfer of correct information about the plant to the application.
In this article, we will show how to establish a connection between the SAP Cloud Platform and an identity provider (IDP) of an imaginary client “ABC PetroCorp”, and also add users to IDP. Next, we will look at how to assign roles for users from a client’s company in a specific application (from IDP), as well as how to configure SAML attributes to transfer them from IDP to the SCP cloud platform application.
In the sub-account of the fictional client “ABC PetroCorp” from the first article , a subscription to the SCP pollution monitoring applications provided by ITeLO Consulting is already established. Now the ABC PetroCorp employee needs to make this application available to other colleagues.
A SAP Cloud Platform user can connect his corporate IDP to a cloud platform and customize security and authentication management for his application loaded into SCP.
')
ABC PetroCorp has connected the SAP Cloud Platform Identity Authentication service, which allows access to business processes, applications and data. This service provides a SCI-tenant, within which the application configuration and user authorization management takes place.
Emily, an imaginary hero from the first article, has access to this SCI tenant - she is his administrator and can customize user authorization in a particular application. She wants to figure out how to create these configurations using the Identity Authentication service.
Requirements:
- A productive global SCP account (not a trial account) with Identity Authentication service connected to it (as IDP for the ABC PetroCorp subaccount);
- The user of the client's subaccount must be the administrator of the SCI tenant, thus he will have access to the administration console of the Identity Authentication service.
Emily needs to perform the following steps in the Identity Authentication service administration console and SCP control panel to make the application in the cloud platform available to other employees of ABC PetroCorp:
Step 1: Establish a trust relationship between the SCI-tenant and the SCP subaccount.
Step 2: Import users into SCI-tenant and update (add) necessary attributes.
Step 3: Assign roles to users at the application level in the SCP.
Step 4: Configure the attributes in the SCI tenant and the SCP control panel to transfer them to the application.
Step 5: Check the settings.
Step 1: Establish a trust relationship between the SCI-tenant and the SCP subaccount
Emily is the administrator of the ABC PetroCorp subaccount and SCI tenant, which gives her the opportunity to apply the necessary settings for using the SCI tenant as a “user repository” for the multi-tenant application provided by the provider ITeLO Consulting.
To start, Emily needs to establish a trust relationship between the SCI-tenant and the client's ABC PetroCorp sub-account SCP.
Let's go to the administration console of the Identity Authentication service using the link "https: //.accounts.ondemand.com/admin", where is the identifier of the SCI-tenant. This link can be found in the registration letter that comes to the tenant administrator of the Identity Authentication service. The identifier of the tenant is also indicated there.
The administration console of the Identity Authentication service looks like this:
In another tab of the browser, open the control panel for the subaccount of the client “ABC PetroCorp” and go to the tab “Security” -> “Trust”.
In the “Trust Management” menu that opens, go to the “Local Service Provider” tab and click “Edit”.
Then we perform the following steps:
- In the “Configuration Type” field, we change the type to “Custom”;
- Click "Generate Key Pair" to create a key and certificate for the account;
- Change the value in the “Principal Propagation” field to “Enable”;
- Click "Save".
Click on “Get Metadata” to download the metadata file in “xml” format, which contains the previously described configurations. It will be used to establish a trust relationship with the SCI-tenant.
Let's go back to the administration console of the Identity Authentication service and go to the tab “Applications & Resources” -> “Applications” in the left menu. In the "Applications" area, click the "Add" button to designate a new application deployed in the ABC PetroCorp subaccount.
In the window that appears, enter the name of the application (for example, ABC_PetroCorp_IDP) and click "Save". After that, a new point will be created in the tenant for our application.
In the created application, go to the “Trust” tab and select the “SAML 2.0 Configuration” option.
In the “Define from Metadata” section, click “Browse” and select the metadata file in the “xml” format, which we downloaded earlier when setting up trust relationships in the SCP subaccount. Details regarding the SAML 2.0 configuration will be automatically filled in after the file is downloaded. Click "Save" - now the SAML 2.0 configuration is created and saved for this application.
Go back to the point of the application called ABC_PetroCorp_IDP in the tenant, click on the “Home URL” and enter the URL of the type “https: // pollutionmonitoringui- <subaccount name> .dispatcher. <Regional_host>”.
This URL can be found in the description of the HTML5 application to which the client is subscribed (subaccount "ABC PetroCorp"). To do this, go to the subaccount of the client in the tab “Applications” -> “Subscriptions” and select the signed HTML5 application.
In the tab "Overview" will be the URL we need.
Then we return to the application point in the SCI-tenant, designate the URL-applications in the “Home URL” and click “Save”.
Now we are going to the tab “Applications & Resources” -> “Tenant Settings” in the administration console of the Identity Authentication service. On the tenant settings page, select "SAML 2.0 Configuration".
In the window that opens, click “Download Metadata File” to download an “xml” file containing the configurations of the SCI-tenant. It will be used later to set up a trust relationship with the client subaccount in the SCP.
Go back to the sub-account “ABC PetroCorp” and go to the menu “Security” -> “Trust”, in the opened window select the tab “Application Identity Provider”. Click on “Add Trusted Identity Provider” to add details about the SCI-tenant.
In the “General” tab, click “Browse” and select the metadata file in the “xml” format downloaded from the administration console of the Identity Authentication service. Configuration details are automatically filled after the file is downloaded. Remove the checkmark from the field “Only for IDP-Initiated SSO” and click “Save”.
Now the trust relationship between the sub-account of the client “ABC PetroCorp” and its SCI-tenant has been successfully established. The same settings can be applied for subaccounts of other clients (for example, for the client “XYZ EnergyCorp”).
Step 2: Import users into SCI-tenant and update (add) necessary attributes
Emily needs to register the users of the application in ABC PetroCorp's corporate IDP.
Ideally, a corporate IDP (in our case, a SCI tenant) would already include a list of all users in the company. For clarity, we import some users into the SCI tenant, after which they will receive appropriate permissions to access the application.
Demo users for the application are stored in a csv file on github in Github .
Download the “CSV” file for “ABC PetroCorp” from GitHub. In the csv format file, two users are designated:
- ABCPlantSupervisor: This user will be the manager of a specific ABC PetroCorp plant and will be able to view data only about his plant;
- ABCAreaManager: This user will be the head of the whole area, which may include several ABC PetroCorp factories. He will be able to view data on all plants in his area.
The “CSV” file for “ABC PetroCorp” contains the fictional email addresses of users. They need to be replaced with real ones, since then they will receive letters to activate accounts. For example, if your real mail is “john.smith@sap.com”, then you need to replace the designation <> with “john.smith”, and << insert_your_company >> with “sap”.
Let's go to the administration console of the Identity Authentication service and select the tab “Users & Authorizations” -> “Import Users”. Select the previously created application point “ABC_PetroCorp_IDP” and click “Browse”, then select the file “ABCPetroCorp.csv” describing our demo users - and click the “Import” button.
Users must activate their account. To receive an e-mail with a link to activate, you must click "Send" in the window "Send E-Mails".
Before you activate the user, you need to change some configurations.
Go to the tab "Users & Authorizations" -> "User Management". Two users appeared in the user lists: "Area Manager" and "Plant Supervisor". They are automatically assigned identifiers: P000011 and P000010. These identifiers can be used as logins to enter the tenant (and into the application, when all the necessary settings have been made).
Let us go to the user P000011 or “Area Manager” and add a name that can also be used as a login to login. To do this, click on the edit icon in the "Personal Information" field and fill in the "Login Name" (in our case, this is Johan).
Then click "Save".
Now let's do the same with P000010 or Plant Supervisor, but let's call it Smith.
The Plant Supervisor user should be able to view information only about his plant, then in the section with information about the company it is necessary to designate the company identifier (how this identifier will be used will be explained in Step 4).
To do this, go to the "Company Information" section and enter the identifier of the plant, namely "101", in the "Company" field.
Now information about our users is changed. To activate them, go to the mailboxes specified in the "csv" file and click on the link to activate, or click "Click here to activate your account".
So, we have successfully imported users into the SCI tenant, updated the information about them and activated them.
Step 3: Assigning Roles to Application-Level Users in the SAP Cloud Platform
The multi-tenant “Pollution Monitoring” application, created by Robert from ITeLO Consulting, provides two predefined PlantSupervisor and AreaManager roles that control user authorization in the application and determine what the end user sees.
- PlantSupervisor Role: Users who are assigned this role will only be able to view data from the plant indicated in the Company Information in the SCI Tenant.
- The role of “AreaManager”: users who are assigned this role will be able to view data from all plants in their area.
Let's see how role separation is achieved at the level of the project code.
Let's go to the file "web.xml", located along the path "/ pollutionmonitoring
/src/main/webapp/WEB-INF/web.xml "in the project folder.
Open the file and make sure that the above two roles are defined in the application.
Now let's go to the file “PollutionDataService.java” located along the path “/pollutionmonitoring/src/main/java/com/sap/hana/cloud/samples/pollutionmonitoring/api/PollutionDataService.java” of the project and open it.
In this file, the “getCompanyPollutionData ()” method is indicated. It allows you to check whether the user is an administrator (manager). If yes, then the application displays data for all plants; if not, data is filtered by plant identifier (plant_id). Also, the application will display information only for those plants whose identifiers correspond to those indicated in the user information.
For greater clarity, you can refer to the “isUserAdmin ()” method, which allows you to determine by role whether a user is an administrator (manager) or not.
A similar algorithm is used to extract plant data from local systems.
Now Emily, as an employee of ABC PetroCorp, needs to allocate area managers and plant managers, assigning them appropriate roles (“ABCPlant Supervisor” and “ABCAreaManager”) in the SCP application.
Go to the ABC PetroCorp client subaccount and select the pollutionmonitoring java application provided by ITeLO Consulting (it is located in the Applications -> Subscriptions tab).
Next, go to the tab "Roles" (at the application level).
In the window that opens, a list of roles indicated in the application will appear. Select the role of "PlantSupervisor" and click "Assign". In the window that appears, enter the user ID, indicated in the SCI-tenant as "ABCPlantSupervisor". In our case, the identifier of such a user would be P000010.
Then select the role “AreaManager” and click “Assign”. In the window that appears, enter the user ID, indicated in the SCI-tenant as “ABCAreaManager” (in our case, the user ID will be P000011).
So, we have successfully compared the roles of the application with the corresponding users of the ABC PetroCorp from the SCI tenant.
The same settings can be applied in the subaccount of another client (for example, "XYZ EnergyCorp").
Step 4: Setting Attributes in the SCI Tenant and the SCP Control Panel for Transferring to the Application
Robert from ITeLO Consulting has programmed a multi-tenant application in such a way that he needs to transfer the plant identifier of the user to PlantSupervisor so that the plant data can be filtered in the application for this particular plant identifier.
In the previous steps, we added a plant identifier to the PlantSupervisor user in the SCI-tenant in the Company Information field, which we now need to transfer to the multi-tenant application. It can then be used in an application for displaying data related to a specific plant. The user of “AreaManager” is essentially an administrator who can view data from all plants.
Let's see how this is organized at the level of the application code.
Open the file "PollutionDataService.java" located along the path "/pollutionmonitoring/src/main/java/com/sap/hana/cloud/samples/pollutionmonitoring/api/PollutionDataService.java" in the project.
This file describes the getPlantId () method. This method describes getting the username and checking the PLANT_ID attribute, which is used to filter pollution level data and plant data.
We can transfer user attributes from the SCI tenant to the application via SAML Assertion Attributes. This is necessary so that the user attribute from the SCI tenant containing the company information is read by the SCP when the user logs on. It is necessary that the so-called “Assertion Attribute” (attribute of approval) defined for the user be transferred to the pollution monitoring application.
To do this, first create an “Assertion Attribute” in the SCI-tenant, then denote the approval attribute in the main attribute (“Principal Attribute”) in the “ABC PetroCorp” subaccount, which can be read by the application code, as shown above.
Let's go to the administration console of the Identity Authentication service and select the tab “Applications & Resources” -> “Applications”. Select the application we need (ABC_PetroCorp_IDP) and in the “Trust” tab click on “Assertion Attributes”.
A list of already existing attributes will appear, we need one more in it. To do this, click on the button "Add" and select the attribute "Company".
Then we add “plant_id” to the attribute value (case sensitive) and click “Save”.
Now let's move on to the sub-account “ABC PetroCorp” in the SCP and go to the tab “Security” -> “Trust”. In the “Trust Management” window, go to the “Application Identity Provider” tab and select the IdP associated with the subaccount.
In the opened window, go to the “Attributes” tab and click “Add Assertion-Based Attribute”. In the “Assertion Attribute” field, enter the value “plant_id” (as in the SCI-tenant), and in the “Principal Attribute” field, enter “PLANT_ID” (this value will be transferred to the application as the plant code) and click “Save”.
So, we have successfully configured the attributes in the SCI-tenant and in the SCP control panel to transfer them to the application.
Step 5: Verify Settings
Now Emily can check if the SCI-tenant (IdP) settings for the sub-account “ABC PetroCorp” in the SCP and for the application provided by the provider are correctly defined.
To do this, go to the sub-account "ABC PetroCorp" and turn to the HTML5-application "pollutionmonitoringui" (it is located in the tab "Applications" -> "Subscriptions").
Copy the link to the application. Open a new tab in the browser in incognito mode and insert a link to the HTML5 application. A window will appear to enter the application, where the name indicated in the SCI-tenant will be displayed.
If everything is set up correctly, then you should be able to enter the application under the users of the AreaManager and PlantSupervisor, indicated in the SCI-tenant.
In our case, the area manager is the user Johan (P000011), and the plant manager is Smith (P000010). Under these users, you can log in to the application, using either the username or its identifier as a login.
Note: when entering the application at this stage, no data will be displayed. This is normal, as the configuration is not yet complete and the local system is not connected.
So, we set up an identity provider (IDP) connection with our SCP pollution monitoring application. We also imported users and assigned them the correct roles for accessing the application, ensured the transfer of correct information about the plant to the application.
Source: https://habr.com/ru/post/418237/
All Articles