Batch photo processing in Blender
Hello!
Blender's free-to-use 3D editor has tremendous possibilities for creating three-dimensional graphics, but this is not all that he can do. In this tutorial, I want to show how using this wonderful program to make fast and high-quality batch processing of photos for later use in creating rotation animation (circling an object, a demonstration from all sides, photo-360).
')
In this lesson we will not go into the detailed settings and will use the previously created template. No special knowledge should be required, there will be enough little experience in image processing.
Where do legs grow
For a long time I have been involved in various projects, one way or another connected with three-dimensional graphics and visualization. We had to manage the studio, build a render farm, design and implement special hardware for 3D photos and 3D scanning in hardware.
One of the projects was a web service that provides an opportunity for an interactive demonstration of products for online stores. Our attempts to use for this “real” polygonal 3D crashed about the cost of scaling this approach, the problems with the support of the necessary technologies by browsers and the “artificiality” of the final result. The winner turned out to be a much simpler method: photographs of objects from different angles were stitched into a rotation animation and all this was controlled by a special player. I think many have seen such things.
However, getting a stack of photos is far from enough; images need to be prepared for publication in an appropriate way: make color correction, remove unnecessary, align, frame, etc. And there can be a lot of such work.
Previously, our team had already created similar lessons, then we used other tools:
Adobe Camera Raw:
Photoshop:
At the moment, we are using a new way of processing, and, according to a set of parameters, we consider it the best.
What the template can do:
- Makes the background around the object completely white.
- Adds logo
- Gives you the opportunity to make high-quality color correction
- Optimizes the sequence for quick download from the Internet
- Color changes in individual elements
Benefits of using Blender:
- Free
- Cross platform
- Works in Linux (Scaling your business you don’t have to spend money on operating systems and photo processing programs)
- Full video work
- There is the possibility of batch optimization of images before publishing.
- Supports GPU - to speed up processing
- Takes little disk space, unlike its paid competitors
Optimize your processing
For objects of the same type, the adjustment of the processing parameters is done once and after that you can simply open them in one scene, start the rendering process. Thus, you can save several templates that will process your type of objects.
Download template (Google Drive)
As a test sequence, I took a white shoe, which was photographed against a white background.

The lighting scheme is created using four table diode lamps from a popular furniture store.
The result of processing in the form of GIF animation
Full-length sequence can be viewed on Google Drive
STEP 1 - Install Blender
a) Open the prepared scene as demonstrated in the video.
b) Import the prepared source sequence into our scene.
c) Specify the required number of frames, in our sequence they are 100 .
d) To display the current frame, press the button on the F12 keyboard or, in the program interface, the Render button
- To move the canvas click on the scroll mouse
- To scale the canvas, rotate the mouse scroll
- In the process of importing a sequence, press the “A” button on the keyboard to select all files.
STEP 2 - Overlay and Position Your Logo
For training, you can use the logo from the template (Open Source project) or immediately use your own.
The logo can be used in the png format with transparency.
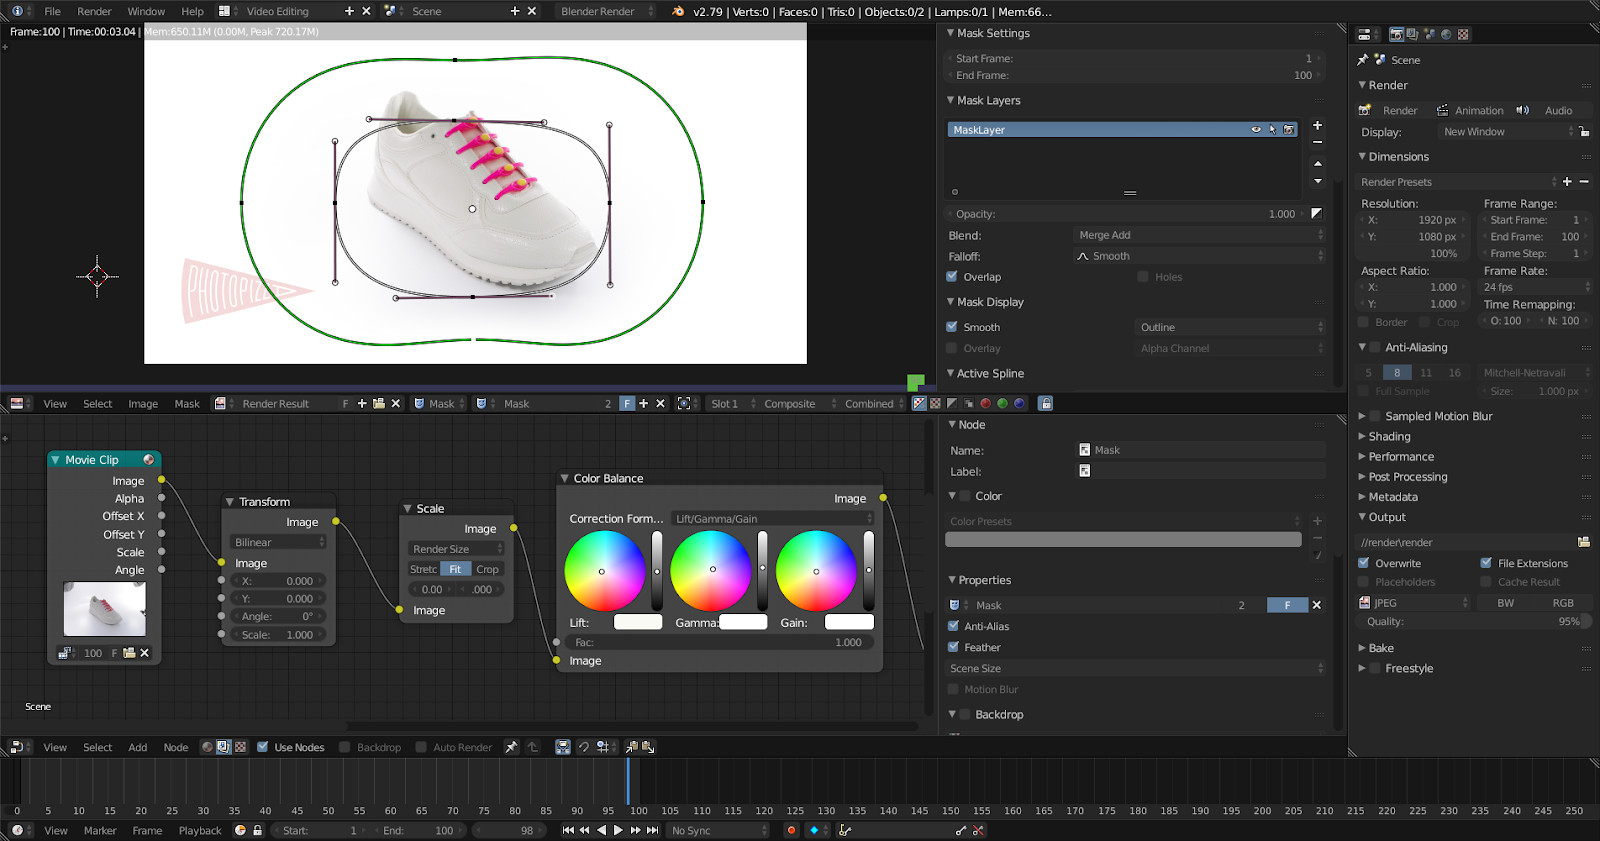
STEP 3 - Editing a mask to lighten the edges of the frame
This is a gradient mask, a smooth transition from transparent to white color is going from black to green. Move, edit the black curve and the green will parallel your changes in parallel. To change the smoothness of the gradient transition, change the distance between the black and green lines.
STEP 4 - Align the rotating object relative to the frame
STEP 5 - Resizing a photo of a photo-360 relative to the proportions of rendering
STEP 6 - Color Correction
STEP 7 - Editing levels to adjust the overall contrast of the object lighting
STEP 8 - Color Replacement
STEP 9 - Adjust the color tone and replace the selected color
STEP 10 - Adjusting the light and shadows
STEP 11 - Saving the processed sequence (render)
Select the required frame resolution to save the sequence.
The default is 1920x1080.
To begin processing, click the Animation button.
To speed up the rendering process, unused nodes should be disabled.
At the moment, we continue our experiments and if it will be interesting to the respectable public, I will be happy to share the results.
Source: https://habr.com/ru/post/417803/
All Articles