Using the KOMPAS-3D API → Lesson 11 → Simple Text Labels
In the previous lessons of the cycle, we learned to display the text in the main title. Today we will talk about how to display text in the document itself. We will consider the simplest examples, and we will show more complex techniques in the following lessons.

Text in KOMPAS is always displayed relative to some point, which is called the anchor point. The text may be different relative to it. In order to find out the position of the text relative to the anchor point, use the ksGetTextAlign method of the ksDocument2D interface. Below is its prototype.
')
As a single parameter, it takes an integer pointer to the "text" object. The method returns the type of binding , or -1 in case of an error. Valid types of bindings are shown in the table below.

Table of allowed types of bindings
To change the text binding, use the ksDetment2D interface's ksSetTextAlign method . Below is its prototype.
If successful, this method returns the value 1 , and in case of error, it returns zero .
For simple text output, the ksText method of the ksDocument2D interface is used . Below is a prototype of this method.
Let us analyze the parameters of the ksText method. The anchor point we discussed in the previous section.
The ang parameter sets the angle in degrees between the text line and the horizontal line. The angle is counted counterclockwise. The figure below shows a line drawn at an angle of 45 ° .

String derived at an angle of 45 °
The hStr parameter sets the character size of the string in millimeters. If the value of this parameter is zero , then the default size is used.
The ksuStr parameter sets the stretching (narrowing) of the text. The figure below shows several lines with different values for the ksuStr parameter.
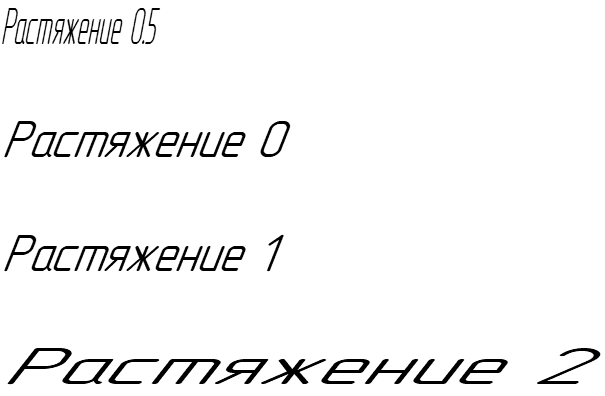
Multiple lines with different stretch values
From this figure, you can see that “stretching 0” is equivalent to “stretching 1,” that is, the absence of any stretching.
The bitVector parameter contains a set of flags defining the character outline. Valid flags are listed in the table below.

Table of flags defining the character outline
In fact, there are other valid flags, but their work is manifested only in the construction of complex compound strings. We will look at some of them in the next lesson.
Remember - the output string must not contain the characters @ , $ , & , ~ , ^ and # , as they are control characters. We will talk about working with them in the next lessons of our cycle.
If successful, the ksText method returns an integer pointer to the text. This pointer can be passed, for example, to the ksSetTextAlign method to change the position of the text relative to the anchor point. In the event of an error, the ksText method returns zero .
Below is an example of a program that demonstrates the output of a string using the ksText method.
For simplicity, in this example, the code responsible for the creation and execution of the document is omitted. As a result of the work of this program, the text “Line” is displayed in the document.
When outputting text to a document, it is helpful to know how much space it takes. Text height is set by the hStr parameter of the ksText method. But its length directly depends on the output string.
To define it, use the ksGetTextLengthFromReference method of the ksDocument2D interface. This method has only one parameter - an integer pointer to the text. It returns the text length in millimeters.
The ksGetTextLengthFromReference method is inconvenient in that it does not allow determining the length of a string before its output to a document. To determine the length of a string that has not yet been output to the document, you need to use the ksGetTextLength method. But before considering it, let's talk about styles.
The KOMPAS system predetermines several styles for texts displayed in documents. Each style corresponds to an integer. The most commonly used styles are in the table below.
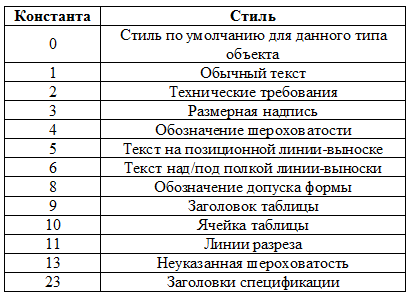
Most commonly used text styles
Not all styles are shown in this table: only a part of them. A complete list of available constants can be found on the page “Parameters Structures and Constants \ Constants \ Text Constants \ System Text Styles” of the COMPASS documentation.
The ksGetTextLength method of the ksDocument2D interface allows you to determine the length of a string before it is output to a document. Below is a prototype of this method.
The method returns the string length in millimeters. Note: the method takes as its parameter the string itself, and not the pointer to the “text” object. This allows you to estimate the size of the string before it is displayed in the document.
Consider an example of using the ksGetTextLength method. Suppose we have a string and it needs to be placed in a rectangle of a certain length (this problem is solved much easier with the help of paragraphs, but about them in the next lessons). If the string fits in it, then it is displayed completely. If not, it is clipped and an ellipsis is placed at the end of it. Below is the source code of the program that solves this problem.
The source string is specified in the FULLSTR constant. The variable maxSize specifies the length of the rectangle in which to insert the string. Later this value is specified, the size of the ellipsis is subtracted from it, which is stored in the size_dots variable. If the line does not fit, one character is cut off from it until it fits in a rectangle of a given size. This happens in a while loop .
Pay attention to a very important point: when displaying a string, all parameters of the ksText method (except for the coordinates of the anchor point) have a zero value . The fact is that the ksGetTextLength method does not know anything about these parameters, so it cannot take them into account when calculating the length of a string. Thus, if non-zero values of parameters of the ksText method are used in the output of the string, then the resulting string length may differ from that obtained by the ksGetTextLength method.
Conclusion
In this lesson, we learned how to display simple text labels using the ksText method. This is not the only way to display text, but perhaps the easiest. In the next lesson we will look at how to use this method to display complex compound strings. And on the following we will consider more complex text output methods.
To be continued, stay tuned to the blog.
 Sergey Norseev, Ph.D., author of the book “Development of applications for COMPAS in Delphi”.
Content of the cycle of lessons “Working with the API KOMPAS-3D”
Text anchor point
Text in KOMPAS is always displayed relative to some point, which is called the anchor point. The text may be different relative to it. In order to find out the position of the text relative to the anchor point, use the ksGetTextAlign method of the ksDocument2D interface. Below is its prototype.
')
long ksGetTextAlign ( long pText // ); As a single parameter, it takes an integer pointer to the "text" object. The method returns the type of binding , or -1 in case of an error. Valid types of bindings are shown in the table below.
Table of allowed types of bindings
To change the text binding, use the ksDetment2D interface's ksSetTextAlign method . Below is its prototype.
long ksSetTextAlign ( long pText, // «» long align // ); If successful, this method returns the value 1 , and in case of error, it returns zero .
Text output
For simple text output, the ksText method of the ksDocument2D interface is used . Below is a prototype of this method.
long ksText ( double x, // double y, double ang, // double hStr, // double ksuStr, // long bitVector, // BSTR s // ); Let us analyze the parameters of the ksText method. The anchor point we discussed in the previous section.
The ang parameter sets the angle in degrees between the text line and the horizontal line. The angle is counted counterclockwise. The figure below shows a line drawn at an angle of 45 ° .
String derived at an angle of 45 °
The hStr parameter sets the character size of the string in millimeters. If the value of this parameter is zero , then the default size is used.
The ksuStr parameter sets the stretching (narrowing) of the text. The figure below shows several lines with different values for the ksuStr parameter.
Multiple lines with different stretch values
From this figure, you can see that “stretching 0” is equivalent to “stretching 1,” that is, the absence of any stretching.
The bitVector parameter contains a set of flags defining the character outline. Valid flags are listed in the table below.
Table of flags defining the character outline
In fact, there are other valid flags, but their work is manifested only in the construction of complex compound strings. We will look at some of them in the next lesson.
Remember - the output string must not contain the characters @ , $ , & , ~ , ^ and # , as they are control characters. We will talk about working with them in the next lessons of our cycle.
If successful, the ksText method returns an integer pointer to the text. This pointer can be passed, for example, to the ksSetTextAlign method to change the position of the text relative to the anchor point. In the event of an error, the ksText method returns zero .
Example
Below is an example of a program that demonstrates the output of a string using the ksText method.
// BSTR str = SysAllocString(L""); long itext; itext = Document2D->ksText(100, 100, // 0, // 11, // 0, // 0, // str); SysFreeString(str); // Document2D->ksSetTextAlign(itext, txta_Left); Document2D.Unbind(); // kompas->Visible = true; kompas.Unbind(); For simplicity, in this example, the code responsible for the creation and execution of the document is omitted. As a result of the work of this program, the text “Line” is displayed in the document.
Text size
When outputting text to a document, it is helpful to know how much space it takes. Text height is set by the hStr parameter of the ksText method. But its length directly depends on the output string.
To define it, use the ksGetTextLengthFromReference method of the ksDocument2D interface. This method has only one parameter - an integer pointer to the text. It returns the text length in millimeters.
The ksGetTextLengthFromReference method is inconvenient in that it does not allow determining the length of a string before its output to a document. To determine the length of a string that has not yet been output to the document, you need to use the ksGetTextLength method. But before considering it, let's talk about styles.
Text styles
The KOMPAS system predetermines several styles for texts displayed in documents. Each style corresponds to an integer. The most commonly used styles are in the table below.
Most commonly used text styles
Not all styles are shown in this table: only a part of them. A complete list of available constants can be found on the page “Parameters Structures and Constants \ Constants \ Text Constants \ System Text Styles” of the COMPASS documentation.
KsGetTextLength method
The ksGetTextLength method of the ksDocument2D interface allows you to determine the length of a string before it is output to a document. Below is a prototype of this method.
double ksGetTextLength ( BSTR text, // long style // ); The method returns the string length in millimeters. Note: the method takes as its parameter the string itself, and not the pointer to the “text” object. This allows you to estimate the size of the string before it is displayed in the document.
Example
Consider an example of using the ksGetTextLength method. Suppose we have a string and it needs to be placed in a rectangle of a certain length (this problem is solved much easier with the help of paragraphs, but about them in the next lessons). If the string fits in it, then it is displayed completely. If not, it is clipped and an ellipsis is placed at the end of it. Below is the source code of the program that solves this problem.
const wchar_t FULLSTR[] = L" ! ! !"; const wchar_t DOTS[] = L"..."; const long STYLE = 1; double maxSize = 100.0; BSTR str = SysAllocString(FULLSTR); if(Document2D->ksGetTextLength(str, STYLE) > maxSize) { // BSTR str_dots = SysAllocString(DOTS); double size_dots = Document2D->ksGetTextLength(str_dots, STYLE); SysFreeString(str_dots); // maxSize -= size_dots; SysReAllocStringLen(&str, str, SysStringLen(str) - 4); // , while(Document2D->ksGetTextLength(str, STYLE) > maxSize) SysReAllocStringLen(&str, str, SysStringLen(str) - 1); // size_t len = SysStringLen(str); SysFreeString(str); // wchar_t *p = new wchar_t[len + wcslen(DOTS) + 1]; wcsncpy(p, FULLSTR, len); p[len] = L'\0'; wcscat(p, DOTS); str = SysAllocString(p); delete [] p; } // Document2D->ksText(100, 100, // 0, // 0, // 0, // 0, // str); // SysFreeString(str); Document2D.Unbind(); // kompas->Visible = true; kompas.Unbind(); The source string is specified in the FULLSTR constant. The variable maxSize specifies the length of the rectangle in which to insert the string. Later this value is specified, the size of the ellipsis is subtracted from it, which is stored in the size_dots variable. If the line does not fit, one character is cut off from it until it fits in a rectangle of a given size. This happens in a while loop .
Pay attention to a very important point: when displaying a string, all parameters of the ksText method (except for the coordinates of the anchor point) have a zero value . The fact is that the ksGetTextLength method does not know anything about these parameters, so it cannot take them into account when calculating the length of a string. Thus, if non-zero values of parameters of the ksText method are used in the output of the string, then the resulting string length may differ from that obtained by the ksGetTextLength method.
Conclusion
In this lesson, we learned how to display simple text labels using the ksText method. This is not the only way to display text, but perhaps the easiest. In the next lesson we will look at how to use this method to display complex compound strings. And on the following we will consider more complex text output methods.
To be continued, stay tuned to the blog.
Sergey Norseev, Ph.D., author of the book “Development of applications for COMPAS in Delphi”.Source: https://habr.com/ru/post/417723/
All Articles