From simple scripts to a client-server application on WCF with my own hands: why I like working in CM
Working in a Configuration Management team is related to providing the functionality of build processes — assembling a company's products, pre-checking code, statistical analysis, documentation, and much more. In addition, we are constantly working to optimize various processes, and, remarkably, we are practically free to choose tools for this interesting work. Next, I will talk in detail about how, having only different levels of knowledge in C # and C ++, I made a functional WCF service for working with fix queues. And why decided that it is very important.

A small lyrical digression, so that you understand why I am so worried about the automation and optimization of processes.
Before Veeam, I worked at a large international company - I was the team leader of the Configuration Management team, I was building the application and deploying it on test environments. The program was successfully developed, new functions were added, documentation was written, the support of which I also worked on. But I always wondered why such a serious program does not have a normal system of parameter configuration, which many dozens, if not hundreds, had.
')
I communicated on this topic with the developers and received an answer - the customer did not pay for this feature, did not agree on its cost, so the feature was not implemented. And in fact, QA suffered and directly we, the CM team. The configuration of the program and its pre-setting was carried out through a variety of configuration files, each of which contained dozens of parameters.
Each new build, each new version made its own configuration changes. Old configuration files could not be used, as they were often incompatible with the new version. As a result, each time before deploying the build for the test or on the testers' working machines, it was necessary to spend a lot of time configuring the program, correcting configuration errors, and constantly consulting with developers on the topic “why is this not so now”? In general, the process was extremely not optimized.
To assist in setting up, we had an instruction for 117 pages in Arial font size 9. We had to read very, very carefully. Sometimes it seemed that it was easier to build a Linux kernel with eyes closed while the computer was turned off.
It became clear that without optimization is not enough. I started writing my configurator for a program with profile support and the ability to change parameters in a few seconds, but the project went to its final stage, and I moved to another project. In it, we analyzed a lot of logs of one billing system for possible bugs in the server part. Automating many actions using Python saved me from the monstrous amount of manual work. I really liked this scripting language, and with its help we made a set of analysis scripts for all occasions. Those tasks that required several days of thoughtful analysis using the “cat logfile123 | grep something_special, took a few minutes. Everything became great ... and boring.
I came to Veeam as a small SM team. Many processes required automation, optimization, rethinking. But given complete freedom in the choice of tools! The developer is obliged to use a specific programming language, code-style, a certain set of libraries. The SM can use nothing at all to solve the problem, if he has enough time, courage and patience.
Veeam, like many other companies, has the task of building updates for products. The update included hundreds of files, and it was necessary to change only those that have changed, given a number of important conditions. To do this, we created a lengthy powershell script that could climb in TFS, select files, lay them out according to the necessary daddies. The functionality of the script was supplemented, it gradually became huge, it took a lot of time to debug and constantly some crutches to boot. It was necessary to urgently do something.
Here are the main complaints:
It was necessary to deal with these tasks and add pleasant trifles, which the developers also would not have refused.
A private fix in the context of our development is a specific set of fixes in the code that is stored in the Team Foundation Server for the release branch in the shelveset. A small explanation for those who are not too familiar with TFS terminology:
This is what the private fix builder does:
For the convenience of developers, a web interface is used, where you can specify the product for which you need to collect a private fix, specify the network set number, select projects for which you want to assemble a private fix, and add a fix assembly to the queue. The screenshot below shows the final working version of the web application, which displays the current status of the build, the queue of private fixes and the history of their assembly. In our example, only the organization queue for assembling private fixes is considered.
In this article I will explain how I implemented the setting of the assembly of fixes to the queue and their sequential launch on the builder. Here are the parts of the solution:
Additionally, they created a new convenient web application that can work with several builders and log events. In order not to overload the article, we will not talk about it in detail yet. In addition, this article does not show how to work with TFS, with the storage history of collected private fixes and various auxiliary classes and functions.

There are many detailed articles describing the creation of WCF services. I liked the material from Microsoft most of all. I took it as a basis for development. To facilitate familiarity with the project, I additionally laid out the binaries . Let's start!
Here we will only have a primary service disc. At this stage, we need to make sure that the service starts and runs. In addition, the code is identical for both QBuilder.AppLauncher and QBuilder.AppQueue, so this process will need to be repeated two times.
Now, when the working blank of service is received, we add functions necessary for us.
When I started learning how to write a WCF service from scratch, I read a bunch of articles on this topic. On my desk lay a dozen or two printed sheets, on which I understood what and how. I admit, I did not succeed in starting the service right away. I spent a lot of time and came to the conclusion that making a service pig is really important. With it you will be sure that everything works and you can begin to implement the necessary functions. The approach may seem wasteful, but it will make life easier if a bunch of written code does not work as it should.
Let's go back to the application. At the debugging stage and in some other cases, it is required to start the service as a console application without registering as a service. This is a very useful feature that allows you to do without the tedious use of debuggers. It is in this mode that the QBuilder.AppLauncher service works. Here's how to implement it:
Service is made extremely simple, there are no additional checks. He can run applications only in the console version and on behalf of the administrator. It can also run them as a service - but you will not see them, they will spin in the background and you can only see them through the Task Manager. All this can be realized, but this is a topic for a separate article. Here the main thing for us is an illustrative working example.
The function starts any application with parameters. The Domain and Username parameters are not used in this context and may be empty, since the service starts the application from the console session with administrator rights.
As previously described, this service is online and allows you to run applications in the current user session, checks whether the process is running or has already been completed.

Any keystroke in the service console closes it, be careful.
If everything works, go to the next step.
And now let's move on to the most important service, for the sake of which the whole article was written! We repeat the sequence of actions in the chapter “Creating the QBuilder.AppLauncher service” and in the “Adding the ability to run from the console” chapter, replacing AppLauncher with AppQueue in the code.
Now we can access the service interface from our program.
In the namespace QBuilder.AppQueue, add the QBuildRecord class:
Add a class CXmlQueue.cs to our project, where there will be a number of procedures for working with an XML file:
In the original code, all these procedures were placed in the main class, but for clarity, I made a separate class CXmlQueue. The class is created in the QBuilder.AppQueue namespace namespace; check that all necessary definitions are specified:
So, we implement. Directly class CXmlQueue:
The queue in the XML file looks like this:
Create a BuildQueue.xml file with this content and put it in the directory with the executable file. This file will be used in test debugging to match test results.
In this class, I place auxiliary functions. Now there is only one function, FormatParameters, which formats the parameters for transfer to the console application for launch. Listing of the AuxFunctions.cs file:
The test function TestConnection at this stage can be removed. To implement the work of the queue, I needed the following set of functions:
The interface will be like this:
Add new variables to the class body:
In the AppQueueWindowsService () constructor, add functions to read the configuration file, initialize the services and queue classes:
AgentTimeout - the frequency of the timer. Specified in milliseconds. Here we ask that the timer should fire every 30 seconds. In the original, this parameter is in the configuration file. For the article, I decided to ask him in the code.
Add the function of checking the launched build process to the class:
Add a procedure for working with a timer:
We make changes to the OnStart function, we add a function for working with a timer:
This is how it should look like now:
In the section we add the following set of parameters:
The queue is working!
The powershell script has been sent to a landfill. The new application is completely written in C #. We have the opportunity to use rulesets - the rules that made the selection of files according to special criteria and inserted them only in certain places in the setup script. Due to the new hashing system, they solved the problem of selecting files only by name and size - it appeared when, with the same name and size, the files differed in content. The new update build program does not treat files as files — it treats them as MD5 hashes and creates a hash table in which each set of files in a specific directory has its own unique hash.

Screenshot of the final solution that we use in our work
Minor improvements to the solution are being made all the time, but we have already solved the most important problem - the new approach allowed us to completely remove the human factor and save ourselves from the heap of crutches. The system turned out so universal that in the near future it will be used to build hotfixes, where several files change. All this will work through a web interface using another application.
During the project, I figured out how to work with XML, with configuration files, with the file system. Now I have my own work, which I successfully use in other projects. For clarity of the article, I removed a large amount of code that could distract from the essence, and made a serious refactoring.
I hope this article will help you in working with WCF-services, with timers in the body of services and implementing queues through XML-files. You can watch the work of applications and queues in the video:
PS I want to thank Victor Borodich, whose advice helped a lot to bring this system to the working view. Victor argues that if you plant a number of experienced developers and juniors, the quality of the code from the latter will definitely increase.
Automate once or 117 page instruction again and again
A small lyrical digression, so that you understand why I am so worried about the automation and optimization of processes.
Before Veeam, I worked at a large international company - I was the team leader of the Configuration Management team, I was building the application and deploying it on test environments. The program was successfully developed, new functions were added, documentation was written, the support of which I also worked on. But I always wondered why such a serious program does not have a normal system of parameter configuration, which many dozens, if not hundreds, had.
')
I communicated on this topic with the developers and received an answer - the customer did not pay for this feature, did not agree on its cost, so the feature was not implemented. And in fact, QA suffered and directly we, the CM team. The configuration of the program and its pre-setting was carried out through a variety of configuration files, each of which contained dozens of parameters.
Each new build, each new version made its own configuration changes. Old configuration files could not be used, as they were often incompatible with the new version. As a result, each time before deploying the build for the test or on the testers' working machines, it was necessary to spend a lot of time configuring the program, correcting configuration errors, and constantly consulting with developers on the topic “why is this not so now”? In general, the process was extremely not optimized.
To assist in setting up, we had an instruction for 117 pages in Arial font size 9. We had to read very, very carefully. Sometimes it seemed that it was easier to build a Linux kernel with eyes closed while the computer was turned off.
It became clear that without optimization is not enough. I started writing my configurator for a program with profile support and the ability to change parameters in a few seconds, but the project went to its final stage, and I moved to another project. In it, we analyzed a lot of logs of one billing system for possible bugs in the server part. Automating many actions using Python saved me from the monstrous amount of manual work. I really liked this scripting language, and with its help we made a set of analysis scripts for all occasions. Those tasks that required several days of thoughtful analysis using the “cat logfile123 | grep something_special, took a few minutes. Everything became great ... and boring.
Configuration Management - new adventures
I came to Veeam as a small SM team. Many processes required automation, optimization, rethinking. But given complete freedom in the choice of tools! The developer is obliged to use a specific programming language, code-style, a certain set of libraries. The SM can use nothing at all to solve the problem, if he has enough time, courage and patience.
Veeam, like many other companies, has the task of building updates for products. The update included hundreds of files, and it was necessary to change only those that have changed, given a number of important conditions. To do this, we created a lengthy powershell script that could climb in TFS, select files, lay them out according to the necessary daddies. The functionality of the script was supplemented, it gradually became huge, it took a lot of time to debug and constantly some crutches to boot. It was necessary to urgently do something.
What the developers wanted
Here are the main complaints:
- Unable to put the fixes in the queue. You have to constantly check the web page to see when the assembly of the private fix is complete and you can run your own assembly.
- No error notifications - in order to see errors in the GUI of the build application, you have to go to the server and watch a lot of voluminous logs.
- No build history of private fixes.
It was necessary to deal with these tasks and add pleasant trifles, which the developers also would not have refused.
What are private fixes
A private fix in the context of our development is a specific set of fixes in the code that is stored in the Team Foundation Server for the release branch in the shelveset. A small explanation for those who are not too familiar with TFS terminology:
- check-in - a set of local changes in the source code, which is made to the code stored in TFS. This check can be checked using Continuous Integration / Gated Check-in processes, allowing you to skip only the correct code and reject all check-ins violating the collection of the final project.
- shelveset is a set of local changes in the source code that is not made directly to the source code located in TFS, but is available by its name. Shelvset can be deployed on a local developer or build system to work with modified code that is not included in TFS. Also, the shelfset can be added to TFS as a check after deployment, when all work on it is completed. For example, this is how gateted chekin works. First, the shellset is checked on the builder. If the check is successful, the boxset turns into a check!
This is what the private fix builder does:
- Gets the name (number) of the shelvset and expands it on the private fixes builder. As a result, we get the source code of the release product plus changes / fixes from the silkset. The release branch remains unchanged.
- On the private fixes builder, a project or a series of projects for which a private fix was executed is collected.
- The set of compiled binary files is copied to the network directory of the private fix. The directory contains the name of the shelvset, which is a sequence of numbers.
- The source code on the private fixes builder is reduced to its original form.
For the convenience of developers, a web interface is used, where you can specify the product for which you need to collect a private fix, specify the network set number, select projects for which you want to assemble a private fix, and add a fix assembly to the queue. The screenshot below shows the final working version of the web application, which displays the current status of the build, the queue of private fixes and the history of their assembly. In our example, only the organization queue for assembling private fixes is considered.
What did i have
- Private fixes builder who collected private fixes from TFS shells by running the console application with the specified command line parameters.
- Veeam.Builder.Agent is a WCF service written by Veeam, which runs the application with parameters in the console mode under the current user and returns the current status of the application.
- The IIS web service is a Windows Forms application that allowed you to enter the name of a network chain, set parameters and start the process of building a private fix.
- Very shallow programming knowledge - C ++, some C # at the university and writing small applications for automation, adding new functions to current build processes and as a hobby.
- Experienced colleagues, Google and Indian articles on MSDN are the sources of all the answers.
What do we do
In this article I will explain how I implemented the setting of the assembly of fixes to the queue and their sequential launch on the builder. Here are the parts of the solution:
- QBuilder.AppQueue is my WCF service that provides work with the build queue and calls the Veeam.Builder.Agent service to run the build program.
- dummybuild.exe is a stub program used for debugging and as a visual aid. Needed to visualize the passed parameters.
- QBuilder.AppLauncher is a WCF service that runs applications in the current user’s console and runs interactively. This is significantly simplified, written specifically for this article analogue of the program Veeam.Builder.Agent. The original service can work as a windows-service and run applications in the console, which requires additional work with the Windows API. To describe all the tricks would require a separate article. My example works as a simple interactive console service and uses two functions - starting a process with parameters and checking its status.
Additionally, they created a new convenient web application that can work with several builders and log events. In order not to overload the article, we will not talk about it in detail yet. In addition, this article does not show how to work with TFS, with the storage history of collected private fixes and various auxiliary classes and functions.
Creation of WCF-services
There are many detailed articles describing the creation of WCF services. I liked the material from Microsoft most of all. I took it as a basis for development. To facilitate familiarity with the project, I additionally laid out the binaries . Let's start!
Create a QBuilder.AppLauncher service
Here we will only have a primary service disc. At this stage, we need to make sure that the service starts and runs. In addition, the code is identical for both QBuilder.AppLauncher and QBuilder.AppQueue, so this process will need to be repeated two times.
- Create a new console application named QBuilder.AppLauncher
- Rename Program.cs to Service.cs
- Rename the namespace to QBuilder.AppLauncher
- Add the following references to the project:
a. System.ServiceModel.dll
b. System.ServiceProcess.dll
c. System.Configuration.Install.dll - Add the following definitions to Service.cs
using System.ComponentModel; using System.ServiceModel; using System.ServiceProcess; using System.Configuration; using System.Configuration.Install;
In the process of further assembly, the following definitions will also be needed:using System.Reflection; using System.Xml.Linq; using System.Xml.XPath; - We define the IAppLauncher interface and add functions for working with the queue:
// [ServiceContract(Namespace = "http://QBuilder.AppLauncher")] public interface IAppLauncher { // [OperationContract] bool TestConnection(); } - In the AppLauncherService class, we implement the interface and test function TestConnection:
public class AppLauncherService : IAppLauncher { public bool TestConnection() { return true; } } - Create a new class AppLauncherWindowsService, which inherits the ServiceBase class. Add a local serviceHost variable - a link to ServiceHost. We define the Main method, which calls ServiceBase.Run (new AppLauncherWindowsService ()):
public class AppLauncherWindowsService : ServiceBase { public ServiceHost serviceHost = null; public AppLauncherWindowsService() { // Name the Windows Service ServiceName = "QBuilder App Launcher"; } public static void Main() { ServiceBase.Run(new AppLauncherWindowsService()); } - Override the OnStart () function that creates a new instance of ServiceHost:
protected override void OnStart(string[] args) { if (serviceHost != null) { serviceHost.Close(); } // Create a ServiceHost for the CalculatorService type and // provide the base address. serviceHost = new ServiceHost(typeof(AppLauncherService)); // Open the ServiceHostBase to create listeners and start // listening for messages. serviceHost.Open(); } - Override the onStop function that closes the ServiceHost instance:
protected override void OnStop() { if (serviceHost != null) { serviceHost.Close(); serviceHost = null; } } } - Create a new class ProjectInstaller, inherited from the Installer and marked RunInstallerAttribute, which is set to True. This allows you to install the Windows service using the installutil.exe program:
[RunInstaller(true)] public class ProjectInstaller : Installer { private ServiceProcessInstaller process; private ServiceInstaller service; public ProjectInstaller() { process = new ServiceProcessInstaller(); process.Account = ServiceAccount.LocalSystem; service = new ServiceInstaller(); service.ServiceName = "QBuilder App Launcher"; Installers.Add(process); Installers.Add(service); } } - Change the contents of the app.config file:
<?xml version="1.0" encoding="utf-8" ?> <configuration> <system.serviceModel> <services> <service name="QBuilder.AppLauncher.AppLauncherService" behaviorConfiguration="AppLauncherServiceBehavior"> <host> <baseAddresses> <add baseAddress="http://localhost:8000/QBuilderAppLauncher/service"/> </baseAddresses> </host> <endpoint address="" binding="wsHttpBinding" contract="QBuilder.AppLauncher.IAppLauncher" /> <endpoint address="mex" binding="mexHttpBinding" contract="IMetadataExchange" /> </service> </services> <behaviors> <serviceBehaviors> <behavior name="AppLauncherServiceBehavior"> <serviceMetadata httpGetEnabled="true"/> <serviceDebug includeExceptionDetailInFaults="False"/> </behavior> </serviceBehaviors> </behaviors> </system.serviceModel> </configuration>
We check the serviceability of the service
- Compile the service.
- Install it with the installutil.exe command
1) Go to the folder where the compiled service file is
2) Run the installation command:
C: \ Windows \ Microsoft .NET \ Framework64 \ v4.0.30319 \ InstallUtil.exe - Go to the services.msc snap-in, check for the availability of the QBuilder App Launcher service and launch it.
- The serviceability of the service is checked using the WcfTestClient.exe program, which is included in the delivery of VisualStudio:
1) Run WcfTestClient
2) Add the address of the service: http: // localhost: 8000 / QBuilderAppLauncher / service
3) The service interface opens:
4) Call the TestConnection test function, check that everything works and the function returns a value: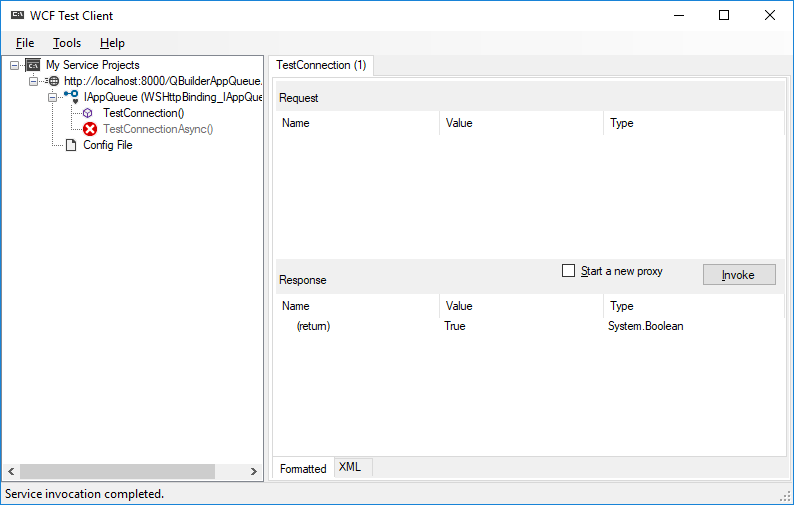
Now, when the working blank of service is received, we add functions necessary for us.
Why do I need a test function that does nothing
When I started learning how to write a WCF service from scratch, I read a bunch of articles on this topic. On my desk lay a dozen or two printed sheets, on which I understood what and how. I admit, I did not succeed in starting the service right away. I spent a lot of time and came to the conclusion that making a service pig is really important. With it you will be sure that everything works and you can begin to implement the necessary functions. The approach may seem wasteful, but it will make life easier if a bunch of written code does not work as it should.
Add the ability to run from the console
Let's go back to the application. At the debugging stage and in some other cases, it is required to start the service as a console application without registering as a service. This is a very useful feature that allows you to do without the tedious use of debuggers. It is in this mode that the QBuilder.AppLauncher service works. Here's how to implement it:
- Add the RunInteractive procedure to the AppLauncherWindowsService class that provides the service in the console mode:
static void RunInteractive(ServiceBase[] services) { Console.WriteLine("Service is running in interactive mode."); Console.WriteLine(); var start = typeof(ServiceBase).GetMethod("OnStart", BindingFlags.Instance | BindingFlags.NonPublic); foreach (var service in services) { Console.Write("Starting {0}...", service.ServiceName); start.Invoke(service, new object[] { new string[] { } }); Console.Write("Started {0}", service.ServiceName); } Console.WriteLine(); Console.WriteLine("Press any key to stop the services and end the process..."); Console.ReadKey(); Console.WriteLine(); var stop = typeof(ServiceBase).GetMethod("OnStop", BindingFlags.Instance | BindingFlags.NonPublic); foreach (var service in services) { Console.Write("Stopping {0}...", service.ServiceName); stop.Invoke(service, null); Console.WriteLine("Stopped {0}", service.ServiceName); } Console.WriteLine("All services stopped."); } - We make changes to the Main procedure - we add the processing of command line parameters. If the / console parameter is present and the user session is open, we launch the program in interactive mode. Otherwise, we run as a service.
public static void Main(string[] args) { var services = new ServiceBase[] { new AppLauncherWindowsService() }; // , /console if (args.Length == 1 && args[0] == "/console" && Environment.UserInteractive) { // RunInteractive(services); } else { // ServiceBase.Run(services); } }
Add functions to launch the application and check its status
Service is made extremely simple, there are no additional checks. He can run applications only in the console version and on behalf of the administrator. It can also run them as a service - but you will not see them, they will spin in the background and you can only see them through the Task Manager. All this can be realized, but this is a topic for a separate article. Here the main thing for us is an illustrative working example.
- To begin with, we add the global variable appProcess, which stores the currently running process.
Add it to the classpublic class AppLauncherService : IAppLauncher:public class AppLauncherService : IAppLauncher { Process appProcess; - Add to this class a function that checks the status of the running process:
public bool IsStarted() { if (appProcess!=null) { if (appProcess.HasExited) { return false; } else { return true; } } else { return false; } }
The function returns false if the process does not exist or is not already started, and true if the process is active. - Add the app launch function:
public bool Start(string fileName, string arguments, string workingDirectory, string domain, string userName, int timeoutInMinutes) { ProcessStartInfo processStartInfo = new ProcessStartInfo(); processStartInfo.FileName = fileName; processStartInfo.Arguments = arguments; processStartInfo.Domain = domain; processStartInfo.UserName = userName; processStartInfo.CreateNoWindow = false; processStartInfo.UseShellExecute = false; try { if (appProcess!=null) { if (!appProcess.HasExited) { Console.WriteLine("Process is still running. Waiting..."); return false; } } } catch (Exception ex) { Console.WriteLine("Error while checking process: {0}", ex); } try { appProcess = new Process(); appProcess.StartInfo = processStartInfo; appProcess.Start(); } catch (Exception ex) { Console.WriteLine("Error while starting process: {0}",ex); } return true; }
The function starts any application with parameters. The Domain and Username parameters are not used in this context and may be empty, since the service starts the application from the console session with administrator rights.
Starting the QBuilder.AppLauncher service
As previously described, this service is online and allows you to run applications in the current user session, checks whether the process is running or has already been completed.
- To work, you need the files QBuilder.AppLauncher.exe and QBuilder.AppLauncher.exe.config, which are in the archive by the link above. There is also the source code for this application for self-assembly.
- We start service with the rights of the administrator.
- The service console window will open:
Any keystroke in the service console closes it, be careful.
- For tests, run wcftestclient.exe, included in the delivery of Visual Studio. We check the availability of the service at http: // localhost: 8000 / QBuilderAppLauncher / service or open the link in Internet Explorer.
If everything works, go to the next step.
Create a QBuilder.AppQueue service
And now let's move on to the most important service, for the sake of which the whole article was written! We repeat the sequence of actions in the chapter “Creating the QBuilder.AppLauncher service” and in the “Adding the ability to run from the console” chapter, replacing AppLauncher with AppQueue in the code.
Add a link to the QBuilder.AppLauncher service for use in the queue service
- In the Solution Explorer for our project, select Add Service Reference and specify the address: localhost : 8000 / QBuilderAppLauncher / service
- Select the name namespace: AppLauncherService.
Now we can access the service interface from our program.
Create a structure for storing items of the queue
In the namespace QBuilder.AppQueue, add the QBuildRecord class:
// , public class QBuildRecord { // ID public string BuildId { get; set; } // ID public string IssueId { get; set; } // public string IssueName { get; set; } // public DateTime StartDate { get; set; } // public DateTime FinishDate { get; set; } // C# public bool Build_CSharp { get; set; } // C++ public bool Build_Cpp { get; set; } } Implementing the work class with the CXmlQueue queue
Add a class CXmlQueue.cs to our project, where there will be a number of procedures for working with an XML file:
- Constructor CXmlQueue - sets during initialization the name of the file where the queue is stored.
- SetCurrentBuild - writes the current build information to the queue XML file. This item is not in the queue, it stores information about the currently running process. It may be empty.
- GetCurrentBuild - gets the parameters of the running process from the XML file queue. It may be empty.
- ClearCurrentBuild is clearing the currentbuild element in the queue XML file if the process has terminated.
- OpenXmlQueue is the function to open the XML file where the queue is stored. If the file is missing, a new one is created.
- GetLastQueueBuildNumber - each build in the queue has its own unique sequence number. This function returns its value, which is stored in the root attribute.
- IncrementLastQueueBuildNumber - increases the value of the build number when placing a new build in the queue.
- GetCurrentQueue - returns a list of QBuildRecord elements from the queue XML file.
In the original code, all these procedures were placed in the main class, but for clarity, I made a separate class CXmlQueue. The class is created in the QBuilder.AppQueue namespace namespace; check that all necessary definitions are specified:
using System; using System.Collections.Generic; using System.Linq; using System.Text; using System.Threading.Tasks; using System.Xml.Linq; using System.Xml.XPath; using System.IO; namespace QBuilder.AppQueue { . . . } So, we implement. Directly class CXmlQueue:
Click to reveal spoiler with code
// XML public class CXmlQueue { // , string xmlBuildQueueFile; public CXmlQueue(string _xmlQueueFile) { xmlBuildQueueFile = _xmlQueueFile; } public string GetQueueFileName() { return xmlBuildQueueFile; } // , xml ( xml) public QBuildRecord GetCurrentBuild() { QBuildRecord qBr; XElement xRoot = OpenXmlQueue(); XElement xCurrentBuild = xRoot.XPathSelectElement("currentbuild"); if (xCurrentBuild != null) { qBr = new QBuildRecord(); qBr.BuildId = xCurrentBuild.Attribute("BuildId").Value; qBr.IssueId = xCurrentBuild.Attribute("IssueId").Value; qBr.StartDate = Convert.ToDateTime(xCurrentBuild.Attribute("StartDate").Value); return qBr; } return null; } // , xml ( xml) public void SetCurrentBuild(QBuildRecord qbr) { XElement xRoot = OpenXmlQueue(); XElement newXe = (new XElement( "currentbuild", new XAttribute("BuildId", qbr.BuildId), new XAttribute("IssueId", qbr.IssueId), new XAttribute("StartDate", DateTime.Now.ToString()) )); XElement xCurrentBuild = xRoot.XPathSelectElement("currentbuild"); if (xCurrentBuild != null) { xCurrentBuild.Remove(); // remove old value } xRoot.Add(newXe); xRoot.Save(xmlBuildQueueFile); } // , xml, , public void ClearCurrentBuild() { XElement xRoot = OpenXmlQueue(); try { XElement xCurrentBuild = xRoot.XPathSelectElement("currentbuild"); if (xCurrentBuild != null) { Console.WriteLine("Clearing current build information."); xCurrentBuild.Remove(); } } catch (Exception ex) { Console.WriteLine("XML queue doesn't have running build yet. Nothing to clear!"); } xRoot.Save(xmlBuildQueueFile); } // XML public XElement OpenXmlQueue() { XElement xRoot; if (File.Exists(xmlBuildQueueFile)) { xRoot = XElement.Load(xmlBuildQueueFile, LoadOptions.None); } else { Console.WriteLine("Queue file {0} not found. Creating...", xmlBuildQueueFile); XElement xE = new XElement("BuildsQueue", new XAttribute("BuildNumber", 0)); xE.Save(xmlBuildQueueFile); xRoot = XElement.Load(xmlBuildQueueFile, LoadOptions.None); } return xRoot; } // public int GetLastQueueBuildNumber() { XElement xRoot = OpenXmlQueue(); if (xRoot.HasAttributes) return int.Parse(xRoot.Attribute("BuildNumber").Value); return 0; } // public int IncrementLastQueueBuildNumber() { int buildIndex = GetLastQueueBuildNumber(); buildIndex++; XElement xRoot = OpenXmlQueue(); xRoot.Attribute("BuildNumber").Value = buildIndex.ToString(); xRoot.Save(xmlBuildQueueFile); return buildIndex; } // xml QBuildRecord public List<QBuildRecord> GetCurrentQueue() { List<QBuildRecord> qList = new List<QBuildRecord>(); XElement xRoot = OpenXmlQueue(); if (xRoot.XPathSelectElements("build").Any()) { List<XElement> xBuilds = xRoot.XPathSelectElements("build").ToList(); foreach (XElement xe in xBuilds) { qList.Add(new QBuildRecord { BuildId = xe.Attribute("BuildId").Value, IssueId = xe.Attribute("IssueId").Value, IssueName = xe.Attribute("IssueName").Value, StartDate = Convert.ToDateTime(xe.Attribute("StartDate").Value), Build_CSharp = bool.Parse(xe.Attribute("Build_CSharp").Value), Build_Cpp = bool.Parse(xe.Attribute("Build_Cpp").Value) }); } } return qList; } } The queue in the XML file looks like this:
<?xml version="1.0" encoding="utf-8"?> <BuildsQueue BuildNumber="23"> <build BuildId="14" IssueId="26086" IssueName="TestIssueName" StartDate="2018-06-13T16:49:50.515238+02:00" Build_CSharp="true" Build_Cpp="true" /> <build BuildId="15" IssueId="59559" IssueName="TestIssueName" StartDate="2018-06-13T16:49:50.6880927+02:00" Build_CSharp="true" Build_Cpp="true" /> <build BuildId="16" IssueId="45275" IssueName="TestIssueName" StartDate="2018-06-13T16:49:50.859937+02:00" Build_CSharp="true" Build_Cpp="true" /> <build BuildId="17" IssueId="30990" IssueName="TestIssueName" StartDate="2018-06-13T16:49:51.0321322+02:00" Build_CSharp="true" Build_Cpp="true" /> <build BuildId="18" IssueId="16706" IssueName="TestIssueName" StartDate="2018-06-13T16:49:51.2009904+02:00" Build_CSharp="true" Build_Cpp="true" /> <build BuildId="19" IssueId="66540" IssueName="TestIssueName" StartDate="2018-06-13T16:49:51.3581274+02:00" Build_CSharp="true" Build_Cpp="true" /> <build BuildId="20" IssueId="68618" IssueName="TestIssueName" StartDate="2018-06-13T16:49:51.5087854+02:00" Build_CSharp="true" Build_Cpp="true" /> <build BuildId="21" IssueId="18453" IssueName="TestIssueName" StartDate="2018-06-13T16:49:51.6713477+02:00" Build_CSharp="true" Build_Cpp="true" /> <build BuildId="22" IssueId="68288" IssueName="TestIssueName" StartDate="2018-06-13T16:49:51.8277942+02:00" Build_CSharp="true" Build_Cpp="true" /> <build BuildId="23" IssueId="89884" IssueName="TestIssueName" StartDate="2018-06-13T16:49:52.0151294+02:00" Build_CSharp="true" Build_Cpp="true" /> <currentbuild BuildId="13" IssueId="4491" StartDate="13.06.2018 16:53:16" /> </BuildsQueue> Create a BuildQueue.xml file with this content and put it in the directory with the executable file. This file will be used in test debugging to match test results.
Adding the AuxFunctions class
In this class, I place auxiliary functions. Now there is only one function, FormatParameters, which formats the parameters for transfer to the console application for launch. Listing of the AuxFunctions.cs file:
using System; using System.Collections.Generic; using System.Linq; using System.Text; using System.Threading.Tasks; namespace QBuilder.AppQueue { class AuxFunctions { // public static string FormatParameters(string fileName, IDictionary<string, string> parameters) { if (String.IsNullOrWhiteSpace(fileName)) { throw new ArgumentNullException("fileName"); } if (parameters == null) { throw new ArgumentNullException("parameters"); } var macros = String.Join(" ", parameters.Select(parameter => String.Format("\"{0}={1}\"", parameter.Key, parameter.Value.Replace(@"""", @"\""")))); return String.Format("{0} /b \"{1}\"", macros, fileName); } } } Add new features to the service interface
The test function TestConnection at this stage can be removed. To implement the work of the queue, I needed the following set of functions:
- PushBuild (QBuildRecord): void. This is a function that adds a new value to the queue XML file with QBuildRecord parameters.
- TestPushBuild (): void. This is a test function that adds test data to a queue in the XML file.
- PullBuild: QBuildRecord. This is a function that retrieves the QBuildRecord value from the queue XML file. It may be empty.
The interface will be like this:
public interface IAppQueue { // [OperationContract] void PushBuild(QBuildRecord qBRecord); // [OperationContract] void TestPushBuild(); // [OperationContract] QBuildRecord PullBuild(); } Implement the functions in the AppQueueService class: IAppQueue:
Click to open spoiler with code
public class AppQueueService : IAppQueue { // , public AppLauncherClient buildAgent; // , private string _xmlQueueFile; public AppQueueService() { // . , . _xmlQueueFile = ConfigurationManager.AppSettings["QueueFileName"]; } public QBuildRecord PullBuild() { QBuildRecord qBr; CXmlQueue xmlQueue = new CXmlQueue(_xmlQueueFile); XElement xRoot = xmlQueue.OpenXmlQueue(); if (xRoot.XPathSelectElements("build").Any()) { qBr = new QBuildRecord(); XElement xe = xRoot.XPathSelectElements("build").FirstOrDefault(); qBr.BuildId = xe.Attribute("BuildId").Value; qBr.IssueId = xe.Attribute("IssueId").Value; qBr.IssueName = xe.Attribute("IssueName").Value; qBr.StartDate = Convert.ToDateTime(xe.Attribute("StartDate").Value); qBr.Build_CSharp = bool.Parse(xe.Attribute("Build_CSharp").Value); qBr.Build_Cpp = bool.Parse(xe.Attribute("Build_Cpp").Value); xe.Remove(); // Remove first element xRoot.Save(xmlQueue.GetQueueFileName()); return qBr; } return null; } public void PushBuild(QBuildRecord qBRecord) { CXmlQueue xmlQueue = new CXmlQueue(_xmlQueueFile); XElement xRoot = xmlQueue.OpenXmlQueue(); xRoot.Add(new XElement( "build", new XAttribute("BuildId", qBRecord.BuildId), new XAttribute("IssueId", qBRecord.IssueId), new XAttribute("IssueName", qBRecord.IssueName), new XAttribute("StartDate", qBRecord.StartDate), new XAttribute("Build_CSharp", qBRecord.Build_CSharp), new XAttribute("Build_Cpp", qBRecord.Build_Cpp) )); xRoot.Save(xmlQueue.GetQueueFileName()); } public void TestPushBuild() { CXmlQueue xmlQueue = new CXmlQueue(_xmlQueueFile); Console.WriteLine("Using queue file: {0}",xmlQueue.GetQueueFileName()); int buildIndex = xmlQueue.IncrementLastQueueBuildNumber(); Random rnd = new Random(); PushBuild (new QBuildRecord { Build_CSharp = true, Build_Cpp = true, BuildId = buildIndex.ToString(), StartDate = DateTime.Now, IssueId = rnd.Next(100000).ToString(), IssueName = "TestIssueName" } ); } } Making changes to the AppQueueWindowsService class: ServiceBase
Add new variables to the class body:
// , private System.Timers.Timer timer; // , public QBuildRecord currentBuild; //public QBuildRecord processingBuild; // , public bool clientStarted; // public string xmlBuildQueueFileName; // public CXmlQueue xmlQueue; // public string btWorkingDir; public string btLocalDomain; public string btUserName; public string buildToolPath; public string btScriptPath; public int agentTimeoutInMinutes; // public AppQueueService buildQueueService; In the AppQueueWindowsService () constructor, add functions to read the configuration file, initialize the services and queue classes:
// try { xmlBuildQueueFileName = ConfigurationManager.AppSettings["QueueFileName"]; buildToolPath = ConfigurationManager.AppSettings["BuildToolPath"]; btWorkingDir = ConfigurationManager.AppSettings["BuildToolWorkDir"]; btLocalDomain = ConfigurationManager.AppSettings["LocalDomain"]; btUserName = ConfigurationManager.AppSettings["UserName"]; btScriptPath = ConfigurationManager.AppSettings["ScriptPath"]; agentTimeout= 30000; // buildQueueService = new AppQueueService(); // xmlQueue = new CXmlQueue(xmlBuildQueueFileName); } catch (Exception ex) { Console.WriteLine("Error while loading configuration: {0}", ex); } AgentTimeout - the frequency of the timer. Specified in milliseconds. Here we ask that the timer should fire every 30 seconds. In the original, this parameter is in the configuration file. For the article, I decided to ask him in the code.
Add the function of checking the launched build process to the class:
// public bool BuildIsStarted() { IAppLauncher builderAgent; try { builderAgent = new AppLauncherClient(); return builderAgent.IsStarted(); } catch (Exception ex) { return false; } } Add a procedure for working with a timer:
private void TimerTick(object sender, System.Timers.ElapsedEventArgs e) { try { // if (!BuildIsStarted()) { // clientStarted, if (clientStarted) { // , clientStarted false currentBuild.FinishDate = DateTime.Now; clientStarted = false; } else { // clientStarted=false ( ) - xmlQueue.ClearCurrentBuild(); } // currentBuild = buildQueueService.PullBuild(); // , if (currentBuild != null) { // true - clientStarted = true; // currentbuild - xml xmlQueue.SetCurrentBuild(currentBuild); // var parameters = new Dictionary<string, string>(StringComparer.OrdinalIgnoreCase) { {"BUILD_ID", currentBuild.BuildId}, {"ISSUE_ID", currentBuild.IssueId}, {"ISSUE_NAME", currentBuild.IssueName}, {"BUILD_CSHARP", currentBuild.Build_CSharp ? "1" : "0"}, {"BUILD_CPP", currentBuild.Build_Cpp ? "1" : "0"} }; // var arguments = AuxFunctions.FormatParameters(btScriptPath, parameters); try { // AppLauncher IAppLauncher builderAgent = new AppLauncherClient(); builderAgent.Start(buildToolPath, arguments, btWorkingDir, btLocalDomain, btUserName, agentTimeout); } catch (Exception ex) { Console.WriteLine(ex); } } } } catch (Exception ex) { Console.WriteLine(ex); } } We make changes to the OnStart function, we add a function for working with a timer:
// OnStart protected override void OnStart(string[] args) { if (serviceHost != null) { serviceHost.Close(); } // this.timer = new System.Timers.Timer(agentTimeout); // this.timer.AutoReset = true; this.timer.Elapsed += new System.Timers.ElapsedEventHandler(this.TimerTick); this.timer.Start(); // ServiceHost AppQueueService serviceHost = new ServiceHost(typeof(AppQueueService)); // ServiceHostBase serviceHost.Open(); } Checking the list of definitions used.
This is how it should look like now:
using System; using System.Collections.Generic; using System.Linq; using System.Text; using System.ComponentModel; using System.ServiceModel; using System.ServiceProcess; using System.Configuration; using System.Configuration.Install; using System.Reflection; using System.Xml.Linq; using System.Xml.XPath; using QBuilder.AppQueue.AppLauncherService; Add a configuration section to App.config
In the section we add the following set of parameters:
<appSettings> <add key="QueueFileName" value="BuildQueue.xml"/> <add key="BuildToolPath" value="c:\temp\dummybuild.exe"/> <add key="BuildToolWorkDir" value="c:\temp\"/> <add key="LocalDomain" value="."/> <add key="UserName" value="username"/> <add key="ScriptPath" value="C:\Temp\BuildSample.bld"/> </appSettings> We check the work of the service
- Unpack the QBuilder.AppLauncher.zip archive. He and other necessary files are available by reference .
- Copy the dummybuild.exe file from the directory inside the binaries archive to the directory, for example, in c: \ temp. This program is a test stub and simply displays the command line parameters that the service passes to the application being launched. If you are using a different directory, remember to change the BuildToolPath and BuildToolWorkDir settings in the configuration file.
- Go to the \ QBuilder.AppLauncher \ binaries \ QBuilder.AppLauncher \ directory and run the QBuilder.AppLauncher.exe file in administrator mode. You can also build this service from source.
- We start the console version of the compiled service with the QBuilder.AppQueue.exe / console command with administrator rights.
- We check that the service has started and is running:

- Run and wait. If everything works successfully, after 30 seconds the following window will appear:

- Open the BuildQueue.xml file and observe how the queue shrinks and the currentbuild value changes:
<?xml version="1.0" encoding="utf-8"?> <BuildsQueue BuildNumber="23"> <build BuildId="19" IssueId="66540" IssueName="TestIssueName" StartDate="2018-06-13T16:49:51.3581274+02:00" Build_CSharp="true" Build_Cpp="true" /> <build BuildId="20" IssueId="68618" IssueName="TestIssueName" StartDate="2018-06-13T16:49:51.5087854+02:00" Build_CSharp="true" Build_Cpp="true" /> <build BuildId="21" IssueId="18453" IssueName="TestIssueName" StartDate="2018-06-13T16:49:51.6713477+02:00" Build_CSharp="true" Build_Cpp="true" /> <build BuildId="22" IssueId="68288" IssueName="TestIssueName" StartDate="2018-06-13T16:49:51.8277942+02:00" Build_CSharp="true" Build_Cpp="true" /> <build BuildId="23" IssueId="89884" IssueName="TestIssueName" StartDate="2018-06-13T16:49:52.0151294+02:00" Build_CSharp="true" Build_Cpp="true" /> <currentbuild BuildId="18" IssueId="16706" StartDate="13.06.2018 23:20:06" /> </BuildsQueue> - Each time dummy closes, the process is simulated to terminate, after which the next element in the queue is launched:
<?xml version="1.0" encoding="utf-8"?> <BuildsQueue BuildNumber="23"> <build BuildId="21" IssueId="18453" IssueName="TestIssueName" StartDate="2018-06-13T16:49:51.6713477+02:00" Build_CSharp="true" Build_Cpp="true" /> <build BuildId="22" IssueId="68288" IssueName="TestIssueName" StartDate="2018-06-13T16:49:51.8277942+02:00" Build_CSharp="true" Build_Cpp="true" /> <build BuildId="23" IssueId="89884" IssueName="TestIssueName" StartDate="2018-06-13T16:49:52.0151294+02:00" Build_CSharp="true" Build_Cpp="true" /> <currentbuild BuildId="20" IssueId="68618" StartDate="13.06.2018 23:24:25" /> </BuildsQueue>
The queue is working!
results
The powershell script has been sent to a landfill. The new application is completely written in C #. We have the opportunity to use rulesets - the rules that made the selection of files according to special criteria and inserted them only in certain places in the setup script. Due to the new hashing system, they solved the problem of selecting files only by name and size - it appeared when, with the same name and size, the files differed in content. The new update build program does not treat files as files — it treats them as MD5 hashes and creates a hash table in which each set of files in a specific directory has its own unique hash.
Screenshot of the final solution that we use in our work
Minor improvements to the solution are being made all the time, but we have already solved the most important problem - the new approach allowed us to completely remove the human factor and save ourselves from the heap of crutches. The system turned out so universal that in the near future it will be used to build hotfixes, where several files change. All this will work through a web interface using another application.
During the project, I figured out how to work with XML, with configuration files, with the file system. Now I have my own work, which I successfully use in other projects. For clarity of the article, I removed a large amount of code that could distract from the essence, and made a serious refactoring.
I hope this article will help you in working with WCF-services, with timers in the body of services and implementing queues through XML-files. You can watch the work of applications and queues in the video:
PS I want to thank Victor Borodich, whose advice helped a lot to bring this system to the working view. Victor argues that if you plant a number of experienced developers and juniors, the quality of the code from the latter will definitely increase.
Source: https://habr.com/ru/post/417701/
All Articles