You and Brad Pitt look like 99%
We in the analytics department of the Okko online cinema like to automate as much as possible the calculations of the fees of the Alexander Nevsky films, and in the time that has become free to learn new things and implement cool things that for some reason usually translate into bots for Telegram. For example, before the start of the 2018 World Cup, we rolled out a bot to the working chat, which collected bets on the distribution of the final places, and after the finals, we calculated the results on a preconceived metric and determined the winners. Croatia in the four did not put one.
The recent free time from the compilation of the TOP-10 Russian comedies, we have devoted to the creation of a bot , which finds the celebrity to which the user is most like a person. In the working chat, everyone appreciated the idea so much that we decided to make the bot publicly available. In this article, we briefly recall the theory, tell you about the creation of our bot and how to do this yourself.
A bit of theory (mostly in pictures)
In detail about how the facial recognition systems are arranged, I told in one of my previous articles . An interested reader can follow the link, and I will set out below only the main points.
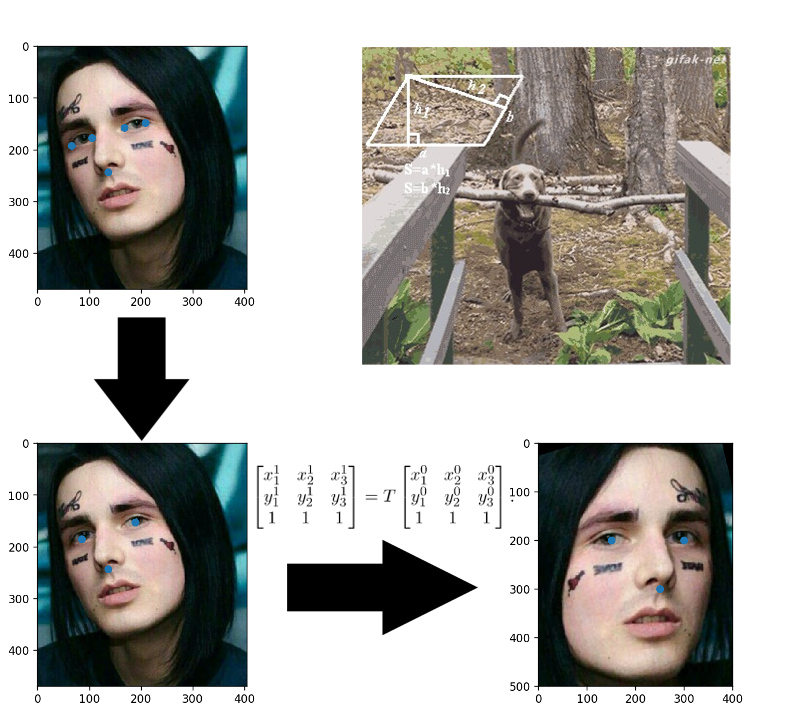
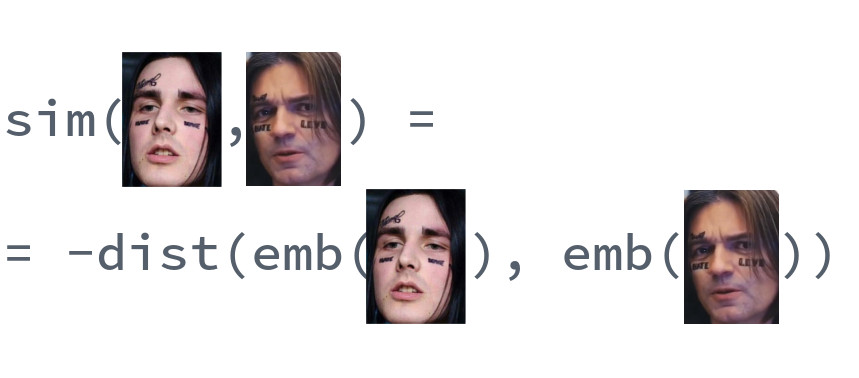
So, you have a photo, which may even show a face, and you want to know whose it is. To do this, you need to perform 4 simple steps:
- Select the rectangle bounding the face.
- Highlight key point faces.
- Align and trim the face.
- Convert a face image into some machine interpretable representation.
- Compare this view with others you have available.
Face highlighting
And although convolutional neural networks have recently learned to find faces in an image as well as classical methods, they are still inferior to classic HOG in speed and ease of use.
HOG - Histograms of Oriented Gradients. To each pixel of the original image, this guy sets his gradient in correspondence - a vector in the direction of which the brightness of the pixels changes the most. The advantage of this approach is that it does not matter the absolute brightness values of the pixels, just their relationship is enough. Therefore, both normal and darkened, and poorly lit, and a noisy face will be displayed in approximately the same gradient histogram.
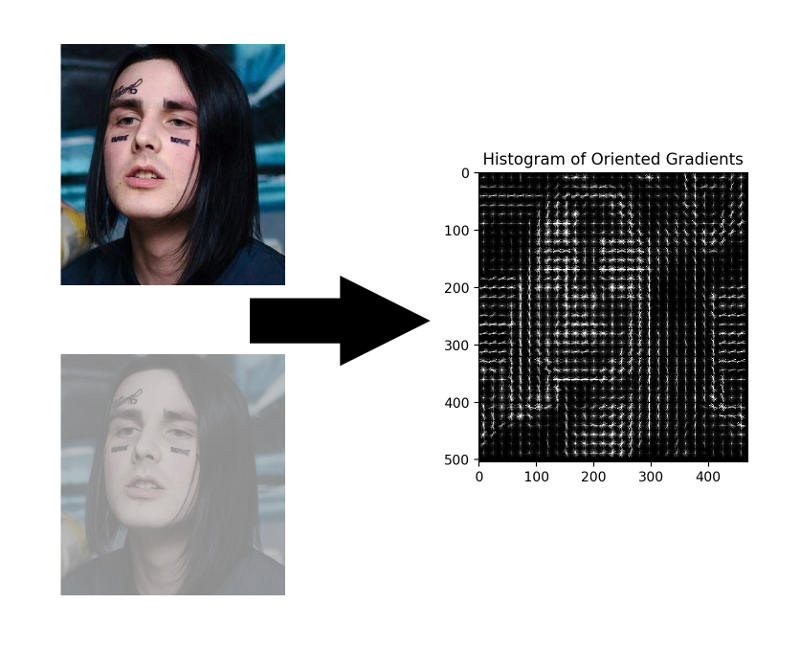
There is no need to count the gradient for each pixel; it suffices to calculate the average gradient for each small square n by n . You can then walk along the received vector field with a certain detector with a window and determine for each window how likely a face is in it. SVM, random forest, and anything else can act as a detector.

Highlight key points
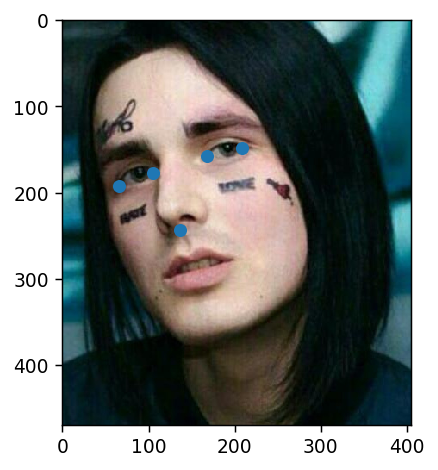
Key points are points that help identify a person in space. Weak and insecure date, the scientists usually need 68 key points, and in particularly neglected cases, and even more. But the normal and self-confident boys, who earn 300k per second, always had five: the inner and outer corners of the eyes and nose.
You can extract such points, for example, by a cascade of regressors .
Face alignment
Kleil childhood application? Here everything is exactly the same: you build an affine transformation that takes three arbitrary points to their standard positions. The nose can be left as it is, and for the eyes to count their centers - three points are ready.
Convert a face image to a vector

Three years have passed since the publication of the article about FaceNet , during which time many interesting learning schemes and loss functions have appeared, but it is she who dominates among the available OpenSource solutions. Apparently, the whole thing in a combination of ease of understanding, implementation and decent results achieved. Thanks at least for the fact that the architecture in these three years has been changed to ResNet.
FaceNet learns from triples of examples: (anchor, positive, negative). Anchor and positive examples belong to one person, negative is chosen as the face of another person, which for some reason is located too close to the first network. The loss function is designed in such a way as to correct this misunderstanding, bring together the necessary examples and move away from them unnecessary.

The output of the last layer of the network is called embedding - a representative representation of a face in a certain space of small dimension (usually 128-dimensional).
Comparison of individuals
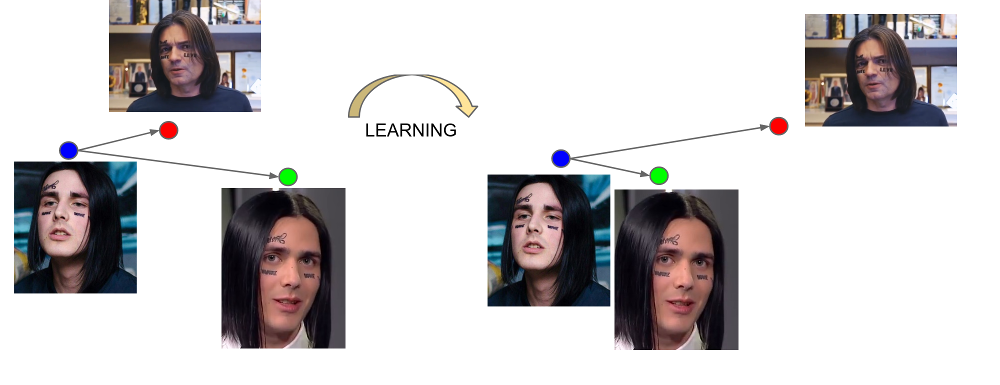
The beauty of well-trained embeddings is that the faces of one person are displayed in some small neighborhood of space, which is distant from the embeds of the faces of other people. So, for this space, you can enter a measure of similarity, the inverse distance: Euclidean or cosine, depending on what distance the network was taught.
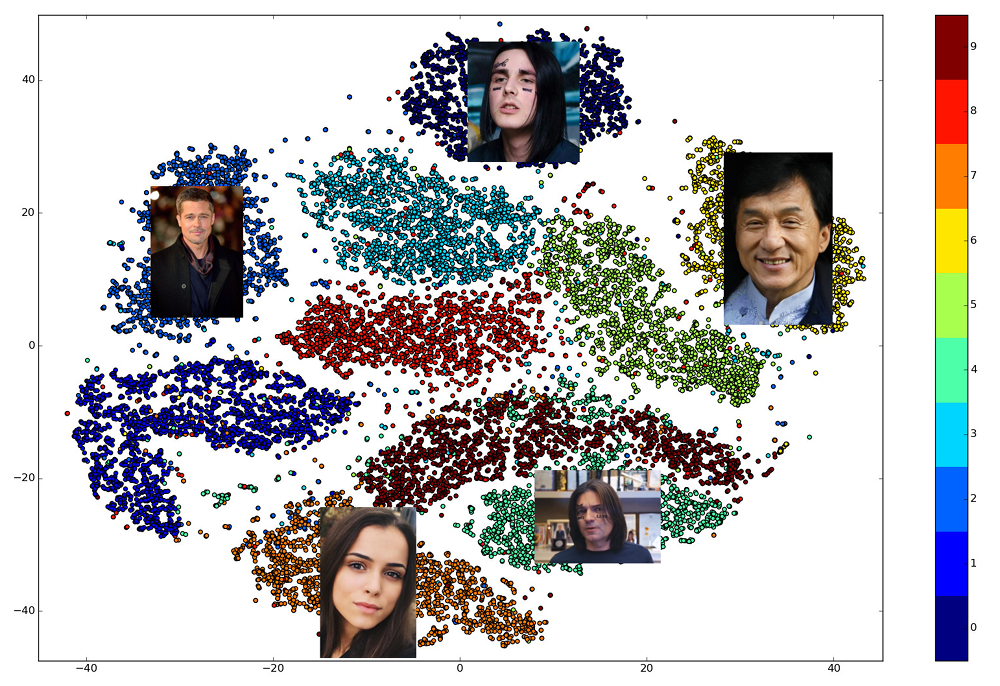
Thus, we need to build in advance embedings for all the people, among whom a search will be made, and then, for each query, find the nearest vector among them. Or, in another way, to solve the problem of finding k nearest neighbors, where k can be equal to one, or maybe not, if we want to use some more advanced business logic. The person who owns the result vector is the most similar to the request person.
What library to use?
The choice of open libraries that implement various parts of the pipeline is great. dlib and OpenCV are able to dlib faces and key points, and pre-trained versions of networks can be found for any large neural network framework. There is a project OpenFace , where you can choose the architecture for your requirements of speed and quality. But only one library allows you to implement all 5 points of face recognition in the calls of three high-level functions: dlib . At the same time, it is written in modern C ++, uses BLAS, has a Python wrapper, does not require a GPU, and works quite quickly on the CPU. Our choice fell on her.
We make our own bot
This section has already been described in literally every guide to creating bots, but once we write the same, we will have to repeat it. We write @BotFather and ask him for a token for our new bot.

The token looks something like this: 643075690:AAFC8ola8WRdhGbJtzjmkOhne1FGfu1BFg . It is required for authorization with each request to the Telegram bots API.
I hope no one at this stage will have any thoughts when choosing a programming language. Of course, you need to write on Haskell. Let's start with the main module.
import System.Process main :: IO () main = do (_, _, _, handle) <- createProcess (shell "python bot.py") _ <- waitForProcess handle putStrLn "Done!" As can be seen from the code, in the future we will use a special DSL for writing telegram bots. The code on this DSL is written in separate files. Install the domain language and everything you need.
python -m venv .env source .env/bin/activate pip install python-telegram-bot python-telegram-bot is currently the most convenient framework for creating bots. It is easy to learn, flexible, scalable, supports multithreading. Unfortunately, at the moment there is not a single normal asynchronous framework, and instead of the divine korutin have to use the ancient threads.

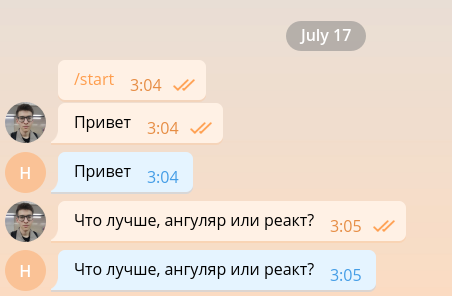
Starting to write a bot with python-telegram-bot very simple. Add the following code to bot.py
from telegram.ext import Updater from telegram.ext import MessageHandler, Filters # TOKEN = '<TOKEN>' def echo(bot, update): bot.send_message(chat_id=update.message.chat_id, text=update.message.text) updater = Updater(token=TOKEN) dispatcher = updater.dispatcher echo_handler = MessageHandler(Filters.text, echo) dispatcher.add_handler(echo_handler) Run the bot. For debugging purposes, this can be done with the python bot.py , without running the Haskell code.
Such a simple bot is able to maintain a minimal conversation, and, therefore, a front-end developer can work easily.
But the frontend of developers is already too much, so let's kill it as soon as possible and get down to implementing the main functionality. For the sake of simplicity, our bot will only respond to messages containing photos and ignore any others. Change the code to the next.
from telegram.ext import Updater from telegram.ext import MessageHandler, Filters # TOKEN = '<TOKEN>' def handle_photo(bot, update): bot.send_message(chat_id=update.message.chat_id, text='nice') updater = Updater(token=TOKEN) dispatcher = updater.dispatcher photo_handler = MessageHandler(Filters.photo, handle_photo) dispatcher.add_handler(photo_handler) updater.start_polling() updater.idle() 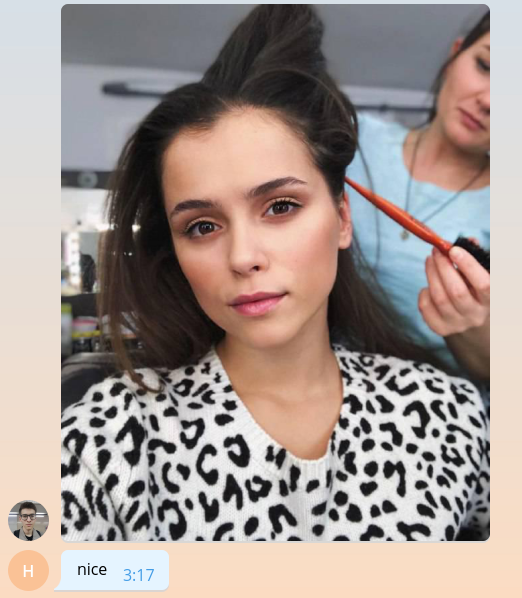
When the picture gets on the Telegram server, it is automatically adjusted to several pre-defined sizes. A bot in turn can download an image of any size from those contained in the message.photo list sorted in ascending order. The easiest option: take the largest image. Of course, in the product environment you need to think about the load on the network and the load time and choose the image of the minimum suitable size. Add an image download code to the beginning of the handle_photo function.
import io message = update.message photo = message.photo[~0] with io.BytesIO() as fd: file_id = bot.get_file(photo.file_id) file_id.download(out=fd) fd.seek(0) The image is downloaded and stored in memory. For its interpretation and representation in the form of a matrix of pixel intensity, we will use the Pillow and numpy libraries.
from PIL import Image import numpy as np The following code must be added to the with block.
image = Image.open(fd) image.load() image = np.asarray(image) It's time to dlib. Outside the function, create a face detector.
import dlib face_detector = dlib.get_frontal_face_detector() And inside the function we use it.
face_detects = face_detector(image, 1) The second parameter of the function is the increase that must be applied before attempting to detect faces. The larger it is, the smaller and more complex faces the detector will be able to detect, but the longer it will work. face_detects - a list of persons, sorted in descending order of detector confidence that there is a face in front of it. In a real application, you will most likely want to apply some logic for choosing the main person, and in the learning example we will limit ourselves to choosing the first one.
if not face_detects: bot.send_message(chat_id=update.message.chat_id, text='no faces') face = face_detects[0] We proceed to the next stage - the search for key points. We download the trained model and we take out its loading out of function limits.
shape_predictor = dlib.shape_predictor('path/to/shape_predictor_5_face_landmarks.dat') Find key points.
landmarks = shape_predictor(image, face) It remains for the small: align the face, drive it through ResNet and get 128-dimensional embedding. Fortunately, dlib allows you to do all this in one call. You only need to download the pre-trained model .
face_recognition_model = dlib.face_recognition_model_v1('path/to/dlib_face_recognition_resnet_model_v1.dat') embedding = face_recognition_model.compute_face_descriptor(image, landmarks) embedding = np.asarray(embedding) Just see what a wonderful time we live in. The entire complexity of convolutional neural networks, the method of support vectors and affine transformations applied to face recognition, is encapsulated in three library calls.
Since we are not yet able to do anything meaningful, let's return to the user the average value of embedding, multiplied by a thousand.
bot.send_message( chat_id=update.message.chat_id, text=f'yours embedding mean: {embedding.mean() * 1e3:.2f}' ) 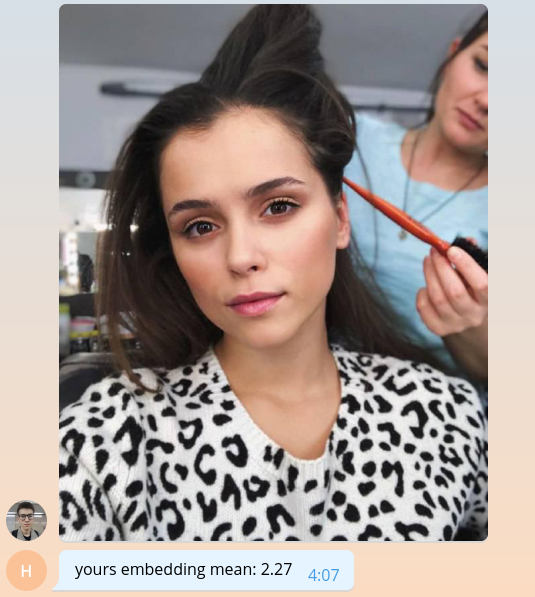
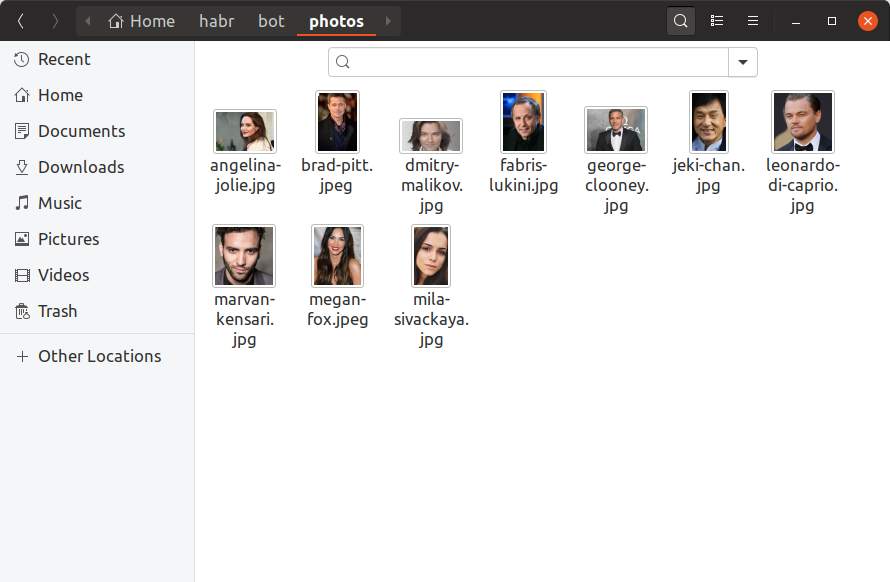
In order for our bot to be able to identify which celebrities look like users, we now need to find at least one photo of each celebrity, build an embedding on it and save it somewhere. We will add 10 celebrities to our training bot, finding their photos with our hands and putting them in the photos directory. This is how it should look like:
If you want to have a million celebrities in the database, everything will look exactly the same, only larger files and you can hardly look for them with your hands. Now we will create the build_embeddings.py utility, using the dlib calls already known to us and save the embeddings of celebrities together with their names in binary format.
import os import dlib import numpy as np import pickle from PIL import Image face_detector = dlib.get_frontal_face_detector() shape_predictor = dlib.shape_predictor('assets/shape_predictor_5_face_landmarks.dat') face_recognition_model = dlib.face_recognition_model_v1('assets/dlib_face_recognition_resnet_model_v1.dat') fs = os.listdir('photos') es = [] for f in fs: print(f) image = np.asarray(Image.open(os.path.join('photos', f))) face_detects = face_detector(image, 1) face = face_detects[0] landmarks = shape_predictor(image, face) embedding = face_recognition_model.compute_face_descriptor(image, landmarks, num_jitters=10) embedding = np.asarray(embedding) name, _ = os.path.splitext(f) es.append((name, embedding)) with open('assets/embeddings.pickle', 'wb') as f: pickle.dump(es, f) Let's add embeddings to our bot code.
import pickle with open('assets/embeddings.pickle', 'rb') as f: star_embeddings = pickle.load(f) And by the exhaustive search method, we will find who our user still looks like.
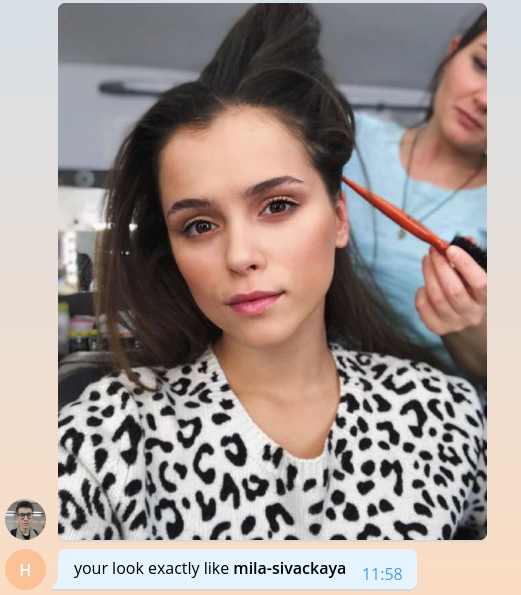
ds = [] for name, emb in star_embeddings: distance = np.linalg.norm(embedding - emb) ds.append((name, distance)) best_match, best_distance = min(ds, key=itemgetter(1)) bot.send_message( chat_id=update.message.chat_id, text=f'your look exactly like *{best_match}*', parse_mode='Markdown' ) Please note that as a distance we use the Euclidean distance, since the network in dlib was trained precisely by it.
That's all, congratulations! We have created the simplest bot that can determine which celebrity the user looks like. It remains to find more photos, add branding, scalability, a pinch of logging and everything can be produced in production. All these topics are too voluminous to tell in detail about them with huge code listings, so I’ll just explain the main points in a question-answer format in the next section.
The full code for the training bot is available on github .
We tell about our bot
How many celebrities do you have? Where did you find them?
The most logical decision when creating a bot seemed to take data on celebrities from our internal content database. It is in the graph format stores films and all entities that are associated with films, including actors and directors. For each person we know her name, login and password from iCloud, related movies and alias, which can be used to generate a link to the site. After cleaning and extracting only the necessary information, a json file of the following content remains:
[ { "name": " ", "alias": "tilda-swinton", "role": "actor", "n_movies": 14 }, { "name": " ", "alias": "michael-shannon", "role": "actor", "n_movies": 22 }, ... ] There are 22,000 such entries in the catalog. By the way, not a directory, but a directory.
Where to find photos for all these people?
Well, you know, here and there . There is, for example, an excellent library that allows you to upload pictures of the query results from Google. 22 thousand people - not so much, using 56 streams, we managed to download photos for them in less than an hour.
Among the downloaded photos, you need to discard broken, noisy, photos in the wrong format. Then leave only those where there are faces and where these faces satisfy certain conditions: the minimum distance between the eyes, the inclination of the head. All this leaves us with 12,000 photos.
Of the 12 thousand celebrities, users currently only found 2. That is, there are approximately 8 thousand celebrities who are not yet similar. Do not leave it just like that! Open telegrams and find them all.
How to determine the percentage of similarity for the Euclidean distance?
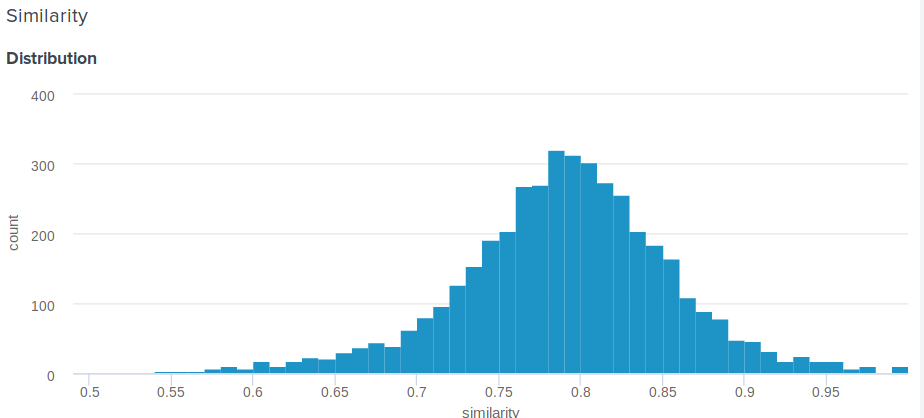
Great question! Indeed, the Euclidean distance, in contrast to the cosine, is not limited from above. Therefore, a reasonable question arises, how to show the user something more meaningful than "Congratulations, the distance between your embedding and the embedding of Angelina Jolie is 0.27635462738"? One of our team members proposed the following simple and ingenious solution. If you build the distribution of distances between embeddings, it will be normal. This means that it is possible to calculate the average and standard deviation for it, and then for each user, according to these parameters, how many percent of people are less similar to their celebrities than he is . This is equivalent to integrating the probability density function from d to plus infinity, where d is the distance between the embeddings of the user and the celebrity.
Here is the exact function we use:
def _transform_dist_to_sim(self, dist): p = 0.5 * (1 + erf((dist - self._dist_mean) / (self._dist_std * 1.4142135623730951))) return max(min(1 - p, 1.0), self._min_similarity) Is it really necessary to go through the list of all embedings to find a match?
Of course not, this is not optimal and takes a lot of time. The easiest way to optimize calculations is to use matrix operations. Instead of subtracting the vectors from one another, you can compose a matrix from them and subtract a vector from the matrix, and then calculate the L2 norm in rows.
scores = np.linalg.norm(emb - embeddings, axis=1) best_idx = scores.argmax() This already gives a huge performance boost, but it turns out you can be even faster. The search can be greatly accelerated by losing a bit of accuracy with the nmslib library. It uses the HNSW method for an approximate search for k nearest neighbors. For all existing vectors should be built so-called index, which then will be searched. You can create and save to disk an index for the Euclidean distance as follows:
import nmslib index = nmslib.init(method='hnsw', space='l2', data_type=nmslib.DataType.DENSE_VECTOR) for idx, emb in enumerate(embeddings): index.addDataPoint(idx, emb) index_time_params = { 'indexThreadQty': 4, 'skip_optimized_index': 0, 'post': 2, 'delaunay_type': 1, 'M': 100, 'efConstruction': 2000 } index.createIndex(index_time_params, print_progress=True) index.saveIndex('./assets/embeddings.bin') The parameters M and efConstruction are described in detail in the documentation and are selected experimentally based on the required accuracy, the time to build the index, and the search speed. Before using the index must be loaded:
index = nmslib.init(method='hnsw', space='l2', data_type=nmslib.DataType.DENSE_VECTOR) index.loadIndex('./assets/embeddings.bin') query_time_params = {'efSearch': 400} index.setQueryTimeParams(query_time_params) The efSearch parameter affects the accuracy and speed of requests and may not coincide with efConstruction . Now you can make requests.
ids, dists = index.knnQuery(embedding, k=1) best_dx = ids[0] best_dist = dists[0] In our case, nmslib is 20 times faster than the vectorized linear version, and one request is performed on average 0.005 seconds.
How to make my bot ready for production?
1. Asynchrony
First, you need to make the handle_photo function asynchronous. As I said before, python-telegram-bot suggests using multithreading for this and implements a convenient decorator.
from telegram.ext.dispatcher import run_async @run_async def handle_photo(bot, update): ... Now the framework will start your handler in a separate thread in its pool. The size of the pool is set when creating the Updater . "But in python there is no multithreading!" the most impatient of you have already exclaimed. And this is not entirely true. Because of the GIL, the usual Python code really cannot be executed in parallel, but the GIL is released to wait for all IO operations, and it can also be released by libraries that use C extensions.
Now analyze our handle_photo function: it only consists of waiting for IO operations (loading a photo, sending a response, reading a photo from disk, etc.) and calling functions from the numpy , nmslib and Pillow libraries.
I did not mention dlib for a reason. The library that calls the native code is not required to release GIL, and dlib this right. She does not need this lock, she just does not let it go. The author says that he will gladly accept the appropriate pull request, but I'm too lazy.
2. Multiprocessing
The easiest way to deal with dlib is to encapsulate the model into a separate entity and run it in a separate process. And better in the process pool.
def _worker_initialize(config): global model model = Model(config) model.load_state() def _worker_do(image): return model.process_image(image) pool = multiprocessing.Pool(8, initializer=_worker_initialize, initargs=(config,)) result = pool.apply(_worker_do, (image,)) 3. Iron
If your bot needs to constantly read photos from the disk, make sure that this disk is an SSD. Or even mount them into RAM. Also important is the ping to the telegraph servers and the quality of the channel.
4. Flood control
Telegrams do not allow bots to send more than 30 messages per second. If your bot is popular and a lot of people use it at the same time, then it is very easy to catch the ban for a few seconds, which will result in frustration from waiting for many users. To solve this problem, python-telegram-bot offers us a queue that is capable of not sending more than a specified limit of messages per second, maintaining an equal interval between sending.
from telegram.ext.messagequeue import MessageQueue To use it, you need to define your own bot and replace it when creating a Updater .
from telegram.utils.promise import Promise class MQBot(Bot): def __init__(self, *args, **kwargs): super().__init__(*args, **kwargs) self._message_queue = MessageQueue( all_burst_limit=30, all_time_limit_ms=1000 ) def __del__(self): try: self._message_queue.stop() finally: super().__del__() def send_message(self, *args, **kwargs): is_group = kwargs.get('chat_id', 0) >= 0 return self._message_queue(Promise(super().send_message, args, kwargs), is_group) bot = MQBot(token=TOKEN) updater = Updater(bot=bot) 5. Web hooks
In the product environment, Web Hooks should be used instead of Long Polling as a way to get updates from the Telegram servers. What it generally is and how to use it can be read here .
6. Trivia
During communication with the telegraph server, tons of json messages are read every second. , ultrajson .
IO-: , , . , .
6.
, . , , , . , .
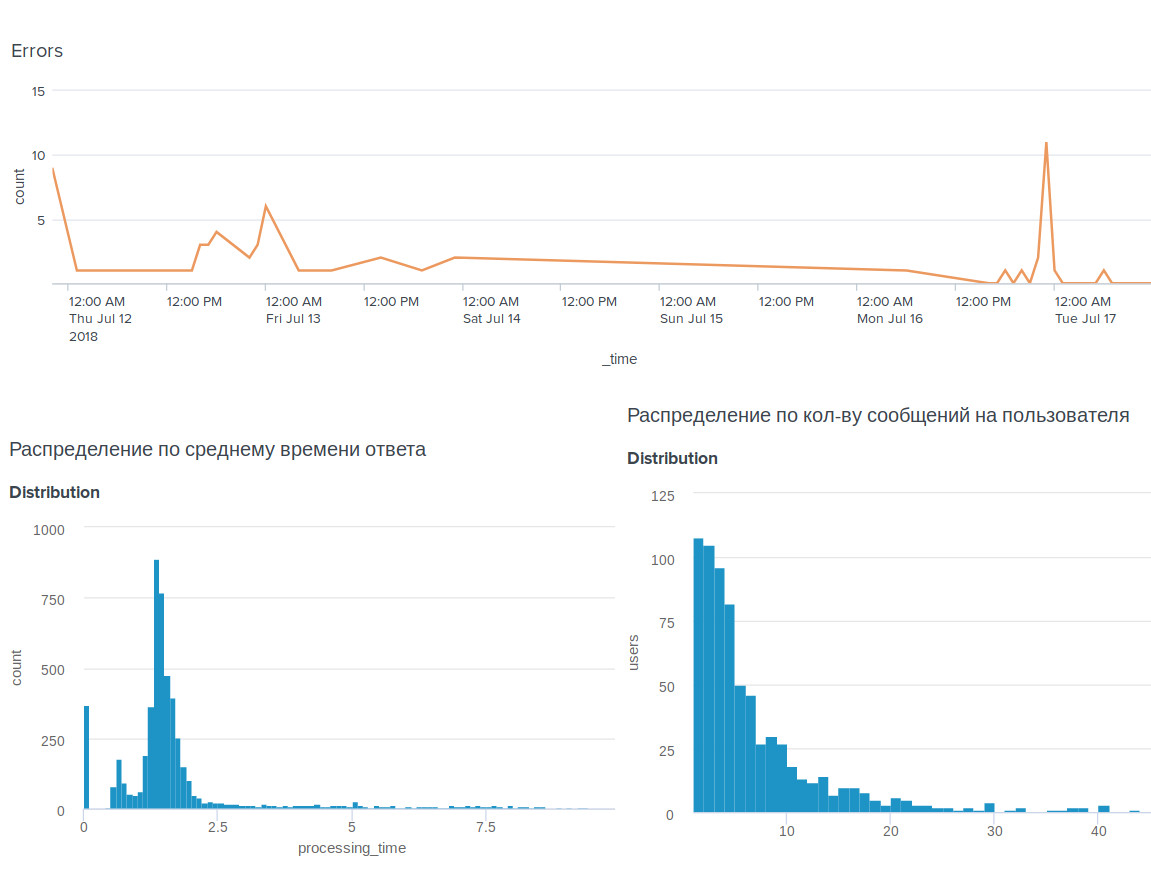
, , BI-tool Splunk .
, . , .
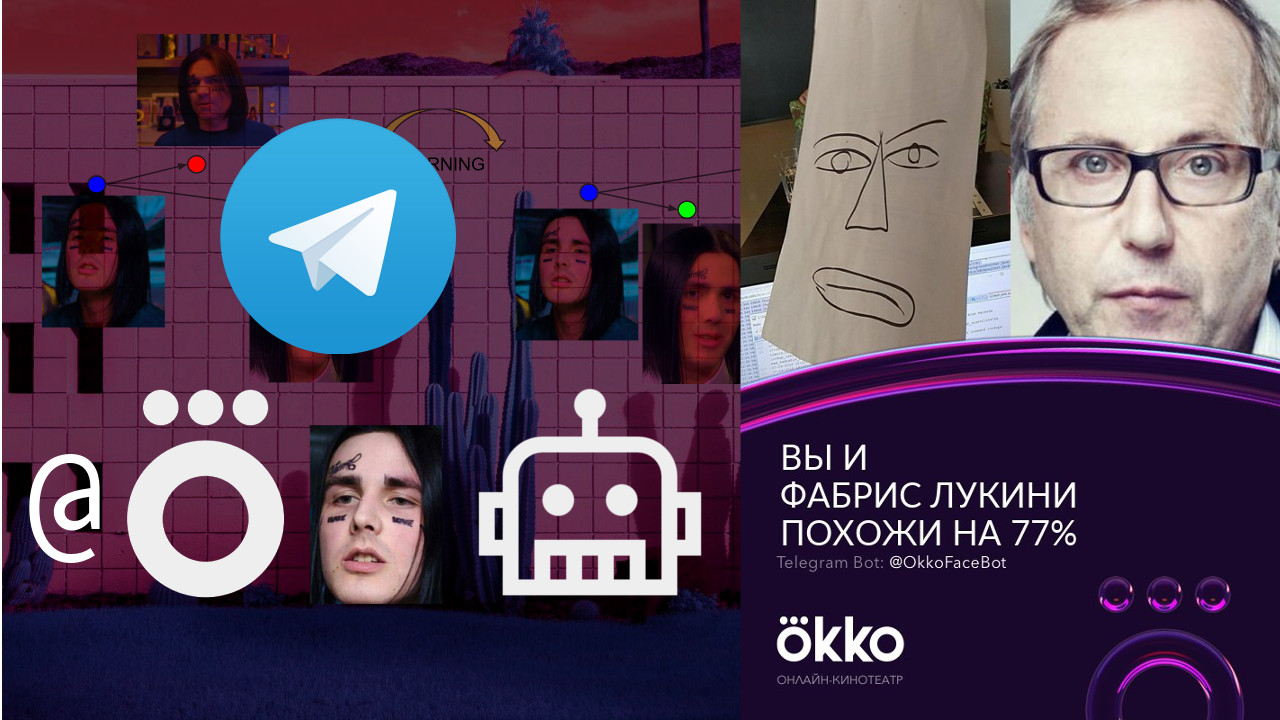
, . , : @OkkoFaceBot .
, . , .
')
Source: https://habr.com/ru/post/417329/
All Articles