3DTouch - Scales on the iPhone: Getting Started
After the launch of the iPhone 6s and iPhone 6s Plus with screens that support 3D Touch technology, an application for weighing plums and peaches almost immediately appeared in the App Store.
I can’t say with certainty why it is these fruits, but I can definitely say why it is fruit. The fact is that the iPhone screen sensor works on the principle of determining the leakage of current from the sensor surface, and for this leakage you need a living finger or something that has an electrical capacity. I think everyone knows that the plastic stylus or nail screens i-devices do not work. That is why it was impossible to weigh something metallic on that application. But the fruits have an electrical capacity, the sensor works on them and 3D Touch directly works normally.
Very quickly, this application was removed from the App Store. Personally, it seems to me that this was done because of the narrow-minded users who tried to weigh the weights on their devices. Of course, the devices broke down and they carried them to the service centers. And there they said something from the series: "The application was downloaded from the official store, and they did not warn there that it was impossible ...".
')
As a result, there are no such applications in the store, but no one will hurt us to create it for ourselves.
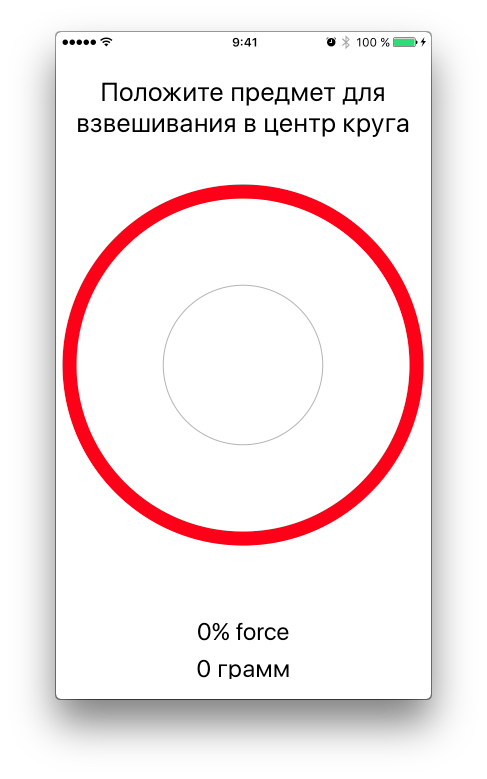
We need to write an application that consists of one controller, on which will be an inviting inscription, a drawn circle in the center of the screen, weight indicators in grams and percent of the defined force (later in the text will be clearer). When you tap the screen, a circle will appear at the touch, which will increase or decrease depending on the pressing force. Just need to say that on the simulator such an application test fails. Therefore, you will need to run the application on a real device. At the end, you should get this application:
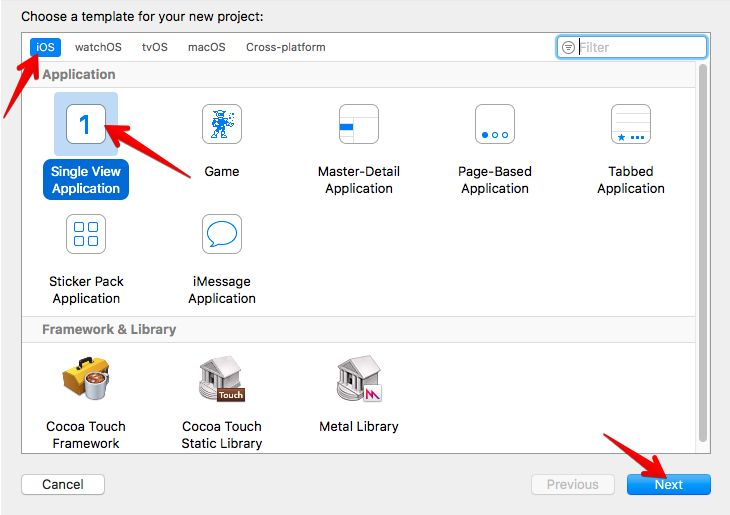
Open Xcode, choose to create a new project, template Single View Application
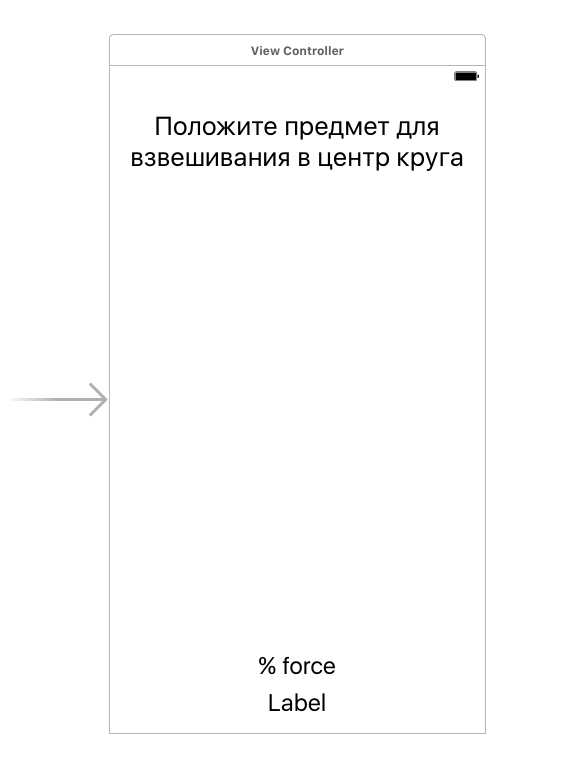
Go to Storyboard , drag a few UILabels from the library of elements onto the controller, place them closer to the top or bottom edges of the controller. I did this:
For aesthetic appeal of the place where we will put the objects, we will highlight the red circle. You can take a ready-made picture with a circle, but this is not our method)). We draw circles using Core Graphics techniques. It will be more convenient to create a descendant class from UIView and already work with it.
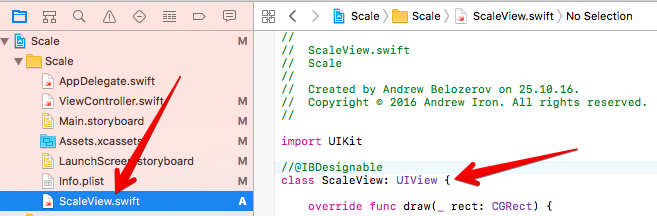
Add a new file to the project, name it ScaleView . Create a ScaleView class in this file that inherits from UIView .
Next, go to StoryBoard , transfer it to the controller from the UIView element library and position it in the center of our controller. Select the newly added UIView and in the Identity Inspector set the ScaleView class we created earlier.
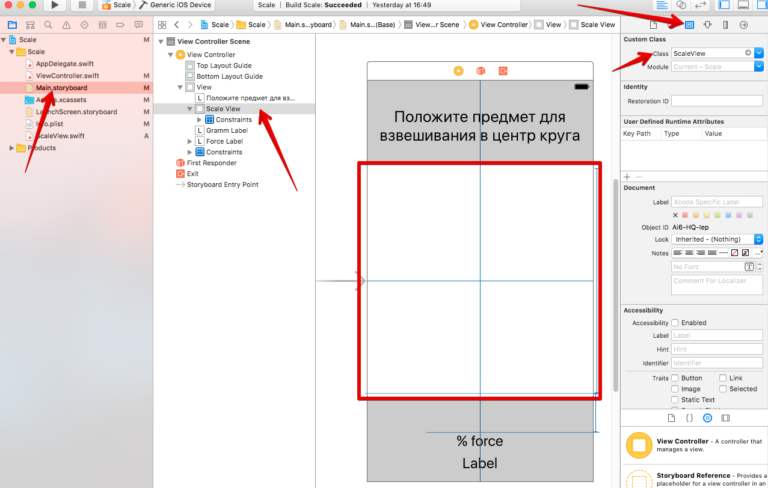
Also with the help of constraints, you can set the rules for the relative position of elements on the screen. It looks like this to me:

Navigate to the ScaleView.swift file. In the ScaleView class , we created the draw (_ rect :) method, which we will use to draw inside the display area of this UIView .
Add the following code to the draw method (_ rect :)
You can compile for verification, but you can also specify a directive to display the changes directly in Interface Builder .
All the magic in the @IBDesignable directive. Mark ScaleView with this directive .
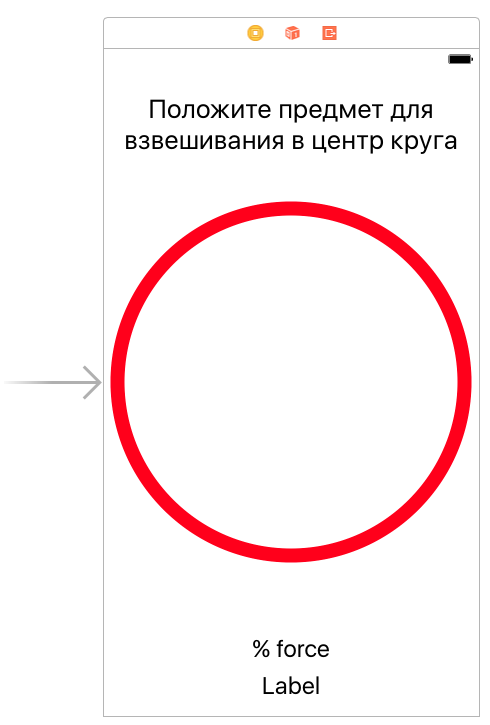
After that, go to StoryBoard , wait a bit and you will see a red circle drawn in the center of the ViewController
Let's work out and draw another circle smaller and thinner. To do this, in the ScaleView file , in the draw (_ rect :) method, add the following code:
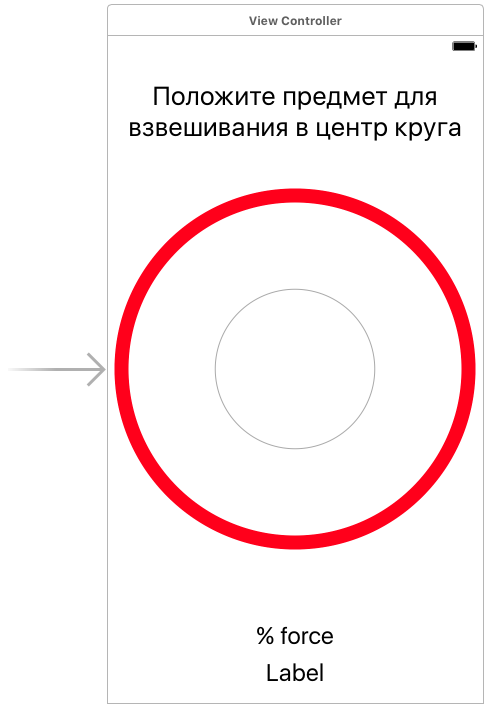
I think it is clear and so we added. In fact, we added another circle, gray, a quarter-radius of ScaleView and one point wide.
Results in StoryBoard :
The final of our preparatory work will be the creation of outlets for ScaleView and two UILabel , which will show the force of clicking on the screen in percent and weight in grams. Ctrl- dragging items from the ViewController will create the necessary outlets.
So, we have come close to the moment of measuring the force of pressure on the screen. Go to ViewController and in the viewDidLoad () method add start values for all UILabel
Like all processes associated with clicking on the screen, in the controller they can be caught in the touchesMoved method (_: :) . This method works when the screen touches occur in time. Those. If the finger is on the screen or moving along it, this method works and you can track all the touches and their properties. Add it to ViewController and write the following code:
The whole mechanics of the Scales iOS application lies in this method. Everything else that we will do next in this lesson is about improvements. We have already done all the basic work. Let's sort through the items
Before launching and testing the application, add another method that works when all touches on the screen stop touchesEnded (: :) , in order to set the initial position of our UILabel and transfer the values of 0% and 0 grams to them. Add this method to the ViewController class.
Now you can compile the application and check. Of course, this should be done on a real device to see the result. The simulator is not able to emulate power clicking on the screen.
The main functionality is ready, but when I wrote this application I decided to add three things:
We will deal with these additions in the next article :-)
I can’t say with certainty why it is these fruits, but I can definitely say why it is fruit. The fact is that the iPhone screen sensor works on the principle of determining the leakage of current from the sensor surface, and for this leakage you need a living finger or something that has an electrical capacity. I think everyone knows that the plastic stylus or nail screens i-devices do not work. That is why it was impossible to weigh something metallic on that application. But the fruits have an electrical capacity, the sensor works on them and 3D Touch directly works normally.
Very quickly, this application was removed from the App Store. Personally, it seems to me that this was done because of the narrow-minded users who tried to weigh the weights on their devices. Of course, the devices broke down and they carried them to the service centers. And there they said something from the series: "The application was downloaded from the official store, and they did not warn there that it was impossible ...".
')
As a result, there are no such applications in the store, but no one will hurt us to create it for ourselves.
Task
We need to write an application that consists of one controller, on which will be an inviting inscription, a drawn circle in the center of the screen, weight indicators in grams and percent of the defined force (later in the text will be clearer). When you tap the screen, a circle will appear at the touch, which will increase or decrease depending on the pressing force. Just need to say that on the simulator such an application test fails. Therefore, you will need to run the application on a real device. At the end, you should get this application:
Project creation
Open Xcode, choose to create a new project, template Single View Application
Building an interface in Xcode
Go to Storyboard , drag a few UILabels from the library of elements onto the controller, place them closer to the top or bottom edges of the controller. I did this:
For aesthetic appeal of the place where we will put the objects, we will highlight the red circle. You can take a ready-made picture with a circle, but this is not our method)). We draw circles using Core Graphics techniques. It will be more convenient to create a descendant class from UIView and already work with it.
Add a new file to the project, name it ScaleView . Create a ScaleView class in this file that inherits from UIView .
import UIKit class ScaleView: UIView { override func draw(_ rect: CGRect) { } } Next, go to StoryBoard , transfer it to the controller from the UIView element library and position it in the center of our controller. Select the newly added UIView and in the Identity Inspector set the ScaleView class we created earlier.
Also with the help of constraints, you can set the rules for the relative position of elements on the screen. It looks like this to me:
Draw circles
Navigate to the ScaleView.swift file. In the ScaleView class , we created the draw (_ rect :) method, which we will use to draw inside the display area of this UIView .
Add the following code to the draw method (_ rect :)
override func draw(_ rect: CGRect) { let context = UIGraphicsGetCurrentContext() // 1 context?.setStrokeColor(UIColor.red.cgColor) // 2 context?.setLineWidth(14.0) // 3 context?.addArc(center: CGPoint(x: 375 / 2, y: 375 / 2), radius: 375 / 2 - 14, startAngle: 0, endAngle: 2 * CGFloat(M_PI), clockwise: true) // 4 context?.strokePath() // 5 } - We get the graphic context in which we draw
- Set the color to draw. In this case. - it is red
- Set the width of the line with which we will draw.
- Set the drawing path in the form of an arc, the center of which is located in the center of ScaleView, with a radius equal to half the width of ScaleView minus 14 (this is to inscribe the arc in the visible View), and a long arc - around a full 360 degrees. Please note that my width digits are rigidly defined in the previous paragraph using constraints.
- We draw on the set way with the set parameters
You can compile for verification, but you can also specify a directive to display the changes directly in Interface Builder .
All the magic in the @IBDesignable directive. Mark ScaleView with this directive .
import UIKit @IBDesignable class ScaleView: UIView { override func draw(_ rect: CGRect) { let context = UIGraphicsGetCurrentContext() context?.setStrokeColor(UIColor.red.cgColor) context?.setLineWidth(14.0) context?.addArc(center: CGPoint(x: 375 / 2, y: 375 / 2), radius: 375 / 2 - 14, startAngle: 0, endAngle: 2 * CGFloat(M_PI), clockwise: true) context?.strokePath() } } After that, go to StoryBoard , wait a bit and you will see a red circle drawn in the center of the ViewController
Let's work out and draw another circle smaller and thinner. To do this, in the ScaleView file , in the draw (_ rect :) method, add the following code:
context?.setLineWidth(1.0) context?.setStrokeColor(UIColor.lightGray.cgColor) context?.addArc(center: CGPoint(x: 375 / 2, y: 375 / 2), radius: 375 / 4 - 14, startAngle: 0, endAngle: 2 * CGFloat(M_PI), clockwise: true) context?.strokePath() I think it is clear and so we added. In fact, we added another circle, gray, a quarter-radius of ScaleView and one point wide.
Results in StoryBoard :
The final of our preparatory work will be the creation of outlets for ScaleView and two UILabel , which will show the force of clicking on the screen in percent and weight in grams. Ctrl- dragging items from the ViewController will create the necessary outlets.
@IBOutlet weak var scaleView: ScaleView! @IBOutlet weak var forceLabel: UILabel! @IBOutlet weak var grammLabel: UILabel! Directly - Scales
So, we have come close to the moment of measuring the force of pressure on the screen. Go to ViewController and in the viewDidLoad () method add start values for all UILabel
override func viewDidLoad() { super.viewDidLoad() forceLabel.text = "0% force" grammLabel.text = "0 " } Like all processes associated with clicking on the screen, in the controller they can be caught in the touchesMoved method (_: :) . This method works when the screen touches occur in time. Those. If the finger is on the screen or moving along it, this method works and you can track all the touches and their properties. Add it to ViewController and write the following code:
override func touchesMoved(_ touches: Set<UITouch>, with event: UIEvent?) { if let touch = touches.first { // 1 if #available(iOS 9.0, *) { // 2 if traitCollection.forceTouchCapability == UIForceTouchCapability.available { // 3 if touch.force >= touch.maximumPossibleForce { // 4 forceLabel.text = "100%+ force" grammLabel.text = "385 " } else { let force = (touch.force / touch.maximumPossibleForce) * 100 // 5 let grams = force * 385 / 100 // 6 let roundGrams = Int(grams) // 7 forceLabel.text = "\(Int(force))% force" // 8 grammLabel.text = "\(roundGrams) " } } } } } The whole mechanics of the Scales iOS application lies in this method. Everything else that we will do next in this lesson is about improvements. We have already done all the basic work. Let's sort through the items
- Of all the many screen touches, choose the first one.
- This directive checks the installed operating system on the device and skips further only if the operating system version is 9.0 or more. Work with 3D Touch became possible only with the 9th version of iOS. Trying to handle it in the pain of earlier versions does not make sense
- And in this line is a device check for support of the screen with the 3D Touch function. After all, iOS version 10 can stand on the iPhone 6, but the screen of this smartphone will not begin to discern the force of pressing from this. This check is required by Apple’s strict request.
- A touch has a force property in which the force of pressing is transmitted each time the touchesMoved (_: :) method works. And in this line we compare the value of the current pressing force and the maximum possible value of pressing force. And if the pressing force is greater than the maximum, then we transfer the maximum values to our UILabel , namely, 100 % of the force and 385 grams. Here it should be noted why it is 385 grams. The fact is that 3D Touch technology is made in such a way that 100% of the pressing force corresponds to 385 grams. Accordingly, get the percentage of pressing force, we can easily calculate the weight in grams.
- Here we make these calculations. In this line, we calculate the percentage of pressing force
- Here we calculate the weight in grams, based on the formula 100% = 385 grams
- This is a simple rounding of grams to the whole.
- We transfer the values of the percentage of force and weight in grams to our UILabel
Before launching and testing the application, add another method that works when all touches on the screen stop touchesEnded (: :) , in order to set the initial position of our UILabel and transfer the values of 0% and 0 grams to them. Add this method to the ViewController class.
override func touchesEnded(_ touches: Set<UITouch>, with event: UIEvent?) { forceLabel.text = "0% force" grammLabel.text = "0 " } Now you can compile the application and check. Of course, this should be done on a real device to see the result. The simulator is not able to emulate power clicking on the screen.
Improvements
The main functionality is ready, but when I wrote this application I decided to add three things:
- When the maximum value is reached, I want the vibration feedback to work.
- Updating the values in UILabel happens very quickly (I think you noticed this when testing), so you need to add some smoothness.
- In the place of pressing should appear a translucent circle. Its diameter should increase as the pressing force increases and decrease as the pressing force decreases.
We will deal with these additions in the next article :-)
Source: https://habr.com/ru/post/417221/
All Articles