CSS Paint API
According to the author of the material, the translation of which we publish today, CSS Paint API is an incredibly interesting technology. Moreover, we are talking not only about its current capabilities, but also about the phenomena it represents, and that its appearance marks the beginning of quite remarkable changes in the world of CSS. Here we will talk about the CSS Paint API and the reasons for its appearance, tell you how to use it.

The API in question is just a small part of the new set of specifications that are being worked on as part of the CSS Houdini project. If you briefly describe this project, then its essence boils down to the fact that it gives developers low-level access to the internal mechanisms of CSS.
The API Paint API allows you to call the
')
The API Paint API allows you to call, instead of a similar function, the
If you now have the feeling that all this sounds good, but it looks difficult, and you think that you are quite comfortable with using ordinary images, keep in mind that regular images do not lose their relevance with the advent of the new technology. To use them, just as it was always done, is perfectly normal. The fact that something new, and probably promising, is on the horizon does not mean that everyone should immediately use this new to solve all existing problems. However, ordinary images are static. The new API attracts the idea of creating dynamic images.
Consider the linear-gradient CSS function. Stuck is very powerful. Take a look, for example, on this . But can you imagine how much easier it would be to achieve the same effect created by the overlay of layers, if you would not have to use a lot of background images? However, it's not just that. If you delve into the CSS Paint API, you can figure out how these images are created during program execution, which can be very useful (actually, we plan to do this here).
What about the conic-gradient CSS function? It can be said, is not yet supported by browsers without a polyfill. Using the new API allows you to create conical gradients, adjust their parameters, which are not particularly different from what is in the specification. All this means that in practice, using the new API, you can create your own native polyfills. And this is just wonderful.
Do not forget that all this is part of a larger group of possibilities, known as CSS Houdini. This is what is written in the project documentation: “The goal of CSS-TAG Houdini Task Force (CSS Houdini) is to jointly develop mechanisms that break the veils of mystery from technologies of styling web pages and building their layouts.”
Sounds good, right? And, in fact, these new mechanisms are aimed at allowing developers to extend the functionality of CSS itself, giving them more advanced style management tools, cross-browser support and the ability to create polyfills.
The process of standardization of new technologies may take some time. First, a new CSS feature is offered. Further - the specification is written, there are other processes. As a result, browser manufacturers implement new specifications. And, since developers often cannot wait to begin using new features as soon as possible, they have to take into account the fact that older browsers may not support innovations, and that if a certain specification is not yet fully implemented, it may, in the course of its development, seriously change. Perhaps nothing to talk about the typical nuances of the implementation of different technologies in different browsers. The Houdini project can go quite far in mitigating these problems, allowing us to develop browser-based functionality on our own, use it and quietly wait for the implementation of certain capabilities by browser manufacturers to appear. Here are a couple of materials on this topic. The first is dedicated to the strengths of Houdini, and the second - to use the capabilities of this project to create complex animation.
Can I use the CSS Paint API today? We can give a positive answer to this question, although it should be noted that far from all browsers support this technology. In order to get information about the support of this API, you can use the resource caniuse.com .
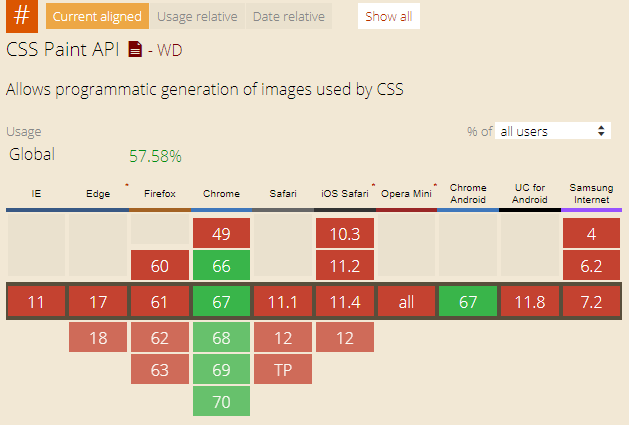
API support for Paint Paint with various browsers (July 2018)
As you can see, this API only supports Chrome for now. But be that as it may, let's talk about how to use it. We will look at the software constructs needed to make the new API work. This includes new CSS features and some pretty recent JavaScript mechanisms. Our example will be divided into three steps.
Recall that the formation of the image when using the API CSS Paint responsible vorklety - fragments of JS-code. Therefore, we first need to give the name of the workpiece and call it in CSS.
The preliminary preparations have been completed, but until the rest of our example is ready, all this will not work.
Now we need to describe the workbench using JS. Here it is shown how, in the main script, loading another script that implements the functionality we need.
At this stage, again, nothing happens, since the most interesting is hidden in the
In the
Here we call the
Next, we are going to use the ECMAScript 2015 class declaration syntax and write a class that will draw the background image. Since now this class is registered as a class of the vorklet, we can use in it some special mechanisms that will be available in it automatically.
The
The first two values passed to the
As a result, we come to this code:
You can see the working version of the example on CodePen . As a matter of fact, this is what this code displays.
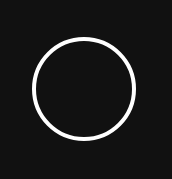
Circle created by CSS Paint API
All this is good, but our example is very simple. Let's, instead of the usual circle, draw something more interesting. For example - such an asterisk - the logo of the site css-tricks.com.

Asterisk created by CSS Paint API
Here is a project on CodePen that allows you to do this.
When you look at the JS code of this project, pay attention to the
Using new technology, we can go far beyond drawing circles and stars. We can turn to the powerful capabilities of custom CSS properties (variables). They, by the way, even in themselves, are very interesting. In our case, they are especially useful.
Suppose we want to be able to change the size or color of a previously created logo. These parameters can be placed in the CSS code in the form of user properties, after which they can be used in the program through the third parameter passed to the
Add the
Now back to the vorklet class. Here we need to interact with the above user properties. This is done using the
Now you can work with them in the
Naturally, the obtained values can be used in the code responsible for the formation of the image. This leads to the fact that if we, in the CSS code, change the value of the
The effect of custom CSS properties on the final image
This functionality is implemented in the same project on CodePen, which we mentioned above.
By the way, it is worth noting that when using the new API, all the usual CSS properties regarding the background settings of elements, such as
The CSS Paint API is a very powerful technology whose capabilities are not limited to creating background images.
Imagine that an element should have a special border, for example, one that is not fully visible, or double. Perhaps, to achieve similar effects, you usually use the
The CSS Paint API brings together many great mechanisms, such as wormlets, ECMAScript 2015 classes, and the capabilities of the
At first glance, all this may seem a bit confusing, but let's take a look at some other parts of the Houdini project that we can meet with:
As a result, we can say that, literally before our eyes, technologies are emerging that open up many new opportunities for web developers. The processes of their standardization and implementation in browsers are not so fast, but they, quite possibly, will have a tremendous impact on everything related to the styling of web pages.
Dear readers! Which areas of the CSS Paint API do you find most interesting?

What is the CSS Paint API?
The API in question is just a small part of the new set of specifications that are being worked on as part of the CSS Houdini project. If you briefly describe this project, then its essence boils down to the fact that it gives developers low-level access to the internal mechanisms of CSS.
The API Paint API allows you to call the
paint() function in situations where, under normal conditions, work would be carried out, for example, with a certain value describing an image. A typical example of this is the background-image property, when working with which you can use the url() function to send a link to the image file to the system:')
area { background-image: url('assets/myimage.jpg'); } The API Paint API allows you to call, instead of a similar function, the
paint() function, and pass it a so-called worklet, described by JavaScript. A worklet can be perceived as a kind of code fragment that allows the developer to programmatically draw almost anything he wants. And, since we are talking about JavaScript, the image can be made dynamic. By itself, this API is very similar to the HTML5 Canvas API and now we’ll talk about how it all works.CSS Paint API Features
If you now have the feeling that all this sounds good, but it looks difficult, and you think that you are quite comfortable with using ordinary images, keep in mind that regular images do not lose their relevance with the advent of the new technology. To use them, just as it was always done, is perfectly normal. The fact that something new, and probably promising, is on the horizon does not mean that everyone should immediately use this new to solve all existing problems. However, ordinary images are static. The new API attracts the idea of creating dynamic images.
Consider the linear-gradient CSS function. Stuck is very powerful. Take a look, for example, on this . But can you imagine how much easier it would be to achieve the same effect created by the overlay of layers, if you would not have to use a lot of background images? However, it's not just that. If you delve into the CSS Paint API, you can figure out how these images are created during program execution, which can be very useful (actually, we plan to do this here).
What about the conic-gradient CSS function? It can be said, is not yet supported by browsers without a polyfill. Using the new API allows you to create conical gradients, adjust their parameters, which are not particularly different from what is in the specification. All this means that in practice, using the new API, you can create your own native polyfills. And this is just wonderful.
Do not forget that all this is part of a larger group of possibilities, known as CSS Houdini. This is what is written in the project documentation: “The goal of CSS-TAG Houdini Task Force (CSS Houdini) is to jointly develop mechanisms that break the veils of mystery from technologies of styling web pages and building their layouts.”
Sounds good, right? And, in fact, these new mechanisms are aimed at allowing developers to extend the functionality of CSS itself, giving them more advanced style management tools, cross-browser support and the ability to create polyfills.
The process of standardization of new technologies may take some time. First, a new CSS feature is offered. Further - the specification is written, there are other processes. As a result, browser manufacturers implement new specifications. And, since developers often cannot wait to begin using new features as soon as possible, they have to take into account the fact that older browsers may not support innovations, and that if a certain specification is not yet fully implemented, it may, in the course of its development, seriously change. Perhaps nothing to talk about the typical nuances of the implementation of different technologies in different browsers. The Houdini project can go quite far in mitigating these problems, allowing us to develop browser-based functionality on our own, use it and quietly wait for the implementation of certain capabilities by browser manufacturers to appear. Here are a couple of materials on this topic. The first is dedicated to the strengths of Houdini, and the second - to use the capabilities of this project to create complex animation.
API support for Paint Paint browsers
Can I use the CSS Paint API today? We can give a positive answer to this question, although it should be noted that far from all browsers support this technology. In order to get information about the support of this API, you can use the resource caniuse.com .
API support for Paint Paint with various browsers (July 2018)
As you can see, this API only supports Chrome for now. But be that as it may, let's talk about how to use it. We will look at the software constructs needed to make the new API work. This includes new CSS features and some pretty recent JavaScript mechanisms. Our example will be divided into three steps.
Step # 1: CSS
Recall that the formation of the image when using the API CSS Paint responsible vorklety - fragments of JS-code. Therefore, we first need to give the name of the workpiece and call it in CSS.
awesomePattern call it awesomePattern . As a result, the CSS code will look like this: section { background-image: url('fallback.png'); background-image: paint(awesomePattern); }; The preliminary preparations have been completed, but until the rest of our example is ready, all this will not work.
Step 2: JavaScript
Now we need to describe the workbench using JS. Here it is shown how, in the main script, loading another script that implements the functionality we need.
CSS.paintWorklet.addModule('patternWorklet.js'); At this stage, again, nothing happens, since the most interesting is hidden in the
patternWorklet.js file.In the
patternWorklet.js file patternWorklet.js we need to register the worclet class: registerPaint('awesomePattern', Shape); Here we call the
registerPaint() function and pass to it what we consider to be a worklet, in this case it's awesomePattern . In addition, we pass this function a reference to the class that we will write, in this case, Shape . This command must be added after the declaration of the corresponding class. When declaring and using classes, you cannot rely on something like a mechanism for lifting function declarations. Before you can use a class, you must declare it.Next, we are going to use the ECMAScript 2015 class declaration syntax and write a class that will draw the background image. Since now this class is registered as a class of the vorklet, we can use in it some special mechanisms that will be available in it automatically.
class Shape { paint(ctx, geom, properties) { ctx.strokeStyle = 'white'; ctx.lineWidth = 4; ctx.beginPath(); ctx.arc( 200, 200, 50, 0, 2*Math.PI); ctx.stroke(); ctx.closePath(); } } The
paint() callback has ctx , geom and properties options. The ctx parameter is the same as the 2D rendering context that can be obtained from the <canvas> . Well, it's almost the same. The fact is that the <canvas> allows you to read pixel data, but the CSS Paint API does not allow this. Despite the differences, using ctx , we can use the same methods for displaying graphic objects that are used when working with the <canvas> . In this example, using the arc() function, we draw a circle.The first two values passed to the
arc() function are the X and Y coordinates of the center of the circle, in pixels, relative to the origin of coordinates, located in the upper left corner of the element. However, I want the circle to be in the center of the element. To solve this problem, we need the geom parameter. It gives access to the PaintSize object, which is a description of the image parameters. In particular, referring to it, we can read the parameters of width and height , and this is exactly what we need in order to center the circle.As a result, we come to this code:
class Shape { paint(ctx, geom, properties) { let x = geom.width/2; let y = geom.height/2; ctx.strokeStyle = 'white'; ctx.lineWidth = 4; ctx.beginPath(); ctx.arc(x, y, 50, 0, 2*Math.PI); ctx.stroke(); ctx.closePath(); } } registerPaint('awesomePattern', Shape); You can see the working version of the example on CodePen . As a matter of fact, this is what this code displays.
Circle created by CSS Paint API
All this is good, but our example is very simple. Let's, instead of the usual circle, draw something more interesting. For example - such an asterisk - the logo of the site css-tricks.com.
Asterisk created by CSS Paint API
Here is a project on CodePen that allows you to do this.
When you look at the JS code of this project, pay attention to the
drawStar() method and to the many functions that are used when working with the <canvas> .Step 3: Custom CSS Properties
Using new technology, we can go far beyond drawing circles and stars. We can turn to the powerful capabilities of custom CSS properties (variables). They, by the way, even in themselves, are very interesting. In our case, they are especially useful.
Suppose we want to be able to change the size or color of a previously created logo. These parameters can be placed in the CSS code in the form of user properties, after which they can be used in the program through the third parameter passed to the
paint() callback. We are talking about the properties parameter.Add the
--star-scale property to our CSS code, which is aimed at controlling the image resizing, and the --star-color property, which is designed to organize the change of the logo color directly in CSS. Here's what we got: section { --star-scale: 2; --star-color: hsla(200, 50%, 50%, 1); background-image: paint(awesomePattern) }; Now back to the vorklet class. Here we need to interact with the above user properties. This is done using the
inputProperties method, which gives us access to all CSS properties and the values assigned to them. static get inputProperties() { return ['--star-scale','--star-color']; } Now you can work with them in the
paint() method: const size = parseInt(properties.get('--shape-size').toString()); Naturally, the obtained values can be used in the code responsible for the formation of the image. This leads to the fact that if we, in the CSS code, change the value of the
--star-scale --start-color or --start-color , it will immediately reflect on how the image will look.The effect of custom CSS properties on the final image
This functionality is implemented in the same project on CodePen, which we mentioned above.
By the way, it is worth noting that when using the new API, all the usual CSS properties regarding the background settings of elements, such as
background-size and background-repeat , will work the same as before. They have not lost relevance.Results
The CSS Paint API is a very powerful technology whose capabilities are not limited to creating background images.
Imagine that an element should have a special border, for example, one that is not fully visible, or double. Perhaps, to achieve similar effects, you usually use the
::before pseudo-elements of ::before or ::after , and maybe the specially configured box-shadow . Borders (and much more) can be implemented using CSS Paint API and border-image properties.The CSS Paint API brings together many great mechanisms, such as wormlets, ECMAScript 2015 classes, and the capabilities of the
<canvas> . In addition, it provides the developer with tools for image management software, based on JavaScript. For example, using the event mechanism, you can organize the updating of user properties, which means the image itself, as, for example, done here , where the click event starts the property update process in the requestAnimationFrame function, which allows you to create an animation every time the user clicks a button. Moreover, even the coordinates of the mouse pointer are taken into account when clicked.At first glance, all this may seem a bit confusing, but let's take a look at some other parts of the Houdini project that we can meet with:
- The CSS Layout API allows a developer to do something like
display: layout('myCustomLayout'). A typical example is the creation of custom layouts in the style of the Masonry library, but the range of use of this feature is much wider. - The CSS Properties and Values API allows you to set custom property types.
- The CSS Animation Worklet API takes animation processing operations out of the main thread, which should be expressed as perfectly smooth animations.
As a result, we can say that, literally before our eyes, technologies are emerging that open up many new opportunities for web developers. The processes of their standardization and implementation in browsers are not so fast, but they, quite possibly, will have a tremendous impact on everything related to the styling of web pages.
Dear readers! Which areas of the CSS Paint API do you find most interesting?
Source: https://habr.com/ru/post/417075/
All Articles