Creating a cartoon water shader for the web. Part 2
In the first part, we looked at setting the environment and the surface of the water. In this part, we will give objects buoyancy, add water lines on the surface and create foam lines with a buffer of depths around the boundaries of objects that intersect the surface.
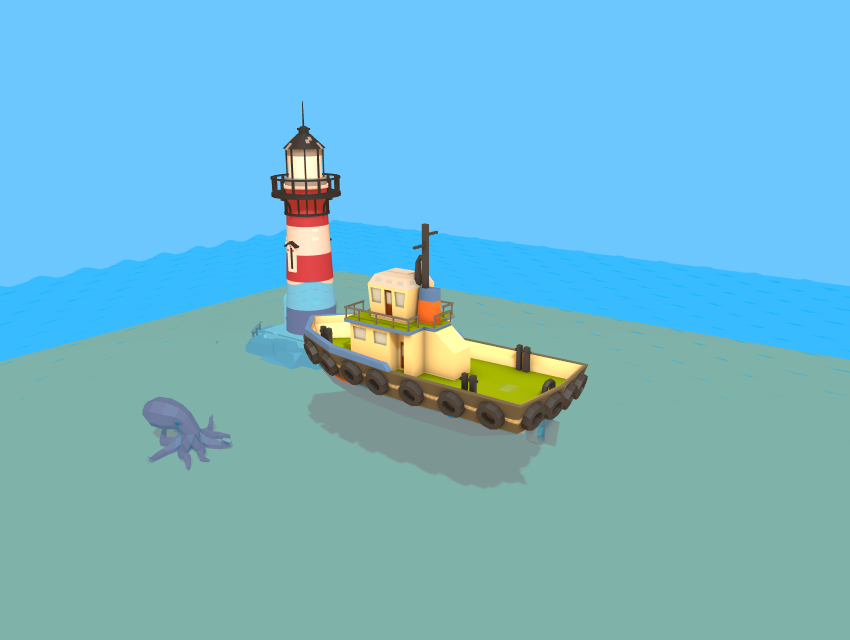
To make the scene look a little better, I made some small changes to it. You can customize your scene the way you want, and I did the following:
My original scene now looks like this.
')
The simplest way to create buoyancy is a script that pushes objects up and down. Create a new Buoyancy.js script and set the following in its initialize:
Now in update we execute the time increment and rotate the object:
Apply this script to the boat and see how it rides up and down the water! You can apply this script to several objects (including the camera - try it)!
While we can see the waves, looking at the edges of the water surface. Adding texture will make the surface movement more noticeable. In addition, it is a low-cost way to simulate reflections and caustics.
You can try to find some caustic textures or create it yourself. I drew a texture in Gimp that you can use freely. Any texture will do, provided it can be tiled without visible joints.
After picking up your favorite texture, drag it into the Assets window of your project. We need to reference this texture from the Water.js script, so we will create an attribute for it:
And then assign it to the editor:

Now we need to pass it to the shader. Go to Water.js and set a new parameter in the
Now go back to Water.frag and declare a new uniform:
We are almost done. To render a texture on a plane, we need to know where each pixel is in the mesh. That is, we need to transfer data from the vertex shader to the fragment shader.
Varying variables allow you to transfer data from a vertex shader to a fragment shader. This is the third type of special variables that can be used in the shader (the first two are uniform and attribute ). The variable is set for each vertex and each pixel can access it. Since there are many more pixels than vertices, the value is interpolated between the vertices (hence the name "varying" appeared - it deviates from the values passed to it).
To check it in work, we will declare a new variable in Water.vert as varying:
And then assign the value
Now back to Water.frag and declare the same variable. We will not be able to get debug output from the shader, but we can use color for visual debugging. Here's how to do it:
The plane should now look black and white, and the color dividing line will pass where
What we just did: transferred the screen position of each vertex to each pixel. You can see that the line separating the black and white sides will always be in the center of the screen, regardless of where the surface is actually in the world.
UV is the 2D coordinates of each vertex on the mesh, normalized from 0 to 1. They are the ones that are needed to correctly sample the texture onto the plane, and we have already adjusted them in the previous section.
Let's declare a new attribute in Water.vert (this name is taken from the definition of the shader in Water.js):
And now we just need to pass it to the fragment shader, so just create a varying and assign the attribute value to it:
Now we will declare the same varying variable in the fragment shader. To make sure that everything works, we can visualize debugging as before, and then Water.frag will look like this:
You should see a gradient confirming that we have a value of 0 from one end and 1 from the other. Now to sample the texture for real, we just need to do the following:
After that we will see a texture on the surface:
Instead of simply setting the texture as a new color, let's combine it with the existing blue:
This works because the texture color is black (0) everywhere, except for the lines of water. By adding it, we do not change the original blue color, except for places with lines where it becomes lighter.
However, this is not the only way to combine colors.
As a final effect, we want the lines to move along the surface and it does not look so static. To do this, we use the fact that any value outside the interval from 0 to 1, passed to the
Rendering foam lines around objects in water makes it much easier to see how objects are immersed and where they cross the surface. In addition, so our water becomes much more believable. To realize the foam lines, we somehow need to figure out where the boundaries of each object are, and do it efficiently.
We need to learn to determine whether a pixel is close to the object on the surface of the water. If so, then we can paint it in foam color. There are no simple ways to solve this problem (as far as I know). Therefore, to solve it, I use a useful technique for solving problems: I will take an example, the answer for which we know, and see if we can generalize it.
Look at the image below.

Which pixels should be part of the foam? We know that it should look something like this:

So let's look at two specific pixels. Below I marked them with asterisks. Black will be on the foam, and red will not. How do we distinguish them in the shader?

We know that even though these two pixels in the screen space are close to each other (both are rendered on top of the beacon body), in fact they are very far in the space of the world. We can see this by looking at the same scene from a different angle.
Note that the red star is not on the lighthouse, as it seemed to us, but the black one is actually there. We can distinguish from using the distance to the camera, which is commonly called the "depth." Depth 1 means that the point is very close to the camera, depth 0 means that it is very far away. But this is not only a matter of absolute distances in the world, depth or camera. The depth relative to the pixel behind it is important.
Look again at the first view. Suppose the lighthouse body has a depth value of 0.5. The depth of the black asterisk will be very close to 0.5. That is, it and the pixel below it have very close depth values. On the other hand, the red star will have a much greater depth, because it is closer to the camera, say 0.7. And although the pixel behind it is still on the lighthouse, it has a depth value of 0.5, that is, there is a difference here.
This is the trick. When the depth of a pixel on the surface of the water is close enough to the depth of the pixel on top of which it is drawn, then we are fairly close to the border of some object and can render the pixel as foam.
That is, we need more information than we have in any pixel. We somehow need to know the depth of the pixel over which it should be drawn. And here we have the depth buffer.
You can render the frame buffer or buffer as an offscreen target render or texture. When we need to read data, we need to render off-screen. This technique is used in the effect of smoke .
The depth buffer is a special target render, which contains information about the depth values of each pixel. Do not forget that the value in
The depth buffer is designed to correctly render the scene without having to sort the objects from behind. Each pixel to be drawn first checks the depth buffer. If its depth value is greater than the value in the buffer, then it is drawn, and its own value overwrites the value of the buffer. Otherwise, it is discarded (because it means that there is another object in front of it).
In fact, you can turn off writing to the depth buffer to see how everything will look without it. Let's try to do this in Water.js:
You will notice that water will now always be drawn from above, even if it is behind opaque objects.
For debugging purposes, let's add a way to render the depth buffer. Create a new script DepthVisualize.js . Attach it to the camera.
To access the depth buffer in PlayCanvas, it’s enough to write the following:
So we automatically inject the uniform variable into all our shaders, which we can use by declaring it as follows:
Below is an example script requesting a depth map and rendering it over the stage. It has a hot reboot configured.
Try copying the code and commenting / uncommenting the line

Hint: in Water.js, you can change one line, which will allow you to write water to the depth buffer.
It should also be noted that in the initialize function, I multiply the depth value by 30. This is necessary to see it clearly, because otherwise the interval of values would be too small to display shades of color.
In the PlayCanvas engine there are several auxiliary functions for working with depth values, but as of this writing, they were not released in production, so we will have to configure them ourselves.
Define the following uniform variables in Water.frag :
We define these auxiliary functions over the main function:
Give the shader information about the camera in Water.js . Paste it where you pass other uniform variables like uTime:
Finally, we need a position in the world of each pixel for our fragment shader. We need to get it from the vertex shader. Therefore, we define in the Water.frag a varying variable:
Define the same varying variable in Water.vert . Then assign it a distorted position from the vertex shader so that the full code looks like this:
Now we are finally ready to implement the technique described at the beginning of this section. We want to compare the depth of the pixel we are in with the depth of the pixel below it. The pixel we are in is taken from a position in the world, and the pixel below it is obtained from the screen position. Therefore, we take these two depths:
We know that foam will be where the distance between the two values is small. So let's render this distinction for each pixel. Paste this at the end of the shader (and disable the depth rendering script from the previous section):
And it should look something like this:

That is, we correctly select the boundaries of any object that is immersed in water in real time! Of course, you can scale the difference to make the foam thicker or less.
We now have many options for how to combine this output with the surface of the water to produce beautiful foam lines. You can leave them with a gradient, use them for sampling from another texture, or assign them a specific color if the difference is less than or equal to a certain limit value.
I liked most of all the assignment of color, similar to the lines of static water, so my finished main function looks like this:
We created the buoyancy of objects immersed in water, laid a moving texture on the surface to simulate caustics, and learned how to use the depth buffer to create dynamic foam bands.
In the third and last part, we will add post-processing effects and learn how to use them to create an underwater distortion effect.
A complete PlayCanvas project can be found here . In our repository there is also a project port under Three.js .
To make the scene look a little better, I made some small changes to it. You can customize your scene the way you want, and I did the following:
- Added models of lighthouse and octopus.
- Added earth model with color
#FFA457. - Added sky color to camera
#6CC8FF. - Added
#FFC480backlight color to the scene (these parameters can be found in the scene settings).
My original scene now looks like this.
')
Buoyancy
The simplest way to create buoyancy is a script that pushes objects up and down. Create a new Buoyancy.js script and set the following in its initialize:
Buoyancy.prototype.initialize = function() { this.initialPosition = this.entity.getPosition().clone(); this.initialRotation = this.entity.getEulerAngles().clone(); // , // // this.time = Math.random() * 2 * Math.PI; }; Now in update we execute the time increment and rotate the object:
Buoyancy.prototype.update = function(dt) { this.time += 0.1; // var pos = this.entity.getPosition().clone(); pos.y = this.initialPosition.y + Math.cos(this.time) * 0.07; this.entity.setPosition(pos.x,pos.y,pos.z); // var rot = this.entity.getEulerAngles().clone(); rot.x = this.initialRotation.x + Math.cos(this.time * 0.25) * 1; rot.z = this.initialRotation.z + Math.sin(this.time * 0.5) * 2; this.entity.setLocalEulerAngles(rot.x,rot.y,rot.z); }; Apply this script to the boat and see how it rides up and down the water! You can apply this script to several objects (including the camera - try it)!
Surface texturing
While we can see the waves, looking at the edges of the water surface. Adding texture will make the surface movement more noticeable. In addition, it is a low-cost way to simulate reflections and caustics.
You can try to find some caustic textures or create it yourself. I drew a texture in Gimp that you can use freely. Any texture will do, provided it can be tiled without visible joints.
After picking up your favorite texture, drag it into the Assets window of your project. We need to reference this texture from the Water.js script, so we will create an attribute for it:
Water.attributes.add('surfaceTexture', { type: 'asset', assetType: 'texture', title: 'Surface Texture' }); And then assign it to the editor:
Now we need to pass it to the shader. Go to Water.js and set a new parameter in the
CreateWaterMaterial function: material.setParameter('uSurfaceTexture',this.surfaceTexture.resource); Now go back to Water.frag and declare a new uniform:
uniform sampler2D uSurfaceTexture; We are almost done. To render a texture on a plane, we need to know where each pixel is in the mesh. That is, we need to transfer data from the vertex shader to the fragment shader.
Varying variables
Varying variables allow you to transfer data from a vertex shader to a fragment shader. This is the third type of special variables that can be used in the shader (the first two are uniform and attribute ). The variable is set for each vertex and each pixel can access it. Since there are many more pixels than vertices, the value is interpolated between the vertices (hence the name "varying" appeared - it deviates from the values passed to it).
To check it in work, we will declare a new variable in Water.vert as varying:
varying vec2 ScreenPosition; And then assign the value
gl_Position after its calculation: ScreenPosition = gl_Position.xyz; Now back to Water.frag and declare the same variable. We will not be able to get debug output from the shader, but we can use color for visual debugging. Here's how to do it:
uniform sampler2D uSurfaceTexture; varying vec3 ScreenPosition; void main(void) { vec4 color = vec4(0.0,0.7,1.0,0.5); // varying- color = vec4(vec3(ScreenPosition.x),1.0); gl_FragColor = color; } The plane should now look black and white, and the color dividing line will pass where
ScreenPosition.x = 0. Color values change only from 0 to 1, but the values in ScreenPosition may be outside of this interval. They are automatically limited, so when you see black, it can be 0 or a negative number.What we just did: transferred the screen position of each vertex to each pixel. You can see that the line separating the black and white sides will always be in the center of the screen, regardless of where the surface is actually in the world.
Task 1: create a new varying variable for transferring a position in the world instead of a screen position. Visualize it in the same way. If the color does not change with the movement of the camera, then everything is done correctly.
Using UV
UV is the 2D coordinates of each vertex on the mesh, normalized from 0 to 1. They are the ones that are needed to correctly sample the texture onto the plane, and we have already adjusted them in the previous section.
Let's declare a new attribute in Water.vert (this name is taken from the definition of the shader in Water.js):
attribute vec2 aUv0; And now we just need to pass it to the fragment shader, so just create a varying and assign the attribute value to it:
// Water.vert // varying vec2 vUv0; // .. // // varying, vUv0 = aUv0; Now we will declare the same varying variable in the fragment shader. To make sure that everything works, we can visualize debugging as before, and then Water.frag will look like this:
uniform sampler2D uSurfaceTexture; varying vec2 vUv0; void main(void) { vec4 color = vec4(0.0,0.7,1.0,0.5); // UV color = vec4(vec3(vUv0.x),1.0); gl_FragColor = color; } You should see a gradient confirming that we have a value of 0 from one end and 1 from the other. Now to sample the texture for real, we just need to do the following:
color = texture2D(uSurfaceTexture,vUv0); After that we will see a texture on the surface:
Texture stylization
Instead of simply setting the texture as a new color, let's combine it with the existing blue:
uniform sampler2D uSurfaceTexture; varying vec2 vUv0; void main(void) { vec4 color = vec4(0.0,0.7,1.0,0.5); vec4 WaterLines = texture2D(uSurfaceTexture,vUv0); color.rgba += WaterLines.r; gl_FragColor = color; } This works because the texture color is black (0) everywhere, except for the lines of water. By adding it, we do not change the original blue color, except for places with lines where it becomes lighter.
However, this is not the only way to combine colors.
Task 2: Can you combine the colors so that you get the weaker effect shown below?
Moving texture
As a final effect, we want the lines to move along the surface and it does not look so static. To do this, we use the fact that any value outside the interval from 0 to 1, passed to the
texture2D function, will be transferred (for example, both 1.5 and 2.5 become equal to 0.5). Therefore, we can increase our position by the uniform time variable we have already specified in order to increase or decrease the density of lines on the surface, which will give the final fragmentary shader the following form: uniform sampler2D uSurfaceTexture; uniform float uTime; varying vec2 vUv0; void main(void) { vec4 color = vec4(0.0,0.7,1.0,0.5); vec2 pos = vUv0; // 1 // pos *= 2.0; // , pos.y += uTime * 0.02; vec4 WaterLines = texture2D(uSurfaceTexture,pos); color.rgba += WaterLines.r; gl_FragColor = color; } Foam lines and depth buffer
Rendering foam lines around objects in water makes it much easier to see how objects are immersed and where they cross the surface. In addition, so our water becomes much more believable. To realize the foam lines, we somehow need to figure out where the boundaries of each object are, and do it efficiently.
Cunning
We need to learn to determine whether a pixel is close to the object on the surface of the water. If so, then we can paint it in foam color. There are no simple ways to solve this problem (as far as I know). Therefore, to solve it, I use a useful technique for solving problems: I will take an example, the answer for which we know, and see if we can generalize it.
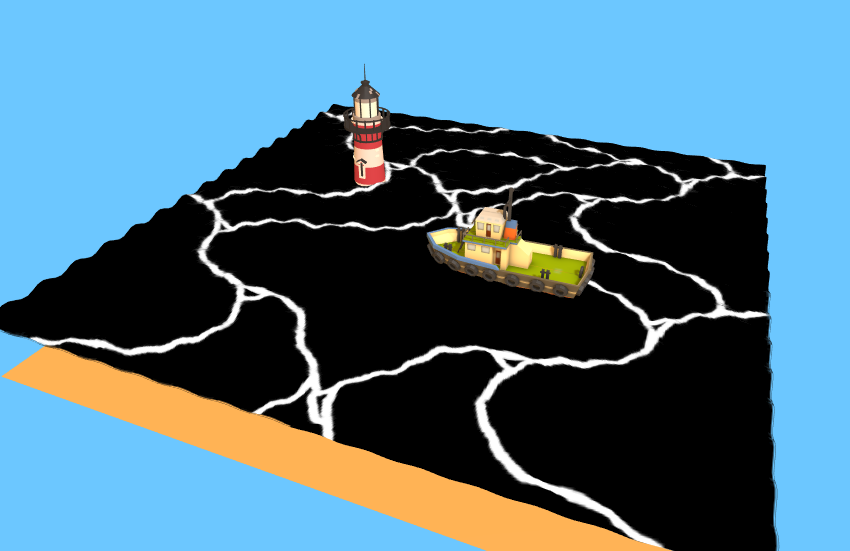
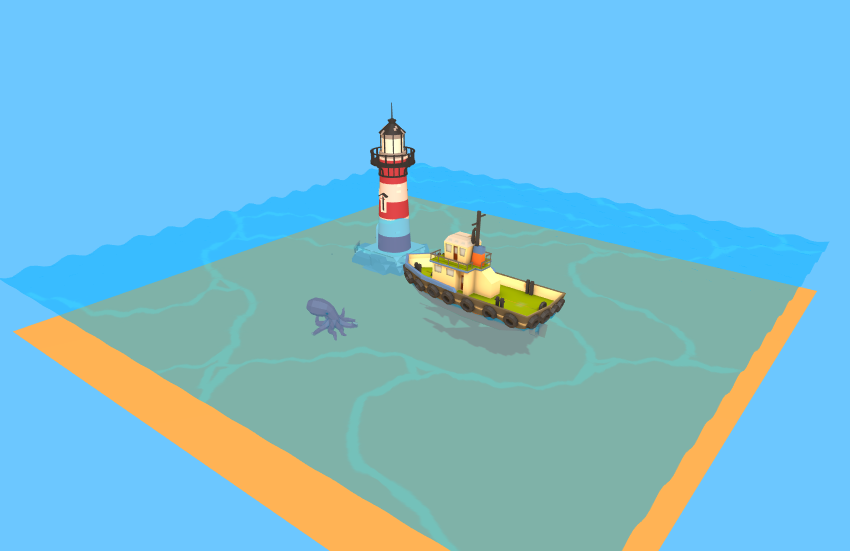
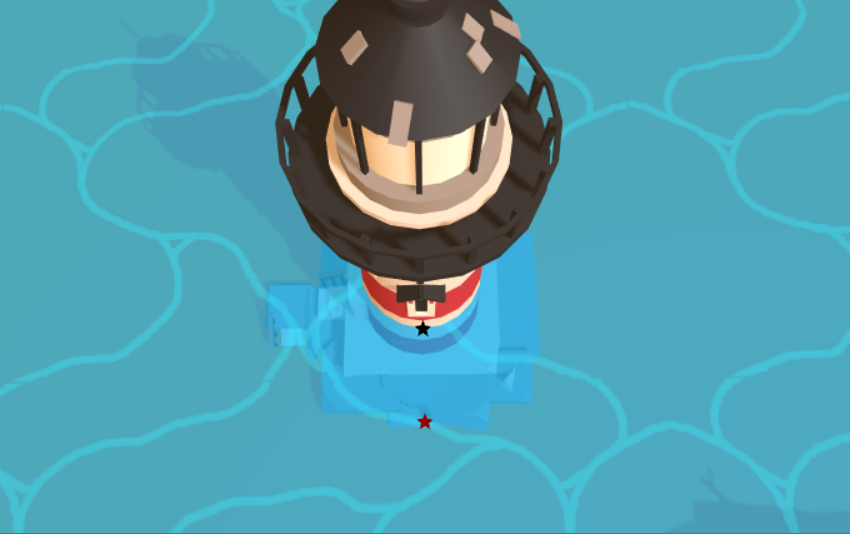
Look at the image below.
Which pixels should be part of the foam? We know that it should look something like this:
So let's look at two specific pixels. Below I marked them with asterisks. Black will be on the foam, and red will not. How do we distinguish them in the shader?
We know that even though these two pixels in the screen space are close to each other (both are rendered on top of the beacon body), in fact they are very far in the space of the world. We can see this by looking at the same scene from a different angle.
Note that the red star is not on the lighthouse, as it seemed to us, but the black one is actually there. We can distinguish from using the distance to the camera, which is commonly called the "depth." Depth 1 means that the point is very close to the camera, depth 0 means that it is very far away. But this is not only a matter of absolute distances in the world, depth or camera. The depth relative to the pixel behind it is important.
Look again at the first view. Suppose the lighthouse body has a depth value of 0.5. The depth of the black asterisk will be very close to 0.5. That is, it and the pixel below it have very close depth values. On the other hand, the red star will have a much greater depth, because it is closer to the camera, say 0.7. And although the pixel behind it is still on the lighthouse, it has a depth value of 0.5, that is, there is a difference here.
This is the trick. When the depth of a pixel on the surface of the water is close enough to the depth of the pixel on top of which it is drawn, then we are fairly close to the border of some object and can render the pixel as foam.
That is, we need more information than we have in any pixel. We somehow need to know the depth of the pixel over which it should be drawn. And here we have the depth buffer.
Depth buffer
You can render the frame buffer or buffer as an offscreen target render or texture. When we need to read data, we need to render off-screen. This technique is used in the effect of smoke .
The depth buffer is a special target render, which contains information about the depth values of each pixel. Do not forget that the value in
gl_Position , calculated in the vertex shader, was the value of the screen space, but it also has a third coordinate, the Z value. This Z value is used to calculate the depth, which is written to the depth buffer.The depth buffer is designed to correctly render the scene without having to sort the objects from behind. Each pixel to be drawn first checks the depth buffer. If its depth value is greater than the value in the buffer, then it is drawn, and its own value overwrites the value of the buffer. Otherwise, it is discarded (because it means that there is another object in front of it).
In fact, you can turn off writing to the depth buffer to see how everything will look without it. Let's try to do this in Water.js:
material.depthTest = false; You will notice that water will now always be drawn from above, even if it is behind opaque objects.
Depth buffer visualization
For debugging purposes, let's add a way to render the depth buffer. Create a new script DepthVisualize.js . Attach it to the camera.
To access the depth buffer in PlayCanvas, it’s enough to write the following:
this.entity.camera.camera.requestDepthMap(); So we automatically inject the uniform variable into all our shaders, which we can use by declaring it as follows:
uniform sampler2D uDepthMap; Below is an example script requesting a depth map and rendering it over the stage. It has a hot reboot configured.
var DepthVisualize = pc.createScript('depthVisualize'); // initialize, DepthVisualize.prototype.initialize = function() { this.entity.camera.camera.requestDepthMap(); this.antiCacheCount = 0; // , this.SetupDepthViz(); }; DepthVisualize.prototype.SetupDepthViz = function(){ var device = this.app.graphicsDevice; var chunks = pc.shaderChunks; this.fs = ''; this.fs += 'varying vec2 vUv0;'; this.fs += 'uniform sampler2D uDepthMap;'; this.fs += ''; this.fs += 'float unpackFloat(vec4 rgbaDepth) {'; this.fs += ' const vec4 bitShift = vec4(1.0 / (256.0 * 256.0 * 256.0), 1.0 / (256.0 * 256.0), 1.0 / 256.0, 1.0);'; this.fs += ' float depth = dot(rgbaDepth, bitShift);'; this.fs += ' return depth;'; this.fs += '}'; this.fs += ''; this.fs += 'void main(void) {'; this.fs += ' float depth = unpackFloat(texture2D(uDepthMap, vUv0)) * 30.0; '; this.fs += ' gl_FragColor = vec4(vec3(depth),1.0);'; this.fs += '}'; this.shader = chunks.createShaderFromCode(device, chunks.fullscreenQuadVS, this.fs, "renderDepth" + this.antiCacheCount); this.antiCacheCount ++; // , this.command = new pc.Command(pc.LAYER_FX, pc.BLEND_NONE, function () { pc.drawQuadWithShader(device, null, this.shader); }.bind(this)); this.command.isDepthViz = true; // , this.app.scene.drawCalls.push(this.command); }; // update, DepthVisualize.prototype.update = function(dt) { }; // swap, // DepthVisualize.prototype.swap = function(old) { this.antiCacheCount = old.antiCacheCount; // for(var i=0;i<this.app.scene.drawCalls.length;i++){ if(this.app.scene.drawCalls[i].isDepthViz){ this.app.scene.drawCalls.splice(i,1); break; } } // this.SetupDepthViz(); }; // , : // http://developer.playcanvas.com/en/user-manual/scripting/ Try copying the code and commenting / uncommenting the line
this.app.scene.drawCalls.push(this.command); to enable / disable depth rendering. This should look like the image below.Task 3: the surface of the water is not drawn into the depth buffer. The PlayCanvas engine does so intentionally. Can you figure out why? What is special about water? In other words, given our rules for checking depths, what would happen if water pixels were recorded in the depth buffer?
Hint: in Water.js, you can change one line, which will allow you to write water to the depth buffer.
It should also be noted that in the initialize function, I multiply the depth value by 30. This is necessary to see it clearly, because otherwise the interval of values would be too small to display shades of color.
Implementation tricks
In the PlayCanvas engine there are several auxiliary functions for working with depth values, but as of this writing, they were not released in production, so we will have to configure them ourselves.
Define the following uniform variables in Water.frag :
// uniform- PlayCanvas uniform sampler2D uDepthMap; uniform vec4 uScreenSize; uniform mat4 matrix_view; // uniform vec4 camera_params; We define these auxiliary functions over the main function:
#ifdef GL2 float linearizeDepth(float z) { z = z * 2.0 - 1.0; return 1.0 / (camera_params.z * z + camera_params.w); } #else #ifndef UNPACKFLOAT #define UNPACKFLOAT float unpackFloat(vec4 rgbaDepth) { const vec4 bitShift = vec4(1.0 / (256.0 * 256.0 * 256.0), 1.0 / (256.0 * 256.0), 1.0 / 256.0, 1.0); return dot(rgbaDepth, bitShift); } #endif #endif float getLinearScreenDepth(vec2 uv) { #ifdef GL2 return linearizeDepth(texture2D(uDepthMap, uv).r) * camera_params.y; #else return unpackFloat(texture2D(uDepthMap, uv)) * camera_params.y; #endif } float getLinearDepth(vec3 pos) { return -(matrix_view * vec4(pos, 1.0)).z; } float getLinearScreenDepth() { vec2 uv = gl_FragCoord.xy * uScreenSize.zw; return getLinearScreenDepth(uv); } Give the shader information about the camera in Water.js . Paste it where you pass other uniform variables like uTime:
if(!this.camera){ this.camera = this.app.root.findByName("Camera").camera; } var camera = this.camera; var n = camera.nearClip; var f = camera.farClip; var camera_params = [ 1/f, f, (1-f / n) / 2, (1 + f / n) / 2 ]; material.setParameter('camera_params', camera_params); Finally, we need a position in the world of each pixel for our fragment shader. We need to get it from the vertex shader. Therefore, we define in the Water.frag a varying variable:
varying vec3 WorldPosition; Define the same varying variable in Water.vert . Then assign it a distorted position from the vertex shader so that the full code looks like this:
attribute vec3 aPosition; attribute vec2 aUv0; varying vec2 vUv0; varying vec3 WorldPosition; uniform mat4 matrix_model; uniform mat4 matrix_viewProjection; uniform float uTime; void main(void) { vUv0 = aUv0; vec3 pos = aPosition; pos.y += cos(pos.z*5.0+uTime) * 0.1 * sin(pos.x * 5.0 + uTime); gl_Position = matrix_viewProjection * matrix_model * vec4(pos, 1.0); WorldPosition = pos; } We implement the trick for real
Now we are finally ready to implement the technique described at the beginning of this section. We want to compare the depth of the pixel we are in with the depth of the pixel below it. The pixel we are in is taken from a position in the world, and the pixel below it is obtained from the screen position. Therefore, we take these two depths:
float worldDepth = getLinearDepth(WorldPosition); float screenDepth = getLinearScreenDepth(); Task 4: one of these values will never be greater than the other (assuming depthTest = true). Can you determine which one?
We know that foam will be where the distance between the two values is small. So let's render this distinction for each pixel. Paste this at the end of the shader (and disable the depth rendering script from the previous section):
color = vec4(vec3(screenDepth - worldDepth),1.0); gl_FragColor = color; And it should look something like this:
That is, we correctly select the boundaries of any object that is immersed in water in real time! Of course, you can scale the difference to make the foam thicker or less.
We now have many options for how to combine this output with the surface of the water to produce beautiful foam lines. You can leave them with a gradient, use them for sampling from another texture, or assign them a specific color if the difference is less than or equal to a certain limit value.
I liked most of all the assignment of color, similar to the lines of static water, so my finished main function looks like this:
void main(void) { vec4 color = vec4(0.0,0.7,1.0,0.5); vec2 pos = vUv0 * 2.0; pos.y += uTime * 0.02; vec4 WaterLines = texture2D(uSurfaceTexture,pos); color.rgba += WaterLines.r * 0.1; float worldDepth = getLinearDepth(WorldPosition); float screenDepth = getLinearScreenDepth(); float foamLine = clamp((screenDepth - worldDepth),0.0,1.0) ; if(foamLine < 0.7){ color.rgba += 0.2; } gl_FragColor = color; } Summing up
We created the buoyancy of objects immersed in water, laid a moving texture on the surface to simulate caustics, and learned how to use the depth buffer to create dynamic foam bands.
In the third and last part, we will add post-processing effects and learn how to use them to create an underwater distortion effect.
Source
A complete PlayCanvas project can be found here . In our repository there is also a project port under Three.js .
Source: https://habr.com/ru/post/416983/
All Articles