My experience of creating "without smart" at home
My time has come and will share their experience of creating a "without smart" home. To enter into polemics, what is all the same such a smart home and what he should be able to do is not very desirable. In my case, we will tame the wifi Sonoff modules from ITEAD and learn how to turn the load on / off from the phone. The publication will discuss how to flash the module, connect the temperature / humidity sensor to the module, learn how to control the module through the HomeKit (Home) application and Siri. Add to all this Domoticz home control system on a raspberry pi. Add wifi to the coffee machine and teach Siri to open the intercom.
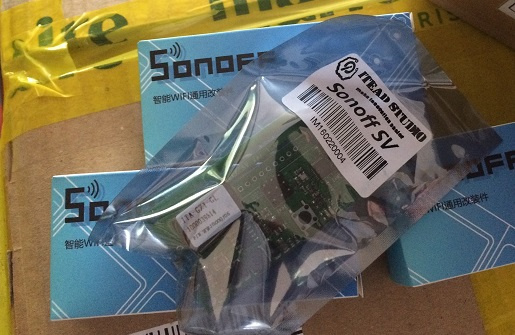
I ordered three normal sonoff modules and one SV (Safe Voltage) for testing. At the time of ordering, the usual 4.85 eternally green module is for stock, although the stock looks indefinite. SV at a similar price of 4.85. With delivery to Ukraine, the total cost was 26 green. China is in China; it is in Africa; the money has gone, but the goods still need to wait three weeks, maybe more. Of course, it was possible to buy in Ukraine and not to wait, but then a little more expensive.
Four modules arrived, the usual ones are packed in boxes, and the SV is simply in an antistatic bag. The case and size pleased.
')
The process of installing native e-Welink software and connecting the module to the home network will not be described, instructions in any languages on the Internet, take it — I don’t want to.
Without thinking, we go into the corridor and add this module to the ceiling lamp. The module is small, there is a lot of space in the lamp. In the corridor, the light is often left on and now you can turn off the light while lying in bed in front of the TV. The apartment has already been renovated everywhere and installed regular switches. Repair does not touch and use the existing wiring.
It turns out the following logic of work:
- The switch is off, the module does not work either;
- The switch is on, the light can be turned off from the application;
- The switch is turned on and the light is turned off through the application, then to turn on the light, you must turn off / on the switch, having previously set ON (when the module is turned on the relay is open) in the “power supply in the area” module settings and the light turns on.
We are happy.
The second module is added to the lamp in the bedroom. Here the lamp is not so spacious was in the hallway. I had to cut the body a little and reduce / cut the button, did not fit in height. After that, the module is neatly hidden in the lamp.
The apartment is installed switches Schneider series Unica. To alter such a switch, you can install a spring under the key and the place is already prepared in advance.
As they say on the Internet, you can try a spring from ballpoint pens. My attempts to install a spring from a ballpoint pen did not succeed. Very weak spring and lack of rigidity to return the key to its original position.
The original Schneider spring has the following characteristics d = 3.6 mm, wire thickness 0.6 mm, height 10 mm. I did not hold it in my hands, I did not find it on sale, I found information on a spring on one of the forums.
After searching around the house, a similar spring was found, quite elastic and successfully added to the switch. Without spending a penny and get a button instead of a switch.
It looks like a switch with a spring installed.
Now we always have a module with power and in the network. In the settings, we put that when powering the module, the module changes the state of the relay.
The logic of work in this case:
- on the sonoff module there is always power, switching the light on and off through the application;
- pressing the button interrupts the power supply and the relay changes its state to the opposite.
We can manage the load on the switch and through the application. The native application and module work through some kind of Chinese server.
Yes, yes, I know, at night there is a jump / disconnection and switching on of the voltage and our lights come on. During the work of the module, this has never happened before, but we live in Ukraine and the headlines are full of promises of fan blackouts.
On the table is the third module. And where are you dear? And you native will pick and scoff!
An autopsy showedthat the patient died from an autopsy, that there is a place under the comb for 5 pins.

From the button on the case (3,3v Rx, Tx, GND, GPIO 14). A soldering iron in hand and connect the usb-to-ttl adapter. In my usb-to-ttl adapter there is 3.3v, I did not try to apply power to the module from 5v and I do not advise it.
Next is the software part. There is a firmware for such modules on the githaba. Now there is a new version of the firmware . What is good about these firmware? There is a web control, mqtt protocol, OTA (Over the air) - firmware over the air. As for the native firmware, the mqtt protocol in the promises to add, OTA also exists, but only for its own. The lack of native firmware - works only when connected to the global network. Why do we need it? At this stage it is not necessary ... all the more we do not know what and where our module is being sent.
Install the Arduino IDE. I installed the portable version 1.8.1. Firmware requires IDE version 1.6.10 or higher.
- Add support for ESP8266 modules
- Install pubsubclient
○ Find the src \ PubSubClient.h file and change the MQTT_MAX_PACKET_SIZE value to 400 or more (now the Tasmot version is asking for a value of 500 or higher).
We download the sketch, compile, fingers crossed and hope that everything went without errors. This was not my case, we read the error and add the necessary libraries which were not. A couple of hours of torment and we have the firmware without errors. (The main problem was that I installed the Arduino IDE on Win XP). Edit the configuration file and upload our firmware.
That little minimum that I ruled in User_config.h.
Depending on the version, other settings may be added, which I would turn off without need. In the latest firmware (Tasmota), more and more settings can be made through the web settings menu and duplicated with User_config.h.
- turn off the power from the module (in any convenient way);
- we press the button on the module and connect the power. The module is ready to receive the firmware;
- press OK in the IDE and again, with fingers crossed, wait for the firmware to start filling in the module.
In case of an error, we check the wires, and if everything is well screwed in, we may not have enough power from usb-to-ttl and we need to take an external source. We dance with a tambourine and repeat the procedure.
Important: power to the module is supplied only through the pins of 3.3V. Connect it to the power load, through the power of the module itself is impossible. Experienced users write that supplying 220v per module with firmware turns it into a brick, small but brick. I did not try, I do not know. Therefore, with the firmware of the module, only four wiring to the pins is connected to it, and everything else is removed away.
If everything is ok, after rebooting the module should have connected to the access point, we find the ip address and go to it in the browser.
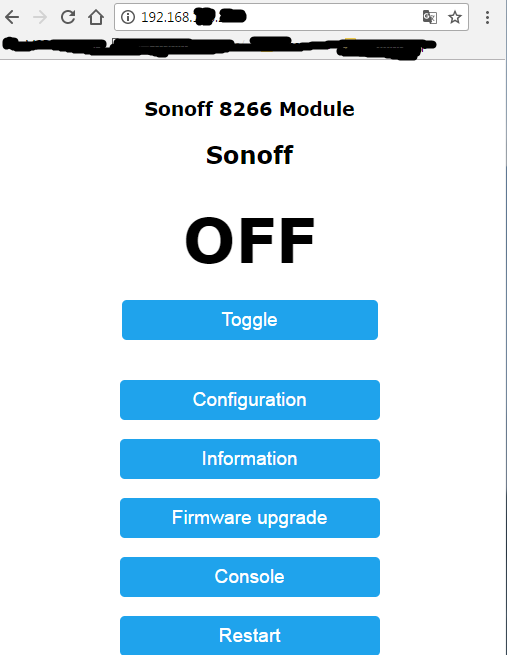
View start page.
If the module is not connected to your access point, then we continue dancing with a tambourine. There are various solutions, I will not describe them within this article. I checked the configs and just flashed the module again.
Now we have web access to the module and its settings, mqtt, wires can be removed in the box, firmware / update done through the air.
All this of course is wonderful, it's time to learn to manage this good from the phone. I tried several programs from the app for the phone and did not get anything interesting. It was decided to reach the Home application or HomeKit, which also makes it possible to control the modules via Siri.
We find on the shelf Raspberry pi and connect to the network. In my case, there was already a “raspberry” connected to the network. How to install the OS and connect the "raspberry" to describe it makes no sense.
To communicate with HomeKit, you must install Homebridge. Homebridge is a NodeJS server running on your local network and emulating the iOS HomeKit API.
Depending on your system, you may need to update the C ++ compiler.
Install Nodejs. We go to the store and select the appropriate dist . We copy the address of a distra and further in the image and likeness
I installed v6.9.4 myself, now there are newer ones.
Add other necessary packages:
Install Homebridge itself:
If this does not work, try:
After installing Homebridge, you need to install a few more plug-ins, and then proceed to change the settings of the Homebridge server.
Plugins are installed in the same way as homebridge itself.
The required plugin is found in the package manager . In the same place we find an example of settings that will need to be added to our settings.
For a simple switch.
Go to the settings, create, if not yet created, the configuration file:
The configuration file looks like this:
Before saving the settings file, check, for example, here . Once saved, try running:
If everything starts to write to us, something like:
In the same place the code 031-45-154 for connection will be indicated, if it has not been changed in the settings.
Now turn on the phone / tablet running iOS. Find the application "Home" or "HomeKit" → Add accessory and wait for our accessory "Homebridge" to appear, add it, enter the code, assign a room for the switch. And voila, "Hi Siri, turn on / off the light in the room" - it worked. "Hi Siri" on phones of the 5th series and below works only when connected to charging.
If everything works correctly for us, it remains to add Homebridge to the autoload. Full instruction in English. In my case, through
The template is copied to the file in this file and changed under the homebridge
We save, we leave.
Now homebridge will start at system startup.
The attentive reader noticed that there are 5 pins on the comb and one of them is GPIO 14. Again we take the soldering iron in our hands and solder the three wires to 3.3V, GND, GPIO 14 for the DHT22 humidity temperature sensor. You can have another sensor (ds18b20, DHT 11, or another one that is supported by the firmware), but I had the DHT22 in my box. Connecting the sensor made through the connector, which is fixed to the side of the native case. If necessary, it will be possible to connect another sensor without a scalpel and a soldering iron.
In the picture, I just fixed the connector, I haven’t connected the wires yet. In the firmware Sonoff-MQTT-OTA-Arduino, you need to check the settings:
For the Tasmota firmware, pin and sensor type can be specified in the web settings.
If everything is correctly connected and configured, then go to the web interface, we will see the status of the relay and sensor readings. In the settings you can set the sensor polling frequency. The default is 300 seconds (5 minutes).
We dive in search of a plug for Homebridge to work with a temperature and humidity sensor. We now need to display these readings in the application. I managed to do all this, but IMHO it was my rake and should not be done.
And why? It's very simple, just screwing the sensor to the sonoff doesn't make sense, it is necessary to turn something on / off based on these readings. But in the firmware settings there is no such possibility, it is possible to configure the Home / HomeKit application for such purposes, but a tablet is needed that will be constantly at home or an apple tv. The presence in the firmware of the ability to communicate with Domoticz led me on this thorny path to installing the Domoticz smart home control system.
In the form of a small lyrical digression, I say, I tried to connect plug-ins to my homebridge that allow to transfer RTSP stream from a webcam. I have an ip-camera TOP-201 from the Chinese counterparts.
Install the plugin:
Add to the settings file:
Additionally, a picture from the camera appears in the HomeKit application, but it all worked very slow and there was no need for this camera. What would unnecessarily not load the system, deleted the ip-camera. Let us return to the installation of the system for managing "without smart" home.
Putty → ssh → and again we pick the raspberry. Surprisingly, the installation in my case did not require dancing with a tambourine and it was enough
Add autorun:
If necessary, change some settings:
Open the address of the raspberry 192.168.xxx.xxx : 8080. And should go to the homepage domotiks. Further adjustment and adding of sensors already occurs through a web.
On the screenshot, sonoff sensors and a street sensor have already been added.
To add sensors / switches, go to Setup → hardware and add Dummy (Does nothing, use for virtual switches only). Our “Dummy” will appear in the device list. Clicking on the Create virtual sensor, we call our sensor / switch and select the required type from the list. Now, in the Setup → Devices tab, a new device will appear and in the same place you can now see the idx of the device.
We open the web of our switch / sensor and save configuration → domoticz → idx of our switch. In the new Tasmota firmware, it is possible to set several idx. For relay / switch and separately for GPIO. Depending on the module, it may be an additional sensor or more, since in the SV version there are three additional pins that can be assigned their role in your system (relays / sensors).
In the old firmware (Sonoff-MQTT-OTA-Arduino) for the module, I had to perform some dances with a tambourine, what would Domoticz see the readings of humidity and temperature. I think it makes no sense to describe it here, for a new firmware (Tasmota) this is not needed.
According to the readings of humidity, you can control the exhaust in the bathroom. Where there is an exhaust fan there is enough space for the module and we already have everything we need. It remains only to adjust the management of the readings of humidity.
Setup → More options → Events
With the help of the designer, we create the logic of the hood operation (as in the picture). You can still on Lua, but this is not my case. Further experience has shown that 5 minutes of sensor polling is too large and I reduced to 3 minutes. Now taking a shower when the humidity rises above 70%, the hood is activated. In the future, when lowering below 45% off. Data on humidity picked up by experience. The only minus, and maybe it is not a minus, but a feature of the system, if you forcefully turn on the hood by pressing a button, then after 3 minutes, interrogating the humidity sensor, the system will shut down.
What about Siri? It turned out, everything is very simple.
And add to the settings
And when you start Homebridge we get
All the devices that we added to Domotiks, now we will have to be displayed among our devices in Homekit and can be managed through a friend of Siri. The need for other plugins for Homebridge has somehow disappeared.
We have a bunch of Domoticz-Homebridge and everything works very well and stably. Already testing not the first month.
A temperature / humidity sensor DHT22 from past crafts is bolted to the Raspberry pi and the data is transmitted to narodmon.ru with a python script every 10 minutes. Add a few lines to the existing script.
We add one more virtual sensor to Domoticz. And now we can additionally see the temperature and humidity on the street, both through the web on our local homepage and in the application on iOS.
Who is closer to mqtt, then the sensor readings could be sent via mqtt.
While my machine is being repaired and waiting for the control unit to arrive from Germany, the Delonghi coffee machine was presented as a gift. On the panel we have an on / off button, cook a small, double coffee and two more which I do not use because I do not mix milk with steam, I do not drink latte and other beverages. The disadvantage, the coffee does not grind itself, it is necessary to fill already ground and on one cup.
For coffee machines using Sonoff SV. Pins 3,3v, Rx, Tx, GND are signed. Separately, GPIO 4, 5, 14 are also added to the board. Firmware following the same procedure as described above.
We open the device and get to the board with buttons.
There is 5v power on the board, which is quite enough to power our sonoff sv wireless module. Labor was not to find where we have the cherished 5c.
Pressing the buttons, simply short-circuits the signal to the ground. We connect our module according to the scheme.
As you can see from the diagram, I made the connection of only two buttons: on / off and make coffee. By analogy, it was possible to make all the other buttons. On sonoff sv, we have 3 pins derived on the board, a relay, and you can also use Rx, Tx (in the latest Tasmota firmware).
Putting it all up according to the scheme, we find the right place inside the coffee maker. In the module settings in the web interface, add a second relay to GPIO5. In the menu "console" set the following settings:
In the homepage settings, we create two more “virtual sensors” and add their idx to the module settings in the homepage settings menu (Configuration → Configure Domoticz → IDX 1 and IDX 2).
As a result, we get two more switches, one of which presses the on / off button of the coffee machine and the second one presses the coffee making button.
To make coffee, anyway, you have to walk with your feet, you need to pour coffee. But turn on the machine is conveniently obtained. From the moment you turn on and before making coffee, you need some time to warm up the machine. Therefore, while sitting in a room, you can remotely turn on the coffee-machine and, after a while, stomp your feet and make yourself a drink.
More benefit will be in such a switch on a full machine in a coffee machine, you just have to remember to set the cup in advance. We are waiting for the management fee.
In the common corridor, the vestibule near the elevator is closed by a door with a magnetic lock and the Vizit access system. The system was installed after the repair was made and the button to open the chain door to the apartment was not held. In order to start the guests, you have to go out to the door and open it with the button to open the door in the corridor. The control unit KTM-602M.
The OP + GND closure opens the door / disconnects the magnet for 7 seconds.
We separate the power supply of the sonoff sv module and the relay by removing two resistors, as indicated below in the picture.
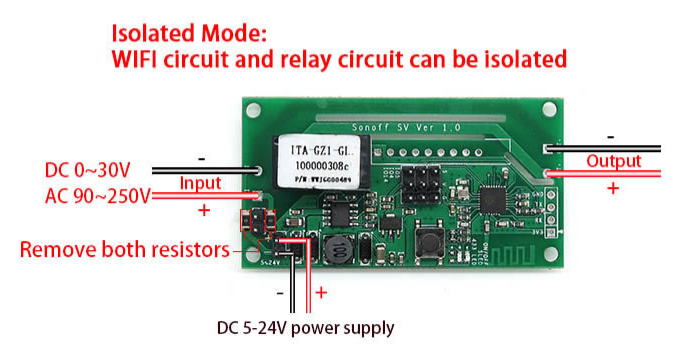
We connect the OP to the input “input +” relay, and at the output “output +” relay we fasten GND. Between ELC and GND control unit 18v from which we supply power to the module itself.
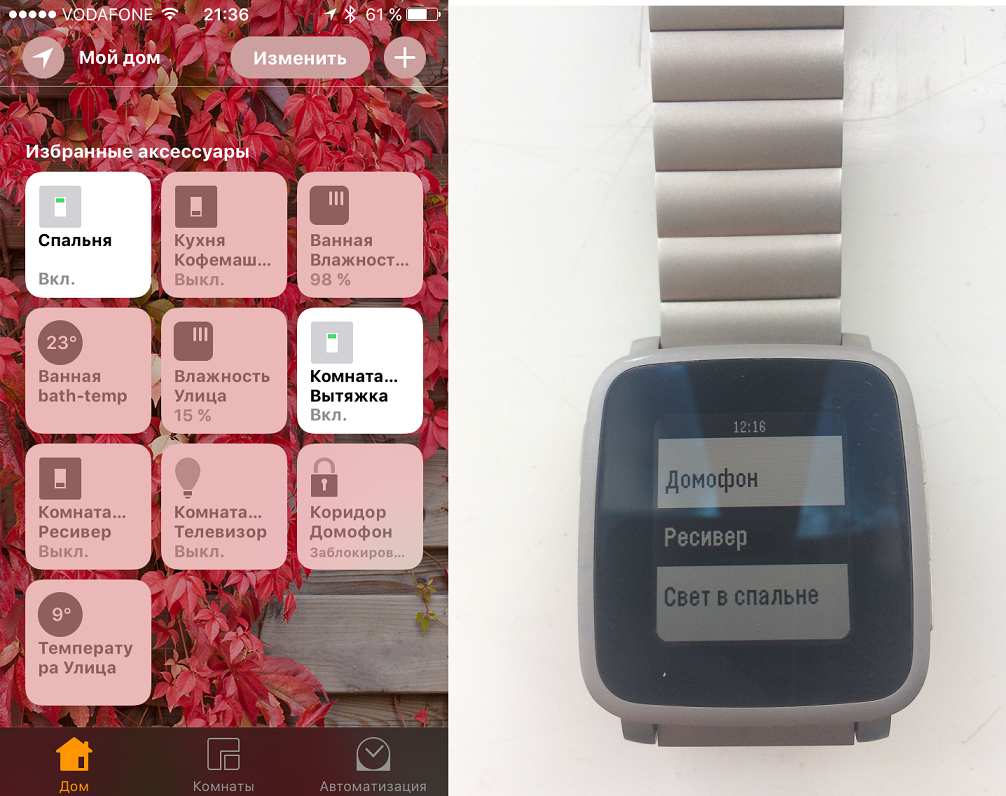
Add the door bell to the houses and now Siri can help us open the doors for the guests.
Siri assistant recognizes the “Open door” voice command, better than “turn on the coffee machine”.
At this point I stopped with the sonoff modules.
Once such a binge has gone, we will also turn the TV off / on. Turning off the TV and turning on no longer has anything to do with the wifi modules. TV is in close proximity with raspberry pi. Here we are helped by IR LED and a pair of resistances of different denominations. Install lirc, in the same place in the databases we find the settings for your remote / TV.
To work with home run, we run a small python script that translates our wishes to turn on / off the TV from mqtt to lirc.
We add to Domoticz three more virtual buttons for a TV, receiver and air conditioning.
To control the TV is not convenient from the phone, still the remote, somehow more familiar. But turn off the TV when I forgot and left the room a nice bonus.
A nice addition to all this is the availability for Pebble hours of the Pemoticz app. Added the address in the settings and the application pulled all the switches. Not a single Siri can now turn on the coffee machine / open doors and turn off the lights. The watch is usually on hand, and the phone may not be in close proximity. This also has its advantages. Speech recognition for hours did not deal with flashing them, but it is also possible.
On this, perhaps, you can finish the story "without a smart" home.
In conclusion, but what next?
Todo list:
- Air conditioning, it was not possible to find the settings for the remote to lirc and the first attempts to copy the presses did not succeed either. Sawing further.
- We are waiting for an order from the Chinese company Mi with a gateway and several sensors. Sensors opening doors by not tricky manipulations become sensors leakage. We will add to our system. When triggered sensors will send a notification to the owner.
- This ends my thoughts ...
→ Running HomeBridge on a Raspberry Pi
→ Sonoff-Tasmota Wiki
→ Installation of Domoticz on an already running Pi
→ How-to: Add WiFi to your coffee machine
I ordered three normal sonoff modules and one SV (Safe Voltage) for testing. At the time of ordering, the usual 4.85 eternally green module is for stock, although the stock looks indefinite. SV at a similar price of 4.85. With delivery to Ukraine, the total cost was 26 green. China is in China; it is in Africa; the money has gone, but the goods still need to wait three weeks, maybe more. Of course, it was possible to buy in Ukraine and not to wait, but then a little more expensive.
The joy of the first steps on the path of "without smart" home
Four modules arrived, the usual ones are packed in boxes, and the SV is simply in an antistatic bag. The case and size pleased.
')
The process of installing native e-Welink software and connecting the module to the home network will not be described, instructions in any languages on the Internet, take it — I don’t want to.
Without thinking, we go into the corridor and add this module to the ceiling lamp. The module is small, there is a lot of space in the lamp. In the corridor, the light is often left on and now you can turn off the light while lying in bed in front of the TV. The apartment has already been renovated everywhere and installed regular switches. Repair does not touch and use the existing wiring.
It turns out the following logic of work:
- The switch is off, the module does not work either;
- The switch is on, the light can be turned off from the application;
- The switch is turned on and the light is turned off through the application, then to turn on the light, you must turn off / on the switch, having previously set ON (when the module is turned on the relay is open) in the “power supply in the area” module settings and the light turns on.
We are happy.
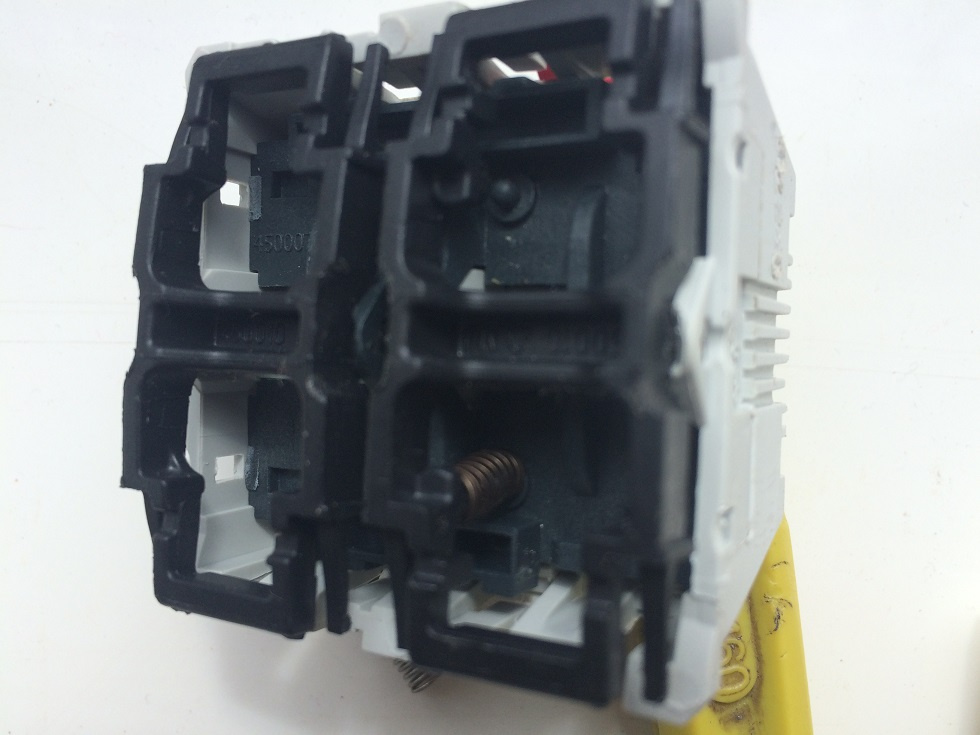
The second module is added to the lamp in the bedroom. Here the lamp is not so spacious was in the hallway. I had to cut the body a little and reduce / cut the button, did not fit in height. After that, the module is neatly hidden in the lamp.
Remaking the switch under the button
The apartment is installed switches Schneider series Unica. To alter such a switch, you can install a spring under the key and the place is already prepared in advance.
As they say on the Internet, you can try a spring from ballpoint pens. My attempts to install a spring from a ballpoint pen did not succeed. Very weak spring and lack of rigidity to return the key to its original position.
The original Schneider spring has the following characteristics d = 3.6 mm, wire thickness 0.6 mm, height 10 mm. I did not hold it in my hands, I did not find it on sale, I found information on a spring on one of the forums.
After searching around the house, a similar spring was found, quite elastic and successfully added to the switch. Without spending a penny and get a button instead of a switch.
It looks like a switch with a spring installed.
Now we always have a module with power and in the network. In the settings, we put that when powering the module, the module changes the state of the relay.
The logic of work in this case:
- on the sonoff module there is always power, switching the light on and off through the application;
- pressing the button interrupts the power supply and the relay changes its state to the opposite.
We can manage the load on the switch and through the application. The native application and module work through some kind of Chinese server.
Yes, yes, I know, at night there is a jump / disconnection and switching on of the voltage and our lights come on. During the work of the module, this has never happened before, but we live in Ukraine and the headlines are full of promises of fan blackouts.
On the table is the third module. And where are you dear? And you native will pick and scoff!
Installing alternative firmware
An autopsy showed
From the button on the case (3,3v Rx, Tx, GND, GPIO 14). A soldering iron in hand and connect the usb-to-ttl adapter. In my usb-to-ttl adapter there is 3.3v, I did not try to apply power to the module from 5v and I do not advise it.
Next is the software part. There is a firmware for such modules on the githaba. Now there is a new version of the firmware . What is good about these firmware? There is a web control, mqtt protocol, OTA (Over the air) - firmware over the air. As for the native firmware, the mqtt protocol in the promises to add, OTA also exists, but only for its own. The lack of native firmware - works only when connected to the global network. Why do we need it? At this stage it is not necessary ... all the more we do not know what and where our module is being sent.
Install the Arduino IDE. I installed the portable version 1.8.1. Firmware requires IDE version 1.6.10 or higher.
- Add support for ESP8266 modules
- Install pubsubclient
○ Find the src \ PubSubClient.h file and change the MQTT_MAX_PACKET_SIZE value to 400 or more (now the Tasmot version is asking for a value of 500 or higher).
We download the sketch, compile, fingers crossed and hope that everything went without errors. This was not my case, we read the error and add the necessary libraries which were not. A couple of hours of torment and we have the firmware without errors. (The main problem was that I installed the Arduino IDE on Win XP). Edit the configuration file and upload our firmware.
That little minimum that I ruled in User_config.h.
User_config.h
#define PROJECT "bath" // -
#define STA_SSID1 "your_wifi_station_id" //
#define STA_PASS1 "your_pass" //
#define STA_SSID2 "your_wifi_station_id_plus" //
#define STA_PASS2 " " //

#define SYS_LOG_HOST "192.168.." // , raspberry pi,
//#define USE_I2C //
//#define USE_IR_REMOTE
//#define USE_WS2812
Depending on the version, other settings may be added, which I would turn off without need. In the latest firmware (Tasmota), more and more settings can be made through the web settings menu and duplicated with User_config.h.
Fill the sketch:
- turn off the power from the module (in any convenient way);
- we press the button on the module and connect the power. The module is ready to receive the firmware;
- press OK in the IDE and again, with fingers crossed, wait for the firmware to start filling in the module.
In case of an error, we check the wires, and if everything is well screwed in, we may not have enough power from usb-to-ttl and we need to take an external source. We dance with a tambourine and repeat the procedure.
Important: power to the module is supplied only through the pins of 3.3V. Connect it to the power load, through the power of the module itself is impossible. Experienced users write that supplying 220v per module with firmware turns it into a brick, small but brick. I did not try, I do not know. Therefore, with the firmware of the module, only four wiring to the pins is connected to it, and everything else is removed away.
If everything is ok, after rebooting the module should have connected to the access point, we find the ip address and go to it in the browser.
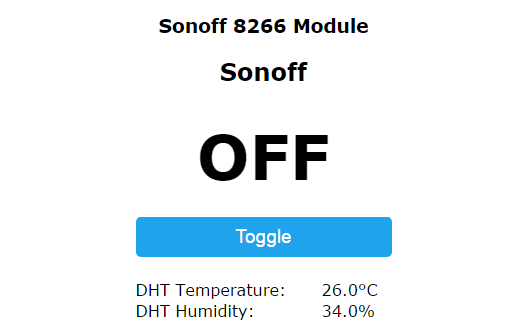
View start page.
If the module is not connected to your access point, then we continue dancing with a tambourine. There are various solutions, I will not describe them within this article. I checked the configs and just flashed the module again.
Now we have web access to the module and its settings, mqtt, wires can be removed in the box, firmware / update done through the air.
And where is Siri?
All this of course is wonderful, it's time to learn to manage this good from the phone. I tried several programs from the app for the phone and did not get anything interesting. It was decided to reach the Home application or HomeKit, which also makes it possible to control the modules via Siri.
We find on the shelf Raspberry pi and connect to the network. In my case, there was already a “raspberry” connected to the network. How to install the OS and connect the "raspberry" to describe it makes no sense.
To communicate with HomeKit, you must install Homebridge. Homebridge is a NodeJS server running on your local network and emulating the iOS HomeKit API.
sudo apt-get update sudo apt-get upgrade sudo apt-get install git make sudo apt-get install g++ Depending on your system, you may need to update the C ++ compiler.
Install Nodejs. We go to the store and select the appropriate dist . We copy the address of a distra and further in the image and likeness
wget https://nodejs.org/dist/v4.0.0/node-v4.0.0-linux-armv6l.tar.gz tar -xvf node-v4.0.0-linux-armv6l.tar.gz cd node-v4.0.0-linux-armv6l sudo cp -R * /usr/local/ I installed v6.9.4 myself, now there are newer ones.
Add other necessary packages:
sudo apt-get install libavahi-compat-libdnssd-dev Install Homebridge itself:
sudo npm install -g --unsafe-perm homebridge If this does not work, try:
sudo npm install -g --unsafe-perm homebridge hap-nodejs node-gyp cd /usr/local/lib/node_modules/homebridge/ sudo npm install --unsafe-perm bignum cd /usr/local/lib/node_modules/hap-nodejs/node_modules/mdns sudo node-gyp BUILDTYPE=Release rebuild After installing Homebridge, you need to install a few more plug-ins, and then proceed to change the settings of the Homebridge server.
Plugins are installed in the same way as homebridge itself.
sudo npm install -g --unsafe-perm homebridge-plugin-name The required plugin is found in the package manager . In the same place we find an example of settings that will need to be added to our settings.
For a simple switch.
npm install -g homebridge-mqttswitch Go to the settings, create, if not yet created, the configuration file:
sudo nano .homebridge/config.json The configuration file looks like this:
config.json
{ "bridge": { "name": "Homebridge", "username": "CC:22:3D:E3:CE:30", "port": 51826, "pin": "031-45-154" }, "platforms": [ ], "accessories": [ { "accessory": "mqttswitch", "name": "", "url": "mqtt://192.168.178.123:1883", "username": "admin", "password": "admin", "caption": "room", "topics": { "statusGet": "stat/sleeping/POWER", "statusSet": "cmnd/sleeping/power" }, "onValue": "1", "offValue": "0", "integerValue": "true" } ] } Before saving the settings file, check, for example, here . Once saved, try running:
Homebridge If everything starts to write to us, something like:
11:27:43 PM] [] Initializing mqttswitch accessory... In the same place the code 031-45-154 for connection will be indicated, if it has not been changed in the settings.
Now turn on the phone / tablet running iOS. Find the application "Home" or "HomeKit" → Add accessory and wait for our accessory "Homebridge" to appear, add it, enter the code, assign a room for the switch. And voila, "Hi Siri, turn on / off the light in the room" - it worked. "Hi Siri" on phones of the 5th series and below works only when connected to charging.
If everything works correctly for us, it remains to add Homebridge to the autoload. Full instruction in English. In my case, through
init.d , create the file sudo nano /etc/init.d/homebridgeThe template is copied to the file in this file and changed under the homebridge
/etc/init.d/homebridge
#!/bin/sh
### BEGIN INIT INFO
# Provides: homebridge
# Required-Start: $network $remote_fs $syslog
# Required-Stop: $remote_fs $syslog
# Default-Start: 2 3 4 5
# Default-Stop: 0 1 6
# Short-Description: Start daemon at boot time
# Description: Enable service provided by daemon.
### END INIT INFO

dir="/home/pi"
cmd="DEBUG=* /usr/local/bin/homebridge"
user="pi"
We save, we leave.
sudo chmod 755 /etc/init.d/homebridge sudo update-rc.d homebridge defaults Now homebridge will start at system startup.
Screw DHT22 sensor (temperature / humidity)
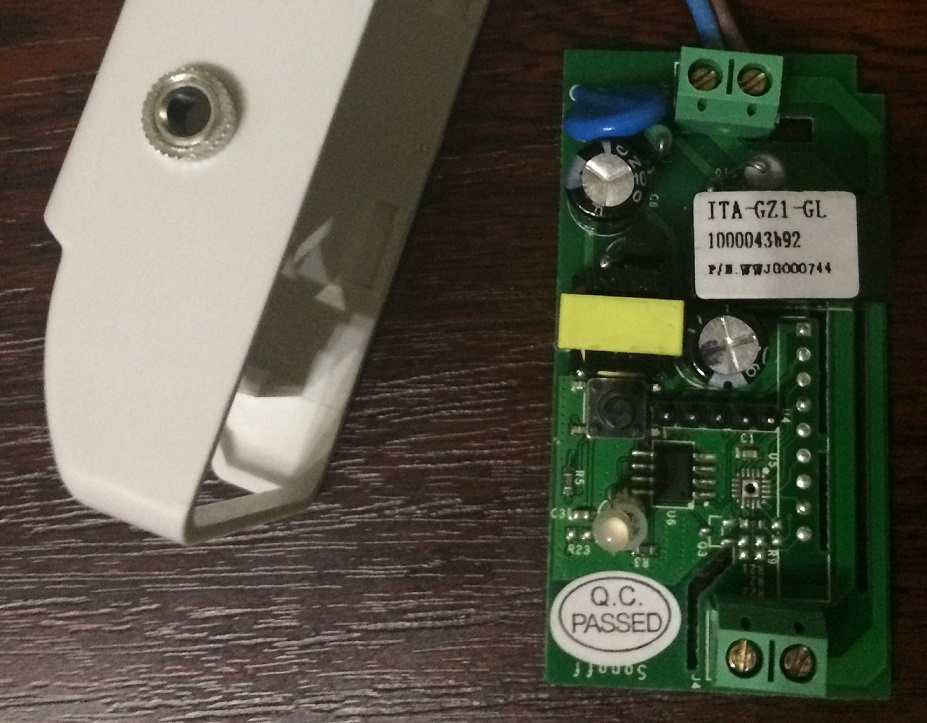
The attentive reader noticed that there are 5 pins on the comb and one of them is GPIO 14. Again we take the soldering iron in our hands and solder the three wires to 3.3V, GND, GPIO 14 for the DHT22 humidity temperature sensor. You can have another sensor (ds18b20, DHT 11, or another one that is supported by the firmware), but I had the DHT22 in my box. Connecting the sensor made through the connector, which is fixed to the side of the native case. If necessary, it will be possible to connect another sensor without a scalpel and a soldering iron.
In the picture, I just fixed the connector, I haven’t connected the wires yet. In the firmware Sonoff-MQTT-OTA-Arduino, you need to check the settings:
#define DHT_PIN 14 // GPIO 14 = AM2301 (Sonoff_TH10A(16A), Sonoff SV) #define DHT_TYPE AM2301 // DHT module type (DHT11, DHT21, DHT22, AM2301, AM2302 or AM2321) For the Tasmota firmware, pin and sensor type can be specified in the web settings.
If everything is correctly connected and configured, then go to the web interface, we will see the status of the relay and sensor readings. In the settings you can set the sensor polling frequency. The default is 300 seconds (5 minutes).
We dive in search of a plug for Homebridge to work with a temperature and humidity sensor. We now need to display these readings in the application. I managed to do all this, but IMHO it was my rake and should not be done.
And why? It's very simple, just screwing the sensor to the sonoff doesn't make sense, it is necessary to turn something on / off based on these readings. But in the firmware settings there is no such possibility, it is possible to configure the Home / HomeKit application for such purposes, but a tablet is needed that will be constantly at home or an apple tv. The presence in the firmware of the ability to communicate with Domoticz led me on this thorny path to installing the Domoticz smart home control system.
In the form of a small lyrical digression, I say, I tried to connect plug-ins to my homebridge that allow to transfer RTSP stream from a webcam. I have an ip-camera TOP-201 from the Chinese counterparts.
Install the plugin:
npm install -g --unsafe-perm homebridge-camera-ffmpeg Add to the settings file:
config.json
"platforms": [{ "platform": "Camera-ffmpeg", "cameras": [ { "name": "top-201", "videoConfig": { "source": "-re -i rtsp://admin@192.168.178.10:554/user=admin_password=tlJwpbo6_channel=1_stream=0.sdp?real_stream", "maxStreams": 2, "maxWidth": 640, "maxHeight": 480, "maxFPS": 3 } } ] Additionally, a picture from the camera appears in the HomeKit application, but it all worked very slow and there was no need for this camera. What would unnecessarily not load the system, deleted the ip-camera. Let us return to the installation of the system for managing "without smart" home.
Installing and configuring Domoticz for Sonoff modules
Putty → ssh → and again we pick the raspberry. Surprisingly, the installation in my case did not require dancing with a tambourine and it was enough
sudo curl -L install.domoticz.com | sudo bash Add autorun:
sudo cp domoticz.sh /etc/init.d sudo chmod +x /etc/init.d/domoticz.sh sudo update-rc.d domoticz.sh defaults If necessary, change some settings:
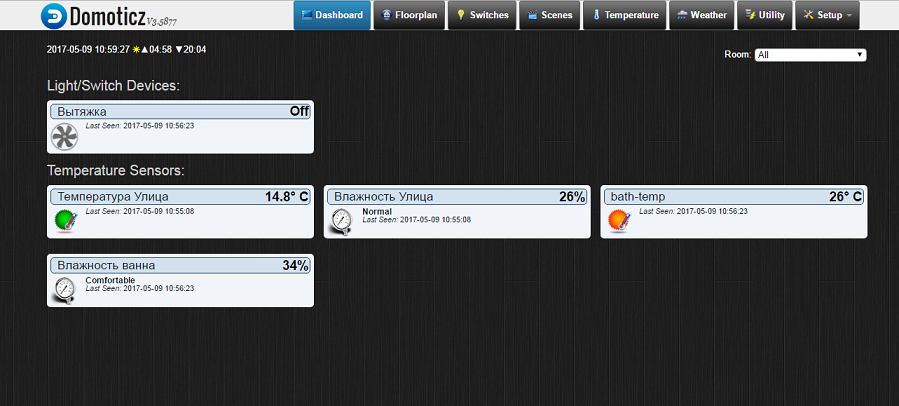
sudo nano /etc/init.d/domoticz.sh Open the address of the raspberry 192.168.xxx.xxx : 8080. And should go to the homepage domotiks. Further adjustment and adding of sensors already occurs through a web.
On the screenshot, sonoff sensors and a street sensor have already been added.
To add sensors / switches, go to Setup → hardware and add Dummy (Does nothing, use for virtual switches only). Our “Dummy” will appear in the device list. Clicking on the Create virtual sensor, we call our sensor / switch and select the required type from the list. Now, in the Setup → Devices tab, a new device will appear and in the same place you can now see the idx of the device.
We open the web of our switch / sensor and save configuration → domoticz → idx of our switch. In the new Tasmota firmware, it is possible to set several idx. For relay / switch and separately for GPIO. Depending on the module, it may be an additional sensor or more, since in the SV version there are three additional pins that can be assigned their role in your system (relays / sensors).
In the old firmware (Sonoff-MQTT-OTA-Arduino) for the module, I had to perform some dances with a tambourine, what would Domoticz see the readings of humidity and temperature. I think it makes no sense to describe it here, for a new firmware (Tasmota) this is not needed.
According to the readings of humidity, you can control the exhaust in the bathroom. Where there is an exhaust fan there is enough space for the module and we already have everything we need. It remains only to adjust the management of the readings of humidity.
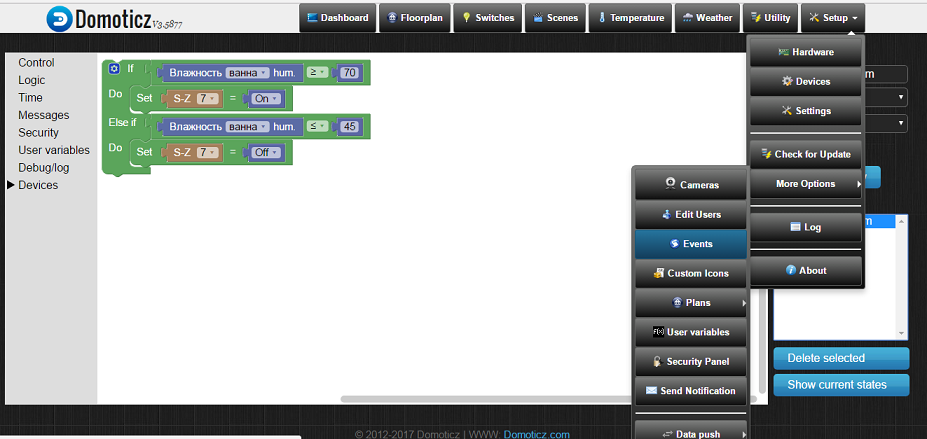
Setup → More options → Events
With the help of the designer, we create the logic of the hood operation (as in the picture). You can still on Lua, but this is not my case. Further experience has shown that 5 minutes of sensor polling is too large and I reduced to 3 minutes. Now taking a shower when the humidity rises above 70%, the hood is activated. In the future, when lowering below 45% off. Data on humidity picked up by experience. The only minus, and maybe it is not a minus, but a feature of the system, if you forcefully turn on the hood by pressing a button, then after 3 minutes, interrogating the humidity sensor, the system will shut down.
What about Siri? It turned out, everything is very simple.
sudo npm install -g -g --unsafe-perm homebridge-edomoticz And add to the settings
sudo nano .homebridge/config.json "platform": "mqtt", "name": "mqtt", "url": "mqtt://127.0.0.1", "topic_prefix": "homebridge", "username": "foo", "password": "bar" And when you start Homebridge we get
[5/8/2017, 11:42:30 PM] [eDomoticz] You have 10 devices defined in Domoticz. [5/8/2017, 11:42:30 PM] [eDomoticz] Initializing platform accessory 'bath-temp'... [5/8/2017, 11:42:30 PM] [eDomoticz] Initializing platform accessory ' '... [5/8/2017, 11:42:30 PM] [eDomoticz] Initializing platform accessory ' '... [5/8/2017, 11:42:30 PM] [eDomoticz] Initializing platform accessory ''... All the devices that we added to Domotiks, now we will have to be displayed among our devices in Homekit and can be managed through a friend of Siri. The need for other plugins for Homebridge has somehow disappeared.
We have a bunch of Domoticz-Homebridge and everything works very well and stably. Already testing not the first month.
A temperature / humidity sensor DHT22 from past crafts is bolted to the Raspberry pi and the data is transmitted to narodmon.ru with a python script every 10 minutes. Add a few lines to the existing script.
#domoticz settings IP = '192.168..' #IP domoticz PORT = '8080' #port of server IDX_1 = '7' #IDX of the DHT temp sensor //…. , narodmon.ru url = 'http://{}:{}/json.htm?type=command¶m=udevice&nvalue=0&idx={}&svalue={}'.format(IP, PORT, IDX_1, sensor_value_1) request = urllib2.Request(url) response = urllib2.urlopen(request) We add one more virtual sensor to Domoticz. And now we can additionally see the temperature and humidity on the street, both through the web on our local homepage and in the application on iOS.
Who is closer to mqtt, then the sensor readings could be sent via mqtt.
playload = '{{ "idx": {} , "nvalue" : {}, "svalue" : "1" }}'.format(IDX_1, humidity) client.publish(TOPIC_DOMOTICZ, playload, qos =0 , retain =False) #publish We add Wifi to the coffee machine
While my machine is being repaired and waiting for the control unit to arrive from Germany, the Delonghi coffee machine was presented as a gift. On the panel we have an on / off button, cook a small, double coffee and two more which I do not use because I do not mix milk with steam, I do not drink latte and other beverages. The disadvantage, the coffee does not grind itself, it is necessary to fill already ground and on one cup.
For coffee machines using Sonoff SV. Pins 3,3v, Rx, Tx, GND are signed. Separately, GPIO 4, 5, 14 are also added to the board. Firmware following the same procedure as described above.
We open the device and get to the board with buttons.
There is 5v power on the board, which is quite enough to power our sonoff sv wireless module. Labor was not to find where we have the cherished 5c.
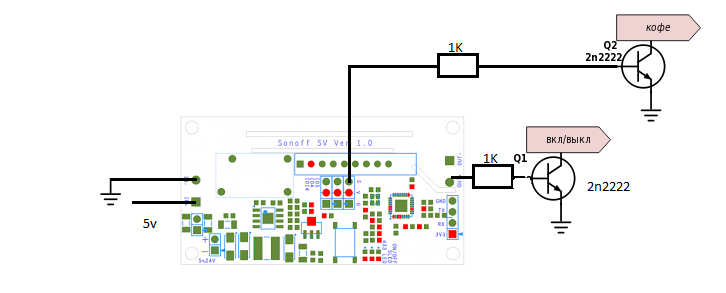
Pressing the buttons, simply short-circuits the signal to the ground. We connect our module according to the scheme.
As you can see from the diagram, I made the connection of only two buttons: on / off and make coffee. By analogy, it was possible to make all the other buttons. On sonoff sv, we have 3 pins derived on the board, a relay, and you can also use Rx, Tx (in the latest Tasmota firmware).
Putting it all up according to the scheme, we find the right place inside the coffee maker. In the module settings in the web interface, add a second relay to GPIO5. In the menu "console" set the following settings:
PowerOnState 0 // , . PulseTime1 10 // 0,1 , PulseTime2 10 // 1 . 1 2 . In the homepage settings, we create two more “virtual sensors” and add their idx to the module settings in the homepage settings menu (Configuration → Configure Domoticz → IDX 1 and IDX 2).
As a result, we get two more switches, one of which presses the on / off button of the coffee machine and the second one presses the coffee making button.
To make coffee, anyway, you have to walk with your feet, you need to pour coffee. But turn on the machine is conveniently obtained. From the moment you turn on and before making coffee, you need some time to warm up the machine. Therefore, while sitting in a room, you can remotely turn on the coffee-machine and, after a while, stomp your feet and make yourself a drink.
More benefit will be in such a switch on a full machine in a coffee machine, you just have to remember to set the cup in advance. We are waiting for the management fee.
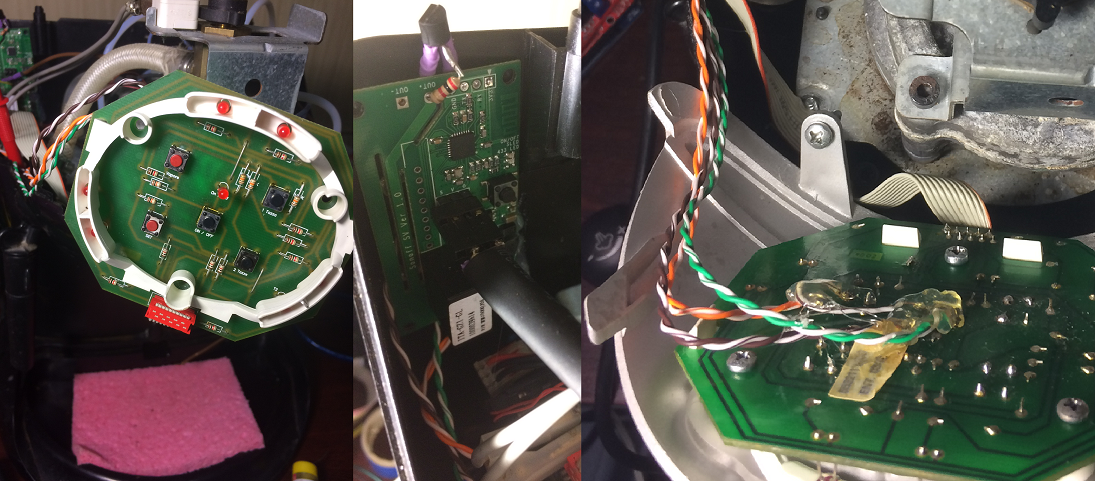
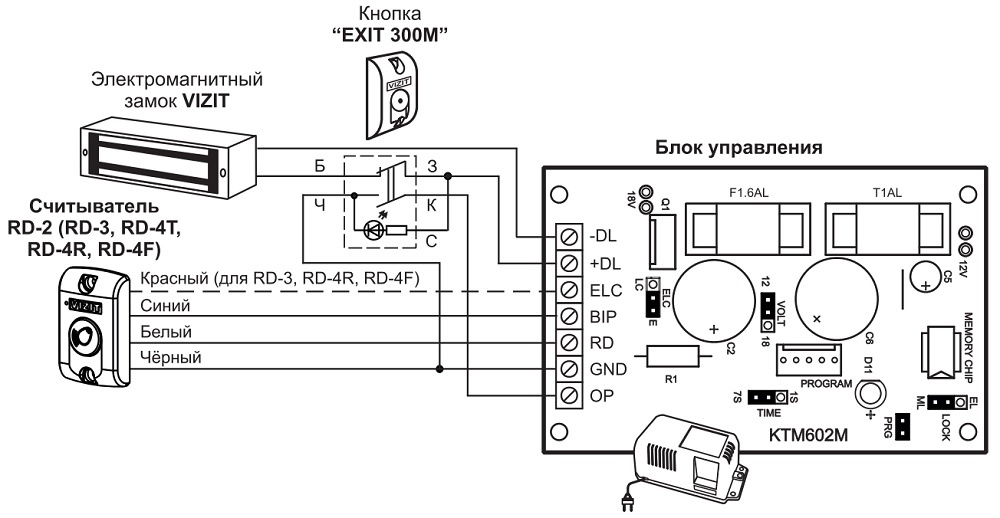
Add wifi to open the door with intercom Vizit
In the common corridor, the vestibule near the elevator is closed by a door with a magnetic lock and the Vizit access system. The system was installed after the repair was made and the button to open the chain door to the apartment was not held. In order to start the guests, you have to go out to the door and open it with the button to open the door in the corridor. The control unit KTM-602M.
The OP + GND closure opens the door / disconnects the magnet for 7 seconds.
We separate the power supply of the sonoff sv module and the relay by removing two resistors, as indicated below in the picture.
We connect the OP to the input “input +” relay, and at the output “output +” relay we fasten GND. Between ELC and GND control unit 18v from which we supply power to the module itself.
Add the door bell to the houses and now Siri can help us open the doors for the guests.
Siri assistant recognizes the “Open door” voice command, better than “turn on the coffee machine”.
At this point I stopped with the sonoff modules.
Small bonus
Once such a binge has gone, we will also turn the TV off / on. Turning off the TV and turning on no longer has anything to do with the wifi modules. TV is in close proximity with raspberry pi. Here we are helped by IR LED and a pair of resistances of different denominations. Install lirc, in the same place in the databases we find the settings for your remote / TV.
To work with home run, we run a small python script that translates our wishes to turn on / off the TV from mqtt to lirc.
mqtt to lirc
import paho.mqtt.client as mqtt import os import time import json IP = '192.168..' PORT = '1883' device = {18 : 'OpenBox', 19 : 'PHILIPS', 22 : 'air'} TOPIC_DOMOTICZ = 'domoticz/in' def send(device, command): # """ Sends IR-signal to the device """ os.system("irsend SEND_ONCE '" + device + "' '" + command + "'") # The callback for when the client receives a CONNACK response from the server. def on_connect(client, userdata, flags, rc): print("Connected with result code "+str(rc)) # Subscribing in on_connect() means that if we lose the connection and # reconnect then subscriptions will be renewed. client.subscribe(TOPIC_DOMOTICZ,0) def on_publish(client,userdata,result): #create function for callback print("data published \n") pass # The callback for when a PUBLISH message is received from the server. def on_message(client, userdata, msg): domoticz = json.loads(msg.payload) if domoticz ['idx'] in device.keys(): idx = domoticz ['idx'] dev = device [idx] command = 'KEY_POWER' send (dev, command) client = mqtt.Client() client.on_connect = on_connect client.on_message = on_message client.on_publish = on_publish client.connect(IP, PORT, 60) client.loop_forever() We add to Domoticz three more virtual buttons for a TV, receiver and air conditioning.
To control the TV is not convenient from the phone, still the remote, somehow more familiar. But turn off the TV when I forgot and left the room a nice bonus.
A nice addition to all this is the availability for Pebble hours of the Pemoticz app. Added the address in the settings and the application pulled all the switches. Not a single Siri can now turn on the coffee machine / open doors and turn off the lights. The watch is usually on hand, and the phone may not be in close proximity. This also has its advantages. Speech recognition for hours did not deal with flashing them, but it is also possible.
On this, perhaps, you can finish the story "without a smart" home.
Conclusion
In conclusion, but what next?
Todo list:
- Air conditioning, it was not possible to find the settings for the remote to lirc and the first attempts to copy the presses did not succeed either. Sawing further.
- We are waiting for an order from the Chinese company Mi with a gateway and several sensors. Sensors opening doors by not tricky manipulations become sensors leakage. We will add to our system. When triggered sensors will send a notification to the owner.
- This ends my thoughts ...
Sources used
→ Running HomeBridge on a Raspberry Pi
→ Sonoff-Tasmota Wiki
→ Installation of Domoticz on an already running Pi
→ How-to: Add WiFi to your coffee machine
Source: https://habr.com/ru/post/403869/
All Articles